3、配置中心
1、当一个系统中的配置文件发生改变的时候,经常的做法是重新启动该服务,才能使得新的配置文件生效,spring cloud config可以实现微服务中的所有系统的配置文件的统一管理,而且还可以实现当配置文件发生变化的时候,系统会自动更新获取新的配置。

将配置文件放入git或者svn等服务中,通过一个Config Server服务来获取git或者svn中的配置数据,二其他服务需要配置数据时在通过Config Client从Config Server获取。
2、在git仓库新建如下图目录

具体内容查看:https://gitee.com/hjj520/spring-cloud-2.x/tree/master/config-repos
3、 新建maven项目sc-config-server,对应pom.xml
<project xmlns="http://maven.apache.org/POM/4.0.0" xmlns:xsi="http://www.w3.org/2001/XMLSchema-instance"

   xsi:schemaLocation="http://maven.apache.org/POM/4.0.0 http://maven.apache.org/xsd/maven-4.0.0.xsd">

   <modelVersion>4.0.0</modelVersion>


   <groupId>spring-cloud</groupId>

   <artifactId>sc-config-server</artifactId>

   <version>0.0.1-SNAPSHOT</version>

   <packaging>jar</packaging>


   <name>sc-config-server</name>

   <url>http://maven.apache.org</url>


   <parent>

      <groupId>org.springframework.boot</groupId>

      <artifactId>spring-boot-starter-parent</artifactId>

      <version>2.0.4.RELEASE</version>

   </parent>


   <dependencyManagement>

      <dependencies>

        <dependency>

           <groupId>org.springframework.cloud</groupId>

           <artifactId>spring-cloud-dependencies</artifactId>

           <version>Finchley.RELEASE</version>

           <type>pom</type>

        </dependency>

      </dependencies>

   </dependencyManagement>


   <properties>

      <project.build.sourceEncoding>UTF-8</project.build.sourceEncoding>

      <maven.compiler.source>1.8</maven.compiler.source>

      <maven.compiler.target>1.8</maven.compiler.target>

   </properties>


   <dependencies>

      <dependency>

        <groupId>org.springframework.cloud</groupId>

        <artifactId>spring-cloud-config-server</artifactId>

        <version>2.0.1.RELEASE</version>

      </dependency>


      <dependency>

        <groupId>org.springframework.cloud</groupId>

         <artifactId>spring-cloud-starter-netflix-eureka-server</artifactId>

        <version>2.0.1.RELEASE</version>

      </dependency>

   </dependencies>

</project>
4、 新建类ConfigServerApplication.java
package sc.config.server;


import org.springframework.boot.SpringApplication;

import org.springframework.boot.autoconfigure.SpringBootApplication;

import org.springframework.cloud.config.server.EnableConfigServer;

import org.springframework.cloud.netflix.eureka.EnableEurekaClient;


@SpringBootApplication

@EnableConfigServer

@EnableEurekaClient

public class ConfigServerApplication {


public static void main(String[] args) {

       SpringApplication.run(ConfigServerApplication.class, args);

}

}
5、创建bootstrap.yml文件
#服务端口

server:

  port: 8100


#服务注册中心

eureka:

  client:

    registerWithEureka: true #是否将自己注册到Eureka服务中,默认为true

    fetchRegistry: true #是否从Eureka中获取注册信息,默认为true

    serviceUrl:

      defaultZone: http://localhost:5001/eureka/

  instance:

    prefer-ip-address: true #将自己的ip地址注册到Eureka服务中

    ipAddress: 127.0.0.1


spring:

  application:

    name: sc-config-server #服务名称

  cloud:

    config:

      label: master #配置文件所在的分支

      server:

        git:

          uri: https://gitee.com/hjj520/spring-cloud-2.x.git #服务的git仓库地址

          #git仓库的用户名

          #username: huangjinjin

          #git仓库的密码

          #password: ********

          search-paths: /config-repos/sc-consumer-config  #配置文件所在的目录
备注:search-paths可以使用占位符{application},不过需要注意的必须使用这样的方式:’{application}’ (单引号引起来),不然可能出现https://blog.csdn.net/weixin_35022258/article/details/79019033帖子说的问题,具体这个占位符以后会说到。
6、启动注册中心Eureka,然后在启动sc-config-server项目

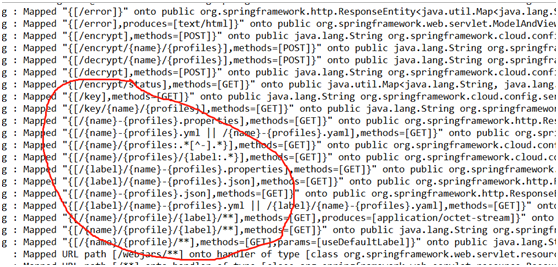
http请求地址和资源文件映射如下:
/{application}/{profile}[/{label}]
/{application}-{profile}.yml
/{label}/{application}-{profile}.yml
/{application}-{profile}.properties
/{label}/{application}-{profile}.properties
具体可以使用哪种http请求地址和资源文件映射可以在config server的日志可以看到
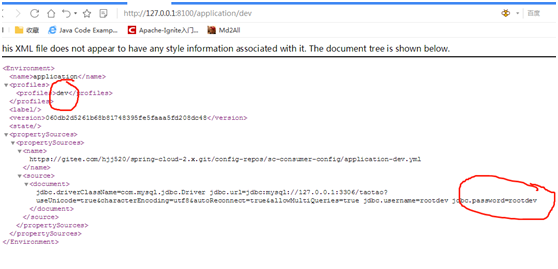
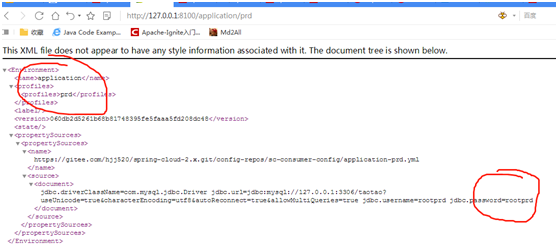
7、验证获取仓库中的配置数据
http://127.0.0.1:8100/application/dev
http://127.0.0.1:8100/application/prd

 浙公网安备 33010602011771号