

翻译:基于 OAuth2 在 Web 服务中使用 MailKit
MailKit 基于 OAuth2 操作 Exchange (IMAP, POP3 和 SMTP)
1. 注册应用
不管你是准备在桌面应用、移动应用,还是在 Web 服务中基于 MailKit 来访问 Exchange,你需要做的第一件事,就是在微软的 Identity Platform 中注册你的应用。
你需要按照 快速入门 中的要求来完成这一步。
注册之后,你可以得到你所注册的应用 Id, 或者在 ids 中被称为 client id.

在上图中,client id 为:11111111-1111-1111-1111-11111111, 同时,还可以看到相应的 Object ID: 00000000-0000-0000-0000-00000000
2. 为应用配置正确的 API 权限
基于你的应用希望支持的邮件协议,有许多种不同的 API 权限需要配置。见:为你的 Extra AD 应用准备权限:POP, IMAP, SMTP
- 在 Azure 门户种,通过 Microsoft Extra appliation 的管理视图,选择 API Permissions 权限
- 选择我的组织使用的 API 权限 (APSs my organization uses),然后,选择 "Office 365 Exchange Online"
- 点击应用权限 (Application permissions)
- 对于 POP 访问协议,选择 POP.AccessAsApp 权限
- 对于 IMAP 访问协议,选择 IMAP.AccessAsApp
- 对于 SMTP 访问协议,选择 SMTP.SendAsApp
- 选择正确的协议之后,点击增加权限 Add permissions
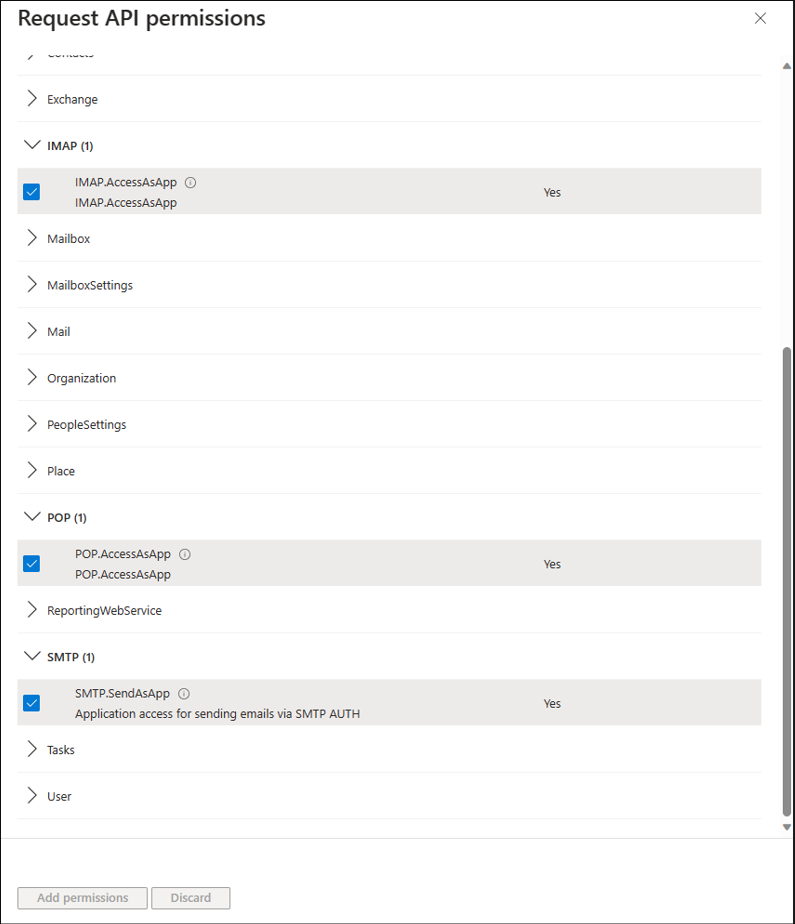
现在,你应该在你的 Entra application 权限种添加了 SMTP, POP 或者 IMAP 权限。
3. 基于 OAuth2 在 Web 服务中使用 MailKit
3.1 为您的 Web 服务注册服务主体
Web 应用代理用户访问 Exchange 需要先进行授权的,这需要到 Exchange 服务器上进行授权。
您的 Web 服务注册完成后,租户管理员需要注册您的服务主体。这是在 Exchange 中配置 Web 服务的访问权限。
要使用 New-ServicePrincipal 命令,请打开 Azure Powershell 终端,安装 ExchangeOnlineManagement 并连接到您的租户,如下所示:
Install-Module -Name ExchangeOnlineManagement -allowprerelease
Import-module ExchangeOnlineManagement
Connect-ExchangeOnline -Organization <tenantId>
然后,为你的 Web 服务注册服务主体, 这需要使用 New-ServicePrincipal 命令。
此 cmdlet 仅适用于基于云的服务。
使用 New-ServicePrincipal cmdlet 可在基于云的组织中创建服务主体。
Microsoft Entra ID 中的服务主体用于定义应用程序可以执行的操作、谁可以访问应用程序以及应用程序可以访问的资源。在 Exchange Online 中,服务主体是对 Microsoft Entra ID 中服务主体的引用。要将 Exchange Online 基于角色的访问控制 (RBAC) 角色分配给 Microsoft Entra ID 中的服务主体,请使用 Exchange Online 中的服务主体引用。Exchange Online PowerShell 中的 *-ServicePrincipal cmdlet 允许您查看、创建和删除这些服务主体引用。
有关更多信息,请参阅 Microsoft Entra ID 中的应用程序和服务主体对象。
您需要先获得权限才能运行此 cmdlet。虽然本主题列出了此 cmdlet 的所有参数,但如果某些参数未包含在分配给您的权限中,您可能无法访问它们。要查找在您的组织中运行任何 cmdlet 或参数所需的权限,请参阅查找运行任何 Exchange cmdlet 所需的权限。
ObjectId 参数指定服务主体的唯一 ObjectId GUID 值。例如,7c7599b2-23af-45e3-99ff-0025d148e929。
此参数的有效值可在以下位置获取:
- Microsoft Graph PowerShell 中 Get-MgServicePrincipal cmdlet 输出中的 Id 属性。
- Microsoft Entra 管理中心中企业应用程序中的 Object ID 属性
New-ServicePrincipal -AppId <APPLICATION_ID> -ObjectId <OBJECT_ID> [-Organization <ORGANIZATION_ID>]
3.2 为你的 Web 服务进行授权
为了授予您的 Web 服务访问 Office365 和/或 Exchange 帐户的权限,您需要首先使用以下命令获取上一步中注册的服务主体 ID:
Get-ServicePrincipal | fl
一旦你的 Web 服务拥有了服务主体标识 Service Principal ID,使用下面的命令,来为你 Web 服务种使用的邮箱账号添加完整的邮箱权限。
Add-MailboxPermission -Identity "john.smith@example.com" -User <SERVICE_PRINCIPAL_ID> -AccessRights FullAccess
3.3 使用 OAuth2 认证 Web 服务
现在,已经有了 Client ID 和 Tenant ID,需要把他们使用到你的应用中。
在下面的示例代码中,使用 Microsoft.Identity.Client NuGet 包来获得访问令牌 Access token, MailKit 需要将它传递给 Exchange Server.
// protocal 是准备使用的邮件访问协议,例如 "SMTP"
// 不同的协议,需要使用的 scope 不同
static async Task<AuthenticationResult> GetConfidentialClientOAuth2CredentialsAsync (string protocol, CancellationToken cancellationToken = default)
{
    var confidentialClientApplication = ConfidentialClientApplicationBuilder.Create (clientId)
        .WithAuthority ($"https://login.microsoftonline.com/{tenantId}/v2.0")
        .WithCertificate (certificate) // or .WithClientSecret (clientSecret)
        .Build ();

    string[] scopes;

    if (protocol.Equals ("SMTP", StringComparison.OrdinalIgnoreCase)) {
        scopes = new string[] {
            // For SMTP, use the following scope
            "https://outlook.office365.com/.default"
        };
    } else {
        scopes = new string[] {
            // For IMAP and POP3, use the following scope
            "https://ps.outlook.com/.default"
        };
    }

    return await confidentialClientApplication.AcquireTokenForClient (scopes).ExecuteAsync (cancellationToken);
}
3.3.1 SMTP
使用通过 GetConfidentialClientOAuth2CredentialsAsync() 方法获得的令牌访问邮箱。
var result = await GetConfidentialClientOAuth2CredentialsAsync ("SMTP");
var oauth2 = new SaslMechanismOAuth2 ("username@outlook.com", result.AccessToken);

using (var client = new SmtpClient ()) {
    await client.ConnectAsync ("smtp.office365.com", 587, SecureSocketOptions.StartTls);
    await client.AuthenticateAsync (oauth2);
    await client.DisconnectAsync (true);
}
4. 桌面和移动应用
现在您已获得客户端 ID 和租户 ID 字符串,您需要将这些值插入到您的应用程序中。
以下示例代码使用 Microsoft.Identity.Client Nuget 包来获取访问令牌,MailKit 需要该令牌才能将其传递给 Exchange 服务器。
// 获得指定用户的访问令牌,protocol 为邮件访问协议,emailAddress 为用户邮箱
static async Task<AuthenticationResult> GetPublicClientOAuth2CredentialsAsync (string protocol, string emailAddress, CancellationToken cancellationToken = default)
{
    var options = new PublicClientApplicationOptions {
        ClientId = "Application (client) ID",
        TenantId = "Directory (tenant) ID",

        // Use "https://login.microsoftonline.com/common/oauth2/nativeclient" for apps using
        // embedded browsers or "http://localhost" for apps that use system browsers.
        RedirectUri = "https://login.microsoftonline.com/common/oauth2/nativeclient"
    };

    var publicClientApplication = PublicClientApplicationBuilder
        .CreateWithApplicationOptions (options)
        .Build ();

    string[] scopes;

    if (protocol.Equals ("IMAP", StringComparison.OrdinalIgnoreCase)) {
        scopes = new string[] {
            "email",
            "offline_access",
            "https://outlook.office.com/IMAP.AccessAsUser.All"
        };
    } else if (protocol.Equals ("POP", StringComparison.OrdinalIgnoreCase)) {
        scopes = new string[] {
            "email",
            "offline_access",
            "https://outlook.office.com/POP.AccessAsUser.All"
        };
    } else {
        scopes = new string[] {
            "email",
            "offline_access",
            "https://outlook.office.com/SMTP.Send"
        };
    }

    try {
        // First, check the cache for an auth token.
        return await publicClientApplication.AcquireTokenSilent (scopes, emailAddress).ExecuteAsync (cancellationToken);
    } catch (MsalUiRequiredException) {
        // If that fails, then try getting an auth token interactively.
        return await publicClientApplication.AcquireTokenInteractive (scopes).WithLoginHint (emailAddress).ExecuteAsync (cancellationToken);
    }
}
4.1 简单邮件发送协议 SMTP
var result = await GetPublicClientOAuth2CredentialsAsync ("SMTP", "username@outlook.com");

// Note: We always use result.Account.Username instead of `Username` because the user may have selected an alternative account.
var oauth2 = new SaslMechanismOAuth2 (result.Account.Username, result.AccessToken);

using (var client = new SmtpClient ()) {
    await client.ConnectAsync ("smtp.office365.com", 587, SecureSocketOptions.StartTls);
    await client.AuthenticateAsync (oauth2);
    await client.DisconnectAsync (true);
}
注意:一旦使用上述交互式方法获取了身份验证令牌,您就可以避免提示用户,如果您缓存结果。帐户信息,然后使用以下代码在将来静默地重新获取身份验证令牌:
var result = await publicClientApplication.AcquireTokenSilent(scopes, account).ExecuteAsync(cancellationToken);
注意:有关缓存令牌的信息,请参阅 Microsoft 有关如何实现 跨平台令牌缓存 的文档。
4.2 IMAP
var result = await GetPublicClientOAuth2CredentialsAsync ("IMAP", "username@outlook.com");

// Note: We always use result.Account.Username instead of `Username` because the user may have selected an alternative account.
var oauth2 = new SaslMechanismOAuth2 (result.Account.Username, result.AccessToken);

using (var client = new ImapClient ()) {
    await client.ConnectAsync ("outlook.office365.com", 993, SecureSocketOptions.SslOnConnect);
    await client.AuthenticateAsync (oauth2);
    await client.DisconnectAsync (true);
}
5 Web 应用
独立用户通过微软认证之后,发送或者接收邮件。
5.1 使用 OAuth2 认证 Web 应用
如果你希望代理用户进行邮件收/发,请使用如下代码:
// Common Code
using Microsoft.Graph;
using Microsoft.Identity.Client;
using Microsoft.Kiota.Abstractions.Authentication;

public static class OAuthMicrosoft
{
    public static readonly string[] RegistrationScopes = new string[] {
        "offline_access",
        "User.Read",
        "Mail.Send",
        "https://outlook.office.com/SMTP.Send",
        "https://outlook.office.com/IMAP.AccessAsUser.All",
    };

    public static readonly string[] SmtpScopes = new string[] {
        "email",
        "offline_access",
        "https://outlook.office.com/SMTP.Send"
    };

    public static readonly string[] ImapScopes = new string[] {
        "email",
        "offline_access",
        "https://outlook.office.com/IMAP.AccessAsUser.All",
    };

    // 获得访问令牌
    public static IConfidentialClientApplication CreateConfidentialClient ()
    {
        var clientId = "Application (client) ID";
        var tenantId = "common"; // common = anybody with microsoft account personal or organization; other options see https://learn.microsoft.com/en-us/entra/identity-platform/v2-protocols#endpoints
        var clientSecret = "client secret";

        var redirectURL = "https://example.com/oauth/microsoft/callback";

        var confidentialClientApplication = ConfidentialClientApplicationBuilder.Create (clientId)
            .WithAuthority ($"https://login.microsoftonline.com/{tenantId}/v2.0")
            .WithClientSecret (clientSecret)
            .WithRedirectUri (redirectURL)
            .Build ();

        // You also need to configure an MSAL token cache. so that token are remembered.
        return confidentialClientApplication;
    }
}
注册页面,将用户重定向到微软页面进行认证
// Registration page - redirect user to Microsoft to get authorization
// 注册页面,重定向用户到微软认证页面
public async Task<IActionResult> OnPostAsync ()
{
    var client = OAuthMicrosoft.CreateConfidentialClient ();

    // Note: When getting authorization, specify all of the scopes that your application will ever need (eg. SMTP /and/ IMAP).
    // Later, when requesting an access token, you will only ask for the specific scopes that you need (e.g. SMTP).
    var authurlbuilder = client.GetAuthorizationRequestUrl (OAuthMicrosoft.RegistrationScopes);
    var authurl = await authurlbuilder.ExecuteAsync ();

    return this.Redirect (authurl.ToString ());
}

// Callback page = https://example.com/oauth/microsoft/callback in this example
// 回调页面
public async Task<IActionResult> OnGet ([FromQuery] string code)
{
    var confidentialClientApplication = OAuthMicrosoft.CreateConfidentialClient ();
    var scopes = OAuthMicrosoft.SmtpScopes;

    var auth = await confidentialClientApplication.AcquireTokenByAuthorizationCode (scopes, code).ExecuteAsync (); //this saves the token in msal cache

    var ident = auth.Account.HomeAccountId.Identifier;
    // Note: you will need to persist the ident to refer to later.
}

// Use the credentials
// 发邮件
public async Task SendEmailAsync (string ident)
{
    var confidentialClientApplication = OAuthMicrosoft.CreateConfidentialClient ();
    var account = await confidentialClientApplication.GetAccountAsync (ident);
    var scopes = OAuthMicrosoft.SmtpScopes;

    try {
        var auth = await confidentialClientApplication.AcquireTokenSilent (scopes, account).ExecuteAsync ();

        using (var client = new SmtpClient ()) {
            await client.ConnectAsync ("smtp-mail.outlook.com", 587, SecureSocketOptions.StartTls);

            var oauth2 = new SaslMechanismOAuth2 (auth.Account.Username, auth.AccessToken);

            await client.AuthenticateAsync (oauth2);

            var serverfeedback = await client.SendAsync (message);
            await client.DisconnectAsync (true);
        }
    } catch (MsalUiRequiredException) {
        throw new Exception ("Need to get authorization again");
    }
}

public async Task TestImapAsync (string ident)
{
    var confidentialClientApplication = OAuthMicrosoft.CreateConfidentialClient ();
    var account = await confidentialClientApplication.GetAccountAsync (ident);
    var scopes = OAuthMicrosoft.ImapScopes;

    var auth = await confidentialClientApplication.AcquireTokenSilent (scopes, account).ExecuteAsync ();

    var oauth2 = new SaslMechanismOAuth2 (auth.Account.Username, auth.AccessToken);

    using (var client = new ImapClient ()) {
        await client.ConnectAsync ("outlook.office365.com", 993, SecureSocketOptions.SslOnConnect);
        await client.AuthenticateAsync (oauth2);
        await client.DisconnectAsync (true);
    }
}

 浙公网安备 33010602011771号