一 安卓开发环境搭建
1.1 环境介绍
# 做安卓开发,需要会Java开发,需要安卓SDK,需要一款编辑器,需要软件测试环境(真机,虚拟机)


# 早期开发安卓app,需要使用eclipse+安卓SDK,自己搭建
# 目前开发安卓app,只需安装AndroidStudio,可以直接通过AndroidStudio下载SDK

# 编写完的代码要运行
	-使用AndroidStudio自带的安卓虚拟机
    -使用网易mumu,夜神模拟器等虚拟机
    -使用真机(推荐),只要是安卓手机,开发usb调试,不需要root就可以使用
1.1 安卓集成开发环境
1.1.1 下载AndroidStudio
# 官方下载
    # 历史版本下载
    https://developer.android.google.cn/studio/archive?hl=zh-cn
    #最新版本下载
    https://developer.android.google.cn/studio

# 官方提供的使用教程
	https://developer.android.google.cn/studio/intro?hl=zh-cn

# 项目构建工具介绍
Gradle和Maven都是Java项目的构建工具,但它们有一些区别:
1. 语法:Gradle使用Groovy语言进行编写,而Maven使用XML。Groovy更加灵活易读,XML更加严谨易于重用。
2. 性能:Gradle比Maven更加高效快速,因为它使用了增量构建模式,只会重新构建被更改的模块,而Maven则需要重新构建整个项目。
3. 插件:Gradle的插件生态更加丰富和现代化,而Maven的插件相对较为传统。此外,Gradle的插件可以非常容易地编写和定制,而Maven的插件相对繁琐。
4. 维护:Maven有比较成熟的工具链和文档支持,而Gradle则相对较新,可能需要更多的自学

# Groovy介绍
Groovy是一种基于JVM(Java虚拟机)的敏捷开发语言,它结合了Python、Ruby和Smalltalk的许多强大的特性,Groovy 代码能够与 Java 代码很好地结合,也能用于扩展现有代码

1.1.2 安装AndriodStudio
# 安装 Android步骤很简单,一路下一步即可
# 注意中间需要选择是否安装安装虚拟机(可以选择安装也可以不安装),如果使用真机调试,就不需要安卓虚拟机
# 注意选择安装路径

1.1.3 配置AndroidStudio
1.1.5 配置环境变量
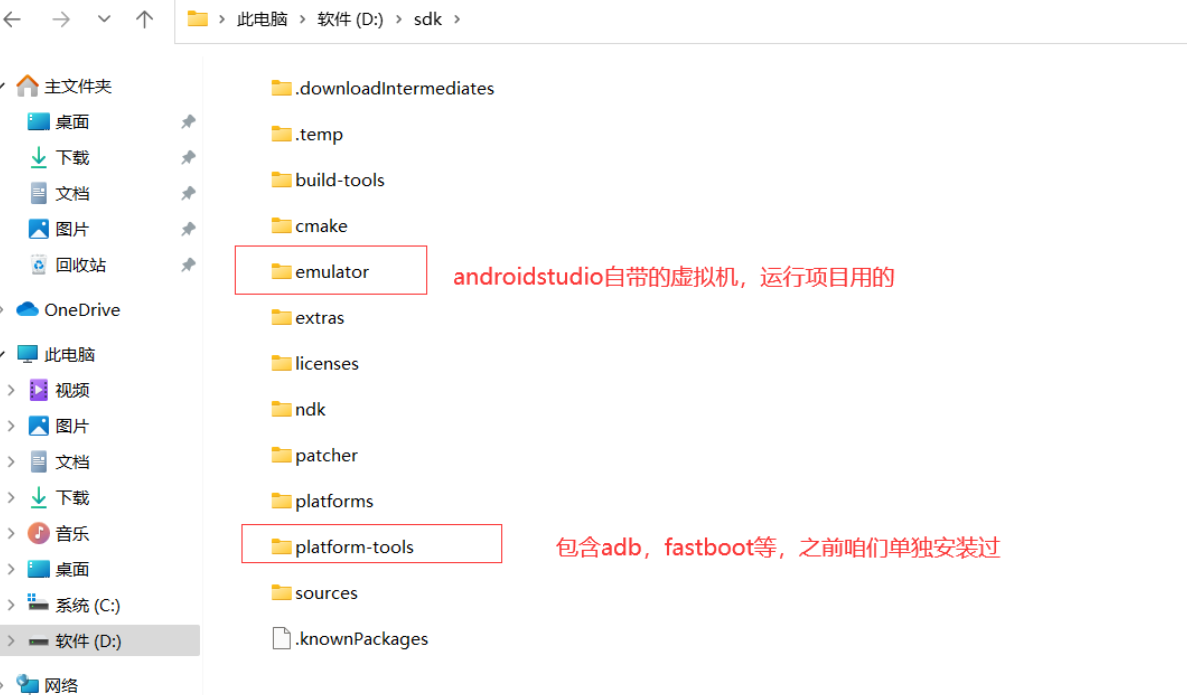
# 在SDK的安装目录下,有很多文件夹,如下
我们把emulator和paltform-tools目录加入到环境变量
1.1.6 创建虚拟机
# win系统在安装和操作之前,请提前开始电脑的vt-x,虚拟机开启方法如下:
https://mumu.163.com/include/16v1/2016/06/27/21967_625825.html
1.2.1 真机运行
手机开启开发者模式 & USB调试,并且用数据线和电脑连接。
当你一插线,手机上会提示授权
稍等片刻,此时在android studio中会读取到你的手机设备。
如果没有读取到,请在手机上【撤销USB调试授权】,然后再重新插入USB,重新授权。
1.2.1 虚拟机运行
# 创建虚拟机后,下拉就好看到当前链接到电脑的设备,直接选择某一个运行即可
二 安卓项目目录结构(开发流程)

2.1 安卓项目目录结构
├── .gradle                            #AndroidStudio 自动生成的文件,会自动修改它的,项目打包时也会删除;
├── .idea                              # AndroidStudio自动生成的文件,会自动修改它的,项目打包时也会删除;
├── app                                # 应用相关的东西都在里面,工作的核心目录
│        ├── build                     # 编译的产物。某些情况下,可以手动把它整个删掉。
│        ├── libs                      # 依赖包可以放这里,比如一些jar文件。
│        ├── src                       # 代码在这。非常重要。
│        │        ├── main
│        │        │        ├── java     # 放Java代码的地方
│        │        │        ├── res
│        │        │        │        ├── drawable  # 应用图标
│        │        │        │        ├── layout    # Android布局文件夹
│        │        │        │        ├── mipmap    # 适配不同分辨率的手机
│        │        │        │        ├── mipmap    # 桌面图标
│        │        │        │        └── values   # 颜色、样式、字符集配置文件夹
│        │        │        ├──AndroidManifest.xml#APP运行配置文件,用来配置权限:程序入口配置、应用程序主题、应用程序组件等
│        ├── .gitignore                          # 版本控制
│        ├── build.gradle                        # 非常重要,app的构建配置。俗称“app的gradle文件”。
│        └── proguard-rules.pro                  # 不管。这个是混淆配置。
├── gradle                                       # 它是一个构建起配置文件
├── .gitignore                                   # 整个工程的版本控制
├── build.gradle                                 # 很重要。项目级的配置。俗称“项目gradle文件”
├── gradle.properties                            # 全局的gradle配置文件
├── gradlew                                       # Linux/mac上执行gradle命令
├── gradlew.bat                                   # Windows上执行gradle命令
├── local.properties                              # 本地配置文件,一般不上传
└── settings.gradle                               # gralde的项目级配置
三 第一个APP(点击按钮切换美女)

3.1 xml
<?xml version="1.0" encoding="utf-8"?>
<LinearLayout xmlns:android="http://schemas.android.com/apk/res/android"
    xmlns:app="http://schemas.android.com/apk/res-auto"
    xmlns:tools="http://schemas.android.com/tools"
    android:layout_width="match_parent"
    android:layout_height="match_parent"
    tools:context=".MainActivity">


    <LinearLayout
        android:layout_width="match_parent"
        android:layout_height="match_parent"

        android:background="#dddddd"
        android:orientation="vertical">

        <ImageView
            android:layout_width="match_parent"
            android:id="@+id/image"
            android:layout_height="300dp"
            android:src="@color/pink"/>

        <Button
            android:layout_width="match_parent"
            android:layout_height="wrap_content"
            android:id="@+id/button01"
            android:text="点击更换美女"></Button>


    </LinearLayout>

</LinearLayout>
3.2 res/drawable 放入图片
3.3 java(MainActivity.java)
package com.justin.justinapp;

import androidx.appcompat.app.AppCompatActivity;
import android.os.Bundle;
import android.view.View;
import android.widget.Button;
import android.widget.ImageView;
import android.widget.Toast;


public class MainActivity extends AppCompatActivity {

    private Button button01;
    private ImageView image ;
    private int id=R.drawable.a;

    @Override
    protected void onCreate(Bundle savedInstanceState) {
        super.onCreate(savedInstanceState);
        setContentView(R.layout.activity_main);
        button01=findViewById(R.id.button01);
        image=findViewById(R.id.image);
        button01.setOnClickListener(new View.OnClickListener() {
            @Override
            public void onClick(View view) {
                Toast.makeText(MainActivity.this,"弹出吐司",Toast.LENGTH_LONG).show();
                if(id==R.drawable.a)
                    id=R.drawable.b;
                else if(id==R.drawable.b)
                    id=R.drawable.c;
                else {
                    id=R.drawable.a;
                }
                image.setImageResource(id);
            }
        });

    }

}
3.4 运行项目
3.5 显示网络图片MainActivity.java
package com.justin.justinapp;

import androidx.appcompat.app.AppCompatActivity;

import android.graphics.Bitmap;
import android.graphics.BitmapFactory;
import android.os.Bundle;
import android.util.Log;
import android.view.View;
import android.widget.Button;
import android.widget.ImageView;
import android.widget.Toast;

import java.net.URL;


public class MainActivity extends AppCompatActivity {

    private Button button01;
    private ImageView image ;
    URL url=null;
    Bitmap bitmap=null;

    @Override
    protected void onCreate(Bundle savedInstanceState){
        super.onCreate(savedInstanceState);
        setContentView(R.layout.activity_main);
        button01=findViewById(R.id.button01);
        image=findViewById(R.id.image);
        button01.setOnClickListener(new View.OnClickListener() {
            @Override
            public void onClick(View view) {
                Toast.makeText(MainActivity.this,"弹出吐司",Toast.LENGTH_LONG).show();
                try {
                    url= new URL("https://lmg.jj20.com/up/allimg/tx28/03102423387976.png");
                    requestImage(url);
                }catch (Exception e){
                    Log.e("justin",e.toString());
                }

            }
        });

    }

    private void requestImage(URL url){
        new Thread(){
            @Override
            public void run() {
                try {
                    bitmap = BitmapFactory.decodeStream(url.openStream());
                    showImg();
                } catch (Exception e) {
                    e.printStackTrace();
                }

            }
        }.start();

    }
    private void showImg(){
        runOnUiThread(new Runnable() {
            @Override
            public void run() {
                image.setImageBitmap(bitmap);
            }
        });
    }

}
四 开发一个登录案例app

3.1 安卓端xml编写
<?xml version="1.0" encoding="utf-8"?>
<LinearLayout xmlns:android="http://schemas.android.com/apk/res/android"
    xmlns:app="http://schemas.android.com/apk/res-auto"
    xmlns:tools="http://schemas.android.com/tools"
    android:layout_width="match_parent"
    android:layout_height="match_parent"
    tools:context=".MainActivity">


    <LinearLayout
        android:layout_width="match_parent"
        android:layout_height="216dp"
        android:layout_marginTop="150dp"
        android:background="#dddddd"
        android:orientation="vertical">

        <TextView
            android:layout_width="match_parent"
            android:layout_height="wrap_content"
            android:layout_marginTop="10dp"
            android:text="用户登录"
            android:textAlignment="center"
            android:textSize="25dp"></TextView>

        <LinearLayout
            android:layout_width="match_parent"
            android:layout_height="wrap_content"
            android:paddingLeft="15dp"
            android:paddingRight="15dp">

            <TextView
                android:layout_width="60dp"
                android:layout_height="match_parent"
                android:gravity="center"
                android:text="用户名"
                ></TextView>

            <EditText
                android:layout_width="match_parent"
                android:layout_height="match_parent"
                android:id="@+id/txt_user">

            </EditText>

        </LinearLayout>

        <LinearLayout
            android:layout_width="match_parent"
            android:layout_height="wrap_content"
            android:paddingLeft="15dp"
            android:paddingRight="15dp">

            <TextView
                android:layout_width="60dp"
                android:layout_height="match_parent"
                android:gravity="center"
                android:text="密码"></TextView>

            <EditText
                android:layout_width="match_parent"
                android:layout_height="match_parent"
                android:inputType="textPassword"
                android:id="@+id/txt_pwd">

            </EditText>

        </LinearLayout>

        <LinearLayout
            android:layout_width="match_parent"
            android:layout_height="60dp"
            android:gravity="center">

            <Button
                android:layout_width="wrap_content"
                android:layout_height="wrap_content"
                android:layout_marginRight="5dp"
                android:id="@+id/btn_login"
                android:text="登录">

            </Button>

            <Button
                android:layout_width="wrap_content"
                android:layout_height="wrap_content"
                android:layout_marginLeft="5dp"
                android:id="@+id/btn_reset"
                android:text="重置">

            </Button>

        </LinearLayout>

    </LinearLayout>

</LinearLayout>
3.2 安卓端java编写
package com.justin.justinapp;

import androidx.appcompat.app.AppCompatActivity;

import android.os.Bundle;
import android.os.Looper;
import android.util.Log;
import android.view.View;
import android.widget.Button;
import android.widget.TextView;
import android.widget.Toast;

import java.io.IOException;

import okhttp3.Call;
import okhttp3.FormBody;
import okhttp3.OkHttpClient;
import okhttp3.Request;
import okhttp3.Response;
import okhttp3.ResponseBody;

public class MainActivity extends AppCompatActivity {

    private TextView txtUser, txtPwd;
    private Button btnLogin, btnReset;

    @Override
    protected void onCreate(Bundle savedInstanceState) {
        super.onCreate(savedInstanceState);
        setContentView(R.layout.activity_main);
        initView();
        initListener();
    }

    private void initView() {
        // 先找到所有的有用的标签
        txtUser = findViewById(R.id.txt_user);
        txtPwd = findViewById(R.id.txt_pwd);
        btnLogin = findViewById(R.id.btn_login);
        btnReset = findViewById(R.id.btn_reset);
    }

    private void initListener() {
        btnReset.setOnClickListener(new View.OnClickListener() {
            @Override
            public void onClick(View v) {
                // 点击btn_reset标签,执行方法
                txtUser.setText("");
                txtPwd.setText("");
            }
        });

        btnLogin.setOnClickListener(new View.OnClickListener() {
            @Override
            public void onClick(View v) {
                loginForm();
            }
        });
    }

    private void loginForm() {
        String username = String.valueOf(txtUser.getText());
        String password = String.valueOf(txtPwd.getText());
        Toast t= Toast.makeText(MainActivity.this, "登录成功", Toast.LENGTH_SHORT);
        new Thread() {
            @Override
            public void run() {
                OkHttpClient client = new OkHttpClient.Builder().build();
                FormBody form = new FormBody.Builder().add("user", username).add("pwd", password).build();
                Request req = new Request.Builder().url("http://192.168.1.12:8080/login").post(form).build();
                Call call = client.newCall(req);
                try {
                    Response res = call.execute();
                    ResponseBody body = res.body();
                    String dataString = body.string();

                    t.show();

                    Log.e("请求发送成功", dataString);
                } catch (IOException ex) {
                    Log.e("Main", "网络请求异常");
                }
            }
        }.start();
    }
}
3.3 配置安卓发送http请求
1.引入,在build.gradle中 implementation "com.squareup.okhttp3:okhttp:4.9.1"
2.配置,在AndroidManifest.xml中
<uses-permission android:name="android.permission.INTERNET"/>
3.支持http(仅测试使用)
    -在res/xml下新建security.xml,写入
        <?xml version="1.0" encoding="utf-8"?>
        <network-security-config>
            <base-config cleartextTrafficPermitted="true" />
        </network-security-config>

    -在AndroidManifest.xml加入
     <application
		...
        android:theme="@style/Theme.JustinApp"
        ...>
3.3 Python后端Flask编写
import uuid

from flask import Flask, request, jsonify

app = Flask(__name__)


@app.route('/login', methods=['POST'])
def login():
    username = request.form.get('username')
    password = request.form.get('password')
    if username == 'justin' and password == '123':
        token = str(uuid.uuid4())
        return jsonify({'code': 100, 'msg': "登录成功", 'token': token})
    else:
        return jsonify({'code': 100, 'msg': "用户名或密码错误"})

if __name__ == '__main__':
    app.run('0.0.0.0',8080)
五 逆向自己的app
# 把自己编写的app,使用jadx打开

 浙公网安备 33010602011771号