python实现excel数据处理
python xlrd读取excel(表格)详解
安装:
pip install xlrd官网地址:
介绍:
为开发人员提供一个库,用于从Microsoft Excel(tm)电子表格文件中提取数据。
快速使用xlrd
import xlrd

book = xlrd.open_workbook("myfile.xls")
print("当前excel文件工作表数量为 {0}".format(book.nsheets))
print("工作表名字为: {0}".format(book.sheet_names()))

# 获取第一张工作表
sh = book.sheet_by_index(0)

# 获取表的数量
print(book.nsheets)

# 当前工作表名, 总行数 总列数
print("{0} {1} {2}".format(sh.name, sh.nrows, sh.ncols))

# 单元 d30 数据为
print("Cell D30 is {0}".format(sh.cell_value(rowx=29, colx=3)))

# 获取所有行数据
for rx in range(sh.nrows):
  # rx 行
  print(sh.row(rx))

>>>  [text:'Camille Richardson', text:'2316 EVIAN CT', empty:'', empty:'', text:'DISTRICT HEIGHTS', text:'MD', text:'20747-1153', text:'US']

# 获取所有行数据
for rx in range(sh.nrows):
    print(sh.row_values(rx))

>>> ['Camille Richardson', '2316 EVIAN CT', '', '', 'DISTRICT HEIGHTS', 'MD', '20747-1153', 'US']
常用方法:
获取工作表名称、行数、列数
-
工作表名字:table.name
-
表行数:table.nrows
-
表列数:table.ncols
获取sheet
-
获取所有sheet名字:book.sheet_names()
-
获取sheet数量:book.nsheets
-
获取所有sheet对象:book.sheets()
-
通过sheet名查找:book.sheet_by_name("demo”)
-
通过索引查找:book.sheet_by_index(0)
获取sheet的汇总数据:
-
获取sheet名:sheet1.name
-
获取总行数:sheet1.nrows
-
获取总列数:sheet1.ncols
单元格批量读取:
-
行操作:
-
sheet1.row_values(0) # 获取第一行所有内容,合并单元格,首行显示值,其它为空。
-
sheet1.row(0) # 获取单元格值类型和内容
-
sheet1.row_types(0) # 获取单元格数据类型
-
列操作
-
sheet1.row_values(0, 6, 10) # 取第1行,第6~10列(不含第10表)
-
sheet1.col_values(0, 0, 5) # 取第1列,第0~5行(不含第5行)
-
sheet1.row_slice(2, 0, 2) # 获取单元格值类型和内容
-
sheet1.row_types(1, 0, 2) # 获取单元格数据类型
特定单元格读取:
-
获取单元格值:
-
sheet1.cell_value(1, 2)
-
sheet1.cell(1, 2).value
-
sheet1.row(1)[2].value
-
获取单元格类型:
-
sheet1.cell(1, 2).ctype
-
sheet1.cell_type(1, 2)
-
sheet1.row(1)[2].ctype
xlrd 常用函数
# 打开excel表,是否带格式
book = xlrd.open_workbook("地址信息.xlsx",formatting_info=True/False)


# 获取excel中所有的sheet
book.sheets()

# 打开具体sheet工作方法1
sheet = book.sheet_by_index(索引位置)

# 打开具体sheet工作方法2
sheet = book.sheet_by_nam(工作表名字)

# 获取单元格的值1
sheet.cell_value(rowx=行, colx=列)

# 获取单元格的值2
sheet.cell(行,列).value

# 获取单元格的值3
sheet.cell(行)[列].value

 # 获取第4行的内容,以列表形式表示
row_4 = table.row_values(3)

# 获取所有工作表的名字
book.sheet_names()

# 获取工作表的数量
book.nsheets

# 获取工作表的所有行数
sheet.nrows

# 获取工作表的所有列数
sheet.ncols
python xlwd对excel(表格)写入详解
xlwd是一个专门对excel写入的数据。是xlrd的孪生兄弟,一个负责读取excel,一个负责对excel写入数据
安装
pip install xlwd官方网址:
https://xlwt.readthedocs.io/en/latest/
https://github.com/python-excel/xlwt
快速入门
import xlwt
from datetime import datetime

# 设置样式 字体name Times New Roman 字体颜色为红色 数字格式为:#,##0.00
style0 = xlwt.easyxf('font: name Times New Roman, color-index red, bold on',
    num_format_str='#,##0.00')

# 设置样式 日期格式为D-MMM-YY
style1 = xlwt.easyxf(num_format_str='D-MMM-YY')

# 新建工作簿
wb = xlwt.Workbook()

# 新建工作表
ws = wb.add_sheet('A Test Sheet')

# 向某行某列写入数据
ws.write(0, 0, 1234.56, style0)
ws.write(1, 0, datetime.now(), style1)
ws.write(2, 0, 1)
ws.write(2, 1, 1)
ws.write(2, 2, xlwt.Formula("A3+B3"))

# 保存工作表
wb.save('1.xls')
python 字典列表list of dictionary保存成csv
python 字典列表list of dictionary保存成csv
csv文件使用逗号分割,是一种纯文本格式,不能指定字体颜色等样式,也不能指定单元格的宽高,不能合并单元格,没有多个工作表等功能,可以使用Excel打开。使用csv模块可以把一些数据做成表格等处理,非常方便。
csv常用方法
csv.reader(f)   读取csv文件,f为打开csv文件的文件对象,返回的本质是一个迭代器,具有__next__(),__iter__()方法
csv.writer(f)   写入csv文件
csv.DictReader(f)    类字典方式读取csv文件
csv.DictWriter(f)    类字典方式写入csv文件
导出示例
from csv import DictWriter

players = [{'dailyWinners': 3, 'dailyFreePlayed': 2, 'user': 'Player1', 'bank': 0.06},
{'dailyWinners': 3, 'dailyFreePlayed': 2, 'user': 'Player2', 'bank': 4.0},
{'dailyWinners': 1, 'dailyFree': 2, 'user': 'Player3', 'bank': 3.1},
{'dailyWinners': 3, 'dailyFree': 2, 'user': 'Player4', 'bank': 0.32}]

fileds_names=('dailyWinners','dailyFreePlayed','dailyFree','user','bank')

with open('spreadsheet.csv','w',encoding='utf-8') as outfile:
    writer = DictWriter(outfile, fileds_names)
    writer.writeheader()
    writer.writerows(players)
python3 format小数点保持指定位数
示例:
:.nf 输出小数点保留n位小数 n为一个整数
:.2f 输出小数点保留2位小数
import math
math.pi

>>>  3.141592653589793

print(f"圆周率小数点保持两位:{pi:.2f}")
>>> 圆周率小数点保持两位:3.14
:> 左对齐
:< 右对齐
:^ 居中对齐
requests 上传文件示例
requests 上传文件示例
import requests

files = {'upload_file': open('file.txt','rb')}
values = {'DB': 'photcat', 'OUT': 'csv', 'SHORT': 'short'}

r = requests.post(url, files=files, data=values)
封装写法
import os
import requests

def upload_file(file_path):
	if os.path.exists(file_path):
		raise ValueError(f"file_path:{file_path} is error")
	files = {'upload_file': open(file_path,'rb')}
	values = {'DB': 'photcat', 'OUT': 'csv', 'SHORT': 'short'}
	r = requests.post(url, files=files, data=values)
python读取xlrd
xlrd模块实现对excel文件内容读取,xlwt模块实现对excel文件的写入。
安装
|
1
2
|
pip install xlrdpip install xlwt |
xlrd模块使用
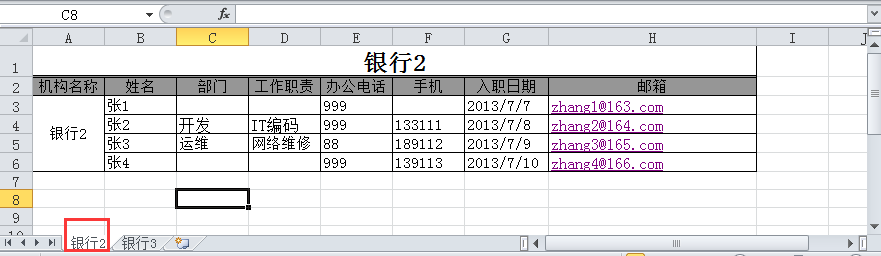
excel文档名称为联系人.xls,内容如下:

(1) 打开excel文件并获取所有sheet
|
1
2
3
4
5
6
7
|
import xlrd# 打开Excel文件读取数据data = xlrd.open_workbook('联系人.xls')sheet_name = data.sheet_names() # 获取所有sheet名称print(sheet_name) # ['银行2', '银行3'] |
(2) 根据下标获取sheet名称
|
1
2
3
|
# 根据下标获取sheet名称sheet2_name = data.sheet_names()[1]print(sheet2_name) # '银行3' |
(3) 根据sheet索引或者名称获取sheet内容,同时获取sheet名称、行数、列数
|
1
2
3
4
5
6
7
8
9
10
11
12
13
|
# 根据sheet索引或者名称获取sheet内容,同时获取sheet名称、列数、行数sheet2 = data.sheet_by_index(1)print('sheet2名称:{}\nsheet2列数: {}\nsheet2行数: {}'.format(sheet2.name, sheet2.ncols, sheet2.nrows))# sheet2名称:银行3# sheet2列数: 7# sheet2行数: 5sheet1 = data.sheet_by_name('银行2')print('sheet1名称:{}\nsheet1列数: {}\nsheet1行数: {}'.format(sheet1.name, sheet1.ncols, sheet1.nrows))# sheet1名称:银行2# sheet1列数: 8# sheet1行数: 6 |
(4) 根据sheet名称获取整行和整列的值
|
1
2
3
4
5
6
|
# 根据sheet名称获取整行和整列的值sheet1 = data.sheet_by_name('银行2')print(sheet1.row_values(3)) # ['', '张2', '开发', 'IT编码', 999.0, 133111.0, 41463.0, 'zhang2@164.com'] 日期2013/7/7,实际却显示为浮点数41463.0print(sheet1.col_values(3)) # ['', '工作职责', '', 'IT编码', '网络维修', ''] |
(5)获取指定单元格的内容
|
1
2
3
4
|
# 获取指定单元格的内容print(sheet1.cell(1,0).value) # 第2 行1列内容:机构名称print(sheet1.cell_value(1,0)) # 第2 行1列内容:机构名称print(sheet1.row(1)[0].value) # 第2 行1列内容:机构名称 |
(6)获取单元格内容的数据类型
|
1
2
3
4
5
|
# 获取单元格内容的数据类型print(sheet1.cell(1,0).ctype) # 第2 行1列内容 :机构名称为string类型print(sheet1.cell(3,4).ctype) # 第4行5列内容:999 为number类型print(sheet1.cell(3,6).ctype) # 第4 行7列内容:2013/7/8 为date类型# 说明:ctype : 0 empty,1 string, 2 number, 3 date, 4 boolean, 5 error |
(7)获取单元内容为日期类型的方式
使用xlrd的xldate_as_tuple处理为date格式
|
1
2
3
4
5
6
7
8
|
from datetime import datetime,dateif sheet1.cell(3,6).ctype == 3 : print(sheet1.cell(3, 6).value) # 41463.0 date_value = xlrd.xldate_as_tuple(sheet1.cell(3, 6).value, data.datemode) print(date_value) # (2013, 7, 8, 0, 0, 0) print(date(*date_value[:3])) # 2013-07-08 print(date(*date_value[:3]).strftime('%Y/%m/%d')) # 2013/07/08 |
(8)获取单元内容为number的方式(转为整型)
|
1
2
3
4
|
if sheet1.cell(3, 5).ctype == 2: print(sheet1.cell(3, 5).value) # 133111.0 num_value = int(sheet1.cell(3, 5).value) print(num_value) # 133111 |
(9) 获取合并单元格的内容
需要merged_cells属性
|
1
2
3
4
5
6
7
8
9
10
11
|
# 这里,需要在读取文件的时候添加个参数,将formatting_info参数设置为True,默认是False,否# 则可能调用merged_cells属性获取到的是空值。<br>data = xlrd.open_workbook('联系人.xls',formatting_info=True)sheet1 = data.sheet_by_name('银行2')print(sheet1.merged_cells) # [(0, 1, 0, 8), (2, 6, 0, 1)]<br># merged_cells返回的这四个参数的含义是:(row,row_range,col,col_range),其中[row,row_range)包括row,# 不包括row_range,col也是一样,下标从0开始。#(0, 1, 0, 8) 表示1列-8列合并 (2, 6, 0, 1)表示3行-6行合并<br># 分别获取合并2个单元格的内容:print(sheet1.cell(0,0).value) # 银行2print(sheet1.cell_value(2, 0)) # 银行2 |
规律 : 获取merge_cells返回的row和col低位的索引即可!
使用以下方法更加方便
|
1
2
3
4
5
6
7
8
9
|
merge_value = []for (row,row_range,col,col_range) in sheet1.merged_cells: merge_value.append((row,col))print(merge_value) # [(0, 0), (2, 0)]for v in merge_value: print(sheet1.cell(v[0], v[1]).value)# 银行2# 银行2 |
xlwt模块
|
1
2
3
4
5
6
7
8
9
10
11
12
13
14
15
16
17
18
19
20
21
22
23
24
25
26
27
28
29
30
31
32
33
34
35
36
37
38
39
40
41
42
43
44
45
|
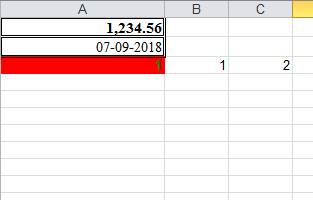
import xlwtfrom datetime import datetime,datedef set_style(name, height, bold=False, format_str=''): style = xlwt.XFStyle() # 初始化样式 font = xlwt.Font() # 为样式创建字体 font.name = name # 'Times New Roman' font.bold = bold font.height = height borders= xlwt.Borders() # 为样式创建边框 borders.left= 6 borders.right= 6 borders.top= 6 borders.bottom= 6 style.font = font style.borders = borders style.num_format_str= format_str return stylewb = xlwt.Workbook()ws = wb.add_sheet('A Test Sheet') # 增加sheetws.col(0).width = 200*30 # 设置第一列列宽ws.write(0, 0, 1234.56,set_style('Times New Roman',220,bold=True,format_str='#,##0.00'))ws.write(1, 0, datetime.now(), set_style('Times New Roman',220,bold=False, format_str='DD-MM-YYYY'))styleOK = xlwt.easyxf('pattern: fore_colour light_blue;' 'font: colour green, bold True;')pattern = xlwt.Pattern()#一个实例化的样式类pattern.pattern = xlwt.Pattern.SOLID_PATTERN # 固定的样式pattern.pattern_fore_colour = xlwt.Style.colour_map['red']#背景颜色styleOK.pattern = patternws.write(2, 0, 1,style=styleOK)ws.write(2, 1, 1)ws.write(2, 2, xlwt.Formula("A3+B3"))wb.save('example.xls') # 保存xls |
联系人表

|
1
2
3
4
5
6
7
8
9
10
11
12
13
14
15
16
17
18
19
20
21
22
23
24
25
26
27
28
29
30
31
32
33
34
35
36
37
38
39
40
41
42
43
44
45
46
47
48
49
50
51
52
53
54
55
56
57
58
59
60
61
62
63
64
65
66
67
68
69
70
71
72
73
74
75
76
77
78
79
80
81
82
83
84
85
86
87
88
89
90
91
92
93
94
95
96
97
98
99
100
101
102
103
104
105
106
107
108
109
110
111
112
113
114
115
116
117
118
119
120
121
|
import xlwtfrom datetime import datetime, datedef set_style(name, height, bold=False, format_str='',align='center'): style = xlwt.XFStyle() # 初始化样式 font = xlwt.Font() # 为样式创建字体 font.name = name # 'Times New Roman' font.bold = bold font.height = height borders = xlwt.Borders() # 为样式创建边框 borders.left = 2 borders.right = 2 borders.top = 0 borders.bottom = 2 alignment = xlwt.Alignment() # 设置排列 if align== 'center': alignment.horz = xlwt.Alignment.HORZ_CENTER alignment.vert = xlwt.Alignment.VERT_CENTER else: alignment.horz = xlwt.Alignment.HORZ_LEFT alignment.vert = xlwt.Alignment.VERT_BOTTOM style.font = font style.borders = borders style.num_format_str = format_str style.alignment = alignment return stylewb = xlwt.Workbook()ws = wb.add_sheet('联系人',cell_overwrite_ok=True) # 增加sheetrows = ['机构名称', '姓名', '部门', '电话', '入职日期', '手机', '邮箱']col1 = ['王1', '王2', '王3']col2 = ['666', '777','888']col3 = ['2014-08-09','2014-08-11','2015-08-09']# 写第一行数据ws.write_merge( 0, 0, 0, 6, '联系人表', set_style( 'Times New Roman', 320, bold=True, format_str='')) # 合并单元格styleOK = xlwt.easyxf()pattern = xlwt.Pattern() # 一个实例化的样式类pattern.pattern = xlwt.Pattern.SOLID_PATTERN # 固定的样式pattern.pattern_fore_colour = xlwt.Style.colour_map['yellow'] # 背景颜色borders = xlwt.Borders() # 为样式创建边框borders.left = 2borders.right = 2borders.top = 6borders.bottom = 2font = xlwt.Font() # 为样式创建字体font.name = 'Times New Roman'font.bold = Truefont.height = 220styleOK.pattern = patternstyleOK.borders = bordersstyleOK.font = font# 写第二行数据for index, val in enumerate(rows): ws.col(index).width = 150 * 30 # 定义列宽 ws.write(1, index, val, style=styleOK)# 写第3行-6行第一列数据ws.write_merge( 2, 2 + len(col1)-1, 0, 0, 'x机构', set_style( 'Times New Roman', 320, bold=True, format_str='')) # 合并单元格# 从第3行开始写1列数据for index, val in enumerate(col1): ws.col(1).width = 150 * 30 # 定义列宽 ws.write(index+2, 1, val, style=set_style('Times New Roman', 200, bold=False, format_str='',align=''))# 从第3行开始写4列数据for index, val in enumerate(col2): ws.col(3).width = 150 * 30 # 定义列宽 ws.write(index+2, 3, val, style=set_style('Times New Roman', 200, bold=False, format_str='',align=''))# 从第3行开始写5列数据for index, val in enumerate(col3): ws.col(4).width = 150 * 30 # 定义列宽 ws.write(index+2, 4, val, style=set_style('Times New Roman', 200, bold=False, format_str='',align=''))ws.write(4, 2,'技术部', style=styleOK)ws.write(4, 5,'186777233', style=styleOK)ws.write(4, 6,'wang@166.com', style=styleOK)wb.save('test.xls') # 保存xls |
【Python】如何处理Excel中的数据
我们平时在做自动化测试的时候,可能会涉及到从表格中去读取或者存储数据,我们除了可以使用openpyxl来操作excel,当然也可以利用pandas来完成,这篇随笔只是我在学习过程中的简单记录,其他的功能还需要继续去探索。
一、pandas的安装:
1.安装pandas其实是非常简单的,pandas依赖处理Excel的xlrd模块,所以我们需要提前安装这个,安装命令是:pip install xlrd
2.开始安装pandas,安装命令是:pip install pandas
二、读取excel文件
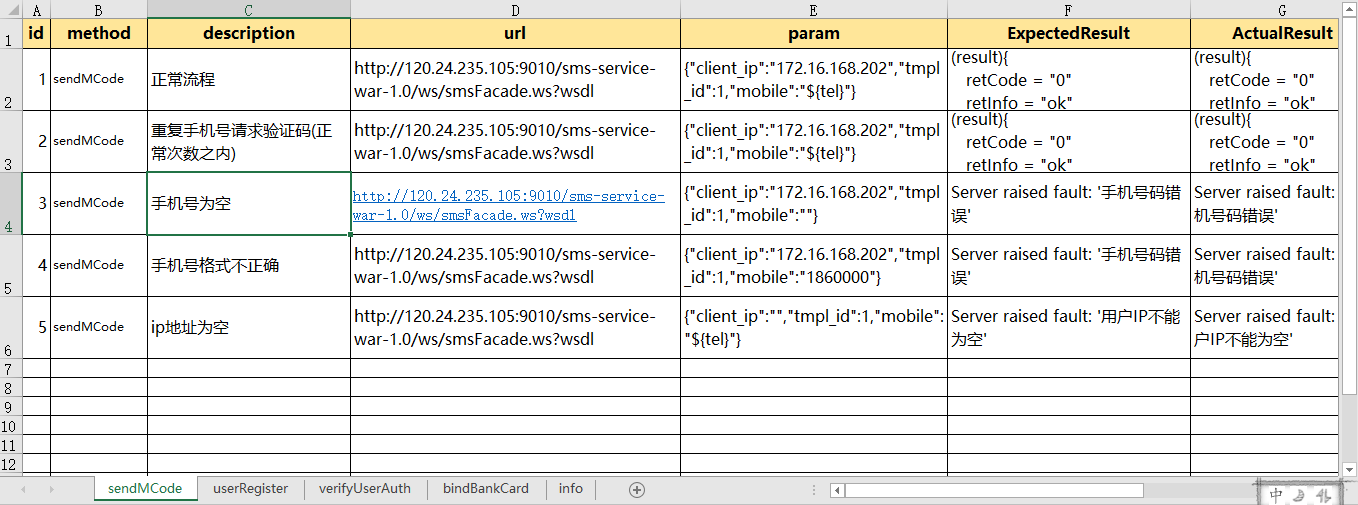
webservice_testcase.xlsx结构如下:
1.首先我们应该先将这个模块导入
|
1
|
import pandas as pd |
2.读取表单中的数据:
sheet=pd.read_excel('test_data\\webservice_testcase.xlsx')#这个会直接默认读取到这个Excel的第一个表单
data=sheet.head()#默认读取前5行数据
print("获取到所有的值:\n{0}".format(data))#格式化输出
3.也可以通过指定表单名来读取数据
sheet=pd.read_excel('test_data\\webservice_testcase.xlsx',sheet_name='userRegister')
data=sheet.head()#默认读取前5行数据
print("获取到所有的值:\n{0}".format(data))#格式化输出
4.通过表单索引来指定要访问的表单,0表示第一个表单,也可以采用表单名和索引的双重方式来定位表单,也可以同时定位多个表单,方式都罗列如下所示

sheet=pd.read_excel('test_data\\webservice_testcase.xlsx',sheet_name=['sendMCode','userRegister'])#可以通过表单名同时指定多个
# sheet=pd.read_excel('test_data\\webservice_testcase.xlsx',sheet_name=0)#可以通过表单索引来指定读取的表单
# sheet=pd.read_excel('test_data\\webservice_testcase.xlsx',sheet_name=['sendMCode',1])#可以混合的方式来指定
# sheet=pd.read_excel('test_data\\webservice_testcase.xlsx',sheet_name=[1,2])#可以通过索引 同时指定多个
data=sheet.values#获取所有的数据,注意这里不能用head()方法
print("获取到所有的值:\n{0}".format(data))#格式化输出
二、操作Excel中的行列
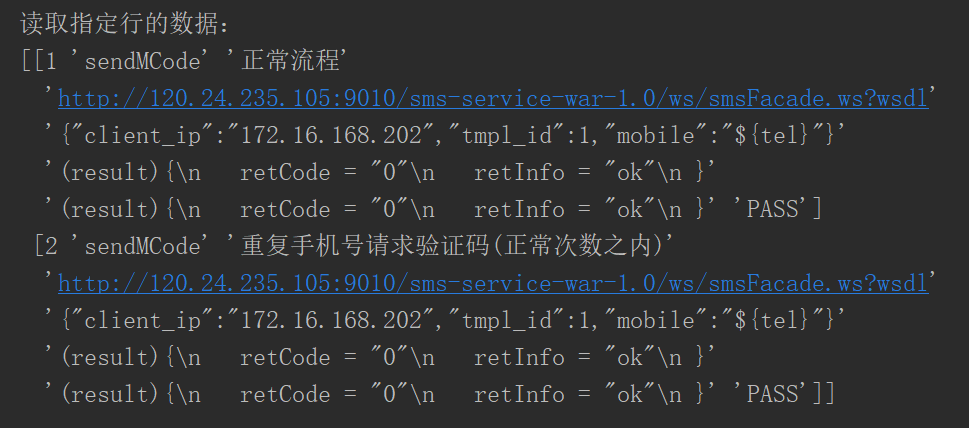
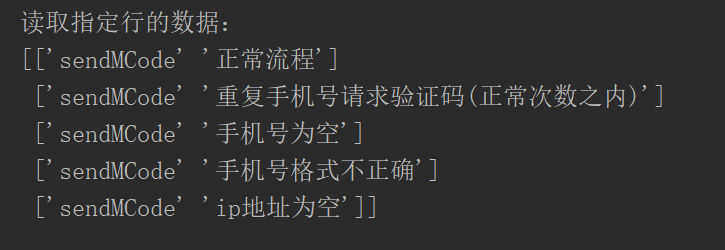
1.读取制定的某一行数据:
sheet=pd.read_excel('webservice_testcase.xlsx')#这个会直接默认读取到这个Excel的第一个表单
data=sheet.ix[0].values#0表示第一行 这里读取数据并不包含表头
print("读取指定行的数据:\n{0}".format(data))
得到了如下结果:

2.读取指定的多行:
sheet=pd.read_excel('test_data\\webservice_testcase.xlsx')#这个会直接默认读取到这个Excel的第一个表单
data=sheet.ix[[0,1]].values#0表示第一行 这里读取数据并不包含表头
print("读取指定行的数据:\n{0}".format(data))
得到了如下的结果:
3.读取指定行列的数据:
sheet=pd.read_excel('test_data\\webservice_testcase.xlsx')#这个会直接默认读取到这个Excel的第一个表单
data=sheet.ix[0,1]#读取第一行第二列的值
print("读取指定行的数据:\n{0}".format(data))
得到了如下结果:

4.读取指定的多行多列的值:
sheet=pd.read_excel('test_data\\webservice_testcase.xlsx')
data=sheet.ix[[1,2],['method','description']].values#读取第二行第三行的method以及description列的值,这里需要嵌套列表
print("读取指定行的数据:\n{0}".format(data))
得到了如下的结果:

5.读取所有行指定的列的值:
sheet=pd.read_excel('test_data\\webservice_testcase.xlsx')
data=sheet.ix[:,['method','description']].values#读取第二行第三行的method以及description列的值,这里需要嵌套列表
print("读取指定行的数据:\n{0}".format(data))
得到了如下的结果:
6.获取行号输出:
sheet=pd.read_excel('test_data\\webservice_testcase.xlsx')
print("输出行号列表",sheet.index.values)
得到了如下的结果:

7.获取列名输出:
sheet=pd.read_excel('test_data\\webservice_testcase.xlsx')
print("输出列标题",sheet.columns.values)
得到了如下的结果:

8.获取指定行数的值:
sheet=pd.read_excel('test_data\\webservice_testcase.xlsx')
print("输出值",sheet.sample(2).values)
9.获取指定列的值
sheet=pd.read_excel('test_data\\webservice_testcase.xlsx')
print("输出值",sheet['description'].values)
得到了如下的结果:

三、将excel中的每一条数据处理成字典,然后让如一个列表中
test_data=[]
sheet = pd.read_excel(self.file_name, sheet_name=key)
for i in sheet.index.values:#获取行号的索引,并对其进行遍历:#根据i来获取每一行指定的数据 并利用to_dict转成字典
  row_data=sheet.ix[i,['id','method','description','url','param','ExpectedResult']].to_dict()
  test_data.append(row_data)
另外,我们可以把测试用例相关的东西写入一个配置文件当中,读取的时候可以根据配置文件中的内容来进行读取:
配置文件如下:
|
1
2
3
4
5
6
|
[CASECONFIG]sheet_list={'sendMCode':'all', 'userRegister':'all', 'verifyUserAuth':'all', 'bindBankCard':[] } |
配置文件处理.py代码如下:
import configparser
class ReadConfig:
    def read_config(self,file_path,section,option):
        cf=configparser.ConfigParser()
        cf.read(file_path,encoding="utf-8")
        value=cf.get(section,option)
        return value
project_path.py代码如下:
import os
Project_path=os.path.split(os.path.split(os.path.realpath(__file__))[0])[0]
#配置文件路径
case_config_path=os.path.join(Project_path,'config','case.config')
#测试用例的路径
test_cases_path=os.path.join(Project_path,'test_data','webservice_testcase.xlsx')
然后我们把读取excel中的内容封装成一个类,代码示例如下:
from common import project_pathfrom common.read_config import ReadConfig as RC
import  pandas  as pd

class DoExcel:
    def __init__(self,file_name):
        self.file_name=file_name
        self.sheet_list=eval(RC().read_config(project_path.case_config_path,'CASECONFIG','sheet_list'))
    def do_excel(self):
        test_data=[]
        for key in self.sheet_list:
            if self.sheet_list[key] == 'all':  # 读取所有的用例
                sheet = pd.read_excel(self.file_name, sheet_name=key)
                for i in sheet.index.values:#获取行号的索引,并对其进行遍历:
                    #根据i来获取每一行指定的数据 并利用to_dict转成字典
                    row_data=sheet.ix[i,['id','method','description','url','param','ExpectedResult']].to_dict()
                    test_data.append(row_data)
       else:
                sheet = pd.read_excel(self.file_name, sheet_name=key)
                for i in self.sheet_list[key]:#根据list中的标号去读取excel指定的用例
                    row_data=sheet.ix[i-1,['id','method','description','url','param','ExpectedResult']].to_dict()
                    test_data.append(row_data)
        return  test_data
if __name__ == '__main__':
    test_data=DoExcel(project_path.test_cases_path).do_excel()
    print(test_data)
如果将配置改成如下内容:
[CASECONFIG]
sheet_list={'sendMCode':[1,3,5],
             'userRegister':[],
             'verifyUserAuth':[],
             'bindBankCard':[]
             }
我们将会得到如下的运行结果:
[{'id': 1, 'method': 'sendMCode', 'description': '正常流程', 'url': 'http://120.24.235.105:9010/sms-service-war-1.0/ws/smsFacade.ws?wsdl', 'param': '{"client_ip":"172.16.168.202","tmpl_id":1,"mobile":"${tel}"}', 'ExpectedResult': '(result){\n   retCode = "0"\n   retInfo = "ok"\n }'},
{'id': 3, 'method': 'sendMCode', 'description': '手机号为空', 'url': 'http://120.24.235.105:9010/sms-service-war-1.0/ws/smsFacade.ws?wsdl', 'param': '{"client_ip":"172.16.168.202","tmpl_id":1,"mobile":""}', 'ExpectedResult': "Server raised fault: '手机号码错误'"},
{'id': 5, 'method': 'sendMCode', 'description': 'ip地址为空', 'url': 'http://120.24.235.105:9010/sms-service-war-1.0/ws/smsFacade.ws?wsdl', 'param': '{"client_ip":"","tmpl_id":1,"mobile":"${tel}"}', 'ExpectedResult': "Server raised fault: '用户IP不能为空'"}]
到此,将excel中的用例数据读取成为[{key1:value1},{key2:value2},...,{keyn:valuen}]这样的形式已经完毕,但是还有很多东西需要完善,比如用例中完成参数的替换,测试完成后回写测试数据到excel对应的表格中等等内容。
python 从word/docx中提取链接(hyperlink)和文本
python 从word/docx中提取链接(hyperlink)和文本
import zipfile
import re
import json
import base64
from docx import Document
from os.path import basename
from docx.opc.constants import RELATIONSHIP_TYPE as RT
from bs4 import BeautifulSoup

def get_linked_text(soup):

    links = []

    # This kind of link has a corresponding URL in the _rel file.
    for tag in soup.find_all("hyperlink"):
        # try/except because some hyperlinks have no id.
        try:
            links.append({"id": tag["r:id"], "text": tag.text})
        except:
            pass

    # This kind does not.
    for tag in soup.find_all("instrText"):
        # They're identified by the word HYPERLINK
        if "HYPERLINK" in tag.text:
            # Get the URL. Probably.
            url = tag.text.split('"')[1]

            # The actual linked text is stored nearby tags.
            # Loop through the siblings starting here.
            temp = tag.parent.next_sibling
            text = ""

            while temp is not None:
                # Text comes in <t> tags.
                maybe_text = temp.find("t")
                if maybe_text is not None:
                    # Ones that have text in them.
                    if maybe_text.text.strip() != "":
                        text += maybe_text.text.strip()

                # Links end with <w:fldChar w:fldCharType="end" />.
                maybe_end = temp.find("fldChar[w:fldCharType]")
                if maybe_end is not None:
                    if maybe_end["w:fldCharType"] == "end":
                        break

                temp = temp.next_sibling

            links.append({"id": None, "href": url, "text": text})

    return links

if __name__ == '__main__':
    file_name="xx.docx"
    archive = zipfile.ZipFile(file_name, "r")
    file_data = archive.read("word/document.xml")
    doc_soup = BeautifulSoup(file_data, "xml")
    linked_text = get_linked_text(doc_soup)
    print(linked_text)
word读取图片,并将图片转换成链接
word读取图片,并将图片转换成链接
from docx import Document
from os.path import basename
import re


def upload_image(image_data):
    image_url = "图片链接"
    return image_url


file_name = "/Users/在文档顶部.docx"
doc = Document(file_name)
a = list()
pattern = re.compile('rId\d+')
for graph in doc.paragraphs:
    b = list()
    for run in graph.runs:
        if run.text != '':
            b.append(run.text)
        else:
            # b.append(pattern.search(run.element.xml))
            content_id = pattern.search(run.element.xml).group(0)
            try:
                content_type = doc.part.related_parts[content_id].content_type
            except KeyError as e:
                print(e)
                continue
            if not content_type.startswith('image'):
                continue
            img_name = basename(doc.part.related_parts[content_id].partname)
            img_data = doc.part.related_parts[content_id].blob
            b.append(upload_image(img_data))
    b_str=f"{''.join(b)}"
    a.append(b_str)
print(a)
python re模块去掉括号及其里面的内容
括号为全角括号
文本:寄令狐绹(一本无绹字)相公
import re
text = "寄令狐绹(一本无绹字)相公"
text = re.sub("\\(.*?)|\\{.*?}|\\[.*?]|\\【.*?】", "",text)

print(text)
>>> 寄令狐绹相公
括号为半角括号
import re
text = "寄令狐绹(一本无绹字)相公"
text = re.sub("\\(.*?\\)|\\{.*?}|\\[.*?]", "",text)

print(text)
>>> 寄令狐绹相公

 浙公网安备 33010602011771号