01. chicken-soup-业务布局篇-uniapp-01新建项目
学习视频
开发工具
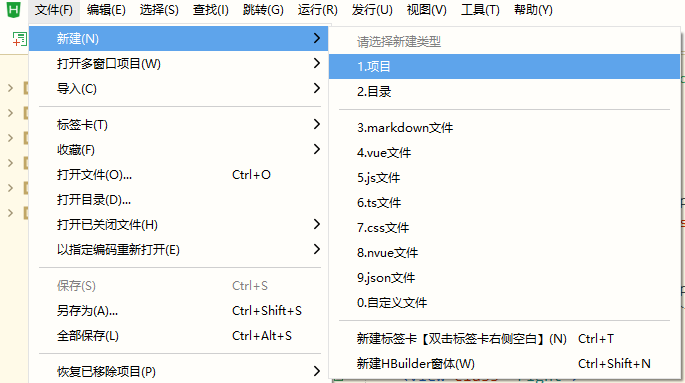
新建项目
- HBuilderX - 文件 - 新建 - 项目
-
配置新建项目
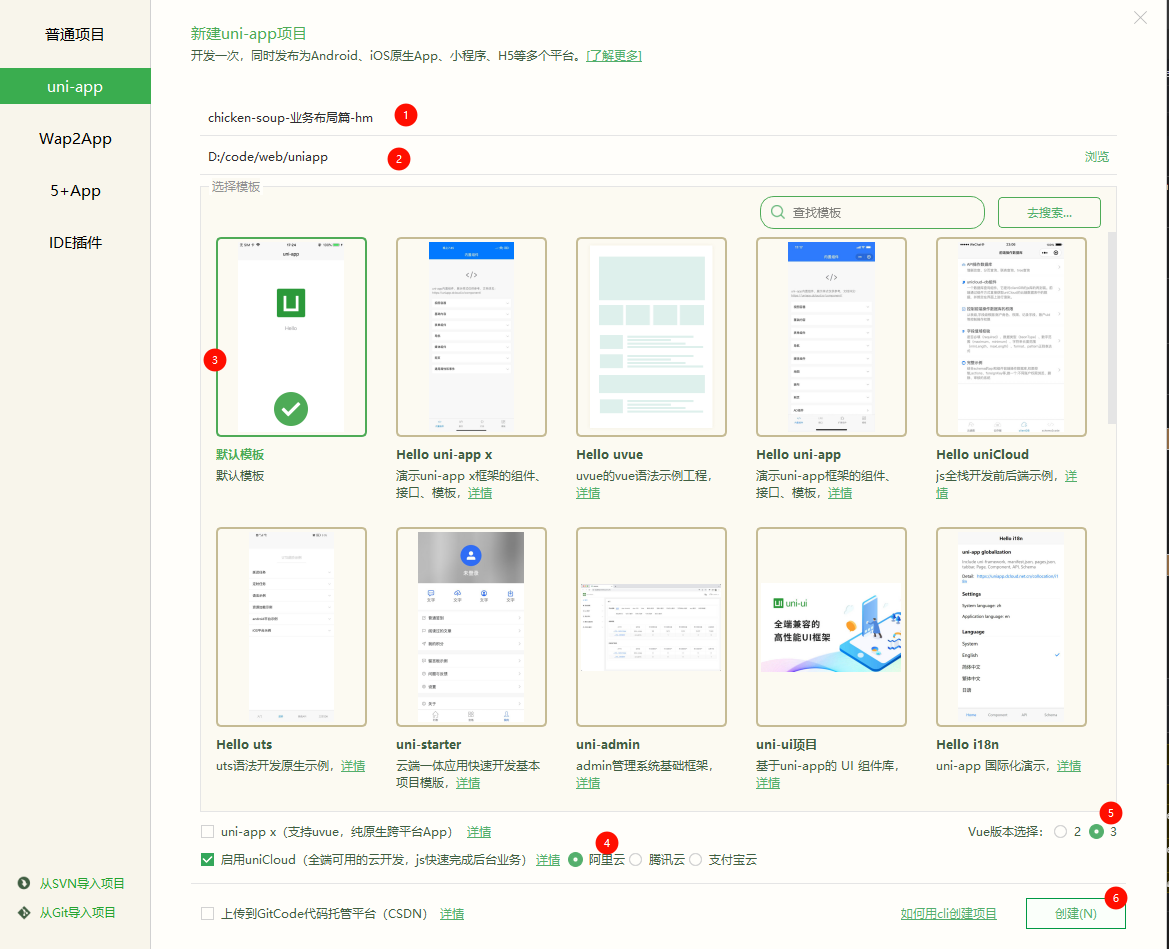
-
在微信开发者工具中运行项目
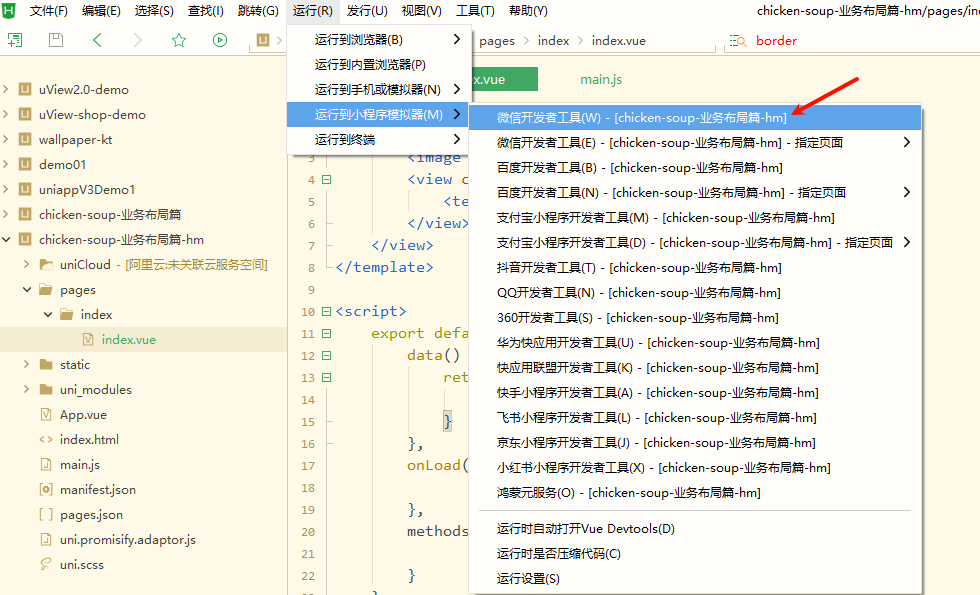
-
信任项目

-
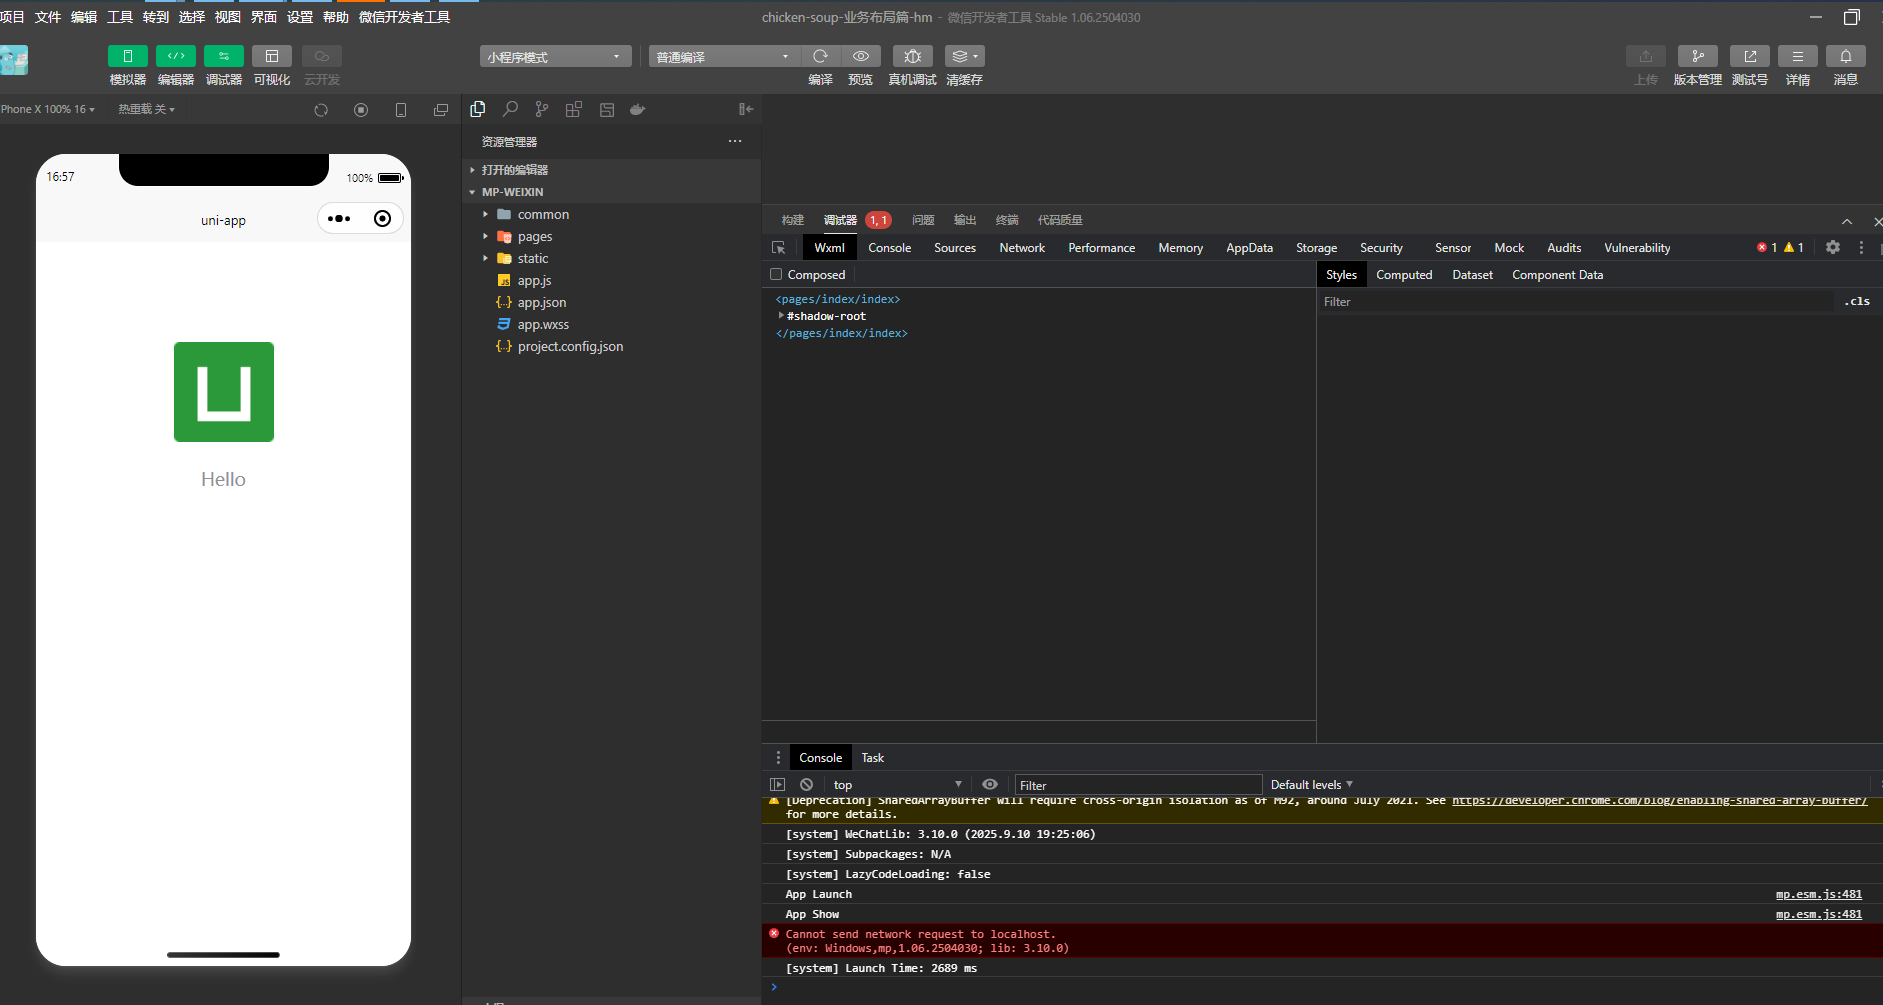
已经运行起项目
新建页面
-
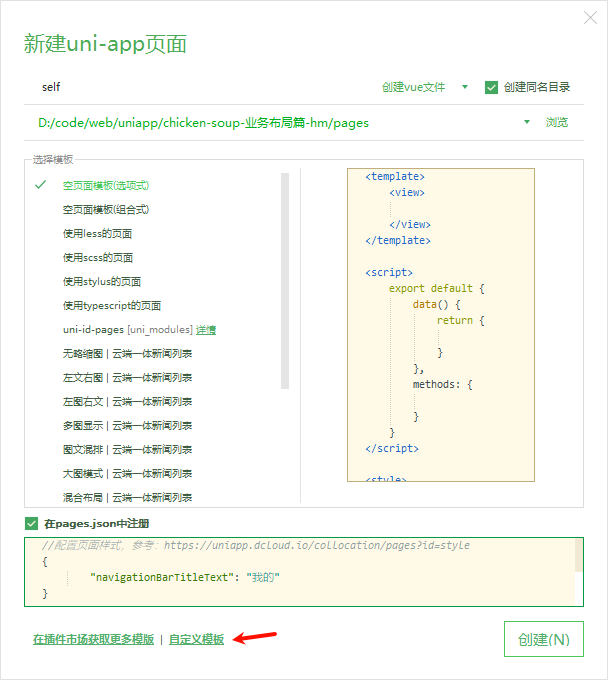
新建我的页面
在pages

-
新建一个自定义模板
vue3-setup-js.vue
<template>
	<view class="">

	</view>
</template>

<script setup>

</script>

<style lang="scss" scoped>

</style>
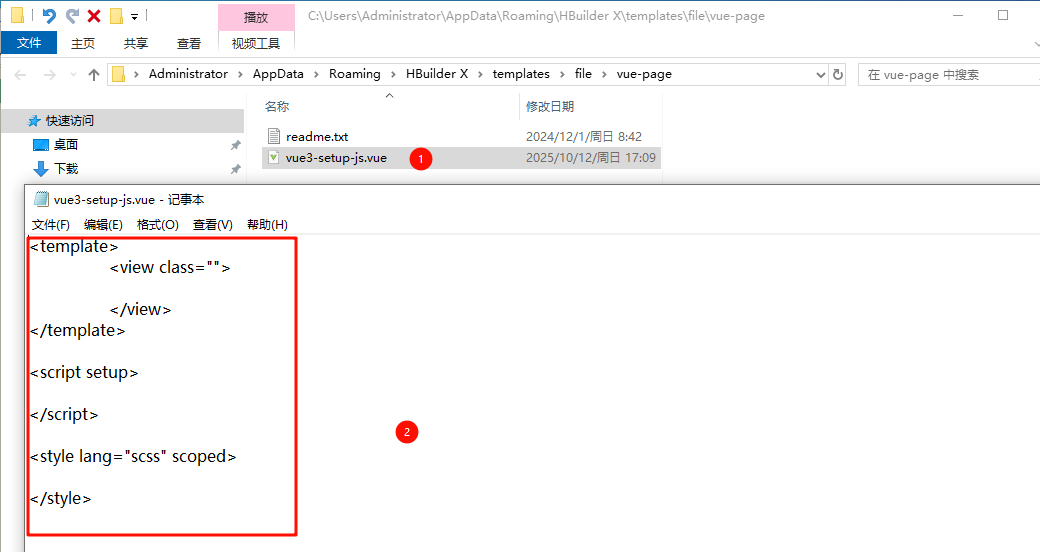
-
选择刚新建的模板
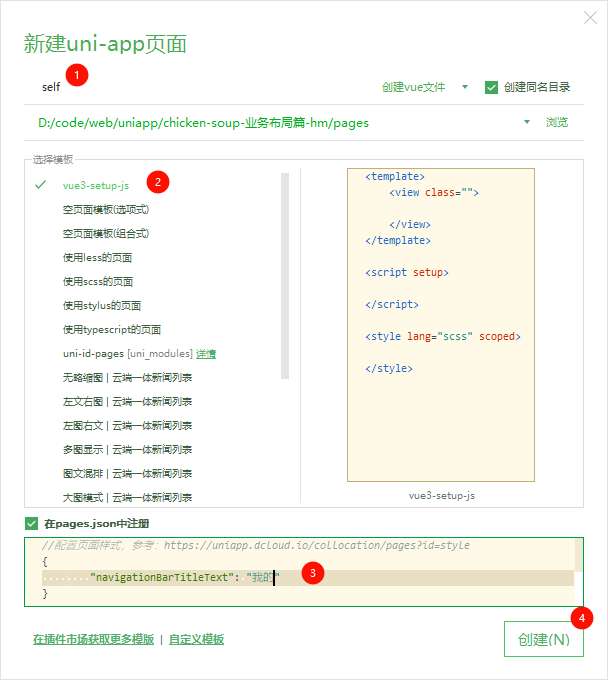
-
此时 我的 页面就创建成功

-
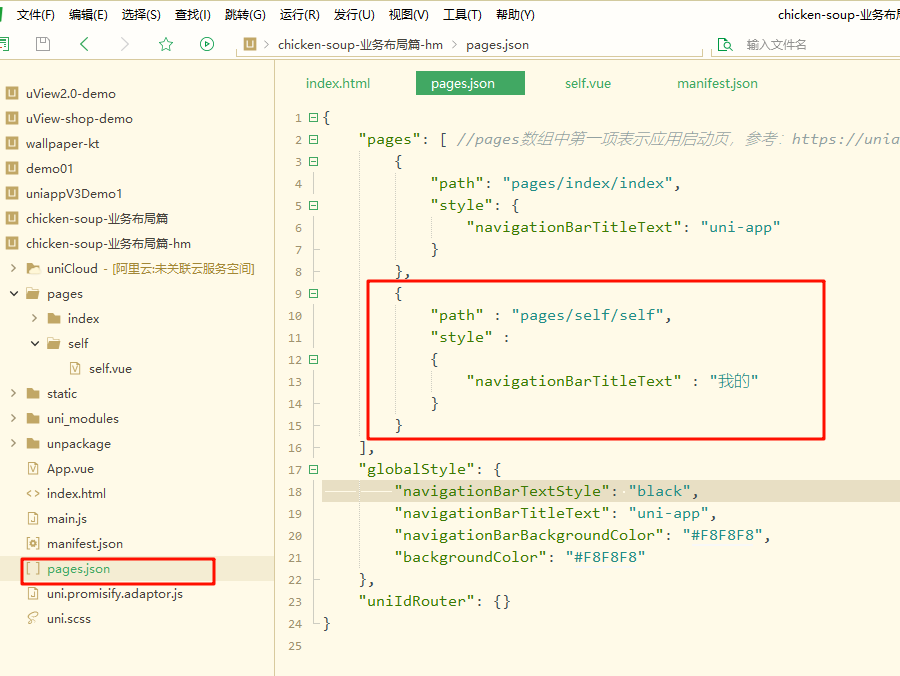
pages.json中会自己添加上path导航
新建底部导航tabbar
- pages.json中写入tabBar配置
	"tabBar": {
		"color": "#333", //默认导航字体颜色
		"selectedColor": "#74dbef", //选中后导航的字体颜色
		"list": [
			{
				"text": "首页",
				"pagePath": "pages/index/index",
				"iconPath": "static/images/home.png",
				"selectedIconPath": "static/images/home-h.png"
			},{
				"text": "我的",
				"pagePath": "pages/self/self",
				"iconPath": "static/images/self.png",
				"selectedIconPath": "static/images/self-h.png"
			}
		]
	}
- 复制图片素材到项目
static/images中
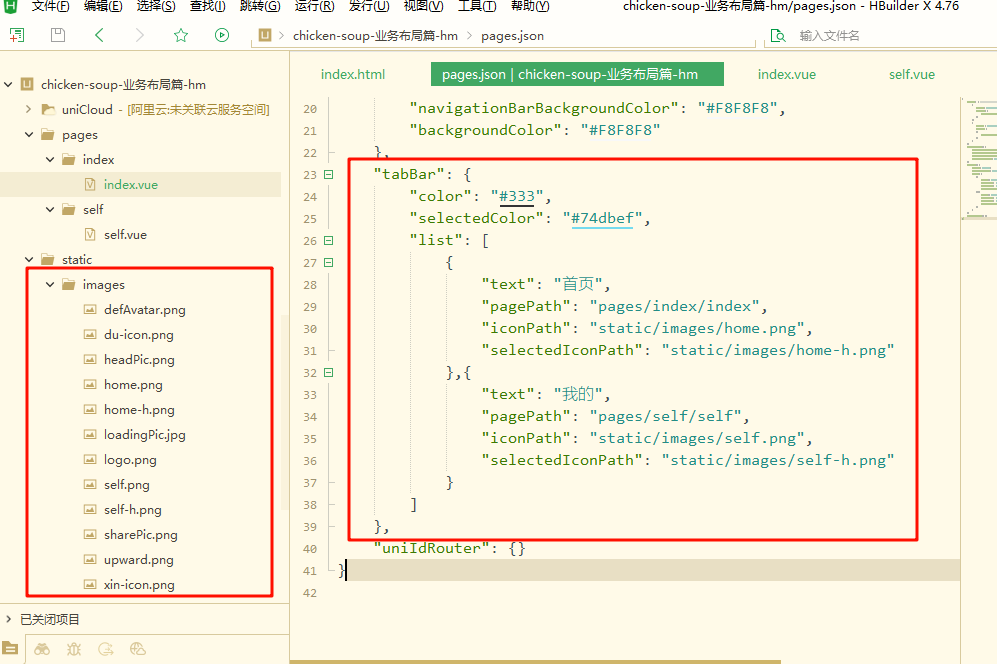
底部导航已经完成

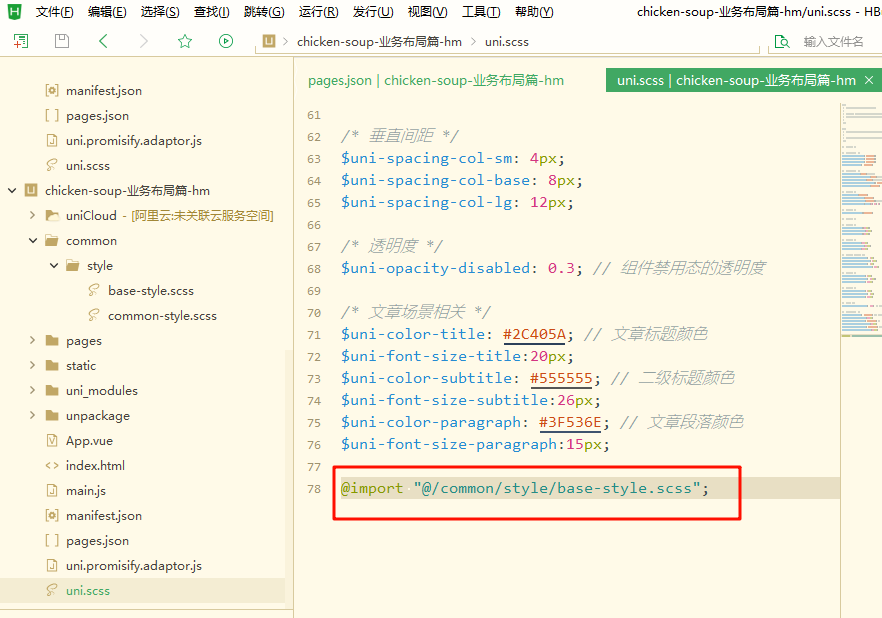
新建公共样式
- 新建
common目录
在项目根目录中新建common目录
注意:
common这个目录编译时,被引用的文件才会打包,而static目录中所有的文件编译时都会被打包)
2.新建 common/style/base-style.scss
这文件功能是定义全局的主题颜色变量
点击查看代码
$brand-theme-color:#74dbef;  //主题色
$brand-theme-color-aux:#576b95;  //品牌辅助色
$page-bg-color:#F7F7F7;          //页面背景色
$border-color:#e0e0e0;           //边框颜色
$border-color-light:#efefef;     //边框亮色

$text-font-color-1:#000;         //文字主色
$text-font-color-2:#676767;      //副标题颜色
$text-font-color-3:#a7a7a7;      //浅色
$text-font-color-4:#b2b2b2;      //更浅色


@mixin maxline($row:none){
	display: -webkit-box; /* 将元素作为块状容器 */
	-webkit-line-clamp: $row; /* 限制显示的最大行数为3行 */
	-webkit-box-orient: vertical; /* 设置子元素垂直布局 */
	overflow: hidden; /* 超出容器范围的内容不显示 */
}
3.新建 common/style/common-style.scss
这里主要是定义一下全局的css样式
view,text,swiper,swiper-item,input,textarea{
	box-sizing: border-box;
}
image{
	width: 100rpx;
	height: 100rpx;
}
.safe-area-bottom{
  width: 100%;
  height: env(safe-area-inset-bottom);
}
4.引入 base-style.scss 文件
@import "@/common/style/base-style.scss";
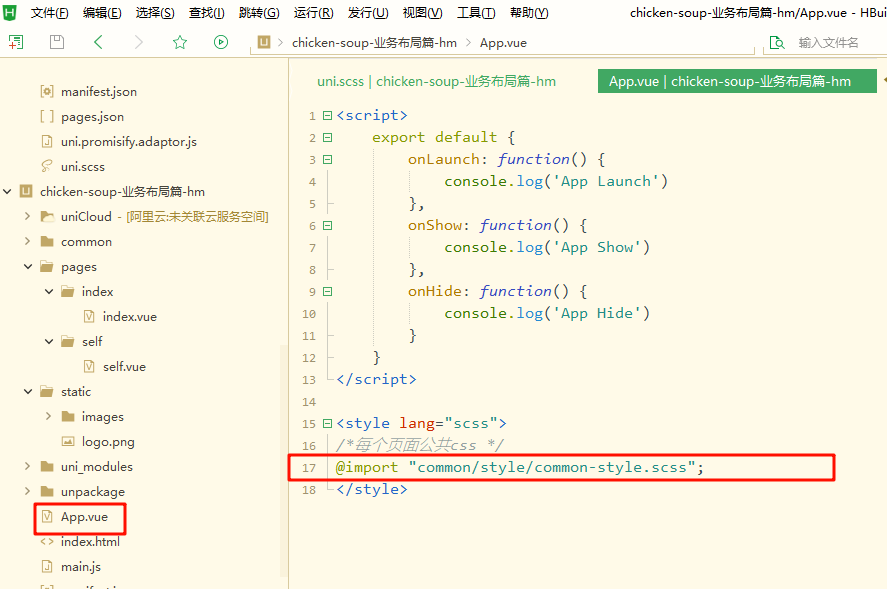
5.引入 common-style.scss 文件
App.vue 文件中引入
<style lang="scss">
/*每个页面公共css */
@import "common/style/common-style.scss";
</style>
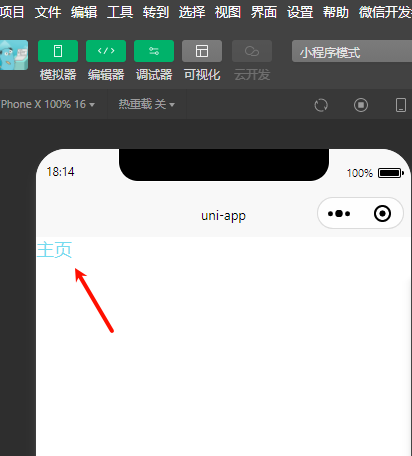
- 主页里使用公共样式里的主题色
编辑pages/index/index.vue文件
点击查看代码
<template>
	<view class="content">
		<view class="text-area">
			<text class="title">{{title}}</text>
		</view>
	</view>
</template>

<script setup lang="ts">
let title = '主页';

</script>

<style lang="scss">
	.title {
		font-size: 36rpx;
		color: $brand-theme-color;
	}
</style>
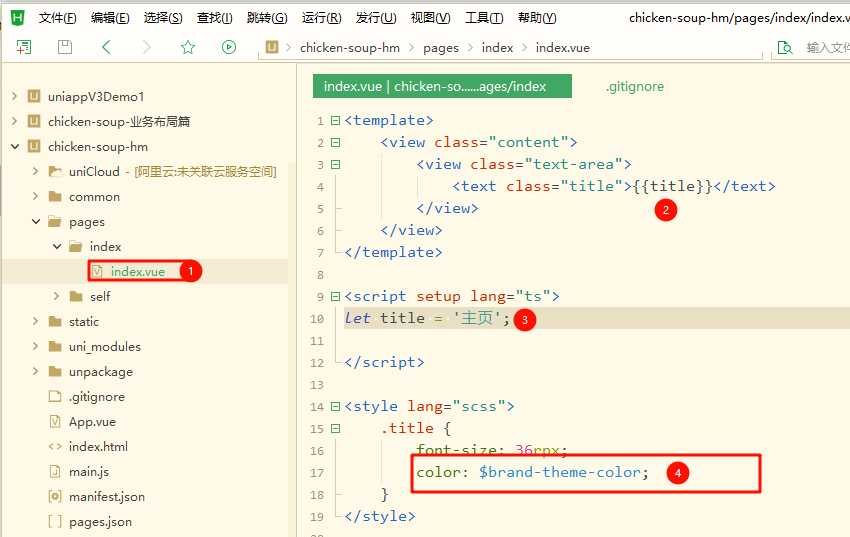
在微信开发者工具中查看,字体颜色已经生效
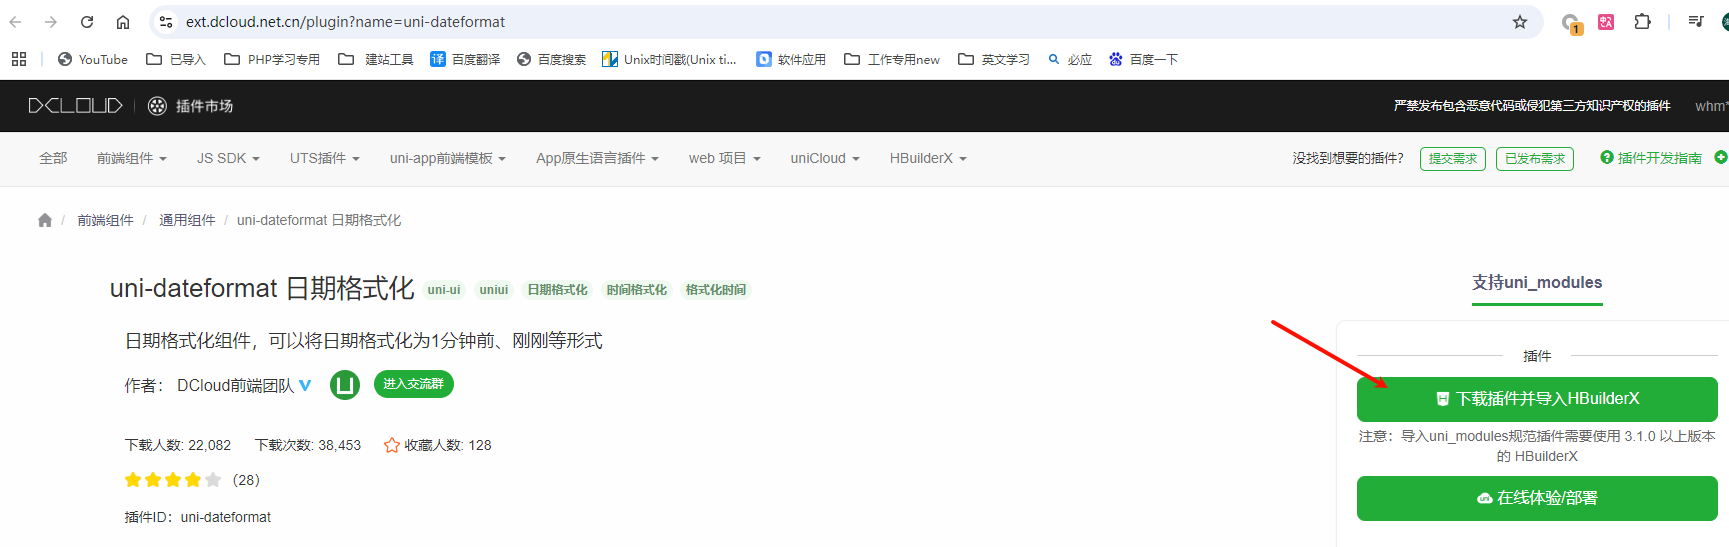
下载uniapp组件
-
这里以时间组件为例: 组件名:uni-dateformat
-
下载插件并导入 到HBuilderX
-
选择要导入的项目-确定

-
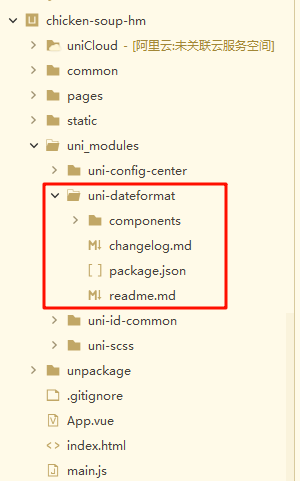
此时已经导入到项目中
-
dateformat用法
基本用法
在 template 中使用组件
<!-- 一般用法 -->
<uni-dateformat date="2020/10/20 20:20:20"></uni-dateformat>

<!-- 不显示刚刚/马上/xx分钟前 -->
<uni-dateformat date="2020/10/20 20:20:20" :threshold="[0,0]"></uni-dateformat>

<!-- 格式化当前时间,显示yyyy年MM月格式 -->
<uni-dateformat :date="Date.now()" format="yyyy年MM月"></uni-dateformat>

<!-- 格式化当前时间,显示dd日格式 -->
<uni-dateformat :date="Date.now()" format="dd日"></uni-dateformat>
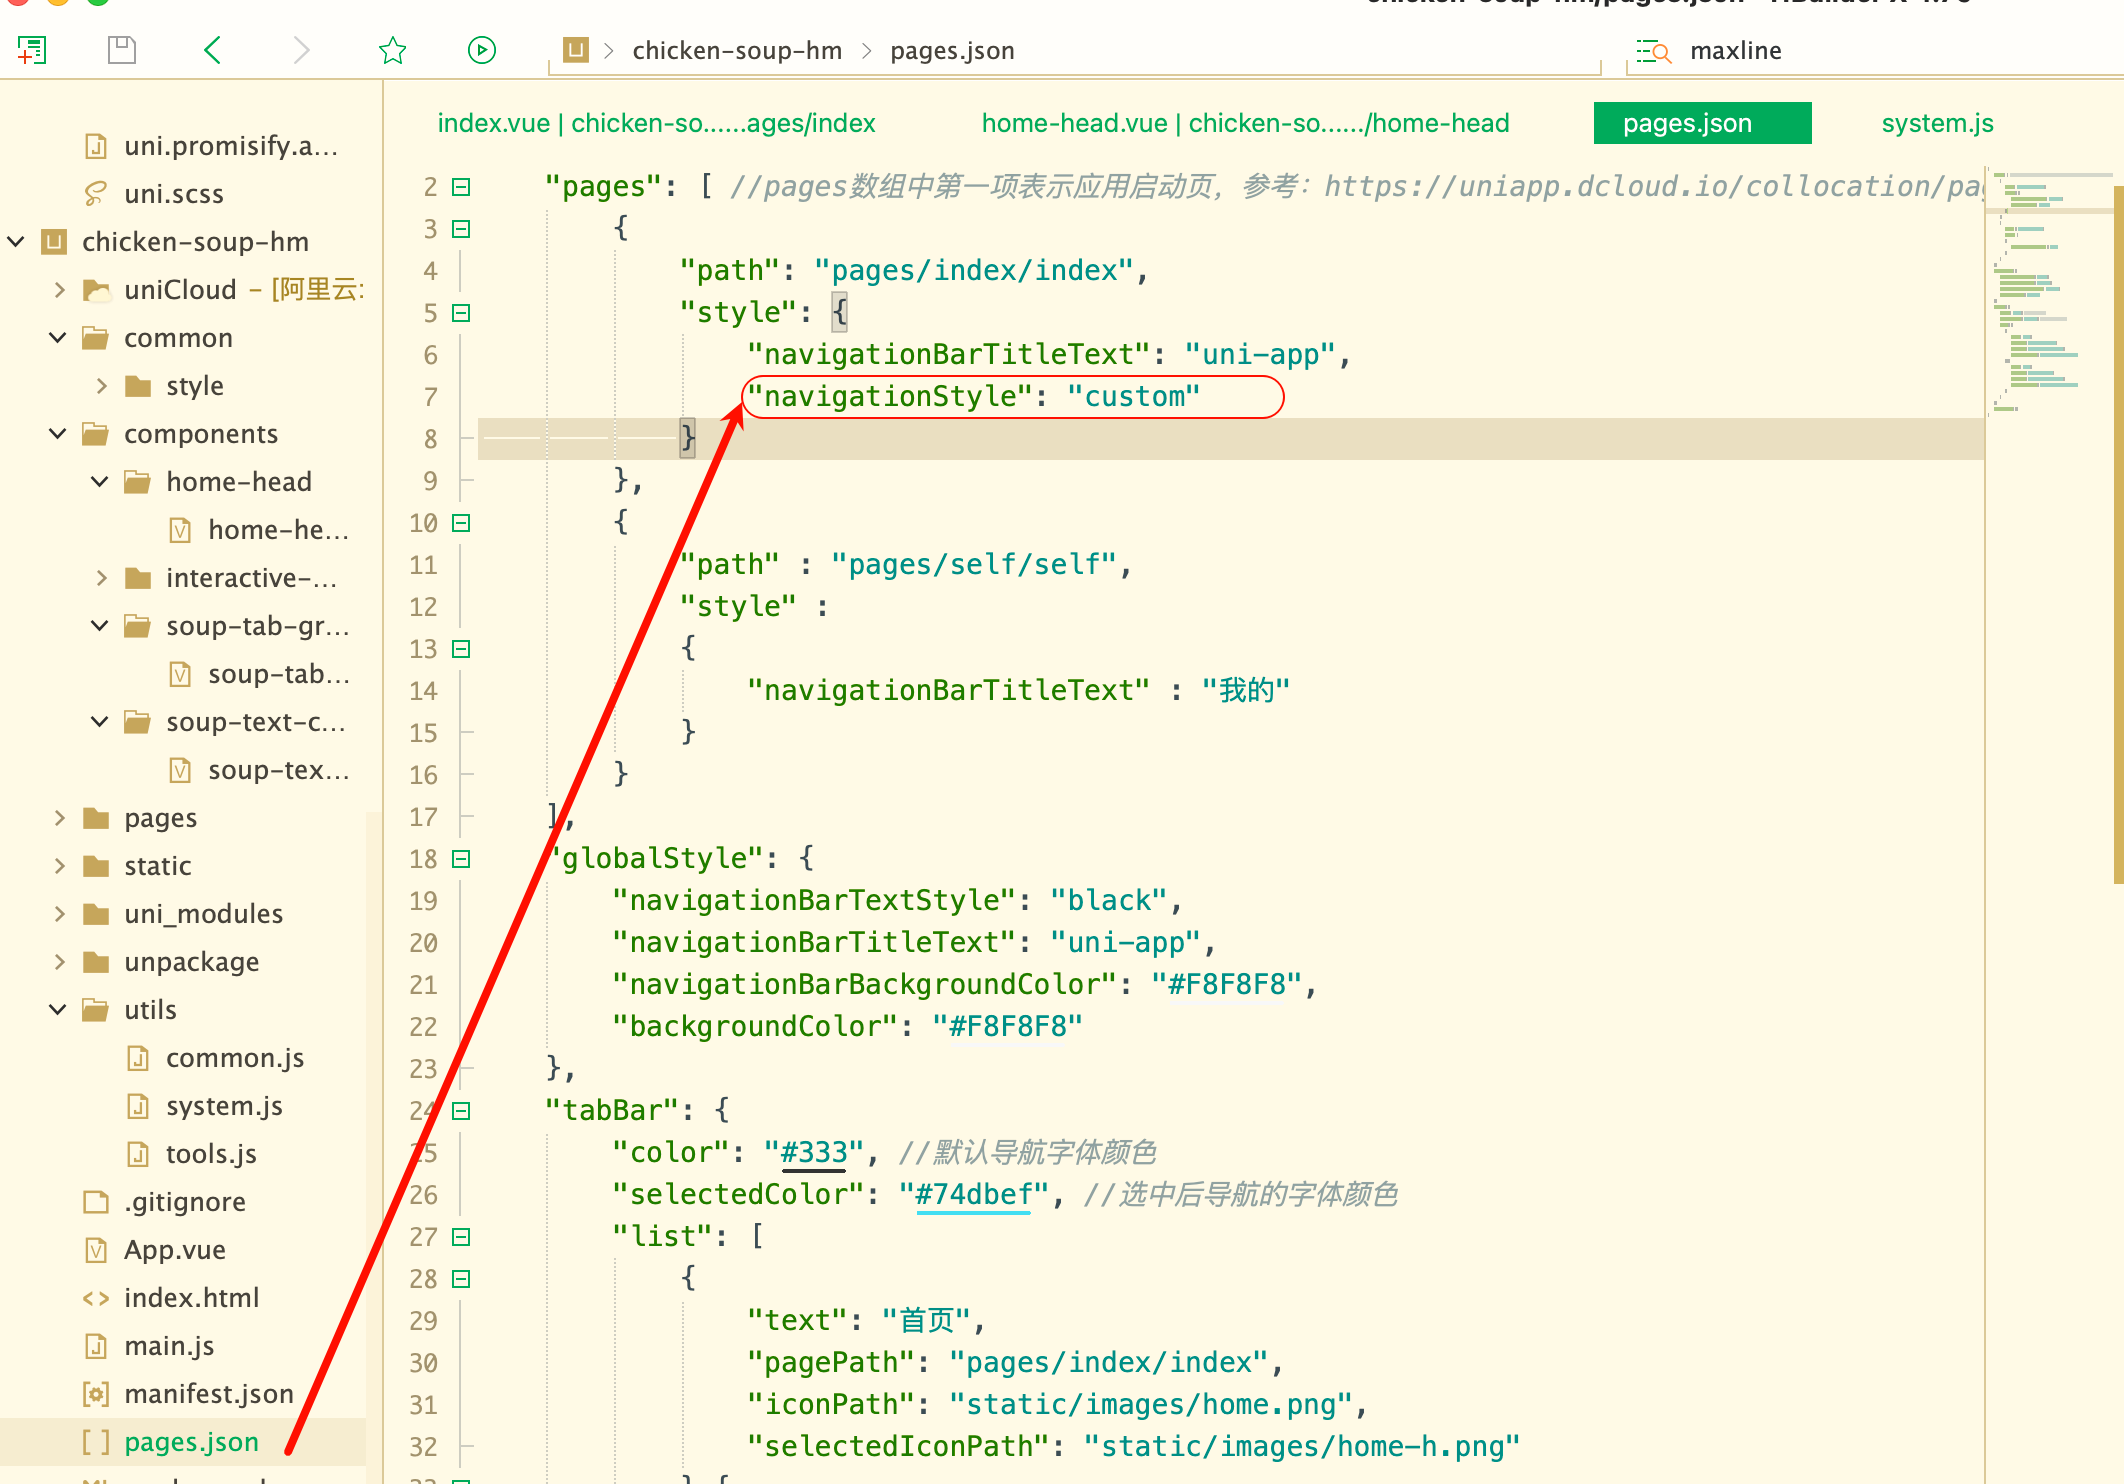
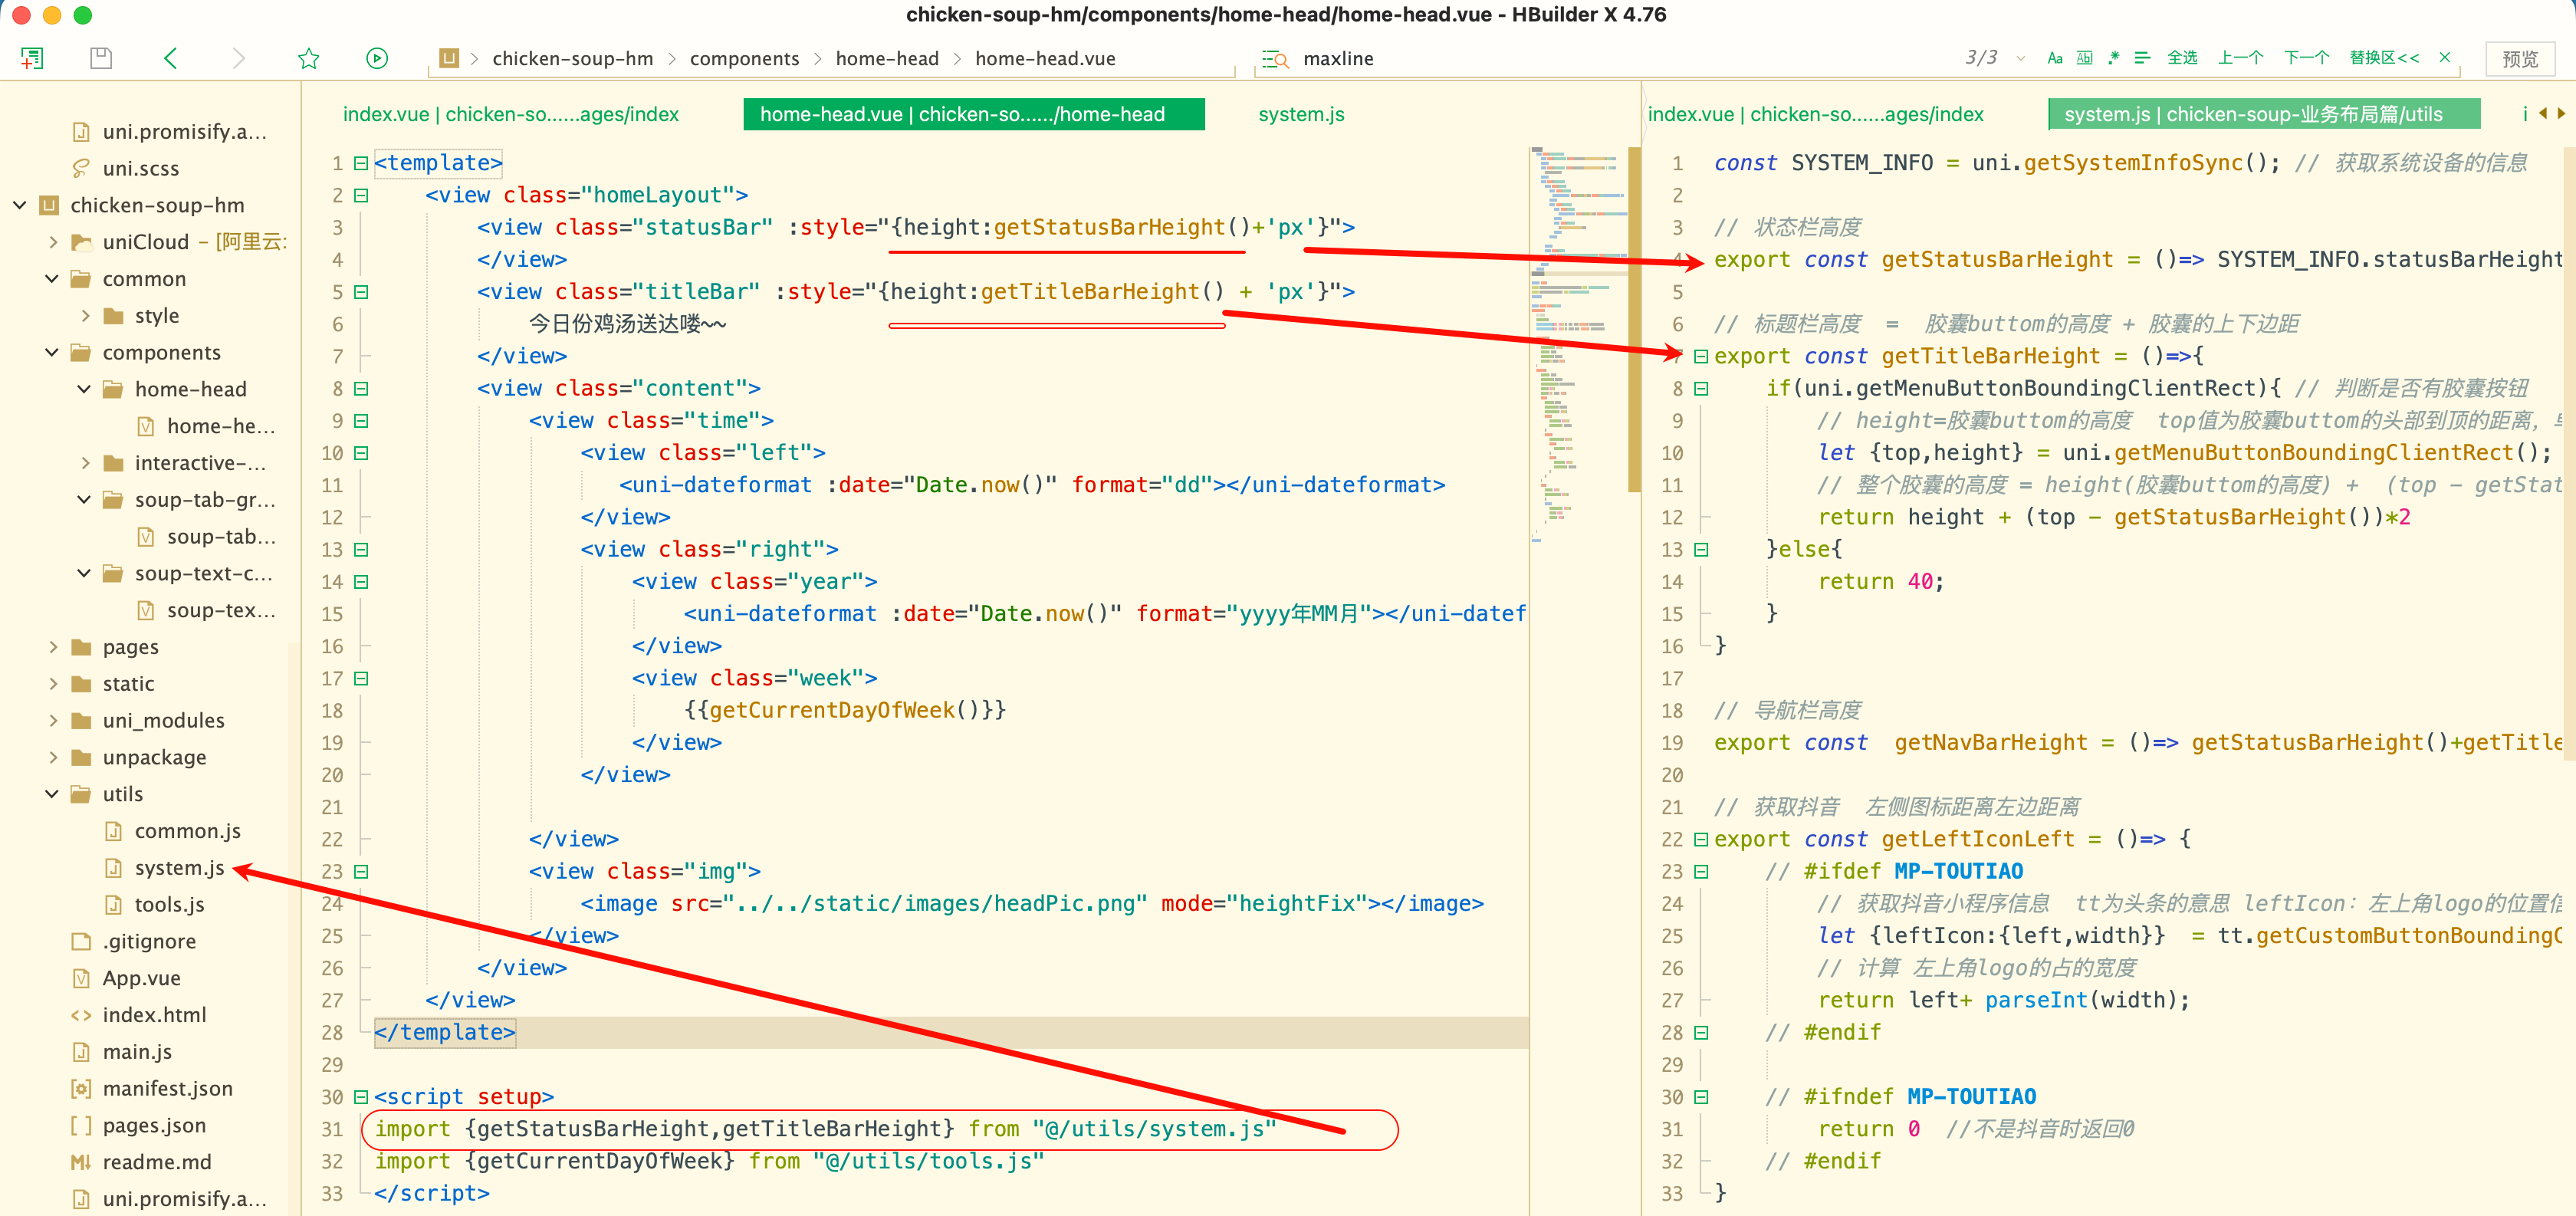
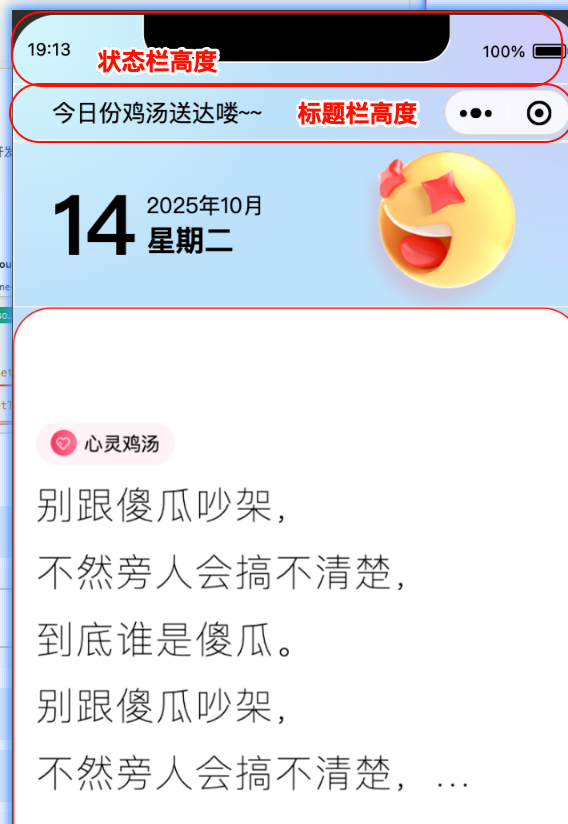
定义页面顶部的 状态栏和标题栏的高度 计算
-
修改
pages.js中pages/index/index页面 为自定义页面
-
新建公共js:
/utils/system.js
const SYSTEM_INFO = uni.getSystemInfoSync(); // 获取系统设备的信息

// 状态栏高度
export const getStatusBarHeight = ()=> SYSTEM_INFO.statusBarHeight || 15;

// 标题栏高度  =  胶囊buttom的高度 + 胶囊的上下边距
export const getTitleBarHeight = ()=>{
	if(uni.getMenuButtonBoundingClientRect){ // 判断是否有胶囊按钮
		// height=胶囊buttom的高度  top值为胶囊buttom的头部到顶的距离,单位为px
		let {top,height} = uni.getMenuButtonBoundingClientRect();
		// 整个胶囊的高度 = height(胶囊buttom的高度) +  (top - getStatusBarHeight())*2   (胶囊buttom的上边距 = top - 状态栏的高度)*2
		return height + (top - getStatusBarHeight())*2	//胶囊buttom总高度 = 胶囊buttom的高度 + 胶囊buttom的上边距*2(*2是因为上下边距一样高)
	}else{
		return 40;
	}
}

// 导航栏高度
export const  getNavBarHeight = ()=> getStatusBarHeight()+getTitleBarHeight();

// 获取抖音  左侧图标距离左边距离
export const getLeftIconLeft = ()=> {
	// #ifdef MP-TOUTIAO
		// 获取抖音小程序信息  tt为头条的意思 leftIcon:左上角logo的位置信息
		let {leftIcon:{left,width}}  = tt.getCustomButtonBoundingClientRect();
		// 计算 左上角logo的占的宽度
		return left+ parseInt(width);
	// #endif

	// #ifndef MP-TOUTIAO
		return 0  //不是抖音时返回0
	// #endif
}
代码分析

-
html中的使用方式
-
效果
小程序分包
小程序中每个包最大2Mb,超过就发布不到小程序上,所以要分包。
主包是pages
查看包大小
在微信开发者工具中-详情-基本信息-本地代码-代码依赖分析

可以看到包的信息
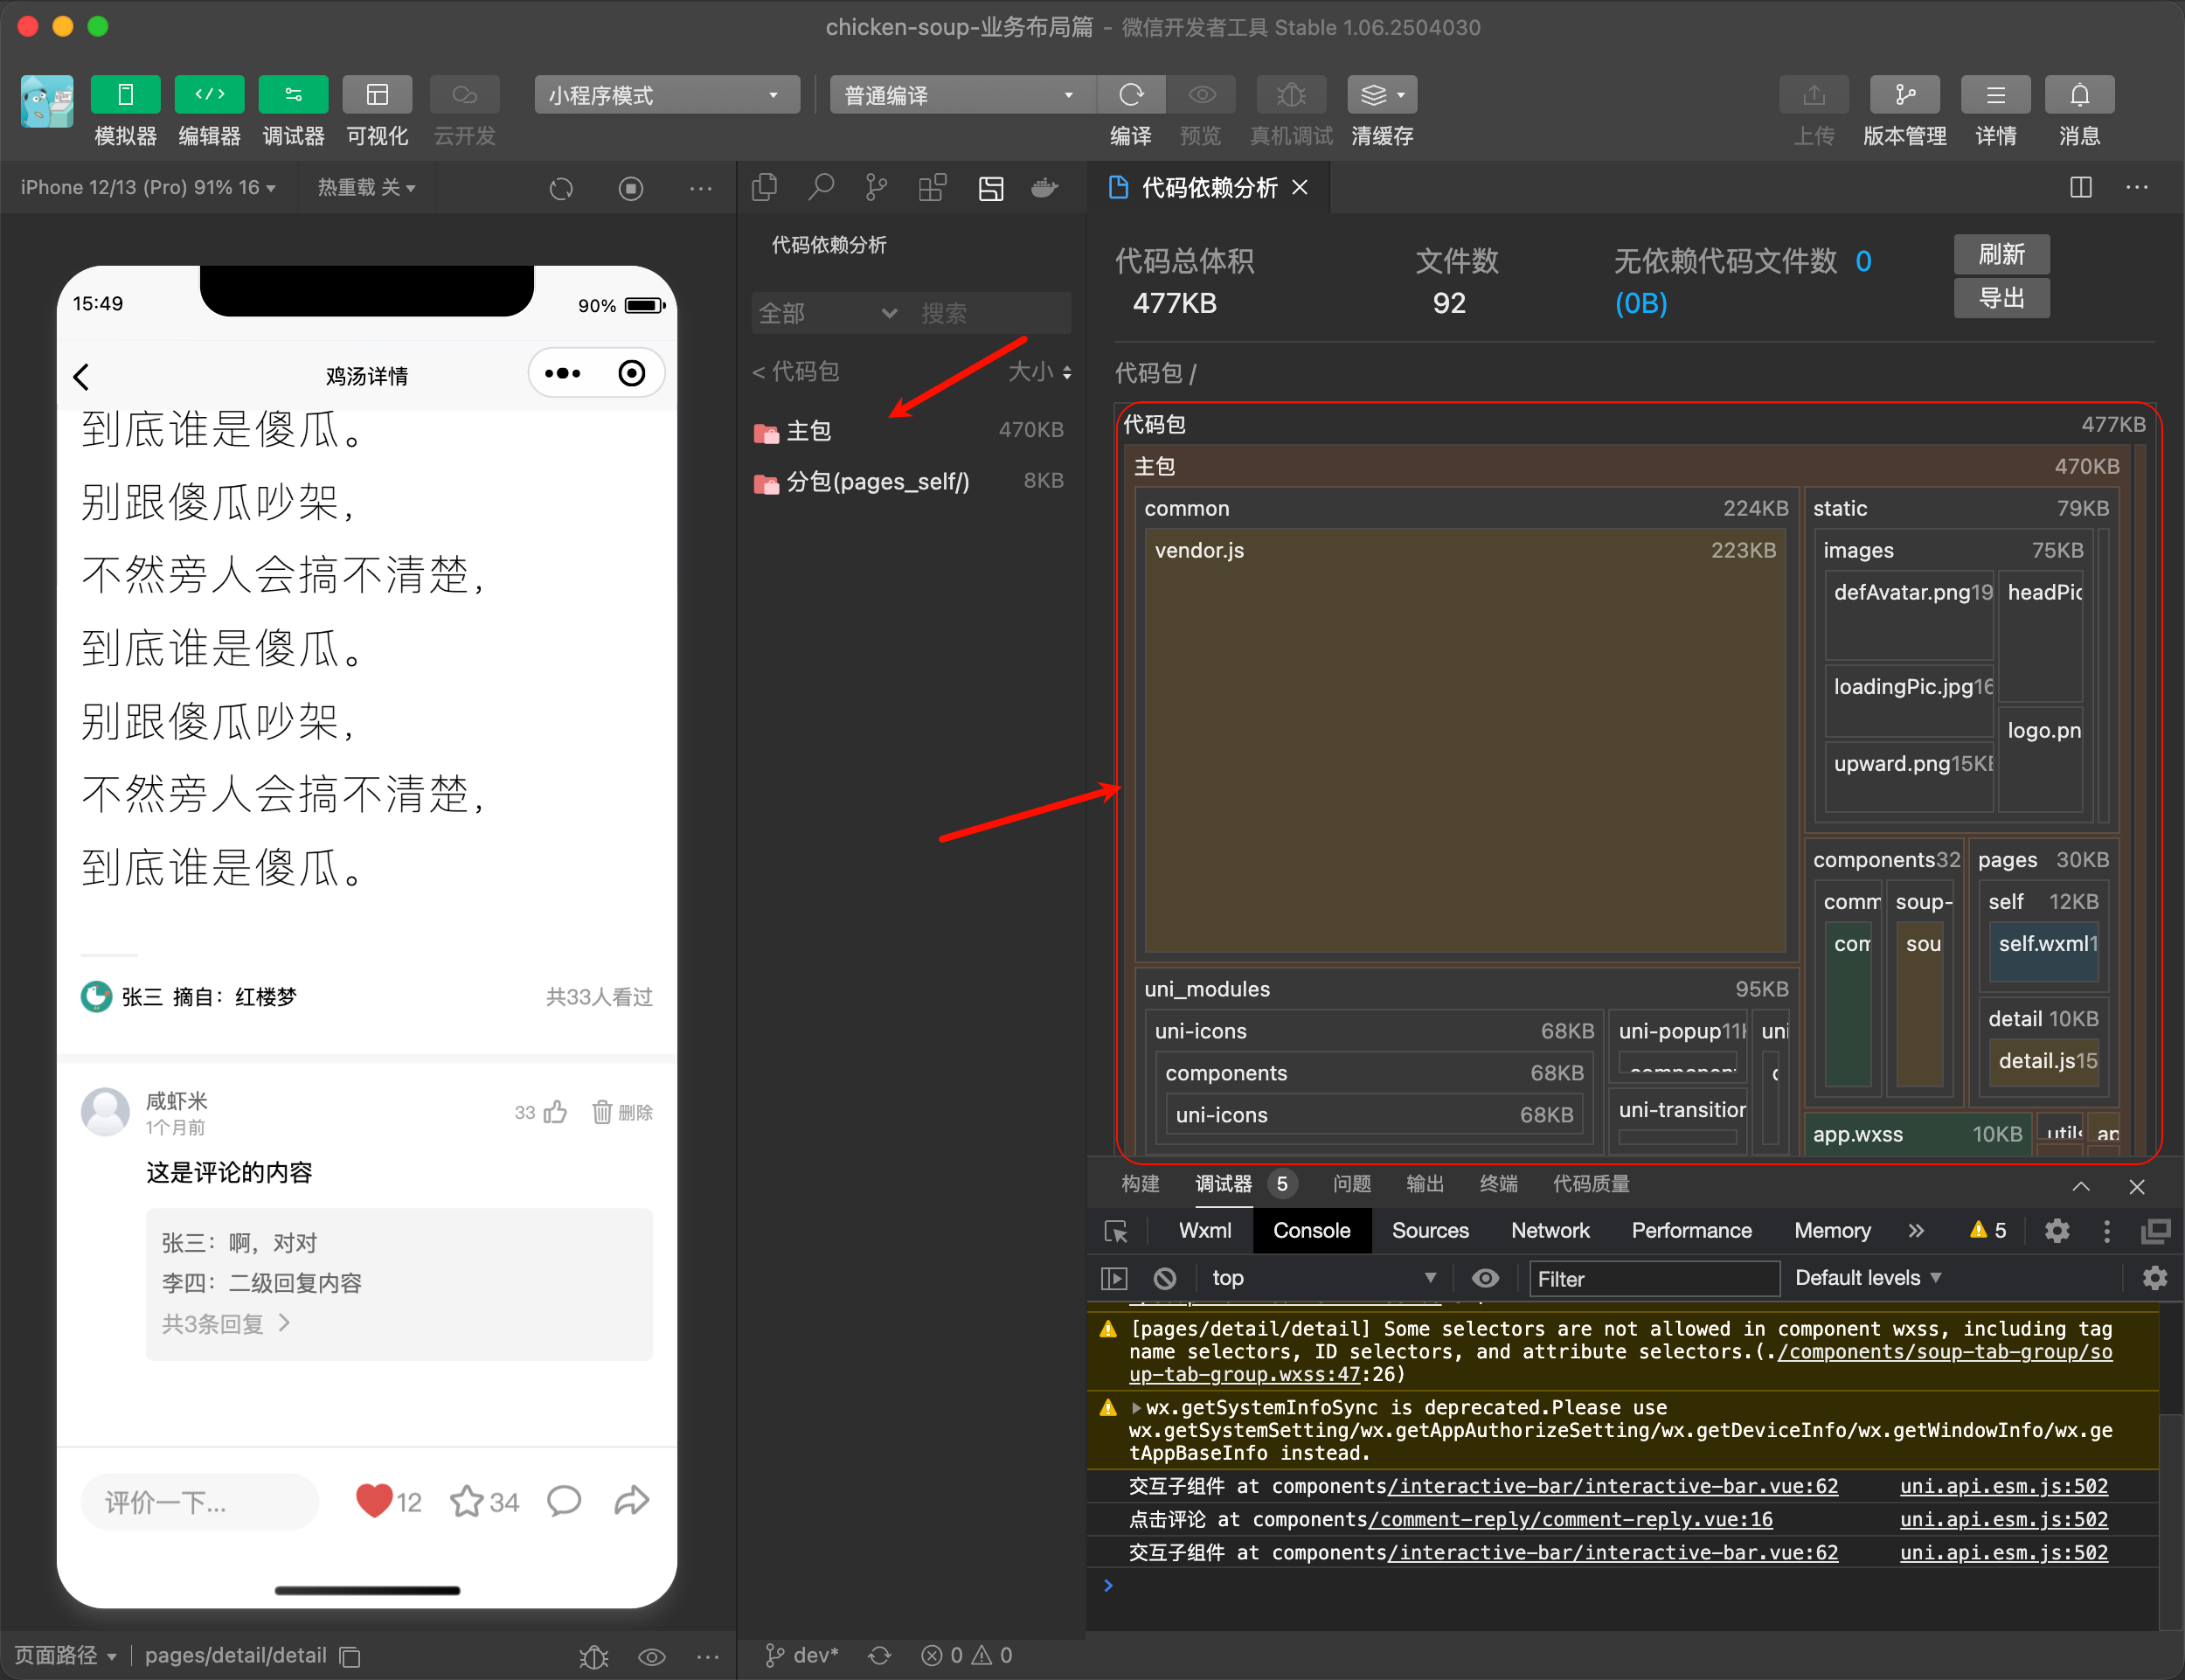
原则:
一般一级页面放在主包里,二级页面放在分包里
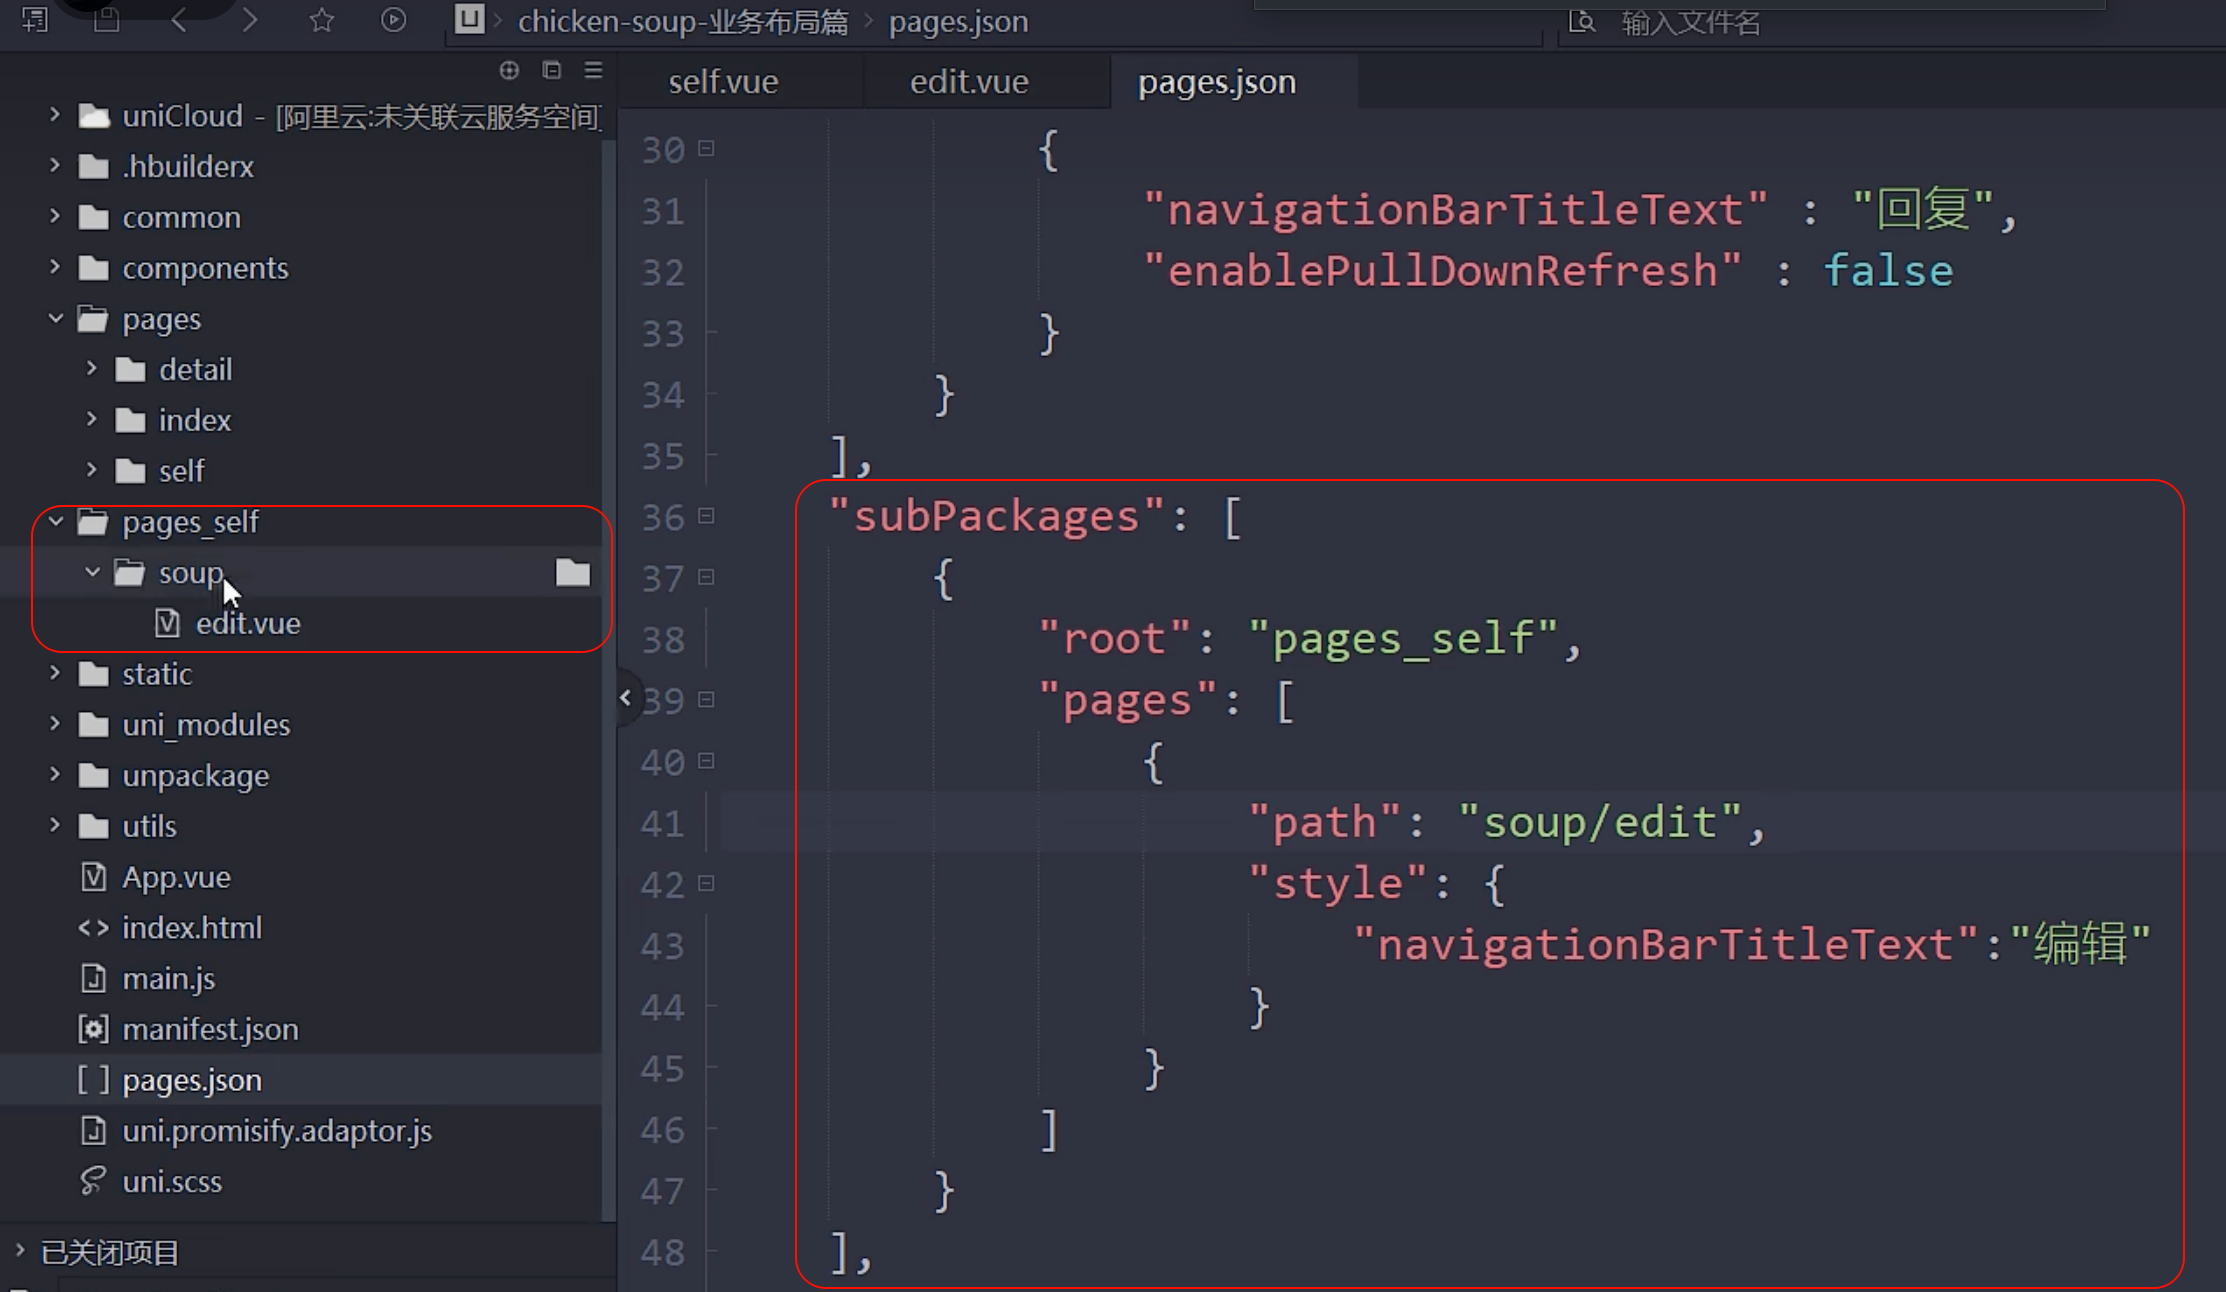
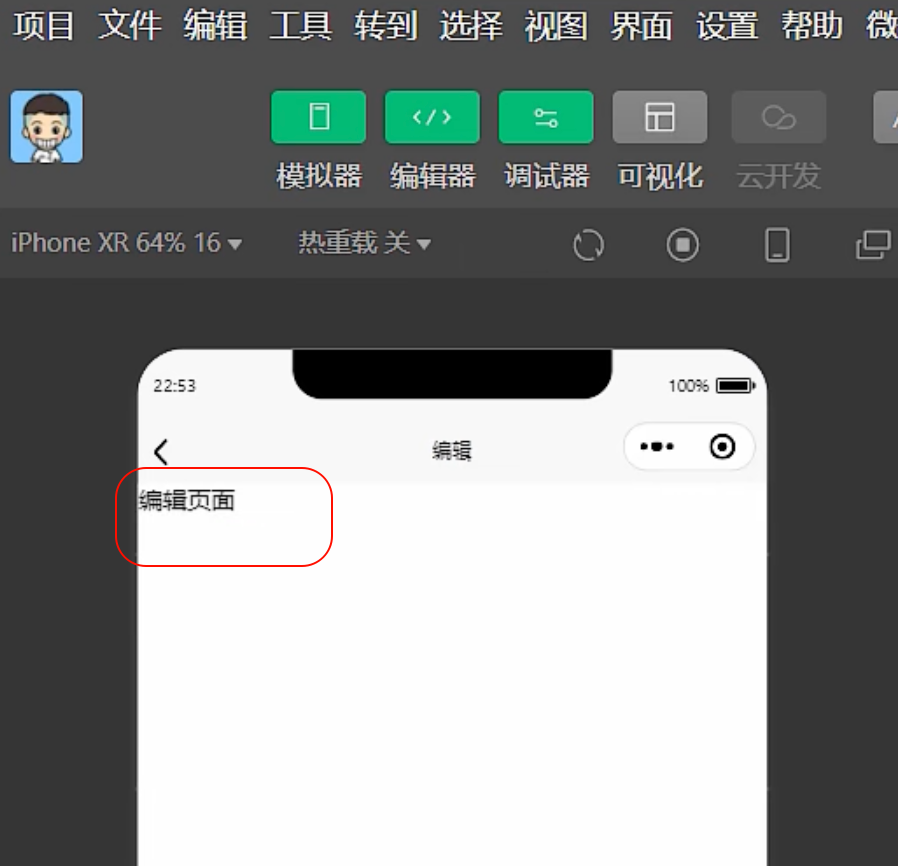
添加分包编辑页面
-
添加页面
pages_self/soup/edit -
根目录
pages.json文件加入以下路由
    "pages":[…………],
	"subPackages": [
		{
			"root": "pages_self",
			"pages": [
				{
					"path": "soup/edit",
					"style": {
						"navigationBarTitleText":"编辑"
					}
				}
			]
		}
	],
- html页面里添加路转连接

效果:
[Haima的博客]
http://www.cnblogs.com/haima/

 浙公网安备 33010602011771号