
Kubernetes容器运行时弃用Docker转型Containerd
文章转载自:https://i4t.com/5435.html
Kubernetes社区在2020年7月份发布的版本中已经开始了dockershim的移除计划,在1.20版本中将内置的dockershim进行分离,这个版本依旧还可以使用dockershim,但是在1.24中被删除。从1.24开始,大家需要使用其他受到支持的运行时选项(例如containerd或CRI-O);如果选择Docker Engine作为运行时,则需要使用cri-dockerd
容器进行时调用过程
起因
当Docker要创建一个容器时,需要进行下面的步骤:

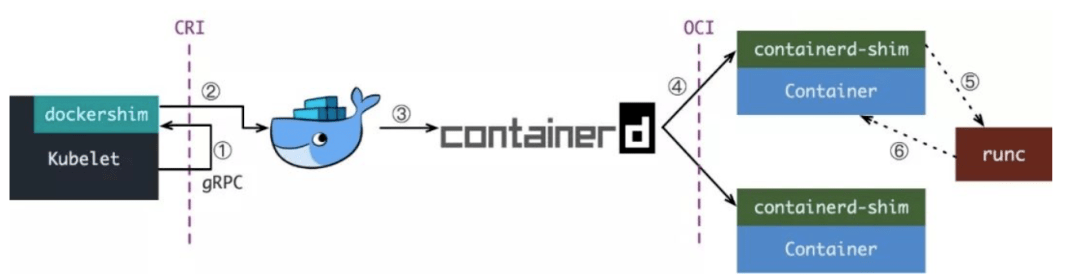
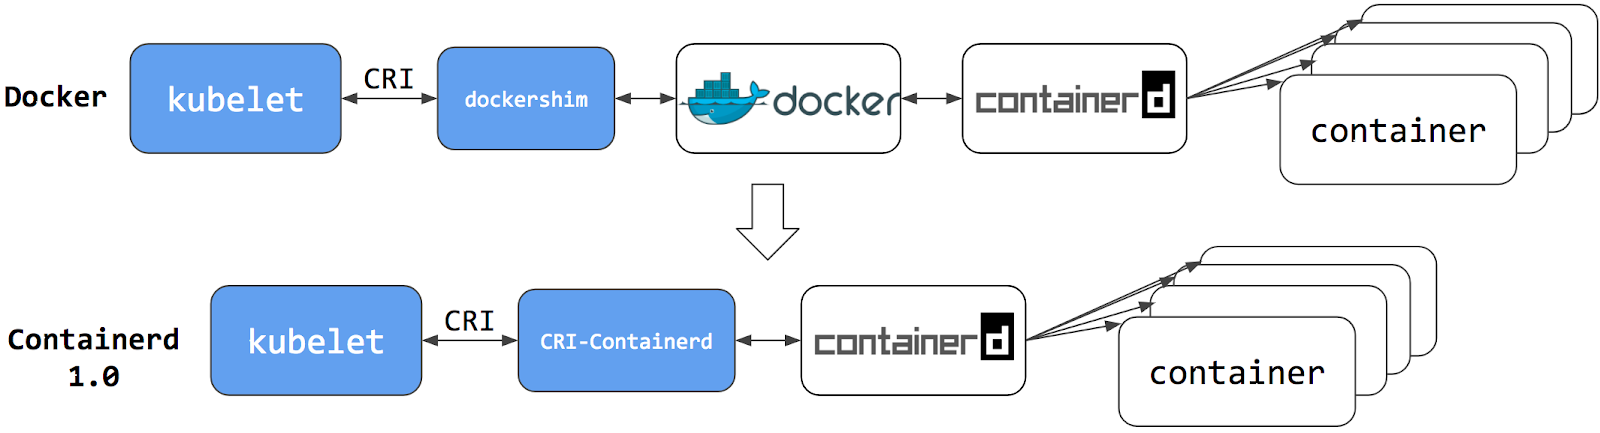
- Kubelet 通过CRI接口(gRPC)调用dockershim,请求创建一个容器。(CRI即容器运行时接口)
- dockershim 收到请求后,转换成Docker Daemon能听懂的请求,发到Docker Daemon上请求创建容器。
- Docker Daemon 早在1.12版本中就已经针对容器的操作转移到另外一个进程--containerd,因此Docker Daemon不会帮我们创建容器,而是要求containerd创建一个容器
- Containerd收到请求后,并不会直接去操作容器,而是创建一个叫做containerd-shim的进程,让containerd-shim去操作容器。这是因为容器进程需要一个父进程来做收集状态,而加入这个父进程就是containerd,那每次containerd挂掉或者升级,整个宿主机上的容器都会退出。而引用containerd-shim就避免了这个问题 (containerd和shim并不是父子进程的关系)
- OCI (Open Container Initiative,开放容器标准)。OCI执行namespace和cgroups,挂载root filesystem等操作,OCI参考RunC,containerd-shim在这一步调用RunC命令行来启动容器。实际上RunC就是一个二进制命令
- runC启动完成后本身会直接退出,containerd-shim则会为容器进程的父进程,负责收集容器进程的状态,上报给containerd,并在容器中pid为1的进程退出后接管容器中的子进程进行清理,确保不会出现僵尸进程
OCI (Open Container Initiative,开放容器标准) runC实际上就是参考OCI实现,OCI实际上就是一个标准文档,主要规定了容器镜像的结构、以及容器需要接收那些操作指令,比如create、start、stop、delete等
实际上我们是可以直接通过调用RunC来实现容器的创建,实际上RunC就是调用的我们内核来进行操作。但是我们直接调用Runc不是很方便,所以就有了OCI。不需要了解底层原理,也可以通过调用OCI来进行容器的创建
containerd-shim则会为容器进程的父进程,负责收集容器进程的状态,上报给containerd,并在容器中pid为1的进程退出后接管容器中的子进程进行清理,确保不会出现僵尸进程
    [root@k8s-01 ~]# ps -ef|grep docker
    root      1100     1  1 Apr19 ?        05:43:15 /usr/bin/dockerd -H fd:// --containerd=/run/containerd/containerd.sock
    root      1425  1043  0 Apr19 ?        00:00:50 containerd-shim -namespace moby -workdir /var/lib/containerd/io.containerd.runtime.v1.linux/moby/306ca6264fdd2bf673b65ba64ef91b9ec4357cb7a21545085199826ad991a3f1 -address /run/containerd/containerd.sock -containerd-binary /usr/bin/containerd -runtime-root /var/run/docker/runtime-runc -systemd-cgroup
    root      2120  1043  0 Apr19 ?        00:00:46 containerd-shim -namespace moby -workdir /var/lib/containerd/io.containerd.runtime.v1.linux/moby/b608189a56350e04d20057f4b4158fe1ef0e6521ecae4030fdc5b03d7cee55c2 -address /run/containerd/containerd.sock -containerd-binary /usr/bin/containerd -runtime-root /var/run/docker/runtime-runc -systemd-cgroup
    root      2121  1043  0 Apr19 ?        00:00:51 containerd-shim -namespace moby -workdir /var/lib/containerd/io.containerd.runtime.v1.linux/moby/847c04dc6aa2ba3e2df261629dee8ff934b27a548392d928c8737f29688ddd1f -address /run/containerd/containerd.sock -containerd-binary /usr/bin/containerd -runtime-root /var/run/docker/runtime-runc -systemd-cgroup
    ...
通过ps -ef过滤docker,我们可以看到docker中实际上就是通过containerd-shim来创建的
containerd-shim -namespace moby -workdir /var/lib/containerd/io.containerd.runtime.v1.linux/moby/306ca6264fdd2bf673b65ba64ef91b9ec4357cb7a21545085199826ad991a3f1 -address /run/containerd/containerd.sock -containerd-binary
containerd-shim垫片的主要作用是用于containerd与Runc的匹配
CRI-shim垫片主要用于kubelet与containerd之间的匹配,并且两者之间没有任何关联
CRI 详解
为什么在Kubernetes 1.20之后不推荐使用docker了?可以继续往下看
在Kubernetes早起的时候,Kubernetes为了支持Docker,通过硬编码的方式直接调用Docker API。后面随着Docker的不断发展以及Google的主导,出现了更多容器运行时可以使用,Kubernetes为了支持更多精简的容器运行时,google就和redhat主导推出了OCI标准,用于将Kubernetes平台和特定的容器运行时解耦
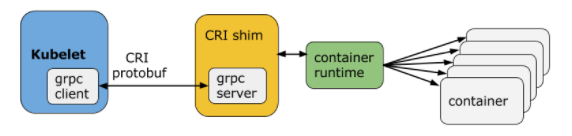
CRI (Container Runtime Interface容器运行时接口)本质就是Kubernetes定义的一组与容器运行时进行交互的接口
CRI实际上就是一组单纯的gRPC接口,核心有如下:
- RuntimeService 对容器操作的接口,包括创建,启停容器等
- ImageService 对镜像操作的接口,包括镜像的增删改查等
可以通过kubelet中--container-runtime-endpoint和--image-service-endpoint来手动配置
官方文档:
https://kubernetes.io/zh/docs/concepts/architecture/cri/
https://kubernetes.io/blog/2016/12/container-runtime-interface-cri-in-kubernetes/
CRI大概通过了下面的几个项目构成了Kubernetes的Runtime生态
- OCI Compatible: runC
- CRI Compatible: Docker (借助dockershim),containerd (借助CRI-containerd)
由于早期Kubernetes在市场没有主导地位,有一些容器运行时可能不会自身实现CRI接口,于是就有了shim,一个shim的职责就是作为适配器,将各种容器运行时的本身的接口适配到Kubernetes的CRI接口上
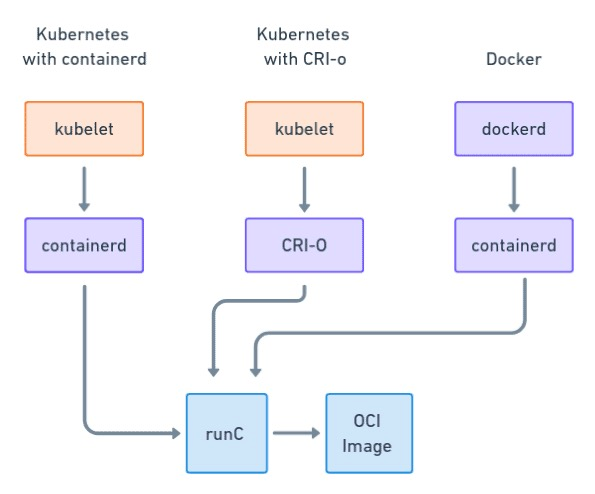
cri-runtime和oci-runtime 容器运行时实际上调用步骤如下
Orchestration API -> Container API(cri-runtime) -> Kernel API(oci-runtime)
Kubelet通过gRPC 框架与容器运行时或shim进行通信,其中 kubelet 作为客户端,CRI shim(也可能是容器运行时本身)
Containerd 发展史
在Containerd 1.0中,对CRI的适配通过了一个单独的进程CRI-containerd来完成
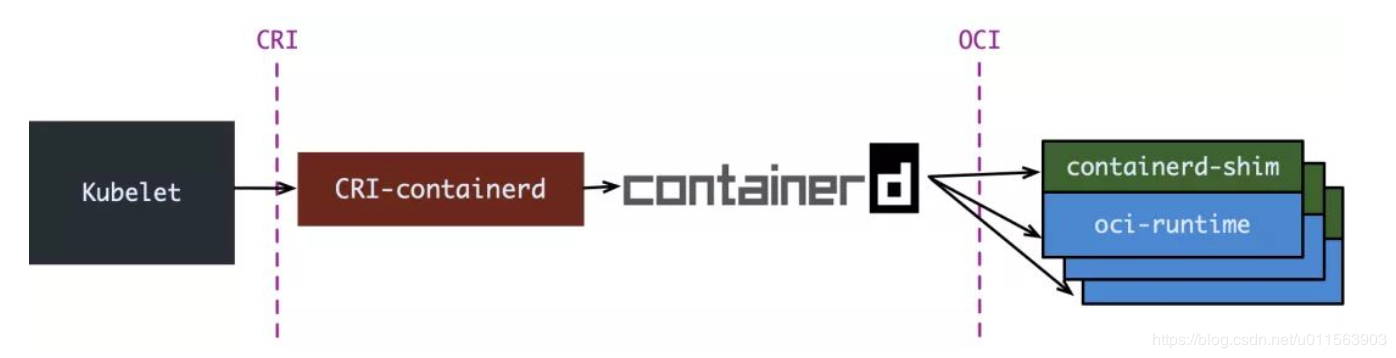
containerd 1.1中,砍掉了CRI-containerd这个进程,直接把适配逻辑作为插件放进了containerd主进程中

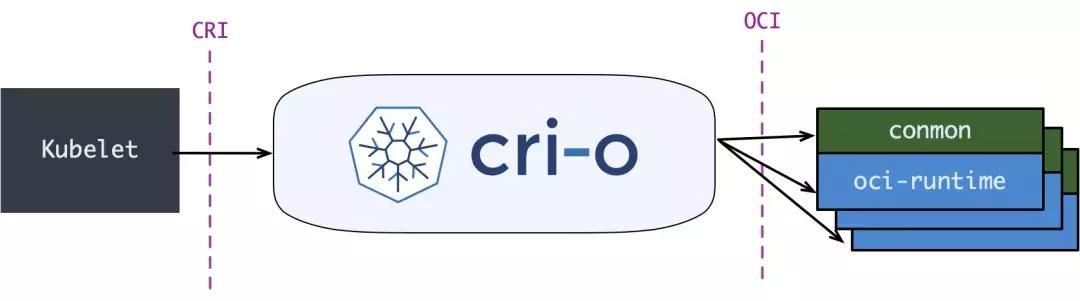
containerd 1.1中做的事情,实际上Kubernetes社区做了一个更漂亮的cri-o,兼容CRI和OCI
Containerd与Docker区别?
实际上containerd只是一个精简版docker,为了更好的支持Kubernetes而已
哪些容器运行时引擎支持CRI?
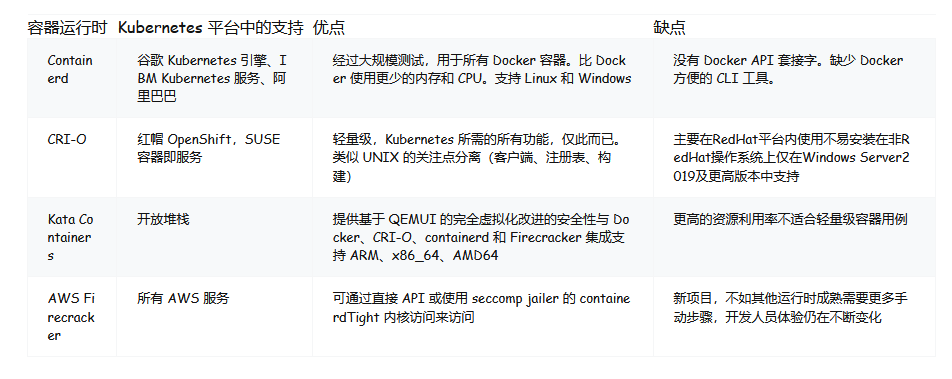
通过下图,我们可以看到这3个的区别,目前Kubernetes官网已经支持containerd、CRI-o容器运行时支持
Containerd
早期Containerd是在Docker Engine中,目前将containerd从Docker中拆分出来,作为一个独立的开源项目,目标是提供一个更加开放、稳定的容器运行基础设施。分离出来的containerd将具有更多的功能,覆盖整个容器运行时的所有需求,提供更强大的支持
Containerd是一个工业级标准的容器运行时,它强调简单性、可移植性
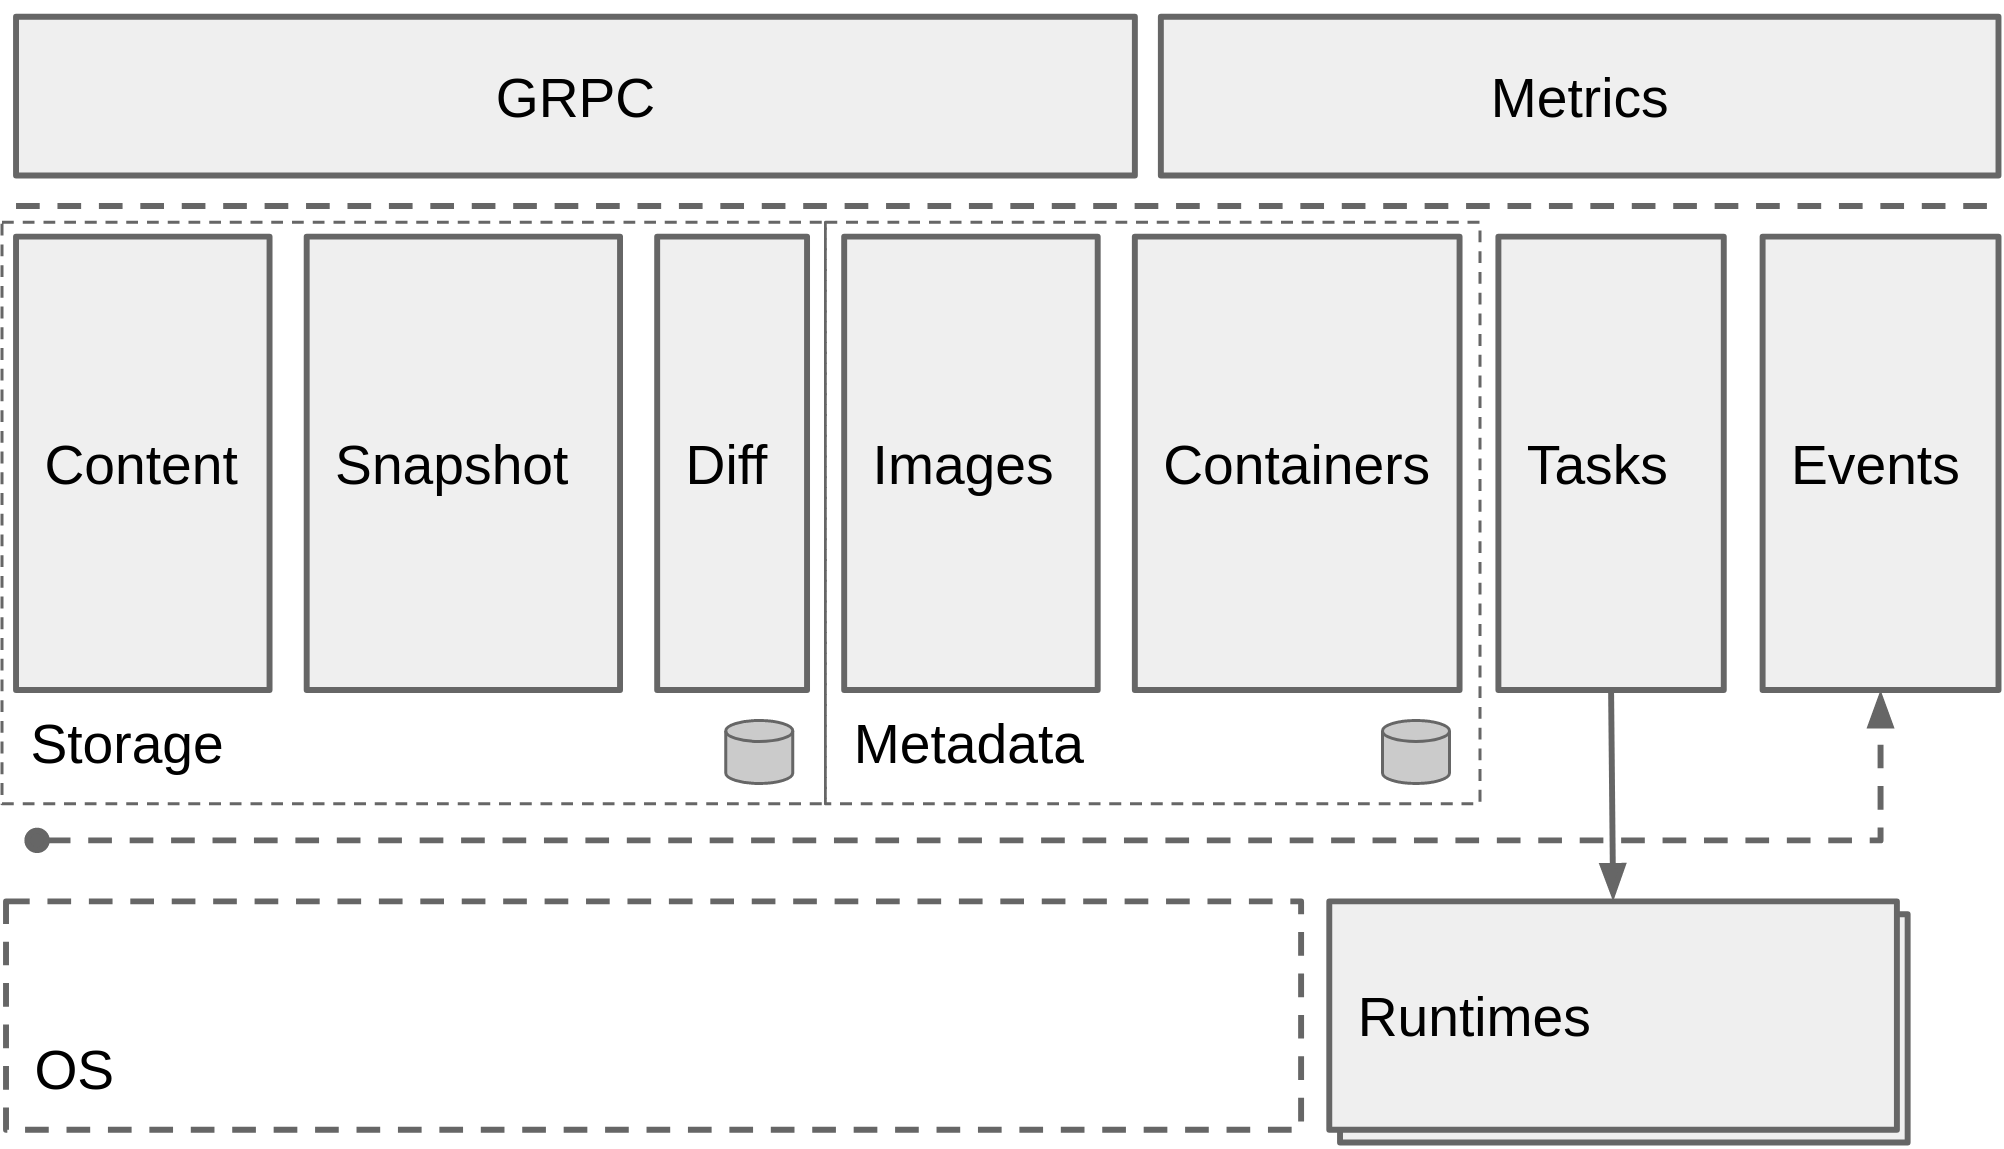
Containerd 架构
服务端通过 unix domain socket 暴露低层的 gRPC API 接口出去,客户端通过这些 API 管理节点上的容器,每个containerd只负责一台机器,Pull镜像,对容器的操作(启动、停止等),网络,存储都是由containerd完成。具体运行容器由runc负责,实际上只要是符合OCI规范的容器都可以支持

为了解耦,containerd 将系统划分成了不同的组件,每个组件都由一个或多个模块协作完成(Core 部分),每一种类型的模块都以插件的形式集成到 Containerd 中,而且插件之间是相互依赖的,例如,上图中的每一个长虚线的方框都表示一种类型的插件,包括 Service Plugin、Metadata Plugin、GC Plugin、Runtime Plugin 等,其中 Service Plugin 又会依赖 Metadata Plugin、GC Plugin 和 Runtime Plugin。每一个小方框都表示一个细分的插件,例如 Metadata Plugin 依赖 Containers Plugin、Content Plugin 等
Content Plugin: 提供对镜像中可寻址内容的访问,所有不可变的内容都被存储在这里。
Snapshot Plugin: 用来管理容器镜像的文件系统快照,镜像中的每一层都会被解压成文件系统快照,类似于 Docker 中的 graphdriver
对于K8s来说,实际需要Containerd即可,中间的垫片(shim)是完全可以省略,减少调用链
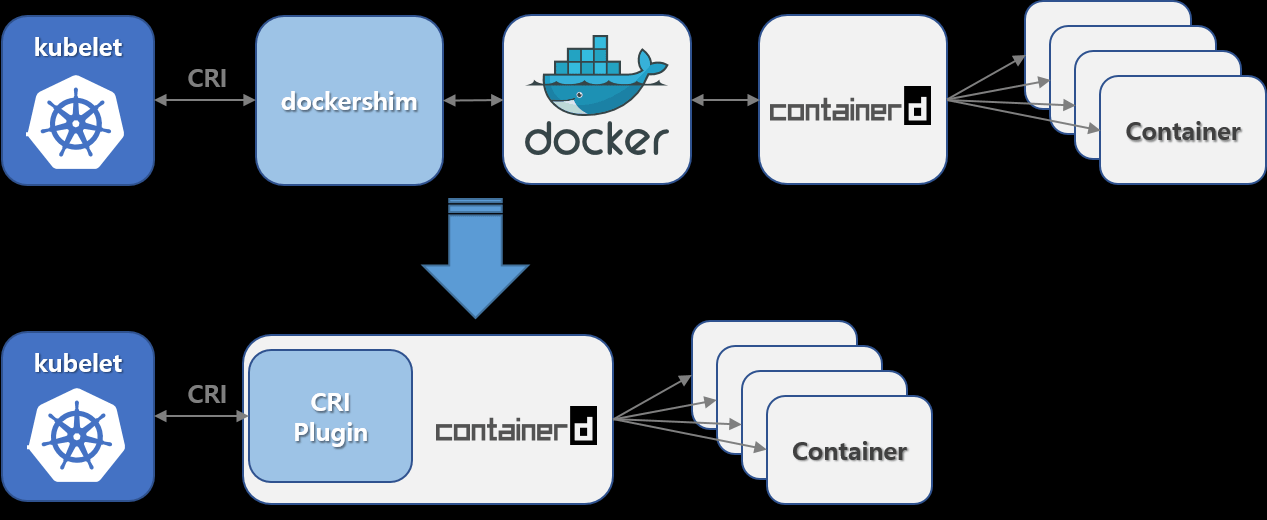
Containerd已经将shim集成到kubelet中,减少了shim,但是如果我们使用containerd,那么将无法使用docker ps或者docker exec命令来获取容器。可以使用docker pull和docker build命令来构建镜像
参考文档:
https://www.cnblogs.com/charlieroro/articles/10998203.html
https://www.qikqiak.com/post/containerd-usage/#:~:text=containerd 是一个工业级,及容器数据的存储)
Containerd 安装
Kubernetes社区在2020年7月份发布的版本中已经开始了dockershim的移除计划,在1.20版本中将内置的dockershim进行分离,这个版本依旧还可以使用dockershim,但是在1.24中被删除。从1.24开始,大家需要使用其他受到支持的运行时选项(例如containerd或CRI-O);如果您选择Docker Engine作为运行时,则需要使用cri-dockerd
本次环境信息
[root@ops ~]# cat /etc/redhat-release
CentOS Linux release 7.4.1708 (Core)
[root@ops ~]# uname -r
3.10.0-693.el7.x86_64
下载containerd
github地址:https://containerd.io/downloads/
Containerd安装我们使用1.6.1版本号
containerd-1.6.1-linux-amd64.tar.gz 只包含containerd
cri-containerd-cni-1.6.4-linux-amd64.tar.gz 包含containerd以及cri runc等相关工具包,建议下载本包
#下载tar.gz包
#containerd工具包,包含cri runc等
https://github.com/containerd/containerd/releases/download/v1.6.4/cri-containerd-cni-1.6.4-linux-amd64.tar.gz
#containerd包
wget https://github.com/containerd/containerd/releases/download/v1.6.1/containerd-1.6.1-linux-amd64.tar.gz
#备用下载地址
https://d.frps.cn/file/kubernetes/containerd/cri-containerd-cni-1.6.4-linux-amd64.tar.gz
https://d.frps.cn/file/kubernetes/containerd/containerd-1.6.1-linux-amd64.tar.gz
工具包文件如下
#cri-containerd-cni会将我们整个containerd相关的依赖都进行下载下来
[root@ops containerd]# tar zxvf cri-containerd-cni-1.6.4-linux-amd64.tar.gz -C /   #我们直接让它给我们对应的目录给替换掉
etc/
etc/systemd/
etc/systemd/system/
etc/systemd/system/containerd.service
etc/crictl.yaml
etc/cni/
etc/cni/net.d/
etc/cni/net.d/10-containerd-net.conflist
usr/
usr/local/
usr/local/sbin/
usr/local/sbin/runc
usr/local/bin/
usr/local/bin/crictl
usr/local/bin/ctd-decoder
usr/local/bin/ctr
usr/local/bin/containerd-shim
usr/local/bin/containerd
usr/local/bin/containerd-shim-runc-v1
usr/local/bin/critest
usr/local/bin/containerd-shim-runc-v2
usr/local/bin/containerd-stress
opt/
opt/containerd/
opt/containerd/cluster/
opt/containerd/cluster/version
opt/containerd/cluster/gce/
opt/containerd/cluster/gce/cni.template
opt/containerd/cluster/gce/env
opt/containerd/cluster/gce/configure.sh
opt/containerd/cluster/gce/cloud-init/
opt/containerd/cluster/gce/cloud-init/node.yaml
opt/containerd/cluster/gce/cloud-init/master.yaml
opt/cni/
opt/cni/bin/
opt/cni/bin/firewall
opt/cni/bin/portmap
opt/cni/bin/host-local
opt/cni/bin/ipvlan
opt/cni/bin/host-device
opt/cni/bin/sbr
opt/cni/bin/vrf
opt/cni/bin/static
opt/cni/bin/tuning
opt/cni/bin/bridge
opt/cni/bin/macvlan
opt/cni/bin/bandwidth
opt/cni/bin/vlan
opt/cni/bin/dhcp
opt/cni/bin/loopback
opt/cni/bin/ptp
上面的文件都是二进制文件,直接移动到对应的目录并配置好环境变量就可以进行使用了。
升级libseccomp,libseccomp需要高于2.4版本
    #卸载原来的
    [i4t@web01 ~]# rpm -qa | grep libseccomp
    libseccomp-devel-2.3.1-4.el7.x86_64
    libseccomp-2.3.1-4.el7.x86_64
    [i4t@web01 ~]# rpm -e libseccomp-devel-2.3.1-4.el7.x86_64 --nodeps
    [i4t@web01 ~]# rpm -e libseccomp-2.3.1-4.el7.x86_64 --nodeps
    #下载高于2.4以上的包
    [i4t@web01 ~]# wget http://rpmfind.net/linux/centos/8-stream/BaseOS/x86_64/os/Packages/libseccomp-2.5.1-1.el8.x86_64.rpm
    #安装
    [i4t@web01 ~]# rpm -ivh libseccomp-2.5.1-1.el8.x86_64.rpm
    warning: libseccomp-2.5.1-1.el8.x86_64.rpm: Header V3 RSA/SHA256 Signature, key ID 8483c65d: NOKEY
    Preparing...                          ################################# [100%]
    Updating / installing...
       1:libseccomp-2.5.1-1.el8           ################################# [100%]
    #查看当前版本
    [root@web01 ~]# rpm -qa | grep libseccomp
    libseccomp-2.5.1-1.el8.x86_64
如果我们机器上通过yum安装docker了,可以用下面的命令进行卸载
    sudo yum remove docker
                      docker-client
                      docker-client-latest
                      docker-common
                      docker-latest
                      docker-latest-logrotate
                      docker-logrotate
                      docker-engine
接下来我们为Containerd设置一个配置文件
#创建配置文件目录
[root@web01 ~]# mkdir /etc/containerd
#生成默认配置文件
[root@web01 ~]# containerd config default > /etc/containerd/config.toml
#--config,-c可以在启动守护程序时更改此路径
#配置文件的默认路径位于/etc/containerd/config.toml
默认cri-containerd-cni包中会有containerd启动脚本,我们已经解压到对应的目录,可以直接调用启动
    [root@web01 ~]# systemctl enable containerd --now
    Created symlink from /etc/systemd/system/multi-user.target.wants/containerd.service to /etc/systemd/system/containerd.service.
    [root@web01 ~]# systemctl status containerd   #查看containerd启动状态
    ● containerd.service - containerd container runtime
       Loaded: loaded (/etc/systemd/system/containerd.service; enabled; vendor preset: disabled)
       Active: active (running) since Thu 2022-05-12 22:59:19 EDT; 3s ago
         Docs: https://containerd.io
      Process: 30048 ExecStartPre=/sbin/modprobe overlay (code=exited, status=0/SUCCESS)
     Main PID: 30050 (containerd)
       Memory: 24.5M
       CGroup: /system.slice/containerd.service
               └─30050 /usr/local/bin/containerd
    May 12 22:59:19 web01 containerd[30050]: time="2022-05-12T22:59:19.153514446-04:00" level=info msg="Get image filesystem path "/var/lib/containerd/io.containerd.snapshotter.v1.overlayfs""
    May 12 22:59:19 web01 containerd[30050]: time="2022-05-12T22:59:19.154085898-04:00" level=info msg="Start subscribing containerd event"
    May 12 22:59:19 web01 containerd[30050]: time="2022-05-12T22:59:19.154137039-04:00" level=info msg="Start recovering state"
    May 12 22:59:19 web01 containerd[30050]: time="2022-05-12T22:59:19.154230615-04:00" level=info msg="Start event monitor"
    May 12 22:59:19 web01 containerd[30050]: time="2022-05-12T22:59:19.154276701-04:00" level=info msg="Start snapshots syncer"
    May 12 22:59:19 web01 containerd[30050]: time="2022-05-12T22:59:19.154299287-04:00" level=info msg="Start cni network conf syncer for default"
    May 12 22:59:19 web01 containerd[30050]: time="2022-05-12T22:59:19.154316094-04:00" level=info msg="Start streaming server"
    May 12 22:59:19 web01 containerd[30050]: time="2022-05-12T22:59:19.154675632-04:00" level=info msg=serving... address=/run/containerd/containerd.sock.ttrpc
    May 12 22:59:19 web01 containerd[30050]: time="2022-05-12T22:59:19.154755704-04:00" level=info msg=serving... address=/run/containerd/containerd.sock
    May 12 22:59:19 web01 containerd[30050]: time="2022-05-12T22:59:19.155220379-04:00" level=info msg="containerd successfully booted in 0.027654s"
containerd配置
每个顶级配置块的命名都是plugin."io.containerd.xxx.vxx.xxx"这种形式,其实每个顶级配置块都代表一个插件,其中io.containerd.xxx.vxx表示插件类型,vxx后面的xxx表示 插件ID。并且可以通过命令ctr查看到
    ...
    [plugins]
      [plugins."io.containerd.gc.v1.scheduler"]
        deletion_threshold = 0
        mutation_threshold = 100
        pause_threshold = 0.02
        schedule_delay = "0s"
        startup_delay = "100ms"
      [plugins."io.containerd.grpc.v1.cri"]
        device_ownership_from_security_context = false
        disable_apparmor = false
        disable_cgroup = false
        disable_hugetlb_controller = true
        disable_proc_mount = false
    ...
    [root@web01 ~]# ctr plugin ls
    TYPE                                  ID                       PLATFORMS      STATUS
    io.containerd.content.v1              content                  -              ok
    io.containerd.snapshotter.v1          aufs                     linux/amd64    skip
    io.containerd.snapshotter.v1          btrfs                    linux/amd64    skip
    io.containerd.snapshotter.v1          devmapper                linux/amd64    error
    ...
containerd配置文件详解
https://www.cnblogs.com/FengGeBlog/p/15057399.html
(可以设置containerd中的一些相关参数)
Containerd属于cs架构需要安装ctr,通过crt进行管理控制;ctr实际上就是containerd的客户端工具
ctr -->Containerd-->RunC
ctr在我们解压包中已经附带了,直接可以使用
    [root@web01 ~]# ctr version
    Client:     #ctr版本号
      Version:  v1.6.4
      Revision: 212e8b6fa2f44b9c21b2798135fc6fb7c53efc16
      Go version: go1.17.9
    Server:
      Version:  v1.6.4     #containerd版本号
      Revision: 212e8b6fa2f44b9c21b2798135fc6fb7c53efc16
      UUID: b376d7b6-c97e-4b39-8144-9624ade3ba84
    #可以使用下面命令查看containerd版本号
    [root@web01 ~]# containerd --version
    containerd github.com/containerd/containerd v1.6.4 212e8b6fa2f44b9c21b2798135fc6fb7c53efc16
拉取镜像
在containerd中拉取docker的相关镜像也需要补全
    [root@web01 ~]# ctr i pull docker.io/library/nginx:alpine --all-platforms
    docker.io/library/nginx:alpine:                                                   resolved       |++++++++++++++++++++++++++++++++++++++|
    index-sha256:5a0df7fb7c8c03e4158ae9974bfbd6a15da2bdfdeded4fb694367ec812325d31:    exists         |++++++++++++++++++++++++++++++++++++++|
    manifest-sha256:1763babed2bf50e37dd065d287227c9066c8be5ec3c0caafb9a9eaa5bf6d934a: done           |++++++++++++++++++++++++++++++++++++++|
    manifest-sha256:efc09388b15fb423c402f0b8b28ca70c7fd20fe31f8d7531ae1896bbb4944999: exists         |++++++++++++++++++++++++++++++++++++++|
    manifest-sha256:1968f73dbbc39b1a32a71755552f195085f1d639e6e71d1639a47449ee5c0074: done           |++++++++++++++++++++++++++++++++++++++|
    manifest-sha256:152fd38e0474de5973743948275ca96c96634db454513357913cc9418de319bf: waiting        |--------------------------------------|
    manifest-sha256:1746c349c5113b180cd0c2d5c0420c89563a65a5555655b5253cf0f2575a027c: done           |++++++++++++++++++++++++++++++++++++++|
    manifest-sha256:dbf24ebd77347ab1ab85469bc4248100e49916ca7612c13a48ace9d097ddea86: done           |++++++++++++++++++++++++++++++++++++++|
    manifest-sha256:134e4709956d97c3c6723f06294d2146e9e31586563872c82f9080b09dd3eb97: done           |++++++++++++++++++++++++++++++++++++++|
    layer-sha256:4071be97c256d6f5ab0e05ebdebcfec3d0779a5e199ad0d71a5fccba4b3e2ce4:    exists         |++++++++++++++++++++++++++++++++++++++|
    layer-sha256:5867cba5fcbd3ae827c5801e76d20e7dc91cbb626ac5c871ec6c4d04eb818b16:    exists         |++++++++++++++++++++++++++++++++++++++|
    layer-sha256:4b639e65cb3ba47e77db93f93c6625a62ba1b9eec99160b254db380115ae009d:    exists         |++++++++++++++++++++++++++++++++++++++|
    config-sha256:51696c87e77e4ff7a53af9be837f35d4eacdb47b4ca83ba5fd5e4b5101d98502:   exists         |++++++++++++++++++++++++++++++++++++++|
    layer-sha256:061ed9e2b9762825b9869a899a696ce8b56e7e0ec1e1892b980969bf7bcda56a:    exists         |++++++++++++++++++++++++++++++++++++++|
    layer-sha256:df9b9388f04ad6279a7410b85cedfdcb2208c0a003da7ab5613af71079148139:    exists         |++++++++++++++++++++++++++++++++++++++|
    layer-sha256:bc19f3e8eeb1bb75268787f8689edec9a42deda5cdecdf2f95b3c6df8eb57a48:    exists         |++++++++++++++++++++++++++++++++++++++|
    layer-sha256:7c96ccaee678fe6c901f93fa9aee2bdfd7aed78ad970e61c6fe17ec5242d6f63:    downloading    |--------------------------------------|    0.0 B/1.4 KiB
    config-sha256:84f7fa8153d66e1a97aa567161d9fd0810d656036800b06f2225e2476ff82a67:   downloading    |--------------------------------------|    0.0 B/8.7 KiB
    docker.io/library/nginx:alpine:                                                   resolved       |++++++++++++++++++++++++++++++++++++++|
    index-sha256:5a0df7fb7c8c03e4158ae9974bfbd6a15da2bdfdeded4fb694367ec812325d31:    exists         |++++++++++++++++++++++++++++++++++++++|
    manifest-sha256:1763babed2bf50e37dd065d287227c9066c8be5ec3c0caafb9a9eaa5bf6d934a: done           |++++++++++++++++++++++++++++++++++++++|
    manifest-sha256:efc09388b15fb423c402f0b8b28ca70c7fd20fe31f8d7531ae1896bbb4944999: exists         |++++++++++++++++++++++++++++++++++++++|
    manifest-sha256:1968f73dbbc39b1a32a71755552f195085f1d639e6e71d1639a47449ee5c0074: done           |++++++++++++++++++++++++++++++++++++++|
    manifest-sha256:152fd38e0474de5973743948275ca96c96634db454513357913cc9418de319bf: waiting        |--------------------------------------|
    manifest-sha256:1746c349c5113b180cd0c2d5c0420c89563a65a5555655b5253cf0f2575a027c: done           |++++++++++++++++++++++++++++++++++++++|
    manifest-sha256:dbf24ebd77347ab1ab85469bc4248100e49916ca7612c13a48ace9d097ddea86: done           |++++++++++++++++++++++++++++++++++++++|
    manifest-sha256:134e4709956d97c3c6723f06294d2146e9e31586563872c82f9080b09dd3eb97: done           |++++++++++++++++++++++++++++++++++++++|
    layer-sha256:4071be97c256d6f5ab0e05ebdebcfec3d0779a5e199ad0d71a5fccba4b   #nginx镜像需要写全
    docker.io/library/nginx:alpine:                                                   resolved       |++++++++++++++++++++++++++++++++++++++|
    index-sha256:5a0df7fb7c8c03e4158ae9974bfbd6a15da2bdfdeded4fb694367ec812325d31:    done           |++++++++++++++++++++++++++++++++++++++|
    manifest-sha256:efc09388b15fb423c402f0b8b28ca70c7fd20fe31f8d7531ae1896bbb4944999: done           |++++++++++++++++++++++++++++++++++++++|
    layer-sha256:4071be97c256d6f5ab0e05ebdebcfec3d0779a5e199ad0d71a5fccba4b3e2ce4:    done           |++++++++++++++++++++++++++++++++++++++|
    config-sha256:51696c87e77e4ff7a53af9be837f35d4eacdb47b4ca83ba5fd5e4b5101d98502:   done           |++++++++++++++++++++++++++++++++++++++|
    layer-sha256:df9b9388f04ad6279a7410b85cedfdcb2208c0a003da7ab5613af71079148139:    done           |++++++++++++++++++++++++++++++++++++++|
    layer-sha256:5867cba5fcbd3ae827c5801e76d20e7dc91cbb626ac5c871ec6c4d04eb818b16:    done           |++++++++++++++++++++++++++++++++++++++|
    layer-sha256:4b639e65cb3ba47e77db93f93c6625a62ba1b9eec99160b254db380115ae009d:    done           |++++++++++++++++++++++++++++++++++++++|
    layer-sha256:061ed9e2b9762825b9869a899a696ce8b56e7e0ec1e1892b980969bf7bcda56a:    done           |++++++++++++++++++++++++++++++++++++++|
    layer-sha256:bc19f3e8eeb1bb75268787f8689edec9a42deda5cdecdf2f95b3c6df8eb57a48:    done           |++++++++++++++++++++++++++++++++++++++|
    elapsed: 10.1s                                                                    total:  9.7 Mi (983.4 KiB/s)
    unpacking linux/amd64 sha256:5a0df7fb7c8c03e4158ae9974bfbd6a15da2bdfdeded4fb694367ec812325d31...
    done: 874.877199ms
    #例如我拉取自己的镜像
    [root@web01 ~]# ctr i pull docker.io/frps9/tools:SynologyNAS
拉取镜像添加了--all-platforms会将所有平台都下载下来
    unpacking linux/amd64 sha256:5a0df7fb7c8c03e4158ae9974bfbd6a15da2bdfdeded4fb694367ec812325d31...
    unpacking linux/arm/v6 sha256:5a0df7fb7c8c03e4158ae9974bfbd6a15da2bdfdeded4fb694367ec812325d31...
    unpacking linux/arm/v7 sha256:5a0df7fb7c8c03e4158ae9974bfbd6a15da2bdfdeded4fb694367ec812325d31...
    unpacking linux/arm64/v8 sha256:5a0df7fb7c8c03e4158ae9974bfbd6a15da2bdfdeded4fb694367ec812325d31...
    unpacking linux/386 sha256:5a0df7fb7c8c03e4158ae9974bfbd6a15da2bdfdeded4fb694367ec812325d31...
    unpacking linux/ppc64le sha256:5a0df7fb7c8c03e4158ae9974bfbd6a15da2bdfdeded4fb694367ec812325d31...
    unpacking linux/s390x sha256:5a0df7fb7c8c03e4158ae9974bfbd6a15da2bdfdeded4fb694367ec812325d31...
    #否则默认下载当前平台
并且containerd相比于docker , 多了namespace概念, 每个image和containe都会在各自的namespace下可见, 目前k8s会使用k8s.io作为命名空间,默认containerd会使用default
    [root@web01 ~]# ctr ns ls
    NAME    LABELS
    default
    [root@web01 ~]# ctr ns
    NAME:
       ctr namespaces - manage namespaces
    USAGE:
       ctr namespaces command [command options] [arguments...]
    COMMANDS:
       create, c   create a new namespace
       list, ls    list namespaces
       remove, rm  remove one or more namespaces
       label       set and clear labels for a namespace
    OPTIONS:
       --help, -h  show help
    #同样containerd也支持标签
查看当前所有namespace
[root@web01 ~]# ctr ns ls
NAME    LABELS
default
如果我们不指定namespace,默认就会使用default
创建containerd namespace
[root@web01 ~]# ctr ns create i4t
[root@web01 ~]# ctr ns ls
NAME    LABELS
default
i4t
#删除一样
ctr ns delete [NameSpace]
接下来我们所有的containerd中的操作,都可以添加-n ns_namespace指定到专属的命名空间中
    #我这里使用-n i4t 下载镜像进行测试,后续在ctr -n 指定命名空间即可
    #命名空间只如果不指定,默认是看不到,这点和k8s namespace作用相同
    [root@web01 ~]# ctr -n i4t i pull docker.io/library/nginx:alpine --all-platforms
    docker.io/library/nginx:alpine:                                                   resolved       |++++++++++++++++++++++++++++++++++++++|
    index-sha256:5a0df7fb7c8c03e4158ae9974bfbd6a15da2bdfdeded4fb694367ec812325d31:    done           |++++++++++++++++++++++++++++++++++++++|
    manifest-sha256:efc09388b15fb423c402f0b8b28ca70c7fd20fe31f8d7531ae1896bbb4944999: done           |++++++++++++++++++++++++++++++++++++++|
    layer-sha256:4071be97c256d6f5ab0e05ebdebcfec3d0779a5e199ad0d71a5fccba4b3e2ce4:    done           |++++++++++++++++++++++++++++++++++++++|
    config-sha256:51696c87e77e4ff7a53af9be837f35d4eacdb47b4ca83ba5fd5e4b5101d98502:   done           |++++++++++++++++++++++++++++++++++++++|
    layer-sha256:df9b9388f04ad6279a7410b85cedfdcb2208c0a003da7ab5613af71079148139:    done           |++++++++++++++++++++++++++++++++++++++|
    layer-sha256:4b639e65cb3ba47e77db93f93c6625a62ba1b9eec99160b254db380115ae009d:    done           |++++++++++++++++++++++++++++++++++++++|
    layer-sha256:5867cba5fcbd3ae827c5801e76d20e7dc91cbb626ac5c871ec6c4d04eb818b16:    done           |++++++++++++++++++++++++++++++++++++++|
    layer-sha256:061ed9e2b9762825b9869a899a696ce8b56e7e0ec1e1892b980969bf7bcda56a:    done           |++++++++++++++++++++++++++++++++++++++|
    layer-sha256:bc19f3e8eeb1bb75268787f8689edec9a42deda5cdecdf2f95b3c6df8eb57a48:    done           |++++++++++++++++++++++++++++++++++++++|
    elapsed: 2.3 s                                                                    total:  3.1 Ki (1.4 KiB/s)
    unpacking linux/amd64 sha256:5a0df7fb7c8c03e4158ae9974bfbd6a15da2bdfdeded4fb694367ec812325d31...
    done: 807.366874ms
    [root@web01 ~]# ctr -n i4t i ls -q
    docker.io/library/nginx:alpine
查看镜像
    #查看镜像可以使用i或者image
    #-q设置只获取我们的名称
    [root@web01 ~]# ctr i ls
    REF                               TYPE                                                      DIGEST                                                                  SIZE      PLATFORMS                                                                                LABELS
    docker.io/frps9/tools:SynologyNAS application/vnd.docker.distribution.manifest.v2+json      sha256:28e355e3ebe86c731af14bcf132543a23ff3dc3a34a3c830691ec59b65df21e6 341.7 MiB linux/amd64                                                                              -
    docker.io/library/nginx:alpine    application/vnd.docker.distribution.manifest.list.v2+json sha256:5a0df7fb7c8c03e4158ae9974bfbd6a15da2bdfdeded4fb694367ec812325d31 9.7 MiB   linux/386,linux/amd64,linux/arm/v6,linux/arm/v7,linux/arm64/v8,linux/ppc64le,linux/s390x -
    [root@web01 ~]# ctr i ls -q
    docker.io/frps9/tools:SynologyNAS
    docker.io/library/nginx:alpine
tag重新打标签
    #这里的tag基本上和docker命令方式相同
    [root@web01 ~]# ctr i tag docker.io/library/nginx:alpine docker.io/library/nginx:i4t
    docker.io/library/nginx:i4t
    [root@web01 ~]# ctr i ls -q
    docker.io/frps9/tools:SynologyNAS
    docker.io/library/nginx:alpine
    docker.io/library/nginx:i4t   #新增tag
删除镜像
    #delete, del, remove, rm  remove one or more images by reference
    #以上的方法都可以进行删除
    [root@web01 ~]# ctr i ls -q
    docker.io/frps9/tools:SynologyNAS
    docker.io/library/nginx:alpine
    docker.io/library/nginx:i4t
    [root@web01 ~]#
    [root@web01 ~]#
    [root@web01 ~]# ctr i rm docker.io/frps9/tools:SynologyNAS
    docker.io/frps9/tools:SynologyNAS
    [root@web01 ~]#
    [root@web01 ~]# ctr i ls -q
    docker.io/library/nginx:alpine
    docker.io/library/nginx:i4t
mount镜像
mount镜像实际上就是可以将我们镜像中的文件,挂载到宿主机的目录中去
    [root@web01 ~]# mkdir ctr_demo_nginx  #创建挂载目录
    [root@web01 ~]# ctr i ls -q         #查看镜像
    docker.io/library/nginx:alpine
    docker.io/library/nginx:i4t
    [root@web01 ~]# ctr i mount docker.io/library/nginx:alpine /root/ctr_demo_nginx  #执行挂载
    sha256:1380ce106a10fac3c312f83ddf8406d187d5c0dd567d9a2454abe6ba563114cd
    /root/ctr_demo_nginx
    [root@web01 ~]# ls /root/ctr_demo_nginx/    #查看挂载文件
    bin  dev  docker-entrypoint.d  docker-entrypoint.sh  etc  home  lib  media  mnt  opt  proc  root  run  sbin  srv  sys  tmp  usr  var
mount参数系统为只读状态,只可以读取,不可以写入数据
使用--rw Enable write support on the mount可以开启只读
取消mount挂载
    #有mount,当然也有umount
    [root@web01 ~]# ctr i unmount /root/ctr_demo_nginx
    /root/ctr_demo_nginx
    [root@web01 ~]#
    [root@web01 ~]# ls /root/ctr_demo_nginx/
推送镜像
    ctr  i push -k docker.io/library/nginx:alpine
    #跳过ssl验证--skip-verify, -k     skip SSL certificate validation
导出导入镜像
    #import #导入
    #export #导出
    #默认export导出的为OCI tar,只要我们容器支持OCI,基本上都是可以使用的
    #同时导出可以使用--platform导出其它平台的(例如arm)
    #--all-platforms为导出所有平台
    [root@web01 ~]# ctr i export --all-platforms nginx.tar docker.io/library/nginx:alpine
    # -all-platforms添不添加都可以
    # /root/nginx_alpine_1.tar为导出的文件名称
    # docker.io/xxx/xxx:alpine为镜像地址以及tag号
    [root@web01 ~]# ll /root/nginx_alpine_1.tar
    -rw-r--r--. 1 root root 10184704 May 15 07:01 /root/nginx_alpine_1.tar
    [root@web01 ~]#
    #导入
    [root@web01 tmp]# ctr i import nginx.tar
    unpacking docker.io/library/nginx:alpine (sha256:5a0df7fb7c8c03e4158ae9974bfbd6a15da2bdfdeded4fb694367ec812325d31)...done
    [root@web01 tmp]# ctr i ls -q
    docker.io/library/nginx:alpine
    docker.io/library/nginx:i4t
ctr不支持 build,commit 镜像
创建容器
    #基本参数
    [root@web01 ~]# ctr c
    NAME:
       ctr containers - manage containers
    USAGE:
       ctr containers command [command options] [arguments...]
    COMMANDS:
       create                   create container
       delete, del, remove, rm  delete one or more existing containers
       info                     get info about a container
       list, ls                 list containers
       label                    set and clear labels for a container
       checkpoint               checkpoint a container
       restore                  restore a container from checkpoint
    OPTIONS:
       --help, -h  show help
    #创建容器可以使用的参数
    [root@web01 ~]# ctr c create -h
    NAME:
       ctr containers create - create container
    USAGE:
       ctr containers create [command options] [flags] Image|RootFS CONTAINER [COMMAND] [ARG...]
    OPTIONS:
       --snapshotter value               snapshotter name. Empty value stands for the default value. [$CONTAINERD_SNAPSHOTTER]
       --snapshotter-label value         labels added to the new snapshot for this container.
       --config value, -c value          path to the runtime-specific spec config file
       --cwd value                       specify the working directory of the process
       --env value                       specify additional container environment variables (e.g. FOO=bar)
       --env-file value                  specify additional container environment variables in a file(e.g. FOO=bar, one per line)
       --label value                     specify additional labels (e.g. foo=bar)
       --mount value                     specify additional container mount (e.g. type=bind,src=/tmp,dst=/host,options=rbind:ro)
       --net-host                        enable host networking for the container
       --privileged                      run privileged container
       --read-only                       set the containers filesystem as readonly
       --runtime value                   runtime name (default: "io.containerd.runc.v2")
       --runtime-config-path value       optional runtime config path
       --tty, -t                         allocate a TTY for the container
       --with-ns value                   specify existing Linux namespaces to join at container runtime (format '<nstype>:<path>')
       --pid-file value                  file path to write the task's pid
       --gpus value                      add gpus to the container
       --allow-new-privs                 turn off OCI spec's NoNewPrivileges feature flag
       --memory-limit value              memory limit (in bytes) for the container (default: 0)
       --device value                    file path to a device to add to the container; or a path to a directory tree of devices to add to the container
       --cap-add value                   add Linux capabilities (Set capabilities with 'CAP_' prefix)
       --cap-drop value                  drop Linux capabilities (Set capabilities with 'CAP_' prefix)
       --seccomp                         enable the default seccomp profile
       --seccomp-profile value           file path to custom seccomp profile. seccomp must be set to true, before using seccomp-profile
       --apparmor-default-profile value  enable AppArmor with the default profile with the specified name, e.g. "cri-containerd.apparmor.d"
       --apparmor-profile value          enable AppArmor with an existing custom profile
       --rdt-class value                 name of the RDT class to associate the container with. Specifies a Class of Service (CLOS) for cache and memory bandwidth management.
       --rootfs                          use custom rootfs that is not managed by containerd snapshotter
       --no-pivot                        disable use of pivot-root (linux only)
       --cpu-quota value                 Limit CPU CFS quota (default: -1)
       --cpu-period value                Limit CPU CFS period (default: 0)
       --rootfs-propagation value        set the propagation of the container rootfs
这里我创建一个nginx容器
    [root@web01 ~]# ctr -n i4t  c create --net-host docker.io/library/nginx:alpine nginx
    # -n 指定命名空间
    # c create 创建容器
    # --net-host 使用宿主机网络
    # docker.io/xx/xxx:xxx 镜像地址
    # nginx 容器名称
    [root@web01 ~]# ctr -n i4t c ls  #查看容器列表
    CONTAINER    IMAGE                             RUNTIME
    nginx        docker.io/library/nginx:alpine    io.containerd.runc.v2
    [root@web01 ~]# ctr -n i4t c ls -q #只获取容器名称
    nginx
可以通过info参数查看容器的相关信息
    [root@web01 ~]# ctr -n i4t c info nginx|less
    #info后面添加容器名称
    {
        "ID": "nginx",
        "Labels": {
            "io.containerd.image.config.stop-signal": "SIGQUIT",
            "maintainer": "NGINX Docker Maintainers u003cdocker-maint@nginx.comu003e"
        },
        "Image": "docker.io/library/nginx:alpine",
        "Runtime": {
            "Name": "io.containerd.runc.v2",
            "Options": {
                "type_url": "containerd.runc.v1.Options"
            }
        },
        "SnapshotKey": "nginx",
        "Snapshotter": "overlayfs",
        "CreatedAt": "2022-05-15T12:02:46.133798687Z",
        "UpdatedAt": "2022-05-15T12:02:46.133798687Z",
        "Extensions": null,
        "Spec": {
            "ociVersion": "1.0.2-dev",
            "process": {
                "user": {
                    "uid": 0,
                    "gid": 0,
                    "additionalGids": [
                        1,
                        2,
                        3,
                        4,
                        6,
                        10,
                        11,
                        20,
                        26,
                        27
                    ]
                },
                "args": [
                    "/docker-entrypoint.sh",
                    "nginx",
                    "-g",
Task任务
在containerd中有一个task任务的概念,刚刚我们使用containerd create创建的容器,这时候并没有running;在Docker中可以直接run容器,但是在containerd是需要先create在通过task启动容器。create 容器并不会启动容器,可以理解只是声明了一个container,并不会启动和执行相关操作
在task我们也可以管理容器的网络,以及容器的监控等。实际上就是增强版的docker ps
    #可以通过下面的命令进行查看正在运行的容器
    [root@web01 ~]# ctr -n i4t task ls
    TASK    PID    STATUS
task可以操作的相关命令
    COMMANDS:
       attach                   attach to the IO of a running container
       checkpoint               checkpoint a container
       delete, del, remove, rm  delete one or more tasks
       exec                     execute additional processes in an existing container
       list, ls                 list tasks
       kill                     signal a container (default: SIGTERM)
       pause                    pause an existing container
       ps                       list processes for container
       resume                   resume a paused container
       start                    start a container that has been created
       metrics, metric          get a single data point of metrics for a task with the built-in Linux runtime
使用task启动容器
    [root@web01 ~]# ctr -n i4t task start -d nginx  #-d后台运行
    #容器运行状态
    [root@web01 ~]# ctr -n i4t task ls
    TASK     PID     STATUS
    nginx    1465    RUNNING
现在我们通过ps -ef就可以看到进程了
    [root@web01 ~]# ps -ef|grep nginx
    root      1446     1  0 08:53 ?        00:00:00 /usr/local/bin/containerd-shim-runc-v2 -namespace i4t -id nginx -address /run/containerd/containerd.sock
    root      1465  1446  0 08:53 ?        00:00:00 nginx: master process nginx -g daemon off;
    101       1504  1465  0 08:54 ?        00:00:00 nginx: worker process
    101       1505  1465  0 08:54 ?        00:00:00 nginx: worker process
    101       1506  1465  0 08:54 ?        00:00:00 nginx: worker process
    101       1507  1465  0 08:54 ?        00:00:00 nginx: worker process
    root      1515  1287  0 08:59 pts/0    00:00:00 grep --color=auto nginx
进入容器
    [root@web01 ~]# ctr -n i4t task ls  #查看当前运行容器
    TASK     PID     STATUS
    nginx    1465    RUNNING
    [root@web01 ~]# ctr -n i4t task exec --exec-id 1 -t nginx sh  #进入容器
    #exec task进入容器操作
    #--exec-id 设置一个id,唯一即可
    #-t --tty为container分配一个tty
    #nginx 容器名称
    #sh && bash即可
    #进入容器内部和docker exec基本上相同
    [root@web01 ~]# ctr -n i4t task exec --exec-id 1 -t nginx sh
    / #
    / # ps -ef|grep nginx
        1 root      0:00 nginx: master process nginx -g daemon off;
       32 nginx     0:00 nginx: worker process
       33 nginx     0:00 nginx: worker process
       34 nginx     0:00 nginx: worker process
       35 nginx     0:00 nginx: worker process
       69 root      0:00 grep nginx
暂停容器
    [root@web01 ~]# ctr -n i4t task ls
    TASK     PID     STATUS
    nginx    1465    RUNNING
    #停止容器
    [root@web01 ~]# ctr -n i4t task pause nginx
    #pause为停止容器
    #查看状态
    [root@web01 ~]# ctr -n i4t task ls
    TASK     PID     STATUS
    nginx    1465    PAUSED
有暂停容器当然也有恢复容器
需要注意暂停和恢复容器不等于重启容器
    [root@web01 ~]# ctr -n i4t task ls
    TASK     PID     STATUS
    nginx    1465    PAUSED
    [root@web01 ~]#
    [root@web01 ~]# ctr -n i4t task resume nginx
    [root@web01 ~]#
    [root@web01 ~]# ctr -n i4t task ls
    TASK     PID     STATUS
    nginx    1465    RUNNING
如果我们需要停止容器,只能通过kill来进行停止,然后在重新start;在containerd中没有stop和restart参数
    [root@web01 ~]# ctr -n i4t task kill nginx   #kill停止task任务
    [root@web01 ~]# ctr -n i4t task ls
    TASK     PID     STATUS
    nginx    1465    STOPPED
    [root@web01 ~]# ctr -n i4t task rm nginx   #删除task任务
    [root@web01 ~]# ctr -n i4t task ls
    TASK    PID    STATUS
    #删除task并不会删除container
    [root@web01 ~]# ctr -n i4t c ls
    CONTAINER    IMAGE                             RUNTIME
    nginx        docker.io/library/nginx:alpine    io.containerd.runc.v2
删除容器
    [root@web01 ~]#  ctr -n i4t c rm nginx
    #-n 指定命名空间
    #c rm代表删除容器
    #nginx 容器名称
task还可以通过metrcis命令,获取到容器内部资源使用情况
    [root@web01 ~]# ctr -n i4t task ls
    TASK     PID     STATUS
    nginx    2010    RUNNING
    [root@web01 ~]# ctr -n i4t task metrics nginx   #使用metrics查看资源使用情况
    ID       TIMESTAMP
    nginx    2022-05-15 13:35:13.767932408 +0000 UTC
    METRIC                   VALUE
    memory.usage_in_bytes    3788800
    memory.limit_in_bytes    9223372036854771712
    memory.stat.cache        24576
    cpuacct.usage            23007334
    cpuacct.usage_percpu     [7718201 3737243 3983818 7568072]
    pids.current             5
    pids.limit               0
task ps可以看到在宿主机上容器的进程
    [root@web01 ~]# ctr -n i4t task ls
    TASK     PID     STATUS
    nginx    2010    RUNNING
    [root@web01 ~]# ctr -n i4t task ps nginx   #PID为宿主机上的PID
    PID     INFO
    2010    -
    2040    -
    2041    -
    2042    -
    2043    -
    [root@web01 ~]# ps -ef|grep 2010
    root      2010  1990  0 09:34 ?        00:00:00 nginx: master process nginx -g daemon off;
    101       2040  2010  0 09:34 ?        00:00:00 nginx: worker process
    101       2041  2010  0 09:34 ?        00:00:00 nginx: worker process
    101       2042  2010  0 09:34 ?        00:00:00 nginx: worker process
    101       2043  2010  0 09:34 ?        00:00:00 nginx: worker process
    root      2084  1287  0 09:36 pts/0    00:00:00 grep --color=auto 2010
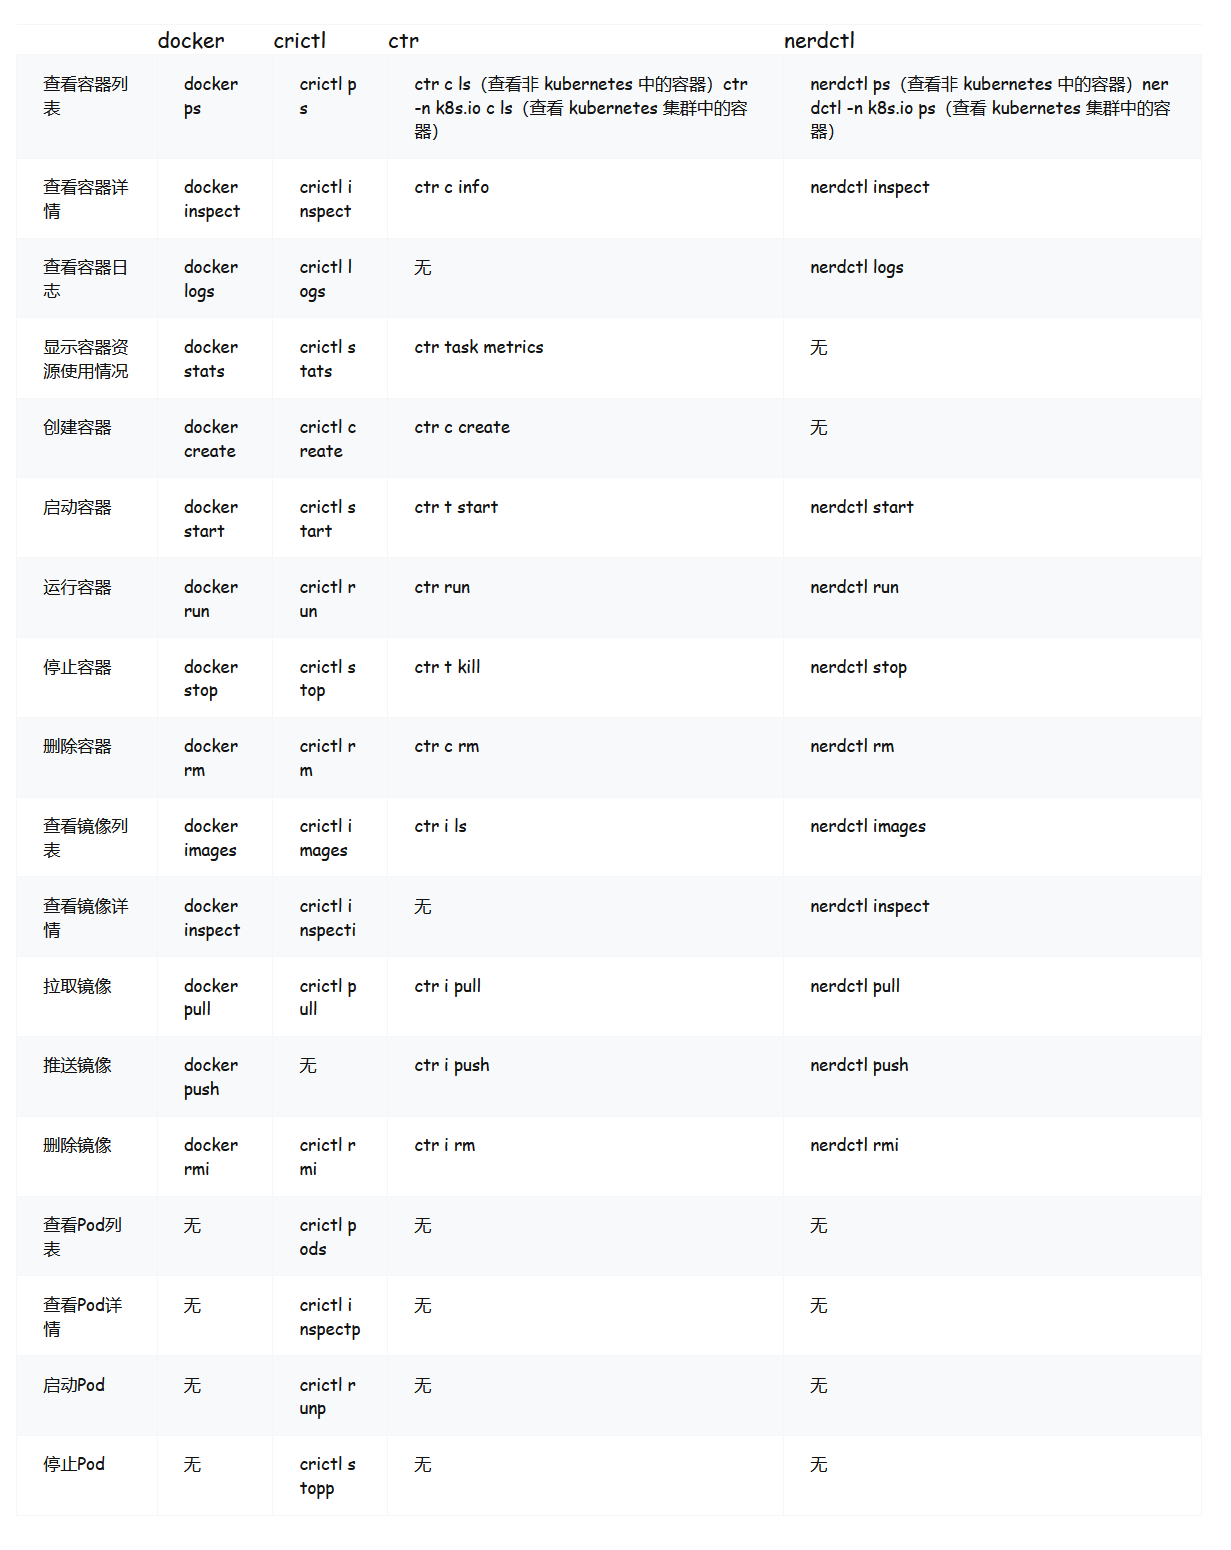
Docker ctr nerdctl命令直接的区别
crictl是kubernetes cri-tools的一部分,是专门为kubernetes使用containerd而专门制作的,提供了Pod、容器和镜像等资源的管理命令。
需要注意的是:使用其他非 kubernetes创建的容器、镜像,crictl是无法看到和调试的,比如说ctr run在未指定namespace情况下运行起来的容器就无法使用crictl看到。当然ctr可以使用-n k8s.io指定操作的namespace为 k8s.io,从而可以看到/操作kubernetes 集群中容器、镜像等资源。可以理解为:crictl 操作的时候指定了containerd 的namespace为k8s.io。
nerdctl ctr功能简单,而且对已经习惯使用docker cli的人来说,ctr并不友好(比如无法像 docker cli 那样)。这个时候nerdctl就可以替代ctr了。nerdctl是一个与docker cli风格兼容的containerd的cli工具,并且已经被作为子项目加入了 containerd 项目中。从nerdctl 0.8开始,nerdctl直接兼容了docker compose的语法(不包含 swarm), 这很大程度上提高了直接将 containerd 作为本地开发、测试和单机容器部署使用的体验。
需要注意的是:安装 nerdctl 之后,要想可以使用 nerdctl 还需要安装 CNI 相关工具和插件。containerd不包含网络功能的实现,想要实现端口映射这样的容器网络能力,需要额外安装 CNI 相关工具和插件。
另外 nerdctl 也可以使用 -n 指定使用的 namespace。

 浙公网安备 33010602011771号