
inotify+rsync实现实时同步部署
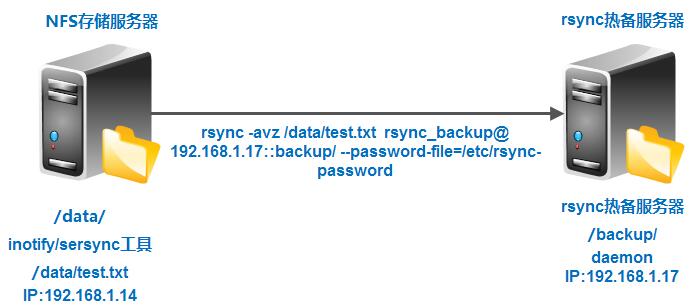
1.1.架构规划
1.1.1架构规划准备
| 服务器系统 | 角色 | IP |
| Centos6.7 x86_64 | NFS服务器端(NFS-server-inotify-tools) | 192.168.1.14 |
| Centos6.7 x86_64 | rsync服务器端(rsync热备服务器) | 192.168.1.17 |
1.1.2架构图
2.1 部署前检查
2.1.1 检查rsync热备服务器daemon是否起来
1 [root@backup data]# lsof -i:873
2 COMMAND  PID USER   FD   TYPE DEVICE SIZE/OFF NODE NAME
3 rsync   3071 root    3u  IPv4  18684      0t0  TCP *:rsync (LISTEN)
4 rsync   3071 root    5u  IPv6  18685      0t0  TCP *:rsync (LISTEN)
5 [root@backup data]# ps -ef|grep rsync|grep -v grep
6 root      3071     1  0 Dec02 ?        00:00:00 rsync --daemon
7 [root@backup data]#
2.1.2 NFS服务器相对于rsync服务器来说是客户端,所以要配置一个客户端密码
1 [root@nfs-server ~]# echo "zhurui" >>/etc/rsync.password
2 [root@nfs-server ~]# cat /etc/rsync.password
3 zhurui
4 [root@nfs-server ~]# chmod 600 /etc/rsync.password
5 [root@nfs-server ~]# ll /etc/rsync.password
6 -rw-------. 1 root root 7 Jan 31 00:49 /etc/rsync.password
7 [root@nfs-server ~]#
2.1.3 NFS客户端手动推/data/目录下数据到rsync热备服务器/backup目录下
 1 [root@nfs-server data]# showmount -e localhost ##检查共享目录
 2 Export list for localhost:
 3 /data 192.168.1.0/24
 4 [root@nfs-server ~]# cd /data/
 5 [root@nfs-server data]# ll
 6 total 12
 7 -rw-r--r--. 1 nfsnobody nfsnobody    0 Jan 30 03:05 beautiful.txt
 8 -rw-r--r--. 1 nfsnobody nfsnobody    9 Jan 30 04:33 f11.txt
 9 -rw-r--r--. 1 root      root         0 Jan 30 04:41 fs.txt
10 drwxr-xr-x. 2 nfsnobody nfsnobody 4096 Jan 30 03:05 huang
11 -rw-r--r--. 1 nfsnobody nfsnobody    0 Jan 30 03:17 reew.txt
12 -rw-r--r--. 1 root      root         0 Jan 30 02:51 test1.txt
13 -rw-r--r--. 1 nfsnobody nfsnobody    0 Jan 30 04:41 wd.txt
14 drwxr-xr-x. 2 nfsnobody nfsnobody 4096 Jan 30 02:57 zhurui
15 -rw-r--r--. 1 nfsnobody nfsnobody    0 Jan 30 02:47 zhurui1.txt
16 -rw-r--r--. 1 nfsnobody root         0 Jan 30 02:10 zhurui.txt
17 [root@nfs-server /]# rsync -avz /data/ rsync_backup@192.168.1.17::backup/ --password-file=/etc/rsync.password   ##推送数据命令
18 sending incremental file list
19 ./
20 beautiful.txt
21 f11.txt
22 fs.txt
23 reew.txt
24 test1.txt
25 wd.txt
26 zhurui.txt
27 zhurui1.txt
28 huang/
29 zhurui/
30
31 sent 572 bytes  received 171 bytes  114.31 bytes/sec
32 total size is 9  speedup is 0.01
33 [root@nfs-server /]#
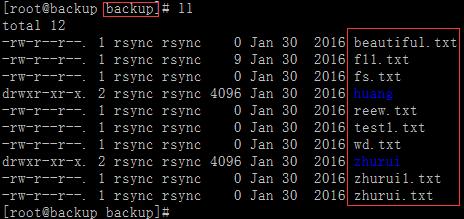
2.1.4 rsync服务器端检查/backup目录下数据
3.1 服务部署
3.1.1 NFS服务端安装inotify工具
inofity-tools下载地址:http://github.com/downloads/rvoicilas/inotify-tools/inotify-tools-3.14.tar.gz
1)查看当前系统是否支持inotify
1 [root@nfs-server tools]# uname -r   ##内核版本,从kernel2.6.13开始支持
2 2.6.32-573.el6.x86_64
3 [root@nfs-server tools]# ls -l /proc/sys/fs/inotify/  ##查看是否支持
4 total 0
5 -rw-r--r-- 1 root root 0 Jan 31 01:34 max_queued_events
6 -rw-r--r-- 1 root root 0 Jan 31 01:34 max_user_instances
7 -rw-r--r-- 1 root root 0 Jan 31 01:34 max_user_watches
8 ##显示当前三个文件表示支持
2)下载inotify源码包
1 [root@nfs-server tools]# ll
2 total 352
3 -rw-r--r--. 1 root root 358772 Mar 14  2010 inotify-tools-3.14.tar.gz
3)编译安装inotify
1 [root@nfs-server tools]# tar zxf inotify-tools-3.14.tar.gz
2 [root@nfs-server tools]# cd inotify-tools-3.14
3 [root@nfs-server inotify-tools-3.14]# ./configure --prefix=/usr/local/inotify-tools-3.14
4 [root@nfs-server inotify-tools-3.14]# make&&make install
 1 [root@nfs-server inotify-tools-3.14]# ln -s /usr/local/inotify-tools-3.14/ /usr/local/inotify-tools  ##创建软链接
 2 [root@nfs-server inotify-tools-3.14]# cd ..
 3 [root@nfs-server local]# ll
 4 total 44
 5 drwxr-xr-x. 2 root root 4096 Sep 23  2011 bin
 6 drwxr-xr-x. 2 root root 4096 Sep 23  2011 etc
 7 drwxr-xr-x. 2 root root 4096 Sep 23  2011 games
 8 drwxr-xr-x. 2 root root 4096 Sep 23  2011 include
 9 lrwxrwxrwx. 1 root root   30 Jan 31 01:58 inotify-tools -> /usr/local/inotify-tools-3.14/
10 drwxr-xr-x. 6 root root 4096 Jan 31 01:55 inotify-tools-3.14
11 drwxr-xr-x. 2 root root 4096 Sep 23  2011 lib
12 drwxr-xr-x. 2 root root 4096 Sep 23  2011 lib64
13 drwxr-xr-x. 2 root root 4096 Sep 23  2011 libexec
14 drwxr-xr-x. 2 root root 4096 Sep 23  2011 sbin
15 drwxr-xr-x. 5 root root 4096 Nov 25 02:40 share
16 drwxr-xr-x. 2 root root 4096 Sep 23  2011 src
17 [root@nfs-server local]# cd inotify-tools
18 [root@nfs-server inotify-tools]# ll
19 total 16
提示编译成功后会生成4个目录,分别是:
1 [root@nfs-server /]# cd /usr/local/inotify-tools
2 [root@nfs-server inotify-tools]# ll
3 total 16
4 drwxr-xr-x. 2 root root 4096 Jan 31 01:55 bin    ##inotify执行命令(二进制)
5 drwxr-xr-x. 3 root root 4096 Jan 31 01:55 include   ##inotify程序所需用的头文件
6 drwxr-xr-x. 2 root root 4096 Jan 31 01:55 lib  ##动态链接的库文件
7 drwxr-xr-x. 4 root root 4096 Jan 31 01:55 share  ##帮助文档
工具集合介绍:
一共安装了2个工具(命令),即inotifywait和inotifywatch
inotifywait:在被监控的文件或目录上等待特定文件系统事件(open、close、delete等)发生,执行后处于阻塞状态,适合在shell脚本中使用。
inotifywatch:收集被监视的文件系统使用度统计数据,指定文件系统事件发生的次数统计。
4)inotify命令常用参数详解
 1 [root@nfs-server inotify-tools]# ./bin/inotifywait --help
 2 inotifywait 3.14
 3 Wait for a particular event on a file or set of files.
 4 Usage: inotifywait [ options ] file1 [ file2 ] [ file3 ] [ ... ]
 5 Options:
 6  -r|--recursive  Watch directories recursively.  ##递归查询目录
 7  -q|--quiet      Print less (only print events)   ##打印很少的信息,仅仅打印监控相关的信息
 8 -m|--monitor    Keep listening for events forever.  Without
 9                         this option, inotifywait will exit after one
10                         event is received.   ##始终保持事件监听状态
11 --excludei <pattern>
12                         Like --exclude but case insensitive.   ##排除文件或目录时,不区分大小写
13 --timefmt <fmt> strftime-compatible format string for use with
14                         %T in --format string.   ##指定时间的输出格式
5)测试监控事件
开启两个窗口
1.测试create
 1 第一步:
 2 [root@nfs-server inotify-tools]# /usr/local/inotify-tools/bin/inotifywait -mrq --timefmt '%d/%m/%y %H:%M' --format '%T %w%f' -e create /data  ##实行当前命令后,界面处于阻塞状态,只有在另外一个客户端测试时,才会显示监控状态
 3 31/01/16 10:23 /data/ceshi.txt
 4 31/01/16 10:24 /data/what
 5 31/01/16 10:27 /data/a
 6 31/01/16 10:27 /data/b
 7 31/01/16 10:27 /data/c
 8 31/01/16 10:27 /data/d
 9 31/01/16 10:27 /data/e
10 31/01/16 10:27 /data/f
11
12 第二步:
13 克隆一个NFS客户端切换到/data目录下,新建ceshi.txt、what文件,观察监控的变化
14 [root@nfs-server data]# touch ceshi.txt
15 [root@nfs-server data]# mkdir /who
16 [root@nfs-server data]# touch what
17 [root@nfs-server data]#
18 [root@nfs-server data]# touch {a..f}
2、测试delete
1 [root@nfs-server inotify-tools]# /usr/local/inotify-tools/bin/inotifywait -mrq --timefmt '%d/%m/%y %H:%M' --format '%T %w%f' -e delete /data   ##监控/data目录删除时间
2
3 监控如下:
4
5 31/01/16 10:31 /data/reew.txt
6 31/01/16 10:31 /data/test1.txt
7
8 [root@nfs-server data]# rm -f reew.txt test1.txt   ##删除这两个文件
9 [root@nfs-server data]#
3、同时测试create、delete
 1 第一步:
 2 [root@nfs-server inotify-tools]# /usr/local/inotify-tools/bin/inotifywait -mrq --timefmt '%d/%m/%y %H:%M' --format '%T %w%f' -e delete,create /data
 3 监控输出信息:
 4 31/01/16 10:35 /data/hero.sh
 5 31/01/16 10:35 /data/a
 6 31/01/16 10:35 /data/f
 7 31/01/16 10:36 /data/b
 8 31/01/16 10:36 /data/c
 9 31/01/16 10:36 /data/d
10 31/01/16 10:36 /data/e
11 第二步:
12 [root@nfs-server data]# touch hero.sh
13 [root@nfs-server data]# ll
14 [root@nfs-server data]# rm -f [a..f]
15 [root@nfs-server data]# rm -f {a..f}
16 [root@nfs-server data]#
一般工作中使用到:[root@nfs-server inotify-tools]# /usr/local/inotify-tools/bin/inotifywait -mrq --timefmt '%d/%m/%y %H:%M' --format '%T %w%f' -e delete,create,close_write /data
工作环境中通过脚本实时同步:
 1 #!/bin/bash
 2 inotify=/usr/local/inotify-tools/bin/inotifywait
 3 $inotify -mrq --timefmt '%d/%m/%y %H:%M' --format '%T %w%f' -e delete,create,close_write /data
 4  \
 5 |while read file
 6 do
 7   cd / &&
 8   rsync -az /data --delete rsync_backup@192.168.1.17::backup \
 9   --password-file=/etc/rsync.password
10 done
测试:
 1 脚本属于开启状态:
 2 [root@nfs-server scripts]# sh -x inotify.sh
 3 + inotify=/usr/local/inotify-tools/bin/inotifywait
 4 + read file
 5 + /usr/local/inotify-tools/bin/inotifywait -mrq --timefmt '%d/%m/%y %H:%M' --format '%T %w%f' -e delete,create,close_write /data
 6 + cd /
 7 + rsync -az /data --delete rsync_backup@192.168.1.17::backup --password-file=/etc/rsync.password
 8 + read file
 9 + cd /
10 + rsync -az /data --delete rsync_backup@192.168.1.17::backup --password
11 接着在NFS客户端/data目录下创建文件
12 [root@nfs-server data]# touch {a..z}
13 [root@nfs-server data]# echo i am best >a  ##修改a中的内容,查看热备服务器是否同步
14
15 rsync热备服务器端显示如下:
16 [root@backup //]# cd /backup/
17 [root@backup backup]# cd data/
18 [root@backup data]# ll
19 total 0
20 -rw-r--r--. 1 rsync rsync 0 Mar  4  2016 a
21 -rw-r--r--. 1 rsync rsync 0 Mar  4  2016 b
22 -rw-r--r--. 1 rsync rsync 0 Mar  4  2016 c
23 -rw-r--r--. 1 rsync rsync 0 Mar  4  2016 d
24 -rw-r--r--. 1 rsync rsync 0 Mar  4  2016 e
25 -rw-r--r--. 1 rsync rsync 0 Mar  4  2016 f
26 -rw-r--r--. 1 rsync rsync 0 Mar  4  2016 g
27 -rw-r--r--. 1 rsync rsync 0 Mar  4  2016 h
28 -rw-r--r--. 1 rsync rsync 0 Mar  4  2016 i
29 -rw-r--r--. 1 rsync rsync 0 Mar  4  2016 j
30 -rw-r--r--. 1 rsync rsync 0 Mar  4  2016 k
31 -rw-r--r--. 1 rsync rsync 0 Mar  4  2016 l
32 -rw-r--r--. 1 rsync rsync 0 Mar  4  2016 m
33 -rw-r--r--. 1 rsync rsync 0 Mar  4  2016 n
34 -rw-r--r--. 1 rsync rsync 0 Mar  4  2016 o
35 -rw-r--r--. 1 rsync rsync 0 Mar  4  2016 p
36 -rw-r--r--. 1 rsync rsync 0 Mar  4  2016 q
37 -rw-r--r--. 1 rsync rsync 0 Mar  4  2016 r
38 -rw-r--r--. 1 rsync rsync 0 Mar  4  2016 s
39 -rw-r--r--. 1 rsync rsync 0 Mar  4  2016 t
40 -rw-r--r--. 1 rsync rsync 0 Mar  4  2016 u
41 -rw-r--r--. 1 rsync rsync 0 Mar  4  2016 v
42 -rw-r--r--. 1 rsync rsync 0 Mar  4  2016 w
43 -rw-r--r--. 1 rsync rsync 0 Mar  4  2016 x
44 -rw-r--r--. 1 rsync rsync 0 Mar  4  2016 y
45 -rw-r--r--. 1 rsync rsync 0 Mar  4  2016 z
46 [root@backup data]# cat a
47 i am best   ##显示已经实时同步过来
48 [root@backup data]#
6)优化
1 [root@nfs-server scripts]# echo "50000000" >/proc/sys/fs/inotify/max_user_watches
2 [root@nfs-server scripts]# echo "50000000" >/proc/sys/fs/inotify/max_queued_events
结论:经过测试,每秒200个文件并发,数据同步几乎无延迟(小于1秒)

 浙公网安备 33010602011771号