

Python之路【第三十一篇】:django ajax
Ajax
文件夹为Ajaxdemo
向服务器发送请求的途径:
1.浏览器地址栏,默认get请求;
2.form表单:
get请求
post请求
3.a标签,超链接(get请求)
4.Ajax请求
特点:1异步请求;2局部刷新
get
post
AJAX(Asynchronous Javascript And XML)翻译成中文就是“异步Javascript和XML”。即使用Javascript语言与服务器进行异步交互,传输的数据为XML(当然,传输的数据不只是XML,现在更多使用json数据)。
- 同步交互:客户端发出一个请求后,需要等待服务器响应结束后,才能发出第二个请求;
- 异步交互:客户端发出一个请求后,无需等待服务器响应结束,就可以发出第二个请求。
AJAX除了异步的特点外,还有一个就是:浏览器页面局部刷新;(这一特点给用户的感受是在不知不觉中完成请求和响应过程)
场景:
优点:
- AJAX使用Javascript技术向服务器发送异步请求
- AJAX无须刷新整个页面
jquery cdn百度 src="http://ajax.aspnetcdn.com/ajax/jquery/jquery-2.1.4.min.js"></script> (把服务器上的jquery引入进来)
1.基于jquery的Ajax实现
index.html
<!DOCTYPE html>
<html lang="en">
<head>
    <meta charset="UTF-8">
    <title>Title</title>
    <script src="http://ajax.aspnetcdn.com/ajax/jquery/jquery-2.1.4.min.js"></script>
</head>
<body>
    <h2>this is Index!</h2>
    <button class="Ajax">Ajax</button>
    <p class="content"></p>
    <script>
        $(".Ajax").click(function(){
            //alert(123)
           //发送ajax请求 (一定要有路径,是哪种请求方式呢?)
            $.ajax({
                url:"/test_ajax/" ,  //请求路径url,不加地址它会找默认当前脚本的ip地址和端口
                type:"get", //请求方式
                success: function (data) {  //回调函数,某个事件执行完之后再去执行的函数
                    console.log(data);

                    $(".content").html(data);

                }
            })
        })
    </script>

</body>


</html>
Ajax---服务器 Ajax流程图
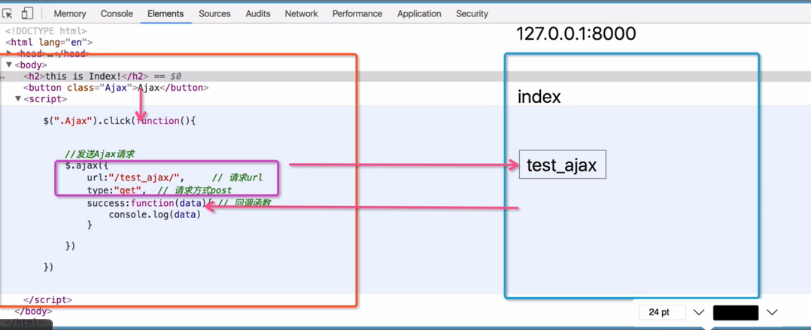
执行过程:
一点击Ajax按钮,触发click这个函数,然后发就要发生ajax,给test_ajax发Ajax路径请求,当url匹配成功后,它把这次请求的结果交给了data,(在test_ajax里返回了一个hello kris的字符串)刚刚那个hello kris这个字符串就交给了data(data拿到结果);然后再执行那个回调函数能够打印,用js处理data. (在页面中加上节点)
2.Ajax数据传递
urls
from django.contrib import admin
from django.urls import path

from app01 import views
urlpatterns = [
    path('admin/', admin.site.urls),
    path('index/', views.index),
    path('test_ajax/', views.test_ajax),
    path('cal/', views.cal),
]
views.py
from django.shortcuts import render, HttpResponse
# Create your views here.
def index(request):
return render(request, "index.html")
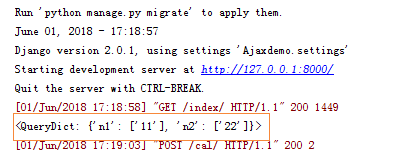
def test_ajax(request): #这次请求在处理ajax请求,
print(request.GET) #拿到数据,去处理
return HttpResponse("Hello kris") #根据数据给回调函数返回个什么参数
def cal(request):
print(request.POST)
n1=int(request.POST.get("n1")) #取出这两个值
n2=int(request.POST.get("n2"))
ret = n1+n2 #计算下
return HttpResponse(ret)
index.html
1 <!DOCTYPE html>
2 <html lang="en">
3 <head>
4 <meta charset="UTF-8">
5 <title>Title</title>
6 <script src="http://ajax.aspnetcdn.com/ajax/jquery/jquery-2.1.4.min.js"></script>
7 </head>
8 <body>
9 <h2>this is Index!</h2>
10 <button class="Ajax">Ajax</button>
11 <p class="content"></p>
12
13 <hr>
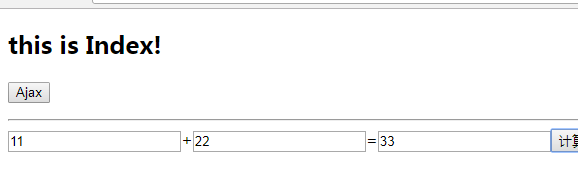
14 <input type="text" id="num1">+<input type="text" id="num2">=<input type="text" id="ret"><button class="cal">计算</button>
15 <script>
16 $(".Ajax").click(function(){
17 //alert(123)
18 //发送ajax请求
19 $.ajax({
20 url:"/test_ajax/" , //请求url,不加地址它会找默认当前脚本的ip地址和端口
21 type:"get", //请求方式 a=1&b=2
22 data:{a:1,b:2}, //发送数据,键值
23 success: function (data) { //回调函数,某个事件执行完之后再去执行的函数
24 console.log(data);
25
26 $(".content").html(data);
27 }
28 })
29 })
30 //Ajax计算求值
31 $(".cal").click(function () {
32 $.ajax({
33 url:"/cal/", //交给cal的路径
34 type:"post",
35 data:{
36 "n1":$("#num1").val(),
37 "n2":$("#num2").val(),
38 },
39 success: function (data) {
40 console.log(data);
41 $("#ret").val(data);
42 }
43 })
44 })
///////////////form表单一定要有input标签放有效控件,action发送路径,method是请求方式;数据由input type="text"里边的内容决定;键就是name指定的值,
一点submit按钮就会给你自动组装这两个键值,通过method指定的方式发给action指定的路径
<form action="" method="">
<input type="text", name="user">
<input type="text", name="pwd">
</form>
///////////////////
45 </script>
46
47 </body>
48
49
50 </html>
3.基于Ajax的登录验证
用户在表单输入用户名与密码,通过Ajax提交给服务器,服务器验证后返回响应信息,客户端通过响应信息确定是否登录成功,成功,则跳转到首页,否则,在页面上显示相应的错误信息。
models
from django.db import models

# Create your models here.
class User(models.Model):
    name = models.CharField(max_length=32)
    pwd = models.CharField(max_length=32)
views
from app01.models import User
def login(request):
    print(request.POST) #<QueryDict: {'user': ['kris'], 'pwd': ['123']}>
    user = request.POST.get("user")
    pwd = request.POST.get("pwd")
    user = User.objects.filter(name=user, pwd=pwd).first()
    res = {"user":None, "msg":None} #如果登录成功了默认是None,有值肯定是登录成功了; "msg"是避免出现错误信息,错误信息是什么
    if user:
        res["user"] = user.name
    else:
        res["msg"] = "username or password wrong!"  #失败了给msg赋个值
    import json   #想把res这个字典交给data,HttpResponse里边必须放字符串,
    return HttpResponse(json.dumps(res)) #序列化下,json字符串 。
index
<!DOCTYPE html>
<html lang="en">
<head>
    <meta charset="UTF-8">
    <title>Title</title>
    <script src="http://ajax.aspnetcdn.com/ajax/jquery/jquery-2.1.4.min.js"></script>
</head>
<body>
    <form>
        用户名<input type="text" id="user">
        密码<input type="password" id="pwd"> //下面是button只是一个按钮;改成submit就会组成键值对发过去,就是form表单请求了。
        <input type="button" value="submit" class="login_btn"><span class="error"></span>
    </form>

    <script>//登录验证
        $(".login_btn").click(function () {
            $.ajax({
                url:"/login/",
                type:"post",
                data:{
                    "user":$("#user").val(),
                    "pwd":$("#pwd").val(),
                },
                success:function(data){
                    console.log(data); //json字符串 ,js再给它反序列化拿到它支持的类似字典的object类型。
                    console.log(typeof data);

                    var data = JSON.parse(data)  //js再用它自己的json方法给它反序列化成字典 object{};js这个语言反序列化的方法是json.parse
                    console.log(data); //反序列化类似字典的object
                    console.log(typeof data);
                    if (data.user){   //有值登录成功了就让它跳转下
                        location.href="http://www.baidu.com"
                    }
                    else {  //html文本赋值(错误信息值)
                        $(".error").html(data.msg).css({"color":"red","margin-left":"10px"})
                    }
                }
            })
        })

    </script>

</body>


</html>
4.上传文件
4.1基于form表单上传文件
views
def file_put(request):
    if request.method == "POST":
        print(request.POST)  #用户上传的数据  post <QueryDict: {'user': ['kris']}>
        print(request.FILES)  #拿到这个文件   <MultiValueDict: {'avatar': [<InMemoryUploadedFile: 袁娅维.jpg (image/jpeg)>]}>
        file_obj = request.FILES.get("avatar")  #把文件下载来
        with open(file_obj.name, "wb")as f:  #上传的文件名file_obj.name 会把这个文件存到跟目录下
            for line in file_obj:
                f.write(line)

        return HttpResponse("ok")
    return render(request, "file_put.html")
file_put.html
<!DOCTYPE html>
<html lang="en">
<head>
    <meta charset="UTF-8">
    <title>Title</title>
</head>
<body>
<h3>基于form表单的文件上传</h3>
<form action="" method="post" enctype="multipart/form-data">  //上传文件一定要加上这个
    用户名<input type="text" name="user">
    头像<input type="file" name="avatar">
    <input type="submit">
</form>

</body>
</html>
4.2 请求头ContentType:urlencoed
都在这个字符串报文里边(请求首行、请求头、请求体):

请求首行

请求头(决定数据以什么格式进行编码)

....

ContentType:urlencoed(告诉服务器,这次发过来的请求体的数据是按照urlencoed这种格式进行编码的(a=1&b=2..))

请求体(a=1&b=2&c=3)

服务器那边拿到这个wsgiref先检查ContentType,如果是urlencoed它就知道你是怎么编码的了,它就按照这种方式解码,拿到相应的键以及对应的值。

enctype="multipart/form-data"是另外一种编码格式,文件可以用这种方式;而普通的键值只适用这种 enctype="application/x-www-form-urlencoded" 编码格式
enctype="multipart/form-data" #上传文件一定要加上这个
enctype="application/x-www-form-urlencoded" #普通的键值对的上传加这个
file_put.html
<!DOCTYPE html>
<html lang="en">
<head>
    <meta charset="UTF-8">
    <title>Title</title>
    <script src="http://ajax.aspnetcdn.com/ajax/jquery/jquery-2.1.4.min.js"></script>
</head>
<body>
<h3>简单的form</h3>
<form action="" method="post" enctype="application/x-www-form-urlencoded"> {#普通的键值只能用这种#}
    用户名<input type="text" name="user">
    密码<input type="password" name="pwd">
    <input type="submit">
</form>


<h3>基于form表单的文件上传</h3>
<form action="" method="post" enctype="multipart/form-data">
    用户名<input type="text" name="user">
    头像<input type="file" name="avatar">
    <input type="submit">
</form>

<h3>基于Ajax文件上传</h3>
<form action="" method="post">
    用户名<input type="text" name="user">
    <input type="button" class="btn" value="Ajax">
</form>
<script>
    $.ajax({
        url:"",
        type:"post",
        data:{
            a:1,
            b:2
        },//无论是ajax还是form它们都有一个默认的请求头ContentType:urlencoed ,把我们写好的数据按照某种类型编码好之后放到请求体中,然后把整个报文部分发给服务器
        success: function (data) {
            console.log(data)
        }
    })
</script>
</body>
</html>
4.3 Ajax传递json数据
file_put
<h3>基于Ajax文件上传</h3>
<form action="" method="post">
    用户名<input type="text" name="user">
    <input type="button" class="btn" value="Ajax">
</form>
<script>
  $(".btn").click(function()){
    $.ajax({
        url:"",
        type:"post",
        contentType:"application/json", //不加它默认是contentType:urlencoed;加上application/json相当于是告诉服务器这次编码类型是json数据了
        data:JSON.stringify({ #对一个数据进行序列化,相当于python里边的json.dumps,把这个a:1,b:2数据放到stringify里边,它对应的值就是json字符串
            a:1,               //告诉服务器这次发的是json数据你到时候按照json解就可以了
            b:2
        }),                 //无论是ajax还是form它们都有一个默认的请求头ContentType:urlencoed ,把我们写好的数据按照某种类型编码好之后放到请求体中,然后把整个报文部分发给服务器
        success: function (data) {
            console.log(data)
        }
    });
  });
</script>
请求首行

请求头(决定数据以什么格式进行编码)

....

ContentType:json               #urlencoed(告诉服务器,这次发过来的请求体的数据是按照urlencoed这种格式进行编码的(a=1&b=2..))

请求体{"a":"1", "b":"2"}   #到时候反序列化就可以了     #(a=1&b=2&c=3)
views
def file_put(request):
    if request.method == "POST":
        print("body",request.body)  #请求报文中的请求体   body b'{"a":1,"b":2}' 取的时候进行解码,反序列化就可以了;a=1&b=2在请求体里边,所以能打印出
        print("post",request.POST)                     #用户上传的数据;post <QueryDict: {}> 只有在ContentType:urlencoed时,request.POST才有数据,数据存到body里边了

        return HttpResponse("ok")
    return render(request, "file_put.html")
'''
请求首行
请求体
'''
'''
ContentType:urlencoed   请求头 这样的编码格式 ;multipart/form-data文件上传只能用这种
请求体(a=1&b=2&c=3)
'''

 浙公网安备 33010602011771号