
Tiles介绍
Tiles 是一种JSP布局框架,主要目的是为了将复杂的jsp页面作为一个的页面的部分机能,然后用来组合成一个最终表示用页面用的,这样的话,便于对页面的各个机能的变更及维护。 Tiles使得struts在页面的处理方面多了一种选择。并且更容易实现代码的重用。有点类是jsp:inlcude。
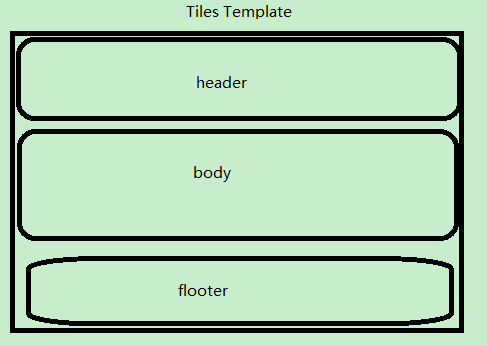
Tiles模版
在Tiles中,模板(Template)是一个页面的布局部分。你能将一个页面结构看成是由不同的需要填补空白组成,本例中采用的模版结构如下:
Tiles使用步骤
- 新建一个maven web项目,可以参照:【Maven】Eclipse 使用Maven创建Java Web项目
- 引入tiles所需要的jar包。在pom文件中添加依赖
 1 <project xmlns="http://maven.apache.org/POM/4.0.0" xmlns:xsi="http://www.w3.org/2001/XMLSchema-instance"
 2     xsi:schemaLocation="http://maven.apache.org/POM/4.0.0 http://maven.apache.org/maven-v4_0_0.xsd">
 3     <modelVersion>4.0.0</modelVersion>
 4     <groupId>com.hd</groupId>
 5     <artifactId>test-tiles</artifactId>
 6     <packaging>war</packaging>
 7     <version>0.0.1-SNAPSHOT</version>
 8     <name>test-tiles Maven Webapp</name>
 9     <url>http://maven.apache.org</url>
10     <dependencies>
11
12         <!-- https://mvnrepository.com/artifact/org.apache.tiles/tiles-jsp -->
13         <dependency>
14             <groupId>org.apache.tiles</groupId>
15             <artifactId>tiles-jsp</artifactId>
16             <version>3.0.5</version>
17         </dependency>
18         <!-- https://mvnrepository.com/artifact/org.apache.tiles/tiles-servlet -->
19         <dependency>
20             <groupId>org.apache.tiles</groupId>
21             <artifactId>tiles-servlet</artifactId>
22             <version>3.0.5</version>
23         </dependency>
24         <!-- https://mvnrepository.com/artifact/org.apache.tiles/tiles-extras -->
25         <dependency>
26             <groupId>org.apache.tiles</groupId>
27             <artifactId>tiles-extras</artifactId>
28             <version>3.0.5</version>
29         </dependency>
30
31         <!-- Servlet -->
32         <dependency>
33             <groupId>javax.servlet</groupId>
34             <artifactId>javax.servlet-api</artifactId>
35             <version>3.0.1</version>
36             <scope>provided</scope>
37         </dependency>
38         <dependency>
39             <groupId>javax.servlet.jsp</groupId>
40             <artifactId>jsp-api</artifactId>
41             <version>2.2</version>
42             <scope>provided</scope>
43         </dependency>
44
45         <dependency>
46             <groupId>junit</groupId>
47             <artifactId>junit</artifactId>
48             <version>3.8.1</version>
49             <scope>test</scope>
50         </dependency>
51     </dependencies>
52     <build>
53         <finalName>test-tiles</finalName>
54     </build>
55 </project>
- 创建一个模版,在webapp/view/core中新建一个test-layout.jsp
 1 <%@ page language="java" contentType="text/html; charset=UTF-8"
 2     pageEncoding="UTF-8"%>
 3 <%@ taglib prefix="tiles" uri="http://tiles.apache.org/tags-tiles"%>
 4 <!DOCTYPE html>
 5 <html lang="en">
 6 <head>
 7 <meta charset="utf-8">
 8 <meta name="viewport"
 9     content="width=device-width, initial-scale=1.0, maximum-scale=1.0">
10
11 <title><tiles:insertAttribute name="title" ignore="true" /></title>
12
13 <tiles:insertAttribute name="cssresources" />
14 </head>
15 <body class="sticky-header">
16
17     <tiles:insertAttribute name="header" />
18     <tiles:insertAttribute name="body" />
19     <tiles:insertAttribute name="footer" />
20 </body>
21 <tiles:insertAttribute name="jsresources" />
22 </html>
- 创建组成页面 ,如下图:


1 <%@ page language="java" contentType="text/html; charset=UTF-8"
2     pageEncoding="UTF-8"%>
3 <div>
4     这是头部
5 </div>
1 <%@ page language="java" contentType="text/html; charset=UTF-8"
2     pageEncoding="UTF-8"%>
3 <%@ taglib prefix="tiles" uri="http://tiles.apache.org/tags-tiles"%>
4
5 <tiles:insertDefinition name="index" />
1 <%@ page language="java" contentType="text/html; charset=UTF-8"
2     pageEncoding="UTF-8"%>
3     <button onclick="go(123)">body按钮</button>
1 <%@ page language="java" contentType="text/html; charset=UTF-8"
2     pageEncoding="UTF-8"%>
3 <div>
4     这是尾部
5 </div>
1 <%@ page language="java" contentType="text/html; charset=UTF-8"
2     pageEncoding="UTF-8"%>
3
4 <script src="js/test.js"></script>
1 <%@ page language="java" contentType="text/html; charset=UTF-8"
2     pageEncoding="UTF-8"%>
3
4 <link href="css/test.css" rel="stylesheet">
5
1 function go(content)
2 {
3     alert(content);
4 }
1 div {
2     border: 1px solid black;
3 }
5. 创建一个定义,在webapp/tiles/test-tiles.xml文件
默认情况,“定义”文件是/WEB-INF/tiles.xml。如果你使用的是CompleteAutoloadTilesListener,tiles将会使用webapp目录下按/WEB-INF/tiles*.xml匹配或classpath下按/META-INF/tiles*.xml匹配的任何文件作为“定义 ”文件;如果发现多个,tiles将会合并这些文件到一起。
 1 <?xml version="1.0" encoding="UTF-8" ?>
 2 <!DOCTYPE tiles-definitions PUBLIC
 3        "-//Apache Software Foundation//DTD Tiles Configuration 3.0//EN"
 4        "http://tiles.apache.org/dtds/tiles-config_3_0.dtd">
 5 <!-- http://tiles.apache.org/framework/config-reference.html -->
 6 <tiles-definitions>
 7     <!-- tiles基础模板 -->
 8     <definition name="baseTemplate" template="/view/core/test-layout.jsp">
 9         <put-attribute name="title" value="标题" />
10         <put-attribute name="cssresources" value="/view/core/test-css.jsp" />
11         <put-attribute name="jsresources" value="/view/core/test-js.jsp" />
12         <put-attribute name="header" value="/view/core/test-header.jsp" />
13         <put-attribute name="body" value="" />
14         <put-attribute name="footer" value="/view/core/test-footer.jsp" />
15     </definition>
16
17     <definition name="index" extends="baseTemplate">
18         <put-attribute name="title" value="首页" />
19         <put-attribute name="body" value="/view/core/test-body.jsp" />
20     </definition>
21
22 </tiles-definitions>
6. 在web.xml中添加Tiles监听器
 1 <?xml version="1.0" encoding="UTF-8"?>
 2 <web-app xmlns:xsi="http://www.w3.org/2001/XMLSchema-instance"
 3     xmlns="http://java.sun.com/xml/ns/javaee"
 4     xsi:schemaLocation="http://java.sun.com/xml/ns/javaee http://java.sun.com/xml/ns/javaee/web-app_3_0.xsd"
 5     id="WebApp_ID" version="3.0">
 6     <display-name>test-tiles</display-name>
 7
 8     <!-- 自定义tiles监听器 -->
 9     <listener>
10         <listener-class>com.test.listener.TestListener</listener-class>
11     </listener>
12
13     <!-- tiles监听器,默认配置文件在/WEB-INF/tiles*.xml
14     <listener>
15         <listener-class>org.apache.tiles.extras.complete.CompleteAutoloadTilesListener</listener-class>
16     </listener>
17      -->
18     <welcome-file-list>
19         <welcome-file>index.jsp</welcome-file>
20     </welcome-file-list>
21 </web-app>
自定义tiles监听器,TestListener

 1 package com.test.listener;
 2
 3 import java.util.ArrayList;
 4 import java.util.List;
 5
 6 import org.apache.tiles.factory.AbstractTilesContainerFactory;
 7 import org.apache.tiles.factory.BasicTilesContainerFactory;
 8 import org.apache.tiles.request.ApplicationContext;
 9 import org.apache.tiles.request.ApplicationResource;
10 import org.apache.tiles.startup.AbstractTilesInitializer;
11 import org.apache.tiles.startup.TilesInitializer;
12 import org.apache.tiles.web.startup.simple.SimpleTilesListener;
13
14 public class TestListener extends SimpleTilesListener {
15
16     @Override
17     protected TilesInitializer createTilesInitializer() {
18
19         return new AbstractTilesInitializer(){
20             @Override
21             protected AbstractTilesContainerFactory createContainerFactory(ApplicationContext context) {
22
23                 BasicTilesContainerFactory basicTilesContainerFactory = new BasicTilesContainerFactory(){
24                     @Override
25                     protected List<ApplicationResource> getSources(ApplicationContext applicationContext) {
26                         //applicationContext.getResources(“/ WEB-INF / my-tiles-definitions-file.xml”);
27
28                         List<ApplicationResource> retValue = new ArrayList<ApplicationResource>(1);
29                         retValue.add(applicationContext.getResource("/tiles/test-tiles.xml"));//修改tiles文件位置
30                         return retValue;
31                         //return super.getSources(applicationContext);
32                     }
33                 };
34                 return basicTilesContainerFactory;
35             }
36         };
37     }
38
39 }
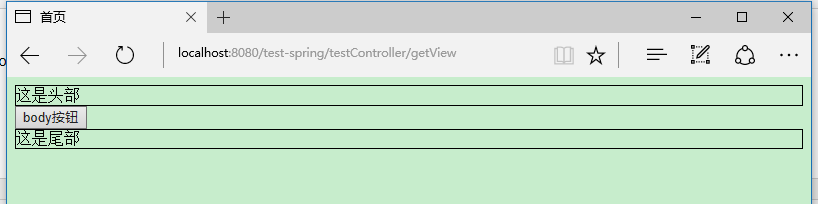
7. 发布到tomcat中,并启动tomcat

8. 在浏览器中访问 http://localhost:8080/test-tiles

Tiles在SpringMVC中应用
- 新建一个maven springmvc web项目,参照:【Maven】Eclipse 使用Maven创建SpringMVC Web项目
- 配置tiles,如上面的步骤(除去添加tiles监听器的步骤,只要在springmvc配置tiles即可)
- 在springmvc的配置文件中加入一下内容:
 1     <!-- tiles视图解释类 -->
 2     <bean id="tilesViewResolver" class="org.springframework.web.servlet.view.UrlBasedViewResolver">
 3         <property name="viewClass" value="org.springframework.web.servlet.view.tiles3.TilesView" />
 4     </bean>
 5
 6     <!-- tiles配置路径 -->
 7     <bean id="tilesConfigurer" class="org.springframework.web.servlet.view.tiles3.TilesConfigurer">
 8         <property name="definitions">
 9             <list>
10                 <value>/tiles/*.xml</value>
11             </list>
12         </property>
13     </bean>
- 写一个测试的controller,TestController.java
 1 package com.test.controller;
 2
 3 import javax.servlet.http.HttpServletRequest;
 4
 5 import org.springframework.stereotype.Controller;
 6 import org.springframework.web.bind.annotation.RequestMapping;
 7
 8 @Controller
 9 @RequestMapping("/testController")
10 public class TestController {
11
12     @RequestMapping(value="/getView")
13     public String getTest(HttpServletRequest request){
14
15         return "index";//返回tiles定义中的name
16
17     }
18 }
- 发布到tomcat,在浏览器中访问TestController中的getTest方法,即可返回界面


 浙公网安备 33010602011771号