django视图 CBV 和 FBV
视图 CBV 和 FBV
目录
什么是视图?
	一个视图函数(类),简称视图,是一个简单的Python 函数(类),它接受Web请求并且返回Web响应。

   响应可以是一张网页的HTML内容,一个重定向,一个404错误,一个XML文档,或者一张图片。放置在项目
(project)或应用程序(app)目录中的名为views.py的文件中。
- 下面是一个以HTML文档的形式返回当前日期和时间的视图:
from django.http import HttpResponse
import datetime

def current_datetime(request):
    now = datetime.datetime.now()
    html = "<html><body>It is now %s.</body></html>" % now
    return HttpResponse(html)
- 让我们来逐行解释下上面的代码:
首先,我们从 django.http模块导入了HttpResponse类,以及Python的datetime库。

接着,我们定义了current_datetime函数。它就是视图函数。每个视图函数都使用HttpRequest对象作为第一个参数,
并且通常称之为request。

注意,视图函数的名称并不重要;不需要用一个统一的命名方式来命名,以便让Django识别它。
我们将其命名为current_datetime,是因为这个名称能够比较准确地反映出它实现的功能。

这个视图会返回一个HttpResponse对象,其中包含生成的响应。每个视图函数都负责返回一个HttpResponse对象。

Django使用请求和响应对象来通过系统传递状态。

当浏览器向服务端请求一个页面时,Django创建一个HttpRequest对象,该对象包含关于请求的元数据。然后,
Django加载相应的视图,将这个HttpRequest对象作为第一个参数传递给视图函数。

每个视图负责返回一个HttpResponse对象。
FBV function based view 基于函数的视图
from app01 import models
from django.shortcuts import render, redirect, HttpResponse

import datetime
def mul(request):
    now = datetime.datetime.now()
    return render(request, 'mul.html',{'now':now})
- 使用 FBV
#urls.py 文件
from django.conf.urls import url
from django.contrib import admin
from app01 import views

urlpatterns = [
    url(r'^mul', views.mul),
]
CBV class based view 基于类的视图
from app01 import models
from django.views import View
from django.shortcuts import render, redirect, HttpResponse

class AddPublisher(View):
    def get(self,request):
        """处理get请求"""
        return response

    def post(self,request):
        """处理post请求"""
        return response
#处理求响的逻辑很清晰
- 使用CBV:
#urls.py 文件
from django.conf.urls import url
from django.contrib import admin
from app01 import views

urlpatterns = [
url(r'^add_publisher/', views.AddPublisher.as_view()),
]#固定写法注意.as_view()是要加括号的
小技巧
我们写的视图,可以接收,处理8种请求,页面发来的8种请求:
from app01 import views   #ctrl+鼠标右击views 查看源码

class View(object):
    """
    Intentionally simple parent class for all views. Only implements
    dispatch-by-method and simple sanity checking.
    """
    http_method_names = ['get', 'post', 'put', 'patch', 'delete', 'head', 'options', 'trace']

#可以看到views 默认接收了八种请求'get', 'post', 'put', 'patch', 'delete', 'head', 'options', 'trace'
#那我在写视图函数是可以重新定义http_method_names = ['get',post]让这个视图,让它只接收get和post请求
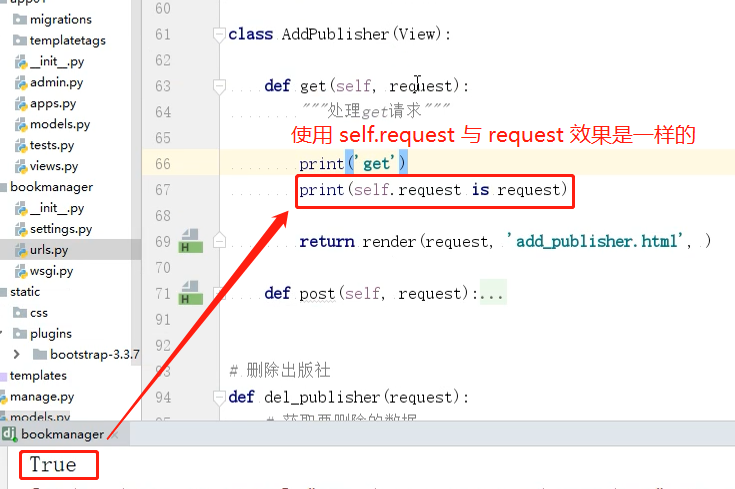
- 在CBV 视图中request和self.request效果是一样的
CBV 如何获取页面请求类型,并响应的
1. 项目启动,执行AddPublisher.as_view()       ——》  view

   	url(r'add_publisher/',views.AddPublisher.as_view())

   	url(r'add_publisher/', view )

2. 请求到来时执行view函数:

   1. 实例化AddPublisher   ——》 self

   2. self.request = reqeust

   3. 执行self.dispatch(request,*args,**kwargs)

      1. 判断请求方式是否被允许     http_method_names  = []

         1. 允许

            通过反射获取到当前请求方式对应的方法   ——》 handler

         2. 不允许

            self.http_method_not_allowed    ——》  handler

      2. 执行handler(request,*args,**kwargs)     ——》  返回响应
使用装饰器的 FBV
- FBV本身就是一个函数,所以和给普通的函数加装饰器无差:
def wrapper(func):
    def inner(*args, **kwargs):
        start_time = time.time()
        ret = func(*args, **kwargs)
        end_time = time.time()
        print("used:", end_time-start_time)
        return ret
    return inner


# FBV版添加装饰器
@wrapper
def add_class(request):
    if request.method == "POST":
        class_name = request.POST.get("class_name")
        models.Classes.objects.create(name=class_name)
        return redirect("/class_list/")
    return render(request, "add_class.html")
使用装饰器的CBV
-
类中的方法与独立函数不完全相同,因此不能直接将函数装饰器应用于类中的方法 ,我们需要先将其转换为方法装饰器。
-
Django中提供了method_decorator装饰器用于将函数装饰器转换为方法装饰器。
-
装饰器加在类方法上
# 装饰器加在类方法上
import tinme
from django.views import View
from django.utils.decorators import method_decorator   #导入method_decorator装饰器

def timer(func):
    def inner(request, *args, **kwargs):
        start = time.time()
        ret = func(request, *args, **kwargs)
        print("函数执行的时间是{}".format(time.time() - start))
        return ret
    return inner

class AddClass(View):

    @method_decorator(timer)#只有get请求装饰器才生效
    def get(self, request):
        return render(request, "add_class.html")

    def post(self, request):
        class_name = request.POST.get("class_name")
        models.Classes.objects.create(name=class_name)
        return redirect("/class_list/")
-
dispatch()加装饰器
# 使用CBV时要注意,请求过来后会先执行dispatch()这个方法,如果需要批量对具体的请求处理方法,如get,
post等做一些操作的时候,这里我们可以手动改写dispatch方法,这个dispatch方法就和在FBV上加装饰器的效果一样。
import tinme
from django.views import View
from django.utils.decorators import method_decorator   #导入方法装饰器

def timer(func):
    def inner(request, *args, **kwargs):
        start = time.time()
        ret = func(request, *args, **kwargs)
        print("函数执行的时间是{}".format(time.time() - start))
        return ret
    return inner

class Login(View):

    @method_decorator(timer) #相当于给get,post请求都加上了装饰器
    def dispatch(self, request, *args, **kwargs):
        obj = super(Login,self).dispatch(request, *args, **kwargs)
        return obj

    def get(self,request):
        return render(request,'login.html')

    def post(self,request):
        print(request.POST.get('user'))
        return HttpResponse('Login.post')
-
装饰器加在类上
#装饰器加在类上
import tinme
from django.views import View
from django.utils.decorators import method_decorator   #导入方法装饰器

def timer(func):
    def inner(request, *args, **kwargs):
        start = time.time()
        ret = func(request, *args, **kwargs)
        print("函数执行的时间是{}".format(time.time() - start))
        return ret
    return inner

@method_decorator(timer,name = 'get') #相当于给get请求,加上了装饰器
@method_decorator(timer,name = 'post')#相当于给post请求,加上了装饰器
class Login(View):

    def get(self,request):
        return render(request,'login.html')

    def post(self,request):
        print(request.POST.get('user'))
        return HttpResponse('Login.post')
使用method_decorator与不使用的区别:
"""
def timer(func):
	pritn(func)
    def inner(request, *args, **kwargs):
    	print(args)
        start = time.time()
        ret = func(request, *args, **kwargs)
        print("函数执行的时间是{}".format(time.time() - start))
        return ret
"""


不使用用method_decorator

func   ——》 <function AddPublisher.get at 0x000001FC8C358598>

args  ——》 (<app01.views.AddPublisher object at 0x000001FC8C432C50>, <WSGIRequest: GET '/add_publisher/'>)


使用method_decorator之后:

func ——》 <function method_decorator.<locals>._dec.<locals>._wrapper.<locals>.bound_func at 0x0000015185F7C0D0>

args ——》 (<WSGIRequest: GET '/add_publisher/'>,)

 浙公网安备 33010602011771号