
springboot源码分析(五)-监听器实现原理(中)
本文是承接上一篇写的:springboot源码分析(四)-监听器实现原理(上)
概述
上一篇文章已经把监听器设计模式介绍一下,不太懂的可以先看一下上一篇文章,有助于理解本文,那本文就从源码角度分析springboot中监听器实现原理。
spring中的监听器都是实现了如下两个接口中的其中的一个
@FunctionalInterface
public interface ApplicationListener<E extends ApplicationEvent> extends EventListener {
    void onApplicationEvent(E var1);
}
public interface SmartApplicationListener extends ApplicationListener<ApplicationEvent>, Ordered {
    boolean supportsEventType(Class<? extends ApplicationEvent> var1);

    default boolean supportsSourceType(@Nullable Class<?> sourceType) {
        return true;
    }

    default int getOrder() {
        return 2147483647;
    }
}
说一下这两个接口的区别:第一个接口是所有的监听器都要实现的,里面就一个抽象方法,是一个函数式接口,第二个接口相比于第一个接口,扩展了几个方法,其中
supportsEventType(Class<? extends ApplicationEvent> var1)
方法跟这个监听器支持什么事件有关系,一会源码的时候就知道这个方法的作用了
首先看一下系统监听器初始化过程,和系统初始化器一样都是放在一个列表中。
SpringApplication初始化函数如下:
private List<ApplicationListener<?>> listeners;
public void setListeners(Collection<? extends ApplicationListener<?>> listeners) {
    this.listeners = new ArrayList(listeners);
}
public SpringApplication(ResourceLoader resourceLoader, Class<?>... primarySources) {
        this.sources = new LinkedHashSet();
        this.bannerMode = Mode.CONSOLE;
        this.logStartupInfo = true;
        this.addCommandLineProperties = true;
        this.addConversionService = true;
        this.headless = true;
        this.registerShutdownHook = true;
        this.additionalProfiles = new HashSet();
        this.isCustomEnvironment = false;
        this.lazyInitialization = false;
        this.resourceLoader = resourceLoader;
        Assert.notNull(primarySources, "PrimarySources must not be null");
        this.primarySources = new LinkedHashSet(Arrays.asList(primarySources));
        this.webApplicationType = WebApplicationType.deduceFromClasspath();
        this.setInitializers(this.getSpringFactoriesInstances(ApplicationContextInitializer.class));
        //这一行就是初始化监听器的
        this.setListeners(this.getSpringFactoriesInstances(ApplicationListener.class));
        this.mainApplicationClass = this.deduceMainApplicationClass();
    }
进入this.getSpringFactoriesInstances(ApplicationListener.class)方法
private <T> Collection<T> getSpringFactoriesInstances(Class<T> type) {
        return this.getSpringFactoriesInstances(type, new Class[0]);
    }

    private <T> Collection<T> getSpringFactoriesInstances(Class<T> type, Class<?>[] parameterTypes, Object... args) {
        ClassLoader classLoader = this.getClassLoader();
        //从META-INF/spring-factories中加载监听器
        Set<String> names = new LinkedHashSet(SpringFactoriesLoader.loadFactoryNames(type, classLoader));
     //实例化监听器
        List<T> instances = this.createSpringFactoriesInstances(type, parameterTypes, classLoader, args, names);
        //排序监听器
        AnnotationAwareOrderComparator.sort(instances);
        return instances;
    }
看过我前几篇系统初始化器的朋友应该对这几个方法都不陌生,因为系统初始化器也是调用的这个方法,当时详细了解析了这几个方法的源码,在这里就不重复了,感兴趣的朋友可以翻翻我的前几篇文章,都是springboot源码系列的。
看过上篇文章的朋友都知道,监听器模式需要几个条件。
- 目标
- 具体目标
- 监听器
- 事件(其实事件就是目标中发生了什么事,不同事对应不同的事件)
- 触发场景(这个上一篇文章中Test中,其实目标中执行了什么东西,然后观察者才可以观察到变化,这个其实就是触发场景)
下面就从上面的几个角度来分析
抽象目标
public abstract class AbstractApplicationEventMulticaster implements ApplicationEventMulticaster, BeanClassLoaderAware, BeanFactoryAware {

    //存放监听器的地方
  private final AbstractApplicationEventMulticaster.ListenerRetriever defaultRetriever = new AbstractApplicationEventMulticaster.ListenerRetriever(false);

    //新增监听器
  public void addApplicationListener(ApplicationListener<?> listener) {
        synchronized(this.retrievalMutex) {
            Object singletonTarget = AopProxyUtils.getSingletonTarget(listener);
            if (singletonTarget instanceof ApplicationListener) {
                this.defaultRetriever.applicationListeners.remove(singletonTarget);
            }

            this.defaultRetriever.applicationListeners.add(listener);
            this.retrieverCache.clear();
        }
    }
  //移除监听器
  public void removeApplicationListener(ApplicationListener<?> listener) {
        synchronized(this.retrievalMutex) {
            this.defaultRetriever.applicationListeners.remove(listener);
            this.retrieverCache.clear();
        }
    }

  //省略N个其他方法


}
可以发现其实这个和我们上一节讲的那个差不多,就是有几个存放监听器的列表,并且实现新增或者删除监听器的方法,但是这里没有广播后者叫着通知的方法,就是通知监听器执行的方法,这个方法在具体的目标中实现。
具体目标
//这里可以发现继承了抽象目标
public class SimpleApplicationEventMulticaster extends AbstractApplicationEventMulticaster {

  //这个方法就是广播事件的
  public void multicastEvent(ApplicationEvent event) {
        this.multicastEvent(event, this.resolveDefaultEventType(event));
      }

    public void multicastEvent(ApplicationEvent event, @Nullable ResolvableType eventType) {
        ResolvableType type = eventType != null ? eventType : this.resolveDefaultEventType(event);
        Executor executor = this.getTaskExecutor();
        Iterator var5 = this.getApplicationListeners(event, type).iterator();

        while(var5.hasNext()) {
            ApplicationListener<?> listener = (ApplicationListener)var5.next();
            if (executor != null) {
                executor.execute(() -> {
                    this.invokeListener(listener, event);
                });
            } else {
                this.invokeListener(listener, event);
            }
        }

    }
  //省略N个方法。。。
}
监听器
下面来看一下springboot中都有哪些监听器
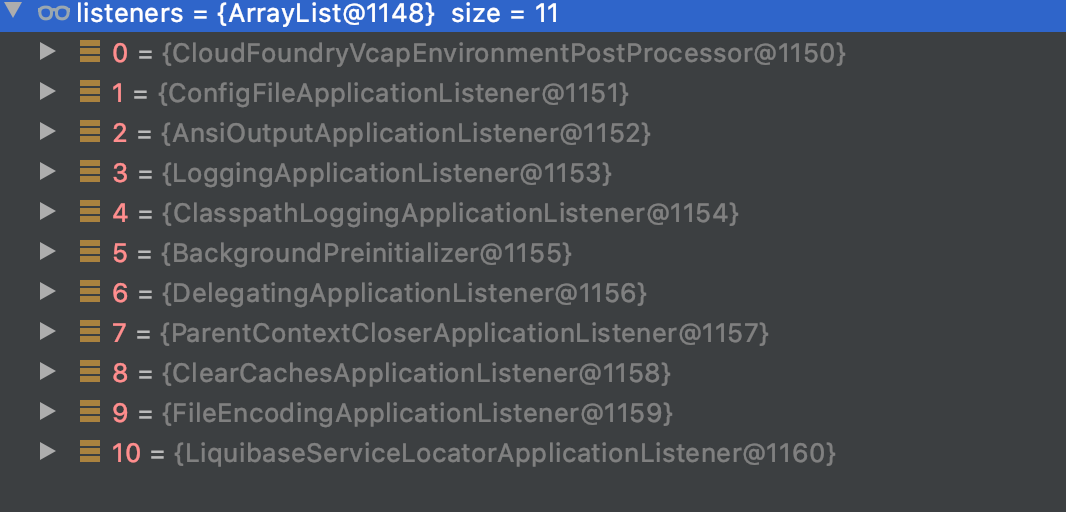
这些个监听器先不要管,一会我会分析几个具体监听器。
事件
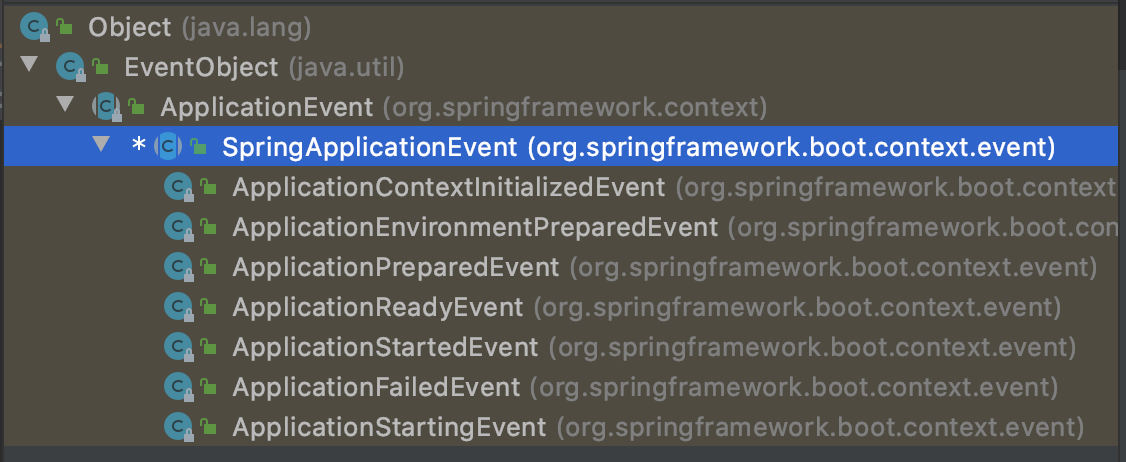
这些事件在SpringApplication初始化过程中基本都会用到,我会分析其中的一两个事件
触发场景
看一下SpringApplication.run()方法
public ConfigurableApplicationContext run(String... args) {
        StopWatch stopWatch = new StopWatch();
        stopWatch.start();
        ConfigurableApplicationContext context = null;
        Collection<SpringBootExceptionReporter> exceptionReporters = new ArrayList();
        this.configureHeadlessProperty();
     //这里就是springboot比较讲究的地方,一会分析这个
        SpringApplicationRunListeners listeners = this.getRunListeners(args);
     //这里就是触发场景
        listeners.starting();

        Collection exceptionReporters;
    //省略N行不相关的
}
进入this.getRunListeners(args);
 private SpringApplicationRunListeners getRunListeners(String[] args) {
        Class<?>[] types = new Class[]{SpringApplication.class, String[].class};
     //这里新建对象,我们看一下这个对象,里面的参数this.getSpringFactoriesInstances这个就是从META-INF/spring-factories中获取监听器的,返回一个实例化好列表,但是这里注意
        //这里后去的监听器是SpringApplicationListener,和上面初始化监听器列表获取的是不一样的
        return new SpringApplicationRunListeners(logger, this.getSpringFactoriesInstances(SpringApplicationRunListener.class, types, this, args));
    }
进入new SpringApplicationRunListeners(logger, this.getSpringFactoriesInstances(SpringApplicationRunListener.class, types, this, args));
class SpringApplicationRunListeners {
    private final Log log;
    private final List<SpringApplicationRunListener> listeners;

    SpringApplicationRunListeners(Log log, Collection<? extends SpringApplicationRunListener> listeners) {
        this.log = log;
        this.listeners = new ArrayList(listeners);
    }
  //SpringApplication开始启动事件
    void starting() {
        Iterator var1 = this.listeners.iterator();

        while(var1.hasNext()) {
            SpringApplicationRunListener listener = (SpringApplicationRunListener)var1.next();
            listener.starting();
        }

    }
  //SpringApplication环境准备就绪事件
    void environmentPrepared(ConfigurableEnvironment environment) {
        Iterator var2 = this.listeners.iterator();

        while(var2.hasNext()) {
            SpringApplicationRunListener listener = (SpringApplicationRunListener)var2.next();
            listener.environmentPrepared(environment);
        }

    }
  //SpringApplication上下文准备事件
    void contextPrepared(ConfigurableApplicationContext context) {
        Iterator var2 = this.listeners.iterator();

        while(var2.hasNext()) {
            SpringApplicationRunListener listener = (SpringApplicationRunListener)var2.next();
            listener.contextPrepared(context);
        }

    }
}
这个类的作用是什么呢?他的类名后面也带有Listener,但是他并不是一个监听器,而是一个封装了目标中会产生的各个事件的封装类,在上一篇文章中,我们是直接在具体目标中实例化事件,这里他没有在具体目标中直接实例化目标,而是让事件的实例化和具体目标分开,这样可以让系统的耦合性降低。
这个类中有一个列表:List<SpringApplicationRunListener> listeners;我们看一下这个SpringApplicationRunListener
public interface SpringApplicationRunListener {
    default void starting() {
    }

    default void environmentPrepared(ConfigurableEnvironment environment) {
    }

    default void contextPrepared(ConfigurableApplicationContext context) {
    }

    default void contextLoaded(ConfigurableApplicationContext context) {
    }

    default void started(ConfigurableApplicationContext context) {
    }

    default void running(ConfigurableApplicationContext context) {
    }

    default void failed(ConfigurableApplicationContext context, Throwable exception) {
    }
}
这个接口就是定义了各种要执行的事件,然后我们看一下这个接口的实现类,就只有一个实现类
public class EventPublishingRunListener implements SpringApplicationRunListener, Ordered {
    private final SpringApplication application;
    private final String[] args;
   //这个里面有一个广播器属性,其实就是我们说的具体目标
    private final SimpleApplicationEventMulticaster initialMulticaster;

    public EventPublishingRunListener(SpringApplication application, String[] args) {
        this.application = application;
        this.args = args;
        this.initialMulticaster = new SimpleApplicationEventMulticaster();
        Iterator var3 = application.getListeners().iterator();

        while(var3.hasNext()) {
            ApplicationListener<?> listener = (ApplicationListener)var3.next();
            this.initialMulticaster.addApplicationListener(listener);
        }

    }

    public int getOrder() {
        return 0;
    }

    public void starting() {
        this.initialMulticaster.multicastEvent(new ApplicationStartingEvent(this.application, this.args));
    }

    public void environmentPrepared(ConfigurableEnvironment environment) {
        this.initialMulticaster.multicastEvent(new ApplicationEnvironmentPreparedEvent(this.application, this.args, environment));
    }

    public void contextPrepared(ConfigurableApplicationContext context) {
        this.initialMulticaster.multicastEvent(new ApplicationContextInitializedEvent(this.application, this.args, context));
    }
    //省略N个方法。。。
}
springboot就是使用这个玩意来连接触发场景和调用具体的监听器去执行的
OK,我们接下来来分析SimpleApplicationEventMulticaster的multicastEvent()方法
public void multicastEvent(ApplicationEvent event) {
        this.multicastEvent(event, this.resolveDefaultEventType(event));
    }

    public void multicastEvent(ApplicationEvent event, @Nullable ResolvableType eventType) {
        ResolvableType type = eventType != null ? eventType : this.resolveDefaultEventType(event);
        Executor executor = this.getTaskExecutor();
     //<1.1>获取对这个事件感兴趣的监听器
        Iterator var5 = this.getApplicationListeners(event, type).iterator();

        while(var5.hasNext()) {
            ApplicationListener<?> listener = (ApplicationListener)var5.next();
            if (executor != null) {
                executor.execute(() -> {
                    this.invokeListener(listener, event);
                });
            } else {
          //<1.2>具体让监听器执行事件的方法
                this.invokeListener(listener, event);
            }
        }

    }
我们进入<1.1>,this.getApplicationListeners(event, type).iterator();
protected Collection<ApplicationListener<?>> getApplicationListeners(ApplicationEvent event, ResolvableType eventType) {
        Object source = event.getSource();
        Class<?> sourceType = source != null ? source.getClass() : null;
        AbstractApplicationEventMulticaster.ListenerCacheKey cacheKey = new AbstractApplicationEventMulticaster.ListenerCacheKey(eventType, sourceType);
     //先从缓存中获取,由于我们初次启动,缓存中是不存在的
        AbstractApplicationEventMulticaster.ListenerRetriever retriever = (AbstractApplicationEventMulticaster.ListenerRetriever)this.retrieverCache.get(cacheKey);
        if (retriever != null) {
            return retriever.getApplicationListeners();
        } else if (this.beanClassLoader == null || ClassUtils.isCacheSafe(event.getClass(), this.beanClassLoader) && (sourceType == null || ClassUtils.isCacheSafe(sourceType, this.beanClassLoader))) {  //添加同步锁
            synchronized(this.retrievalMutex) {
                //再次从缓存中获取,防止在执行这个操作的过程中,别的线程向里面写了数据
                retriever = (AbstractApplicationEventMulticaster.ListenerRetriever)this.retrieverCache.get(cacheKey);
                if (retriever != null) {
                    return retriever.getApplicationListeners();
                } else {
                    retriever = new AbstractApplicationEventMulticaster.ListenerRetriever(true);
            //这一步就是获取对这个事件感兴趣的监听器的关键步骤
                    Collection<ApplicationListener<?>> listeners = this.retrieveApplicationListeners(eventType, sourceType, retriever);
                    this.retrieverCache.put(cacheKey, retriever);
                    return listeners;
                }
            }
        } else {
            return this.retrieveApplicationListeners(eventType, sourceType, (AbstractApplicationEventMulticaster.ListenerRetriever)null);
        }
    }
我们进入this.retrieveApplicationListeners(eventType, sourceType, retriever);
private Collection<ApplicationListener<?>> retrieveApplicationListeners(ResolvableType eventType, @Nullable Class<?> sourceType, @Nullable AbstractApplicationEventMulticaster.ListenerRetriever retriever) {
     //新建list,用来存放对该事件感兴趣的监听器
        List<ApplicationListener<?>> allListeners = new ArrayList();
        LinkedHashSet listeners;
        LinkedHashSet listenerBeans;
        synchronized(this.retrievalMutex) {
       //这里this.defaultRetriever.applicationListeners就是在SpringApplication初始化的时候从META-INF/spring-factories中获取的监听器
            listeners = new LinkedHashSet(this.defaultRetriever.applicationListeners);
            listenerBeans = new LinkedHashSet(this.defaultRetriever.applicationListenerBeans);
        }

        Iterator var7 = listeners.iterator();
     //把系统中所有的监听器都遍历一遍,找到对这个事件感兴趣的监听器
        while(var7.hasNext()) {
            ApplicationListener<?> listener = (ApplicationListener)var7.next();
       //这里就是判断是否感兴趣的核心方法,我们进入看看
            if (this.supportsEvent(listener, eventType, sourceType)) {
                if (retriever != null) {
                    retriever.applicationListeners.add(listener);
                }

                allListeners.add(listener);
            }
        }
     //第一次初始化,listenerBeans是空的,这里就不分析了
        if (!listenerBeans.isEmpty()) {
            ConfigurableBeanFactory beanFactory = this.getBeanFactory();
            Iterator var15 = listenerBeans.iterator();

            while(var15.hasNext()) {
                String listenerBeanName = (String)var15.next();

                try {
                    if (this.supportsEvent(beanFactory, listenerBeanName, eventType)) {
                        ApplicationListener<?> listener = (ApplicationListener)beanFactory.getBean(listenerBeanName, ApplicationListener.class);
                        if (!allListeners.contains(listener) && this.supportsEvent(listener, eventType, sourceType)) {
                            if (retriever != null) {
                                if (beanFactory.isSingleton(listenerBeanName)) {
                                    retriever.applicationListeners.add(listener);
                                } else {
                                    retriever.applicationListenerBeans.add(listenerBeanName);
                                }
                            }

                            allListeners.add(listener);
                        }
                    } else {
                        Object listener = beanFactory.getSingleton(listenerBeanName);
                        if (retriever != null) {
                            retriever.applicationListeners.remove(listener);
                        }

                        allListeners.remove(listener);
                    }
                } catch (NoSuchBeanDefinitionException var11) {
                }
            }
        }
进入this.supportsEvent(listener, eventType, sourceType)
protected boolean supportsEvent(ApplicationListener<?> listener, ResolvableType eventType, @Nullable Class<?> sourceType) {
     //先判断监听器是不是GenericApplicationListener
        GenericApplicationListener smartListener = listener instanceof GenericApplicationListener ? (GenericApplicationListener)listener : new GenericApplicationListenerAdapter(listener);
     //这里是判断是不是感兴趣的
        return ((GenericApplicationListener)smartListener).supportsEventType(eventType) && ((GenericApplicationListener)smartListener).supportsSourceType(sourceType);
    }
进入((GenericApplicationListener)smartListener).supportsEventType(eventType)
public boolean supportsEventType(ResolvableType eventType) {
     //先判断这个监听器是不是SmartApplication类型的
        if (this.delegate instanceof SmartApplicationListener) {
            Class<? extends ApplicationEvent> eventClass = eventType.resolve();
        //<3.1> 如果是SmartApplicationListener类型的,可以直接使用delegate中的supportsEventType方法判断,为什么可以这样判断呢?
        //因为在SmartApplicationListener接口中有这个抽象方法,他的实现类都会实现这个方法

            return eventClass != null && ((SmartApplicationListener)this.delegate).supportsEventType(eventClass);
        } else {
    //这个declaredEventType在GenericApplicationListenerAdapter初始化的时候已经赋值了,大家可以看一下这个类的构造方法
    //<3.2> declaredEventType.isAssignableFrom(eventType); 这个方法就是判断当前监听器是否对这个事件感兴趣的,这个怎么判断呢?后面会说

 return this.declaredEventType == null || this.declaredEventType.isAssignableFrom(eventType); } }
ok,<3.1>中,我们就找一个实现了SmartApplicationListener接口的监听器,在我上面的截图中的ConfigFileApplicationListener,这个监听器实现了
public class ConfigFileApplicationListener implements EnvironmentPostProcessor, SmartApplicationListener, Ordered {
  //可以发现这个监听器对两个事件感兴趣,只要是下面的两个事件,他都会返回true
  public boolean supportsEventType(Class<? extends ApplicationEvent> eventType) {
        return ApplicationEnvironmentPreparedEvent.class.isAssignableFrom(eventType) || ApplicationPreparedEvent.class.isAssignableFrom(eventType);
    }
}
<3.2>处, this.declaredEventType.isAssignableFrom(eventType);这个方法有什么有呢?
我举个例子大家就明白了。
在上面截图的监听器中有一个CloudFoundryVcapEnvironmentPostProcessor,我们看一下这个类的定义
public class CloudFoundryVcapEnvironmentPostProcessor implements EnvironmentPostProcessor, Ordered, ApplicationListener<ApplicationPreparedEvent> {}
这个类在实现ApplicationListener的时候指定了具体的事件,就是ApplicationPreparedEvent,那<3.2>处的代码,假设当前正在遍历的就是这个监听器,那这个方法就是判断当前的事件是不是ApplicationPreparedEvent,如果是就返回true
也许分析到这里大家已经找不着北了,spring的代码写的就是这种,一层套一层,,,,,,,,,,,不过我们的分析还没有完成,我们在上面已经找到了对ApplicationStartingEvent事件感兴趣的监听器,如下:
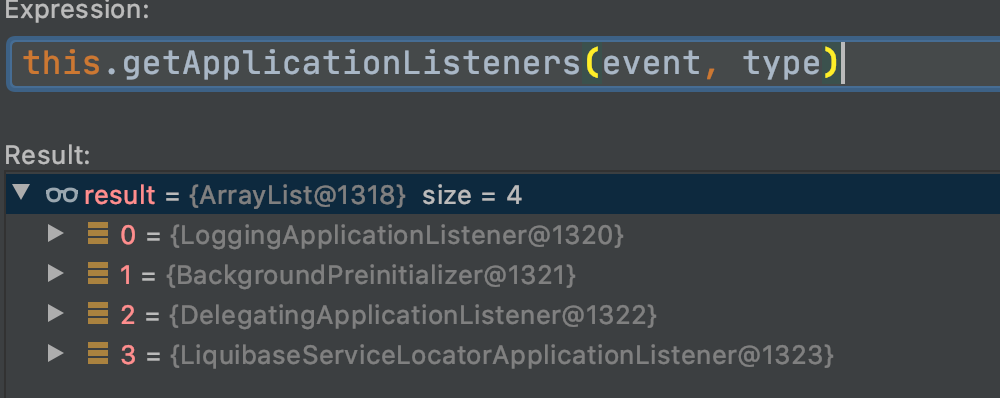
我们找到了4个对这个事件感兴趣的监听器,那我们要执行对应的回调方法,我们拿其中的一个监听器举例,就拿第一个LoggingApplicationListener,我们看一下这个监听器会做什么吧,😄
public void onApplicationEvent(ApplicationEvent event) {
        if (event instanceof ApplicationStartingEvent) {
            this.onApplicationStartingEvent((ApplicationStartingEvent)event);
        } else if (event instanceof ApplicationEnvironmentPreparedEvent) {
            this.onApplicationEnvironmentPreparedEvent((ApplicationEnvironmentPreparedEvent)event);
        } else if (event instanceof ApplicationPreparedEvent) {
            this.onApplicationPreparedEvent((ApplicationPreparedEvent)event);
        } else if (event instanceof ContextClosedEvent && ((ContextClosedEvent)event).getApplicationContext().getParent() == null) {
            this.onContextClosedEvent();
        } else if (event instanceof ApplicationFailedEvent) {
            this.onApplicationFailedEvent();
        }

    }
可以发现这个监听器可以处理很多的事件,基本上就是打印日志。
以上,基本上把监听器的原理给介绍完了,总结一下,从触发场景产生事件开始,到寻找对这个事件感兴趣的监听器,在最后执行回调,就是整个监听器的执行链路,在判断监听器是否对事件感兴趣的时候,把监听器分为两种,一种是实现了SmartApplicationListener的,另一个种是实现了ApplicationListener的,前者会调用监听器内部的supportEventType()方法来判断当前监听器是否对该事件感兴趣,后者则是直接调用declaredEventType.isAssignableFrom(eventType);来判断当前监听器是否对该事件感兴趣。下一篇文章我会自定义几个监听器,加入到springboot的启动监听器列表中,看一下执行的结果。
番外话:如果大家觉得这文章写的又臭又长,很凌乱,那抱歉了,因为这个系列的文章就是我学习springboot过程中整理的一种类似笔记的东西,由于本身水平确实有限,各位看官老爷就多担待。

 浙公网安备 33010602011771号