drf基本使用(5)_认证,权限,过滤,分页......
前言
rest_framework除了给我们提供了方便的视图集合序列化功能,还提供了其他一些功能, 比如权限认证, 限流, 过滤, 异常处理
首先我们先快速创建一个django项目
- urls
from rest_framework.router import DefaultRouter
from .views import GameModelViewSet # 引入视图集

urlpatterns = []

router = DefaultRouter()
router.register('store', GameModelViewSet)
urlpatterns += router.urls
- serializer
from rest_framework.serializers import ModelSerialier
from . models import Game
class GameModelSerializer(ModelSerialzier):
    class Meta:
        model = Game
        fields = '__all__'
- views
from rest_framework.viewsets import ModelViewSet
from . import models
from .serializer import GameModelSerializer

class GameModelViewSet(ModelViewSet):
    queryset = models.Game.objects.all()
    serializer_class = GameModelSerializer
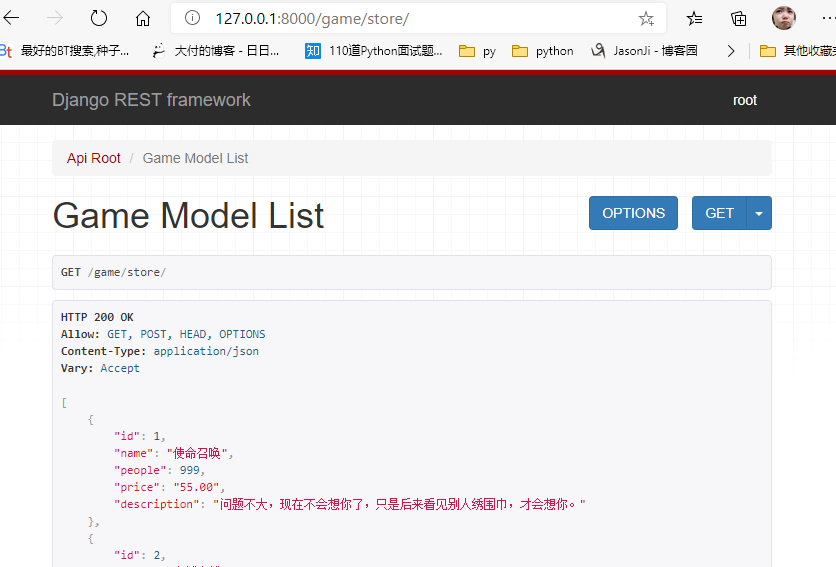
创建 好了我们访问看一下
http://127.0.0.1:8000/game/store/
认证 Authentication
详情点击: https://mp.weixin.qq.com/s/gEI2ikzeWR4MJ7AVwPIQ7w
我们可以通过下面的命令看到rest_framework中定义的权限认证方法
from rest_framework import settings
REST_FRAMEWORK = {
    'DEFAULT_AUTHENTICATION_CLASSES': [
        'rest_framework.authentication.SessionAuthentication',
        # session认证, admin后台其实就是使用的session认证,数据也是保存在了session表中,其实接口开发很少用到session认证, 所以我们可以通过配置改为其他认证, 比如jwt(JSON WEB TOKEN)或者一些陪着redis的认证

        'rest_framework.authentication.BasicAuthentication']
    # 基本认证,工作当中可能一些测试人员会参与的话,他们会将一些认证数据保存在内存当中,然后验证的,我们基本上用不上
}
如何自定义认证方案?
要实现自定义的认证方案,要继承BaseAuthentication类并且重写.authenticate(self, request)方法。如果认证成功,该方法应返回(user, auth)的二元元组,否则返回None。
在某些情况下,你可能不想返回None,而是希望从.authenticate()方法抛出AuthenticationFailed异常。
通常你应该采取的方法是:
- 如果不尝试验证,返回
None。还将检查任何其他正在使用的身份验证方案。 - 如果尝试验证但失败,则抛出
AuthenticationFailed异常。无论任何权限检查也不检查任何其他身份验证方案,立即返回错误响应。
你也可以重写.authenticate_header(self, request)方法。如果实现该方法,则应返回一个字符串,该字符串将用作HTTP 401 Unauthorized响应中的WWW-Authenticate头的值。
如果.authenticate_header()方法未被重写,则认证方案将在未验证的请求被拒绝访问时返回HTTP 403 Forbidden响应。
自定义一个认证方法
我们在utils文件夹中创建一个authentiction.py文件
- user是验证通过后返回的user对象,auth存token等其它信息
from rest_framework.authentication import BaseAuthentication
from rest_framework.exceptions import AuthenticationFailed

class LoginAuthenticate(BaseAuthentication):
    def authenticate(self, request):

        if request.session:
            return ('user', 'auth')

        else:
            raise AuthenticationFailed('认证失败')
接下来我们要将自定义的认证组件添加使用
- 全局使用
直接在settings中添加到最上面
REST_FRAMEWORK = {

    'DEFAULT_AUTHENTICATION_CLASSES': [
        'game.utils.authentication.LoginAuthenticate',  # 自定义的登录认证
        'rest_framework.authentication.SessionAuthentication',
        'rest_framework.authentication.BasicAuthentication']
}
- 局部使用
在每个视图中通过设置authentication_classess属性来设置
from game.utils.authentication import LoginAuthenticate # 引入自定义的认证组件
class GameModelViewSet(ModelViewSet):
authentication_classes = [LoginAuthenticate, ] #
queryset = models.Game.objects.all()
serializer_class = GameModelSerializer
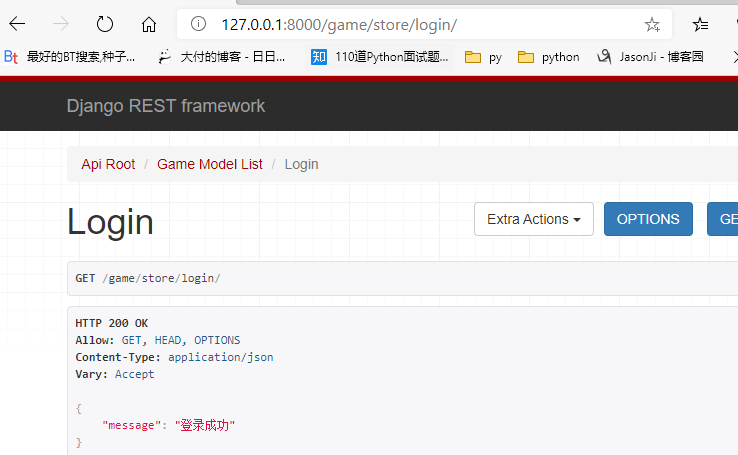
@action(methods=['get'], detail=False)
def login(self, request):
# 获取一个认证中返回过来元组中的数据
print(request.user) # user
print(request.auth) # auth
return Response({'message': '登录成功'})
接下来我们在我们视图中自定义一个方法进行测试
# views
from rest_framework.viewsets import ModelViewSet
from . import models
from .serializer import GameModelSerializer
from rest_framework.decorators import action
from rest_framework.response import Response


class GameModelViewSet(ModelViewSet):
    queryset = models.Game.objects.all()
    serializer_class = GameModelSerializer

    @action(methods=['get'], detail=False)
    def login(self, request):
        # 获取一个认证中返回过来元组中的数据
        print(request.user)  # user
        print(request.auth)  # auth
        return Response({'message': '登录成功'})
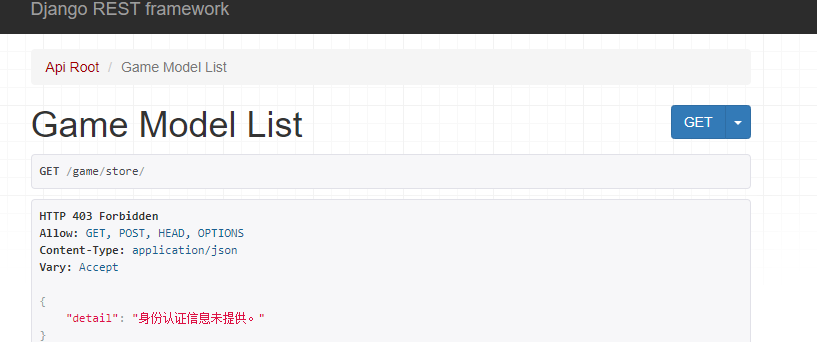
权限Permission
权限控制可以限制用户对于视图的访问和对于具体数据对象的访问。
- 在执行视图的dispatch()方法前,会先进行视图访问权限的判断
- 在通过get_object()获取具体对象时,会进行模型对象访问权限的判断
使用
可以在配置文件中全局设置默认的权限管理类,如
REST_FRAMEWORK = {
    'DEFAULT_PERMISSION_CLASSES': [
        'rest_framework.permissions.IsAuthenticated'
        # 'rest_framework.permissions.AllowAny',
    ],
}
登录状态下才能访问我们的接口,可以通过退出admin后台之后,你看一下还能不能访问我们正常的接口就看到效果了
也可以在具体的视图中通过permission_classes属性来设置,如
from rest_framework.permissions import IsAuthenticated
from rest_framework.views import APIView

class ExampleView(APIView):
    permission_classes = (IsAuthenticated,)
    ...
提供的权限
- AllowAny 允许所有用户
- IsAuthenticated 仅通过认证的用户
举例
from rest_framework.permissions import IsAuthenticated
from rest_framework.authentication import SessionAuthentication

class GameModelViewSet(ModelViewSet):
    # authentication_classes = [LoginAuthenticate, ]
    queryset = models.Game.objects.all()
    serializer_class = GameModelSerializer
    authentication_classes = [SessionAuthentication]
    permission_classes = [IsAuthenticated]
没有登录的情况下
自定义权限
在我们的utils文件夹中创建一个permissions.py文件
from rest_framework.permissions import BasePermission

class VipPermission(BasePermission):
    def has_permission(self, request, view):
        # 验证用户有没有权限,这里就不验证了
        return True
在views中
from game.utils.permissions import VipPermission

class GameModelViewSet(APIView):
    permission_classes = [VIPpermission, ]
    def get(self,request):
        return Response({'msg':'ok'})
限流 Throttling
可以对接口访问的频次进行限制,以减轻服务器压力。
一般用于付费购买次数,投票等场景使用.
使用
可以在配置文件中,使用DEFAULT_THROTTLE_CLASSES 和 DEFAULT_THROTTLE_RATES进行全局配置
REST_FRAMEWORK = {

    'DEFAULT_THROTTLE_CLASSES': (
        'rest_framework.throttling.AnonRateThrottle', # 匿名用户,未登录的
        'rest_framework.throttling.UserRateThrottle'  # 经过登录之后的用户
    ),
    'DEFAULT_THROTTLE_RATES': {
        'anon': '100/day',
        'user': '1000/day'
    }
}
DEFAULT_THROTTLE_RATES 可以使用 second, minute, hour 或day来指明周期。
# 源码
{'s': 1, 'm': 60, 'h': 3600, 'd': 86400} m表示分钟,可以写m,也可以写minute
也可以在具体视图中通过throttle_classess属性来配置,如
from rest_framework.throttling import UserRateThrottle
from rest_framework.views import APIView

class ExampleView(APIView):
    throttle_classes = (UserRateThrottle,)
    ...
自定义一个频率组件
from rest_framework.throttling import BaseThrottle,SimpleRateThrottle
import time
from rest_framework import exceptions
visit_record = {}
class VisitThrottle(BaseThrottle):
    # 限制访问时间
    VISIT_TIME = 10
    VISIT_COUNT = 3

    # 定义方法 方法名和参数不能变
    def allow_request(self, request, view):
        # 获取登录主机的id
        id = request.META.get('REMOTE_ADDR')
        self.now = time.time()

        if id not in visit_record:
            visit_record[id] = []

        self.history = visit_record[id]
        # 限制访问时间
        while self.history and self.now - self.history[-1] > self.VISIT_TIME:
            self.history.pop()
        # 此时 history中只保存了最近10秒钟的访问记录
        if len(self.history) >= self.VISIT_COUNT:
            return False
        else:
            self.history.insert(0, self.now)
            return True

    def wait(self):
        return self.history[-1] + self.VISIT_TIME - self.now
可选限流类
1) AnonRateThrottle
限制所有匿名未认证用户,使用IP区分用户。
使用DEFAULT_THROTTLE_RATES['anon'] 来设置频次
2)UserRateThrottle
限制认证用户,使用User id 来区分。
使用DEFAULT_THROTTLE_RATES['user'] 来设置频次
实例
全局配置中设置访问频率
    'DEFAULT_THROTTLE_RATES': {
        'anon': '3/minute',
        'user': '10/minute'
    }
from rest_framework.authentication import SessionAuthentication
from rest_framework.permissions import IsAuthenticated
from rest_framework.generics import RetrieveAPIView
from rest_framework.throttling import UserRateThrottle

class StudentAPIView(RetrieveAPIView):
    queryset = Student.objects.all()
    serializer_class = StudentSerializer
    authentication_classes = [SessionAuthentication]
    permission_classes = [IsAuthenticated]
    throttle_classes = (UserRateThrottle,)
过滤 Filtering
对于列表数据可能需要根据字段进行过滤,我们可以通过添加django-fitlter扩展来增强支持。
pip install django-filter
在配置文件中增加过滤后端的设置:
INSTALLED_APPS = [
    ...
    'django_filters',  # 需要注册应用,
]

REST_FRAMEWORK = {
    ...
    'DEFAULT_FILTER_BACKENDS': ['django_filters.rest_framework.DjangoFilterBackend']
}
在视图中添加filter_fields属性,指定可以过滤的字段
class GameModelViewSet(ModelViewSet):
    queryset = models.Game.objects.all()
    serializer_class = GameModelSerializer
    filter_fields = ('price', 'id')

# 127.0.0.1:8000/game/store/?id=1
排序 Ordering
对于列表数据,REST framework提供了OrderingFilter过滤器来帮助我们快速指明数据按照指定字段进行排序。
使用方法:
在类视图中设置filter_backends,使用rest_framework.filters.OrderingFilter过滤器,REST framework会在请求的查询字符串参数中检查是否包含了ordering参数,如果包含了ordering参数,则按照ordering参数指明的排序字段对数据集进行排序。
前端可以传递的ordering参数的可选字段值需要在ordering_fields中指明。
示例
from rest_framework.filters import OrderingFilter
class GameModelViewSet(ModelViewSet):
    queryset = models.Student.objects.all()  # 必须写这个参数 ,方法中使用的self.get_queryset()方法自动获取到queryset属性数据
    serializer_class = GameModelSerializer  # 非必填属性,self.get_serializer获取到serializer_class制定的序列化器类
    filter_backends = (OrderingFilter,)
    ordering_fields = ('id', 'price')
    # students/?ordering=-id

# http://127.0.0.1:8000/game/store/?ordering=-price
# 必须是ordering=某个值
# -id 表示针对id字段进行倒序排序
# id  表示针对id字段进行升序排序

如果需要在过滤以后再次进行排序,则需要两者结合!
from django_filters.rest_framework import DjangoFilterBackend #需要使用一下它才能结合使用
class GameModelViewSet(ModelViewSet):
    queryset = Student.objects.all()
    serializer_class = GameModelSerializer
    filter_fields = ('id', 'price')
    # 因为filter_backends是局部过滤配置,局部配置会覆盖全局配置,所以需要重新把过滤组件核心类再次声明,
    # 否则过滤功能会失效
    filter_backends = [OrderingFilter,DjangoFilterBackend]
    ordering_fields = ('id', 'price')

# http://127.0.0.1:8000/game/store/?price=55&ordering=price
分页 Pagination
REST framework提供了分页的支持。
我们可以在配置文件中设置全局的分页方式,如:
我们可以在配置文件中设置全局的分页方式,如:
REST_FRAMEWORK = {
  # 全局分页,一旦设置了全局分页,那么我们drf中的视图扩展类里面的list方法提供的列表页都会产生分页的效果。所以一般不用全局分页
    'DEFAULT_PAGINATION_CLASS':  'rest_framework.pagination.PageNumberPagination',
    'PAGE_SIZE': 10  # 每页最大数据量
}
也可通过自定义Pagination类,来为视图添加不同分页行为。在视图中通过pagination_class属性来指明。
from rest_framework.pagination import PageNumberPagination
class LargeResultsSetPagination(PageNumberPagination):
    page_size = 10
    #127.0.0.1:8001/game/store/?page=5&page_size=10

    page_size_query_param = 'page_size'
    max_page_size = 10000
class GameModelViewSet(ModelViewSet):
    queryset = BookInfo.objects.all()
    serializer_class = GameModelSerializer
    pagination_class = LargeResultsSetPagination
注意:如果在视图内关闭分页功能,只需在视图内设置
pagination_class = None
可选分页器
1) PageNumberPagination
前端访问网址形式:
GET http://127.0.0.1:8000/students/?page=4
可以在子类中定义的属性:
- page_size 每页数目
- page_query_param 前端发送的页数关键字名,默认为"page"
- page_size_query_param 前端发送的每页数目关键字名,默认为None
- max_page_size 前端最多能设置的每页数量
# 声明分页的配置类
from rest_framework.pagination import PageNumberPagination
class LargeResultsSetPagination(PageNumberPagination):
    # 默认每一页显示的数据量
    page_size = 10
  	# 允许客户端通过get参数来控制每一页的数据量
    page_size_query_param = 'page_size'
    max_page_size = 10
class GameModelViewSet(ModelViewSet):
    queryset = BookInfo.objects.all()
    serializer_class = GameModelSerializer
    pagination_class = LargeResultsSetPagination
2)LimitOffsetPagination
前端访问网址形式:#其实就是通过偏移量来取数据
GET http://127.0.0.1/four/students/?limit=100&offset=400 #从下标为400的记录开始,取100条记录
可以在子类中定义的属性:
- default_limit 默认限制,每页数据量大小,默认值与
PAGE_SIZE设置一致 - limit_query_param limit参数名,默认'limit' , 可以通过这个参数来改名字
- offset_query_param offset参数名,默认'offset' ,可以通过这个参数来改名字
- max_limit 最大limit限制,默认None, 无限制
from rest_framework.pagination import LimitOffsetPagination
class StandardLimitOffsetPagination(LimitOffsetPagination):
    # 默认每一页查询的数据量,类似上面的page_size
    default_limit = 2
    limit_query_param = "size"
    offset_query_param = "start"

class StudentAPIView(ListAPIView):
    queryset = Student.objects.all()
    serializer_class = StudentModelSerializer
    # 调用页码分页类
    # pagination_class = StandardPageNumberPagination
    # 调用查询偏移分页类
    pagination_class = StandardLimitOffsetPagination
异常处理 Exceptions
看一个简单的示例
class APIError(Exception):
    pass

class Student2APIView(APIView):
    def get(self,request,pk):
        try:
            instance = Student.objects.get(pk=pk)
        except Student.DoesNotExist:
            raise APIError('自定义API错误')
            return Response({"message":"访问的商品已经下架~"})

        serializer = StudentModelSerializer(instance=instance)
        return Response(serializer.data)
REST framework提供了异常处理,我们可以自定义异常处理函数。
可以创建一个utils文件夹,里面放一个exceptions.py文件,名字随便写,然后写下面的内容
from rest_framework.views import exception_handler

def custom_exception_handler(exc, context): #自定义的错误处理函数
  	”“”
    	exc错误对象
      context 异常发生时的一些上下文信息
    “”“
    # 先调用REST framework默认的异常处理方法获得标准错误响应对象
    response = exception_handler(exc, context) #这个函数是drf提供的,它处理了一些错误,但是如果它处理不了的,它会返回None,所以,如果是None的话,我们需要自己来处理错误

    # 在此处补充自定义的异常处理
    if response is None:
      	if isinstance(exc,APIError) # APIView就是上面我们定义的错误类
        #这里就可以记录错误信息了,一般记录到文件中,可以使用日志系统来进行记录
        # return Respose({'msg':'自定义API错误了'})
        response.data['status_code'] = response.status_code

    return response
在配置文件中还要声明自定义的异常处理
REST_FRAMEWORK = {
    'EXCEPTION_HANDLER': 'my_project.my_app.utils.custom_exception_handler'
}
如果未声明,会采用默认的方式,如下
settings.py
REST_FRAMEWORK = {
    'EXCEPTION_HANDLER': 'rest_framework.views.exception_handler'
}
例如:
补充上处理关于数据库的异常
from rest_framework.views import exception_handler as drf_exception_handler
from rest_framework import status
from django.db import DatabaseError # 数据库异常抛出的错误

def exception_handler(exc, context):
    response = drf_exception_handler(exc, context)

    if response is None:
        view = context['view'] #出错的方法或者函数名称
        if isinstance(exc, DatabaseError):
            print('[%s]: %s' % (view, exc))
            response = Response({'detail': '服务器内部错误'}, status=status.HTTP_507_INSUFFICIENT_STORAGE)

    return response
REST framework定义的异常
- APIException 所有异常的父类
- ParseError 解析错误
- AuthenticationFailed 认证失败
- NotAuthenticated 尚未认证
- PermissionDenied 权限决绝
- NotFound 未找到
- MethodNotAllowed 请求方式不支持
- NotAcceptable 要获取的数据格式不支持
- Throttled 超过限流次数
- ValidationError 校验失败
也就是说,上面列出来的异常不需要我们自行处理了,很多的没有在上面列出来的异常,就需要我们在自定义异常中自己处理了。
自动生成接口文档
REST framework可以自动帮助我们生成接口文档。
接口文档以网页的方式呈现。
自动接口文档能生成的是继承自APIView及其子类的视图。
安装依赖
REST framewrok生成接口文档需要coreapi库的支持。
pip install coreapi
设置接口文档访问路径
在总路由中添加接口文档路径。
文档路由对应的视图配置为rest_framework.documentation.include_docs_urls,
参数title为接口文档网站的标题。
from rest_framework.documentation import include_docs_urls

urlpatterns = [
    ...
    path('docs/', include_docs_urls(title='站点页面标题'))
]
如果报错了下面的错误,说明我们缺少一个依赖,配置一下就行了
'AutoSchema' object has no attribute 'get_link'
配置:
REST_FRAMEWORK = {
    ...
    'DEFAULT_SCHEMA_CLASS': "rest_framework.schemas.AutoSchema",

}
文档描述说明的定义位置
1) 单一方法的视图,可直接使用类视图的文档字符串,如
class BookListView(generics.ListAPIView):
    """
    get: 返回所有图书信息.
    post: 添加记录
    """
    #注意,这是在类中声明的注释,如果在方法中你声明了其他注释,会覆盖这个注释的
2)包含多个方法的视图,在类视图的文档字符串中,分开方法定义,如
class BookListCreateView(generics.ListCreateAPIView):
    """
    get:
    返回所有图书信息.

    post:
    新建图书.
    """
3)对于视图集ViewSet,仍在类视图的文档字符串中封开定义,但是应使用action名称区分,如
class BookInfoViewSet(mixins.ListModelMixin, mixins.RetrieveModelMixin, GenericViewSet):
    """
    list:
    返回图书列表数据

    retrieve:
    返回图书详情数据

    latest:
    返回最新的图书数据

    read:
    修改图书的阅读量
    """
访问接口文档网页
浏览器访问 127.0.0.1:8000/docs/,即可看到自动生成的接口文档。
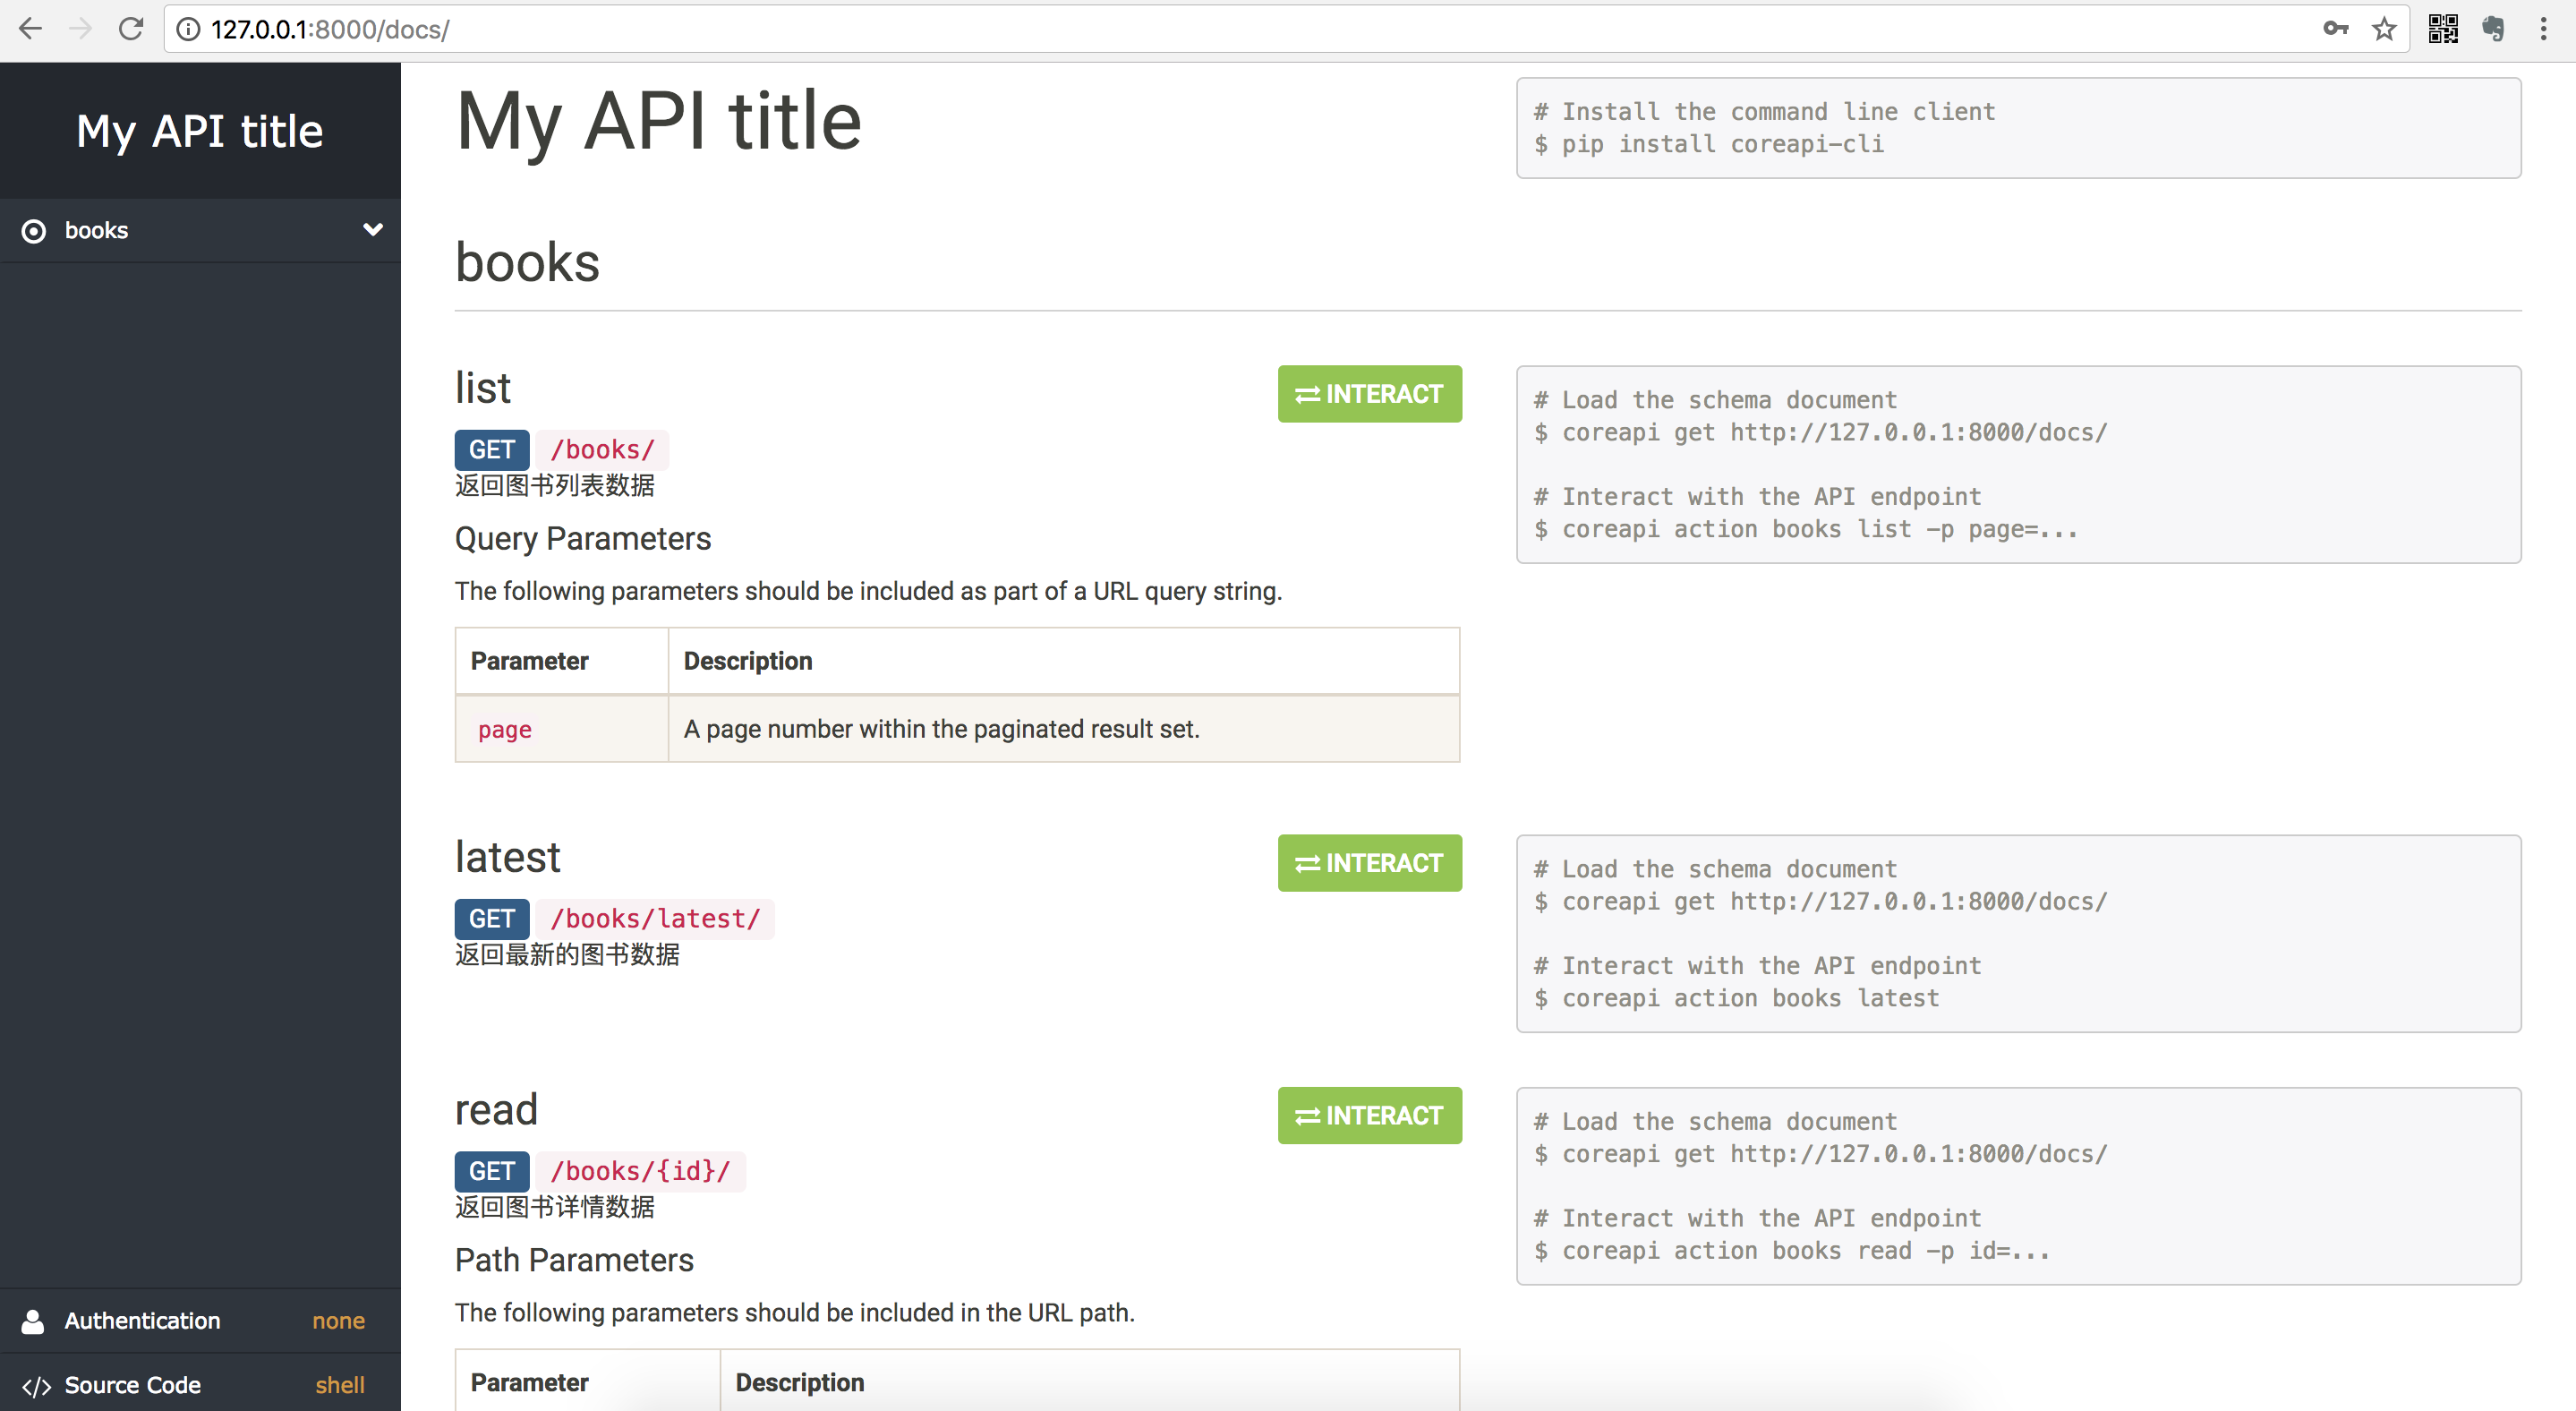
两点说明:
1) 视图集ViewSet中的retrieve名称,在接口文档网站中叫做read
2)参数的Description需要在模型类或序列化器类的字段中以help_text选项定义,如:
class Student(models.Model):
    ...
    age = models.IntegerField(default=0, verbose_name='年龄', help_text='年龄')
    ...
或 注意,如果你多个应用使用同一个序列化器,可能会导致help_text的内容显示有些问题,小事情
class StudentSerializer(serializers.ModelSerializer):
    class Meta:
        model = Student
        fields = "__all__"
        extra_kwargs = {
            'age': {
                'required': True,
                'help_text': '年龄'
            }
        }
本文来自博客园,作者:长情不羁的五年,转载请注明原文链接:https://www.cnblogs.com/grlend/articles/14156254.html

 浙公网安备 33010602011771号