Eureka Server 实现在线扩容
Eureka Server 实现在线扩容
作者:Grey
原文地址:
需求
Eureka 是 Spring Cloud Netflix 套件中的服务注册中心组件,作为微服务的核心组件,需要支持在线扩容的需求。
本示例模拟 Eureka 从单实例在线扩容到三个实例的过程。
环境
Java 版本:17
Spring Boot 版本:2.7.5
Spring Cloud 版本:2021.0.4
项目结构和说明
- eureka-scale-out-online:父项目名称
- server : 服务端模块
- src/
- pom.xml
- client : 客户端模块
- src/
- pom.xml
- config : 配置中心模块,使用本地配置
- src/
- pom.xml
- pom.xml:父项目 pom 配置
- server : 服务端模块
其中 config 项目存放了 server 和 client 的配置,基于 Spring Cloud Config ,方便起见,我们配置成 native,即本地配置模式,所以如果有配置修改,需要重启 config 项目,如果使用 Git 来托管配置,则无须重启。
完整代码见:Github
单个 Eureka 实例
将 config 项目中的 eureka-client.yml 修改为
server:
  port: 8081

spring:
  application:
    name: eureka-client1

eureka:
  client:
    serviceUrl:
      defaultZone: http://localhost:8761/eureka/
将 config 项目中的 eureka-server-peer1.yml 修改为
server:
  port: 8761
spring:
  application:
    name: eureka-server
eureka:
  instance:
    hostname: localhost
    preferIpAddress: true
  client:
    registerWithEureka: true
    fetchRegistry: true
    serviceUrl:
      defaultZone: http://localhost:8761/eureka/
  server:
    waitTimeInMsWhenSyncEmpty: 0
    enableSelfPreservation: false
依次启动 config 模块(运行 ConfigStartApp.java 这个类),server 模块(运行 ServerStartApp.java 这个类),client 模块(运行 ClientStartApp.java 这个类),
注:server 模块在启动过程中,需要指定 peer1 这个配置文件。

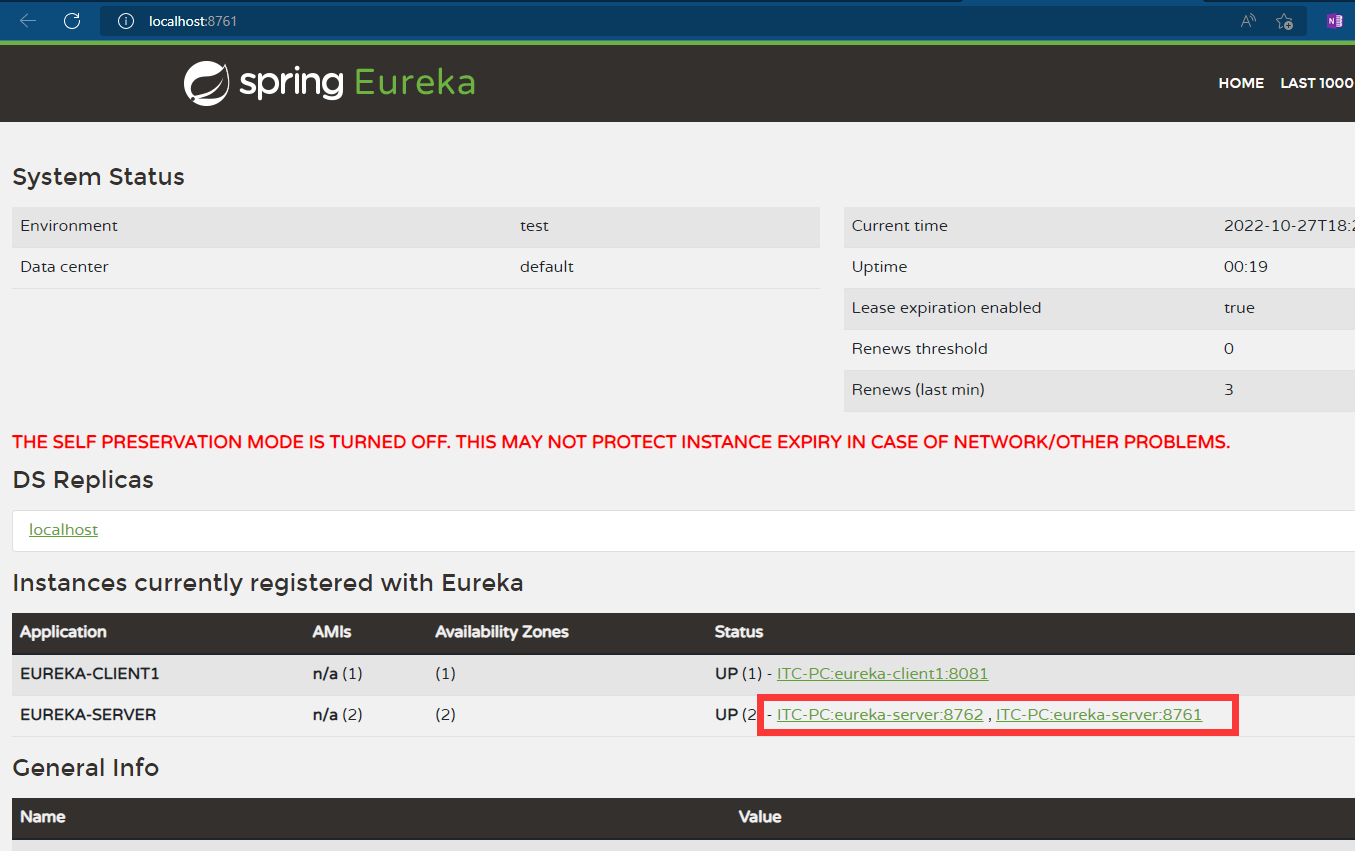
启动完毕后,可以通过浏览器访问:http://localhost:8761/
看到目前的服务注册情况

目前 Eureka Server 只有一个实例。
在线扩充到两个 Eureka 实例
保持上述运行环境,先不做任何重启动作,由于要增加一个实例,所以将 config 项目中的 eureka-server-peer2.yml 修改为
server:
  port: 8762

eureka:
  instance:
    hostname: localhost
    preferIpAddress: true
  client:
    registerWithEureka: true
    fetchRegistry: true
    serviceUrl:
      defaultZone: http://localhost:8761/eureka/
  server:
      waitTimeInMsWhenSyncEmpty: 0
      enableSelfPreservation: false
同时,把 eureka-server-peer1.yml 内容调整为
server:
  port: 8761
spring:
  application:
    name: eureka-server
eureka:
  instance:
    hostname: localhost
    preferIpAddress: true
  client:
    registerWithEureka: true
    fetchRegistry: true
    serviceUrl:
      defaultZone: http://localhost:8762/eureka/
  server:
    waitTimeInMsWhenSyncEmpty: 0
    enableSelfPreservation: false
客户端需要感知到两个 Eureka Server 的存在,所以,也要修改 内容为
server:
  port: 8081
spring:
  application:
    name: eureka-client1
eureka:
  client:
    serviceUrl:
      defaultZone: http://localhost:8761/eureka/,http://localhost:8762/eureka/
配置修改完毕后,
首先,重启 config 模块(注:由于配置的是 native 模式,需要重启,如果用 Git 托管,则无须重启)
然后启动 server peer2 实例,启动时做如下配置

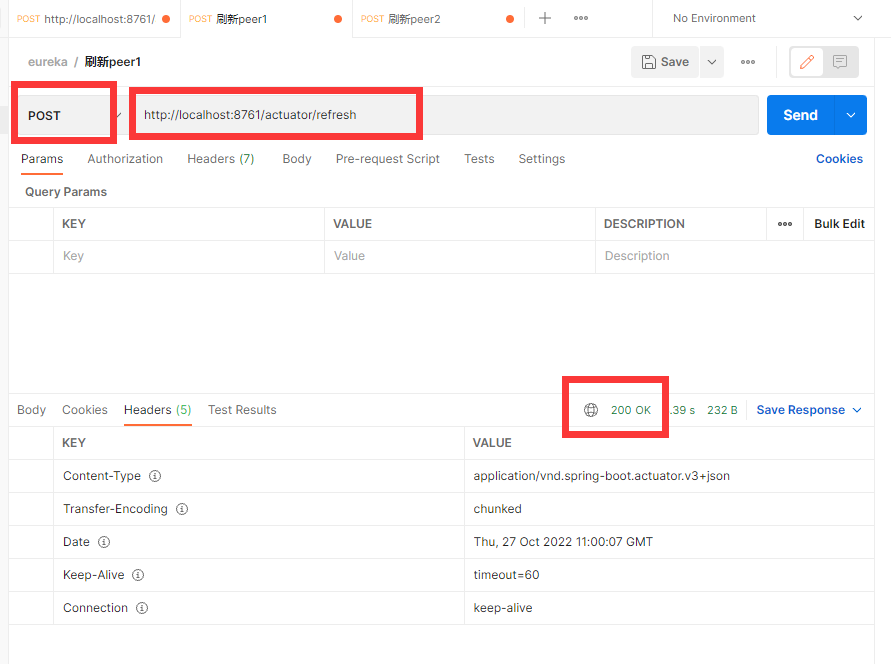
接下来,使用 Eureka 的管理 API,将 client 模块实例和 server peer1 实例的配置进行热更新,操作如下
使用命令行或者 Postman 工具,发送如下请求

通过浏览器再次访问:http://localhost:8761/,出现两个实例
在线扩充到三个 Eureka 实例
同理,维持上述运行实例,先不要做任何重启动作,修改 eureka-client.yml 配置,让客户端感知到三个实例
server:
  port: 8081
spring:
  application:
    name: eureka-client1
eureka:
  client:
    serviceUrl:
      defaultZone: http://localhost:8761/eureka/,http://localhost:8762/eureka/,http://localhost:8763/eureka/
修改 peer1 的配置
server:
  port: 8761
spring:
  application:
    name: eureka-server
eureka:
  instance:
    hostname: localhost
    preferIpAddress: true
  client:
    registerWithEureka: true
    fetchRegistry: true
    serviceUrl:
      defaultZone: http://localhost:8762/eureka/,http://localhost:8763/eureka/
  server:
    waitTimeInMsWhenSyncEmpty: 0
    enableSelfPreservation: false
使得 peer1 可以感知到另外两个实例,同理,修改 peer2 实例配置
server:
  port: 8762
eureka:
  instance:
    hostname: localhost
    preferIpAddress: true
  client:
    registerWithEureka: true
    fetchRegistry: true
    serviceUrl:
      defaultZone: http://localhost:8761/eureka/,http://localhost:8763/eureka/
  server:
    waitTimeInMsWhenSyncEmpty: 0
    enableSelfPreservation: false
修改 peer3 实例配置
server:
  port: 8763
eureka:
  instance:
    hostname: localhost
    preferIpAddress: true
  client:
    registerWithEureka: true
    fetchRegistry: true
    serviceUrl:
      defaultZone: http://localhost:8761/eureka/,http://localhost:8762/eureka/
  server:
      waitTimeInMsWhenSyncEmpty: 0
      enableSelfPreservation: false
接下来,重启配置中,即 config 模块
然后,启动第三个实例,profile 指定 peer3

然后,使用 Eureka 的管理 API,刷新 peer1,peer2 的配置信息

再次通过浏览器访问:http://localhost:8761/
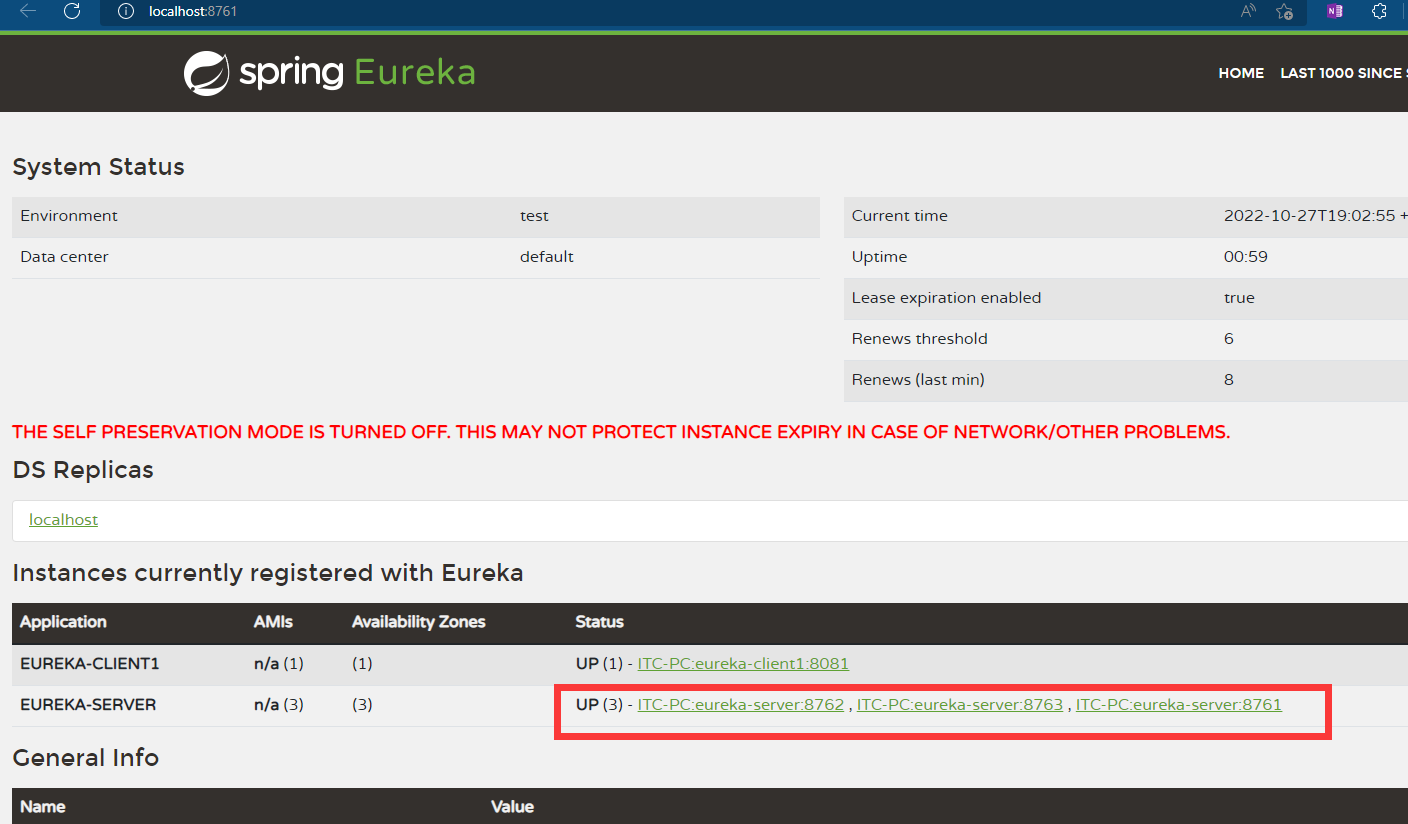
出现三个实例,扩容成功。
完整代码见:Github
参考资料
本文来自博客园,作者:Grey Zeng,转载请注明原文链接:https://www.cnblogs.com/greyzeng/p/16833383.html

 浙公网安备 33010602011771号