

lightswitch如何实现文件批量上传功能
本例中使用devexpress uploadcontrol来实现上传,主要介绍如何集成到LS中的具体步骤。
1.将lightswitch项目切换到文件视图状态.

2.在client工程里添加一个自定义的控件进来,(silverlight 中一样的操作方式,)并实现自己需要的功能。
<controls:ChildWindow x:Class="LightSwitchApplication.Screens.SelectUploadFile"
xmlns="http://schemas.microsoft.com/winfx/2006/xaml/presentation"
xmlns:x="http://schemas.microsoft.com/winfx/2006/xaml"
xmlns:controls="clr-namespace:System.Windows.Controls;assembly=System.Windows.Controls"
Width="600" Height="400"
xmlns:local="clr-namespace:LightSwitchApplication.Screens"
Title="上传附件">
<Grid x:Name="LayoutRoot" Margin="2">
<Border Background="White">
<local:CustomUploadControl x:Name="uploadControl1" UploadServerPath="UploadFiles"
FileUploadCompleted="OnFileUploadCompleted"
TotalUploadCompleted="OnTotalUploadCompleted"
UploadItemRemoved="OnUploadItemRemoved"
UploadCancelled="OnUploadCancelled" AllowDrop="True" Width="532" FileNameFilter="所有文件 (*.*)|*.*" FontSize="12" />
</Border>
</Grid>
</controls:ChildWindow>
CustomUploadControl 在DEVEXPRESS的基础上重新包装了一下,增加了上传文件唯一编号。
在需要上传的地方执行如下:
partial void ShowUpload_Execute()
{
// Write your code here.
Dispatchers.Main.BeginInvoke(() =>
{
SelectUploadFile selectFileWindow = new SelectUploadFile();
selectFileWindow.uploadControl1.BeforeStartUpload += new EventHandler(dxUploadControl_BeforeStartUpload);
selectFileWindow.uploadControl1.FileUploadCompleted += new EventHandler<UploadItemEventArgs>(FileUploadCompletedHandler);
selectFileWindow.uploadControl1.UploadItemRemoved += new EventHandler<UploadItemEventArgs>(dxUploadControl_UploadItemRemoved);
var webHandlerUri = new Uri(System.Windows.Application.Current.Host.Source, "../FileUploader.ashx");
selectFileWindow.uploadControl1.WebHandlerUri = webHandlerUri; //上传服务器路径,谁来处理,可参考Dev示例
selectFileWindow.uploadControl1.UploadServerPath = uploadServerPath;
selectFileWindow.Show();
});
}
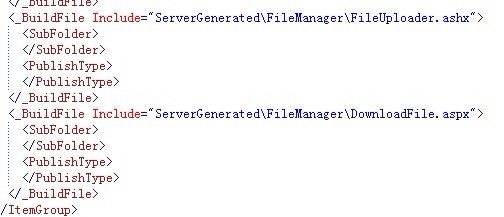
3.进入ServerGenerated,添加相关自定义处理的功能,如下图: downloadfile.aspx, fileuploader.ashx ,一个下载,一个上传。具体代码就不显示了

4.集成刚才增加的二个功能(上传、下载),需要LS将二个文件进行编译到工程中。
先将项目卸装,然后手动编辑LS解决方案文件。
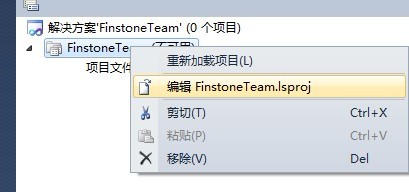
打开文件,找到项目包含文件的位置,手工加入如下:

 浙公网安备 33010602011771号