vue-route开发注意事项
1、router-link to 动态赋值
router-link组件的to属性值有两种写法,字符串类型和对象类型
如果要动态传值,比如放到for循环中,传入for的index值,这时就必须使用对象形式,动态传值
<router-link :to="{path:'/old_data_details/params/'+item.id}" > </router-link>

2、路由跳转的三种方式,及返回上一级
1)<router-link to="keyframes">点击验证动画效果 </router-link>
to属性值可以是路由字符串,也可以使对象形式
2)this.$router.push({ path:’/user’})
this.$router.push({
     path:'/select',   //跳转的路径
     query:{           //路由传参时push和query搭配使用
       id:this.id ,
     }
})
3)this.$router.replace{path:‘/’ } 与push类似
返回上一级使用this.$router.go(-1) ,跳转到指定路由this.$router.push('/home')
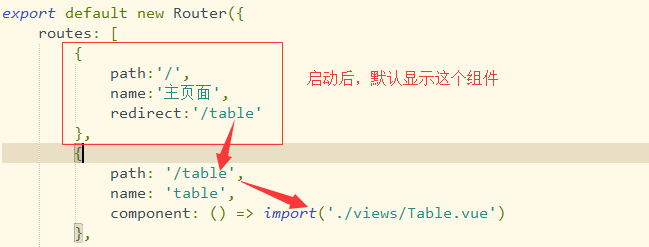
3、路由重定向(设置默认路由)
4、vue监听路由变化
1)通过watch函数(注意:必须在跟组件中,才能监听到路由的变化)
// 监听,当路由发生变化的时候执行
watch:{
  $route(to,from){
    console.log(to.path);
  }
},
或者
// 监听,当路由发生变化的时候执行
watch: {
  $route: {
    handler: function(val, oldVal){
      console.log(val);
    },
    // 深度观察监听
    deep: true
  }
},
或者
// 监听,当路由发生变化的时候执行
watch: {
  '$route':'getPath'
},
methods: {
  getPath(){
    console.log(this.$route.path);
  }
}
2)通过 vue-router 的钩子函数 beforeRouteEnter beforeRouteUpdate beforeRouteLeave
<script>
  export default {
    name: 'app',
    // 监听,当路由发生变化的时候执行
    beforeRouteEnter (to, from, next) {
      // 在渲染该组件的对应路由被 confirm 前调用
      // 不!能!获取组件实例 `this`
      // 因为当钩子执行前,组件实例还没被创建
    },
    beforeRouteUpdate (to, from, next) {
    //beforeRouteUpdate守卫并不会在不同路由共用同一组件时触发
    //当从/item/22/edit切换到/item/11/edit时,会触发beforeRouteUpdate。
    //但如果从/item/22/edit切换到/item/create时,并不会触发beforeRouteUpdate。


      // 在当前路由改变,但是该组件被复用时调用,即同一路由下只有参数发生变化的情况下可以用此钩子监听到
      // 举例来说,对于一个带有动态参数的路径 /foo/:id,在 /foo/1 和 /foo/2 之间跳转的时候,
      // 由于会渲染同样的 Foo 组件,因此组件实例会被复用。而这个钩子就会在这个情况下被调用。
      // 可以访问组件实例 `this`
    },
    beforeRouteLeave (to, from, next) {
      // 导航离开该组件的对应路由时调用
      // 可以访问组件实例 `this`
    }
</script>
3)如上面提到的 <router-view :key="key"></router-view>
  对于一个带有动态参数的路径 /foo/:id,在 /foo/1 和 /foo/2 之间跳转的时候,页面是不是刷新的,即hashChage函数是不会触发的,这时,可以给路由组件router-view添加 :key=""属性来阻止复用
  然后动态参数的路由跳转就是可以刷新页面了
  Vue 为你提供了一种方式来声明“这两个元素是完全独立的——不要复用它们”。只需添加一个具有唯一值的 key 属性,这样就可以如愿刷新数据了
<router-view :key="key"></router-view>
computed: {
  key() {
    return this.$route.name !== undefined? this.$route.name +new Date(): this.$route +new Date()
  }
}
5、图片 :src=" " 使用data里面的url时出现404的情况
这么写会出现404错误,图片路径不被webpack解析,直接展示为src='./1.png'
<li v-for="(item,index) in images" :key="index">
<img :src="item.src"></li>
//js部分
data(){
  return {
    images:[{src:'./1.png'},{./2.png}]
  }
}
应该这么写,将图片作为模块加载进来require
 data(){
    return {
      iconsData : [
        {
          pageName:'guohu',
          iconUrl:require('../assets/img/guohu.png'),
          iconName:'过户',
          toUrl:this.handleUrlStr('guohu')
        },
        {
          pageName:'xiaohao',
          iconUrl:require('../assets/img/xiaohao.png'),
          iconName:'销号及复装',
          toUrl:this.handleUrlStr('xiaohao')
        }
     ]
    }
}
6、vue路由守卫
//创建路由实例
const router = new Router({
  routes: [
    {
      path: '/',
      name: 'home',
      component: Home,
      meta:{
        isLogin:true    // 添加该字段,表示进入这个路由是需要登录的
      }//路由元
    },{
      path:"/login",
      name:"login",
      component:Login
    }
  ]
})


// 路由守卫
router.beforeEach((to,from,next)=>{
        if(to.matched.some(res=>res.meta.isLogin)){//判断是否需要登录
            if (sessionStorage['username']) {
                next();
            }else{
                next({
                    path:"/login",
                    query:{
                        redirect:to.fullPath
                    }
                });
            }

        }else{
            next()
        }
    });

export default router;
to 表示将要跳转到的组件 (目标组件)
console.log(from); //(源组件)
next();
next 是一个函数
next() 进入下一个组件的钩子函数
next(false) 阻止跳转 中断导航
next("/login") 进入指定的组件的钩子函数
注意:路由守卫处理了逻辑之后,必须调用next()函数,路由才会向下执行
7、区分$router 对象和 $route对象
$router : 是路由操作对象,只写对象 ,用来操作路由的行为
$route : 路由信息对象,只读对象,获取当前路由的信息
参考:https://blog.csdn.net/qq_42928918/article/details/88406257

 浙公网安备 33010602011771号