
一、阿里云与物理服务器
1. 常见服务器厂家
亚马逊云 、阿里云、 腾讯云、 华为云、 百度云、 京东云、 网易云
2. 阿里云服务名词对比
物理架构      阿里云服务
服务器        ECS
负载均衡      SLB
Mysql        RDS
Redis        Redis
NFS          NAS
外网IP        EIP
网络          VPC
防火墙        安全组
3.优势与劣势
- 解放了劳动力,不用担心硬件损坏了。
- 大部分服务的高可用不用自己做了。
- 减少了人力成本。
- 上云轻松,下云难了。
- 一开始很便宜,长时间看,云服务并不便宜。
- 扩容简单迅速,计费方式灵活。
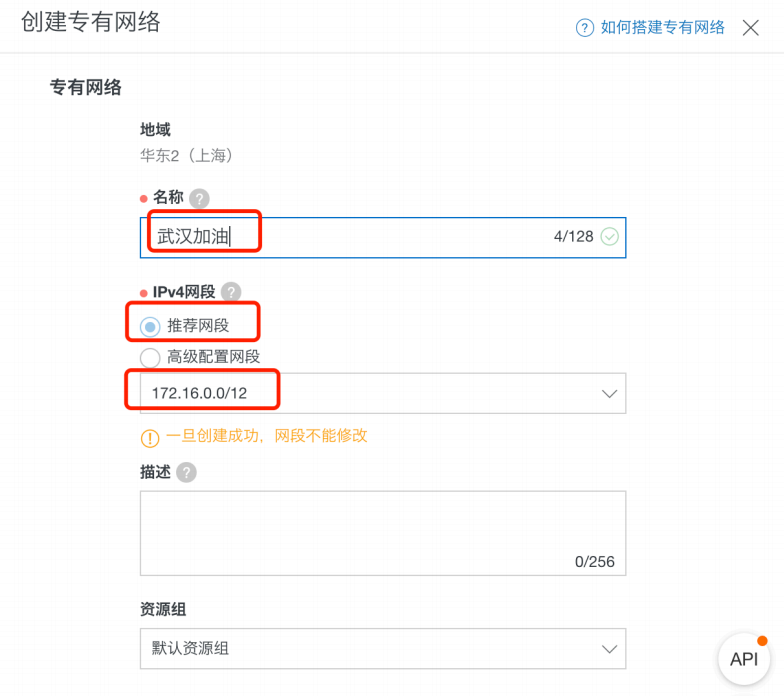
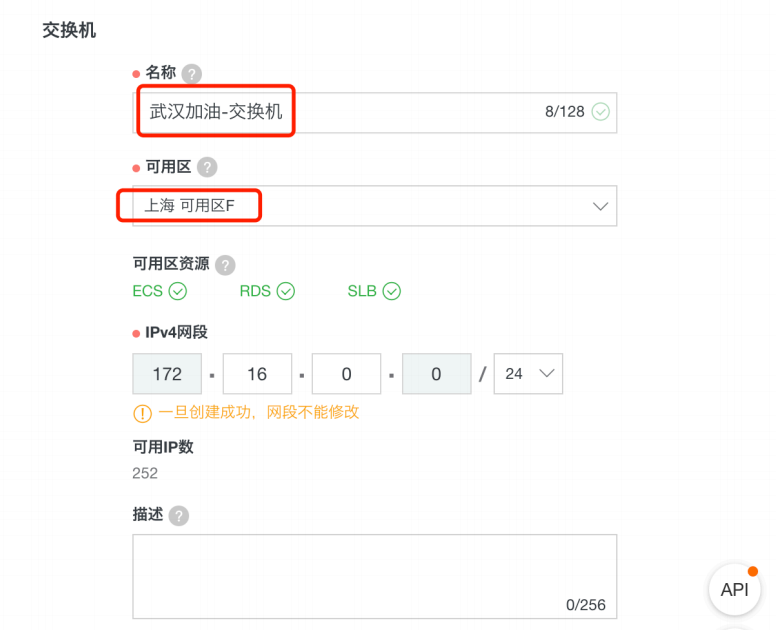
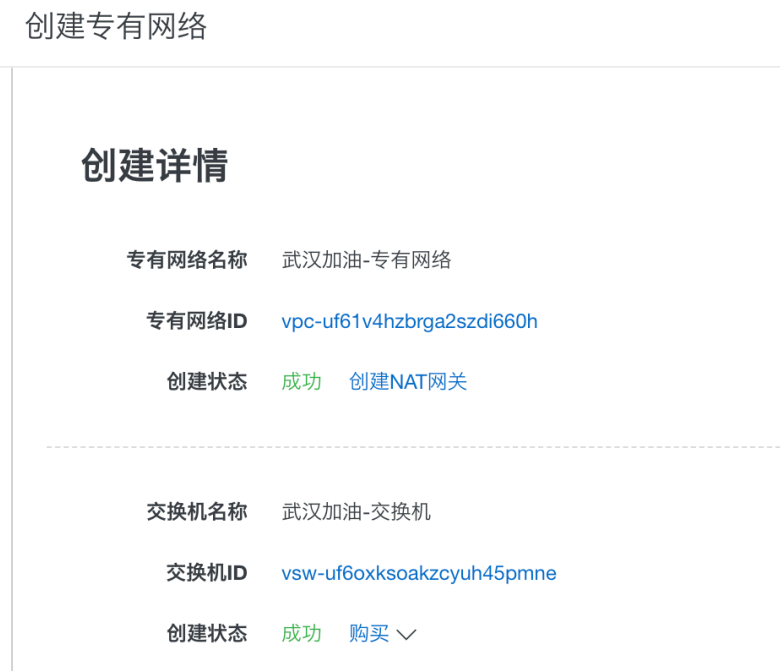
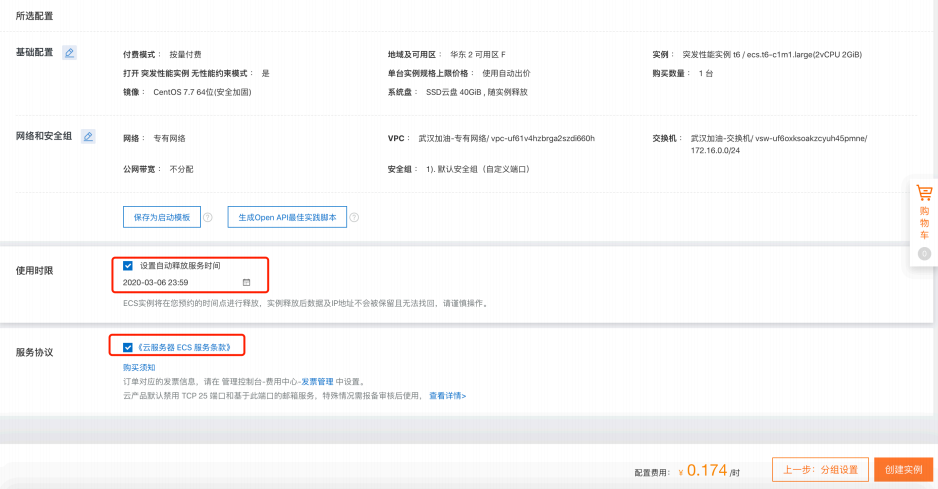
二、ECS服务器
注意: 购买服务的时候账面上不能低于100块。
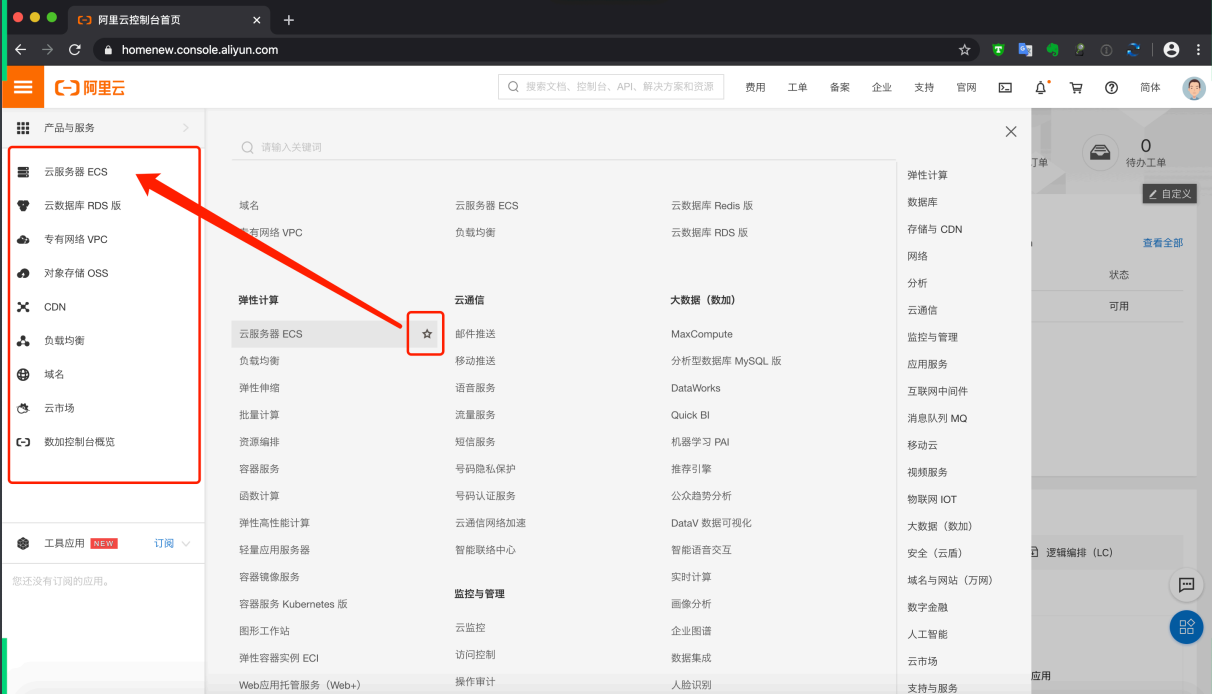
1.控制台
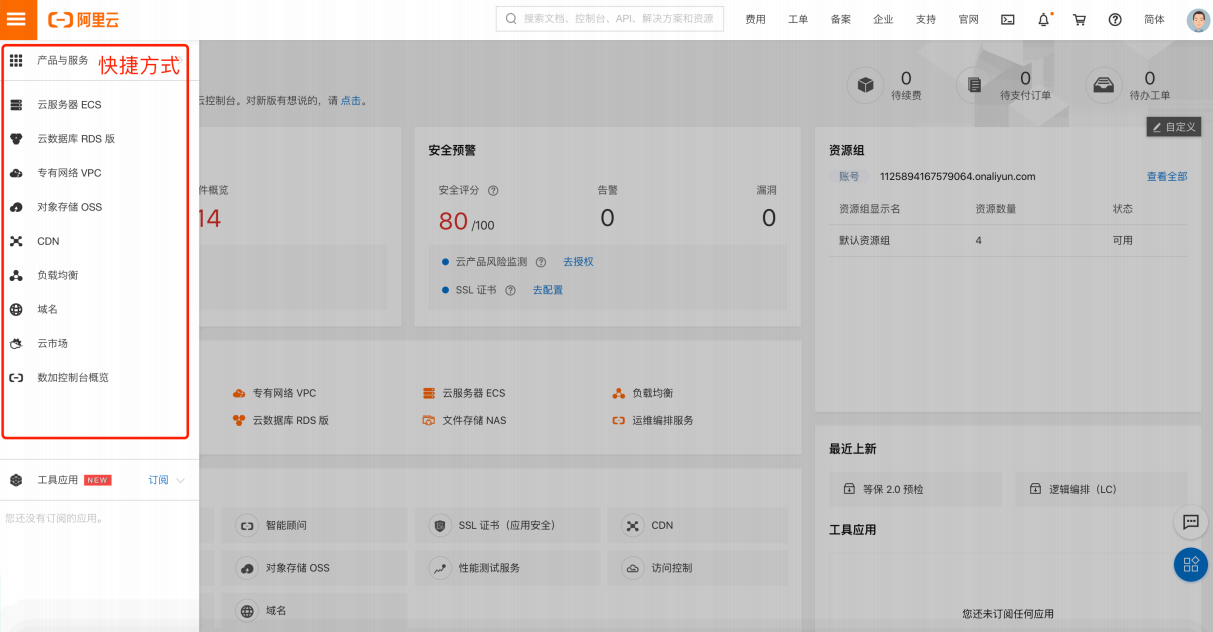
2.收藏项目
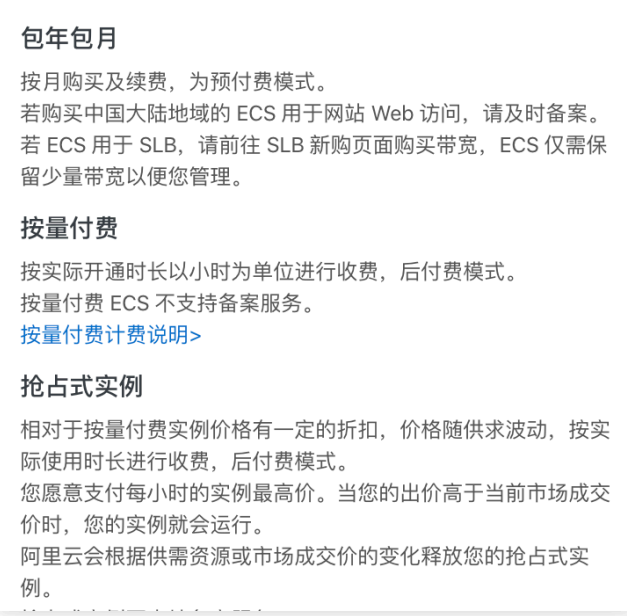
3.收费方式
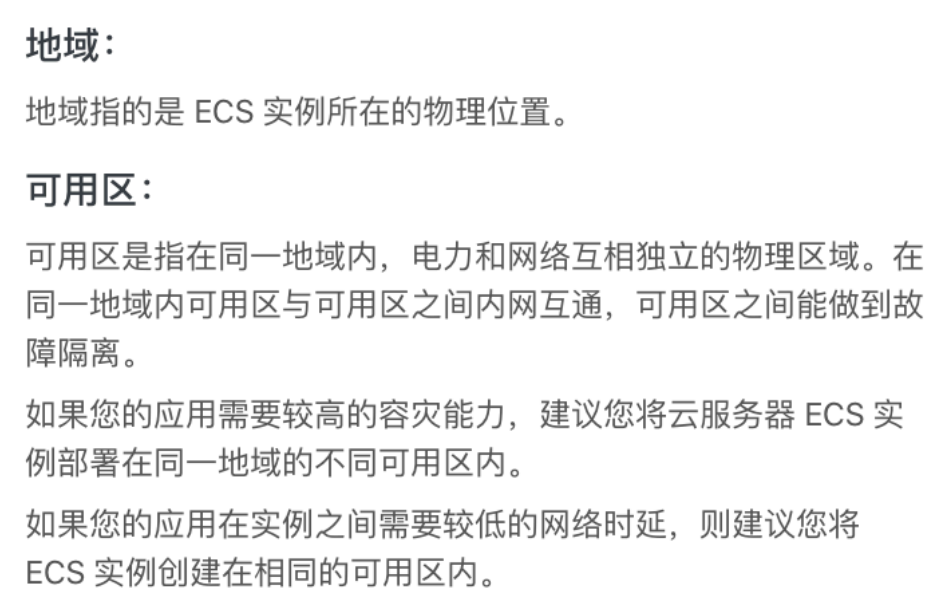
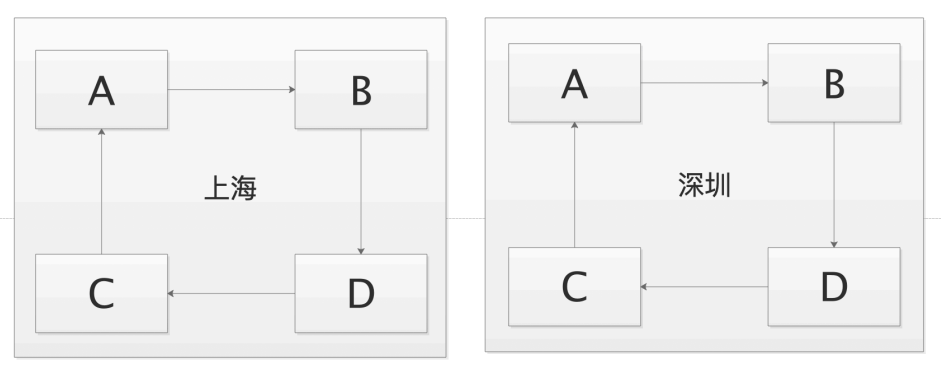
4.可用区与地域

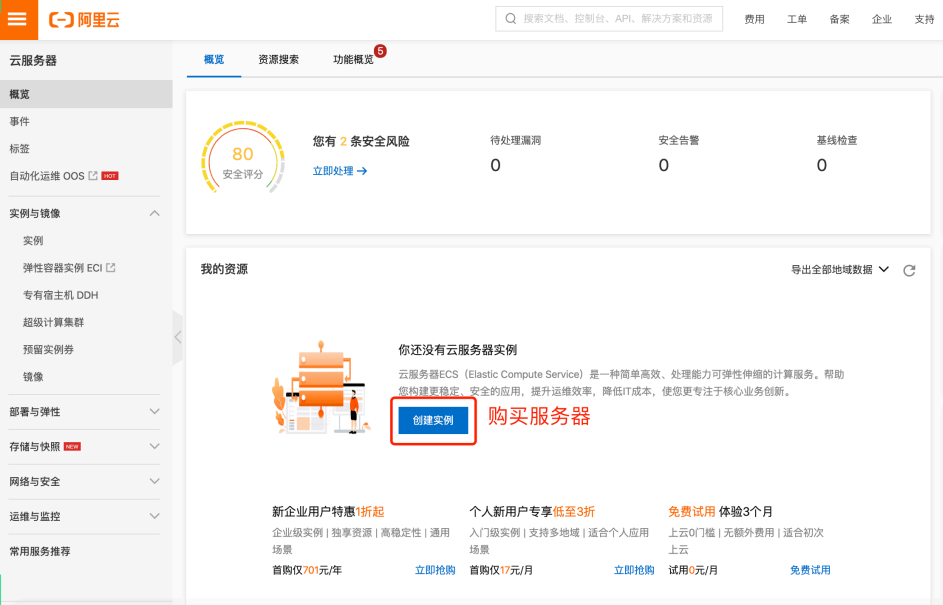
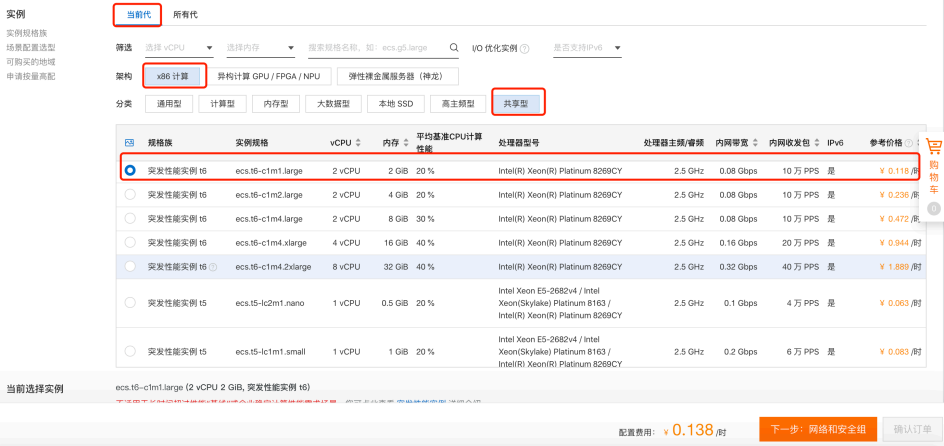
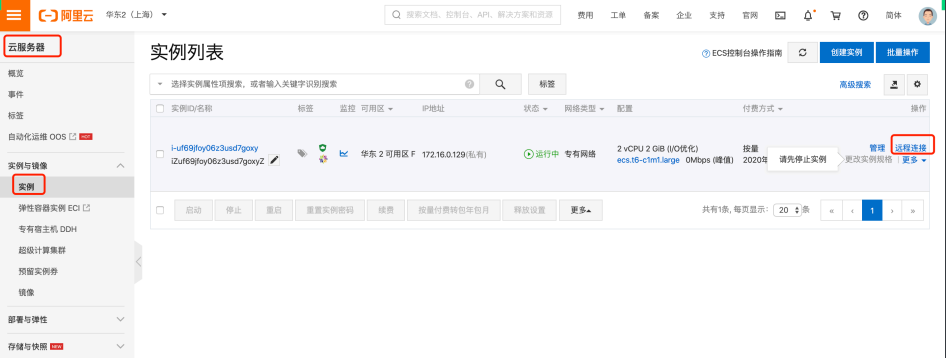
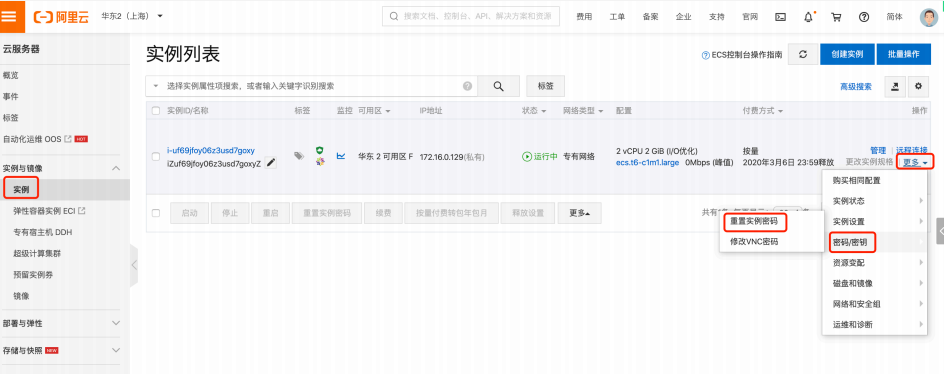
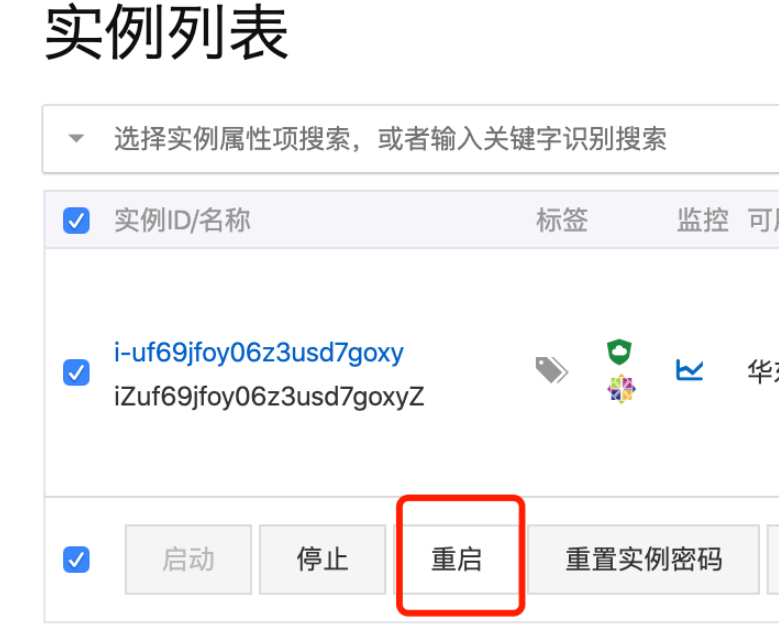
5.实例
6.镜像


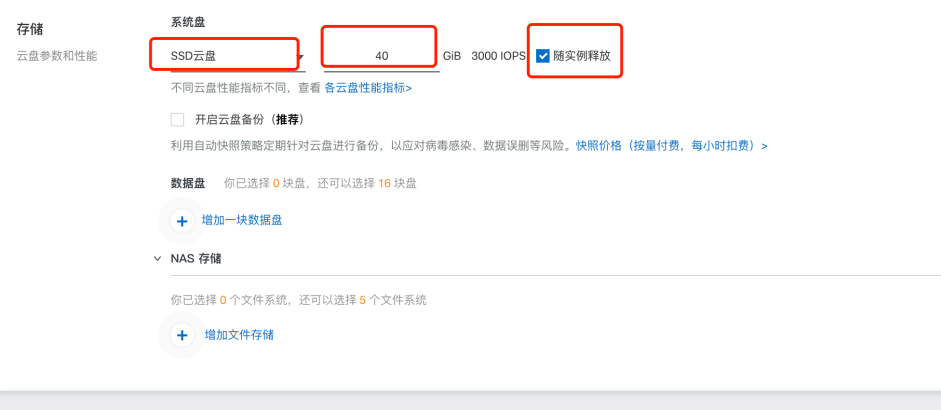
7.存储
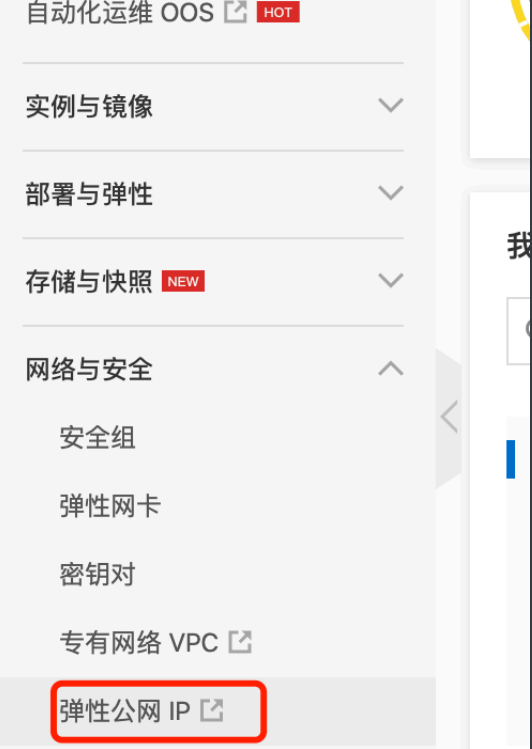
8.网络


9.安全组

10.确认订单
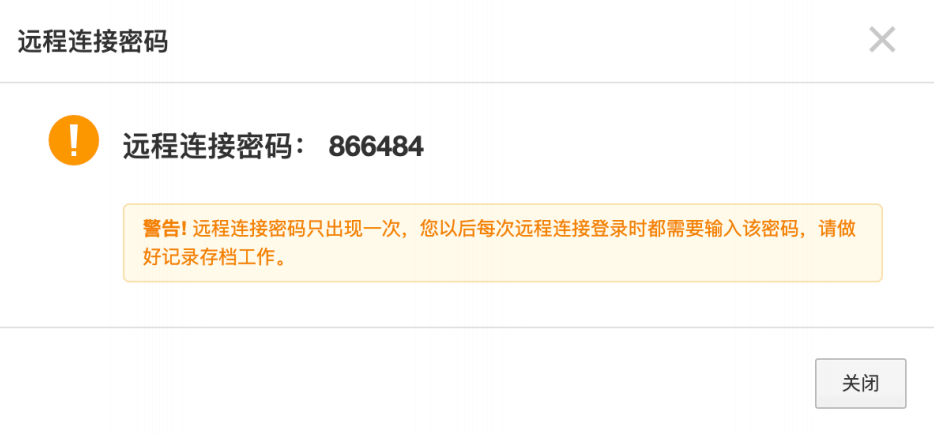
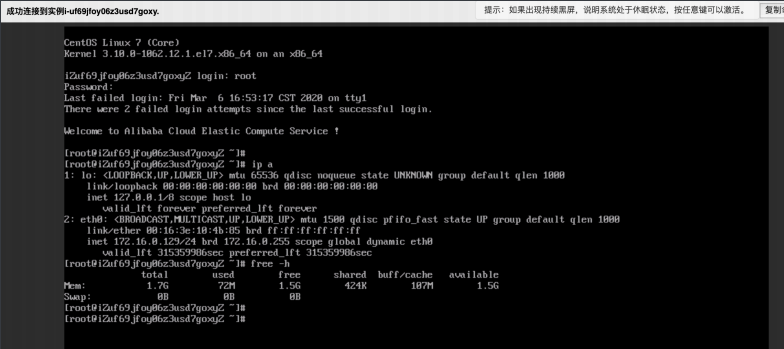
11.远程连接

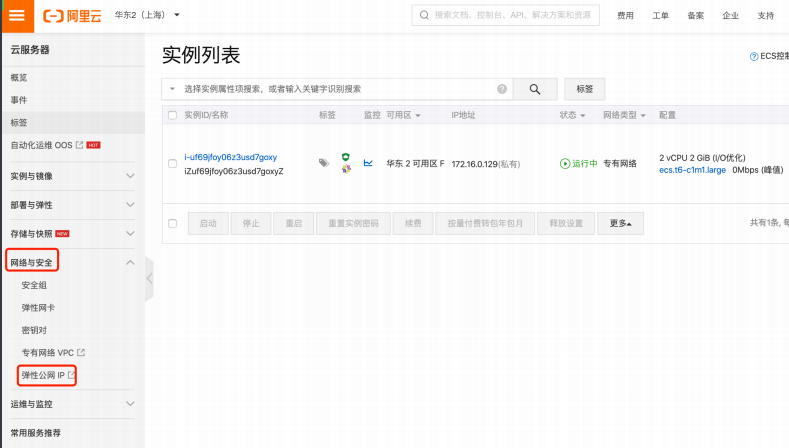
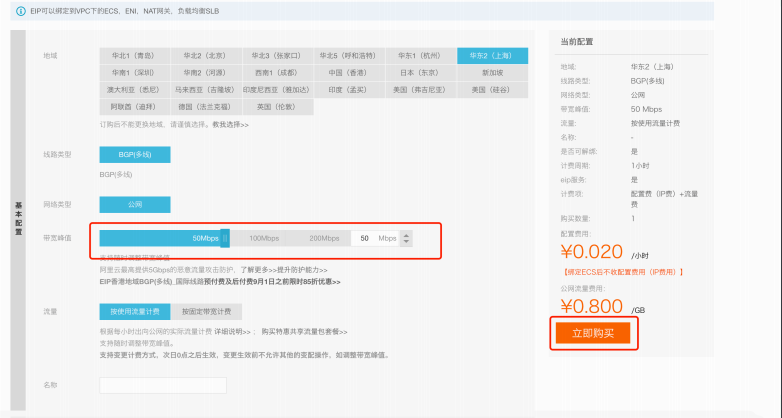
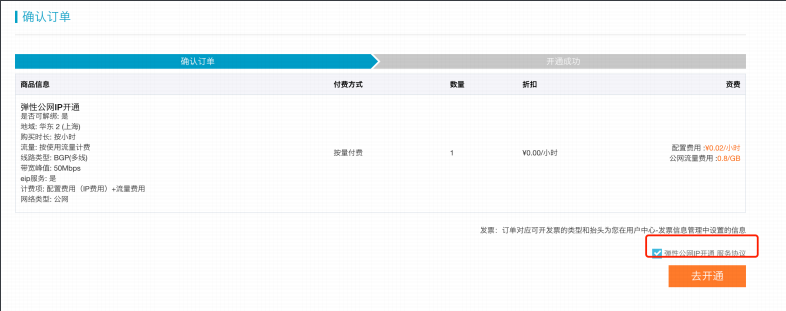
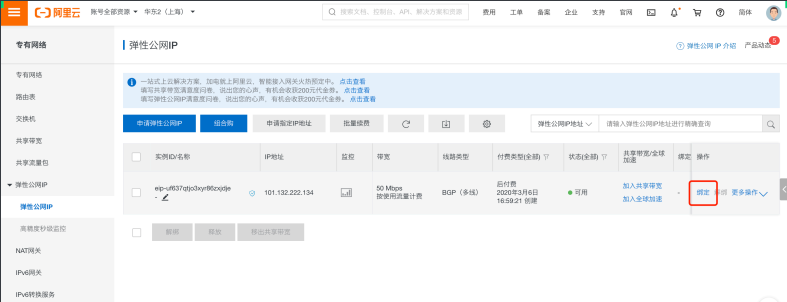
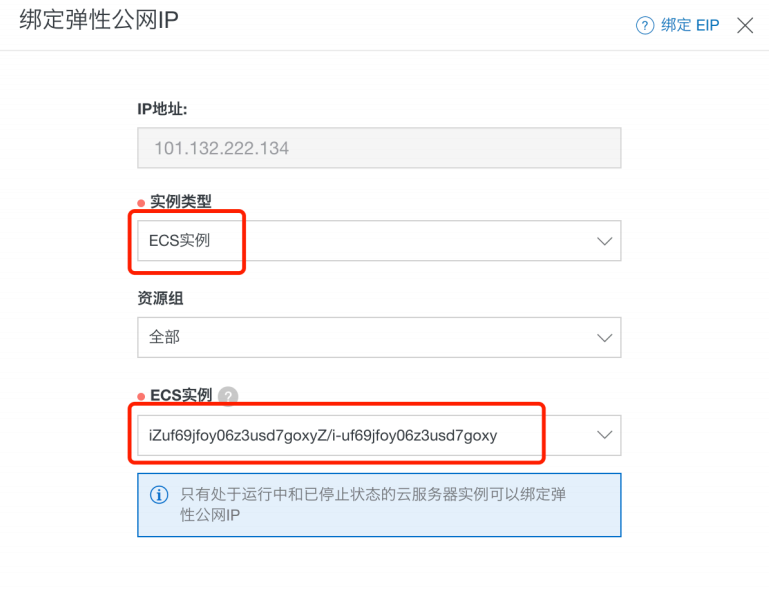
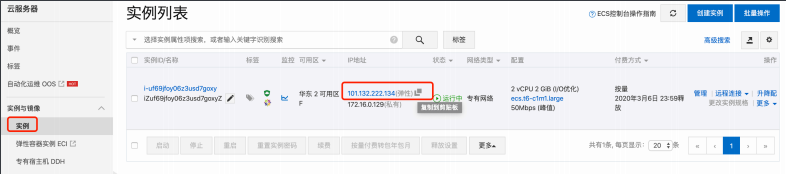
12.弹性公网IP


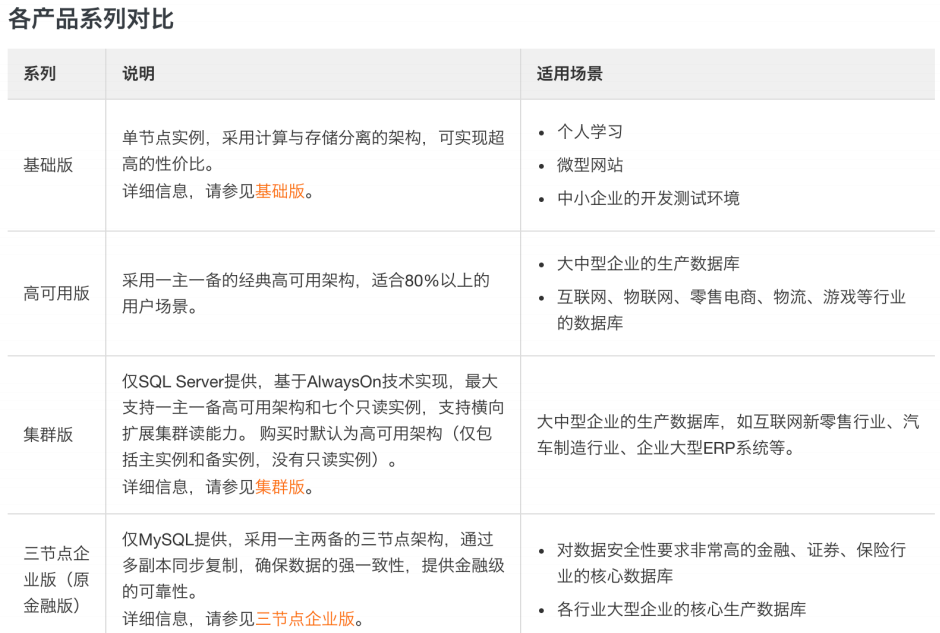
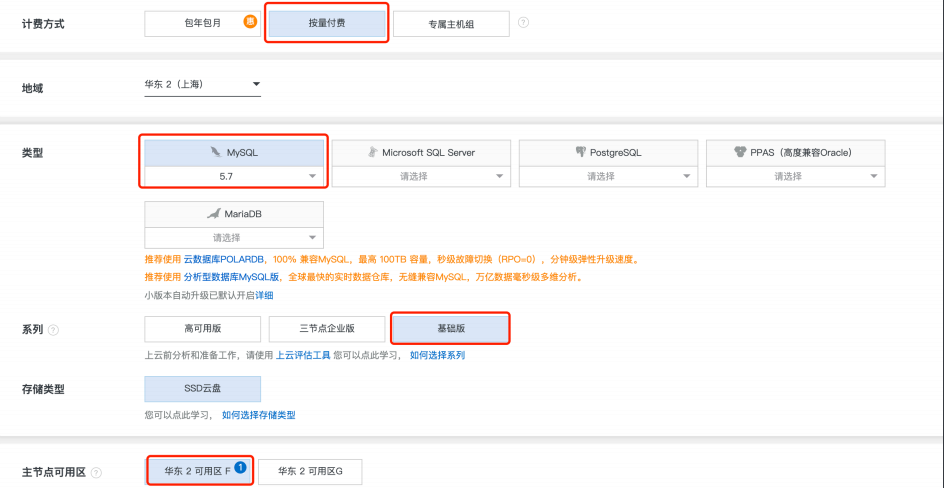
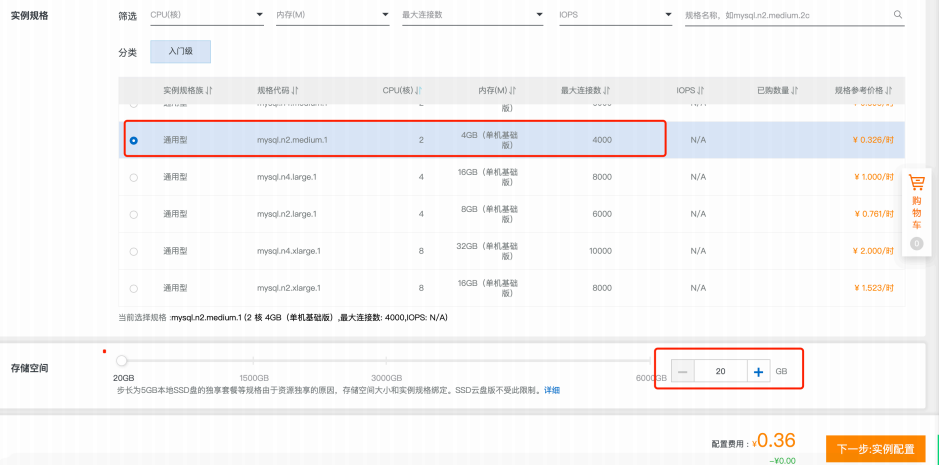
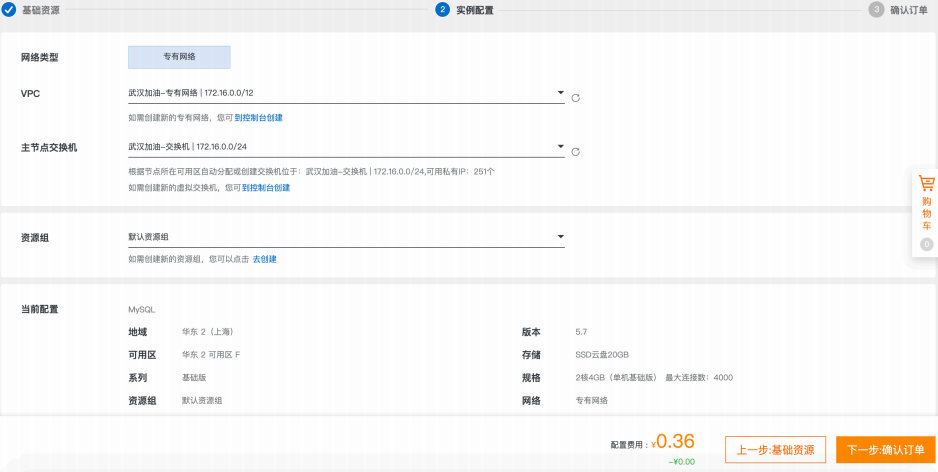
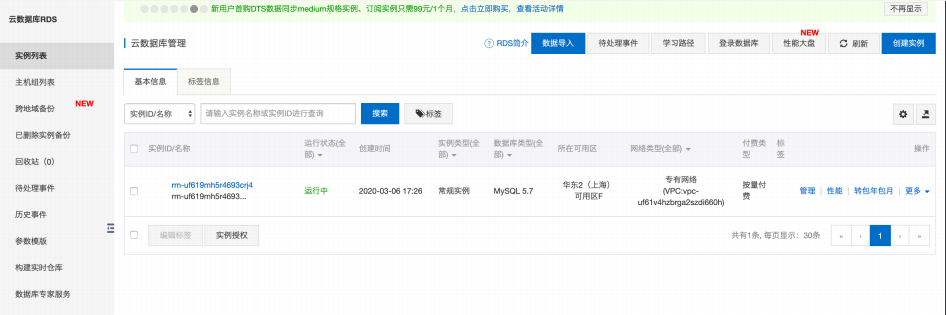
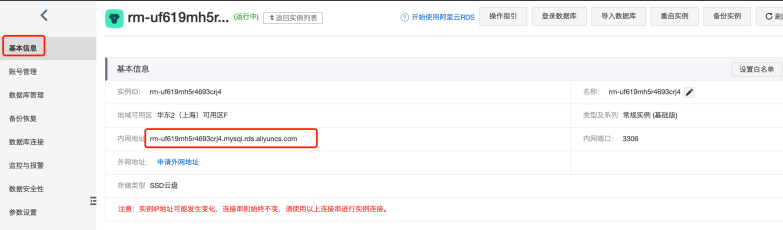
三、阿里云数据库RDS
1.购买RDS实例

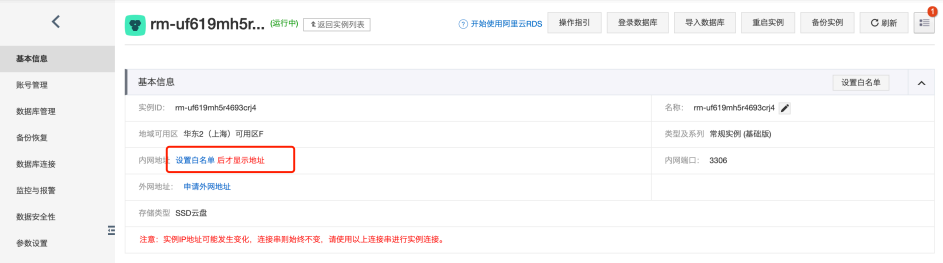
2.配置连接

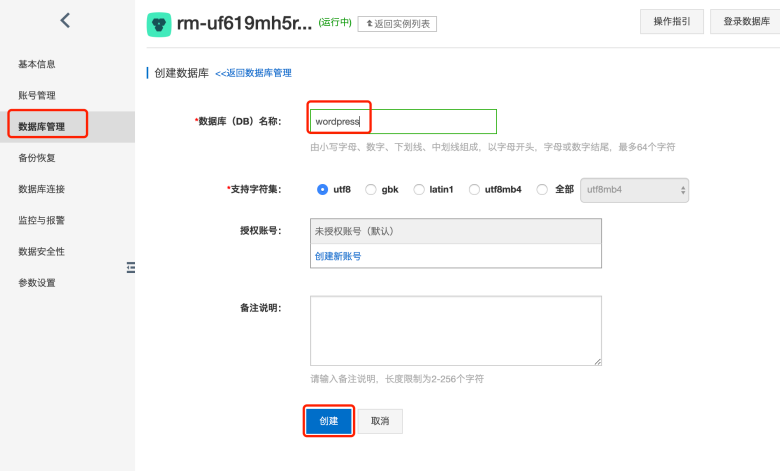
3.创建数据库

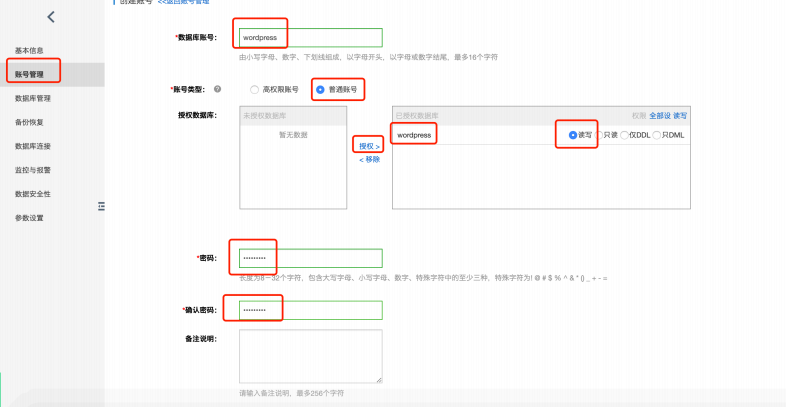
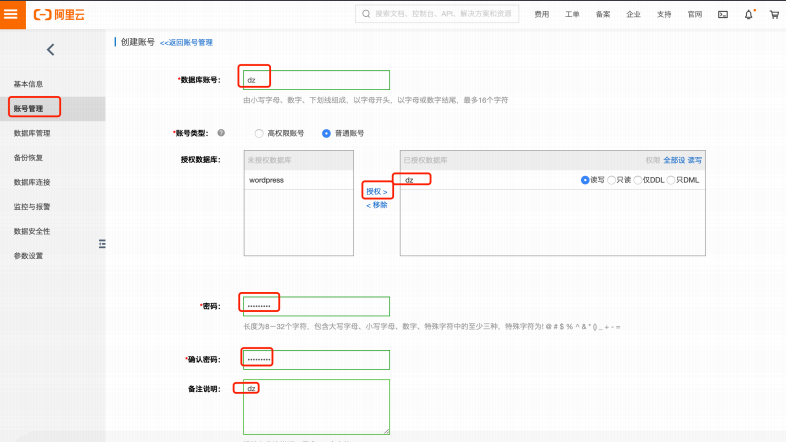
4.创建账号并关联数据库
5.测试连接
yum install mariadb -y
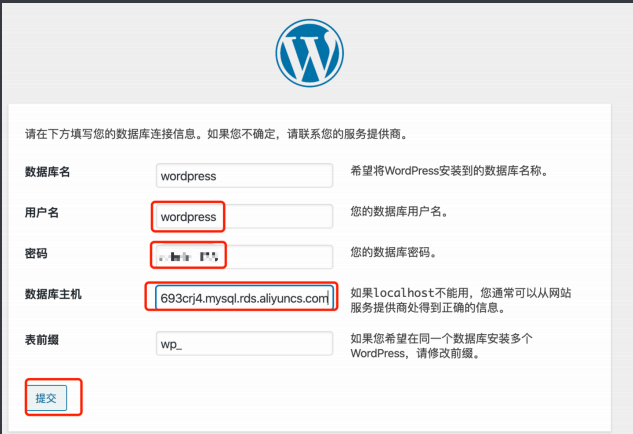
mysql -hrm-uf619mh5r4693crj4.mysql.rds.aliyuncs.com -uwordpress -padmin-123
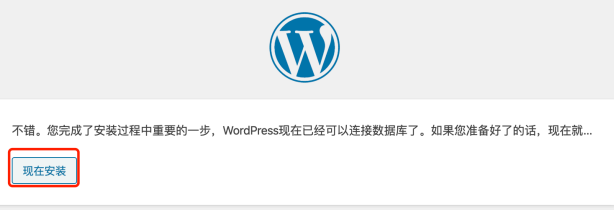
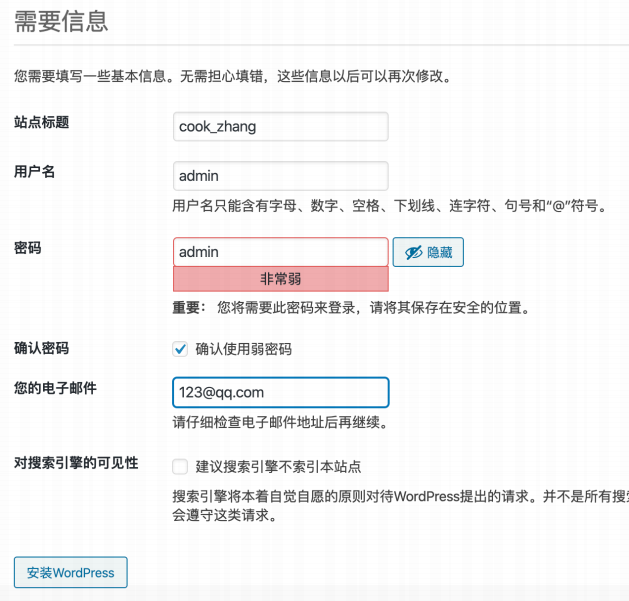
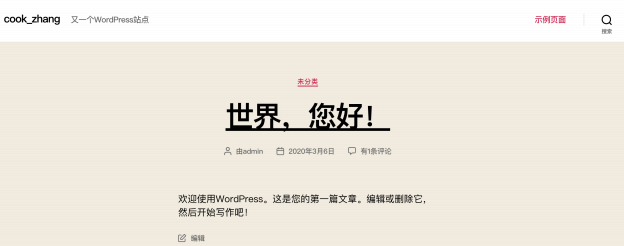
四、阿里云部署wordpress
1.安装配置nginx
yum install -y nginx
sed -i '37,38d' /etc/nginx/nginx.conf
cat > /etc/nginx/conf.d/blog.conf <<EOF
server {
    listen 8080;
    server_name localhost;
    root /code/wordpress;
    index index.php index.html;

    localhost ~ \.php\$ {
        root /code/wordpress;
        fastcgi_pass 127.0.0.1:9000;
        fastcgi_index index.php;
        fastcgi_param SCRIPT_FILENAME\$document_root\$fastcgi_script_name;
        include fastcgi_params;
    }
}
EOF
nginx -t
systemctl start nginx
netstat -lntup|grep 8080
2.安装配置php
cd /opt
tar xf php71.tar.gz
yum localinstall *.rpm -y
sed -i 's#user=apache#user=nginx#g' /etc/php-fpm.d/www.conf
sed -i 's#group=apache#group=nginx#g' /etc/php-fpm.d/www.conf
systemctl start php-fpm
netstat -lntup|grep php
ps -ef|grep php
3.部署代码
yum install -y unzip
cd /opt
mkdir /code
unzip wordpress-5.3.2.zip -d /code
chown -R nginx:nginx /code
curl -I 127.0.0.1:8080
4.配置安全组


5.网页访问

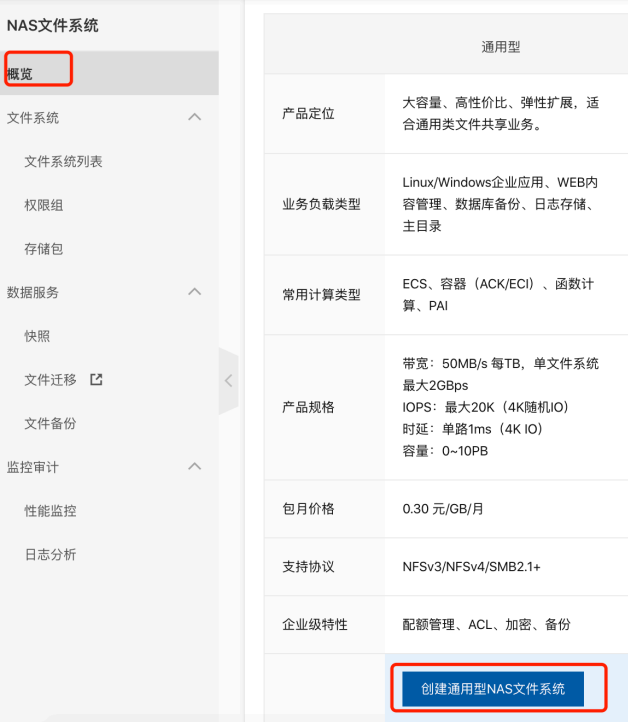
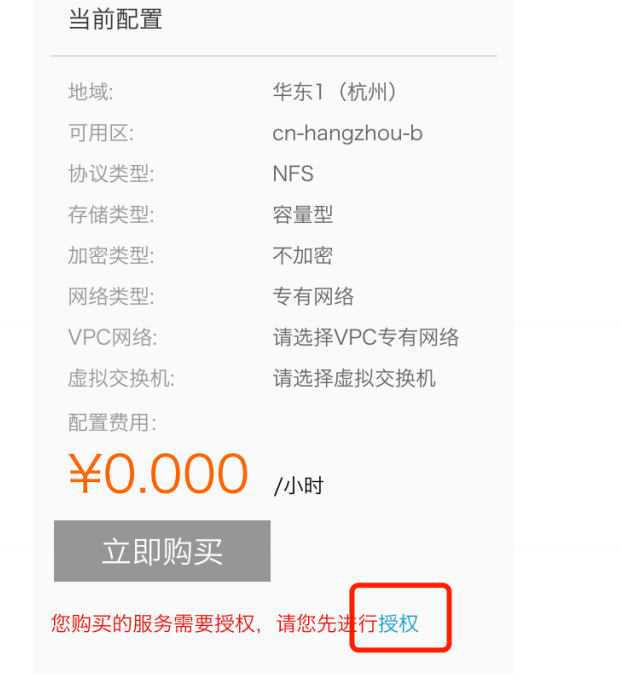
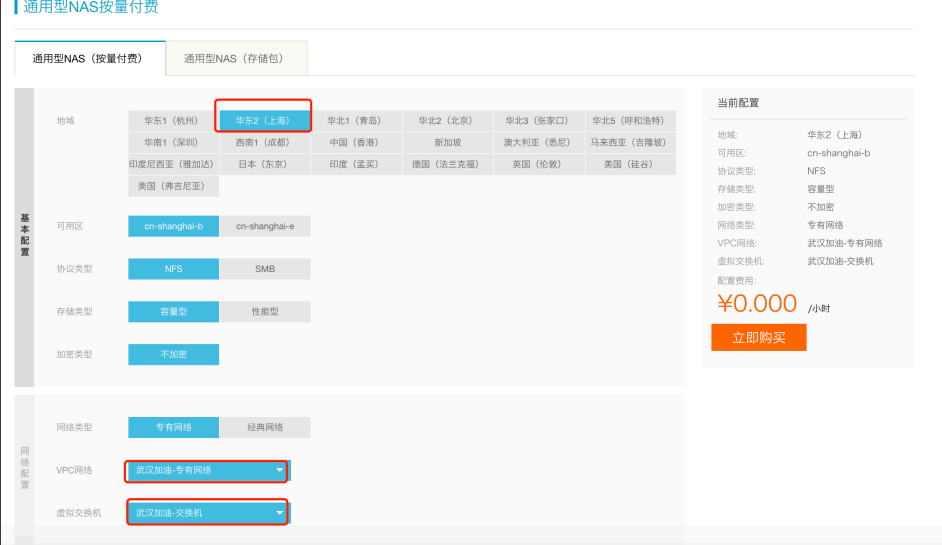
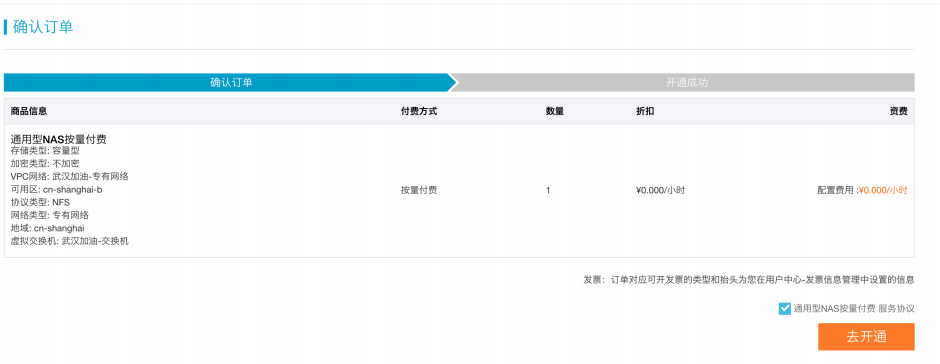
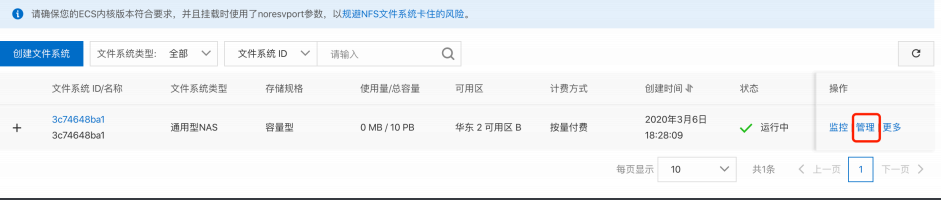
五、共享存储NAS
1.购买

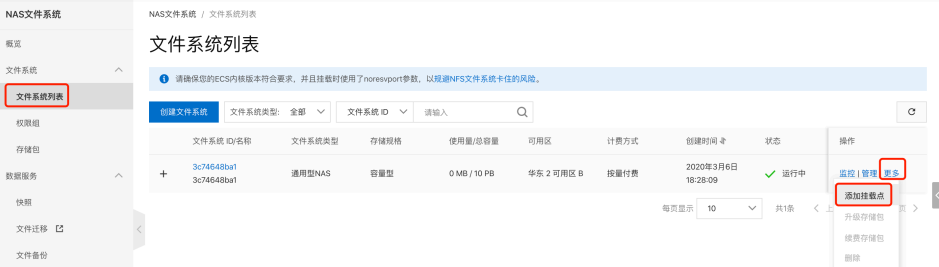
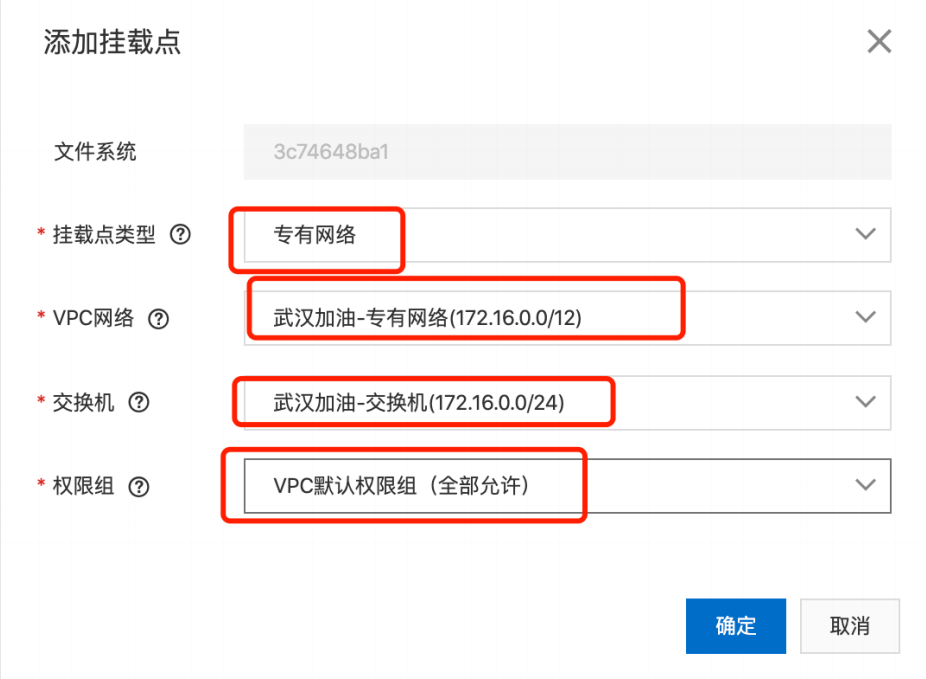
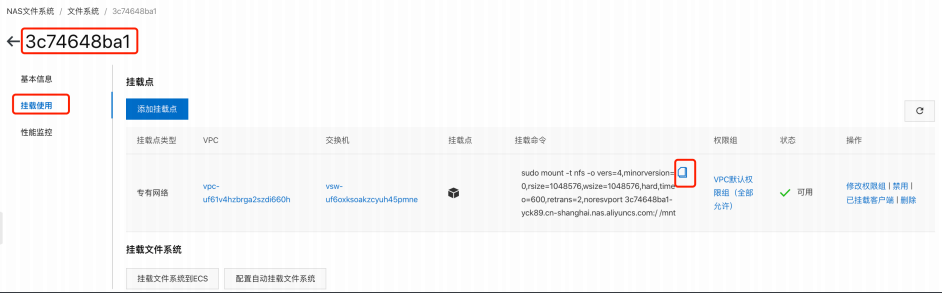
2.挂载命令
yum install nfs-utils -y
cd /code/wordpress/wp-content
cp -a uploads uploads_bak
mount -t nfs -o
vers=4,minorversion=0,rsize=1048576,wsize=1048576,hard,timeo=600,retrans=2,noresvport 3c74648ba1-yck89.cn-shanghai.nas.aliyuncs.com:/ /code/wordpress/wp-content/uploads
cp -a uploads_bak/* uploads/
df -h
3.开机自动挂载
UUID=3c7468ba1-yck89.cn-shanghai.nas.aliyuncs.com:/ /code/wordpress/wp-content/uploads nfs defaults 0 0
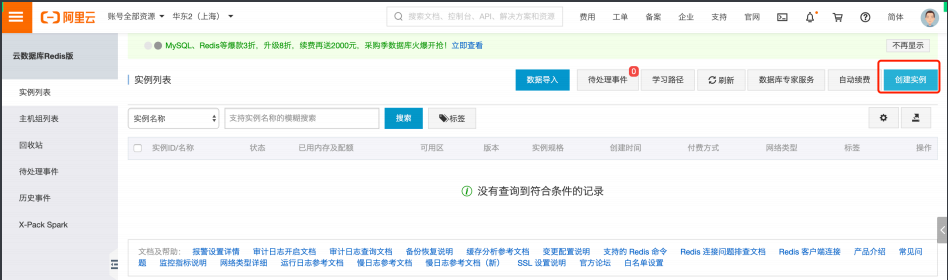
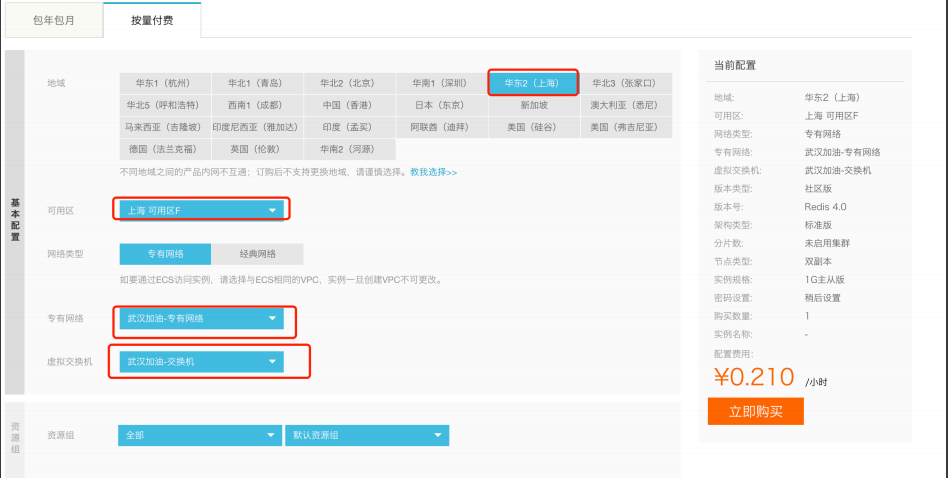
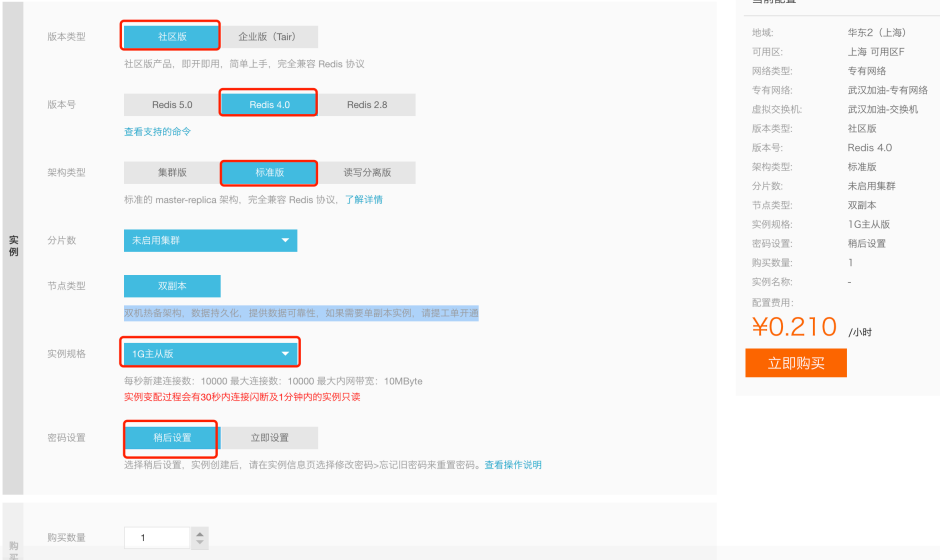
六、阿里云数据库REDIS
1.购买redis

七、部署DZ论坛
1.配置nginx配置文件
cd /etc/nginx/conf.d/
cp blog.conf dz.conf
sed -i "s#wordpress#dz#g" dz.conf
sed -i "s#8080#8090#g" dz.conf
nginx -t
systemctl restart nginx
2.配置代码
cd /opt
mkdir dz
unzip Discuz_X3.4_SC_UTF8.zip -d dz
mkdir /code/dz
cp -a /opt/dz/upload/* /code/dz/
chown -R nginx:nginx /code/dz
curl -I 127.0.0.1:8090
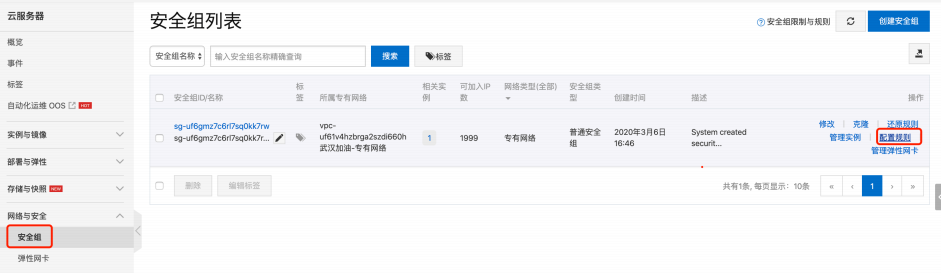
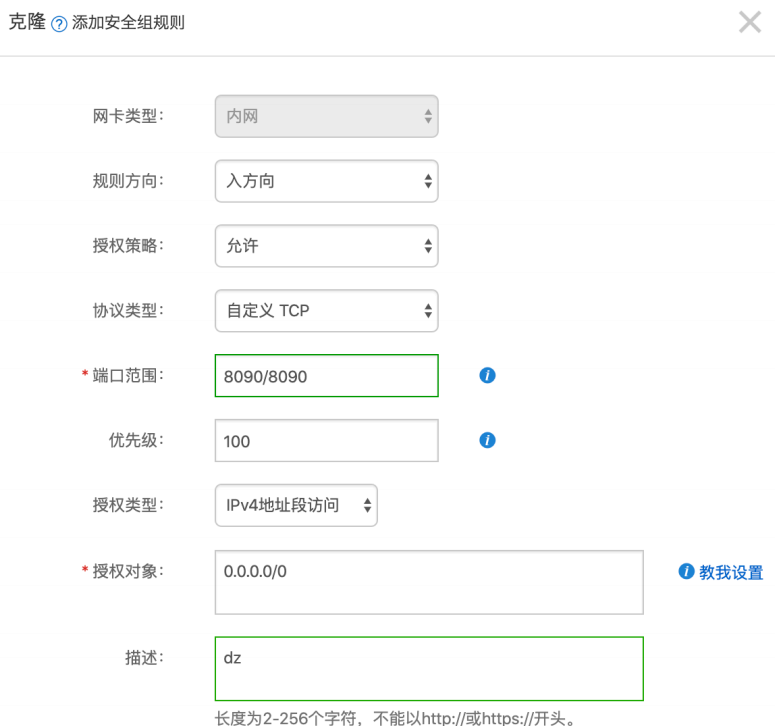
3.配置安全组
4.配置mysql数据库

5.网页操作
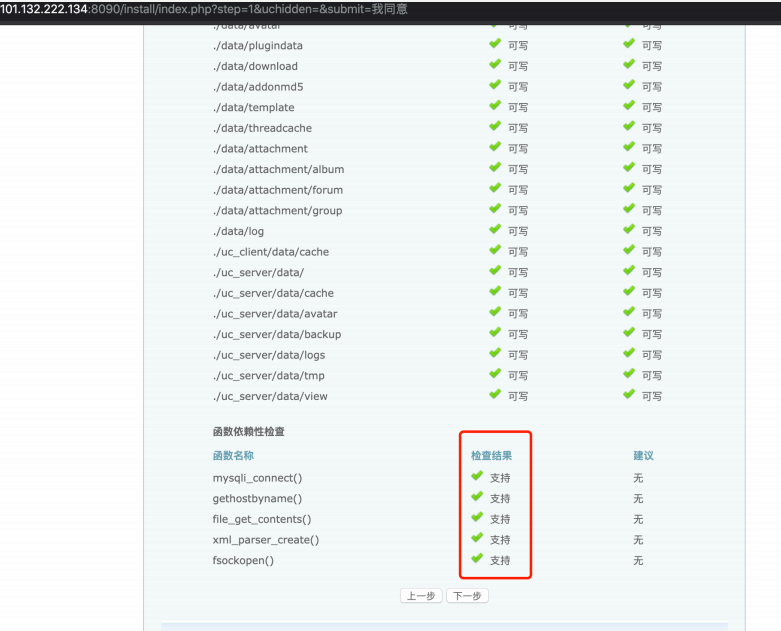
安装过程中会提示SQL错误,不用关心,无影响

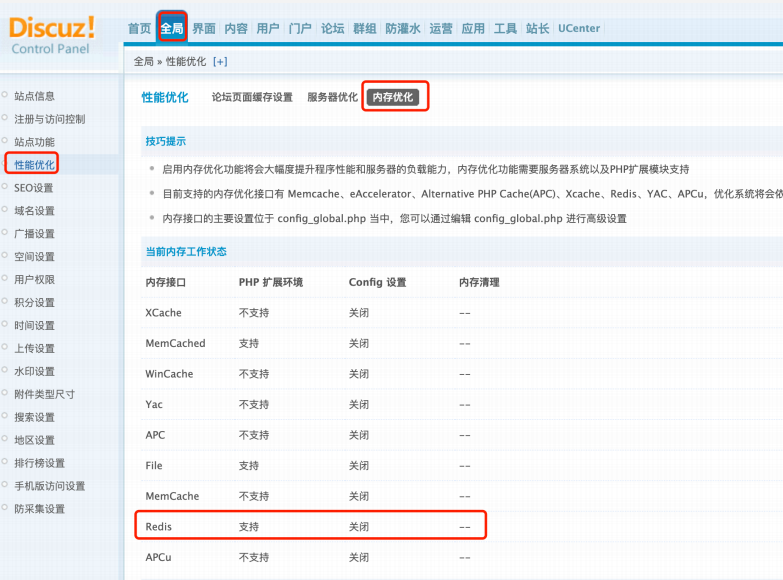
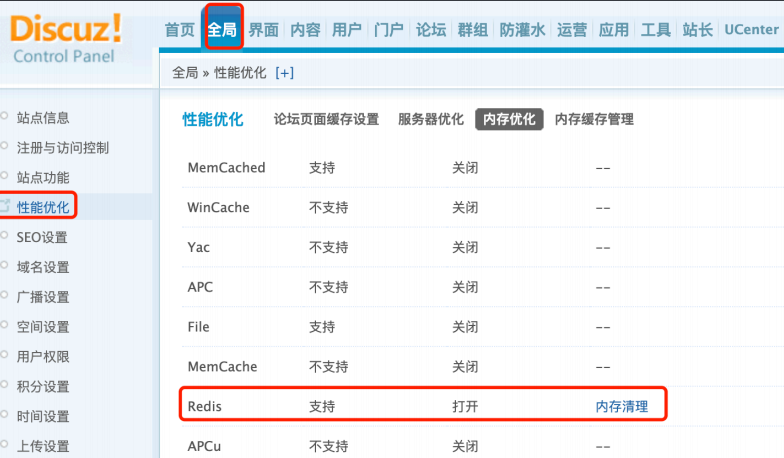
6.配置Redis

7.连接测试
yum install redis -y
redis-cli -h r-uf6760sfu9ou8s48p9.redis.rds.aliyuncs.com set k1 v1
8.修改DZ代码
vi /code/dz/config/config_global.php
$_config['memory']['redis']['server'] = 'r-uf6760sfu9ou8s48p9.redis.rds.aliyuncs.com';
systemctl restart php-fpm
9.检查并测试
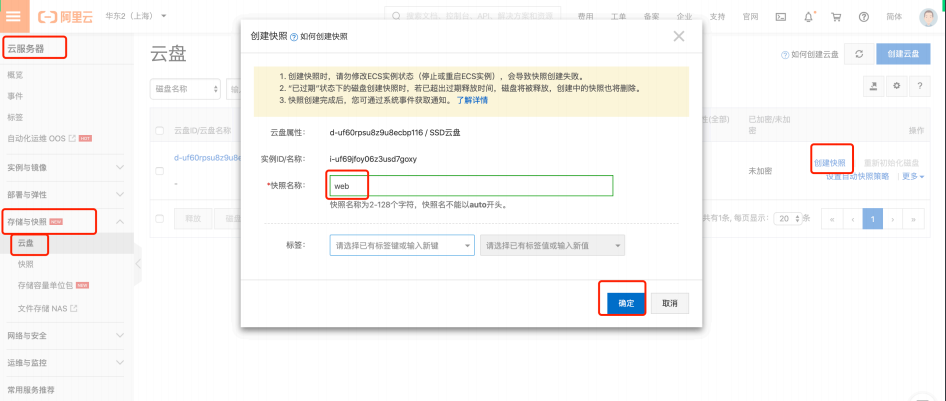
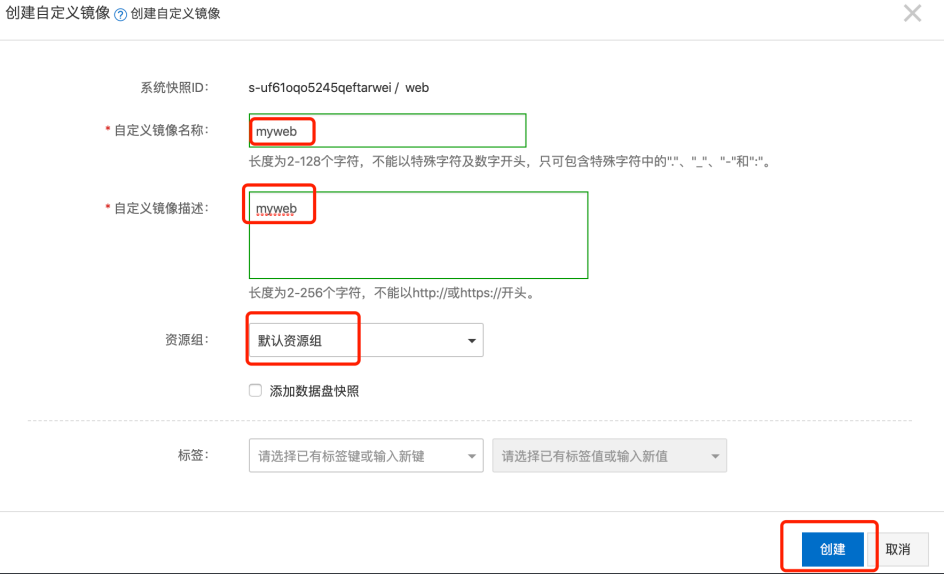
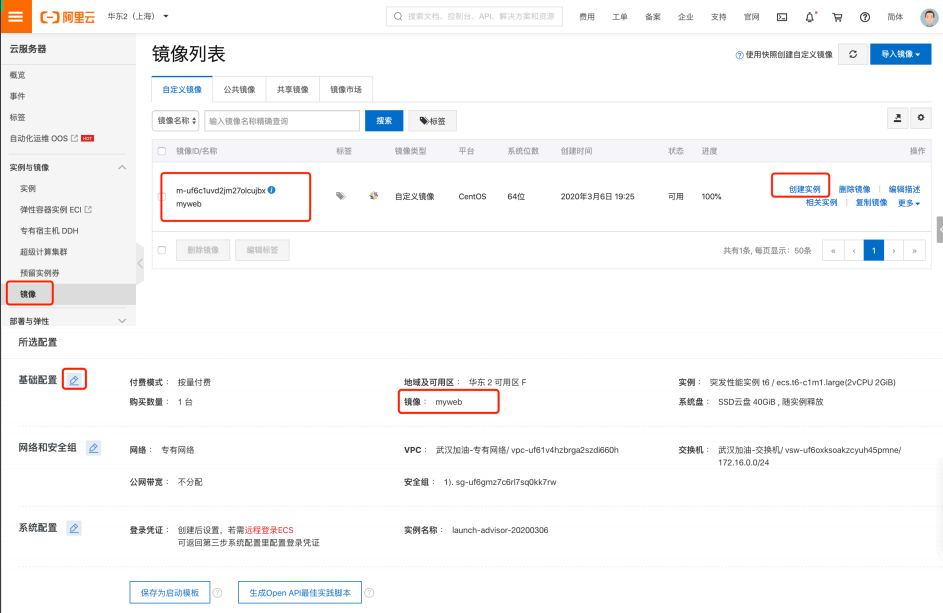
八、镜像与快照
1.创建快照
2.创建镜像

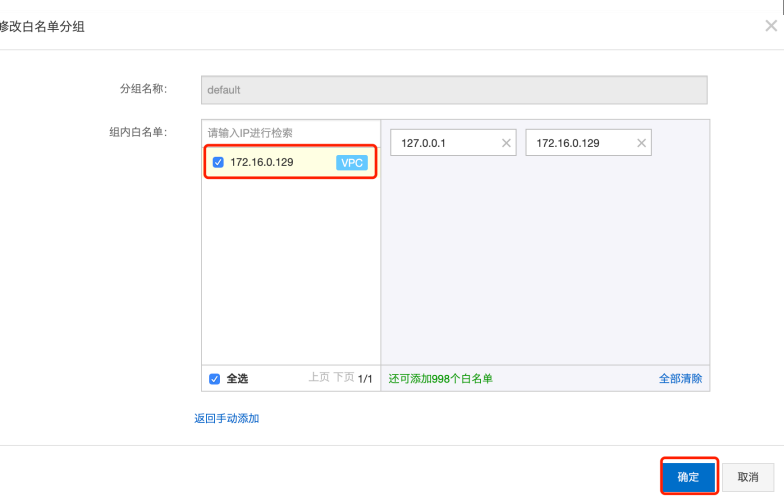
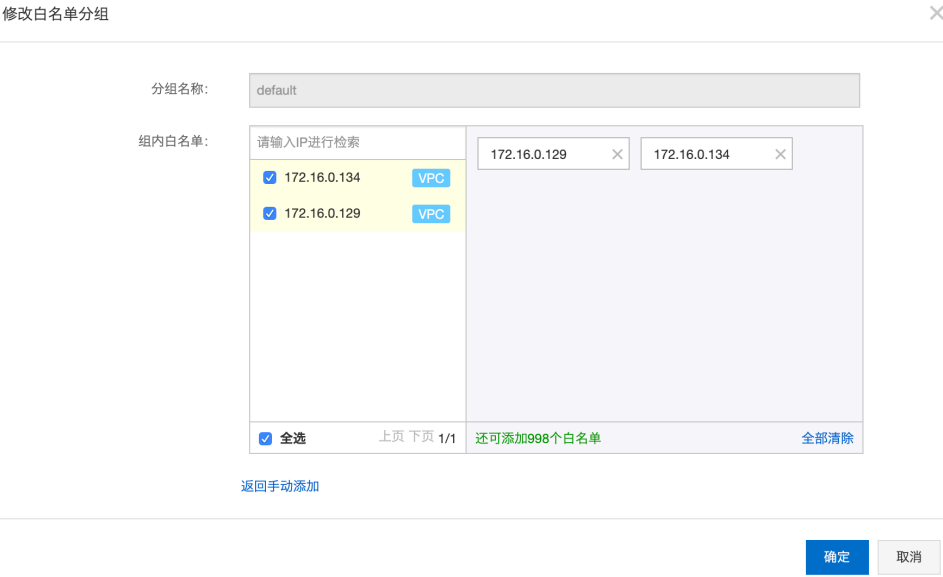
3.RDS配置白名单

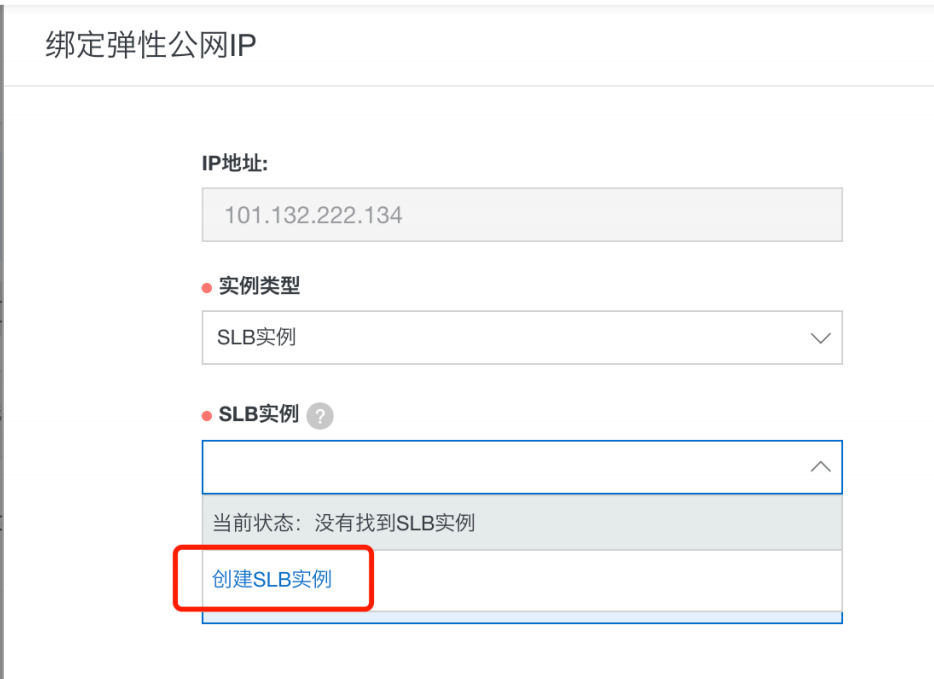
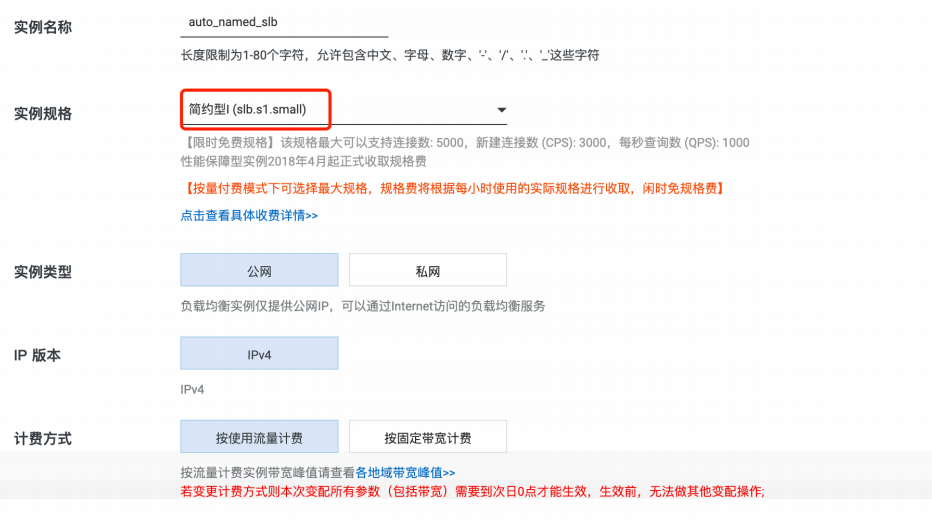
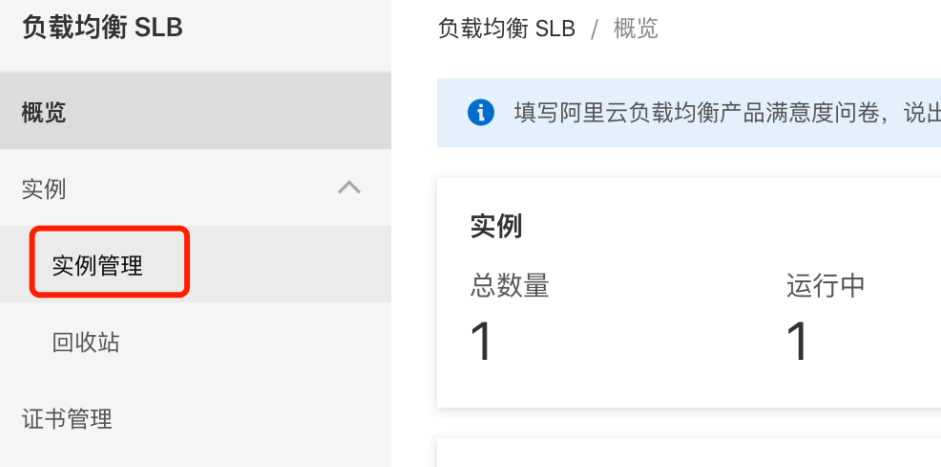
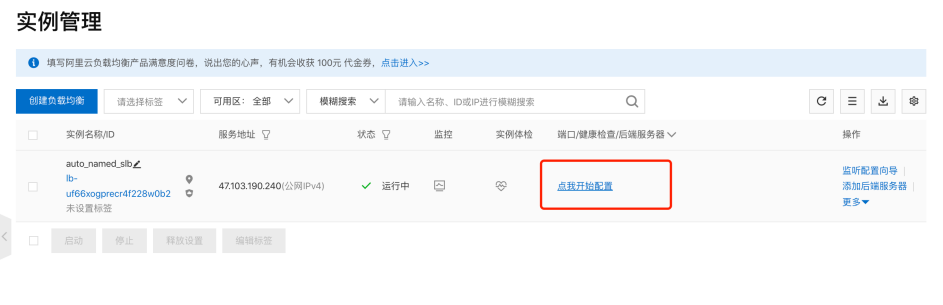
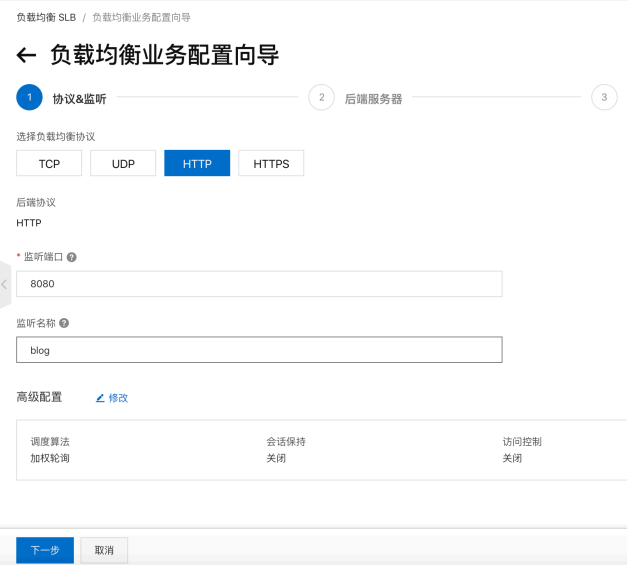
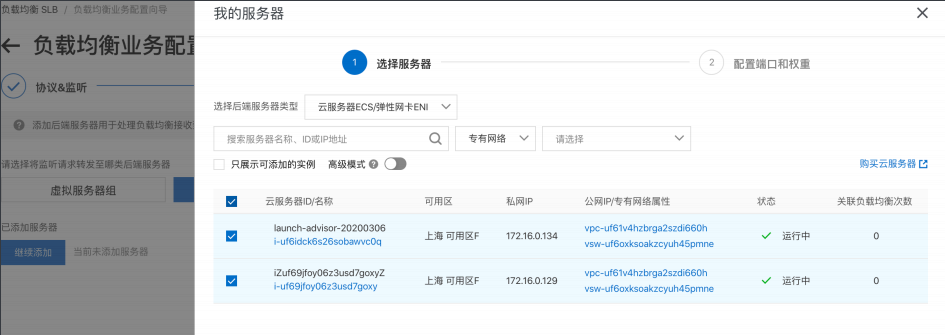
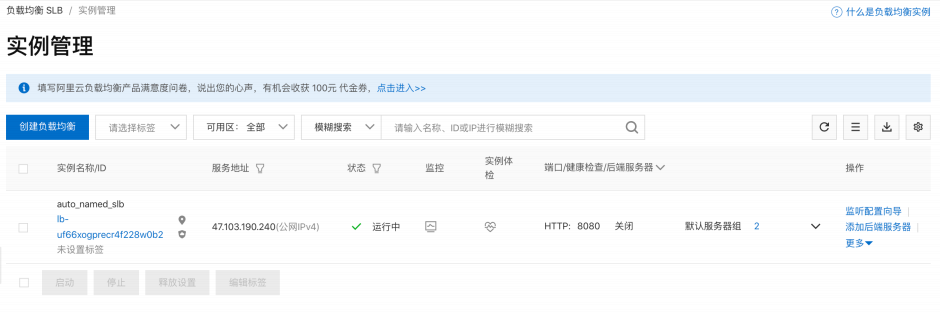
九、SLB配置
1.修改弹性公网IP


 浙公网安备 33010602011771号