


【rabbitmq】
rabbitMQ消息队列
- 生产者消费者模型
- 主流的消息中间件
- rabbitMQ
- kafka
1.什么是队列,什么是MQ
-
队列
- 先进先出的模式
import queue q = queue.Queue(maxsize=10) # fifo first in first out q.put(111) q.put(222) q.put(333) q.get() # 111 q.get() # 222 q.get() # 333 q.get() # 默认夯住 block=true -
MQ
-
MQ(message queue消息队列):通过典型的生产者消费者模型,生产者不断向消息中间件中发送消息,消费者不断的从队列中获取消息,并且消息的生产和消费都是异步的,我们只关系消息的发送和接受,没有业务逻辑,轻松解藕,利用高效可靠的消息传递机制进行平台无关的数据交流,并基于数据通信来进行分布式的集成
-
消息队列的优点
- MQ的最重要作用就是去做进程之间的通信,它是跨语言的。
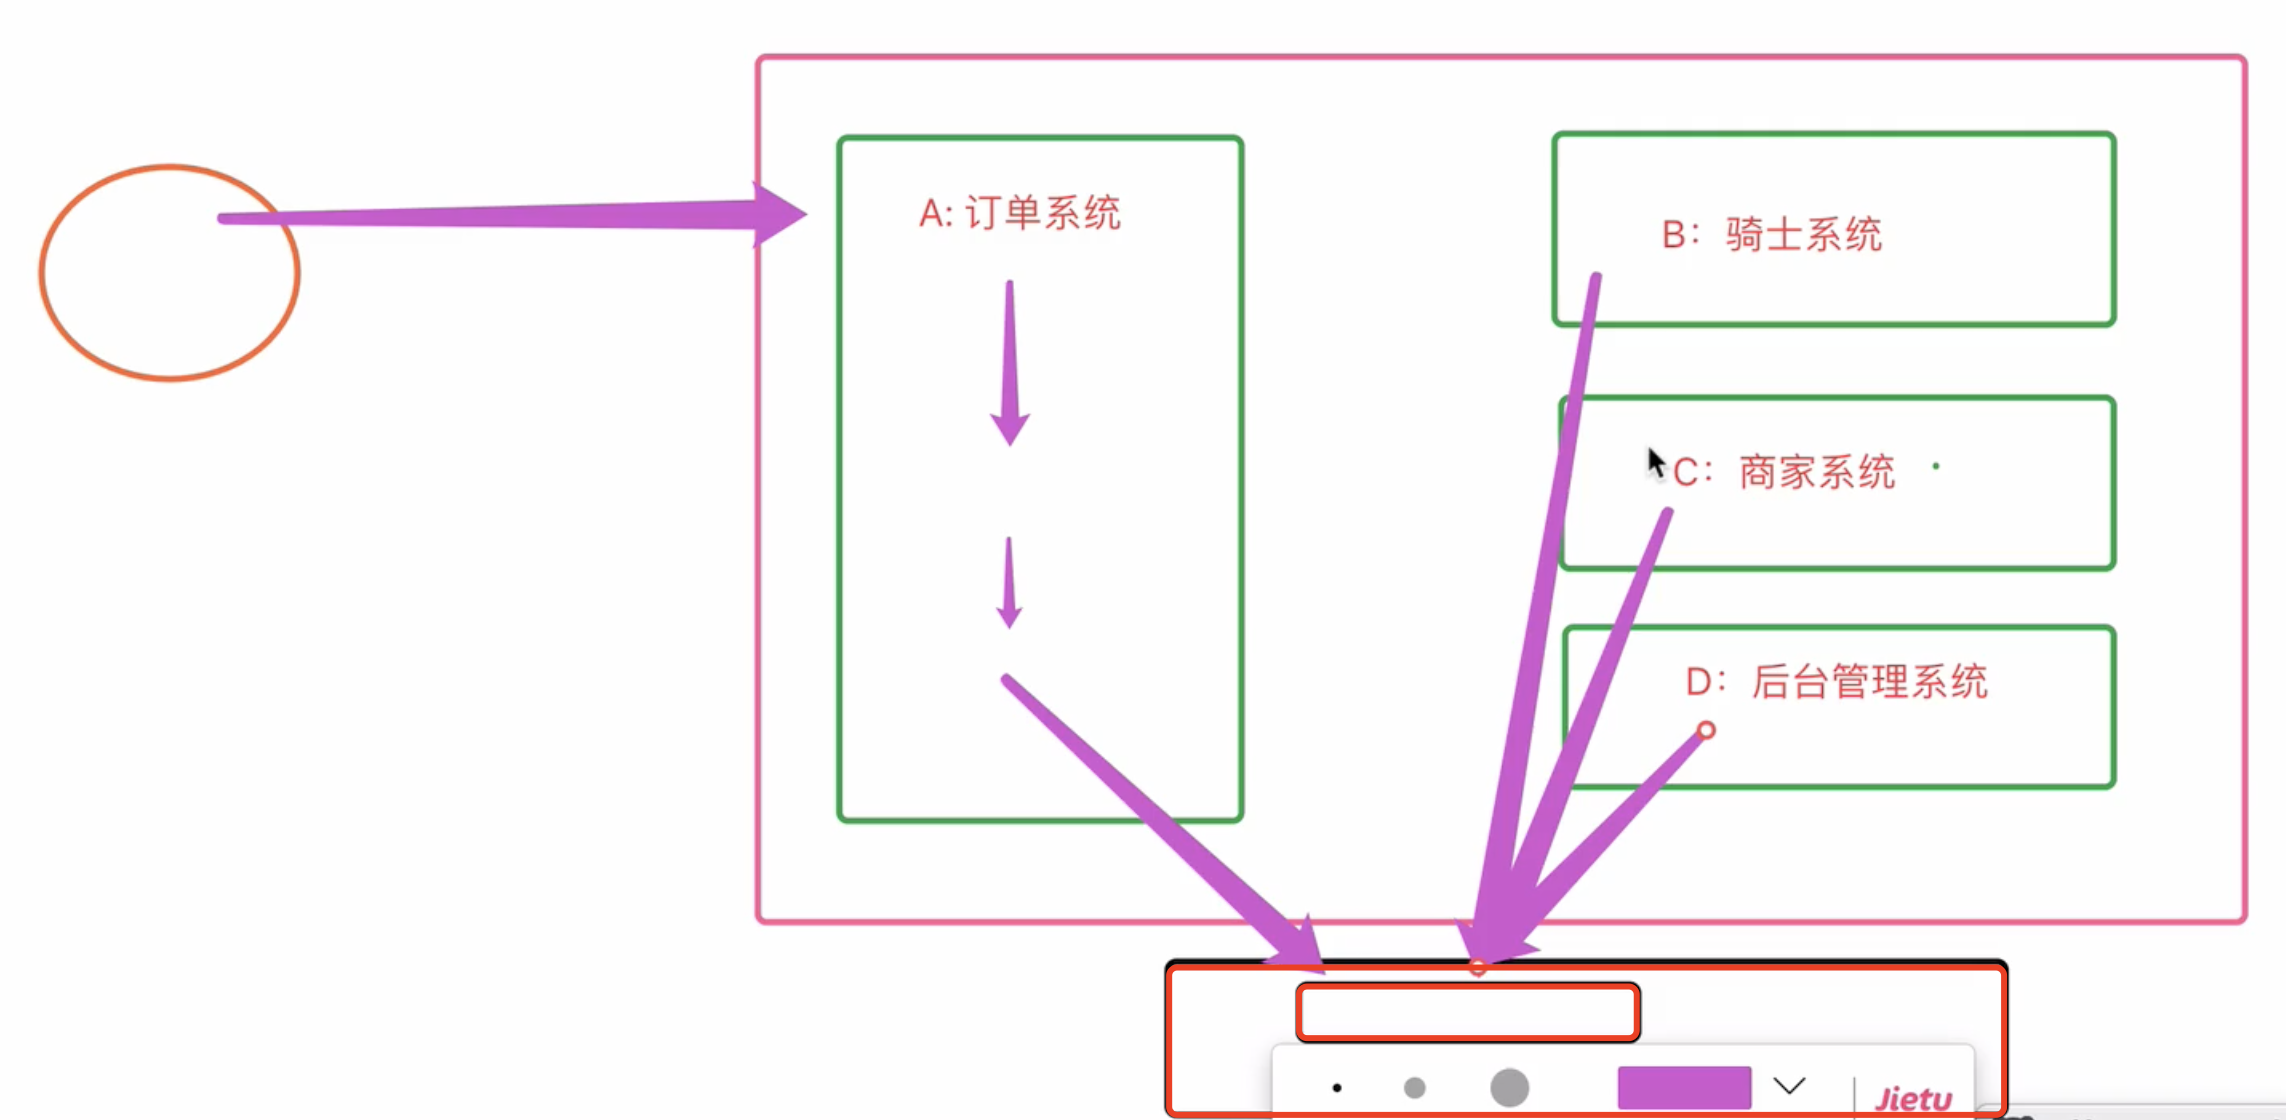
- 消息队列主要解决解耦,异步,流量削峰的问题
- 订单系统和其他系统没有耦合,实现解耦
- 向队列中生产数据不等待实现异步
- 大流量来的时候先进队列,这样多请求不会导致宕机,实现流量削峰
![image-20210316121436325]()
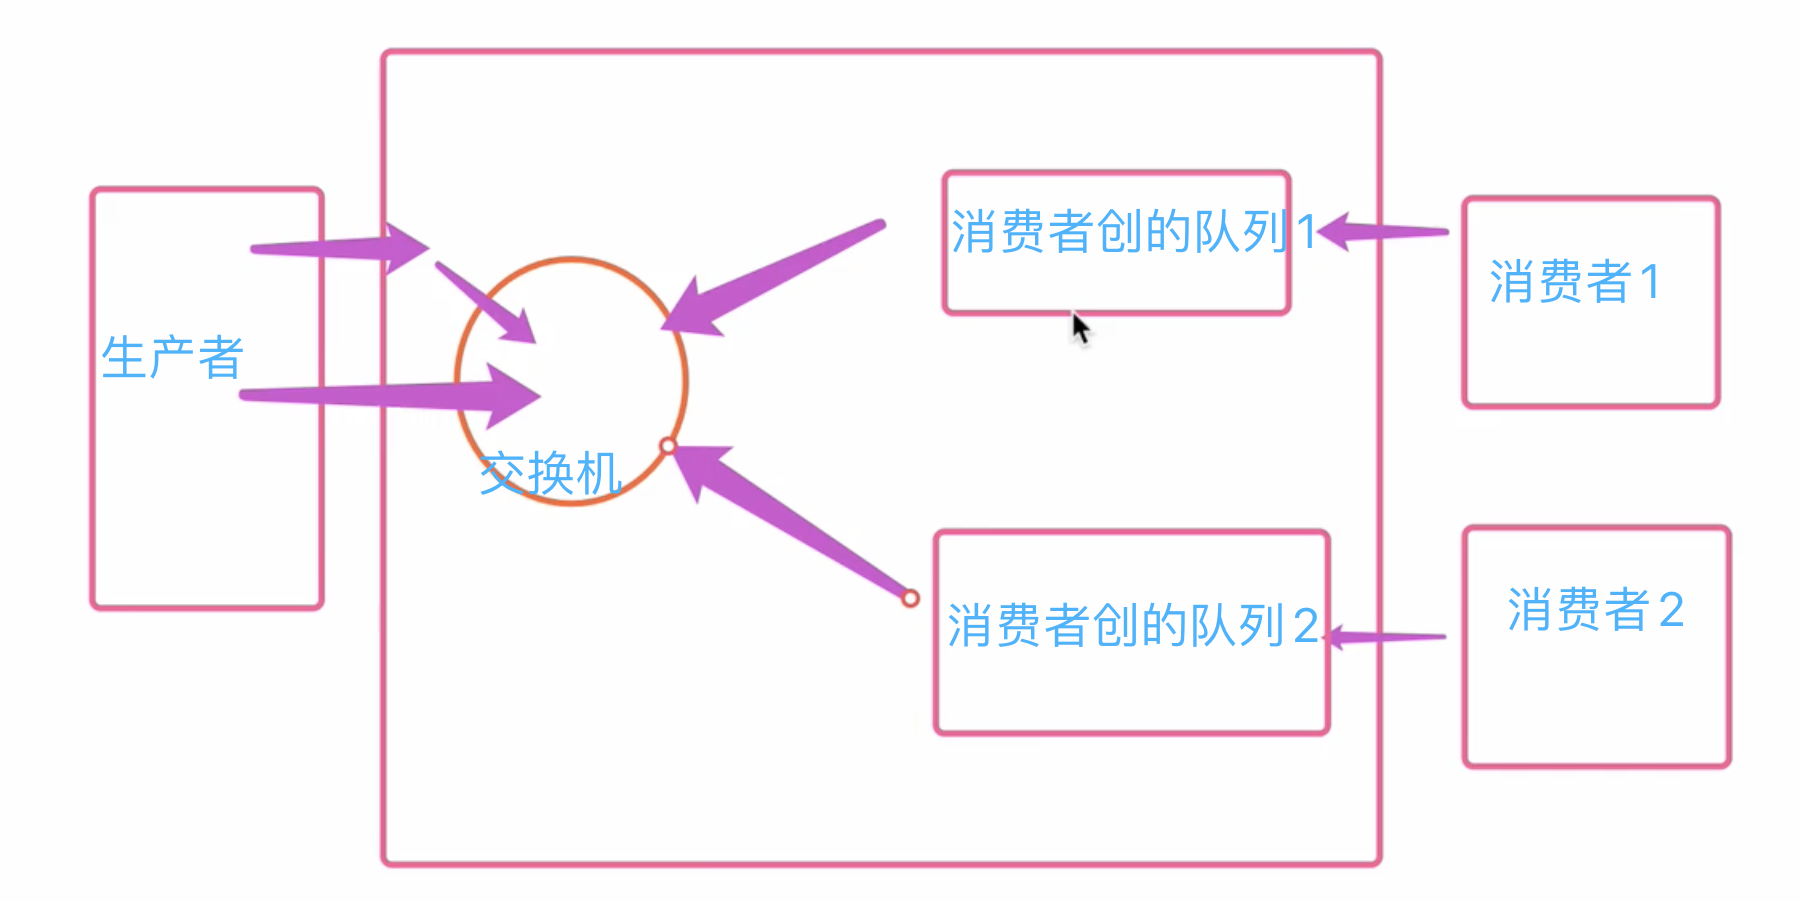
- 生产者不直接把消息发在队列中,而是通过server给交换机,交换机再交给队列,这给我们提供了很多业务场景的组合模式
![image-20210316000803105]()
-

2.MQ有哪些
- rabiitMQ
- kafka
- ActiveMQ
- RocketMQ
3.不用MQ的特点
- rabbitMQ
- rabbitMQ是使用Erlang语言开发的开源消息队列系统,基于ampq协议实现,ampq的主要特征是面向消息、队列、路由、可靠性、安全。amqp协议更多用在企业系统内对数据一致性,稳定性,可靠性要求很高的场景,对性能和吞吐量要求还在其次。
- kafka
- 处理日志很广泛、kafka是linkedIn开发的分布式生产者消费者模型,追去搞吞吐量,最开始的设计目的是为了收集日志
4.rabbitMQ安装
4.1 mac
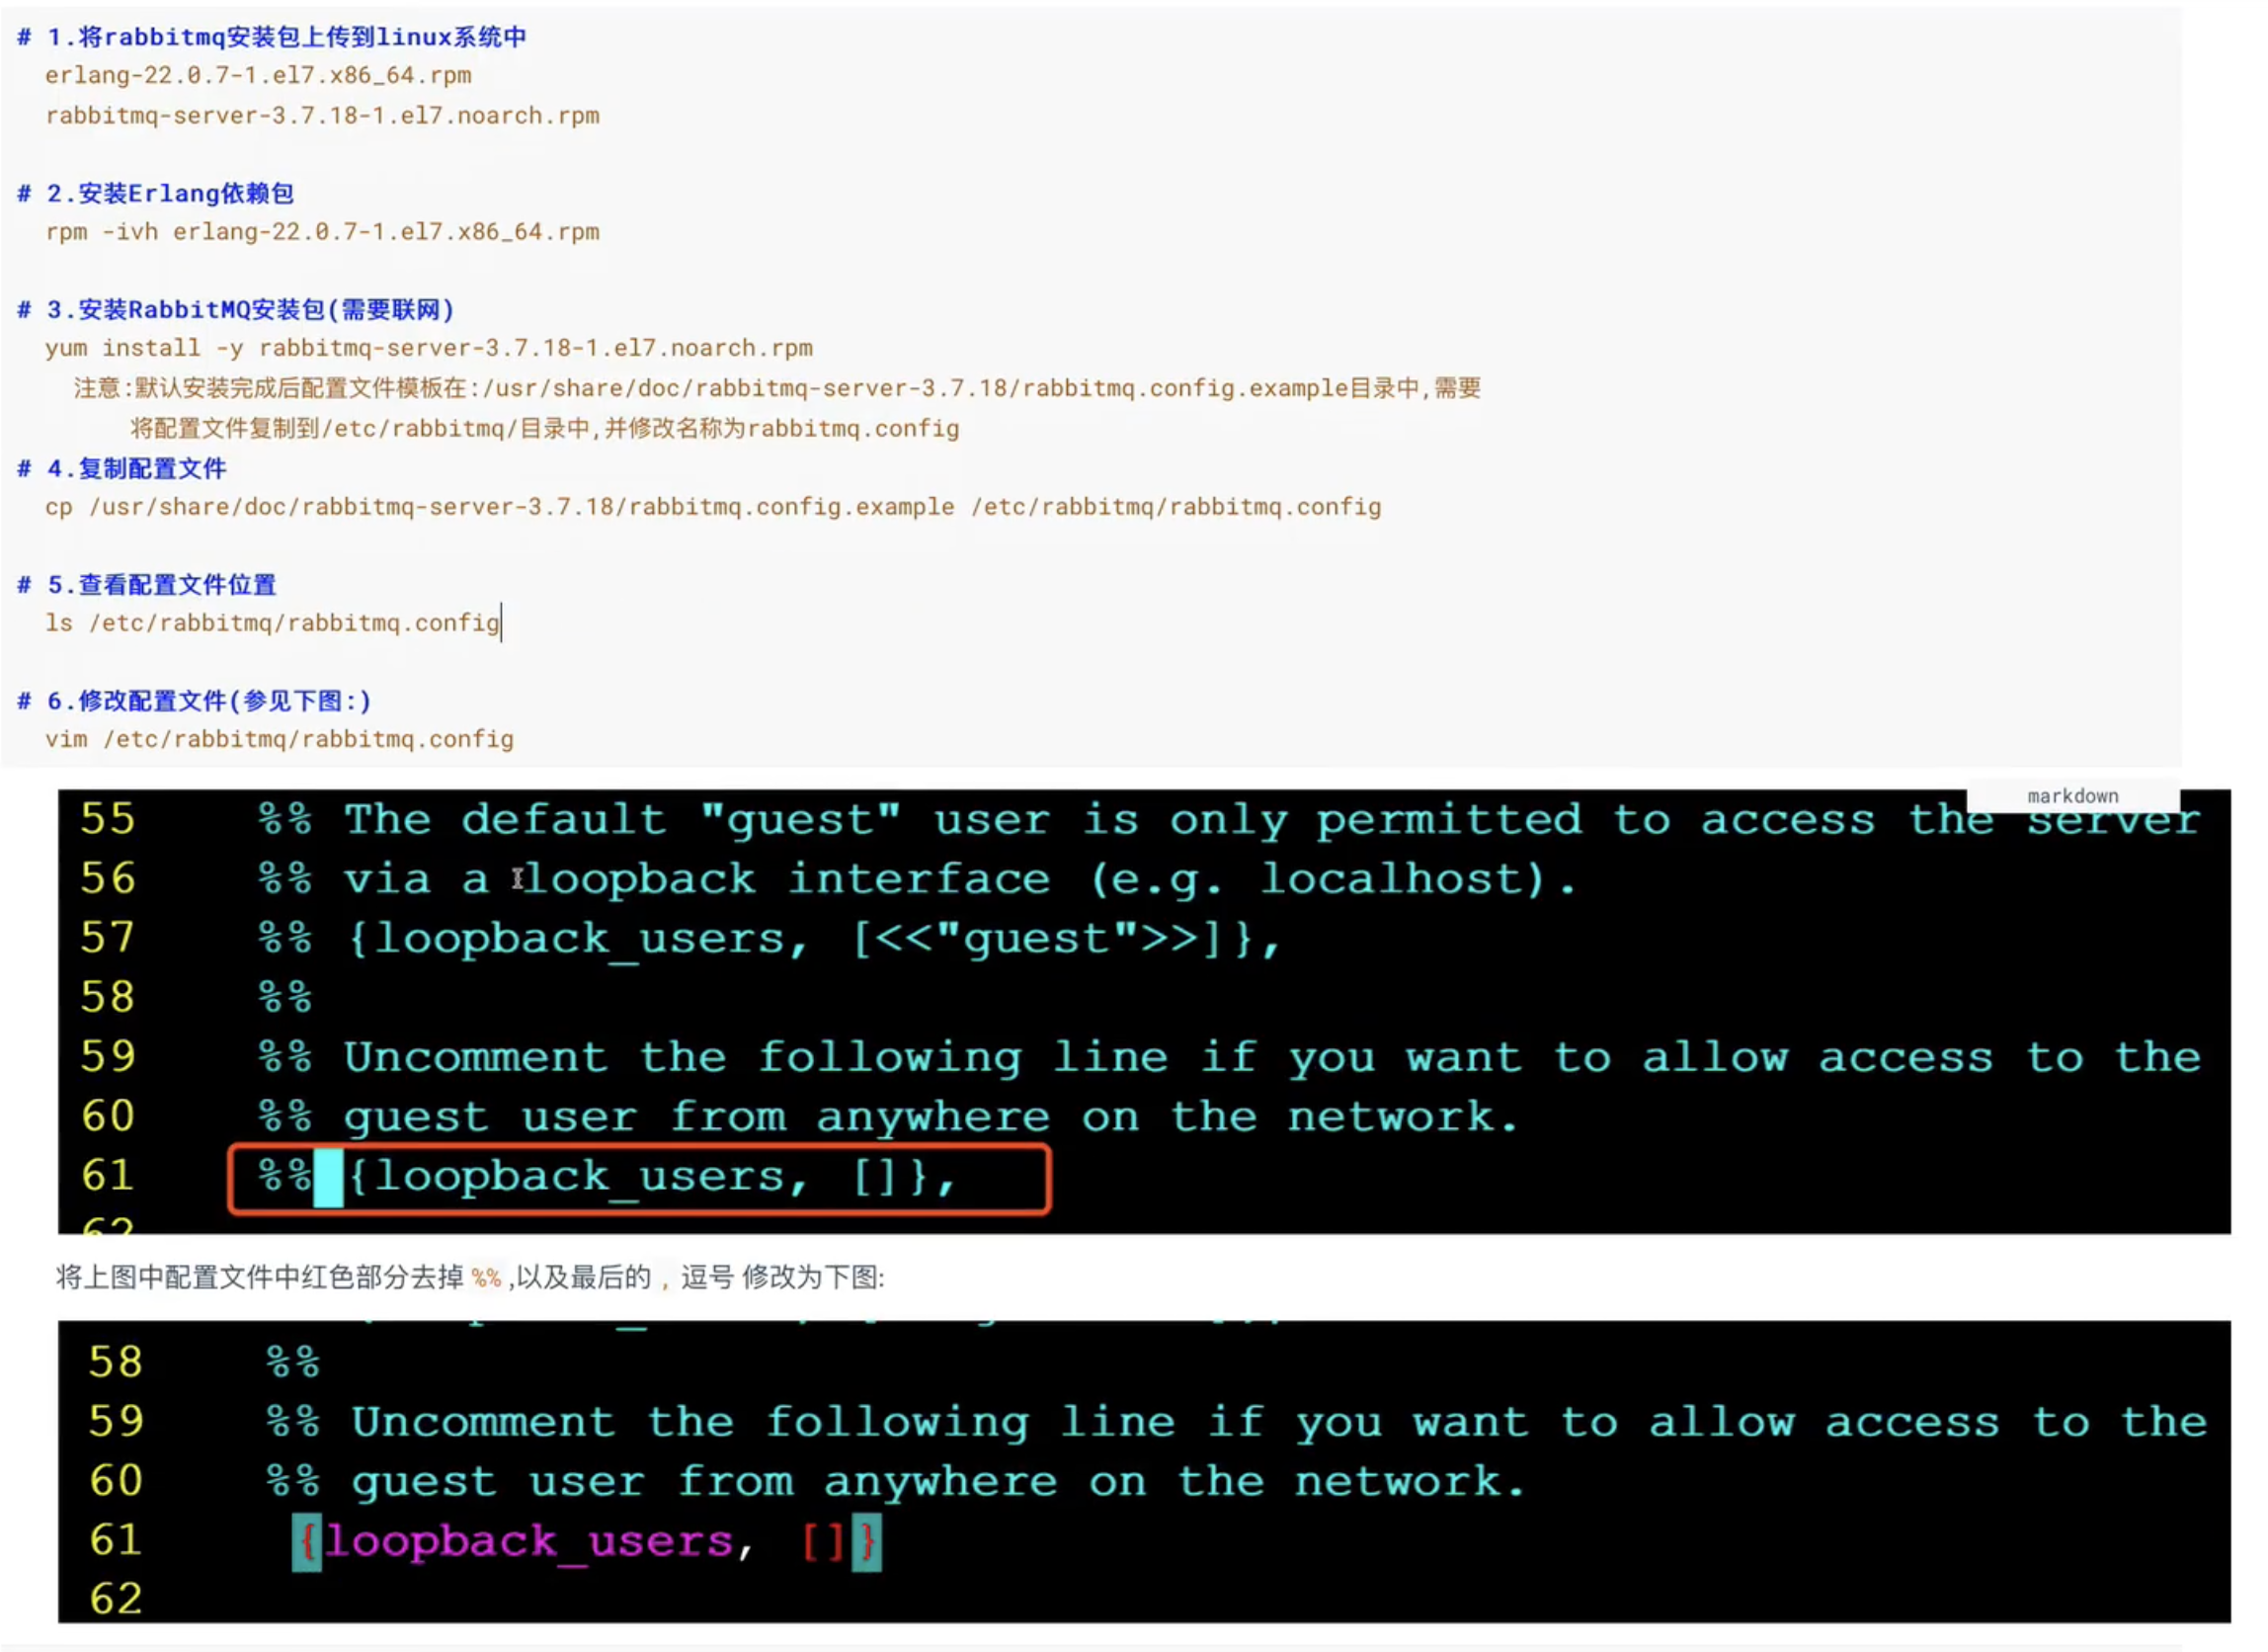
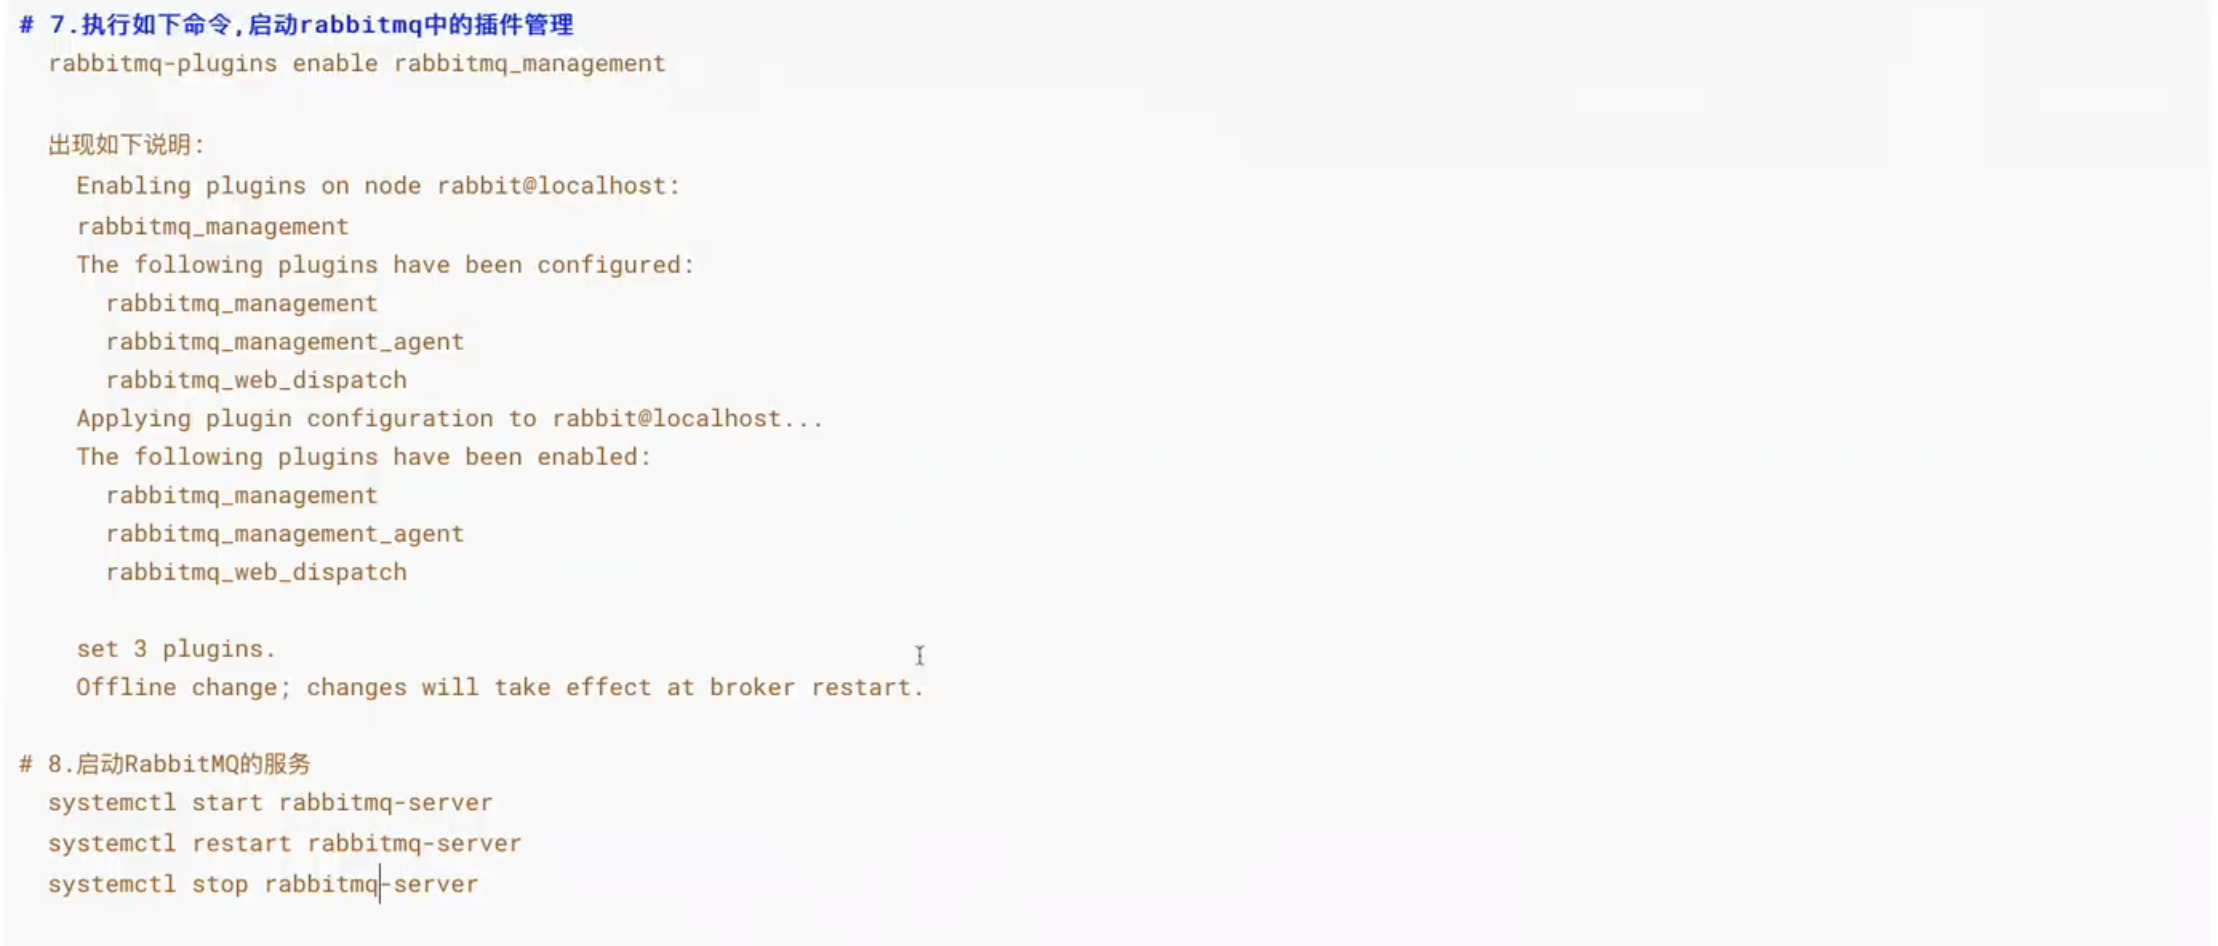
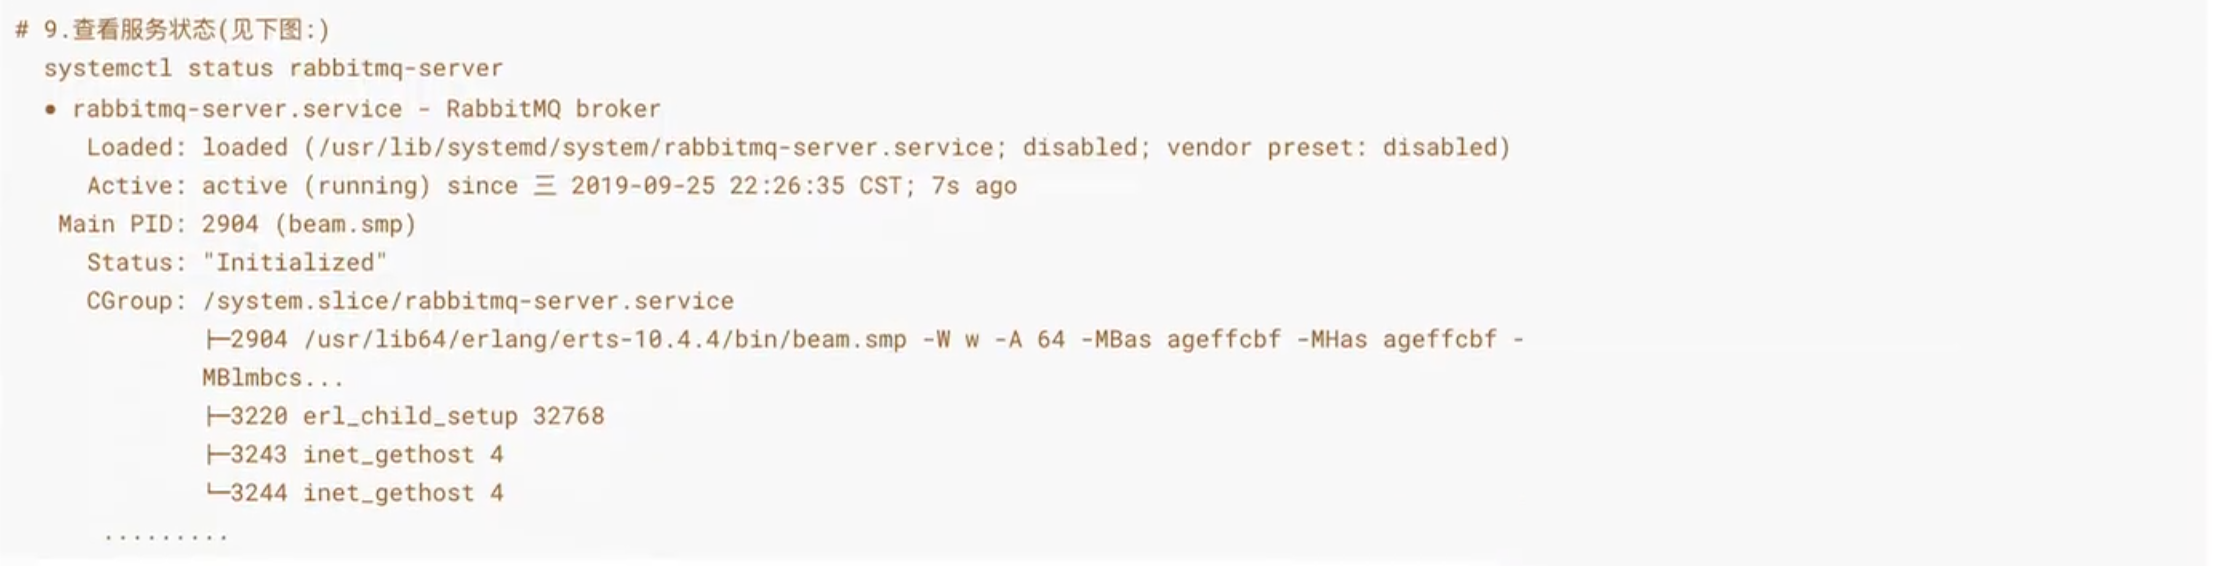
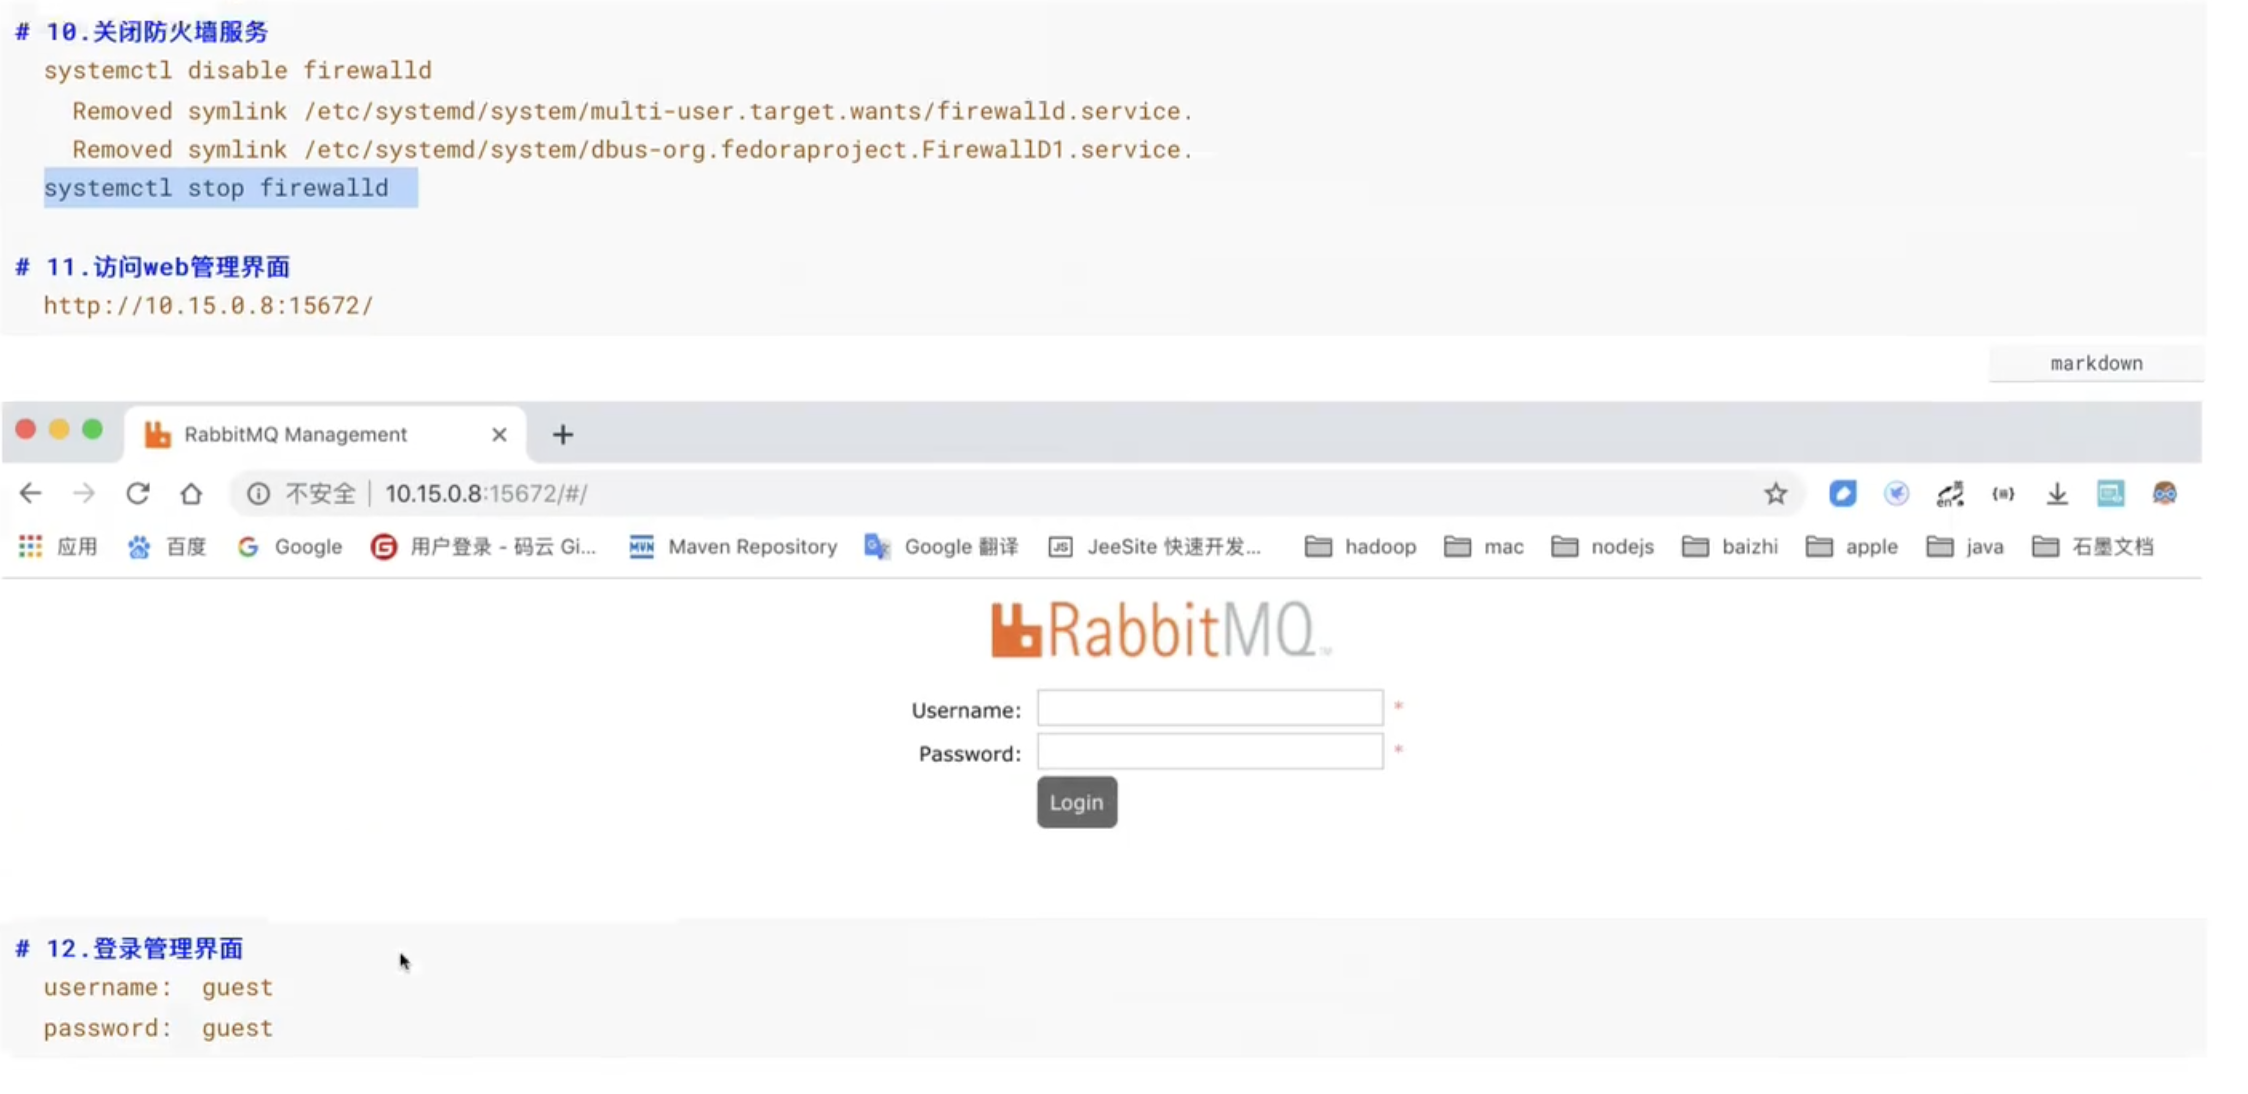
4.2 linux
5.rabbitMQ的简单模式应用
5.1 生产者
- 连接rabbitMQ
- 创建队列
- 向队列插入数据
import pika

# 连接rabbitmq
# 创建控制对象
connection = pika.BlockingConnection(pika.ConnectionParameters('localhost'))
channel = connection.channel()

# 创建队列
channel.queue_declare(queue='hello')

# 发布(插入)
channel.basic_publish(exchange='' # 简单模式
                      routing_key='hello' # 指定队列
                      body='hello world') # 插入的具体信息
5.2 消费者
- 连接rabbitMQ
- 监听队列
- 确定回调函数
import pika

# 建立连接
connection = pika.BlockingConnection(pika.ConnectionParameters('localhost'))
channel = connection.channel()

# 创建队列(消费则要监听hello队列 必须先有队列 所以这里会有创建的过程 如果已经有了这句没什么作用 如果没有创建hello队列)
channel.queue_declare(queue='hello')

# 确定回调函数
def callback(ch, method, properties, body):
    print(" [x] Received %r" % body)

# 确定监听队列
channel.basic_consume(queue='hello', # 内容
                      auto_ack=True, # 默认应答 简单模式下为true
                      on_message_callback=callback)# 指定了回调函数


print(' [*] Waiting for messages. To exit press CTRL+C')

# 开始监听队列(真正开始执行)
channel.start_consuming()
5.3 参数使用
-
参数使用
-
应答参数
-
自动应答:效率优先
- auto_ack=True
-
手动应答:安全优先
- auto_ack=False
- ch.basic_ack(delivery_tag=method.delivery_tag)
-
-
-
解决数据丢失的问题可以将默认应答改成手动应答的方法
import pika

# 建立连接
connection = pika.BlockingConnection(pika.ConnectionParameters('localhost'))
channel = connection.channel()

# 创建队列(消费则要监听hello队列 必须先有队列 所以这里会有创建的过程 如果已经有了这句没什么作用 如果没有创建hello队列)
channel.queue_declare(queue='hello')

# 确定回调函数
def callback(ch, method, properties, body):
    print(" [x] Received %r" % body)
		ch.basic_ack(delivery_tag=method.delivery_tag)	# 到调用callback函数时候才会删除队列中的数据
# 确定监听队列
channel.basic_consume(queue='hello', # 内容
                      auto_ack=False, # 默认应答 手动应用--false
                      on_message_callback=callback)# 指定了回调函数


print(' [*] Waiting for messages. To exit press CTRL+C')

# 开始监听队列(真正开始执行)
channel.start_consuming()
5.3 持久化到硬盘
-
持久化参数
- 服务器宕机,如何处理数据的问题
-
创建持久化队列
- 生产者
import pika # 连接rabbitmq # 创建控制对象 connection = pika.BlockingConnection(pika.ConnectionParameters('localhost')) channel = connection.channel() # 创建队列 channel.queue_declare(queue='hello',durable=True) # 发布(插入) channel.basic_publish(exchange='' # 简单模式 routing_key='hello2' # 指定队列 body='hello world'# 插入的具体信息 properties=pika.BasicProperties( # 信息持久化到硬盘 delivery_mode=2, ) )- 消费者
import pika

# 建立连接
connection = pika.BlockingConnection(pika.ConnectionParameters('localhost'))
channel = connection.channel()

# 创建队列(消费则要监听hello队列 必须先有队列 所以这里会有创建的过程 如果已经有了这句没什么作用 如果没有创建hello队列)
channel.queue_declare(queue='hello',durable=True)

# 确定回调函数
def callback(ch, method, properties, body):
    print(" [x] Received %r" % body)
		ch.basic_ack(delivery_tag=method.delivery_tag)	# 到调用callback函数时候才会删除队列中的数据
# 确定监听队列
channel.basic_consume(queue='hello', # 内容
                      auto_ack=False, # 默认应答 手动应用--false
                      on_message_callback=callback)# 指定了回调函数


print(' [*] Waiting for messages. To exit press CTRL+C')

# 开始监听队列(真正开始执行)
channel.start_consuming()
5.4 分发参数
-
正常的默认多个消费者情况下是轮循的分发模式就是第一个消费者1,3,5,7,第二个消费者2,4,6,8
- 实现公平分发:在消费者中加入如下代码
# 公平分发 channel.basic_qos(prefetch_count=1) -
分发参数
- 生产者
import pika # 连接rabbitmq # 创建控制对象 connection = pika.BlockingConnection(pika.ConnectionParameters('localhost')) channel = connection.channel() # 创建队列 channel.queue_declare(queue='hello') # 发布(插入) channel.basic_publish(exchange='' # 简单模式 routing_key='hello2' # 指定队列 body='hello world'# 插入的具体信息 )- 消费者
import pika

# 建立连接
connection = pika.BlockingConnection(pika.ConnectionParameters('localhost'))
channel = connection.channel()

# 创建队列(消费则要监听hello队列 必须先有队列 所以这里会有创建的过程 如果已经有了这句没什么作用 如果没有创建hello队列)
channel.queue_declare(queue='hello')

# 确定回调函数
def callback(ch, method, properties, body):
    print(" [x] Received %r" % body)
		ch.basic_ack(delivery_tag=method.delivery_tag)	# 到调用callback函数时候才会删除队列中的数据
# 公平分发
# channel.basic_qos(prefetch_count=1)

# 确定监听队列
channel.basic_consume(queue='hello', # 内容
                      auto_ack=False, # 默认应答 手动应用--false
                      on_message_callback=callback)# 指定了回调函数

# 开始监听队列(真正开始执行)
channel.start_consuming()
6.rabbitMQ的交换机模式
6.1 交换机的三种模式
6.1.1 发布订阅模式
- 发布订阅模式
-
发布订阅模式代码
- 生产者
import pika # 连接rabbitmq # 创建控制对象 connection = pika.BlockingConnection(pika.ConnectionParameters('localhost')) channel = connection.channel() # 声明交换机 channel.exchange_declare(exchang='logs',exchange_type='fanout') # fanout:发布订阅模式 # 向交换机中插入数据 message = 'hello world' channel.basic_publish(exchange='logs' # 向名为logs的交换机中插入数据 routing_key='' # 指定队列 body=message) # 插入的具体信息- 消费者
import pika

# 建立连接
connection = pika.BlockingConnection(pika.ConnectionParameters('localhost'))
channel = connection.channel()

# 声明交换机 和队列道理一样 怕消费者先启动 保证交换机存在
channel.exchange_declare(exchange='logs',exchange_type='fanout') # fanout:发布订阅模式

# 创建队列(消费则要监听hello队列 必须先有队列 所以这里会有创建的过程 如果已经有了这句没什么作用 如果没有创建hello队列)
result = channel.queue_declare("",exclusive=True) # exclusive=True 程序生成一个唯一的queue_name
queue_name = result.method.queue
print(queue_name)

# 将队列绑定到交换机
channel.queue_bind(exchange='logs',queue=queue_name)

# 确定回调函数
def callback(ch, method, properties, body):
    print(" [x] Received %r" % body)

# 确定监听队列
channel.basic_consume(queue=queue_name, # 内容
                      auto_ack=True, # 默认应答 简单模式下为true
                      on_message_callback=callback)# 指定了回调函数

print(' [*] Waiting for messages. To exit press CTRL+C')

# 开始监听队列(真正开始执行)
channel.start_consuming()
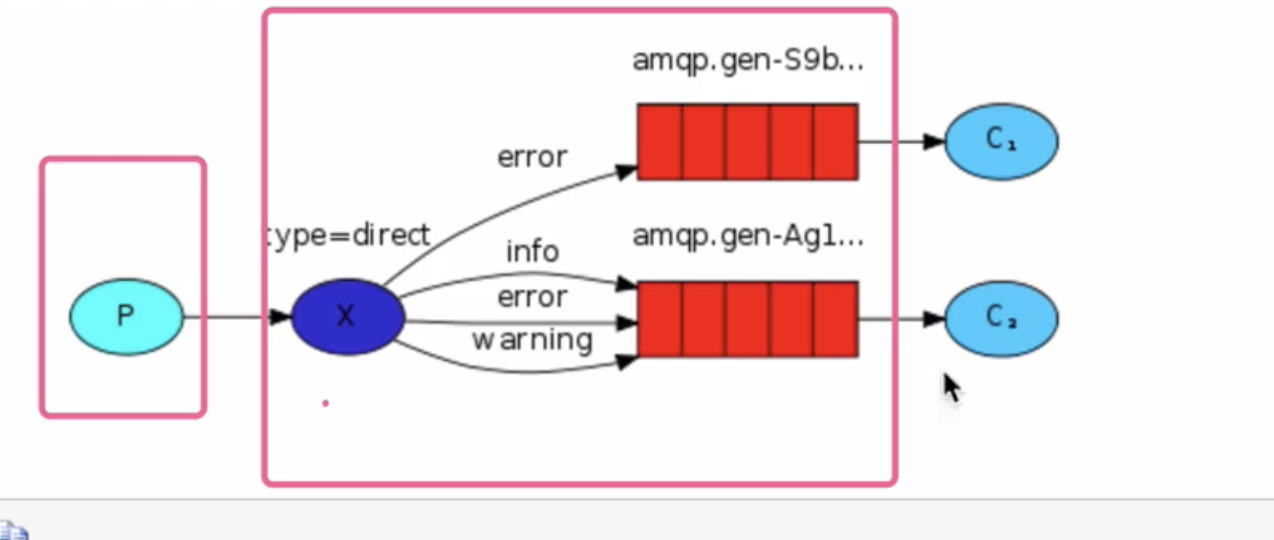
6.1.2 关键字模式
-
生产者
-
插入的时候加入关键字
- 生产者
import pika

# 连接rabbitmq
# 创建控制对象
connection = pika.BlockingConnection(pika.ConnectionParameters('localhost'))
channel = connection.channel()

# 声明交换机
channel.exchange_declare(exchang='logs',exchange_type='direct')

# 向交换机中插入数据
message = 'hello world'
channel.basic_publish(exchange='logs' # 向名为logs的交换机中插入数据
                      routing_key='' # 指定队列
                      body=message) # 插入的具体信息
- 消费者
import pika

# 建立连接
connection = pika.BlockingConnection(pika.ConnectionParameters('localhost'))
channel = connection.channel()

# 声明交换机 和队列道理一样 怕消费者先启动 保证交换机存在
channel.exchange_declare(exchange='logs2',exchange_type='direct')

# 创建队列(消费则要监听hello队列 必须先有队列 所以这里会有创建的过程 如果已经有了这句没什么作用 如果没有创建hello队列)
result = channel.queue_declare("",exclusive=True) # exclusive=True 程序生成一个唯一的queue_name
queue_name = result.method.queue
print(queue_name)

# 将队列绑定到交换机
channel.queue_bind(exchange='logs2',queue=queue_name,routing_key="error") # 绑定关键字error
channel.queue_bind(exchange='logs2',queue=queue_name,routing_key="info") # 绑定关键字info
channel.queue_bind(exchange='logs2',queue=queue_name,routing_key="waring") # 绑定关键字waring


# 确定回调函数
def callback(ch, method, properties, body):
    print(" [x] Received %r" % body)

# 确定监听队列
channel.basic_consume(queue=queue_name, # 内容
                      auto_ack=True, # 默认应答 简单模式下为true
                      on_message_callback=callback)# 指定了回调函数

print(' [*] Waiting for messages. To exit press CTRL+C')

# 开始监听队列(真正开始执行)
channel.start_consuming()
6.1.3 通配符模式
- 相当于在关键字模式下加入了正则的匹配

 浙公网安备 33010602011771号