日志结构合并树LSM代码解读
1. LSM树的由来
1.1. 索引结构特征
a. 哈希存储引擎: 是哈希表的持久化实现,支持增、删、改以及随机读取操作,但不支持顺序扫描,对应的存储系统为key-value存储系统。
b. B树存储引擎是B树: 不仅支持单条记录的增、删、读、改操作,还支持顺序扫描, 因此B树是传统关系型数据库中索引结构的不二人选。
但从技术角度:由于磁盘的(磁柱、磁盘、磁道、磁头)结构与B树结构的特点,导致传统B树索引存在着随机写效率的上限挑战,所以当在那些索引插入频率远大于查询频率的应用场景下,如历史记录表和日志文件来说,B树索引显得捉襟见肘了。
1.2. BTree的随机写特点
一个BTree,对于在没有缓存的Case情况下, 一个随机写分为两步进行:1. 从磁盘Load目标块节点到内存,2.修改它并写回磁盘。所以,BTree在对于随机key值下的平均“blind-write”操作需要两次IO操作,其限定了BTree的随机写吞吐量。
1.3. LSM“blind-write”吞吐量
既然随机写相对昂贵的,LSM采用“有序map的数据分层与延迟写”(all sorted-map write-deferral)的策略而代替立即写的操作;同时为了避免数据层数的过多造成对读的性能的伤害,数据层级之间会周期性地触发自顶向下地进行合并的操作。随机写的平均IO此时用式子表示:(O*R/B), 其中O表示数据的层数,R表示数据记录的平均大小,B表示Block的大小。如:如果block的大小是16k,数据分层是10层,平均记录大小100byte,那随机写的平均IO次数是0.06,当然这只是理论上的分析方法, 接下来用携程开源的Key/Value存储引擎SessionDB中的LSM实现的案例来分析其的基本结构,其实LSM已在许多开源的存储引擎中存在,如Google的leveldb,Facebook的rocksdb,Hadoop中的HBase等。
2. Log Structured Merge Tree
LSM树是一个按数据新鲜度进行分层依次驻落在内存与磁盘的多层数据结构。
2.1. ActiveMemTable数据结构
a. 数据逻辑结构:
一个含有二级索引的三层结构,其参考图:
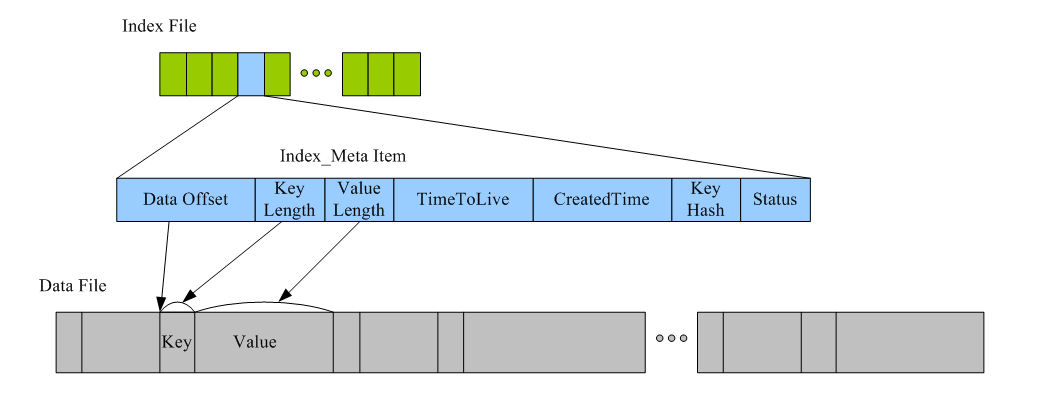
b. 数据存储格式样例如下:
c. 数据dump条件与流程:
数据下放条件有2个:a.Key的总规模数上限,如128k; b.Data的总大小上限,如128M。其数据dump下放的流程:1. 首先Check该Table是否达到存储上限; 2. 如果达到上限,则把整个表标记为Immutable;3. 然后,采用Copy-On-Write技术将整块Table拷贝到C0队列中; 4. 最后,重新New一个新的ActiveInMemTable的HashMapTable, 代码如下:
boolean success = this.activeInMemTables[shard].put(key, value, timeToLive, createdTime, isDelete);

if (!success) { // overflow
    synchronized(activeInMemTableCreationLocks[shard]) {
        success = this.activeInMemTables[shard].put(key, value, timeToLive, createdTime, isDelete); // other thread may have done the creation work
        if (!success) { // move to level queue 0
            this.activeInMemTables[shard].markImmutable(true);
            LevelQueue lq0 = this.levelQueueLists[shard].get(LEVEL0);
            lq0.getWriteLock().lock();
            try {
                lq0.addFirst(this.activeInMemTables[shard]);
            } finally {
                lq0.getWriteLock().unlock();
            }
            @SuppressWarnings("resource")
            HashMapTable tempTable = new HashMapTable(dir, shard, LEVEL0, System.nanoTime());
            tempTable.markUsable(true);
            tempTable.markImmutable(false); //mutable
            tempTable.put(key, value, timeToLive, createdTime, isDelete);
            // switch on
            this.activeInMemTables[shard] = tempTable;
        }
    }
2.2. C0层数据
C0属于一个索引与数据完全存于内存的二维队列,是一个存放着热点数据ActiveMemTable的链表。
a. 归并压缩条件
通过周期时间与队列Table个数两个维度判断是否进行归并压缩:a. 心跳线程周期性检查,如2s b. Check下队列中Table的个数,如是否大于1个,源码如下:
		while(!stop) {
			try {
				LevelQueue levelQueue0 = levelQueueList.get(SDB.LEVEL0);
				if (levelQueue0 != null && levelQueue0.size() >= DEFAULT_MERGE_WAYS) {
					log.info("Start running level 0 merge thread at " + DateFormatter.formatCurrentDate());
					log.info("Current queue size at level 0 is " + levelQueue0.size());

					long start = System.nanoTime();
					LevelQueue levelQueue1 = levelQueueList.get(SDB.LEVEL1);
					mergeSort(levelQueue0, levelQueue1, DEFAULT_MERGE_WAYS, sdb.getDir(), shard);
					stats.recordMerging(SDB.LEVEL0, System.nanoTime() - start);

					log.info("Stopped running level 0 merge thread at " + DateFormatter.formatCurrentDate());
				} else {
					Thread.sleep(MAX_SLEEP_TIME);
				}
			} catch (Exception ex) {
				log.error("Error occured in the level0 merge dumper", ex);
			}

		}
		this.countDownLatch.countDown();
		log.info("Stopped level 0 merge thread " + this.getName());
b. 归并Compaction与dump过程
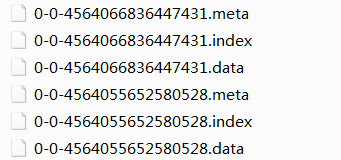
其合并过程:1. 首先按Key值进行排序; 2. 依次放入C1队列的队首;3. 持久化并且放入C1层数据,对于每一个Sorted表,其持久化文件命名规则:shard + "-" + level + "-" + createdTime。
2.3. C1与C2层数据
C1与C2层数据都搁置于磁盘上。
a. 归并压缩条件
通过周期时间与队列Table个数两个维度判断是否进行归并压缩:1. 心跳线程周期性检查,如5s;2. Check下队列中上一层C1中Table的个数,如是否大于4个,源码如下:
		while(!stop) {
			try {
				boolean merged = false;
				LevelQueue lq1 = levelQueueList.get(SDB.LEVEL1);
				LevelQueue lq2 = levelQueueList.get(SDB.LEVEL2);
				boolean hasLevel2MapTable = lq2.size() > 0;
				if ((!hasLevel2MapTable && lq1.size() >= DEFAULT_MERGE_WAYS) ||
					(hasLevel2MapTable && lq1.size() >= DEFAULT_MERGE_WAYS - 1)) {
					log.info("Start running level 1 merging at " + DateFormatter.formatCurrentDate());
					log.info("Current queue size at level 1 is " + lq1.size());
					log.info("Current queue size at level 2 is " + lq2.size());

					long start = System.nanoTime();
					mergeSort(lq1, lq2, DEFAULT_MERGE_WAYS, sdb.getDir(), shard);
					stats.recordMerging(SDB.LEVEL1, System.nanoTime() - start);
					merged = true;
					log.info("End running level 1 to 2 merging at " + DateFormatter.formatCurrentDate());
				}

				if (!merged) {
					Thread.sleep(MAX_SLEEP_TIME);
				}
			} catch (Exception ex) {
				log.error("Error occured in the level 1 to 2 merger", ex);
			}
		}
		this.countDownLatch.countDown();
		log.info("Stopped level 1 to 2 merge thread " + this.getName());
b. 归并Compaction过程
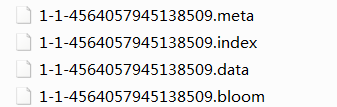
其与C0->C1层数据的合并流程类似,持久化的样例结构如下:
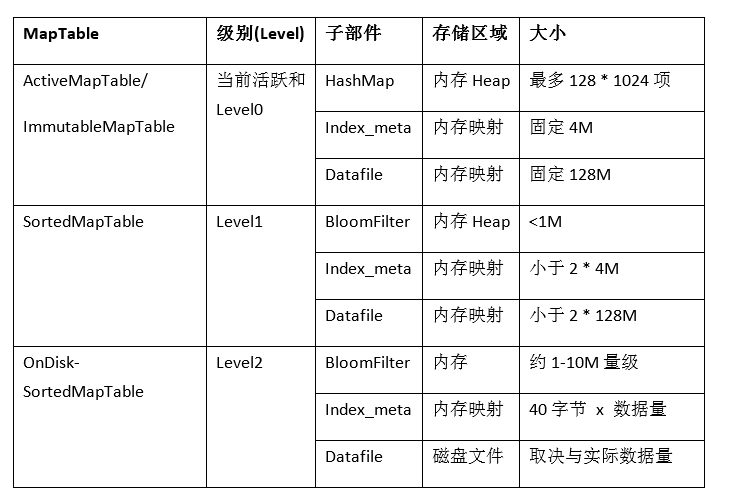
2.4 分层结构特征对比
参考链接给出其各数据层的对比结构:
 2.5 写操作
Put操作发生且仅发生在当前活跃的ActiveMapTable,操作涉及一次内存映射文件写入和一次内存Hashmap的写入,代码流程如下:
{
// 1.write index_metadata
ByteBuffer tempIndexBuf = ByteBuffer.allocate(INDEX_ITEM_LENGTH);
tempIndexBuf.putLong(IMapEntry.INDEX_ITEM_IN_DATA_FILE_OFFSET_OFFSET, tempToAppendDataFileOffset);
tempIndexBuf.putInt(IMapEntry.INDEX_ITEM_KEY_LENGTH_OFFSET, key.length);
tempIndexBuf.putInt(IMapEntry.INDEX_ITEM_VALUE_LENGTH_OFFSET, value.length);
tempIndexBuf.putLong(IMapEntry.INDEX_ITEM_TIME_TO_LIVE_OFFSET, timeToLive);
tempIndexBuf.putLong(IMapEntry.INDEX_ITEM_CREATED_TIME_OFFSET, createdTime);
tempIndexBuf.putInt(IMapEntry.INDEX_ITEM_KEY_HASH_CODE_OFFSET, keyHash);
byte status = 1; // mark in use
if (markDelete) {
  status = (byte) (status + 2); // binary 11
}
if (compressed && !markDelete) {
  status = (byte) (status + 4);
}
tempIndexBuf.put(IMapEntry.INDEX_ITEM_STATUS, status); // mark in use

//2. write local_offset index
int offsetInIndexFile = INDEX_ITEM_LENGTH * (int)tempToAppendIndex;
ByteBuffer localIndexBuffer = this.localIndexMappedByteBuffer.get();
localIndexBuffer.position(offsetInIndexFile);
//indexBuf.rewind();
localIndexBuffer.put(tempIndexBuf);

//3. write key/value
ByteBuffer localDataBuffer = this.localDataMappedByteBuffer.get();
localDataBuffer.position((int)tempToAppendDataFileOffset);
localDataBuffer.put(ByteBuffer.wrap(key));
localDataBuffer.position((int)tempToAppendDataFileOffset + key.length);
localDataBuffer.put(ByteBuffer.wrap(value));

this.hashMap.put(new ByteArrayWrapper(key), new InMemIndex((int)tempToAppendIndex));
return new MMFMapEntryImpl((int)tempToAppendIndex, localIndexBuffer, localDataBuffer);
}
2.6 读操作
输入一个给定的key值,其访问流程如下:
a. 首先会查找C0层:HashMap->Index_Meta->SequentialMapData
b. 当C0层查找失败时,然后访问C1层:BloomFilter->Index_Meta->SortedMapData
c. 当C1层查找失败时,最后访问C2层:BloomFilter->Index_Meta->SortedMapData
参考:
1. http://120.52.72.41/paperhub.s3.amazonaws.com/c3pr90ntcsf0/18e91eb4db2114a06ea614f0384f2784.pdf
2. https://github.com/google/leveldb
3. https://github.com/facebook/rocksdb
4. https://github.com/ctriposs/sessdb

 浙公网安备 33010602011771号