
使用kvm制作Eucalyptus镜像(Windows Server 2008r2为例)
1、前言
Elastic Utility Computing Architecture for Linking Your Programs To Useful Systems (Eucalyptus) 是一种开源的软件基础结构,用来通过计算集群或工作站群实现弹性的、实用的云计算。它最初是美国加利福尼亚大学 Santa Barbara 计算机科学学院的一个研究项目,现在已经商业化,发展成为了 Eucalyptus Systems Inc。不过,Eucalyptus 仍然按开源项目那样维护和开发。
我们这里所要制作的镜像是桉树实例启动的模板,需要在镜像模板中提前配置好桉树管理工具及相关软件,然后注册到桉树中方可使用。创建镜像我们建议在NC节点上执行,需停止该节点上所有实例,以及节点服务,再进行相关创建工作。
2、前期准备
桉树环境
(1)、版本:4.0.0

(2)、节点使用情况

说明:建议在NC节点上进行制作工作,并且NC节点服务需关闭,关闭会导致该节点上实例永久性消失(PS:实例没有做持久化,一旦停止就会消失)。所以我们这里制作实例使用的是没有被分配节点的63服务器。
service eucalyptus-nc stop //关闭NC节点服务
工具软件
关于相关工具的使用上我们提供了两种方案,大家可依据自己的喜好决定采用哪一种。制作Eucalyptus Windows Server2008r2镜像我们采用第一种方案演示。
方案一:MobaXterm
MobaXterm 官方下载地址:http://mobaxterm.mobatek.net/download-home-edition.html 绿色版下载
注:MobaXterm是一个X服务器和一组的Unix命令(GNU/ Cygwin的)封装在一个单一的便携式exe文件的增强终端。 MobaXterm包括一个巨大的multitab原生的Windows终端。操作简单,功能强大,易上手,也是这次我们推荐使用的。后面的流程是基于MobaXterm操作的。
方案二:tightvnc +Xshell+Xftp
tightvnc 官方下载支持:http://www.tightvnc.com/download-old.php 绿色版下载
注:TightVNC 是一套免费的 VNC 软件,能让你轻松控制远程的计算机,就像坐在自己家的计算机前面一般,让你出门在外无后顾之忧!
Xshell 官方下载地址:http://www.netsarang.com/download/down_xsh4.html
注:Xshell 是一个极好用的免费 SSH 客户端,可以作为 Telnet、Rlogin、SSH、SFTP、Serial 等协议的安全终端模拟软件,让你轻松管理远程主机。
Xftp 官方下载地址:http://www.netsarang.com/download/down_xfp4.html
注:是一个基于 MS windows 平台的功能强大的SFTP、FTP 文件传输软件。使用了 Xftp 以后,MS windows 用户能安全地在 UNIX/Linux 和 Windows PC 之间传输文件。Xftp 能同时适应初级用户和高级用户的需要。它采用了标准的 Windows 风格的向导,它简单的界面能与其他 Windows 应用程序紧密地协同工作,此外它还为高级用户提供了众多强劲地功能特性。
这里我们为了方便提供了Xshell & Xftp整合版绿色版下载地址:http://pan.baidu.com/s/1bnngdXH
相关程序包和文件
(1)、Windows Server 2008r2 64位安装包(这个下载地址大家百度吧,也可以是windows的其他版本,但是需要注意集成程序包对应)
(2)、桉树Windows集成程序包,依据具体情况采用,下载地址:
windows-prep-tools-3.4.0.iso http://downloads.eucalyptus.com/software/tools/windows-prep/
windows-prep-tools-legacy.iso http://downloads.eucalyptus.com/software/tools/windows-prep/
(3)、启动用配置文件libvirt-kvm-windows.xml。该文件示例模板位置在节点服务器/usr/share/eucalyptus/doc/文件夹下。/usr/share/eucalyptus/doc/libvirt-kvm-windows-example.xml,我们只需要进行简单的定制修改即可。
3、制作流程
3.1、收集相关文件到指定目录并初始化
3.1.1、设置工作空间
登陆63节点服务器在home目录下新建一个工作目录,作为制作虚拟机用到的iso及配置文件等的统一存放目录:
cd /home     //进入到home目录
mkdir makeimages  //创建一个makeimages目录
cd /home/makeimages   //进入到makeimages目录
ls //查看makeimages   下所有文件
MobaXterm链接远程Linux服务器,请参考文章:http://www.cnblogs.com/gis-luq/p/3993378.html
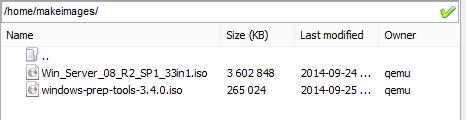
使用MobaXterm工具可以实现文件的拖拽上传,上传成功后文件列表如下:
3.1.2、创建disk磁盘文件
dd if=/dev/zero of=windows.2008r2_X64_test.img bs=1M count=1 seek=36999
注意: 创建DISK 命名必需要以windows 开头。 本例生成36999个1M的容量(大约37G)硬盘。

3.1.3、创建软驱文件
dd if=/dev/zero of=floppy.img bs=1k count=1474

3.1.4、创建第二块磁盘文件
dd if=/dev/zero of=secondary.img bs=1M count=1 seek=1000

3.1.5、拷贝虚拟机配置文件
系统自带了一系列配置文件模板,我们把使用到的复制过来。这里复制的是kvm-windows文件。
cp /usr/share/eucalyptus/doc/libvirt-kvm-windows-example.xml /home/makeimages/

备注:将安装系统用到的ISO文件,也统一放到此目录下。创建windows虚拟机时,需要使用libvirt-kvm-windows配置文件来启动,libvirt-kvm-windows中进行了相应的磁盘路径、ISO路径的配置。而在这一过程中,总计需要三次修改libvirt配置文件:
3.1.6、检查所需文件列表

说明:当文件列表信息有改动时,右侧文件列表需被刷新后方可显示为最新。
3.2、第一次修改libvirt文件
3.2.1、修改libvirt-kvm-windows-example.xml文件中devices下的disk中的节点信息
由于libvirt-kvm-windows-example.xml文件中包含大量说明性信息,这里仅截取实际使用部分。ISO 路径挂载Win_Server_08_R2_SP1_33in1.iso。硬盘挂在为windows.2008r2_X64_test.img,并使第二块硬盘及软驱路径配置不生效。
libvirt-kvm-windows-example.xml在MobaXterm中双击即可修改,相关信息参考如下:


<domain type='kvm'>
    <name>eucalyptus-windows</name>
    <os>
    <type>hvm</type>
    <boot dev='cdrom'/>
    </os>
    <features>
        <acpi/>
    </features>
    <memory>524288</memory>
    <vcpu>1</vcpu>
    <devices>
        <disk type='file'>
            <source file='/home/makeimages/windows.2008r2_X64_test.img'/>
            <target dev='hda'/>
        </disk
        <!--   <disk type='file' device='disk'>
            <source file='/home/makeimages/secondary.img'/>
            <target dev='vda' bus='virtio'/>
        </disk>
        <disk type='file' device='floppy'>
             <source file='/home/makeimages/floppy.img'/>
             <target dev='fda'/>
        </disk>  -->
        <disk type='file' device='cdrom'>
            <source file='/home/makeimages/Win_Server_08_R2_SP1_33in1.iso'/>
            <target dev='hdc'/>
            <readonly/>
        </disk>
        <interface type='bridge'>
            <source bridge='br0'/>
            <model type='rtl8139'/>
        </interface>
    <!--<interface type='bridge'>
        <source bridge='br0'/>
        <model type='virtio'/>
    </interface> -->
        <graphics type='vnc' port='-1' autoport='yes' listen='0.0.0.0'/>
    </devices>
</domain>

3.2.2、执行命令创建虚拟机
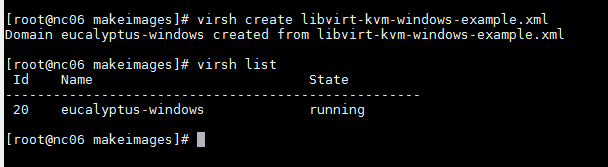
virsh create libvirt-kvm-windows-example.xml

如上图所示,虚拟机创建成功已在正常运行。
3.2.3、通过VNC远程连接,完成操作系统安装
在MobaXterm工具中选择Sessions—>new Session进入Session Setting页面,选择VNC选项卡,设置IP地址和端口号。

说明:这里服务器中只有一台虚拟机,默认端口5900,若多台虚拟机端口号依次递增,登陆成功后如下图所示。

此处即为一般Windows的安装过程,具体过程这里不做赘述。若在安装过程中出现找不到磁盘的情况,请注意libvirt中的磁盘文件的地址是不是配置对了,笔者在操作过程中就不仔细地址配置错误,导致出现磁盘找不到的情况。
3.2.4、系统安装完毕后,关机

3.3、第二次修改libvirt文件
本次修改配置文件的目的为挂载windows-prep-tools-3.4.0.iso。需要更改的内容包括,ISO 路径、并使第二块硬盘及软驱路径配置生效。
看到这里我想细心的读者已经发现了前面出现的一直都是windows-prep-tools-3.4.0.iso,而环境需求的出现的是两个,那这两个包该如何选择呢,官方的帮助是这样说的:
If you're running a version of Windows more recent than Windows Server 2003, download the most recent version of the Windows Image Preparation Tool from http://downloads.eucalyptus.com/software/tools/windows-prep/ to /var/lib/libvirt/images on your NC or on the host running the vSphere client.
从上面我们可以知道,如果运行是 Windows Server 2003使用第一个,更新版本的使用第二个,这里Server 2008使用第二个。即:windows-prep-tools-3.4.0.iso
3.3.1、具体配置信息参照如下配置文件
<domain type='kvm'>
    <name>eucalyptus-windows</name>
    <os>
    <type>hvm</type>
    <boot dev='cdrom'/>
    </os>
    <features>
        <acpi/>
    </features>
    <memory>524288</memory>
    <vcpu>1</vcpu>
    <devices>
        <disk type='file'>
            <source file='/home/makeimages/windows.2008r2_X64_test.img'/>
            <target dev='hda'/>
        </disk>
     <disk type='file' device='disk'>
         <source file='/home/makeimages/secondary.img'/>
         <target dev='vda' bus='virtio'/>
      </disk>
       <disk type='file' device='floppy'>
             <source file='/home/makeimages/floppy.img'/>
             <target dev='fda'/>
        </disk>
        <disk type='file' device='cdrom'>
            <source file='/home/makeimages/windows-prep-tools-3.4.0.iso'/>
            <target dev='hdc'/>
            <readonly/>
        </disk>
        <interface type='bridge'>
            <source bridge='br0'/>
            <model type='rtl8139'/>
        </interface>
    <!--<interface type='bridge'>
        <source bridge='br0'/>
        <model type='virtio'/>
    </interface> -->
        <graphics type='vnc' port='-1' autoport='yes' listen='0.0.0.0'/>
    </devices>
</domain>

3.3.2、执行命令,启动虚拟机
virsh create libvirt-kvm-windows-example.xml
3.3.3、通过VNC远程连接到虚拟机。安装windows-prep-tools-3.4.0工具,工具会自动安装相应的网络和软盘驱动。
安装驱动程序时,确保在WINDOWS 虚拟机内发现所有的VIRTIO 设备,包括软驱,第二块硬盘,总线,网卡。

安装.net 3.5。 CD驱动器中包含了一个,但是在Server 2008r2中默认已经包含了.net3.5.我们只需要开启就可以了,若需要使用IIS下下一步操作中开始IIS功能即可。

注意:在完全完成软件安装前不要在windows 下执行sysperp工具。
3.3.4、进行相应软件的安装,比如ArcGIS Server、Tomcat等需要的应用。
3.3.5、关闭防火墙,允许远程连接。


3.3.6、关机。
3.4、第三次修改libvirt文件
3.4.1、第三次修改为了更改配置文件,只挂载VIRTIO驱动的设备。具体内容参照配置文件
<domain type='kvm'>
    <name>eucalyptus-windows</name>
    <os>
    <type>hvm</type>
    <boot dev='cdrom'/>
    </os>
    <features>
        <acpi/>
    </features>
    <memory>524288</memory>
    <vcpu>1</vcpu>
    <devices>
        <disk type='file'>
            <source file='/home/makeimages/windows.2008r2_X64_test.img'/>
            <target dev='hda'/>
        </disk>
     <disk type='file' device='disk'>
         <source file='/home/makeimages/secondary.img'/>
         <target dev='vda' bus='virtio'/>
        </disk>
         <disk type='file' device='floppy'>
             <source file='/home/makeimages/floppy.img'/>
             <target dev='fda'/>
        </disk>
      <disk type='file' device='cdrom'>
            <source file=''/>
            <target dev='hdc'/>
            <readonly/>
        </disk>
        <interface type='bridge'>
            <source bridge='br0'/>
            <model type='rtl8139'/>
        </interface>
    <!--<interface type='bridge'>
        <source bridge='br0'/>
        <model type='virtio'/>
    </interface> -->
        <graphics type='vnc' port='-1' autoport='yes' listen='0.0.0.0'/>
    </devices>
</domain>

3.4.2、执行命令启动虚拟机
virsh create libvirt-kvm-windows-example.xml
3.4.3、通过VNC远程连接到虚拟机,进入虚拟机后,配置并运行sysperp 工具,将自动清理掉所有相关的应用。
(1)配置活动文件夹 https://www.eucalyptus.com/docs/eucalyptus/4.0/index.html#shared/images_win_activedirectory.html
(2)配置远程桌面 https://www.eucalyptus.com/docs/eucalyptus/4.0/index.html#shared/images_win_rdp.html
(3)运行sysperp 工具
按照eucalyptus4.0官方的帮助文档,是需要配置活动文件夹和远程桌面的,但是笔者在安装过程中仅运行了sysperp工具,并无配置也可通过,所以就跳过了这两步。所产生的问题暂时还没有发现。
说明:运行sysperp 工具后若显示successful则成功,若多次运行,可能会报错,并导致实例创建成功连接不上的问题。
3.4.4、关机
以上内容,配置了一个基于Windows系统的虚拟机,接下来需要将此虚拟机文件拷贝到CLC上,并注册为Eucalyptus的Image镜像。
3.5、Windows镜像模板上传
3.5.1、登陆CLC所在服务器,在CLC节点的var目录下,新建一个img文件夹
cd /var
mkdir img
3.5.2、从NC节点拷贝img文件
scp root@192.168.20.63:/home/makeimages/windows.2008r2_X64_test.img /var/img

3.5.3、将镜像上传Eucalyptus中
euca-install-image -n wintest -i /var/img/windows.2008r2_X64_test.img -r x86_64 --virtualization-type hvm -b winnull --platform=windows


安装过程比较慢,等到完成,通过浏览器界面,可以查看到上传的Image镜像。接下来可以使用此镜像进行实例部署。
命令行查看已安装镜像。
euca-describe-images

管理页面查看已安装镜像

4、参考链接
https://www.eucalyptus.com/docs/eucalyptus/4.0/index.html#shared/images_win.html
文章若无特殊说明均为原创,原创作品,允许转载,转载时请务必以超链接形式标明文章出处、作者信息和本声明。 博客:http://www.cnblogs.com/gis-luq 作者:gis-luq 邮箱:luqiang.gis@foxmail.com
