
创建一个简单的迷你Vue3-0
最近看尤大一些关于Vue3的视频资料和相关文章。决定自己也来创建一个简单的迷你Vue3,通过这个过程来加强对Vue的核心实质的理解。
那么如何创建一个简单的迷你Vue3呢,我们先来看看一个mini Vue3需要哪些东西。
1、模板编译及渲染系统(将模板语法等编译为最终执行的Javascript代码并渲染到对应宿主,通过VDom实现虚拟VNode)
2、Reactivity响应式数据系统,利用Proxy实现(实现数据双向绑定以及根据依赖自动触发更新操作)
3、生命周期等各类API
因此我们首先就需要来实现一个模板编译及渲染系统,考虑到编译系统实现过于复杂,因此我们先简单实现渲染系统即可。
渲染系统
思路
想象一下,如果我们要实现一个渲染系统,我们肯定需要有一个抽象的DOM系统,这样我们才能够实现平台无关,否则我们的代码都需要依赖宿主平台了。也即是所谓的VDom,
有了这个VDom之后,我们还需要一个渲染函数,用于将我们字符串式的html内容通过JS代码来描述。有了这两个能力之后,我们就可以将所需要渲染的html内容描述为js代码,并
通过渲染系统转换为VNode,然后通过宿主系统提供的能力渲染到页面上(我们这里的宿主当然是浏览器了)
实现
1、新建dom.html,包含Vue3渲染相关的三个函数,h、mount,patch
<html>
    <head>
        <title>dom</title>
    </head>
    <body>
      <div id="app"></div>
      <script>
        function h(tag, props, children) {
        }

        function mount(vnode, container) {
        }

        function patch(oldNode, newNode) {

        }

        const vdom = h('div', { class: 'red' }, [
          h('span', null, 'hello')
        ]);

        mount(vdom, document.getElementById('app'));
      </script>
    </body>
</html>
熟悉Vue的同学应该知道,这里的函数命名与Vue的完全一致。
“h”即渲染函数,用于将我们通过函数描述的模板字符串转换成JS对象形式并传递给编译系统用于渲染为VNode。
“mount”则是将虚拟VNode实际渲染到我们需要渲染到的DOM节点container上。
“patch”则是与响应式系统有关,当模板中所使用到的值发生改变时,会触发重新渲染,生成新的VNode,然后与旧的VNode进行比对,找出变化的部分,并调用DOM接口更新DOM,这部分逻辑我们最后
处理。
2、处理“h”函数,我们提到了,h函数是用于将我们所写的函数描述的模板转换为JS对象形式并传递给编译系统渲染为VNode
<html>
    <head>
        <title>dom</title>
    </head>
    <body>
      <div id="app"></div>
      <script>
        function h(tag, props, children) {
          // 这里我们简单处理,就不对各种异常情况做处理了,直接返回json对象
          return {
            tag, props, children
          }
        }

        function mount(vnode, container) {
        }

        function patch(oldNode, newNode) {

        }

        const vdom = h('div', { class: 'red' }, [
          h('span', null, 'hello')
        ]);

        mount(vdom, document.getElementById('app'));
      </script>
    </body>
</html>
3、经过第二步,我们能通过h函数得到vdom,接下来我们就需要将vdom给装载到页面上,需要实现mount方法
<html>
<head> <title>dom</title>
<style type="style/css">
.red { color: red }
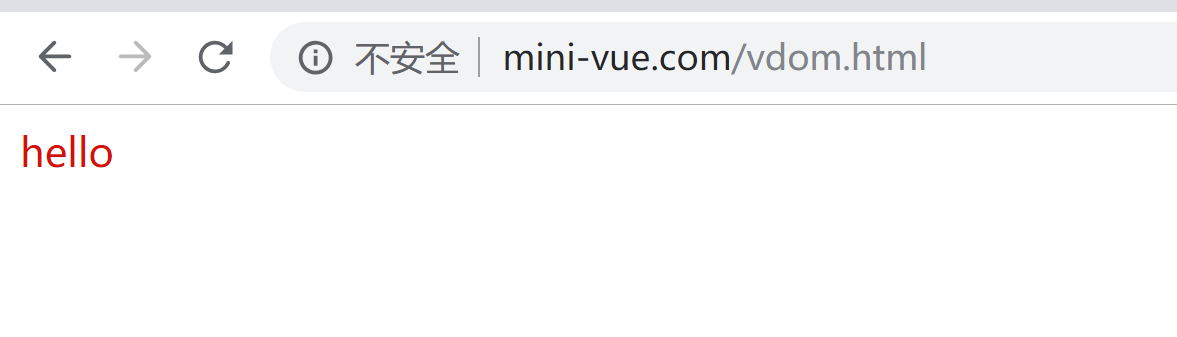
</style> </head> <body> <div id="app"></div> <script> function h(tag, props, children) { } function mount(vnode, container) { // 创建对应的dom对象 const el = document.createElement(el.tag); // 添加属性 if (vnode.props) { for (const key in vnode.props) { // 简单处理,假定全部都是attribute el.setAttribute(key, vnode.props[key]); } } // 添加子元素 if (vnode.children) { // 对children也做简单处理,只分为纯文本和数组节点 if (typeof vnode.children === 'string') { el.textContent = vnode.children; } else { vnode.children.forEach(child => { // 这里用递归即可 mount(child, el); }); } } container.appendChild(el); } function patch(oldNode, newNode) { } // 使用h方法创建vdom const vdom = h('div', { class: 'red' }, [ h('span', null, 'hello') ]); // 将vdom挂载到指定container上 mount(vdom, document.getElementById('app')); </script> </body> </html>
此时我们已经可以看到效果了
4、现在我们已经实现了一个简单的编译和渲染系统了,但是还有一点关键的没有实现,那就是patch方法,因为当我们的响应式数据更新时,需要重新生成vdom,然后与原来的vdom对比,如果发现不一致,则需要更新,我们现在来填充patch方法,实际Vue其中的patch方法有着
许许多多的分支处理逻辑,因此我们这里简单处理下,理解主要概念即可。首先处理两个节点完全不同的情况
<html>
<head>
<title>dom</title>
<style type="style/css">
.red { color: red }
.green { color: green }
</style>
</head>
<body>
<div id="app"></div>
<script>
function h(tag, props, children) {
}
function mount(vnode, container) {
// 创建对应的dom对象
const el = document.createElement(el.tag);
// 添加属性
if (vnode.props) {
for (const key in vnode.props) {
// 简单处理,假定全部都是attribute
el.setAttribute(key, vnode.props[key]);
}
}
// 添加子元素
if (vnode.children) {
// 对children也做简单处理,只分为纯文本和数组节点
if (typeof vnode.children === 'string') {
el.textContent = vnode.children;
} else {
vnode.children.forEach(child => {
// 这里用递归即可
mount(child, el);
});
}
}
container.appendChild(el);
}
function patch(oldNode, newNode) {
if (oldNode.tag === newNode.tag) {
// 稍后处理
} else {
// 对于标签都不一样的,直接替换即可
const parent = oldNode.el.parentNode;
mount(newNode, parent);
parent.removeChild(oldNode.el);
oldNode.el = newNode.el;
}
}
// 使用h方法创建vdom
const vdom = h('div', { class: 'red' }, [
h('span', null, 'hello')
]);
// 将vdom挂载到指定container上
mount(vdom, document.getElementById('app'));
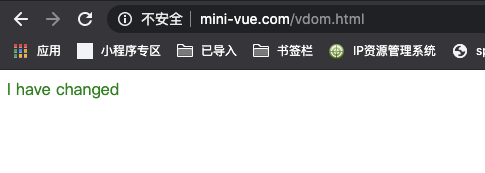
// 节点修改,patch
const vdom2 = h('span', { class: 'green' }, 'I have changed');
patch(vdom, vdom2);
</script>
</body>
</html>
运行这段程序,可以看到新的结果了
接下来就是最为复杂的节点对比了,这里我们也尽量简单处理,理解理念即可
<html>
  <head>
    <title>mini-vue</title>
    <style>
      .red { color: red; }
      .green { color: green; }
    </style>
  </head>
  <body>
    <div id="app"></div>
    <script>
      // 渲染函数,将函数描述的模版转换为对象表述的json对象
      function h(tag, props, children) {
        return {
          tag,
          props,
          children,
        };
      }

      // 将指定的vnode装在到container上
      function mount(vnode, container) {
        const el = document.createElement(vnode.tag);
        // 保存vnode的dom引用
        vnode.el = el;

        // props
        if (vnode.props) {
          for (const key in vnode.props) {
            const value = vnode.props[key];
            el.setAttribute(key, value);
          }
        }

        // children
        if (vnode.children) {
          // 区分字符串还是array,简单处理
          if (typeof vnode.children === 'string') {
            el.textContent = vnode.children;
          } else {
            vnode.children.forEach(child => {
              mount(child, el);
            });
          }
        }

        container.appendChild(el);
      }

      // 比对已有vnode和新node,进行更新
      function patch(oldNode, newNode) {
        if (oldNode.tag === newNode.tag) {
          const el = oldNode.el;
      // 新节点的el也要引用,后续更新dom时会需要
      newNode.el = el;
          // 如果tag相同,则需要进行下一步的各种判断,props的判断,更新,children的判断,更新
          // 首先处理props
          const oldProps = oldNode.props || {};
          const newProps = newNode.props || {};

          // 首先判断新props,如果旧的有,则更新,无,则添加
          for (const key in newProps) {
            const oldValue = oldProps[key];
            const newValue = newProps[key];

            if (newValue !== oldValue) {
              // 如果新的与旧的不同,则更新
              el.setAttribute(key, newValue);
            }
          }
          // 然后判断旧props里面,如果新的没有,则删除
          for (const key in oldProps) {
            if (!(key in newProps)) {
              el.removeAttribute(key);
            }
          }

          // 然后将props设置为新
          oldNode.props = newProps;

          // 接着处理children,分为

        } else {
          // 如果tag都不同,则直接替换即可
          const parent = oldNode.el.parentNode;
          mount(newNode, parent);
          parent.removeChild(oldNode.el);
          oldNode.el = newNode.el;
        }
      }

      const vdom = h('div', { class: 'red' }, [
        h('span', null, 'hello'),
      ]);
      mount(vdom, document.getElementById('app'));
      const vdom2 = h('div', { class: 'green' }, [
        h('span', null, 'hello'),
      ]);
      setTimeout(() => {
        patch(vdom, vdom2);
      }, 5000);
    </script>
  </body>
</html>
props的修改已经加上,我们看下5s之后的效果:

类名已经修改为green。剩下就是最复杂的children对比了,这里我们也稍微简单点,假定children要么是string,要么是array,不会有其他情况
最新代码如下:
<html>
  <head>
    <title>mini-vue</title>
    <style>
      .red { color: red; }
      .green { color: green; }
    </style>
  </head>
  <body>
    <div id="app"></div>
    <script>
      // 渲染函数,将函数描述的模版转换为对象表述的json对象
      function h(tag, props, children) {
        return {
          tag,
          props,
          children,
        };
      }

      // 将指定的vnode装在到container上
      function mount(vnode, container) {
        const el = document.createElement(vnode.tag);
        // 保存vnode的dom引用
        vnode.el = el;

        // props
        if (vnode.props) {
          for (const key in vnode.props) {
            const value = vnode.props[key];
            el.setAttribute(key, value);
          }
        }

        // children
        if (vnode.children) {
          // 区分字符串还是array,简单处理
          if (typeof vnode.children === 'string') {
            el.textContent = vnode.children;
          } else {
            vnode.children.forEach(child => {
              mount(child, el);
            });
          }
        }

        container.appendChild(el);
      }

      // 比对已有vnode和新node,进行更新
      function patch(oldNode, newNode) {
        if (oldNode.tag === newNode.tag) {
          const el = oldNode.el;
          // 如果tag相同,则需要进行下一步的各种判断,props的判断,更新,children的判断,更新
          // 首先处理props
          const oldProps = oldNode.props || {};
          const newProps = newNode.props || {};

          // 首先判断新props,如果旧的有,则更新,无,则添加
          for (const key in newProps) {
            const oldValue = oldProps[key];
            const newValue = newProps[key];

            if (newValue !== oldValue) {
              // 如果新的与旧的不同,则更新
              el.setAttribute(key, newValue);
            }
          }
          // 然后判断旧props里面,如果新的没有,则删除
          for (const key in oldProps) {
            if (!(key in newProps)) {
              el.removeAttribute(key);
            }
          }

          // 然后将props设置为新
          oldNode.props = newProps;

          // 接着处理children, 这里我们简单处理,认为children要么是string,要么是array
          const oldChildren = oldNode.children;
          const newChildren = newNode.children;

          if (typeof oldChildren === 'string') {
            // 对于旧子节点为string的情况
            if (typeof newChildren === 'string') {
              // 如果新子节点也是string,则直接替换即可
              el.textContent = newChildren;
              oldNode.children = newChildren;
            } else {
              // 新节点是array
              // 清空原有子节点内容
              el.innerHTML = '';
              newChildren.forEach(child => {
                mount(child, el);
              });
              oldNode.children = newChildren;
            }
          } else {
            // 旧节点是array
            if (typeof newChildren === 'string') {
              el.innerHTML = newChildren;
              oldNode.children = newChildren;
            } else {
              // 两个都是array,就简单处理,只是比对同顺序

              // 先取两个数组同样长度对比,直接patch
              const sameLength = Math.min(oldChildren.length, newChildren.length);
              for (let i = 0; i < sameLength; i++) {
                // 替换新元素
                patch(oldChildren[i], newChildren[i]);
              }
              // 然后如果旧数组还有,则移除多出部分
              if (oldChildren.length > sameLength) {
                oldChildren.slice(sameLength).forEach(child => {
                  el.removeChild(child.el);
                });
              }

              // 如果新数组还有,则添加多出部分
              if (newChildren.length > sameLength) {
                newChildren.slice(sameLength).forEach(child => {
                  mount(child, el);
                });
              }
            }
          }

        } else {
          // 如果tag都不同,则直接替换即可
          const parent = oldNode.el.parentNode;
          mount(newNode, parent);
          parent.removeChild(oldNode.el);
          oldNode.el = newNode.el;
        }
      }

      const vdom = h('div', { class: 'red' }, [
        h('span', null, 'hello'),
      ]);
      mount(vdom, document.getElementById('app'));
      const vdom2 = h('div', { class: 'green' }, [
        h('span', null, 'hello'),
        h('span', null, 'world'),
      ]);

      setTimeout(() => {
        patch(vdom, vdom2);
      }, 5000);
    </script>
  </body>
</html>
至此一个Vue3的基础班的编译和渲染系统已实现,当然实际Vue的实现需要考虑到各种边界情况,但是这个并不影响核心逻辑和理念。
但是这里我们并没有去真正实现编译系统,而我们在使用Vue的过程中所写的单模板文件,<template>中的内容其实最终也是会被编译为h渲染函数的形式。这一步是Vue的编译器帮我们实现了,如果想
了解具体的实现,可以直接去看Vue3的源码。这部分逻辑还有非常多的hint部分,用于性能优化。
后面第二章要实现的则是数据双向绑定和响应式的部分了。


 浙公网安备 33010602011771号