nsq 源码剖析
简要介绍
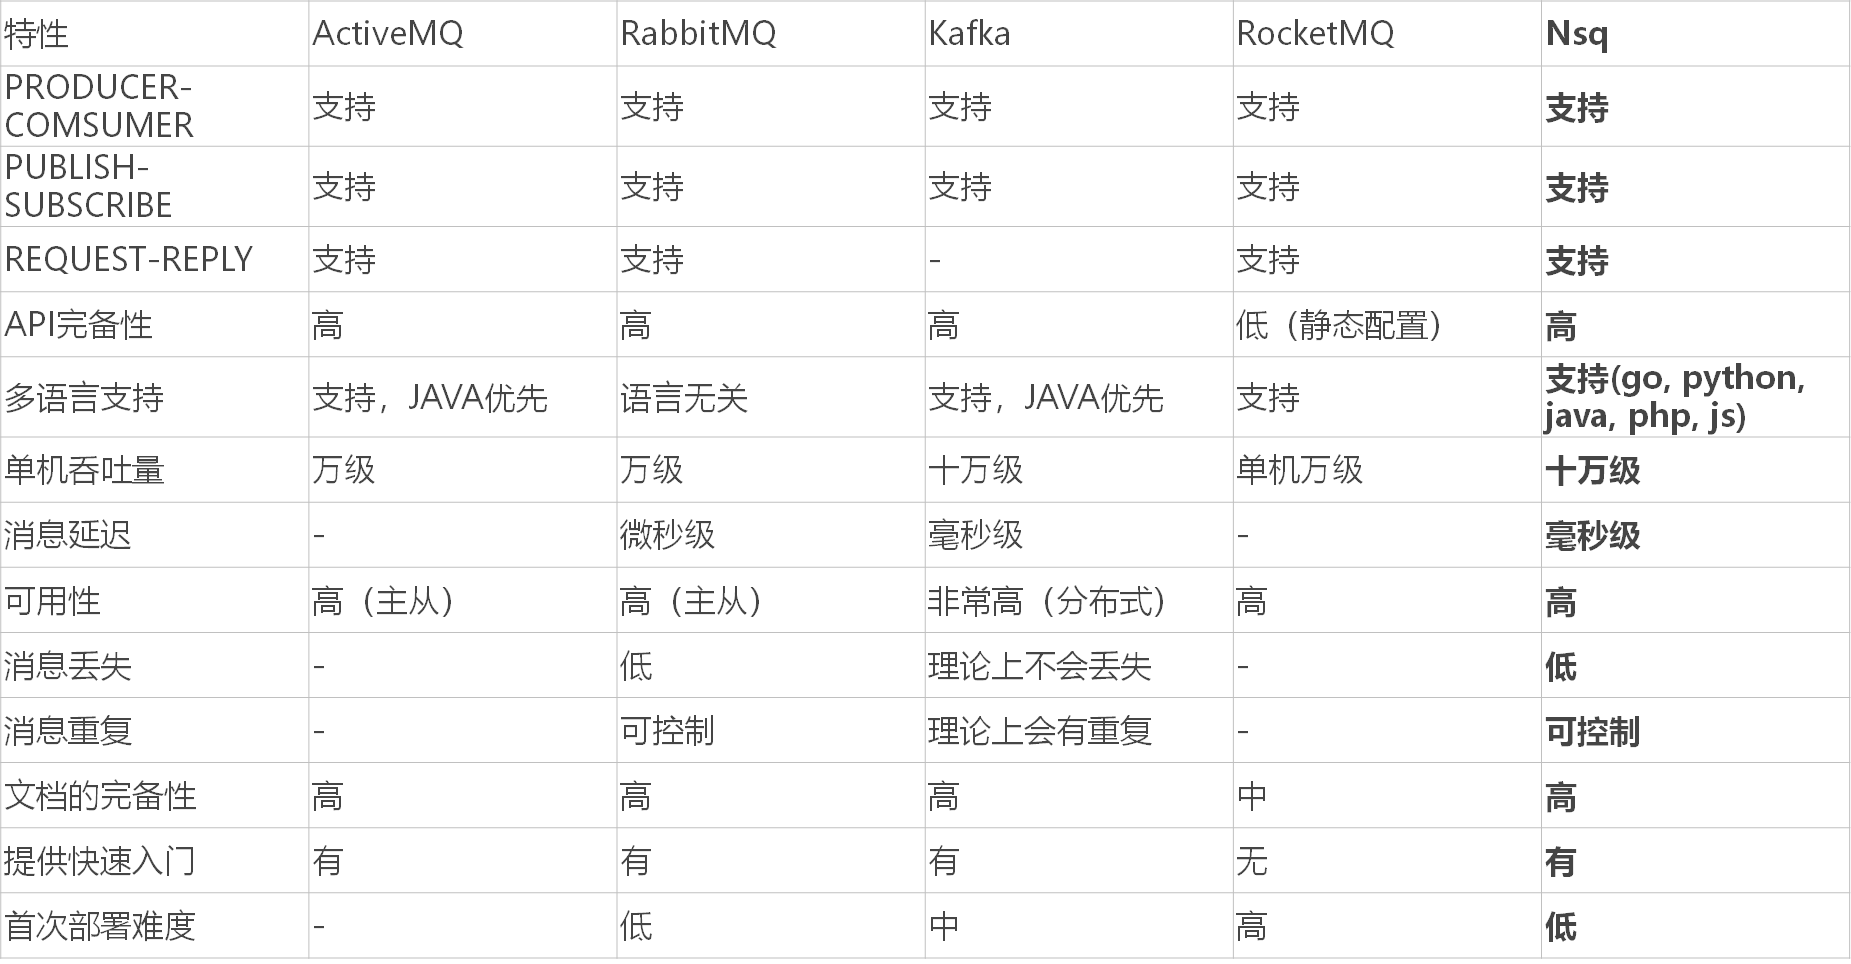
主流 MQ 比较:
目前主流的 MQ 有 Kafka, RabbitMQ, NSQ, RocketMQ, ActiveMQ 等, 它们的对比如下:
NSQ 组件
Topic: 一个 topic 就是程序发布消息的一个逻辑键, 当程序第一次发布消息时就会创建 topic.
Channels: channel 与消费者相关, 是消费者之间的负载均衡, channel 在某种意义上来说是一个“队列”. 每当一个发布者发送一条消息到一个 topic, 消息会被复制到所有消费者连接的 channel 上, 消费者通过这个特殊的 channel 读取消息, 实际上, 在消费者第一次订阅时就会创建 channel. Channel 会将消息进行排列, 如果没有消费者读取消息, 消息首先会在内存中排队, 当量太大时就会被保存到磁盘中.
Messages:消息构成了我们数据流的中坚力量, 消费者可以选择结束消息, 表明它们正在被正常处理, 或者重新将他们排队待到后面再进行处理. 每个消息包含传递尝试的次数, 当消息传递超过一定的阀值次数时, 我们应该放弃这些消息, 或者作为额外消息进行处理.
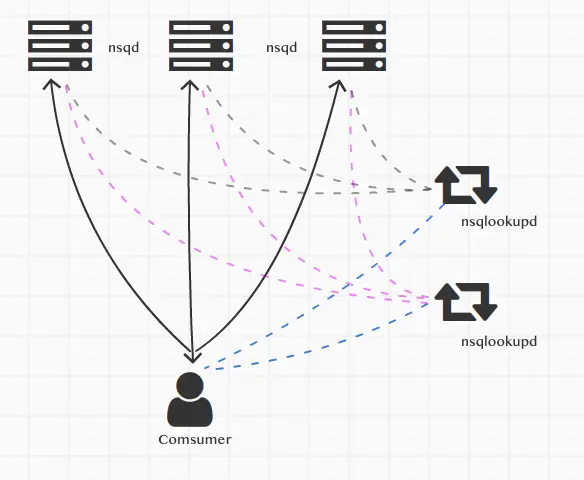
nsqd: nsqd 是一个守护进程, 负责接收(生产者 producer )、排队(最小堆 min heap 实现)、投递(消费者 consumer )消息给客户端. 它可以独立运行, 不过通常它是由 nsqlookupd 实例所在集群配置的(它在这能声明 topics 和 channels, 以便大家能找到).
nsqlookupd: nsqlookupd 是守护进程负责管理拓扑信息. 客户端通过查询 nsqlookupd 来发现指定话题( topic )的生产者, 并且 nsqd 节点广播话题(topic)和通道( channel )信息. 有两个接口: TCP 接口, nsqd 用它来广播. HTTP 接口, 客户端用它来发现和管理.
nsqadmin: nsqadmin 是一套 WEB UI, 用来汇集集群的实时统计, 并执行不同的管理任务. 常用工具类:
-
nsq_to _file: 消费指定的话题(topic)/通道(channel), 并写到文件中, 有选择的滚动和/或压缩文件.
-
nsq_to _http:消费指定的话题(topic)/通道(channel)和执行 HTTP requests (GET/POST) 到指定的端点.
-
nsq_to _nsq:消费者指定的 Topic/Channel 和重发布消息到目的地 nsqd 通过 TCP.
Topic
我们先来看 Topic 的源代码, 这样我们再后面看 nsqd 自定义协议 magicStr 的时候才能看懂. Topic 源代码主要在 nsqd/topic.go 中.
首先是 Topic 结构体, 这个结构体持有着一个 Channel map. 每收到一条消息, 它就将信息发送到每一个 Channel 中. Topic 同时持有一个内存通道和 FIFO 磁盘队列(go-diskqueue, 这个之后会讲), 用来存放消息. 如果 Topic 接收到的消息内存通道写不下了, 就会写入到磁盘中. Topic 中当一条消息被传递给每一个 Channel 后, Topic 就会将这条消息丢弃, 而不是持久化.
type Topic struct {
	// 64bit atomic vars need to be first for proper alignment on 32bit platforms
	messageCount uint64 // topic 中的消息数目
	messageBytes uint64 // topic 中的消息体大小总和

	sync.RWMutex // 读写锁

	name              string                // topic 名字
	channelMap        map[string]*Channel   // topic 对应的 channel map
	backend           BackendQueue          // 辅助的消息存储系统(磁盘中)
	memoryMsgChan     chan *Message         // 内存通道, 当 nsqd 收到消息后则写入
	startChan         chan int              // 启动 channel
	exitChan          chan int              // 终止 channel
	channelUpdateChan chan int              // topic 对应的 channel map 发生更新
	waitGroup         util.WaitGroupWrapper // waitgroup
	exitFlag          int32                 // topic 是否准备退出
	idFactory         *guidFactory          // id 生成工厂

	ephemeral      bool         // 是否临时, 临时的 topic 不存入磁盘
	deleteCallback func(*Topic) // 删除 topic 的回调函数
	deleter        sync.Once    // 保证只删除一次

	paused    int32    // topic 是否暂停
	pauseChan chan int // 暂停信号

	ctx *context // nsqd
}
再继续看 Topic 是如何处理写入的消息的:
// PutMessages writes multiple Messages to the queue
func (t *Topic) PutMessages(msgs []*Message) error {
	t.RLock()
	defer t.RUnlock()
	if atomic.LoadInt32(&t.exitFlag) == 1 {
		return errors.New("exiting")
	}

	// 用于统计写入的消息有多大
	messageTotalBytes := 0

	// 循环调用 put
	for i, m := range msgs {
		err := t.put(m)
		if err != nil {
			atomic.AddUint64(&t.messageCount, uint64(i))
			atomic.AddUint64(&t.messageBytes, uint64(messageTotalBytes))
			return err
		}
		messageTotalBytes += len(m.Body)
	}

	// 更新统计信息
	atomic.AddUint64(&t.messageBytes, uint64(messageTotalBytes))
	atomic.AddUint64(&t.messageCount, uint64(len(msgs)))
	return nil
}

// 向 Topic 中写入消息
func (t *Topic) put(m *Message) error {
	select {
	case t.memoryMsgChan <- m: // 优先写入到内存中, 如果内存满了那么就写入到磁盘上
	default:
		// get ring buffer
		b := bufferPoolGet()
		// 写入到磁盘上
		err := writeMessageToBackend(b, m, t.backend)
		// put ring buffer back towards pool
		bufferPoolPut(b)
		t.ctx.nsqd.SetHealth(err) // ?
		// 如果写入磁盘出现问题, 那么就返回错误
		if err != nil {
			t.ctx.nsqd.logf(LOG_ERROR,
				"TOPIC(%s) ERROR: failed to write message to backend - %s",
				t.name, err)
			return err
		}
	}
	return nil
}
看 put() 这个方法, 优先将消息写入到内存通道中, 如果内存通道已经写满了, 那么就写入到 FIFO 磁盘中. 这里展示的是写入逻辑, 消费逻辑是在 messagePump() 这个函数中体现的.
首先监听 Channel 通道是否收到了启动信号, 因为 Topic 通道启动之前需要做一些初始化的工作, 比如将元数据载入到内存中, 然后初始化其他模块的一些变量, 都做完之后才能启动 Topic, 所以这里使用一个 startChan 来做异步通知.
// messagePump selects over the in-memory and backend queue and
// writes messages to every channel for this topic
// 从内存中和存储队列(硬盘中)选择消息, 并写入到这个 topic 的每一个 Channel 中
func (t *Topic) messagePump() {
	var msg *Message
	var buf []byte
	var err error
	var chans []*Channel
	var memoryMsgChan chan *Message
	var backendChan chan []byte

	// do not pass messages before Start(), but avoid blocking Pause() or GetChannel()
	for {
		select {
		case <-t.channelUpdateChan:
			continue
		case <-t.pauseChan:
			continue
		case <-t.exitChan:
			goto exit
		case <-t.startChan:
			// Start 之后才开始正式执行, 这个应该是为了防止 Start 之前就 Update/Pause
		}
		break
	}
Topic 启动之后, 监听内存消息通道和 FIFO 磁盘消息通道, 如果消息是从磁盘上来的, 那么需要先解码. 同时也监听一些操作和元数据变更的通知: 更新 Topic 对应的 Channel map, 暂停 Topic, 退出 Topic.
	t.RLock() // 加读锁
	// 拿出 topic 绑定的所有 channel
	for _, c := range t.channelMap {
		chans = append(chans, c)
	}
	t.RUnlock() // 释放读锁
	// topic 没有被暂停
	if len(chans) > 0 && !t.IsPaused() {
		memoryMsgChan = t.memoryMsgChan
		backendChan = t.backend.ReadChan()
	}

	// main message loop
	// 消息循环
	for {
		select {
		// 监听内存中和硬盘中是否有消息传入
		// 这里就是 nsqd 消息无序的原因, 如果内存中和硬盘中同时有消息传入, 那么这个选择是随机的
		case msg = <-memoryMsgChan:
			// 读取内存消息
		case buf = <-backendChan:
			// 读取硬盘消息
			// 首先需要解码, []byte -> Message
			msg, err = decodeMessage(buf)
			if err != nil {
				t.ctx.nsqd.logf(LOG_ERROR, "failed to decode message - %s", err)
				continue
			}
		case <-t.channelUpdateChan:
			// topic 的 channel map 发生更新
			chans = chans[:0] // 复用 slice
			t.RLock()         // 加读锁
			// 更新
			for _, c := range t.channelMap {
				chans = append(chans, c)
			}
			t.RUnlock() // 释放读锁
			if len(chans) == 0 || t.IsPaused() {
				// 如果 topic 暂停或者没有 Channel 了
				memoryMsgChan = nil
				backendChan = nil
			} else {
				// 没暂停就继续读内存中消息和硬盘中消息
				memoryMsgChan = t.memoryMsgChan
				backendChan = t.backend.ReadChan()
			}
			continue // 继续监听
		case <-t.pauseChan:
			// topic 发生暂停事件
			if len(chans) == 0 || t.IsPaused() {
				// 确实暂停了
				memoryMsgChan = nil
				backendChan = nil
			} else {
				// 没暂停, 继续
				memoryMsgChan = t.memoryMsgChan
				backendChan = t.backend.ReadChan()
			}
			continue // 继续监听
		case <-t.exitChan:
			// 退出事件, 直接退出
			goto exit
		}
如果收到了内存中来的信息或者是磁盘中来的信息, 那么就会将这个信息拷贝到每个 Channel 中.
		// 只有读取到内存消息或者读取到硬盘消息的时候才能到这
		// 遍历 topic 绑定的 channel
		for i, channel := range chans {
			chanMsg := msg // 读到的消息
			// copy the message because each channel
			// needs a unique instance but...
			// fastpath to avoid copy if its the first channel
			// (the topic already created the first copy)
			// 必须将这个消息拷贝一份, 因为每个 channel 都要有一个独立的实例.
			// 第一个 channel 就不用拷贝了, 直接用 topic 产生的就行(优化方法)
			if i > 0 {
				chanMsg = NewMessage(msg.ID, msg.Body) // ID, payload
				chanMsg.Timestamp = msg.Timestamp      // 时间戳
				chanMsg.deferred = msg.deferred        // 延迟投递时间
			}
			if chanMsg.deferred != 0 {
				channel.PutMessageDeferred(chanMsg, chanMsg.deferred)
				continue
			}
			// 放入 channel 中
			err := channel.PutMessage(chanMsg)
			if err != nil {
				t.ctx.nsqd.logf(LOG_ERROR,
					"TOPIC(%s) ERROR: failed to put msg(%s) to channel(%s) - %s",
					t.name, msg.ID, channel.name, err)
			}
		}
	}

exit:
	t.ctx.nsqd.logf(LOG_INFO, "TOPIC(%s): closing ... messagePump", t.name)
}
那么 Topic 是如何退出的呢?
Topic 退出时的逻辑是在 exit() 这个函数中, 这个 exit() 函数总共被两个函数调用了, 这两个函数分别是 Delete() 和 Close(). 我们先看这两个函数:
// Delete empties the topic and all its channels and closes
func (t *Topic) Delete() error {
	return t.exit(true)
}

// Close persists all outstanding topic data and closes all its channels
func (t *Topic) Close() error {
	return t.exit(false)
}
可以看出, Delete() 和 Close() 唯一的区别就是调用 exit() 函数的参数不一样. true 是删除所有数据, false 则是将内存中的数据持久化到磁盘上, 然后持久化 Topic 的元信息.
func (t *Topic) exit(deleted bool) error {
	// 已经删除/退出过了, 就不要继续删除了
	if !atomic.CompareAndSwapInt32(&t.exitFlag, 0, 1) {
		return errors.New("exiting")
	}

	if deleted {
		// 删除
		t.ctx.nsqd.logf(LOG_INFO, "TOPIC(%s): deleting", t.name)

		// since we are explicitly deleting a topic (not just at system exit time)
		// de-register this from the lookupd
		// 通知 nsqdlookup
		t.ctx.nsqd.Notify(t)
	} else {
		t.ctx.nsqd.logf(LOG_INFO, "TOPIC(%s): closing", t.name)
	}

	// 已经删除/关闭了, 所以就需要关闭 exitChan
	close(t.exitChan)

	// synchronize the close of messagePump()
	// 等待 goroutine 都结束, 这样可以优雅退出
	t.waitGroup.Wait()

	if deleted {
		// 删除
		t.Lock()
		// 需要删除 map 中所有的 Channel
		for _, channel := range t.channelMap {
			delete(t.channelMap, channel.name)
			channel.Delete()
		}
		t.Unlock()

		// empty the queue (deletes the backend files, too)
		t.Empty()
		return t.backend.Delete()
	}

	// close all the channels
	for _, channel := range t.channelMap {
		err := channel.Close()
		if err != nil {
			// we need to continue regardless of error to close all the channels
			t.ctx.nsqd.logf(LOG_ERROR, "channel(%s) close - %s", channel.name, err)
		}
	}

	// write anything leftover to disk
	t.flush()
	return t.backend.Close()
}
由代码可知, Topic 将内存通道中的数据持久化到 FIFO 磁盘队列中调用的是 flush() 这个函数:
// 将内存中的数据全部持久化到磁盘中
func (t *Topic) flush() error {
	var msgBuf bytes.Buffer

	if len(t.memoryMsgChan) > 0 {
		t.ctx.nsqd.logf(LOG_INFO,
			"TOPIC(%s): flushing %d memory messages to backend",
			t.name, len(t.memoryMsgChan))
	}

	for {
		select {
		case msg := <-t.memoryMsgChan: // 将内存通道中的消息全部写入到磁盘中
			err := writeMessageToBackend(&msgBuf, msg, t.backend)
			if err != nil {
				t.ctx.nsqd.logf(LOG_ERROR,
					"ERROR: failed to write message to backend - %s", err)
			}
		default:
			goto finish
		}
	}

finish:
	return nil
}
Message
现在我们看看 NSQ 中的消息究竟长什么样. Message 这个结构体是在 nsqd/message.go 中定义的. Message struct 中有几个字段很重要. ID, Body, Timestamp, Attempts 这四个字段是需要被持久化到磁盘上, 剩下的字段则不需要被持久化. 每一个消息都和一个生产者绑定(clientID), pri 则是一个时间戳, 是消息最晚需要被消费的时间, 如果消息发送到消费者后, 消费者在 pri 这个时间戳之间没有给 ACK 应答, 则将这个消息投递到发送失败处理逻辑中(这个下面会讲).
const (
	MsgIDLength       = 16
	minValidMsgLength = MsgIDLength + 8 + 2 // Timestamp + Attempts
)

// 消息 ID
type MessageID [MsgIDLength]byte

type Message struct {
	ID        MessageID // ID (持久化)
	Body      []byte    // 消息体 (持久化)
	Timestamp int64     // 产生的时间戳 (持久化)
	Attempts  uint16    // 消息尝试发送的次数 (持久化)

	// for in-flight handling
	// 不持久化
	// 发送中的消息控制

	deliveryTS time.Time // 消息被发送时的时间戳
	clientID   int64     // 产生消息的客户端 ID
	// NSQ 默认按照消息的时间戳来处理消息, 如果需要指定优先级, 那么就需要指定 pri 字段, NSQ 会根据优先级写入 inFlightQueue 中.
	// 默认 pri 是规定的消息最晚需要被消费的时间
	pri      int64         // 消息最晚需要被消费的时间
	index    int           // 在 InFlight Queue中的下标
	deferred time.Duration // 消息的延迟发送时间
}
然后再看 WriteTo() 函数, 这个函数就是将 Message 持久化到磁盘. 因为在写 NSQ 的时候还没有 protobuf 这样的二进制协议, 所以 NSQ 就直接采用自己的方式: 先写 Timestamp 和 Attempts 正好 10 个字节, 再写 ID(长度固定为16 bytes) 和 Body.
func (m *Message) WriteTo(w io.Writer) (int64, error) {
	var buf [10]byte
	var total int64

	// 首先写入时间戳和尝试次数作为标志, 长度大小为固定的 10 byte
	binary.BigEndian.PutUint64(buf[:8], uint64(m.Timestamp))
	binary.BigEndian.PutUint16(buf[8:10], uint16(m.Attempts))

	// Message 属性 (timestamp, attempts) 写入磁盘
	n, err := w.Write(buf[:])
	total += int64(n)
	if err != nil {
		return total, err
	}

	// Message ID 写入磁盘
	n, err = w.Write(m.ID[:])
	total += int64(n)
	if err != nil {
		return total, err
	}

	// Message Body 写入磁盘
	n, err = w.Write(m.Body)
	total += int64(n)
	if err != nil {
		return total, err
	}

	return total, nil
}
有写入磁盘, 那必有从磁盘中读出, 读出的时候就需要被解码. timestamp 长度固定为 8 字节, attempts 长度固定为 2 字节, ID 长度固定为 16 字节. 然后这个二进制块剩下的就都是 Body 了.
这里要注意了, 我们在写入多个消息的时候, 每个消息之间到哪里结束这里没有控制, 这里只是将一个二进制块解码为消息体.
// decodeMessage deserializes data (as []byte) and creates a new Message
// message format:
// [x][x][x][x][x][x][x][x][x][x][x][x][x][x][x][x][x][x][x][x][x][x][x][x][x][x][x][x][x][x]...
// |       (int64)        ||    ||      (hex string encoded in ASCII)           || (binary)
// |       8-byte         ||    ||                 16-byte                      || N-byte
// ------------------------------------------------------------------------------------------...
//
//	nanosecond timestamp    ^^                   message ID                       message body
//	                     (uint16)
//	                      2-byte
//	                     attempts
func decodeMessage(b []byte) (*Message, error) {
	// 将二进制数据解码为 Message struct
	var msg Message

	// 长度不够
	if len(b) < minValidMsgLength {
		return nil, fmt.Errorf("invalid message buffer size (%d)", len(b))
	}

	// 取出 Message 属性, 大端存储
	msg.Timestamp = int64(binary.BigEndian.Uint64(b[:8]))
	msg.Attempts = binary.BigEndian.Uint16(b[8:10])
	copy(msg.ID[:], b[10:10+MsgIDLength]) // 直接赋值 16 字节 Message ID
	msg.Body = b[10+MsgIDLength:]         // 直接赋值 Message ID 之后的全部为 Message Body

	return &msg, nil
}
我们再看 writeMessageToBackend() 这个函数, 这里使用了一个缓冲池作为 io Writer, 然后再将缓冲池中的内容写入到磁盘中, 这样的好处就是不需要每次开辟一块新的空间, 减轻 GC 压力.
// 先将 Message 写入到缓存上, 然后将缓存持久化到磁盘上
func writeMessageToBackend(buf *bytes.Buffer, msg *Message, bq BackendQueue) error {
	buf.Reset()                // 重置缓存池
	_, err := msg.WriteTo(buf) // 先写入缓存中
	if err != nil {
		return err
	}
	return bq.Put(buf.Bytes()) // 从缓存中写入到磁盘上
}
有的同学看到这里可能就会问了, 写入多条数据到磁盘的时候如何判断每一条数据从哪里开始, 从哪里结束呢? 这个问题是由 NSQ 配套的 FIFO 磁盘队列解决的. bq 就是 backendqueue, 也就是这个磁盘队列, 它在 Put 数据的时候, 就会将这个数据的块的大小使用 uint32 写在数据的最前面, 当 Get 的时候只需要先看看当前块的大小是多少, 然后将这么大的二进制数据取出就可以了.
Channel
先看 Channel 结构体, 一个 Topic 匹配多个 Channel, 一个 Channel 可以被多个消费者监听.
type Channel struct {
	// 64bit atomic vars need to be first for proper alignment on 32bit platforms
	requeueCount uint64 // 重新发送的消息数量
	messageCount uint64 // channel 中的消息总数
	timeoutCount uint64 // 发送超时的消息数量

	sync.RWMutex // 读写锁

	topicName string   // topic 名称
	name      string   // channel 名称
	ctx       *context // nsqd

	backend BackendQueue // 硬盘存储

	memoryMsgChan chan *Message // channel 的消息通道
	exitFlag      int32         // 退出信号
	exitMutex     sync.RWMutex  // 退出时的锁

	// state tracking
	clients        map[int64]Consumer // 连接这个 channel 的消费者
	paused         int32              // 暂停信号
	ephemeral      bool               // channel 是否持久化
	deleteCallback func(*Channel)     // 删除回调函数
	deleter        sync.Once          // 只删除一次

	// Stats tracking
	e2eProcessingLatencyStream *quantile.Quantile // ?

	// 以下都是优先级消息队列实现的
	// 延迟消息投递
	// TODO: these can be DRYd up
	deferredMessages map[MessageID]*pqueue.Item
	deferredPQ       pqueue.PriorityQueue // 小顶堆, 延迟发送的消息队列. key: timestamp
	deferredMutex    sync.Mutex

	// 正在发送中的消息内容, 直到收到客户端的 FIN 才会删除; 如果 timeout 那么就重传
	inFlightMessages map[MessageID]*Message
	// 小顶堆, 发送中的消息队列. key: timestamp, 可以防止消息被重复消费
	inFlightPQ    inFlightPqueue
	inFlightMutex sync.Mutex
}
Channel 中也有一个内存通道和一个 FIFO 磁盘队列, Topic 将消息复制到 Channel 中. 与 Topic 存储信息的逻辑相似, Channel 也是先将消息存储到内存中, 如果内存已经存储满了, 那么就将其写入到 FIFO 队列中. 在消息传递给消费者后, 消费者未消费的情况也很常见, 这是消息队列需要重传未消费的消息. 为了满足这个需求, Channel 在内存中持有者一个优先级消息队列 inFlightPQ. 当消息被取出发送给消费者后, 就将其加入到优先级消息队列中, 优先级是消息过期的时间.
这样, Channel 就可以控制并重发消息, 如果消息仍无法被消费者 ACK, 或者 Channel 需要被关闭, 那么就将 inFlight 中的消息写入到 backendQueue 中进行持久化.
我们先看 Channel 接收消息的流程:
// 将文件写入, 如果内存中放不下了, 就放在硬盘中
func (c *Channel) put(m *Message) error {
	select {
	case c.memoryMsgChan <- m: // 放入内存
	default: // 内存放满了, 放入硬盘
		b := bufferPoolGet()                          // 从缓存池中取出一块缓存
		err := writeMessageToBackend(b, m, c.backend) // 写入到磁盘中
		bufferPoolPut(b)                              // 将缓存放回缓存池中
		c.ctx.nsqd.SetHealth(err)
		if err != nil {
			c.ctx.nsqd.logf(LOG_ERROR, "CHANNEL(%s): failed to write message to backend - %s",
				c.name, err)
			return err
		}
	}
	return nil
}
可以看出, 这里 Channel 接收消息的逻辑与 Topic 基本一样. Channel 的读取消息流程是写在 nsqd/protocol_v2.go 中:
func (p *protocolV2) messagePump(client *clientV2, startedChan chan bool) {
	... // 一些启动初始化流程

	for {
		... // 检测一些可能出现的情况

		select {
		case <-flusherChan:
			/... // 刷新同步逻辑
		case <-client.ReadyStateChan: // 收到了 Ready 命令
		case subChannel = <-subEventChan:
			// you can't SUB anymore
			// 每个 Client 只能订阅一个 Channel, 所以这个部分就会被跳过
			subEventChan = nil
		case identifyData := <-identifyEventChan:
			... // 认证逻辑
		case <-heartbeatChan: // 心跳
			err = p.Send(client, frameTypeResponse, heartbeatBytes)
			if err != nil {
				goto exit
			}
		case b := <-backendMsgChan: // 监听磁盘通道消息
			if sampleRate > 0 && rand.Int31n(100) > sampleRate {
				continue
			}

			msg, err := decodeMessage(b) // 解码
			if err != nil {
				p.ctx.nsqd.logf(LOG_ERROR, "failed to decode message - %s", err)
				continue
			}
			msg.Attempts++

			// 消费消息之前, 将消息放入这个优先级队列中, timeout 后能重传
			subChannel.StartInFlightTimeout(msg, client.ID, msgTimeout)
			// 设置统计信息
			client.SendingMessage()
			// 真正的将消息发送出去
			err = p.SendMessage(client, msg)
			if err != nil {
				goto exit
			}
			flushed = false
		case msg := <-memoryMsgChan: // 监听内存通道消息
			if sampleRate > 0 && rand.Int31n(100) > sampleRate {
				continue
			}
			msg.Attempts++

			// 消费消息之前, 将消息放入这个优先级队列中, timeout 后能重传
			subChannel.StartInFlightTimeout(msg, client.ID, msgTimeout)
			// 设置统计信息
			client.SendingMessage()
			// 真正的将消息发送出去
			err = p.SendMessage(client, msg)
			if err != nil {
				goto exit
			}
			flushed = false
		case <-client.ExitChan:
			goto exit
		}
	}

exit:
	... // 退出逻辑
}
messagePump 这个函数被 protocolV2.IOLoop() 调用, IOLoop() 被 TCPServer.Handle() 调用.
我们可以看到, 这里 messagePump 这个函数监听了内存通道和磁盘通道以及其他同步通道(心跳, 刷新, 订阅...), 如果监听到了一个 Message, 那么就会把这个 Message 写入到 InFlightPQ 中, 然后设置好最晚被消费时间. 这也是为什么多个客户端订阅同一个 Channel 时, 收到的消息近似于负载均衡.
InFlightPQ
我们看一下 inFlightPQ 的调用过程和实现细节:
// 这个是根据 Message.pri 的小顶堆
type inFlightPqueue []*Message
inFlightPqueue 对外暴露了 Swap(), Push(), Pop(), Remove(), PeekAndShift() 这些方法. Push 和 Pop 就不需要说了, Remove() 的作用就是从堆中指定位置弹出一个元素:
// 根据 index 取堆中任意一个元素
func (pq *inFlightPqueue) Remove(i int) *Message {
	n := len(*pq)
	if n-1 != i {
		pq.Swap(i, n-1)
		pq.down(i, n-1)
		pq.up(i)
	}
	x := (*pq)[n-1]
	x.index = -1
	*pq = (*pq)[0 : n-1]
	return x
}
PeekAndShift() 的作用就是检查堆顶元素, 看看它的时间是否已经过期了, 如果过期了, 那么就将堆顶元素弹出.
// Message.pri > max 就返回 nil, Message.pri <= max 就将堆顶元素弹出
func (pq *inFlightPqueue) PeekAndShift(max int64) (*Message, int64) {
	if len(*pq) == 0 {
		return nil, 0
	}

	x := (*pq)[0]
	if x.pri > max {
		return nil, x.pri - max
	}
	pq.Pop()

	return x, 0
}
普通的堆只需要压入和弹出堆顶元素, 而 InFlightPQ 需要从堆中根据下标弹出元素, 为什么要这么设计呢? 首先我们要清除 InFlightPQ 是用来做什么的. 客户端从订阅的 Channel (内存中或磁盘中) 取出消息后, 首先将消息放入 InFlightPQ 中, 然后才将消息通过自定义协议发送给客户端. 而在发送后, 如果客户端返回消息发送成功了, 我们需要从 InFlightPQ 中移除这个消息. 因此, InFlightPQ 才设计了从任意下标弹出元素的功能.
Protocol
好了, 以上我们将 nsqd 的存储逻辑基本都弄清除了, 现在我们来看看 nsqd 与客户端交互的协议是什么样子的.
客户端与 nsqd 交互的协议是在 nsqd/protocolV2.go 这个文件中. 其中, 客户端与 nsqd 主要有 11 种命令交互:
FIN - 消息消费完成
RDY - 客户端连接就绪
REQ - 消息重放入队
PUB - 发布一条消息
MPUB - 发布多条消息
DPUB - 发布一条延时消息
NOP - 空操作
TOUCH - 重置消息过期时间
SUB - 消费者订阅 Topic/Channel
CLS - 超时关闭连接CLOSE_WAIT
AUTH - 权限认证
这 11 种交互交互方式在 protocolV2.go 这个文件中都有写, 这里就不多说了, 我们只关心消息的传递. 发送消息呢在 messagePump() 这个函数中实现的, 我们前文已经介绍过了. 这里我们介绍处理 TCP 连接的主入口函数 IOLoop(), 这个函数调用了 messagePump(), 将 Channel 中的消息发送给客户端, 同时也监听了客户端传递来的命令和消息.
func (p *protocolV2) IOLoop(conn net.Conn) error {
	var err error
	var line []byte
	var zeroTime time.Time

	// 原子操作, 增加客户端个数
	clientID := atomic.AddInt64(&p.ctx.nsqd.clientIDSequence, 1)
	// 新建客户端
	client := newClientV2(clientID, conn, p.ctx)
	// 加入 client map(clientID->client)
	p.ctx.nsqd.AddClient(client.ID, client)

	//
	// synchronize the startup of messagePump in order
	// to guarantee that it gets a chance to initialize
	// goroutine local state derived from client attributes
	// and avoid a potential race with IDENTIFY (where a client
	// could have changed or disabled said attributes)
	messagePumpStartedChan := make(chan bool)
	// 处理与客户端的交互(这里的客户端仅仅是消费消息, 是一个消费者). 生产者应该与 Topic 对接.
	go p.messagePump(client, messagePumpStartedChan)
	// 需要同步之后再开启心跳
	<-messagePumpStartedChan
IOLoop() 启动了一个 goroutine 负责调用 messagePump 方法, 目的是持续监听 Channel 中的信息, 并将其发送给客户端. 下面就是 IOLoop() 监听客户端传来的命令和消息:
	for {
		// ?
		if client.HeartbeatInterval > 0 {
			client.SetReadDeadline(time.Now().Add(client.HeartbeatInterval * 2))
		} else {
			client.SetReadDeadline(zeroTime)
		}

		// ReadSlice does not allocate new space for the data each request
		// ie. the returned slice is only valid until the next call to it
		line, err = client.Reader.ReadSlice('\n')
		if err != nil {
			if err == io.EOF {
				err = nil
			} else {
				err = fmt.Errorf("failed to read command - %s", err)
			}
			break
		}

		// trim the '\n'
		line = line[:len(line)-1]
		// optionally trim the '\r'
		if len(line) > 0 && line[len(line)-1] == '\r' {
			line = line[:len(line)-1]
		}
		params := bytes.Split(line, separatorBytes)

		p.ctx.nsqd.logf(LOG_DEBUG, "PROTOCOL(V2): [%s] %s", client, params)

		var response []byte
		// 执行命令
		response, err = p.Exec(client, params)
		if err != nil {
			ctx := ""
			if parentErr := err.(protocol.ChildErr).Parent(); parentErr != nil {
				ctx = " - " + parentErr.Error()
			}
			p.ctx.nsqd.logf(LOG_ERROR, "[%s] - %s%s", client, err, ctx)

			// 发送结果
			sendErr := p.Send(client, frameTypeError, []byte(err.Error()))
			if sendErr != nil {
				p.ctx.nsqd.logf(LOG_ERROR, "[%s] - %s%s", client, sendErr, ctx)
				break
			}

			// errors of type FatalClientErr should forceably close the connection
			if _, ok := err.(*protocol.FatalClientErr); ok {
				break
			}
			continue
		}

		if response != nil {
			// 发送结果
			err = p.Send(client, frameTypeResponse, response)
			if err != nil {
				err = fmt.Errorf("failed to send response - %s", err)
				break
			}
		}
	}

	p.ctx.nsqd.logf(LOG_INFO, "PROTOCOL(V2): [%s] exiting ioloop", client)
	conn.Close()
	close(client.ExitChan)
	if client.Channel != nil {
		client.Channel.RemoveClient(client.ID)
	}

	p.ctx.nsqd.RemoveClient(client.ID)
	return err
}
因为 nsq 用了私有协议实现, 这段代码知道是监听客户端的就可以了.
我们来看一下 NSQ 的主入口函数, 这里有一个很值得学习的一点:
func (n *NSQD) Main() error {
	ctx := &context{n}

	exitCh := make(chan error) // 退出信号, 接收 error
	var once sync.Once
	// 接收 error, 放入 exitCh 中 (无论 error 是否为空)
	exitFunc := func(err error) {
		once.Do(func() {
			if err != nil {
				n.logf(LOG_FATAL, "%s", err)
			}
			exitCh <- err
		})
	}

	// 初始化 tcp server
	tcpServer := &tcpServer{ctx: ctx}
	// 加入任务
	n.waitGroup.Wrap(func() {
		// 监听 tcpserver 传递的 error
		exitFunc(protocol.TCPServer(n.tcpListener, tcpServer, n.logf))
	})
	// 初始化 http server
	httpServer := newHTTPServer(ctx, false, n.getOpts().TLSRequired == TLSRequired)
	// 加入任务
	n.waitGroup.Wrap(func() {
		// 监听
		exitFunc(http_api.Serve(n.httpListener, httpServer, "HTTP", n.logf))
	})
	// 如果有 https 则初始化 https server
	if n.tlsConfig != nil && n.getOpts().HTTPSAddress != "" {
		httpsServer := newHTTPServer(ctx, true, true)
		// 加入一个任务
		n.waitGroup.Wrap(func() {
			// 监听
			exitFunc(http_api.Serve(n.httpsListener, httpsServer, "HTTPS", n.logf))
		})
	}

	// InFlightPQ 扫描协程
	n.waitGroup.Wrap(n.queueScanLoop)
	// lookup 查找协程
	n.waitGroup.Wrap(n.lookupLoop)
	// 统计信息
	if n.getOpts().StatsdAddress != "" {
		n.waitGroup.Wrap(n.statsdLoop)
	}

	err := <-exitCh // 阻塞接收
	return err
}
在 NSQD 的主入口中, 发现一个很好的封装, 以后可以用到项目中:
type WaitGroupWrapper struct {
	sync.WaitGroup
}

func (w *WaitGroupWrapper) Wrap(cb func()) {
	w.Add(1)
	go func() {
		cb()
		w.Done()
	}()
}
以上就是整个 NSQD 的源码剖析了, 感谢阅读!

 浙公网安备 33010602011771号