开源API文档工具- swagger2 与 smart-doc 比较 与 使用
工具开源地址
swagger2 : https://swagger.io/
smart-doc: https://www.oschina.net/p/smart-doc 国产
两者的比较
swagger2 和 smart-doc 两个开源工具 都可以 使用jar包 生成 api 文档。
相同点:
这个两个工具 都可以 自动 扫描 有 @Controller 注解的 类 并生成 相应的 api 接口文档。都可以生成 静态网页,提供在线api html 页面的访问。
区别:
1、swagger2相对 功能多一点,它不仅能 生成 文档 ,而且还可以 提供在线测试 api 的页面,方便调试。尤其是post 请求调试,不需要自己写 json 格式请求数据了,只要在对应的请求属性输入对应的值就可以测试了,这个功能比较方便。而 smart-doc 只能生成 文档,格式包含(多种格式文档:Markdown、HTML5、Asciidoctor、Postman json)
2、设计思路不同,smart-doc 是基于 源码分析的,它生成api文档是通过分析JAVA源码主要是通过 注释 和 系统自带注解,来实现文档的 生成,而 swagger 是运行时 自动生成在线文档,并且 生成 测试 接口的 案例。由于他们设计思路 理念 不一样,swagger2 使用过程需要使用它定义的@API 相关注解,这样就污染了源码,代码入侵有点高,而smart -doc 就不一样了,主要是通过 注释 、解析/** */ 来生成API文档的 。这样基本上没有入侵性,很自由!
3、swagger 生成 离线的文档 需要借助第三方jar包实现,而 smart-doc 直接 运行 test 方法就可以直接导出 md,html,asciidoc 等格式文档。
两个工具的使用
(基于 spring-boot的 使用Demo) 使用maven 构建项目和管理依赖的
swagger2:
1、引入依赖包
<springfox-swagger2.version>2.9.2</springfox-swagger2.version>
        <!-- swagager api 依赖包 -->
        <dependency>
            <groupId>io.springfox</groupId>
            <artifactId>springfox-swagger2</artifactId>
            <version>${springfox-swagger2.version}</version>
        </dependency>
        <dependency>
            <groupId>io.springfox</groupId>
            <artifactId>springfox-swagger-ui</artifactId>
            <version>${springfox-swagger2.version}</version>
        </dependency>
2、编写swagger 配置类
@Configuration
@EnableSwagger2
public class Swagger2Config extends WebMvcConfigurationSupport {
    public static final String SWAGGER_SCAN_BASE_PACKAGE = "org.demo.SpringCloud.web";
    public static final String VERSION = "1.0.0";

    @Bean
    public Docket createRestApi() {
        return new Docket(DocumentationType.SWAGGER_2)
                .apiInfo(apiInfo())
                .select()
                .apis(RequestHandlerSelectors.basePackage(SWAGGER_SCAN_BASE_PACKAGE))//api接口包扫描路径
                .paths(PathSelectors.any())//可以根据url路径设置哪些请求加入文档,忽略哪些请求

                .build();
    }

    private ApiInfo apiInfo() {
        return new ApiInfoBuilder()
                .title("Swagger2 接口文档示例")//设置文档的标题
                .description("更多内容请关注:http://www.baidu.com")//设置文档的描述->1.Overview
                .version(VERSION)//设置文档的版本信息-> 1.1 Version information
                .contact(new Contact("SpringCloud", "http://www.baidu.com", "geekswg@qq.com"))//设置文档的联系方式->1.2 Contact information
                .termsOfServiceUrl("https://baidu.com")//设置文档的License信息->1.3 License information
                .build();
    }

    /**
     * 防止@EnableMvc把默认的静态资源路径覆盖了,手动设置的方式
     * @param registry
     */
    @Override
    protected void addResourceHandlers(ResourceHandlerRegistry registry) {
        // 解决静态资源无法访问
        registry.addResourceHandler("/**").addResourceLocations("classpath:/static/");
        // 解决swagger无法访问
        registry.addResourceHandler("/swagger-ui.html").addResourceLocations("classpath:/META-INF/resources/");
        // 解决swagger的js文件无法访问
        registry.addResourceHandler("/webjars/**").addResourceLocations("classpath:/META-INF/resources/webjars/");
    }
}
3、启动项目 访问 swagger-ui

smart-doc
1、引入依赖包
<smart-doc.version>1.8.6</smart-doc.version>
        <!-- smart-doc 依赖包 -->
        <dependency>
            <groupId>com.github.shalousun</groupId>
            <artifactId>smart-doc</artifactId>
            <version>${smart-doc.version}</version>
            <scope>test</scope>
        </dependency>
2、使用 @Test 方法 生成 api 文档
@Test
    public void testBuilderControllersApi() {
        ApiConfig config = new ApiConfig();
        //当把AllInOne设置为true时,Smart-doc将会把所有接口生成到一个Markdown、HHTML或者AsciiDoc中
        config.setAllInOne(true);
        config.setLanguage(DocLanguage.CHINESE);
        //Set the api document output path.
        config.setOutPath("d:/smart-doc/");
        //生成Markdown文件
        ApiDocBuilder.buildApiDoc(config);
    }
@Test
    public void testBuilderControllersApiHtml() {
        String OUTPUT_PATH = "smart-doc/html/";
        ApiConfig config = new ApiConfig();
        config.setServerUrl("http://127.0.0.1:8080");
        //设置为严格模式,Smart-doc将降至要求每个Controller暴露的接口写上标准文档注释
//        config.setStrict(true);
        //当把AllInOne设置为true时,Smart-doc将会把所有接口生成到一个Markdown、HHTML或者AsciiDoc中
        config.setAllInOne(true);
        config.setLanguage(DocLanguage.CHINESE);
        //HTML5文档,建议直接放到src/main/resources/static/doc下,Smart-doc提供一个配置常量HTML_DOC_OUT_PATH
        config.setOutPath(DocGlobalConstants.HTML_DOC_OUT_PATH);
        config.setOutPath(OUTPUT_PATH);
        // 设置接口包扫描路径过滤,如果不配置则Smart-doc默认扫描所有的接口类
        // 配置多个报名有英文逗号隔开
//        config.setPackageFilters("com.power.doc.controller");
        //设置公共请求头.如果不需要请求头,则无需设置
//        config.setRequestHeaders(
//                ApiReqHeader.header().setName("access_token").setType("string")
//                        .setDesc("Basic auth credentials").setRequired(true).setSince("v1.1.0"),
//                ApiReqHeader.header().setName("user_uuid").setType("string").setDesc("User Uuid key")
//        );

        //设置错误错列表,遍历自己的错误码设置给Smart-doc即可
        List<ApiErrorCode> errorCodeList = new ArrayList<>();
        for (HttpCodeEnum codeEnum : HttpCodeEnum.values()) {
            ApiErrorCode errorCode = new ApiErrorCode();
            errorCode.setValue(codeEnum.getCode()).setDesc(codeEnum.getMessage());
            errorCodeList.add(errorCode);
        }
        //不需要显示错误码,则可以不用设置错误码。
        config.setErrorCodes(errorCodeList);
        //1.7.9 优化了错误码处理,用于下面替代遍历枚举设置错误码
        //不需在文档中展示错误码则可以不设置。
//        config.setErrorCodeDictionaries(
//                ApiErrorCodeDictionary.dict().setEnumClass(HttpCodeEnum.class)
//                        .setCodeField("code") //错误码值字段名
//                        .setDescField("desc")//错误码描述
//        );


        //设置文档变更记录,没有需要可以不设置
//        config.setRevisionLogs(
//                RevisionLog.getLog().setRevisionTime("2018/12/15").setAuthor("chen").setRemarks("test").setStatus("create").setVersion("V1.0"),
//                RevisionLog.getLog().setRevisionTime("2018/12/16").setAuthor("chen2").setRemarks("test2").setStatus("update").setVersion("V2.0")
//        );

        long start = System.currentTimeMillis();
        //since 1.8.1版本开始入口方法有变更
        HtmlApiDocBuilder.buildApiDoc(config);
        long end = System.currentTimeMillis();
        DateTimeUtil.printRunTime(end, start);
    }
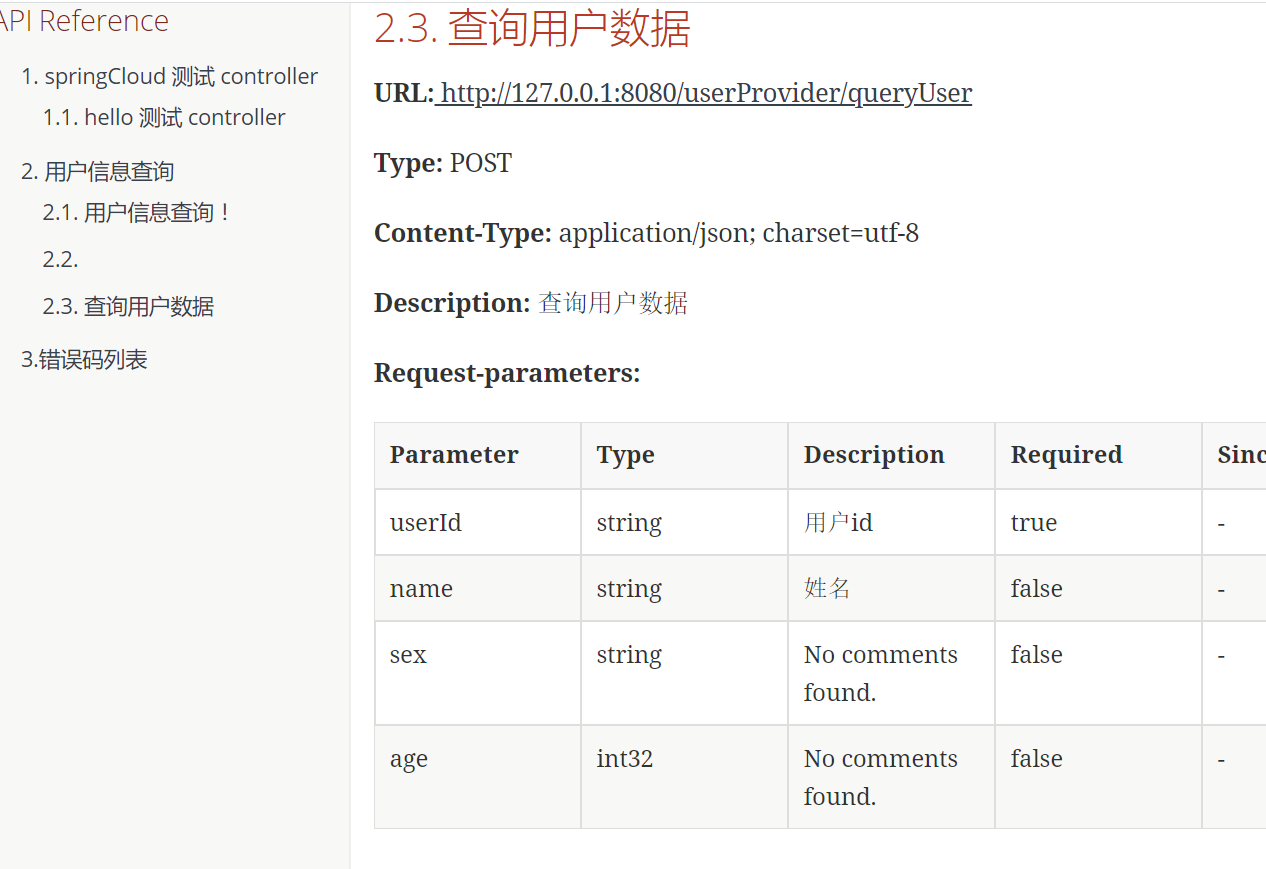
生成文档文件
总结:
如果 你 只想 生成 api 文档功能的 话 推荐使用 smart - doc ,更方便 无入侵! 如果你不仅想生成文档,还想使用 测试接口 功能,那就 用swagger 吧!
PS 一般 文档不是要是 word格式嘛,那怎么办尼?用java代码生成word,那太麻烦了,而且不太好弄,这里有个小技巧,那就是 生成html格式 文档,然后打开 html文件 全选,复制,新建一个word文档,然后把刚刚拷贝的内容粘贴进去,这样 word格式的 api 文档就搞定了!格式基本上没有什么问题,而且目录文档清晰,本人亲测,只是在复制的过程中 可能表格格式会有点问题,不能正常全部显示,解决办法请移步 :https://www.cnblogs.com/geekswg/#/cnblog/works/article/13041255
本文来自博客园,作者:独行侠X,转载请注明原文链接:https://www.cnblogs.com/geekswg/p/13053205.html


 浙公网安备 33010602011771号