

keras函数式模型举例
一、多输入和多输出模型
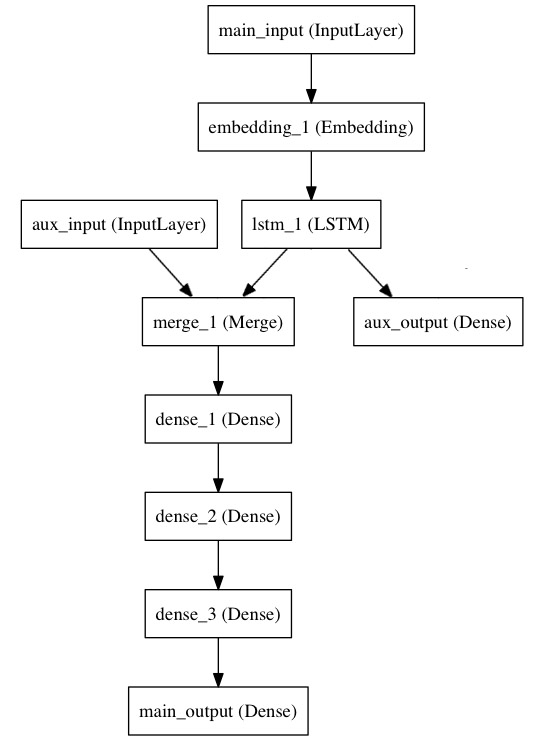
考虑这样一个模型。我们希望预测Twitter上一条新闻会被转发和点赞多少次。模型的主要输入是新闻本身,也就是一个词语的序列。但我们还可以拥有额外的输入,如新闻发布的日期等。这个模型的损失函数将由两部分组成,辅助的损失函数评估仅仅基于新闻本身做出预测的情况,主损失函数评估基于新闻和额外信息的预测的情况,即使来自主损失函数的梯度发生弥散,来自辅助损失函数的信息也能够训练Embeddding和LSTM层。在模型中早点使用主要的损失函数是对于深度网络的一个良好的正则方法。
主要的输入接收新闻本身,即一个整数的序列(每个整数编码了一个词)。这些整数位于1到10,000之间(即我们的字典有10,000个词)。这个序列有100个单词
from keras.layers import Input, Embedding, LSTM, Dense
from keras.models import Model
from keras.utils import plot_model

# Headline input: meant to receive sequences of 100 integers, between 1 and 10000.
# Note that we can name any layer by passing it a "name" argument.
main_input = Input(shape=(100,), dtype='int32', name='main_input')

# This embedding layer will encode the input sequence
# into a sequence of dense 512-dimensional vectors.
x = Embedding(output_dim=512, input_dim=10000, input_length=100)(main_input)

# A LSTM will transform the vector sequence into a single vector,
# containing information about the entire sequence
lstm_out = LSTM(32)(x)
#然后,我们插入一个额外的损失,使得即使在主损失很高的情况下,LSTM和Embedding层也可以平滑的训练。
auxiliary_output = Dense(1, activation='sigmoid', name='aux_output')(lstm_out)
#再然后,我们将LSTM与额外的输入数据串联起来组成输入,送入模型中:
auxiliary_input = Input(shape=(5,), name='aux_input')
x = keras.layers.concatenate([lstm_out, auxiliary_input])

# We stack a deep densely-connected network on top
x = Dense(64, activation='relu')(x)
x = Dense(64, activation='relu')(x)
x = Dense(64, activation='relu')(x)

# And finally we add the main logistic regression layer
main_output = Dense(1, activation='sigmoid', name='main_output')(x)

#最后,我们定义整个2输入,2输出的模型:
model = Model(inputs=[main_input, auxiliary_input], outputs=[main_output, auxiliary_output])
#模型定义完毕,下一步编译模型。我们给额外的损失赋0.2的权重。我们可以通过关键字参数loss_weights或loss来为不同的输出设置不同的损失函数或权值。这两个参数均可为Python的列表或字典。这里我们给loss传递单个损失函数,这个损失函数会被应用于所有输出上。
model.compile(optimizer='rmsprop', loss='binary_crossentropy',
              loss_weights=[1., 0.2])

#编译完成后,我们通过传递训练数据和目标值训练该模型:
model.fit([headline_data, additional_data], [labels, labels],
          epochs=50, batch_size=32)

因为我们输入和输出是被命名过的(在定义时传递了“name”参数),我们也可以用下面的方式编译和训练模型:
model.compile(optimizer='rmsprop',
              loss={'main_output': 'binary_crossentropy', 'aux_output': 'binary_crossentropy'},
              loss_weights={'main_output': 1., 'aux_output': 0.2})

# And trained it via:
model.fit({'main_input': headline_data, 'aux_input': additional_data},
          {'main_output': labels, 'aux_output': labels},
          epochs=50, batch_size=32)

# 打印网络结构
model.summary()
# 产生网络拓补图
plot_model(model,to_file='multilayer_perceptron_graph.png')
参考链接:https://keras-cn.readthedocs.io/en/latest/getting_started/functional_API/

 浙公网安备 33010602011771号