前端学习-基础部分-css(一)
开始今日份整理
1.CSS的导入方式
CSS的导入方式主要是有内联模式,行内模式,外部样式表
1.1 内联模式
内联模式:直接在<head>中直接写css,例如
p{
        color:rgb(166, 226, 226);
    }
#设置P标签的颜色
1.2 行内模式
行内模式:在html中对应元素直接书写
<p style="color:cadetblue">第一段 世界大势,合久必分,分久必合</p>
1.3 外部样式表
外部样式表,主要是有俩种,一种为链接式,一种为外联样式表
<link rel="stylesheet" href="index.css">
<!-- CSS2.1的样式 -->
@import.url()
俩者的区别如下
- 一个是全部导入后,才开始编译,包括css,<link>方式
- 一个是先导入html进行编译,然后在将css文件加载到网页中 <@import>方式
2.CSS选择器
css的选择器主要分基本选择器以及高级选择器
2.1 基本选择器
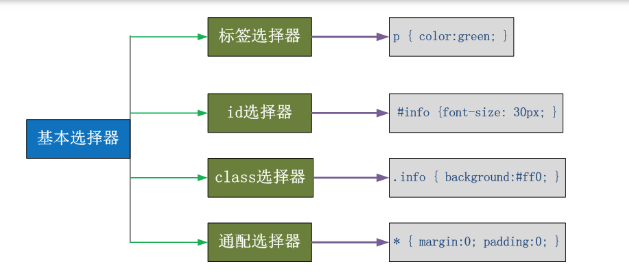
- 通用元素选择器 *: 匹配任意元素,一般用于清楚网页的默认样式
- 标签选择器:匹配所有指定标签的样式,不管样式有多深,都可以匹配,选中既所有,并不是单一的一个
- id选择器:根据指定的id匹配标签 ,id在网页中全局唯一,一般留给后面js中调用,获取到标签
- class类选择器:根据指定的class匹配标签
注:一定要有公共类的概念,不要试图用一个类完整一个网页,尽量把类拆分出来,每个类尽量的小,让更多的标签去使用,同一个标签可以携带多个类,类与类之间用空格隔开即可。
基本应用


<!DOCTYPE html>
<html lang="en">
<head>
    <meta charset="UTF-8">
    <title>基础选择器</title>
    <style>
        /*标签选择器*/
        body{
            background: #b6bbb2;
        }
        div{
            background: #747F8C;
            color: red;
        }
        /*id选择器*/
        #h1{
            color: #501c56;
        }
        /*class选择器*/
        .c1{
            background: #2d4ca2;
            color: #41db50;
        }
    </style>
</head>
<body>
<h1 id="h1">id</h1>
<div>
    <p>内容1</p>
</div>
<span class="c1">class1</span>
<div>
    <p>内容2</p>
</div>
<span class="c1">class1</span>
<span class="c1">class1</span>
</body>
</html>
2.2 高级选择器
2.2.1 后代选择器
后代选择器:外层的选择器写在前面,内层的选择器写在后面,之间用空格分隔,标签嵌套时,内层的标签成为外层的标签的后代,eg:
div p{
            background-color: rgb(33, 140, 228);
        }
        /* 意思就是div标签内的P标签的样式 */
注:这个在正常的前端学习中频繁使用。
2.2.2 儿子选择器
儿子选择器,通过’>’连接在一起的,仅用于子元素,eg:
div>p{
            color:red;
        }
        /* 意思就是div的子标签p的颜色为红色 */
2.2.3 并集选择器与交集选择器
并集选择器:多个连接器,通过逗号连接而成,同时声明多个分格相同的样式
eg:
<!DOCTYPE html>
<html lang="en">
<head>
    <meta charset="UTF-8">
    <title>组合选择器</title>
    <style>
        #i1, #i2, #i3{
            background: #2d4ca2;
            color: #41db50;
        }
    </style>
</head>
<body>
<div id="i1">第一行</div>
<div id="i2">第二行</div>
<div id="i3">第三行</div>
</body>
</html>

交集选择器:由俩个选择器连接而成,第一个必须为标签选择器,第二个为类选择器或者是ID选择器
2.2.5 属性选择器
除了HTML元素的id,classy也可以使用特定的属性来选择元素
input[type='text']{ width:100px; height:200px; },对选择到的标签再通过属性再进行一次筛选,选择type属性等于text的input标签
eg:
<!DOCTYPE html>
<html lang="en">
<head>
    <meta charset="UTF-8">
    <title>属性选择器</title>
    <style>
        input[type="text"]{
            width:100px;
            height: 200px;
        }
    </style>
</head>
<body>
<input type="text">
<input type="password">
</body>
</html>
2.3 伪类
2.3.1伪类选择器
CSS伪类是用来给选择器添加一些特殊效果
a:link(没有接触过的链接),用于定义了链接的常规状态
a:hover(鼠标放在链接上的状态),用于产生视觉效果
a:visited(访问过的链接),用于阅读文章,能清楚的判断已经访问过的链接
a:active(在链接上按下鼠标时的状态),用于表现鼠标按下时的链接状态

a:link {color: #FF0000}     /* 未访问的链接 */
a:visited {color: #00FF00} /* 已访问的链接 */
a:hover {color: #FF00FF} /* 鼠标移动到链接上 */
a:active {color: #0000FF} /* 选定的链接 */ 格式: 标签:伪类名称{ css代码; }
<!DOCTYPE html>
<html lang="en">
<head>
    <meta charset="UTF-8">
    <title>hover示例</title>
    <style>
        body{
            margin: 0 auto;
        }
        a{
            text-decoration: none;
        }
        .pg-header{
            height: 38px;
            line-height: 38px;
            width: 100%;
            background-color: #5d48ff;
        }
        .w{
            width: 980px;
            margin: 0 auto;
        }
        .pg-header .log{
            color: #8c3d41;
        }
        .pg-header .menu{
            display: inline-block;
            padding: 0 10px;
            color: white;
        }
        /*当鼠标移动到标签上时以下CSS才生效*/
        .pg-header .menu:hover{
            background-color: #501c56;
        }
    </style>
</head>
<body>
<div class="pg-header">
    <div class="w">
        <a href="" class="logo">Logo</a>
        <a href="" class="menu">全部</a>
        <a href="" class="menu">42区段子</a>
        <a href="" class="menu">1024</a>
    </div>
</div>
</body>
</html>

hover实例
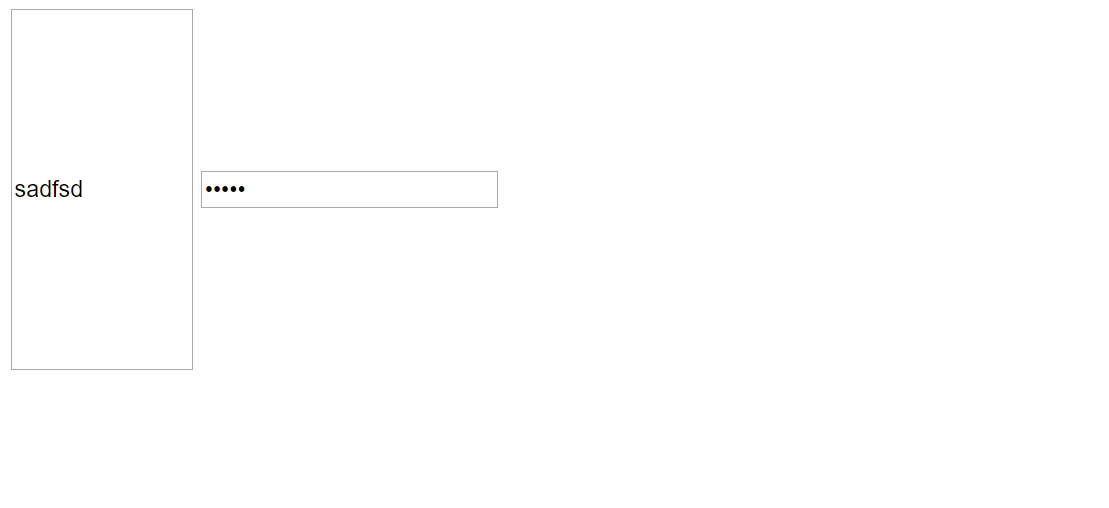
2.3.2 focus伪类
:focus input标签获取光标焦点
应用eg:
<!DOCTYPE html>
<html lang="en">
<head>
    <meta charset="UTF-8">
    <title>focus</title>
    <style>
        .container{
            width: 600px;
            height: 350px;
            margin: 0 auto;
            border: 1px solid red;
        }
        .form{
            margin-top: 135px;
            text-align: center;
        }
        input.text{
            margin-bottom: 10px;
        }
        input.text:focus{
            color: #8c3d41;
            background-color: grey;
        }
    </style>
</head>

<body>

<div class="container">
    <span>搜索框</span>
    <div class="form">
        <form action="">
            <input type="text" class="text">
            <br/>
            <input type="submit" value="搜索" class="submit">
        </form>
    </div>
</div>

</body>
</html>
2.3.3 before after伪类
- first-letter:文本首字母,特殊样式
- before:用于在元素的内容前面插入内容,在每个 <p> 元素的内容之前插入内容 p:before{content:"hello";color:red}
- after:在元素后面插入新内容,也用于清除浮动,在每个 <p> 元素的内容之后插入内容 p:after{ content:"hello";color:red}
2.4 CSS的继承以及优先级
2.4.1 选择器的优先级
选择器的优先级是按照选择器的权重来计算
选择器    权重
style=""  1000
 #id     100
class   10
p       1
#注意:权重计算永远不进位
补充:
- 在正常的权重在,也可以用import强制让样式生效,不过不推荐使用,权重会无限大
- 当权重一样大时,后来者居上
- 继承的权重与选中的权重相比,继承的权重为0
- 如果属性都是继承的,权重都是0,采用就近原则,谁的描述近就采用它的样式
2.4.2 选择器的继承性与层叠性
继承:给父级设置一些属性,子级继承了父级的该属性,这就是CSS中的继承,有些属性是可以继承的,只有color,font-*,text-*,line-*可以继承,像一些盒子元素,定位的元素(浮动,绝对定位,固定定位,border, margin, padding, background等)不能继承。
层叠:谁的权重大就会显示谁的样式。
3. CSS常用样式
3.1 通用样式
3.1.1 字体相关属性
text-align规定元素中的文本的水平对齐方式。
- left 把文本排列到左边。默认值:由浏览器决定。
- right 把文本排列到右边。
- center 把文本排列到中间,水平方向居中
- justify 实现两端对齐文本效果。
line-height: 标签高度 垂直方向根据标签高度居中
text-decoration:文字装饰

3.1.2 字体属性
color:字体颜色
颜色属性被用来设置文字的颜色:
- 十六进制值 - 如: #FF0000
- 一个RGB值 - 如: RGB(255,0,0)
- 颜色的名称 - 如: red
font-weight:字重属性

font-family:字体系列
font-family可以把多个字体名称作为一个“回退”系统来保存。如果浏览器不支持第一个字体,则会尝试下一个。浏览器会使用它可识别的第一个值。eg:
body { font-family: "Microsoft Yahei", "微软雅黑", "Arial", sans-serif }
font-size:字体大小,设置像素大小,即可设置字体的大小
3.1.3 背景属性
常用背景属性
在HTML中可以直接给body设置背景如下所示
<body background=图片文件名>
CSS中的背景设置如下:
1 background-color: cornflowerblue    ->  指定背景颜色
2 background-image: url('1.jpg');      ->  指定背景图片
3 background-repeat: no-repeat;(repeat:平铺满)   ->  指定背景重复方式(no-repeat;repeat-x;repeat-y)
4 background-position: right top(20px 20px);  -> 指定背景位置(横向:left center right 纵向:top center bottom )
3.1.4 其他常用属性
其他
- height 高度: 像素,百分比
- width 宽度: 像素,百分比
- text-align:ceter 水平方向居中
- text-indent 首行缩进
- text-decoration 装饰(去除a标签的下划线 text-decoration:none;)
3.2 边框属性
通过使用 CSS 边框属性,我们可以创建出效果出色的边框,并且可以应用于任何元素
边框设置:
- 宽度(border-width),样式(border-style),颜色(border-color) border: 4px dotted red;
- border-left,border-right,border-top,border-bottom
1 border-style: solid;
2 border-color: red;
3 border-width: 10px;
4 简写:border: 10px red solid;
常用边框样式:
- dotted: 定义一个点线边框
- dashed: 定义一个虚线边框
- solid: 定义实线边框
<!DOCTYPE html>
<html lang="en">
<head>
    <meta charset="UTF-8">
    <title>边框</title>
    <style>
        body{
            margin: 0 auto;
        }
        p{
            margin-left: 30px;
            width: 300px;
            height: 100px;
        }
        .c1{
            border: 3px solid red;
        }
        .c2{
            border-top: 3px dashed green;
            border-bottom: 3px dashed red;
            border-left: 3px dotted #804761;
            border-right: 3px dotted blue;
        }
    </style>
</head>
<body>
<p class="c1">这是一句话</p>
<br>
<p class="c2">最后一句话!</p>
</body>
</html>
效果如下
3.3 显示属性
显示属性:设置元素如何被显示
3.3.1 显示分类
(1)display分类
- display: none; -- 让标签消失(隐藏元素并脱离文档流)
- display: inline; -- 内联元素(内联表签)
- display: block; -- 块级元素(块级标签)
- display: inline-block; -- 既有inline的属性也有block属性
(2)块级元素和内联元素
block元素:
- block元素会独占一行,多个block元素会各自新起一行。默认情况下,block元素宽度自动填满其父元素宽度
- block元素可以设置width和height属性。块级元素即使设置了宽度,仍然是独占一行
- block元素也可以设置margin和padding属性
inline元素:
- inline元素不会独占一行,多个相邻的行内元素会排列在同一行里,直到一行排列不下,才会新换一行
- inline元素的宽度是自身内容的宽度(默认有多少占多少)
- inline元素设置width和height属性无效
- inline元素的margin和padding属性,水平方向的padding-left, padding-right, margin-left, margin-right都产生边距效果;但竖直方向的padding-top, padding-bottom, margin-top, margin-bottom不会产生边距效果。
inline-block元素:
简单来说就是将对象呈现为inline对象,但是对象的内容作为block对象呈现。之后的内联对象会被排列在同一行内。比如我们可以给一个link(a元素)设置inline-block属性,使其既具有block的可设置宽度和高度特性又具有inline的同行特性
3.3.2 块级标签与内联标签(块级元素和内联元素)
(1)块级标签与内联标签实例
<!DOCTYPE html>
<html lang="en">
<head>
    <meta charset="UTF-8">
    <title>块级标签和内联标签</title>
    <style>
        div, p, span{
            width: 100px;
            height: 100px;
        }
        div{
            background: red;
        }
        p{
            background: #747F8C;
        }
        span{
            background: #41db50;
        }
    </style>
</head>
<body>
<div>div(块级标签) </div>
<p>p(块级标签)</p>
<span>span(内联标签)</span>
</body>
</html>
(2)块级标签和内联标签通过display转换
<!DOCTYPE html>
<html lang="en">
<head>
    <meta charset="UTF-8">
    <title>块级标签和内联标签通过display转换</title>
    <style>
        .inline{
            background: red;
            display: inline;
        }
        .block{
            background: red;
            display: block;
        }
    </style>
</head>
<body>
    <!--将块级标签变成行内标签-->
    <div class="inline">div</div>
    <!--将行内标签变成块级标签-->
    <span class="block">span</span>
</body>
</html>

3.3.3 inline-block应用
display:inline-block可做列表布局,其中的类似于图片间的间隙小bug可以通过如下设置解决:
1 #outer{
2 border: 3px dashed;
3 word-spacing: -6px;
4 }
3.4 列表属性
ul,ol{
list-style: none; /*去掉样式*/
list-style: circle;
list-style: disc;
list-style: upper-alpha;
、、、
}
4.CSS补充内容
(1)overflow -> 隐藏溢出
overflow: hidden; //超过范围隐藏
overflow: auto; //超出加滚动条
overflow: scroll; //不管如何都带滚动条
(2)下划线
- 去掉下划线 :text-decoration: none ;
- 加上下划线: text-decoration: underline;
1 /*清除a标签的下划线*/
2 a{
3      text-decoration: none;
4 }
(3)居中显示
针对block元素居中:
- 指定block元素宽度
- 然后指定margin 0 auto
居中测试
<!DOCTYPE html>
<html lang="en">
<head>
    <meta charset="UTF-8">
    <title>居中显示</title>
    <style>
        *{
            margin: 0;
            padding: 0;
        }
        .content-box{
            width: 100%;
            height: 800px;      /*实际中可以不用设置*/
        }
        .content{
            margin: 0 auto;
            width: 800px;
            height: 800px;      /*实际中可以不用设置*/
            background-color: #747F8C;
        }
    </style>
</head>
<body>
<div class="content-box">
    <div class="content"></div>
</div>
</body>
</html>

居中显示
针对inline元素和inline-block元素居中:设置父元素的text-align属性为center
(4)隐藏的两个方法
- display:none; #隐藏了会顶上去
- visibility :hidden; #隐藏了不会顶上去
(5)透明度设置及层设置
opacity: 0.5; //设置透明度
z-index: 10; //设置层(只能作用于定位过的元素!)
(6)清除浏览器默认的margin和padding
*{
margin: 0;
padding: 0;
}
(7)内联标签position设置
如果内联标签position设置为absolute或relative,此时内联标签可以直接设置长和宽而不用再设置display为inline-block
补充:float属性,盒模型,position属性放在下一节单独整理。
https://www.cnblogs.com/gbq-dog/p/10629328.html
a

 浙公网安备 33010602011771号