calico集成详解
一、摘要
=======================================================================================
包括三项:
calico相关概念
calico和docker集成
calico和kubernetes集成
不包括:
calico集群穿透
二、概念简介
=======================================================================================
Calico是一个纯三层的协议,为OpenStack虚机和Docker容器提供多主机间通信。Calico不使用重叠网络比如flannel和libnetwork重叠网络驱动,
它是一个纯三层的方法,使用虚拟路由代替虚拟交换,每一台虚拟路由通过BGP协议传播可达信息(路由)到剩余数据中心。
通过将整个互联网的可扩展 IP 网络原则压缩到数据中心级别,Calico 在每一个计算节点利用Linux kernel实现了一个高效的vRouter来负责数据转发而每个vRouter通过BGP协议负责把自己上运行的 workload 的路由信息像整个 Calico 网络内传播 - 小规模部署可以直接互联,大规模下可通过指定的
BGP route reflector (摒弃所有节点互联的 mesh 模式,通过一个或者多个BGP Route Reflector来完成集中式的路由分发)来完成。
BGP用于在不同的自治系统(AS)之间交换路由信息。当两个AS需要交换路由信息时,每个AS都必须指定一个运行BGP的节点,来代表AS与其他的AS交换路由信息。这个节点可以是一个主机。但通常是路由器来执行BGP。两个AS中利用BGP交换信息的路由器也被称为边界网关(Border Gateway)或边界路由器(Border Router)
bgp相关介绍:
三、版本要求
=======================================================================================
Docker:>=1.9
Calicoctl:>=1.0(旧版本也可以用,api不同)
Kubernetes:>=1.1,
The kube-proxy must be started in iptables proxy mode. This is the default as of Kubernetes v1.2.0.
如果使用网络策略至少1.3(The Kubernetes NetworkPolicy API requires at least Kubernetes version v1.3.0 )
如果需要应用全部功能至少需要1.5
四、相关名词
=======================================================================================
Host Endpoint Resource (hostEndpoint)
A Host Endpoint resource (hostEndpoint) represents an interface attached to a host that is running Calico.
Each host endpoint may include a set of labels and list of profiles that Calico will use to apply policy to the interface. If no profiles or labels are applied, Calico will not apply any policy.
意思是说:一个主机终端是一个calico节点上的一个网络接口,这些主机终端可能包括一些标签或者轮廓来指定网路策略,如果没有的话,默认没有规则.
下面是创建资源的例子:
Sample YAML
apiVersion:v1
kind:hostEndpoint
metadata:
name:eth0
node:myhost
labels:
type:production
spec:
interfaceName:eth0
expectedIPs:
-192.168.0.1
-192.168.0.2
profiles:
-profile1
-profile2
IP Pool Resource (ipPool)
An IP pool resource (ipPool) represents a collection of IP addresses from which Calico expects endpoint IPs to be assigned.
意思是说:ip池代表了calico即将拿出来分配给终端的ip段
下面是例子:
Sample YAML
apiVersion:v1
kind:ipPool
metadata:
cidr:10.1.0.0/16
spec:
ipip:
enabled:true
mode:cross-subnet
nat-outgoing:true
disabled:false
Node Resource (node)
An Node resource (node) represents a node running Calico. When adding a host to a Calico cluster, a Node resource needs to be created which contains the configuration for the Calico Node instance running on the host.
When starting a Calico node instance, the name supplied to the instance should match the name configured in the Node resource.
By default, starting a calico/node instance will automatically create a node resource using the hostname of the compute host.
启动calico的机器就是一个node,
看例子:
Sample YAML
apiVersion:v1
kind:node
metadata:
name:node-hostname
spec:
bgp:
asNumber:64512
ipv4Address:10.244.0.1/24
ipv6Address:2001:db8:85a3::8a2e:370:7334/120
Policy Resource (policy)
A Policy resource (policy) represents an ordered set of rules which are applied to a collection of endpoints which match a label selector.
Policy resources can be used to define network connectivity rules between groups of Calico endpoints and host endpoints, and take precedence over Profile resources if any are defined.
翻译:策略中规定了对拥有不同的label的终端,执行不同的策略,优先级高于profile
看例子:
Sample YAML
This sample policy allows TCP traffic from frontend endpoints to port 6379 on database endpoints.
apiVersion:v1
kind:policy
metadata:
name:allow-tcp-6379
spec:
selector:role == 'database'
ingress:
-action:allow
protocol:tcp
source:
selector:role == 'frontend'
destination:
ports:
-6379
egress:
-action:allow
Profile Resource (profile)
A Profile resource (profile) represents a set of rules which are applied to the individual endpoints to which this profile has been assigned.
Each Calico endpoint or host endpoint can be assigned to zero or more profiles.
Also see the Policy resource which provides an alternate way to select what policy is applied to an endpoint.
翻译:profile与policy差不多,只不过只针对单独的终端,一个终端可以配置多个profile,policy中可以配置哪个终端应用哪个profile
看例子:
Sample YAML
The following sample profile allows all traffic from endpoints that have the profile label set to profile1 (i.e. endpoints that reference this profile), except that all traffic from 10.0.20.0/24 is denied.
apiVersion:v1
kind:profile
metadata:
name:profile1
labels:
profile:profile1
spec:
ingress:
-action:deny
source:
net:10.0.20.0/24
-action:allow
source:
selector:profile == 'profile1'
egress:
-action:allow
四、calico集成docker(security using calico profiles)
=======================================================================================
安装etcd(略)
部署calico
要想使用calico构建容器网络的话,docker daemon需要配置一个cluster store。由于calico使用的是etcd,在docker的/etc/sysconfig/docker配置文件的OPTIONS里面添加:
#根据实际情况替换<etcd_ip>和<etcd_port>
--cluster-store=etcd://10.1.8.9:2379使用calicoctl
calicoctl在1.0以后的版本,命令与之前有所改变。calicoctl
1.0之后calicoctl管理的都是资源(resource),之前版本的ip
pool,profile,
policy等都是资源。资源通过yaml或者json格式方式来定义,通过calicoctl
create 或者apply来创建和应用,通过calicoctl
get命令来查看。使用yaml或json来定义资源的格式为:
apiVersion: v1 kind: <type of resource> metadata:# Identifying information
name: <name of resource>...
spec:# Specification of the resource
...
a) 下载calico的命令管理工具calicoctl
下载calicoctl的操作如下:
sudo wget-O/usr/local/bin/calicoctl https://github.com/projectcalico/calicoctl/releases/download/v1.0.2/calicoctl
sudo chmod+x /usr/local/bin/calicoctl
由于/usr/local/bin在系统的PATH路径里面,所以之后就可以直接使用calicoctl命令了。
b) 配置calicoctl的datastore
calicoctl默认是会读取/etc/calico/calicoctl.cfg的配置文件(也可以通过–config选项来指定要读取的配置文件),配置里指定etcd集群的地址,文件的格式类似如下:
apiVersion: v1
kind: calicoApiConfig
metadata:
spec:
datastoreType:"etcdv2"
etcdEndpoints: "http://10.1.8.9:2379"c) 运行calico/node
使用如下命令运行:
#以在node1上运行为例
sudo calicoctl noderun--ip=10.1.4.57
实际上是运行一个calico的容器,作为插件启动,实际运行命令(已修改为仓库下载):
docker run --net=host --privileged --name=calico-node -d --restart=always \
-e NODENAME=sdw1 \
-e NO_DEFAULT_POOLS= \
-e CALICO_LIBNETWORK_IFPREFIX=cali \
-e IP6_AUTODETECTION_METHOD=first-found \
-e CALICO_LIBNETWORK_CREATE_PROFILES=true \
-e CALICO_LIBNETWORK_LABEL_ENDPOINTS=false \
-e IP=10.1.4.57 -e ETCD_ENDPOINTS=http://10.1.8.9:2379 \
-e CALICO_NETWORKING_BACKEND=bird \
-e CALICO_LIBNETWORK_ENABLED=true \
-e IP_AUTODETECTION_METHOD=first-found \
-v /var/log/calico:/var/log/calico \
-v /var/run/calico:/var/run/calico \
-v /lib/modules:/lib/modules \
-v /run/docker/plugins:/run/docker/plugins \
-v /var/run/docker.sock:/var/run/docker.sock 10.1.8.9:5000/calico
得到:

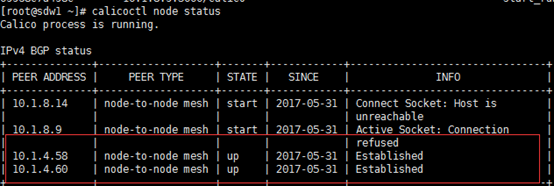
服务器上还没有calico/node镜像的话,会先进行下载。运行成功后,可以看到正在运行的名为calico-node的容器。通过下面命令查看节点状态信息:
sudo calicoctl node status
d) 使用calicoctl创建ipPool
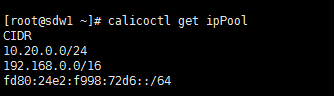
查看ip pool的命令为:
calicoctlgetipPool
创建完得到下图:
创建ip pool首先定义一个资源文件ipPool.yaml,如:
- apiVersion: v1
kind: ipPool metadata:cidr:10.20.0.0/24
spec: ipip:enabled:true
nat-outgoing:true
然后运行命令进行创建:
calicoctl create-fipPool.yaml
这样再通过calicoctl get ipPool命令查看,就会发现生成了一个10.20.0.0/24的ip pool。
连通性验证
在上面创建的ip pool(10.20.0.0/24)里创建子网络,如:
dockernetworkcreate--drivercalico--ipam-drivercalico-ipam--subnet10.20.0.0/24net1
dockernetworkcreate--drivercalico--ipam-drivercalico-ipam--subnet10.20.0.0/24net2
dockernetworkcreate--drivercalico--ipam-drivercalico-ipam--subnet10.20.0.0/24net3
上面创建了net1,net2和net3三个不同的网络。上面的命令在任意一个节点上执行即可。由于node1和node2使用的是同一套etcd,在两个节点上都可以通过docker network ls命令查看到生成的网络信息:
参考官网上的一个例子,在node1和node2上分别创建几个容器来测试下容器网络的连通性。
#node1
dockerrun--net net1 --name workload-A -tid busybox
dockerrun--net net2 --name workload-B -tid busybox
dockerrun--net net1 --name workload-C -tid busybox
#node2
dockerrun--net net3 --name workload-D -tid busybox
dockerrun--net net1 --name workload-E -tid busybox
可以在node1上使用如下命令来试验连通性:
#同一网络内的容器(即使不在同一节点主机上)可以使用容器名来访问
docker exec workload-Aping-c4workload-C.net1
docker exec workload-Aping-c4workload-E.net1
#不同网络内的容器需要使用容器ip来访问(使用容器名会报:bad address)
docker exec workload-Aping-c2`docker inspect --format"{{ .NetworkSettings.Networks.net2.IPAddress }}"workload-B`
同一网络内的容器是能相互通信的;不同网络内的容器相互是不通的。不同节点上属于同一网络的容器也是能相互通信的,这样就实现了容器的跨主机互连。
除此之外,官网还提供了两个个应用profile和policy来建立策略的案例,这里附上:
第一种:
先创建网络:
On any host in your Calico / Docker network, run the following commands:
docker network create --driver calico --ipam-driver calico-ipam database docker network create --driver calico --ipam-driver calico-ipam frontend创建profile:
cat << EOF | calicoctl apply -f -- apiVersion: v1 kind: profile metadata: name: database labels: role: database- apiVersion: v1 kind: profile metadata: name: frontend labels: role: frontendEOF创建策略,在策略中指定哪种终端应用哪种profile:
cat << EOF | calicoctl create -f -- apiVersion: v1 kind: policy metadata: name: database spec: order: 0 selector: role == 'database' ingress: - action: allow protocol: tcp source: selector: role == 'frontend' destination: ports: - 3306 - action: allow source: selector: role == 'database' egress: - action: allow destination: selector: role == 'database'- apiVersion: v1 kind: policy metadata: name: frontend spec: order: 0 selector: role == 'frontend' egress: - action: allow protocol: tcp destination: selector: role == 'database' ports: - 3306EOF第二种:(把他们写到一起)
cat << EOF | calicoctl create -f -- apiVersion: v1 kind: policy metadata: name: database spec: order: 0 selector: role == 'database' ingress: - action: allow protocol: tcp source: selector: role == 'frontend' destination: ports: - 3306 - action: allow source: selector: role == 'database' egress: - action: allow destination: selector: role == 'database'- apiVersion: v1 kind: policy metadata: name: frontend spec: order: 0 selector: role == 'frontend' egress: - action: allow protocol: tcp destination: selector: role == 'database' ports: - 3306EOF
六、calico集成k8s
=======================================================================================
使用calico需要kubernetes>=1.1。使用NetworkPolicy功能,kubernetes>=1.3.0
一键安装:
1、下载calico.yaml,地址为http://docs.projectcalico.org/v2.0/getting-started/kubernetes/installation/hosted/calico.yaml
2、修改calico.yaml文件中,etcd的地址
etcd_endpoints: "http://10.1.8.9:2379"
3、通过以下命令部署calico
kubectl apply -f calico.yaml
手工安装:
如果一键安装出现结果不正确,可以根据手工安装查看该有的文件等是否存在,如果正确了就跳过.
kubelet需要调用calico和calico-ipam插件
wget -N -P /opt/cni/bin https://github.com/projectcalico/calico-cni/releases/download/v1.4.3/calico
wget -N -P /opt/cni/bin https://github.com/projectcalico/calico-cni/releases/download/v1.4.3/calico-ipam
chmod +x /opt/cni/bin/calico /opt/cni/bin/calico-ipam
CalicoCNI插件需要标准的CNI配置文件,如下所示。只有当部署calico/kube-policy-controller时候才需要policy字段。
mkdir -p /etc/cni/net.d
cat >/etc/cni/net.d/10-calico.conf <5.安装标准CNI lo插件wget https://github.com/containernetworking/cni/releases/download/v0.3.0/cni-v0.3.0.tgz
tar -zxvf cni-v0.3.0.tgz
sudo cp loopback /opt/cni/bin/
配置kubeletkubelet启动的时候使用如下参数配置使用calico--network-plugin=cni--network-plugin-dir=/etc/cni/net.d
注意:
1 kube-apiserver和kubelet的启动脚本中添加--allow_privileged=true,如果不添加的话,下面在部署calico的时候,会以下错误:
The DaemonSet "calico-node" is invalid: spec.template.spec.containers[0].securityContext.privileged: Forbidden: disallowed by policy
2下载 https://github.com/containernetworking/cni/releases/download/v0.4.0/cni-v0.4.0.tgz,解压之后,将loopback拷贝到/opt/cni/bin目录下,如果不做这步的话,创建pod时会抛错,说找不到loopback。
3 报错:kubelet does not have ClusterDNS IP configured and cannot create Pod using "ClusterFirst" policy. Falling back to DNSDefault policy.
KUBE_ARGS="--cluster-dns=10.10.0.10 --cluster-domain=cluster.local"systemctl daemon-reload; systemctl restart kubelet
验证
部署redis,redis-rc.yaml如下:
apiVersion: v1

kind: ReplicationController

metadata:

  name: redis

spec:

  replicas: 2

  selector:

    name: redis

  template:

    metadata:

      labels:

        name: redis

    spec:

      containers:

        - name: redis

          image: redis

          ports:

            - containerPort: 22
redis-svc.yaml如下:
apiVersion: v1

kind: Service

metadata:

  name: redis

spec:

  selector:

    k8s-app: redis

  clusterIP: 10.1.66.66

  ports:

  - name: "1"

    port: 6379

    protocol: TCP
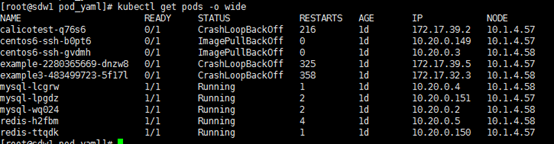
3、部署情况如下:
运行kubectl get pods –o wide
运行kubectl get svc –o wide

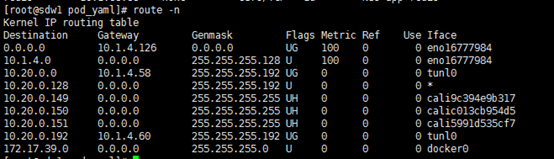
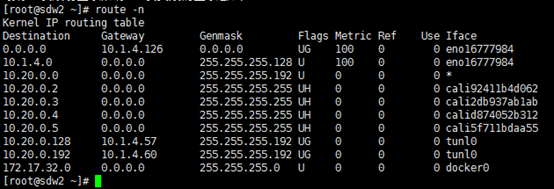
master主机上的路由:
[root@master redis]# route -n
slave1主机上的路由:
[root@slave1 bin]# route –n
slave2主机上的路由:
[root@slave2 bin]# route -n

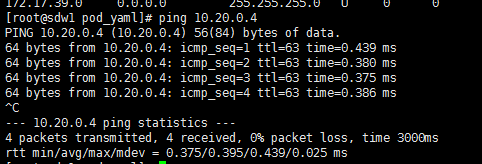
【验证网络连通性】
1、在master主机上ping mysql和redis的ip
[root@master redis]# ping 10.20.0.4
telnet:

还可以进入容器中进行验证等.
Using Calico with Kubernetes
官网给出一个简单的例子让kubernetes应用网络策略
配置命名空间
kubectl create ns policy-demo创建demo pods
1) Create some nginx pods in the policy-demo Namespace, and expose them through a Service.
# 运行pods
kubectl run --namespace=policy-demo nginx --replicas=2 --image=nginx
# 创建service
kubectl expose --namespace=policy-demo deployment nginx --port=80
2) 确保nginx可以访问
# 创建一个可以访问service的nginx pod. $ kubectl run --namespace=policy-demo access --rm -ti --image busybox /bin/shWaiting for pod policy-demo/access-472357175-y0m47 to be running, status is Pending, pod ready: false If you don't see a command prompt, try pressing enter. / # wget -q nginx -O -You should see a response from nginx. Great! Our Service is accessible. You can exit the Pod now.
启用独立配置
配置isolation选项,默认阻止命名空间内所有应用访问.
kubectl annotate ns policy-demo "net.beta.kubernetes.io/network-policy={\"ingress\":{\"isolation\":\"DefaultDeny\"}}"测试:
# Run a Pod and try to access the `nginx` Service. $ kubectl run --namespace=policy-demo access --rm -ti --image busybox /bin/shWaiting for pod policy-demo/access-472357175-y0m47 to be running, status is Pending, pod ready: false If you don't see a command prompt, try pressing enter. / # wget -q --timeout=5 nginx -O - wget: download timed out / #
利用网络策略打开网络连接
创建网络策略: access-nginx:
kubectl create -f - <<EOFkind: NetworkPolicyapiVersion: extensions/v1beta1metadata: name: access-nginx namespace: policy-demospec: podSelector: matchLabels: run: nginx ingress: - from: - podSelector: matchLabels: run: accessEOF允许流量从带有标签 run: access 的pod到 run: nginx.
测试带正确标签的可以访问:
# Run a Pod and try to access the `nginx` Service. $ kubectl run --namespace=policy-demo access --rm -ti --image busybox /bin/shWaiting for pod policy-demo/access-472357175-y0m47 to be running, status is Pending, pod ready: false If you don't see a command prompt, try pressing enter. / # wget -q --timeout=5 nginx -O -没有 run: access标签的不能访问:
# Run a Pod and try to access the `nginx` Service. $ kubectl run --namespace=policy-demo cant-access --rm -ti --image busybox /bin/shWaiting for pod policy-demo/cant-access-472357175-y0m47 to be running, status is Pending, pod ready: false If you don't see a command prompt, try pressing enter. / # wget -q --timeout=5 nginx -O - wget: download timed out / #You can clean up the demo by deleting the demo Namespace:
kubectl delete ns policy-demo
七、集群穿透(未验证)
=======================================================================================
顺便看一下官网给的相关说明
Example topology / multiple cluster IDs
When the topology includes a cluster of Route Reflectors, BGP uses the concept of a cluster ID to ensure there are no routing loops when distributing routes.
The Route Reflector image provided assumes that it has a fixed cluster ID for each Route Reflector rather than being configurable on a per peer basis. This simplifies the overall configuration of the network, but does place some limitations on the topology as described here.
当拓扑包含了多个反射路由时,BGP利用集群id来保证分配路由时不陷入循环路由.
反射路由镜像帮助每个反射路由提供固定的集群id而不是依赖单一平行原则进行配置,这简化了整个网络的配置,但也给拓扑带来了一些限制:
The topology is based on the Top of Rack model where you would have a set of redundant route reflectors peering with all of the servers in the rack.
- Each rack is assigned its own cluster ID (a unique number in IPv4 address format).
- Each node (server in the rack) peers with a redundant set of route reflectors specific to that set rack.
- All of the Route Reflectors across all racks form a full BGP mesh (this is handled automatically by the Calico BIRD Route Reflector image and does not require additional configuration).

For example, to set up the topology described above, you would:
- Spin up nodes N1 - N9
- Spin up Route Reflectors RR1 - RR6
- Add node specific peers, peering:
- N1, N2 and N3 with RR1 and RR2
- N4, N5 and N6 with RR3 and RR4
- N7, N8 and N9 with RR5 and RR6
- Add etcd config for the Route Reflectors:
- RR1 and RR2 both using the cluster ID 1.0.0.1
- RR2 and RR3 both using the cluster ID 1.0.0.2
- RR4 and RR5 both using the cluster ID 1.0.0.3
一个反射路由的例子(资料参考)
http://www.tuicool.com/articles/yMbmY3v
By default, Calico enable full node-to-node mesh, and each Calico node automatically sets up a BGP peering with every other Calico node in the network.
However, the full node-to-node mesh is only useful for small scale deployments and where all Calico nodes are on the same L2 network.
We can disable full node-to-node mesh by setup Route Reflector (or set of Route Reflectors), and each Calico node only peer with Route Reflector.
Environment
172.17.42.30 kube-master
172.17.42.31 kube-node1
172.17.42.32 kube-node2
172.17.42.40 node1
[root@kube-node1 ~]# calicoctl bgp node-mesh
on
[root@kube-node1 ~]# ip route show
default via 172.17.42.1 dev eth0
172.17.0.0/16 dev eth0 proto kernel scope link src 172.17.42.31
blackhole 192.168.0.0/26 proto bird
192.168.0.2 dev cali1f3c9fa633a scope link
192.168.0.64/26 via 172.17.42.32 dev eth0 proto bird
[root@kube-node2 ~]# ip route show
default via 172.17.42.1 dev eth0
172.17.0.0/16 dev eth0 proto kernel scope link src 172.17.42.32
192.168.0.0/26 via 172.17.42.31 dev eth0 proto bird
192.168.0.64 dev cali03adc9f233a scope link
blackhole 192.168.0.64/26 proto bird
192.168.0.65 dev calicb1a3b2633b scope link
Setup Route Reflector
[root@kube-node1 ~]# calicoctl bgp node-mesh off
[root@kube-node1 ~]# ip route show
default via 172.17.42.1 dev eth0
172.17.0.0/16 dev eth0 proto kernel scope link src 172.17.42.31
blackhole 192.168.0.0/26 proto bird
192.168.0.2 dev cali1f3c9fa633a scope link
[root@kube-node2 ~]# ip route show
default via 172.17.42.1 dev eth0
172.17.0.0/16 dev eth0 proto kernel scope link src 172.17.42.32
192.168.0.64 dev cali03adc9f233a scope link
blackhole 192.168.0.64/26 proto bird
192.168.0.65 dev calicb1a3b2633b scope link
Route entry 192.168.0.64/26 on kube-node1 is removed after disable full node-to-node BGP mesh.
- Run BIRD Route Reflector on node1
- Adding the Route Reflector into etcd
- Config every node peer with each of the Route Reflectors
# docker run --privileged --net=host -d -e IP=172.17.42.40 -e ETCD_AUTHORITY=172.17.42.30:2379 -v /var/log/:/var/log/ calico/routereflector:latest
# curl -L http://172.17.42.30:2379/v2/keys/calico/bgp/v1/rr_v4/172.17.42.40 -XPUT -d value="{\"ip\":\"172.17.42.40\",\"cluster_id\":\"1.0.0.1\"}"
[root@kube-node1 ~]# calicoctl bgp peer add 172.17.42.40 as 65100
[root@kube-node1 ~]# calicoctl bgp peer show
+----------------------+--------+
| Global IPv4 BGP Peer | AS Num |
+----------------------+--------+
| 172.17.42.40 | 65100 |
+----------------------+--------+
No global IPv6 BGP Peers defined.
Bird of Route Reflector will connect to every Calico node, and route entries will be automatically recreated.
[root@node1 ~]# netstat -tnp|grep 179
tcp 0 0 172.17.42.40:54395 172.17.42.31:179 ESTABLISHED 27782/bird
tcp 0 0 172.17.42.40:56733 172.17.42.30:179 ESTABLISHED 27782/bird
tcp 0 0 172.17.42.40:58889 172.17.42.32:179 ESTABLISHED 27782/bird
[root@kube-node1 ~]# ip route show
default via 172.17.42.1 dev eth0
172.17.0.0/16 dev eth0 proto kernel scope link src 172.17.42.31
blackhole 192.168.0.0/26 proto bird
192.168.0.2 dev cali1f3c9fa633a scope link
192.168.0.64/26 via 172.17.42.32 dev eth0 proto bird
[root@kube-master ~]# ip route show
default via 172.17.42.1 dev eth0
172.17.0.0/16 dev eth0 proto kernel scope link src 172.17.42.30
192.168.0.0/26 via 172.17.42.31 dev eth0 proto bird
192.168.0.64/26 via 172.17.42.32 dev eth0 proto bird
[root@kube-node2 ~]# ip route show
default via 172.17.42.1 dev eth0
172.17.0.0/16 dev eth0 proto kernel scope link src 172.17.42.32
192.168.0.0/26 via 172.17.42.31 dev eth0 proto bird
192.168.0.64 dev cali03adc9f233a scope link
blackhole 192.168.0.64/26 proto bird
192.168.0.65 dev calicb1a3b2633b scope link
For redundancy, multiple BGP route reflectors can be deployed seamlessly. The route reflectors are purely involved in the control of the network: no endpoint data passes through them.
- Bird config of Route Reflector
- Bird config of Calico node
[root@node1 ~]# docker exec 56854e7cb79a cat /config/bird.cfg
# Generated by confd
router id 172.17.42.40;
# Watch interface up/down events.
protocol device {
scan time 2; # Scan interfaces every 2 seconds
}
# Template for all BGP clients
template bgp bgp_template {
debug all;
description "Connection to BGP peer";
multihop;
import all; # Import all routes, since we don't know what the upstream
# topology is and therefore have to trust the ToR/RR.
export all; # Export all.
source address 172.17.42.40; # The local address we use for the TCP connection
graceful restart; # See comment in kernel section about graceful restart.
}
# ------------- RR-to-RR full mesh -------------
# For RR 172.17.42.40
# Skipping ourselves
# ------------- RR as a global peer -------------
# This RR is a global peer with *all* calico nodes.
# Peering with Calico node kube-master
protocol bgp Global_172_17_42_30 from bgp_template {
local as 65100;
neighbor 172.17.42.30 as 65100;
rr client;
rr cluster id 1.0.0.1;
}
# Peering with Calico node kube-node1
protocol bgp Global_172_17_42_31 from bgp_template {
local as 65100;
neighbor 172.17.42.31 as 65100;
rr client;
rr cluster id 1.0.0.1;
}
# Peering with Calico node kube-node2
protocol bgp Global_172_17_42_32 from bgp_template {
local as 65100;
neighbor 172.17.42.32 as 65100;
rr client;
rr cluster id 1.0.0.1;
}
# ------------- RR as a node-specific peer -------------
[root@kube-node1 ~]# docker exec e234b4e9dce7 cat /etc/calico/confd/config/bird.cfg
# Generated by confd
include"bird_aggr.cfg";
include"bird_ipam.cfg";
router id172.17.42.31;
# Configure synchronization between routing tables and kernel.
protocol kernel {learn;# Learn all alien routes from the kernel
persist;# Don't remove routes on bird shutdown
scan time2;# Scan kernel routing table every 2 seconds
importall;
exportfilter calico_ipip;# Default is export none
graceful restart;# Turn on graceful restart to reduce potential flaps in
# routes when reloading BIRD configuration. With a full
# automatic mesh, there is no way to prevent BGP from
# flapping since multiple nodes update their BGP
# configuration at the same time, GR is not guaranteed to
# work correctly in this scenario.
} # Watch interface up/down events.
protocol device { debug { states }; scan time2;# Scan interfaces every 2 seconds
} protocol direct { debug { states }; interface -"cali*","*";# Exclude cali* but include everything else.
} # Template for all BGP clients
template bgp bgp_template { debug { states }; description"Connection to BGP peer";
local as65100;
multihop;gateway recursive;# This should be the default, but just in case.
importall;# Import all routes, since we don't know what the upstream
# topology is and therefore have to trust the ToR/RR.
exportfilter calico_pools;# Only want to export routes for workloads.
next hop self;# Disable next hop processing and always advertise our
# local address as nexthop
source address172.17.42.31;# The local address we use for the TCP connection
add pathson;
graceful restart;# See comment in kernel section about graceful restart.
}# ------------- Global peers -------------
# For peer /global/peer_v4/172.17.42.40
protocol bgp Global_172_17_42_40frombgp_template {
neighbor172.17.42.40as65100;
}

 浙公网安备 33010602011771号