

ELK6.0环境搭建及配置
ELK环境搭建及配置
ElasticSearch在5.x后的安装和插件的官方执行更好了,head插件官方默认集成在kibana的dev tools里,支持rpm包方式安装,x-pack安装后支持权限及各种报表功能。
一、安装ES
1. 安装JAVA SDK
类似阿里云和aws一般默认的操作系统都自带了java环境,检查java安装环境使用java -version查看。
目前安装的ELK版本是5.6.4版本,需要java8以上(java有两个版本,sdk版本和外部版本,sdk版本是1.8.x)就满足要求了。
# yum install java-1.8.0-openjdk
2. 安装elasticsearch
下载地址: https://www.elastic.co/downloads/elasticsearch
下载对应的版本,下载后解压到想安装的文件夹中,因为es是绿色版本所以解压后就可以使用
./bin/elasticsearch其实是一个shell脚本,最终还是启动在java的虚拟机环境中,并加入了一定参数。
# rpm -ivh elasticsearch-5.6.4.rpm
# chkconfig --add elasticsearch
# chkconfig elasticsearch on
# vim etc/elasticsearch/elasticsearch.yml
# /etc/init.d/elasticsearch.rpmnew start
可执行文件目录:/usr/share/elasticsearch/
配置文件目录: /etc/elasticsearch/
日志文件目录:/var/log/elasticsearch/
data文件目录:/var/lib/elasticsearch/
pid文件路径:/var/run/elasticsearch/
日志文件:/var/log/elasticsearch/
3. 启动elasticsearch
守护进程 ./bin/elasticsearch -d
前台运行 ./bin/elasticsearch
配合elasticsearch-servicewrapper 插件将脚本服务化更易管理 (2.x加不再支持,弃用)
运行日志在../log/下,每一个索引一个文件,每日一个文件,包括运行的慢日志和服务日志。
4. 测试elasticsearch
curl -XGET http://xxx:9200/?pretty
5. 集群配置
discovery.zen.ping.unicast.hosts : ["17.16.0.1:9300", "172.16.2.1:9300"]
默认通信的TCP端口是9300,也可以自定义修改,如果集群连接失败可查看是否启动成功,并在elasticsearch/kibana的日志中查看具体原因并排查,配置定义在加入的新服务器里,使用_cat/nodes?v可查看节点信息。
6. 常用api
_cat/health?v 查看集群监控情况
_cat/nodes?v 集群节点情况
_cat/indices 索引情况
二、安装Kibana
下载页面:https://www.elastic.co/cn/downloads/kibana
安装rpm包,我的电脑是x64的所以下载64位的安装包,rpm包安装完毕后会自动在/etc/init.d/下生成执行脚本,提供给service/chkconfig,更方便我们使用
# wget https://artifacts.elastic.co/downloads/kibana/kibana-5.6.4-x86_64.rpm
# rpm -ivh kibana-5.6.4-x86_64.rpm
# vim /etc/kibana/kibana.yml
三、安装Beats
Beats与Logstash的主要区别是Beats是轻量级的数据采集器,Beats包含Filebeat(普通文件采集)、
Metricbeat(系统和服务指标收集)、Packetbeat(网络相关数据采集)、Winlogbeat(windows日志)、
Heartbeat(运行时间监控、ping检测)、Auditbeat 、Topbeat等。
1. 安装Heartbeat客户端
安装Heartbeat并将数据写入到ES中,并结合Kibana平台进行数据展示报表和检索功能
下载地址:https://www.elastic.co/downloads/beats/heartbeat
项目介绍:https://www.elastic.co/cn/products/beats/heartbeat
启动 /etc/init.d/heartbeat start
四、安装x-pack插件
官方下载地址:https://www.elastic.co/downloads/x-pack
官方文档地址:https://www.elastic.co/guide/en/x-pack/current/xpack-introduction.html
https://www.elastic.co/gu ide/en/x-pack/6.0/setting-up-authentication.html#set-built-in-user-passwords
1. elasticsearch安装x-pack插件
- 如果是集群架构,则每一台新机器都需要安装插件
- kibana安装了x-pack,elasticsearch也必须要安装
# /usr/share/elasticsea		rch/bin/elasticsearch-plugin install x-pack
# /usr/share/kibana/bin/kibana-plugin install x-pack
2. 编辑配置文件
# vim /etc/elasticsearch/x-pack/
3. 用户管理
# /usr/share/elasticsearch/bin/x-pack/users useradd test -p 123456 -r superuser
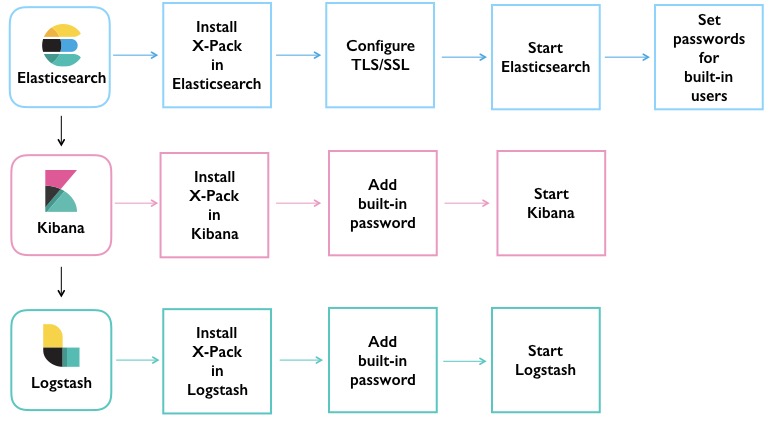
如果设置的密码不能登录,则可以创建内置用户,登录成功后再修改密码。
官方说明:https://www.elastic.co/guide/en/x-pack/current/security-getting-started.html
/usr/share/elasticsearch/bin/x-pack/users useradd test -p 123456 -r superuser
vim /etc/kibana/kibana.yml
x-pack有很多内置角色,具体可以看官方说明superuser是最高权限,详见:
https://www.elastic.co/guide/en/x-pack/current/built-in-roles.html
Kibana支持在elasticsearch、kibana、logstath都安装,但是各个支持的功能点不一样,设置也不太一样,
比如es的x-pack就不支持Graph,具体参考以下链接:
https://www.elastic.co/guide/en/elasticsearch/reference/6.0/settings-xpack.html
常见问题及注意
-
Elasticsearch is still initializing the Monitoring indices
解决:删除相关索引
-
transport.tcp.port自定义discovery集群发行端口 -
如果安装了x-pack,则集群每台机器都需要安装
-
如果shell执行则需要注意目录的每个文件的所属者都要是执行用户的,否则java会抛出AccessDenied错误


 浙公网安备 33010602011771号