CentOS7中使用yum安装nginx和php7.2的方法
c
1、安装源
安装php72w,是需要配置额外的yum源地址的,否则会报错不能找到相关软件包。
php高版本的yum源地址,有两部分,其中一部分是epel-release,另外一部分来自webtatic。如果跳过epel-release的话,安装webtatic的时候,会有错误爆出。
所以,这里需要的命令是:
rpm -Uvh https://dl.fedoraproject.org/pub/epel/7/x86_64/Packages/e/epel-release-7-11.noarch.rpm
rpm -Uvh https://mirror.webtatic.com/yum/el7/webtatic-release.rpm
当然,您也可以选择下面的这个命令,也是一样的效果。
yum install epel-release -y
rpm -Uvh https://mirror.webtatic.com/yum/el7/webtatic-release.rpm
2、清除历史版本
为了防止centos上面发生php冲突,所以,这个命令还是先执行一下更好些。
yum -y remove php*
3、安装扩展包
事实上,这里面的对应扩展库很多,这里大家一定要注意cli和fpm这两个包,而其它的相关包就看您需要了。
yum -y install php72w php72w-cli php72w-fpm php72w-common php72w-devel
还有比较豪华的版本:
yum -y install php72w php72w-cli php72w-fpm php72w-common php72w-devel php72w-embedded php72w-gd php72w-mbstring php72w-mysqlnd php72w-opcache php72w-pdo php72w-xml
4、安装完成以后,启动服务
systemctl enable php-fpm.service
systemctl start php-fpm.service
5、安装成功

nginx官方文档说明:http://nginx.org/en/linux_packages.html#RHEL-CentOS
一、安装前准备:
yum install yum-utils
1、由于 yum 源中没有我们想要的 nginx,那么我们就需要创建一个“/etc/yum.repos.d/nginx.repo”的文件,其实就是新增一个 yum 源。
[root@niaoyun~]# vim /etc/yum.repos.d/nginx.repo
2、然后将下面的内容复制进去:
[nginx]
name=nginx repo
baseurl=http://nginx.org/packages/centos/7/$basearch/
gpgcheck=0
enabled=1
三、安装Nginx
3、然后保存“/etc/yum.repos.d/nginx.repo”文件后,我们就使用 yum 命令查询一下我们的 nginx 的 yum 源配置好了没有。
[root@niaoyun~]# yum list |grep nginx
nginx.x86_64 1:1.10.1-1.el7.ngx nginx
nginx-debug.x86_64 1:1.8.0-1.el7.ngx nginx
nginx-debuginfo.x86_64 1:1.10.1-1.el7.ngx nginx
nginx-module-geoip.x86_64 1:1.10.1-1.el7.ngx nginx
nginx-module-image-filter.x86_64 1:1.10.1-1.el7.ngx nginx
nginx-module-njs.x86_64 1:1.10.1.0.0.20160414.1c50334fbea6-1.el7.ngx
nginx
nginx-module-perl.x86_64 1:1.10.1-1.el7.ngx nginx
nginx-module-xslt.x86_64 1:1.10.1-1.el7.ngx nginx
nginx-nr-agent.noarch 2.0.0-9.el7.ngx nginx
pcp-pmda-nginx.x86_64 3.10.6-2.el7 base
4、如果执行命令是这样的显示效果,那么我们的 nginx 的 yum 源就配置成功啦!
然后要安装我们的 nginx 就直接执行:
[root@niaoyun~]# yum -y install nginx
5、如果操作正确到这里 nginx 环境就已经安装 OK 了。
当然你还可以使用命令查一下究竟是否安装完成。
[root@niaoyun~]# rpm -q nginx
nginx-1.10.1-1.el7.ngx.x86_64
6、不解释,已经成功了,并且是 nginx 官方的最新版本
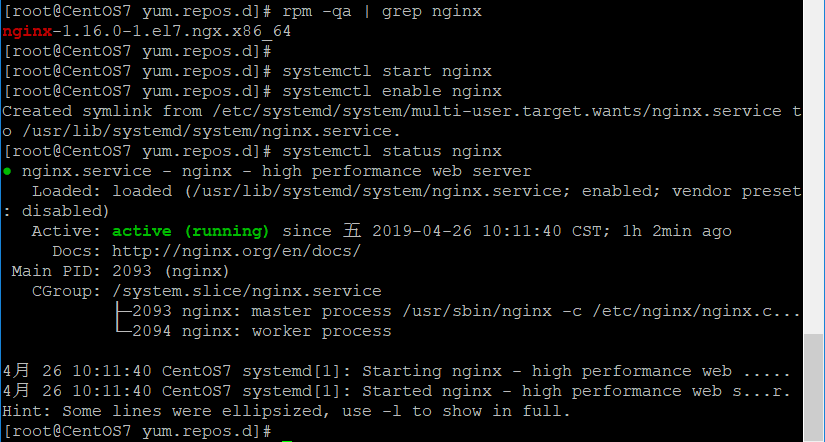
安装完后,rpm -qa | grep nginx 查看
启动nginx:systemctl start nginx
加入开机启动:systemctl enable nginx
查看nginx的状态:systemctl status nginx
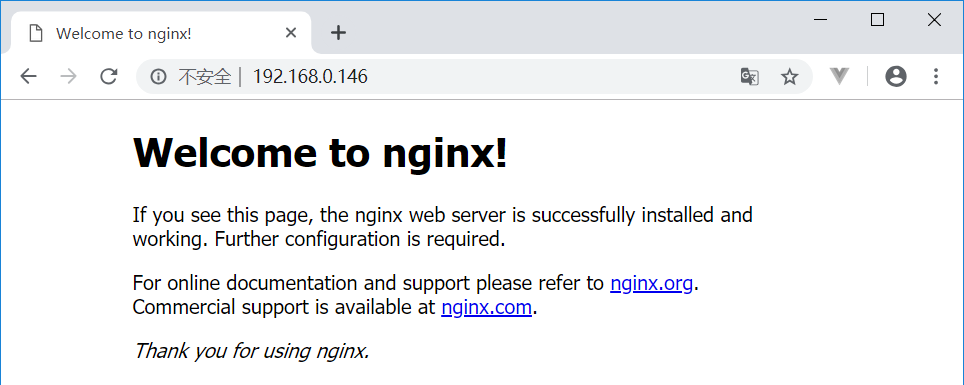
在浏览器输入自己服务器的IP地址即可访问到nginx,如下图所示,nginx服务的默认端口为80(这里需要注意防火墙的限制和端口冲突)。
用命令lsof -i:80,可查看80端口被那个进程占用。

nginx服务的默认配置文件在 vim /etc/nginx/conf.d/default.conf ,打开可看到,默认端口为80,项目部署目录为/usr/share/nginx/html/。
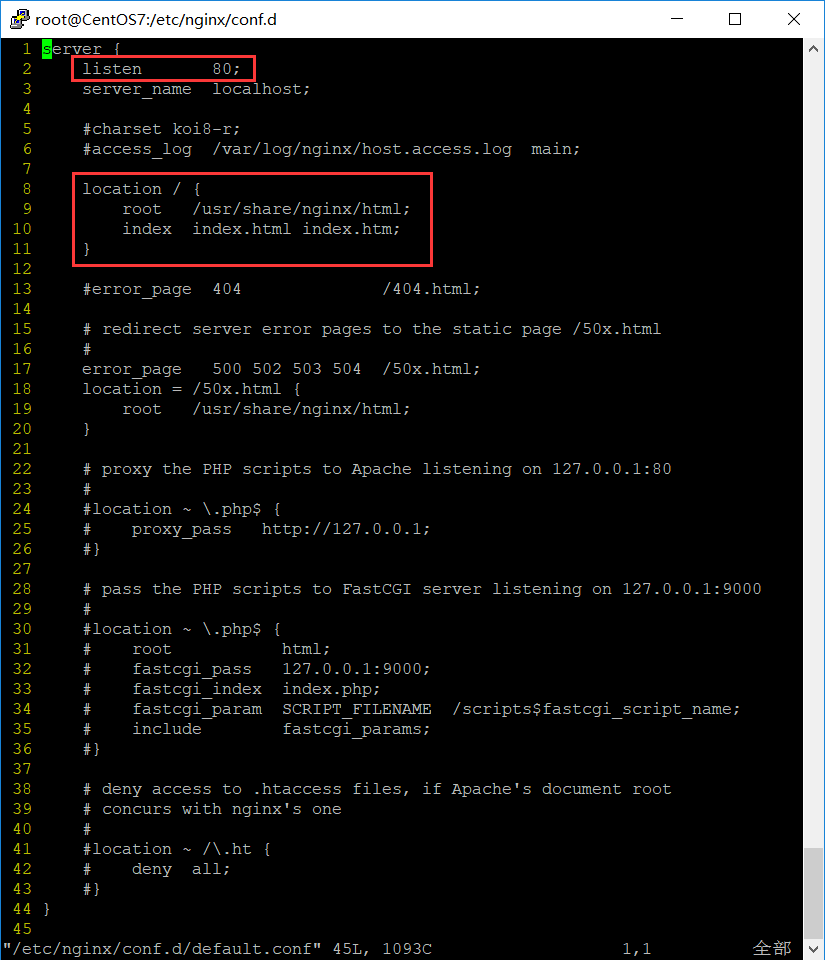
server {
    listen       80;
    server_name  localhost;
    #root   /var/www/html;
    root  /usr/share/nginx/html;
    index  index.html index.htm index.php;
    #charset koi8-r;
    #access_log  /var/log/nginx/host.access.log  main;

   error_page  404              /404.html;
    location = /404.html {
        return 404 'Sorry, File not Found!';
    }
    error_page  500 502 503 504  /50x.html;
    location = /50x.html {
        root   /usr/share/nginx/html; # windows用户替换这个目录
    }

    location / {
        try_files $uri @rewrite;
    }
    location @rewrite {
       # set $static 0;
       # if  ($uri ~ \.(css|js|jpg|jpeg|png|gif|ico|woff|eot|svg|css\.map|min\.map)$) {
        #    set $static 1;
       # }
       # if ($static = 0) {
        #    rewrite ^/(.*)$ /index.php?s=/$1;
       # }
        if (!-e $request_filename) {
         rewrite  ^(.*)$  /index.php?s=$1  last;
         break;
        }
    }
    location ~ /Uploads/.*\.php$ {
        deny all;
    }
    location ~ \.php/ {
       if ($request_uri ~ ^(.+\.php)(/.+?)($|\?)) { }
       fastcgi_pass 127.0.0.1:9000;
       include fastcgi_params;
       fastcgi_param SCRIPT_NAME     $1;
       fastcgi_param PATH_INFO       $2;
       fastcgi_param SCRIPT_FILENAME $document_root$1;
    }
    location ~ \.php$ {
        fastcgi_pass 127.0.0.1:9000;
        fastcgi_param SCRIPT_FILENAME $document_root$fastcgi_script_name;
        include fastcgi_params;
        #include fastcgi.conf;
    }
    location ~ /\.ht {
        deny  all;
    }
}

 浙公网安备 33010602011771号