
shiro权限管理
Apache Shiro 是java的一个安全框架。它能够帮助我们完成:认证、授权、加密、会话管理、与web集成、缓存等。使用Shiro的易于理解的API,您可以快速、轻松地获得任何应用程序,从最小的移动应用程序到最大的网络和企业应用程序。
首先我们看一下shiro的系统框架:
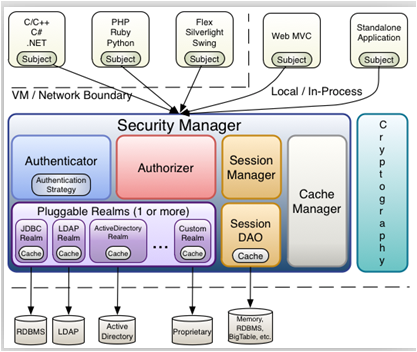
从上图可以看出,shiro框架包含了以下主题内容:

下面,我们就通过集成spring项目配置学习shiro
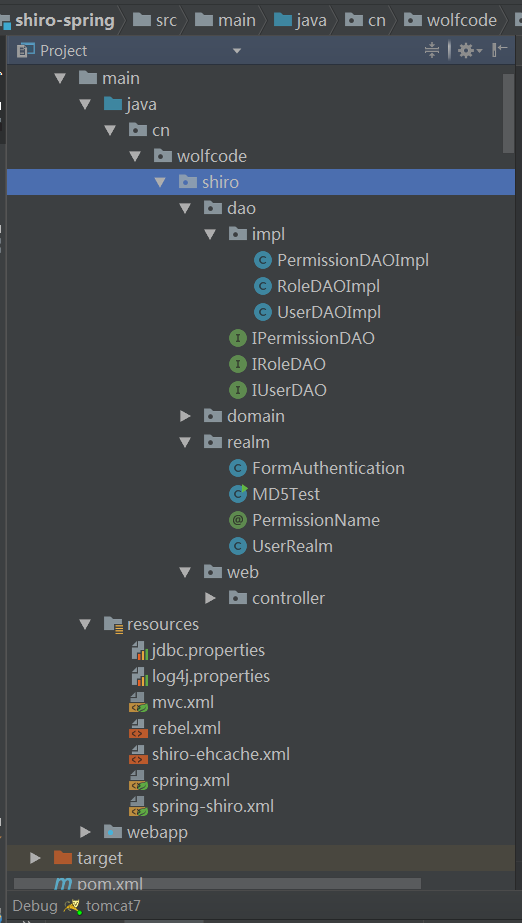
首先,我们要新建一个spring项目,我的项目框架完成时是这样的:
在pom.xml 中添加依赖:
<properties>
    <org.springframework.version>4.2.4.RELEASE</org.springframework.version>
  </properties>

  <dependencies>
    <dependency>
      <groupId>org.projectlombok</groupId>
      <artifactId>lombok</artifactId>
      <version>1.16.16</version>
    </dependency>


    <!--servlet-->
    <dependency>
      <groupId>javax.servlet</groupId>
      <artifactId>servlet-api</artifactId>
      <version>2.5</version>
      <scope>provided</scope>
    </dependency>

    <!--spring-->
    <dependency>
      <groupId>org.springframework</groupId>
      <artifactId>spring-core</artifactId>
      <version>${org.springframework.version}</version>
    </dependency>
    <dependency>
      <groupId>org.springframework</groupId>
      <artifactId>spring-context</artifactId>
      <version>${org.springframework.version}</version>
    </dependency>
    <dependency>
      <groupId>org.springframework</groupId>
      <artifactId>spring-context-support</artifactId>
      <version>${org.springframework.version}</version>
    </dependency>
    <dependency>
      <groupId>org.springframework</groupId>
      <artifactId>spring-expression</artifactId>
      <version>${org.springframework.version}</version>
    </dependency>

    <dependency>
      <groupId>org.springframework</groupId>
      <artifactId>spring-web</artifactId>
      <version>${org.springframework.version}</version>
    </dependency>
    <dependency>
      <groupId>org.springframework</groupId>
      <artifactId>spring-aop</artifactId>
      <version>${org.springframework.version}</version>
    </dependency>
    <dependency>
      <groupId>org.springframework</groupId>
      <artifactId>spring-webmvc</artifactId>
      <version>${org.springframework.version}</version>
    </dependency>
    <dependency>
      <groupId>org.springframework</groupId>
      <artifactId>spring-jdbc</artifactId>
      <version>${org.springframework.version}</version>
    </dependency>
    <dependency>
      <groupId>org.springframework</groupId>
      <artifactId>spring-tx</artifactId>
      <version>${org.springframework.version}</version>
    </dependency>

    <dependency>
      <groupId>mysql</groupId>
      <artifactId>mysql-connector-java</artifactId>
      <version>5.1.21</version>
    </dependency>

    <!-- druid -->
    <dependency>
      <groupId>com.alibaba</groupId>
      <artifactId>druid</artifactId>
      <version>1.0.14</version>
    </dependency>


    <!-- aspectj -->
    <dependency>
      <groupId>org.aspectj</groupId>
      <artifactId>aspectjrt</artifactId>
      <version>1.7.4</version>
    </dependency>

    <dependency>
      <groupId>org.aspectj</groupId>
      <artifactId>aspectjweaver</artifactId>
      <version>1.7.4</version>
    </dependency>

    <!-- cglib -->
    <dependency>
      <groupId>cglib</groupId>
      <artifactId>cglib</artifactId>
      <version>3.1</version>
    </dependency>

    <!--日志-->
    <dependency>
      <groupId>org.slf4j</groupId>
      <artifactId>slf4j-api</artifactId>
      <version>1.7.25</version>
    </dependency>

    <dependency>
      <groupId>org.slf4j</groupId>
      <artifactId>slf4j-log4j12</artifactId>
      <version>1.7.25</version>
    </dependency>
    <dependency>
      <groupId>log4j</groupId>
      <artifactId>log4j</artifactId>
      <version>1.2.17</version>
    </dependency>

    <!-- jstl -->
    <dependency>
      <groupId>jstl</groupId>
      <artifactId>jstl</artifactId>
      <version>1.2</version>
    </dependency>
    <!-- standard -->
    <dependency>
      <groupId>taglibs</groupId>
      <artifactId>standard</artifactId>
      <version>1.1.2</version>
    </dependency>


    <!--shiro-->
    <dependency>
      <groupId>commons-logging</groupId>
      <artifactId>commons-logging</artifactId>
      <version>1.1.3</version>
    </dependency>
    <dependency>
      <groupId>commons-collections</groupId>
      <artifactId>commons-collections</artifactId>
      <version>3.2.1</version>
    </dependency>

    <dependency>
      <groupId>org.apache.shiro</groupId>
      <artifactId>shiro-core</artifactId>
      <version>1.2.2</version>
    </dependency>

    <dependency>
      <groupId>org.apache.shiro</groupId>
      <artifactId>shiro-web</artifactId>
      <version>1.2.2</version>
    </dependency>
    <dependency>
      <groupId>net.sf.ehcache</groupId>
      <artifactId>ehcache-core</artifactId>
      <version>2.6.8</version>
    </dependency>
    <dependency>
      <groupId>org.apache.shiro</groupId>
      <artifactId>shiro-ehcache</artifactId>
      <version>1.2.2</version>
    </dependency>

    <dependency>
      <groupId>org.apache.shiro</groupId>
      <artifactId>shiro-quartz</artifactId>
      <version>1.2.2</version>
    </dependency>

    <dependency>
      <groupId>org.apache.shiro</groupId>
      <artifactId>shiro-spring</artifactId>
      <version>1.2.2</version>
    </dependency>

  </dependencies>
以上主要添加的依赖是:spring支持依赖、severlet支持依赖、durid支持依赖、aspectj支持依赖、cglib支持依赖、jstl支持依赖、日志依赖、shiro依赖。
在web.xml中配置过滤器:
<?xml version="1.0" encoding="UTF-8"?>
<web-app xmlns:xsi="http://www.w3.org/2001/XMLSchema-instance" xmlns="http://java.sun.com/xml/ns/javaee" xmlns:web="http://java.sun.com/xml/ns/javaee/web-app_2_5.xsd" xsi:schemaLocation="http://java.sun.com/xml/ns/javaee http://java.sun.com/xml/ns/javaee/web-app_3_0.xsd" id="WebApp_ID" version="3.0">
  <display-name>Archetype Created Web Application</display-name>

  <servlet>
    <servlet-name>SpringMVC</servlet-name>
    <servlet-class>org.springframework.web.servlet.DispatcherServlet</servlet-class>
    <init-param>
      <param-name>contextConfigLocation</param-name>
      <param-value>classpath:mvc.xml</param-value>
    </init-param>
    <load-on-startup>1</load-on-startup>
  </servlet>

  <servlet-mapping>
    <servlet-name>SpringMVC</servlet-name>
    <url-pattern>/</url-pattern>
  </servlet-mapping>

  <!--编码过滤器-->
  <filter>
    <filter-name>CharacterEncodingFilter</filter-name>
    <filter-class>org.springframework.web.filter.CharacterEncodingFilter</filter-class>
    <init-param>
      <param-name>encoding</param-name>
      <param-value>UTF-8</param-value>
    </init-param>
    <init-param>
      <param-name>forceEncoding</param-name>
      <param-value>true</param-value>
    </init-param>
  </filter>

  <filter-mapping>
    <filter-name>CharacterEncodingFilter</filter-name>
    <url-pattern>/*</url-pattern>
  </filter-mapping>


  <!--配置StrutsPrepareAndExecuteFilter之前-->
  <!-- shiro过虑器,DelegatingFilterProx会从spring容器中找shiroFilter -->
  <filter>
    <filter-name>shiroFilter</filter-name>
    <filter-class>org.springframework.web.filter.DelegatingFilterProxy</filter-class>
    <init-param>
      <param-name>targetFilterLifecycle</param-name>
      <param-value>true</param-value>
    </init-param>
  </filter>
  <filter-mapping>
    <filter-name>shiroFilter</filter-name>
    <url-pattern>/*</url-pattern>
  </filter-mapping>
</web-app>
web.xml中主要是配置springmvc,引入中央处理器DispatcherServlet,初始化时加载mvc.xml配置文件;还配置了编码过滤器,统一字符集;然后就是最重要的shiro过滤器了。mvc.xml配置文件如下:
<?xml version="1.0" encoding="UTF-8"?>
<beans xmlns="http://www.springframework.org/schema/beans"
    xmlns:xsi="http://www.w3.org/2001/XMLSchema-instance" xmlns:p="http://www.springframework.org/schema/p"
    xmlns:context="http://www.springframework.org/schema/context"
    xmlns:aop="http://www.springframework.org/schema/aop" xmlns:jee="http://www.springframework.org/schema/jee"
    xmlns:mvc="http://www.springframework.org/schema/mvc"
    xsi:schemaLocation="
            http://www.springframework.org/schema/beans http://www.springframework.org/schema/beans/spring-beans.xsd
            http://www.springframework.org/schema/context http://www.springframework.org/schema/context/spring-context.xsd
            http://www.springframework.org/schema/jee http://www.springframework.org/schema/jee/spring-jee.xsd
            http://www.springframework.org/schema/aop http://www.springframework.org/schema/aop/spring-aop.xsd
            http://www.springframework.org/schema/mvc http://www.springframework.org/schema/mvc/spring-mvc.xsd">

    <!--1:配置DI注解解析器-->
    <context:annotation-config/>
    <!--2:配置IoC注解解析器-->
    <context:component-scan base-package="cn.wolfcode.shiro"/>
    <!--3:配置mvc注解解析器-->
    <mvc:annotation-driven/>
    <!--4:静态资源处理-->
    <mvc:default-servlet-handler/>

    <!--5:配置视图解析器-->
    <bean class="org.springframework.web.servlet.view.InternalResourceViewResolver">
        <property name="prefix" value="/WEB-INF/views/"/>
        <property name="suffix" value=".jsp"/>
    </bean>
    <!--6:引入shiro配置文件-->
    <import resource="classpath:spring-shiro.xml"></import>
    <!--7:引入spring配置文件-->
    <import resource="classpath:spring.xml"></import>
</beans>
其中cn.wolfcode.shiro是shiro的扫描包,spring-shiro.xml配置文件如下:
<?xml version="1.0" encoding="UTF-8"?>
<beans xmlns="http://www.springframework.org/schema/beans"
       xmlns:xsi="http://www.w3.org/2001/XMLSchema-instance" xmlns:aop="http://www.springframework.org/schema/aop"
       xmlns:url="http://www.springframework.org/schema/util"
       xsi:schemaLocation="http://www.springframework.org/schema/beans http://www.springframework.org/schema/beans/spring-beans.xsd http://www.springframework.org/schema/aop http://www.springframework.org/schema/aop/spring-aop.xsd http://www.springframework.org/schema/util http://www.springframework.org/schema/util/spring-util.xsd">

    <!--配置自定义的realm值-->
    <bean id="userRealm" class="cn.wolfcode.shiro.realm.UserRealm">
        <!--密码需要加密,加密器-->
        <property name="credentialsMatcher" ref="credentialsMatcher" />
        <property name="userDAO" ref="userDAOImpl"></property>
        <property name="roleDAO" ref="roleDAOImpl"></property>
        <property name="permissionDAO" ref="permissionDAOImpl"></property>
    </bean>

    <!-- 配置安全管理器SecurityManager -->
    <bean id="securityManager" class="org.apache.shiro.web.mgt.DefaultWebSecurityManager">
        <property name="realm" ref="userRealm"/>
        <property name="cacheManager" ref="cacheManager"></property>
    </bean>

    <!--自定义Filter-->
    <bean id="myFormAuthenticationFilter" class="cn.wolfcode.shiro.realm.FormAuthentication"/>

    <!--注意:名字必须要和web.xml中配置的名字一致-->
    <!-- 定义ShiroFilter -->
    <bean id="shiroFilter" class="org.apache.shiro.spring.web.ShiroFilterFactoryBean">
        <property name="securityManager" ref="securityManager"/>
        <property name="loginUrl" value="/login"/>
        <property name="unauthorizedUrl" value="/nopermission.jsp"/>
        <property name="successUrl" value="/main"/>
        <property name="filters">
            <url:map>
                <entry key="authc" value-ref="myFormAuthenticationFilter"/>
            </url:map>
        </property>
        <property name="filterChainDefinitions">
            <value>
          <!--退出过滤器-->
                /logout=logout
                /**=authc
            </value>
        </property>
    </bean>

    <!--在总的applicationContext.xml中添加如下配置:-->
    <!-- 开启aop,对类代理 -->
    <aop:config proxy-target-class="true"></aop:config>
    <!-- 开启shiro注解支持 -->
    <bean class="org.apache.shiro.spring.security.interceptor.AuthorizationAttributeSourceAdvisor">
        <property name="securityManager" ref="securityManager" />
    </bean>
    <!--在需要控制的方法上贴上注解:@RequiresPermissions("employee:view")-->

    <!-- 定义需要特殊处理的异常,用类名或完全路径名作为key,异常页名作为值 -->
    <!--shiro权限异常处理-->
    <bean class="org.springframework.web.servlet.handler.SimpleMappingExceptionResolver">
        <property name="exceptionMappings">
            <props>
                <prop key="org.apache.shiro.authz.UnauthorizedException">redirect:/nopermission.jsp</prop>
            </props>
        </property>
    </bean>

    <!--如果导入的ehcache版本在2.5.0以上,需要配置如下.-->
    <!-- 缓存管理器开始 -->
    <bean id="cacheManager" class="org.apache.shiro.cache.ehcache.EhCacheManager">
        <property name="cacheManager" ref="ehCacheManager"/>
    </bean>
    <bean id="ehCacheManager" class ="org.springframework.cache.ehcache.EhCacheManagerFactoryBean">
        <property name="configLocation" value="classpath:shiro-ehcache.xml" />
        <property name="shared" value="true"></property>
    </bean>

    <!--加密器-->
    <bean id="credentialsMatcher" class="org.apache.shiro.authc.credential.HashedCredentialsMatcher">
        <!--加密算法-->
        <property name="hashAlgorithmName" value="md5" />
        <!--散列次数-->
        <property name="hashIterations" value="3" />
    </bean>

</beans>
这是shiro的核心配置,主要是注入自定义的realm(可以理解为是从数据库查出来的users包括用户名、密码、角色和权限),安全管理器SecurityManager ,自定义的filter(主要是让用户在登录成功之后跳转到/main页面,如果不设置,用户在登录之后就会跳到上一次访问的URL,如果我们是直接访问登录页面的话,shiro就会根据我们配置的successUrl去重定向,如果我们没有配置successUrl的话,那么shiro重定向默认的/,从而报404错误),shiroFilter(主要是配置登录页面,登录成功后的跳转页面,以及没有权限时跳转到nopermission.jsp页面),开启aop,对类代理,开启shiro注解支持,异常处理机制(当用户当前无访问权限的时候跳转到nopermission.jsp页面,而不是页面显示500),缓存管理机制(主要是用户登录之后不用再次进行认证授权操作,提高系统性能和效率)和加密器(shiro自身支持MD5和SHA加密算法,我这里配置的是md5,并且散列次数为3,相当于是加密了3次,还有加盐的操作,只是加盐不用在配置文件中提现,下面会讲到)。
spring.xml配置文件如下:
<?xml version="1.0" encoding="UTF-8"?>
<beans xmlns="http://www.springframework.org/schema/beans"
    xmlns:xsi="http://www.w3.org/2001/XMLSchema-instance" xmlns:p="http://www.springframework.org/schema/p"
    xmlns:context="http://www.springframework.org/schema/context"
    xmlns:aop="http://www.springframework.org/schema/aop" xmlns:jee="http://www.springframework.org/schema/jee"
    xmlns:mvc="http://www.springframework.org/schema/mvc"
    xsi:schemaLocation="
            http://www.springframework.org/schema/beans http://www.springframework.org/schema/beans/spring-beans.xsd
            http://www.springframework.org/schema/context http://www.springframework.org/schema/context/spring-context.xsd
            http://www.springframework.org/schema/jee http://www.springframework.org/schema/jee/spring-jee.xsd
            http://www.springframework.org/schema/aop http://www.springframework.org/schema/aop/spring-aop.xsd
            http://www.springframework.org/schema/mvc http://www.springframework.org/schema/mvc/spring-mvc.xsd">

    <!--1:引入数据源配置文件-->
    <context:property-placeholder location="classpath:jdbc.properties" system-properties-mode="NEVER"/>
    <!--2:配置数据源-->
    <bean id="dataSource" class="com.alibaba.druid.pool.DruidDataSource" init-method="init"
          destroy-method="close">
        <property name="driverClassName" value="${jdbc.driverClassName}"/>
        <property name="url" value="${jdbc.url}"/>
        <property name="username" value="${jdbc.username}"/>
        <property name="password" value="${jdbc.password}"/>

    </bean>


</beans>
主要是配置数据源,其中的jdbc.properties配置文件如下:
jdbc.driverClassName=com.mysql.jdbc.Driver
jdbc.url=jdbc:mysql:///shiro?createDatabaseIfNotExist=true&useUnicode=true&characterEncoding=UTF-8
jdbc.username=root
jdbc.password=root
log4j.properties配置文件如下:
# Global logging configuration
log4j.rootLogger=ERROR, stdout
# MyBatis logging configuration...
log4j.logger.cn.wolfcode.shiro=TRACE
# Console output...
log4j.appender.stdout=org.apache.log4j.ConsoleAppender
log4j.appender.stdout.layout=org.apache.log4j.PatternLayout
log4j.appender.stdout.layout.ConversionPattern=%5p [%t] - %m%n
shiro-ehcache.xml配置文件如下:
<?xml version="1.0" encoding="UTF-8"?>
<ehcache>
    <defaultCache
            maxElementsInMemory="1000"
            eternal="false"
            timeToIdleSeconds="120"
            timeToLiveSeconds="120"
            memoryStoreEvictionPolicy="LRU">
    </defaultCache>
</ehcache>
然后还有比较重要的就是UserRealm了,文件如下:
package cn.wolfcode.shiro.realm;

import cn.wolfcode.shiro.dao.IPermissionDAO;
import cn.wolfcode.shiro.dao.IRoleDAO;
import cn.wolfcode.shiro.dao.IUserDAO;
import cn.wolfcode.shiro.domain.User;
import lombok.Setter;
import org.apache.shiro.SecurityUtils;
import org.apache.shiro.authc.AuthenticationException;
import org.apache.shiro.authc.AuthenticationInfo;
import org.apache.shiro.authc.AuthenticationToken;
import org.apache.shiro.authc.SimpleAuthenticationInfo;
import org.apache.shiro.authz.AuthorizationInfo;
import org.apache.shiro.authz.SimpleAuthorizationInfo;
import org.apache.shiro.realm.AuthorizingRealm;
import org.apache.shiro.subject.PrincipalCollection;
import org.apache.shiro.util.ByteSource;

import java.util.ArrayList;
import java.util.List;

/**
 * Created with IntelliJ IDEA.
 * User: gaopeng
 * Date: 2018/11/9 0009
 * Time: 11:39
 * Description:
 */
public class UserRealm extends AuthorizingRealm{

    @Setter
    public IUserDAO userDAO;
    @Setter
    public IRoleDAO roleDAO;
    @Setter
    public IPermissionDAO permissionDAO;

    //获取realmName
    @Override
    public String getName(){
        return "userRealm";
    }

    //授权
    @Override
    protected AuthorizationInfo doGetAuthorizationInfo(PrincipalCollection principalCollection) {
        List<String> permission = new ArrayList<>();
        List<String> roles = new ArrayList<>();
        User user = (User) principalCollection.getPrimaryPrincipal();
        if ("admin".equals(user.getUsername())) {
            permission.add("*:*");
            roles = roleDAO.getAllRoleSn();
        }else {
            permission.addAll(permissionDAO.getPermissionResourceByUserId(user.getId()));
            roles = roleDAO.getRoleSnByUserId(user.getId());
        }
        SimpleAuthorizationInfo info = new SimpleAuthorizationInfo();
        info.addStringPermissions(permission);
        info.addRoles(roles);
        return info;
    }

    //认证
    @Override
    protected AuthenticationInfo doGetAuthenticationInfo(AuthenticationToken authenticationToken) throws AuthenticationException {
        //从token中获取登录的用户名,查询数据库返回的用户信息
        String userName = (String) authenticationToken.getPrincipal();
        User user = userDAO.getUserByUsername(userName);
        if (user == null) {
            return null;
        }
        SimpleAuthenticationInfo info = new SimpleAuthenticationInfo(user, user.getPassword(), ByteSource.Util.bytes(user.getUsername()), getName());
        return info;
    }

    //清除缓存
    public void clearCached() {
        //获取当前登录用户的凭证,然后清除
        PrincipalCollection principals = SecurityUtils.getSubject().getPrincipals();
        super.clearCache(principals);
    }
}
这里面有4个方法其中授权和认证是shiro用户登录的核心,其登陆登出流程如下图:
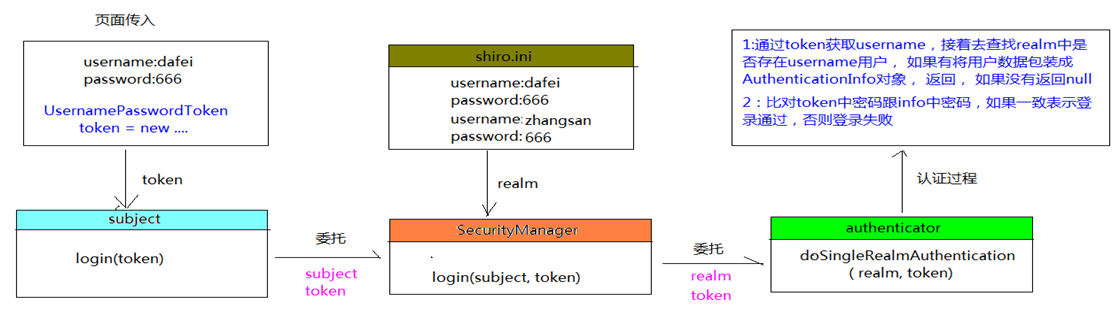
首先用户登录时从页面传来了登录的用户名和密码,通过token对象传到subject,subject调用login(token)方法将他自己和token作为参数委托SecurityManager进行登录认证授权,而SecurityManager的功能和DeparterSeverlet类似(相当于是一个中央管理器),将从数据库查询出来的所有用户名和密码及token传给认证器authenticator,认证器先是通过token(用户传过来的用户名和密码)获取username,接着查realm中是否存在这样的用户名,如果不存在就返回null,此时认证不通过,返回到SecurityManager后报UnknownAccountException错误,controller处理这种错误,页面跳转到登录页面,如果存在 username则将查询出来的用户名密码包装成AuthenticationInfo对象,对比token中的密码,如果一致,表示登录成功,否则登录失败,报IncorrectCredentialsException错误,controller处理这种错误,页面跳转到登录页面。
注意:这里的SimpleAuthenticationInfo info = new SimpleAuthenticationInfo(user, user.getPassword(), ByteSource.Util.bytes(user.getUsername()), getName());是把user.getUsername()作为盐进行密码加密的。
LoginController如下:
package cn.wolfcode.shiro.web.controller;


import org.apache.shiro.authc.IncorrectCredentialsException;
import org.apache.shiro.authc.UnknownAccountException;
import org.springframework.stereotype.Controller;
import org.springframework.ui.Model;
import org.springframework.web.bind.annotation.RequestMapping;

import javax.servlet.http.HttpServletRequest;

@Controller
public class LoginController {

    @RequestMapping("/login")
    public String login(Model model, HttpServletRequest req) throws  Exception{

        //如果登陆失败从request中获取认证异常信息,shiroLoginFailure就是shiro异常类的全限定名
        String exceptionClassName = (String) req.getAttribute("shiroLoginFailure");
        //根据shiro返回的异常类路径判断,抛出指定异常信息
        if(exceptionClassName!=null){
            if (UnknownAccountException.class.getName().equals(exceptionClassName)) {
                //最终会抛给异常处理器

                model.addAttribute("errorMsg", "账号不存在");
            } else if (IncorrectCredentialsException.class.getName().equals(
                    exceptionClassName)) {
                model.addAttribute("errorMsg", "用户名/密码错误");
            } else {
                //最终在异常处理器生成未知错误.
                model.addAttribute("errorMsg", "其他异常信息");
            }
        }
        //此方法不处理登陆成功(认证成功),shiro认证成功会自动跳转到上一个请求路径
        //登陆失败还到login页面
        return "forward:/login.jsp";
    }

}
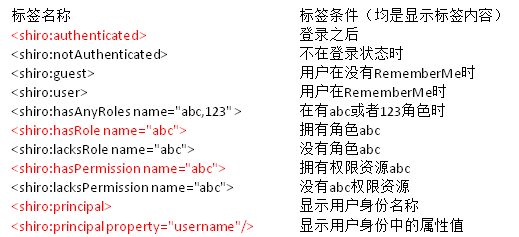
shiro在页面上展示时如果有权限限制,它本身是提供有shiro标签的,如下:
要进行权限的认证,我在数据库中创建了5张表,分别是user,user_role,role,role_permission,permission,其中的sql语句如下:
/*
SQLyog Professional v12.09 (64 bit)
MySQL - 5.5.28 : Database - shiro
*********************************************************************
*/


/*!40101 SET NAMES utf8 */;

/*!40101 SET SQL_MODE=''*/;

/*!40014 SET @OLD_UNIQUE_CHECKS=@@UNIQUE_CHECKS, UNIQUE_CHECKS=0 */;
/*!40014 SET @OLD_FOREIGN_KEY_CHECKS=@@FOREIGN_KEY_CHECKS, FOREIGN_KEY_CHECKS=0 */;
/*!40101 SET @OLD_SQL_MODE=@@SQL_MODE, SQL_MODE='NO_AUTO_VALUE_ON_ZERO' */;
/*!40111 SET @OLD_SQL_NOTES=@@SQL_NOTES, SQL_NOTES=0 */;
CREATE DATABASE /*!32312 IF NOT EXISTS*/`shiro` /*!40100 DEFAULT CHARACTER SET utf8 */;

USE `shiro`;

/*Table structure for table `permission` */

DROP TABLE IF EXISTS `permission`;

CREATE TABLE `permission` (
  `id` bigint(20) NOT NULL AUTO_INCREMENT,
  `name` varchar(255) DEFAULT NULL,
  `resource` varchar(255) DEFAULT NULL,
  PRIMARY KEY (`id`)
) ENGINE=InnoDB AUTO_INCREMENT=29 DEFAULT CHARSET=utf8;

/*Data for the table `permission` */

insert  into `permission`(`id`,`name`,`resource`) values (1,'员工保存','employee:save'),(2,'员工删除','employee:delete'),(3,'员工列表','employee:list'),(4,'员工编辑','employee:edit'),(5,'部门保存','department:save'),(6,'部门列表','department:list'),(7,'部门删除','department:delete'),(8,'部门编辑','department:edit');

/*Table structure for table `role` */

DROP TABLE IF EXISTS `role`;

CREATE TABLE `role` (
  `id` bigint(20) NOT NULL AUTO_INCREMENT,
  `name` varchar(255) CHARACTER SET utf8 DEFAULT NULL,
  `sn` varchar(255) CHARACTER SET utf8 DEFAULT NULL,
  PRIMARY KEY (`id`)
) ENGINE=InnoDB AUTO_INCREMENT=3 DEFAULT CHARSET=utf8 COLLATE=utf8_unicode_ci;

/*Data for the table `role` */

insert  into `role`(`id`,`name`,`sn`) values (1,'部门经理','deptMgr'),(2,'员工经理','empMgr');

/*Table structure for table `role_permission` */

DROP TABLE IF EXISTS `role_permission`;

CREATE TABLE `role_permission` (
  `role_id` bigint(20) NOT NULL,
  `permission_id` bigint(20) NOT NULL
) ENGINE=InnoDB DEFAULT CHARSET=utf8 COLLATE=utf8_unicode_ci;

/*Data for the table `role_permission` */

insert  into `role_permission`(`role_id`,`permission_id`) values (2,1),(2,2),(2,3),(2,4),(1,1),(1,2),(1,3),(1,4),(1,5),(1,6),(1,7),(1,8);

/*Table structure for table `user` */

DROP TABLE IF EXISTS `user`;

CREATE TABLE `user` (
  `id` bigint(20) NOT NULL AUTO_INCREMENT,
  `username` varchar(255) CHARACTER SET utf8 DEFAULT NULL,
  `password` varchar(255) CHARACTER SET utf8 DEFAULT NULL,
  PRIMARY KEY (`id`)
) ENGINE=InnoDB AUTO_INCREMENT=3 DEFAULT CHARSET=utf8 COLLATE=utf8_unicode_ci;

/*Data for the table `user` */

insert  into `user`(`id`,`username`,`password`) values (1,'admin','3fed7a346e430ea4c2aa10250928f4de'),(2,'zhangsan','cd757bae8bd31da92c6b14c235668091');

/*Table structure for table `user_role` */

DROP TABLE IF EXISTS `user_role`;

CREATE TABLE `user_role` (
  `user_id` bigint(20) NOT NULL,
  `role_id` bigint(20) NOT NULL
) ENGINE=InnoDB DEFAULT CHARSET=utf8 COLLATE=utf8_unicode_ci;

/*Data for the table `user_role` */

insert  into `user_role`(`user_id`,`role_id`) values (2,2);

/*!40101 SET SQL_MODE=@OLD_SQL_MODE */;
/*!40014 SET FOREIGN_KEY_CHECKS=@OLD_FOREIGN_KEY_CHECKS */;
/*!40014 SET UNIQUE_CHECKS=@OLD_UNIQUE_CHECKS */;
/*!40111 SET SQL_NOTES=@OLD_SQL_NOTES */;
其中user表中的账号信息是:zhangsan:666;admin:admin,这里是因为加密了,密码是看不出来的。
这些表的一些数据查询接口,我这里就不一一展示了,源码在下面:
https://download.csdn.net/download/weixin_38340967/10781371
我也是看了shiro视频学习后,总结的这篇文章,视频资源:https://ke.qq.com/course/289923,希望能对你有所帮助!谢谢!

 浙公网安备 33010602011771号