7.python常用模块
time模块
常用表示时间方式: 时间戳,格式化的时间字符串,元组(struct_time)
UTC(Coordinated Universal Time,世界协调时)亦即格林威治天文时间,世界标准时间。在中国为UTC+8。DST(Daylight Saving Time)即夏令时。
时间戳(timestamp)的方式:通常来说,时间戳表示的是从1970年1月1日00:00:00开始按秒计算的偏移量。
元组(struct_time)方式:struct_time元组共有9个元素,返回struct_time的函数主要有gmtime(),localtime(),strptime()。
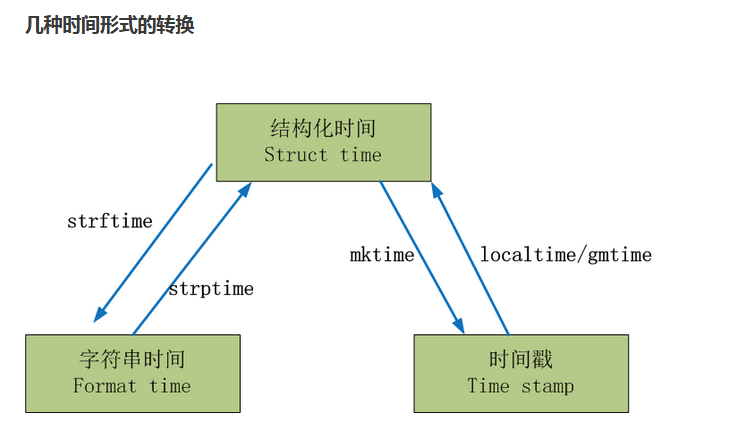
1. 时间戳转换成struct_time
>>> import time
>>> time.time()
1513821691.159022
>>> time.gmtime()     # 转换的是UTC时间
time.struct_time(tm_year=2017, tm_mon=12, tm_mday=21, tm_hour=2, tm_min=1, tm_sec=40, tm_wday=3, tm_yday=355, tm_isdst=0)
>>> x = time.localtime()       #转换的是本地时间(UTC+8)
>>> print(x)
time.struct_time(tm_year=2017, tm_mon=12, tm_mday=21, tm_hour=10, tm_min=1, tm_sec=49, tm_wday=3, tm_yday=355, tm_isdst=0)

tm_wday(0-6)   星期一是0,星期天是6
2. struct_time转换成时间戳
>>> time.mktime(x)        #x = time.localtime()
1513821709.0
3.struct_time转换成format_time
%a    本地(locale)简化星期名称
%A    本地完整星期名称
%b    本地简化月份名称
%B    本地完整月份名称
%c    本地相应的日期和时间表示
%d    一个月中的第几天(01 - 31)
%H    一天中的第几个小时(24小时制,00 - 23)
%I    第几个小时(12小时制,01 - 12)
%j    一年中的第几天(001 - 366)
%m    月份(01 - 12)
%M    分钟数(00 - 59)
%p    本地am或者pm的相应符    一
%S    秒(01 - 61)    二
%U    一年中的星期数。(00 - 53星期天是一个星期的开始。)第一个星期天之前的所有天数都放在第0周。
%w    一个星期中的第几天(0 - 6,0是星期天)    三
%W    和%U基本相同,不同的是%W以星期一为一个星期的开始。
%x    本地相应日期
%X    本地相应时间
%y    去掉世纪的年份(00 - 99)
%Y    完整的年份
%Z    时区的名字(如果不存在为空字符)
%%    ‘%’字符
>>> import time
>>> time.time()
1513822266.5659332
>>> x = time.localtime()
>>> print(x)
time.struct_time(tm_year=2017, tm_mon=12, tm_mday=21, tm_hour=10, tm_min=11, tm_sec=31, tm_wday=3, tm_yday=355, tm_isdst=0)
>>>
>>> time.strftime("%Y%m%d %H:%M:%S",x)
'20171221 10:11:31'
>>>

#语法:
#strftime(format,[tuple])
4 format_time转换成struct_time
>>> time.strftime("%Y%m%d %H:%M:%S",x)
'20171221 10:11:31'
>>>
>>>
>>> time.ct_time(tm_year=2017, tm_mon=12, tm_mday=21, tm_hour=10, tm_min=11, tm_sec=31, tm_wday=3, tm_yday=355, tm_isdst=-1)
用法:
strp('string',format
5.结构化时间转换成字符串时间

import time
x = time.localtime()
print(x)
print(time.asctime(x))

结果:
time.struct_time(tm_year=2017, tm_mon=12, tm_mday=21, tm_hour=10, tm_min=29, tm_sec=58, tm_wday=3, tm_yday=355, tm_isdst=0)

Thu Dec 21 10:29:58 2017
6.时间戳转换成字符串
>>> import time
>>> time.time()
1513823679.9577746
>>> print(time.ctime())
Thu Dec 21 10:34:50 2017
random模块
>>> import random
>>> random.random()    # 0~1 随机浮点数
0.6990063739837862
>>> random.randint(1,7)   #随机整数1~7
5
>>> random.randrange(1,7)   #随机整数,不包括7
4
>>> random.choice('hello world')   #获取一个随机元素
'l'
>>> random.choice(['1','2','3',])
'2'

>>> random.sample([1,2,3,4,5],3)
[1, 2, 4]
random.sample的函数原型为:random.sample(sequence, k),从指定
序列中随机获取指定长度的片
随机验证码
import random
def v_code():
    code = ""
    for i in range(4):
        num = random.randint(0,9)             #随机选择0~9
        A1Z1 = chr(random.randint(65,90))     #随机选择A~Z
        a1z1 = chr(random.randint(97,122))    #随机选择a~z
        add = random.choice([num,A1Z1,a1z1])  #随机选择其中一个
        code = "".join([code,str(add)])       #拼接一次选到的元素
    return code                               #返回验证码#
print(v_code())

结果:
5adc
OS模块
os.getcwd() #获取当前工作目录,即当前python脚本工作的目录路径

os.chdir()  #当前目录

os.chdir("dirname")  #改变当前脚本工作目录;相当于shell下cd    os.chdir(r"c:\Users")

os.curdir  #返回当前目录: ('.'),相当于shell下cd.

os.pardir # 获取当前目录的父目录字符串名:('..'),相当于shell下cd.. 返回上一层目录

os.makedirs('dirname1/dirname2')    #可生成多层递归目录      os.makedirs(r"c:\a\b\c")

os.removedirs('dirname1')    #若目录为空,则删除,并递归到上一级目录,如若也为空,则删除,依此类推      os.removedirs(r"c:\a\b\c")

os.mkdir('dirname')    #生成单级目录;相当于shell中mkdir dirname

os.rmdir('dirname')   # 删除单级空目录,若目录不为空则无法删除,报错;相当于shell中rmdir dirname

os.listdir('dirname')    #列出指定目录下的所有文件和子目录,包括隐藏文件,并以列表方式打印        os.listdir("c:\\test")

os.remove()  #删除一个文件                  os.remove(r"c:\oldboy.txt")

os.rename("oldname","newname")  #重命名文件/目录      os.rename("c:\\test","c:\\test2")

os.stat('path/filename') # 获取文件/目录信息          os.stat("c:\\test2")

os.sep    #输出操作系统特定的路径分隔符,win下为"\\",Linux下为"/"

os.linesep    #输出当前平台使用的行终止符,win下为"\r\n",Linux下为"\n"

os.pathsep    #输出用于分割文件路径的字符串

os.name    #输出字符串指示当前使用平台。win->'nt'; Linux->'posix'

os.system("bash command")  #运行shell命令,直接显示

os.environ  #获取系统环境变量

os.path.abspath(path)  #返回path规范化的绝对路径

os.path.split(path)  #将path分割成目录和文件名二元组返回

os.path.dirname(path)  #返回path的目录。其实就是os.path.split(path)的第一个元素

os.path.basename(path) # 返回path最后的文件名。如何path以/或\结尾,那么就会返回空值。即os.path.split(path)的第二个元素

os.path.exists(path)  #如果path存在,返回True;如果path不存在,返回False

os.path.isabs(path)  #如果path是绝对路径,返回True

os.path.isfile(path)  #如果path是一个存在的文件,返回True。否则返回False

os.path.isdir(path)  #如果path是一个存在的目录,则返回True。否则返回False

os.path.join(path1[, path2[, ...]])  #将多个路径组合后返回,第一个绝对路径之前的参数将被忽略

os.path.getatime(path)  #返回path所指向的文件或者目录的最后存取时间

os.path.getmtime(path)  #返回path所指向的文件或者目录的最后修改时间

os.path.getsize(path)  #返回path的大小
sys模块
sys.argv           命令行参数List,第一个元素是程序本身路径
sys.exit(n)        退出程序,正常退出时exit(0)
sys.version        获取Python解释程序的版本信息
sys.maxint         最大的Int值
sys.path           返回模块的搜索路径,初始化时使用PYTHONPATH环境变量的值
sys.platform       返回操作系统平台名称
shutil模块
高级的 文件、文件夹、压缩包 处理模块
shutil.copy(src, dst)
拷贝文件和权限
1 import shutil
2
3 shutil.copy('f1.log', 'f2.log')
shutil.copy2(src, dst)
拷贝文件和状态信息
shutil.copystat(src, dst)
仅拷贝状态的信息,包括:mode bits, atime, mtime, flags
shutil.copymode(src, dst)
仅拷贝权限。内容、组、用户均不变
shutil.copytree(src, dst, symlinks=False, ignore=None)
递归的去拷贝文件夹
shutil.rmtree(path[, ignore_errors[, onerror]])
递归的去删除文件
参考博客: http://www.cnblogs.com/linhaifeng/articles/6384466.html
Json和pickle模块
什么是序列化?
我们把对象(变量)从内存中变成可存储或传输的过程称之为序列化
为什么要序列化?
1:持久保存状态
需知一个软件/程序的执行就在处理一系列状态的变化,在编程语言中,'状态'会以各种各样有结构的数据类型(也可简单的理解为变量)的形式被保存在内存中。
内存是无法永久保存数据的,当程序运行了一段时间,我们断电或者重启程序,内存中关于这个程序的之前一段时间的数据(有结构)都被清空了。
在断电或重启程序之前将程序当前内存中所有的数据都保存下来(保存到文件中),以便于下次程序执行能够从文件中载入之前的数据,然后继续执行,这就是序列化。
具体的来说,你玩使命召唤闯到了第13关,你保存游戏状态,关机走人,下次再玩,还能从上次的位置开始继续闯关。或如,虚拟机状态的挂起等。
2:跨平台数据交互
序列化之后,不仅可以把序列化后的内容写入磁盘,还可以通过网络传输到别的机器上,如果收发的双方约定好实用一种序列化的格式,那么便打破了平台/语言差异化带来的限制,实现了跨平台数据交互。
反过来,把变量内容从序列化的对象重新读到内存里称之为反序列化,即unpickling。
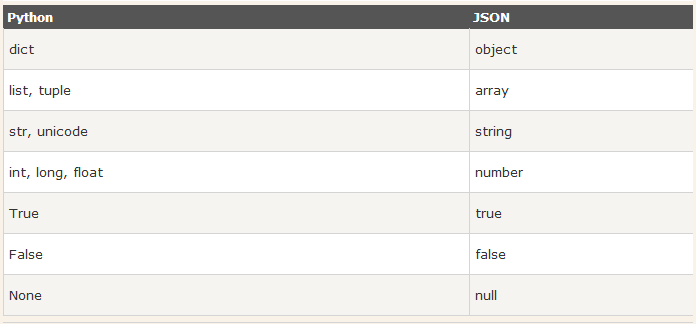
JSON和Python内置的数据类型对应如下:
1 import json
 2
 3 dic={'name':'alvin','age':23,'sex':'male'}
 4 print(type(dic))#<class 'dict'>
 5
 6 j=json.dumps(dic)
 7 print(type(j))#<class 'str'>
 8
 9
10 f=open('序列化对象','w')
11 f.write(j)  #-------------------等价于json.dump(dic,f)
12 f.close()
13 #-----------------------------反序列化<br>
14 import json
15 f=open('序列化对象')
16 data=json.loads(f.read())#  等价于data=json.load(f)


import json
#dct="{'1':111}"#json 不认单引号
#dct=str({"1":111})#报错,因为生成的数据还是单引号:{'one': 1}

dct='{"1":"111"}'
print(json.loads(dct))

#conclusion:
#        无论数据是怎样创建的,只要满足json格式,就可以json.loads出来,不一定非要dumps的数据才能loads
实例
import json

# 序列化
info = {'name':'derek','age':'22'}

with open('test','w') as f:
    f.write(json.dumps(info))

# 反序列化
with open('test','r') as f:
    info = json.loads(f.read())
    print(info)
pickle (它只能用于Python)
1 import pickle
 2
 3 dic={'name':'alvin','age':23,'sex':'male'}
 4
 5 print(type(dic))#<class 'dict'>
 6
 7 j=pickle.dumps(dic)
 8 print(type(j))#<class 'bytes'>
 9
10
11 f=open('序列化对象_pickle','wb')#注意是w是写入str,wb是写入bytes,j是'bytes'
12 f.write(j)  #-------------------等价于pickle.dump(dic,f)
13
14 f.close()
15 #-------------------------反序列化
16 import pickle
17 f=open('序列化对象_pickle','rb')
18
19 data=pickle.loads(f.read())#  等价于data=pickle.load(f)
20
21
22 print(data['age'])
总结:
Json模块提供了四个功能:dumps、dump、loads、load
pickle模块提供了四个功能:dumps、dump、loads、load
dump()函数接受一个文件句柄和一个数据对象作为参数,把数据对象以特定的格式保存 到给定的文件中。当我们使用load()函数从文件中取出已保存的对象时,pickle知道如何恢复这些对象到它们本来的格式。
dumps()函数执行和dump() 函数相同的序列化。取代接受流对象并将序列化后的数据保存到磁盘文件,这个函数简单的返回序列化的数据。
loads()函数执行和load() 函数一样的反序列化。取代接受一个流对象并去文件读取序列化后的数据,它接受包含序列化后的数据的str对象, 直接返回的对象。
configparser模块
用于生成和修改常见配置文档
配置文件
[default]
serveraliveinterval = 45
compression = yes
compressionlevel = 9

[bitbucket.org]
user = hg

[topsecret.server.com]
port = 50022
forwardx11 = no
用python生成这样的一个配置文档
import configparser

config = configparser.ConfigParser()
config['default'] = {'ServerAliveInterval':'45',
                     'Compression':'yes',
                     'CompressionLevel':'9'}

config['bitbucket.org'] = {}
config['bitbucket.org']['User'] = 'hg'


config['topsecret.server.com'] = {'port':'50022',
                                'Forwardx11':'no'}

with open('example.ini','w') as configfile:
    config.write(configfile)
读取
import configparser

config = configparser.ConfigParser()
print(config.read('example.ini'))

#查看所有的标题
print(config.sections())
#['default', 'bitbucket.org', 'topsecret.server.com']

#查看标题section1下所有key=value的key
options = config.options('default')
print(options)
#['serveraliveinterval', 'compression', 'compressionlevel']

#查看标题section1下所有key=value的(key,value)格式
items_list = config.items('topsecret.server.com')
print(items_list)
#[('port', '50022'), ('forwardx11', 'no')]
增删改查
import configparser

config = configparser.ConfigParser()
config.read('example.ini',encoding = 'utf-8')

#删除整个标题
config.remove_section('bitbucket.org')

#删除标题下的option
config.remove_option('topsecret.server.com','port')

#添加一个标题
config.add_section('info')
#在标题下添加options
config.set('info','name','derek')

#判断是否存在
print(config.has_section('info'))        #True
print(config.has_option('info','name'))    #True

#将修改的内容存入文件
config.write(open('new_example.ini','w'))
#修改后的文件

[default]
serveraliveinterval = 45
compression = yes
compressionlevel = 9

[topsecret.server.com]
forwardx11 = no

[info]
name = derek
hashlib模块
hash:一种算法 ,3.x里代替了md5模块和sha模块,主要提供 SHA1, SHA224, SHA256, SHA384, SHA512 ,MD5 算法
三个特点:
1.内容相同则hash运算结果相同,内容稍微改变则hash值则变
2.不可逆推
3.相同算法:无论校验多长的数据,得到的哈希值长度固定。
 1 import hashlib
 2
 3 m=hashlib.md5()# m=hashlib.sha256()
 4
 5 m.update('hello'.encode('utf8'))
 6 print(m.hexdigest())  #5d41402abc4b2a76b9719d911017c592
 7
 8 m.update('alvin'.encode('utf8'))
 9
10 print(m.hexdigest())  #92a7e713c30abbb0319fa07da2a5c4af
11
12 m2=hashlib.md5()
13 m2.update('helloalvin'.encode('utf8'))
14 print(m2.hexdigest()) #92a7e713c30abbb0319fa07da2a5c4af
15
16 '''
17 注意:把一段很长的数据update多次,与一次update这段长数据,得到的结果一样
18 但是update多次为校验大文件提供了可能。
re模块
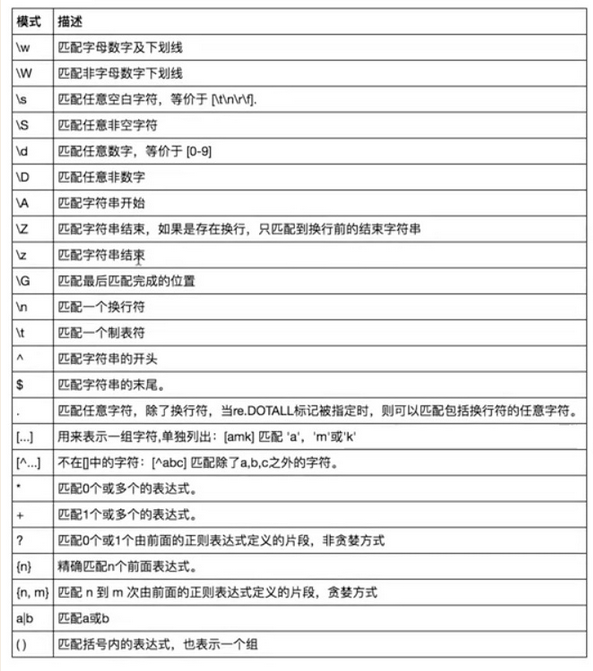
# 正则匹配
import re

# \w与\W 字母数字下划线
print(re.findall('\w', 'hello derek \n 123'))
print(re.findall('\W', 'hello derek \n 123'))
# ['h', 'e', 'l', 'l', 'o', 'd', 'e', 'r', 'e', 'k', '1', '2', '3']
# [' ', ' ', '\n', ' ']

# \s与\S  匹配任意空白字符
print(re.findall('\s', 'hello  egon  123'))  # [' ', ' ', ' ', ' ']
print(re.findall('\S', 'hello  egon  123'))  # ['h', 'e', 'l', 'l', 'o', 'e', 'g', 'o', 'n', '1', '2', '3']

# \n \t都是空,都可以被\s匹配
print(re.findall('\s', 'hello \n egon \t 123'))  # [' ', '\n', ' ', ' ', '\t', ' ']

# \n与\t
print(re.findall(r'\n', 'hello egon \n123'))  # ['\n']
print(re.findall(r'\t', 'hello egon\t123'))  # ['\n']

# \d与\D
print(re.findall('\d', 'hello egon 123'))  # ['1', '2', '3']
print(re.findall('\D', 'hello egon 123'))  # ['h', 'e', 'l', 'l', 'o', ' ', 'e', 'g', 'o', 'n', ' ']

# \A与\Z   \A  匹配字符串开始  \Z 匹配字符串结束
print(re.findall('\Ahe', 'hello egon 123'))  # ['he'],\A==>^
print(re.findall('123\Z', 'hello egon 123'))  # ['he'],\Z==>$

# ^与$
print(re.findall('^h', 'hello egon 123'))  # ['h']
print(re.findall('3$', 'hello egon 123'))  # ['3']

# 重复匹配:| . | * | ? | .* | .*? | + | {n,m} |
# .  匹配任意字符,除了换行符,除非re.DOTALL标记
print(re.findall('a.b', 'a1b'))  # ['a1b']
# a和b中间匹配任意一个字符
print(re.findall('a.b', 'a1b a*b a b aaab'))  # ['a1b', 'a*b', 'a b', 'aab']
print(re.findall('a.b', 'a\nb'))  # []
print(re.findall('a.b', 'a\nb', re.S))  # ['a\nb']
print(re.findall('a.b', 'a\nb', re.DOTALL))  # ['a\nb']同上一条意思一样
print(re.findall('a...b', 'a123b'))  # ['a123b']

# *匹配*号前的字符0次或多次
print(re.findall('ab*', 'bbbbbbb'))  # []
print(re.findall('ab*', 'a'))  # ['a']
print(re.findall('ab*', 'abbbb'))  # ['abbbb']
print(re.findall('ab*', 'abababbabbbb'))  # ['ab', 'ab', 'abb', 'abbbb']

# ?   匹配前一个字符1次或0次
print(re.findall('ab?', 'a'))  # ['a']
print(re.findall('ab?', 'abbb'))  # ['ab']
# 匹配所有包含小数在内的数字
print(re.findall('\d+\.?\d*', "asdfasdf123as1.13dfa12adsf1asdf3"))  # ['123', '1.13', '12', '1', '3']

# .*默认为贪婪匹配
print(re.findall('a.*b', 'a1b22222222b'))  # ['a1b22222222b']

# .*?为非贪婪匹配:推荐使用
print(re.findall('a.*?b', 'a1b22222222b'))  # ['a1b']

# +   匹配前一个字符1次或多次
print(re.findall('ab+', 'abbaabb'))  # ['abb', 'abb']
print(re.findall('ab+', 'abbb'))  # ['abbb']

# {n,m}  匹配前一个字符n到m次
print(re.findall('ab{2}', 'abbb'))  # ['abb']
print(re.findall('ab{2,4}', 'abbb'))  # ['abb']
print(re.findall('ab{1,}', 'abbb'))  # 'ab{1,}' ===> 'ab+'
print(re.findall('ab{0,}', 'abbb'))  # 'ab{0,}' ===> 'ab*'

# []
print(re.findall('a[1*-]b', 'a1b a*b a-b'))  # []内的都为普通字符了,且如果-没有被转意的话,应该放到[]的开头或结尾
print(re.findall('a[^1*-]b', 'a1b a*b a-b a=b'))  # []内的^代表的意思是取反,所以结果为['a=b']
print(re.findall('a[0-9]b', 'a1b a*b a-b a=b'))  # []内的^代表的意思是取反,所以结果为['a=b']
print(re.findall('a[a-z]b', 'a1b a*b a-b a=b aeb'))  # []内的^代表的意思是取反,所以结果为['a=b']
print(re.findall('a[a-zA-Z]b', 'a1b a*b a-b a=b aeb aEb'))  # []内的^代表的意思是取反,所以结果为['a=b']

# \# print(re.findall('a\\c','a\c')) #对于正则来说a\\c确实可以匹配到a\c,但是在python解释器读取a\\c时,会发生转义,然后交给re去执行,所以抛出异常
print(re.findall(r'a\\c', 'a\c'))  # r代表告诉解释器使用rawstring,即原生字符串,把我们正则内的所有符号都当普通字符处理,不要转义
print(re.findall('a\\\\c', 'a\c'))  # 同上面的意思一样,和上面的结果一样都是['a\\c']

# (): 匹配括号里面的内容
print(re.findall('ab+', 'ababab123'))  # ['ab', 'ab', 'ab']
print(re.findall('(ab)+123', 'ababab123'))  # ['ab'],匹配到末尾的ab123中的ab
print(re.findall('(?:ab)+123', 'ababab123'))  # findall的结果不是匹配的全部内容,而是组内的内容,?:可以让结果为匹配的全部内容

# |
print(re.findall('compan(?:y|ies)', 'Too many companies have gone bankrupt, and the next one is my company'))
一些方法


# ===========================re模块提供的方法介绍===========================
import re
#1
print(re.findall('e','alex make love') )   #['e', 'e', 'e'],返回所有满足匹配条件的结果,放在列表里
#2
print(re.search('e','alex make love').group()) #e,只到找到第一个匹配然后返回一个包含匹配信息的对象,该对象可以通过调用group()方法得到匹配的字符串,如果字符串没有匹配,则返回None。

#3
print(re.match('e','alex make love'))    #None,同search,不过在字符串开始处进行匹配,完全可以用search+^代替match

#4
print(re.split('[ab]','abcd'))     #['', '', 'cd'],先按'a'分割得到''和'bcd',再对''和'bcd'分别按'b'分割

#5
print('===>',re.sub('a','A','alex make love')) #===> Alex mAke love,不指定n,默认替换所有
print('===>',re.sub('a','A','alex make love',1)) #===> Alex make love
print('===>',re.sub('a','A','alex make love',2)) #===> Alex mAke love
print('===>',re.sub('^(\w+)(.*?\s)(\w+)(.*?\s)(\w+)(.*?)$',r'\5\2\3\4\1','alex make love')) #===> love make alex

print('===>',re.subn('a','A','alex make love')) #===> ('Alex mAke love', 2),结果带有总共替换的个数


#6
obj=re.compile('\d{2}')

print(obj.search('abc123eeee').group()) #12
print(obj.findall('abc123eeee')) #['12'],重用了obj
shelve模块
shelve模块比pickle模块简单,只有一个open函数,返回类似字典的对象,可读可写;key必须为字符串,而值可以是python所支持的数据类型
import shelve

f=shelve.open(r'sheve.txt')
# f['stu1_info']={'name':'egon','age':18,'hobby':['piao','smoking','drinking']}
# f['stu2_info']={'name':'gangdan','age':53}
# f['school_info']={'website':'http://www.pypy.org','city':'beijing'}

print(f['stu1_info']['hobby'])
f.close()
logging模块
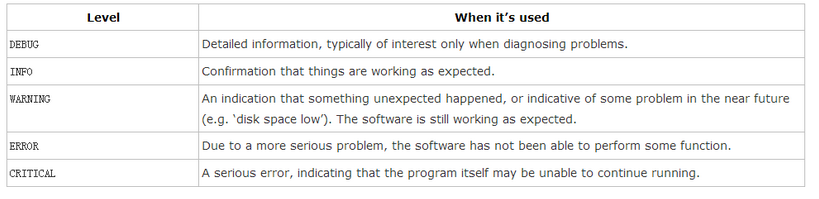
很多程序都有记录日志的需求,并且日志中包含的信息即有正常的程序访问日志,还可能有错误、警告等信息输出,python的logging模块提供了标准的日志接口,你可以通过它存储各种格式的日志,logging的日志可以分为 debug、info、warning、error、critical5个级别
1.模块初始
import logging

logging.warning('wrong password more than 3 times')
logging.critical('server is down')
logging.error('error message')


结果:
WARNING:root:wrong password more than 3 times
CRITICAL:root:server is down
ERROR:root:error message
2.logging模块五个级别

 浙公网安备 33010602011771号