
布局和控件
一、LinearLayout(线性布局)
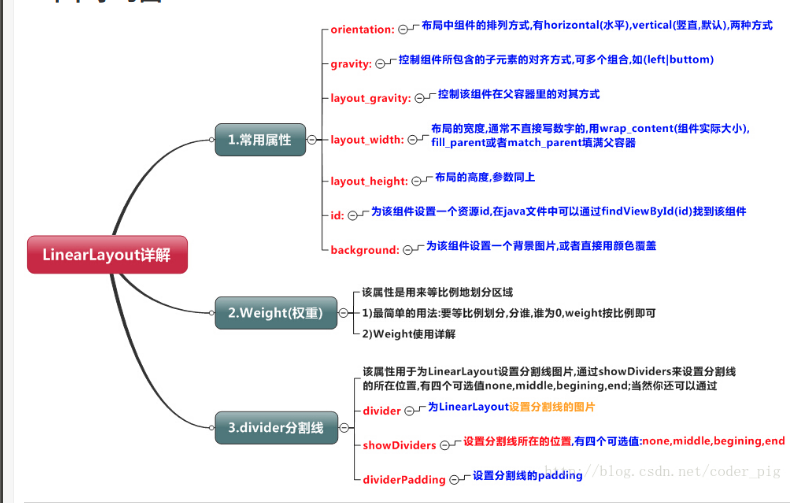
例:
<LinearLayout xmlns:android="http://schemas.android.com/apk/res/android"
    xmlns:tools="http://schemas.android.com/tools"
    android:id="@+id/LinearLayout1"
    android:layout_width="match_parent"  //  宽度或高度布满整个屏幕
    android:layout_height="wrap_parent"    //布局元素根据内容大小更改
    android:orientation="horizontal">
    <LinearLayout
        android:layout_width="0dp"
        android:layout_height="match_parent"
        android:background="#ADFF2F"
        android:layout_weight="1"/>
    <LinearLayout
        android:layout_width="0dp"
        android:layout_height="fill_parent"
        android:background="#DA70D6"
        android:layout_weight="2"/>
        </LinearLayout>
二、RelativeLayout(相对布局)
1.margin与padding的区别
margin代表的是偏移,比如marginleft = "5dp"表示组件离容器左边缘偏移5dp; 而padding代表的则是填充,而填充的对象针对的是组件中的元素,比如TextView中的文字,比如为TextView设置paddingleft = "5dp",则是在组件里的元素的左边填充5dp的空间。 margin针对的是容器中的组件,而padding针对的是组件中的元素。
实现代码:
<RelativeLayout xmlns:android="http://schemas.android.com/apk/res/android"
    xmlns:tools="http://schemas.android.com/tools"
    android:id="@+id/RelativeLayout1"
    android:layout_width="match_parent"
    android:layout_height="match_parent" >
    <!-- 这个是在容器中央的 -->
    <ImageView
        android:id="@+id/img1"
        android:layout_width="80dp"
        android:layout_height="80dp"
        android:layout_centerInParent="true"
        android:src="@drawable/pic1"/>
    <!-- 在中间图片的左边 -->
    <ImageView
        android:id="@+id/img2"
        android:layout_width="80dp"
        android:layout_height="80dp"
        android:layout_toLeftOf="@id/img1"
        android:layout_centerVertical="true"
        android:src="@drawable/pic2"/>
    <!-- 在中间图片的右边 -->
    <ImageView
        android:id="@+id/img3"
        android:layout_width="80dp"
        android:layout_height="80dp"
        android:layout_toRightOf="@id/img1"
        android:layout_centerVertical="true"
        android:src="@drawable/pic3"/>
    <!-- 在中间图片的上面-->
    <ImageView
        android:id="@+id/img4"
        android:layout_width="80dp"
        android:layout_height="80dp"
        android:layout_above="@id/img1"
        android:layout_centerHorizontal="true"
        android:src="@drawable/pic4"/>
    <!-- 在中间图片的下面 -->
    <ImageView
        android:id="@+id/img5"
        android:layout_width="80dp"
        android:layout_height="80dp"
        android:layout_below="@id/img1"
        android:layout_centerHorizontal="true"
        android:src="@drawable/pic5"/>
    </RelativeLayout>
三、TextView(文本框)
1.属性
(1)id:为TextView设置一个组件id,根据id,我们可以在Java代码中通过findViewById()的方法获取到该对象,然后进行相关属性的设置,又或者使用RelativeLayout时,参考组件用的也是id。
(2)layout_width:组件的宽度,一般写:wrap_content或者match_parent(fill_parent),前者是控件显示的内容多大,控件就多大,而后者会填满该控件所在的父容器;当然也可以设置成特定的大小,比如我这里为了显示效果,设置成了200dp。
(3)layout_height:组件的高度,内容同上。
(4)gravity:设置控件中内容的对齐方向,TextView中是文字,ImageView中是图片等等。
(5)text:设置显示的文本内容,一般我们是把字符串写到string.xml文件中,然后通过@String/xxx取得对应的字符串内容的。
(6)textColor:设置字体颜色,同上,通过colors.xml资源来引用,别直接这样写。
(7)textStyle:设置字体风格,三个可选值:normal(无效果),bold(加粗),italic(斜体)
(8)textSize:字体大小,单位一般是用sp。
(9)background:控件的背景颜色,可以理解为填充整个控件的颜色,可以是图片。
2.带阴影的TextView
涉及到的几个属性:
(1)android:shadowColor:设置阴影颜色,需要与shadowRadius一起使用哦!
(2)android:shadowRadius:设置阴影的模糊程度,设为0.1就变成字体颜色了,建议使用3.0
(3)android:shadowDx:设置阴影在水平方向的偏移,就是水平方向阴影开始的横坐标位置
(4)android:shadowDy:设置阴影在竖直方向的偏移,就是竖直方向阴影开始的纵坐标位置
3. 带边框的TextView
自行编写一个ShapeDrawable的资源文件。然后TextView将blackgroung 设置为这个drawable资源即可。shapeDrawable资源文件的几个节点以及属性:
(1)
(2)<stroke android:width = "xdp" android:color="xxx" 这个是设置边框的粗细,以及边框颜色的
(3)<padding androidLbottom = "xdp"...> 这个是设置边距的
(4)<corners android:topLeftRadius="10px"...> 这个是设置圆角的
(5)
四、EditText(输入框)
1.EditText可以接受用户输入。
<EditText
        android:layout_width="fill_parent"
        android:layout_height="wrap_content"
        android:inputType="phone" />
2.当想在点击输入框获得焦点后,不是将光标移动到文本的开始或者结尾;而是获取到输入框中所有的文本内容的话,这个时候可以使用selectAllOnFocus属性。
android:selectAllOnFocus="true"
3.另外很多时候可能要限制EditText只允许单行输入,而且不会滚动,比如上面的登陆界面的例子,只需要设置
android:singleLine="true"
即可实现单行输入不换行。
五、Button(按钮)
布局文件:activity_main.xml:
<Button
        android:id="@+id/btnOne"
        android:layout_width="match_parent"
        android:layout_height="64dp"
        android:background="@drawable/btn_bg1"
        android:text="按钮"/>
    <Button
        android:id="@+id/btnTwo"
        android:layout_width="match_parent"
        android:layout_height="64dp"
        android:text="按钮不可用"/>
MainActivity.java:
public class MainActivity extends Activity {
    private Button btnOne,btnTwo;
    @Override
    protected void onCreate(Bundle savedInstanceState) {
        super.onCreate(savedInstanceState);
        setContentView(R.layout.activity_main);
        btnOne = (Button) findViewById(R.id.btnOne);
        btnTwo = (Button) findViewById(R.id.btnTwo);
        btnTwo.setOnClickListener(new OnClickListener() {
            @Override
            public void onClick(View v) {
                if(btnTwo.getText().toString().equals("按钮不可用")){
                    btnOne.setEnabled(false);
                    btnTwo.setText("按钮可用");
                }else{
                    btnOne.setEnabled(true);
                    btnTwo.setText("按钮不可用");
                }
            }
        });
    }
}

 浙公网安备 33010602011771号