
1 链接脚本vmlinux.lds
先编译一下 Linux 源码,因为有很多文件是需要编译才会生成的。首先分析 Linux 内核的连接脚本文件 arch/arm/kernel/vmlinux.lds,通过链接脚本可以找到 Linux 内核的第一行程序是从哪里执行的。vmlinux.lds 中有如下代码:
492 OUTPUT_ARCH(arm)
493 ENTRY(stext)
494 jiffies = jiffies_64;
495 SECTIONS
496 {
497 	/*
498 	* XXX: The linker does not define how output sections are
499 	* assigned to input sections when there are multiple statements
500 	* matching the same input section name. There is no documented
501 	* order of matching.
502 	*
503 	* unwind exit sections must be discarded before the rest of the
504 	* unwind sections get included.
505 	*/
506 	/DISCARD/ : {
507 	*(.ARM.exidx.exit.text)
508 	*(.ARM.extab.exit.text)
509
......
645 }
ENTRY 指明了了 Linux 内核入口,入口为 stext,stext 定义在文件arch/arm/kernel/head.S 中 , 因 此 要 分 析 Linux 内 核 的 启 动 流 程 , 就 得 先 从 文 件arch/arm/kernel/head.S 的 stext 处开始分析。
2 Linux 内核启动流程
2.0 Linux kernel启动流程概述
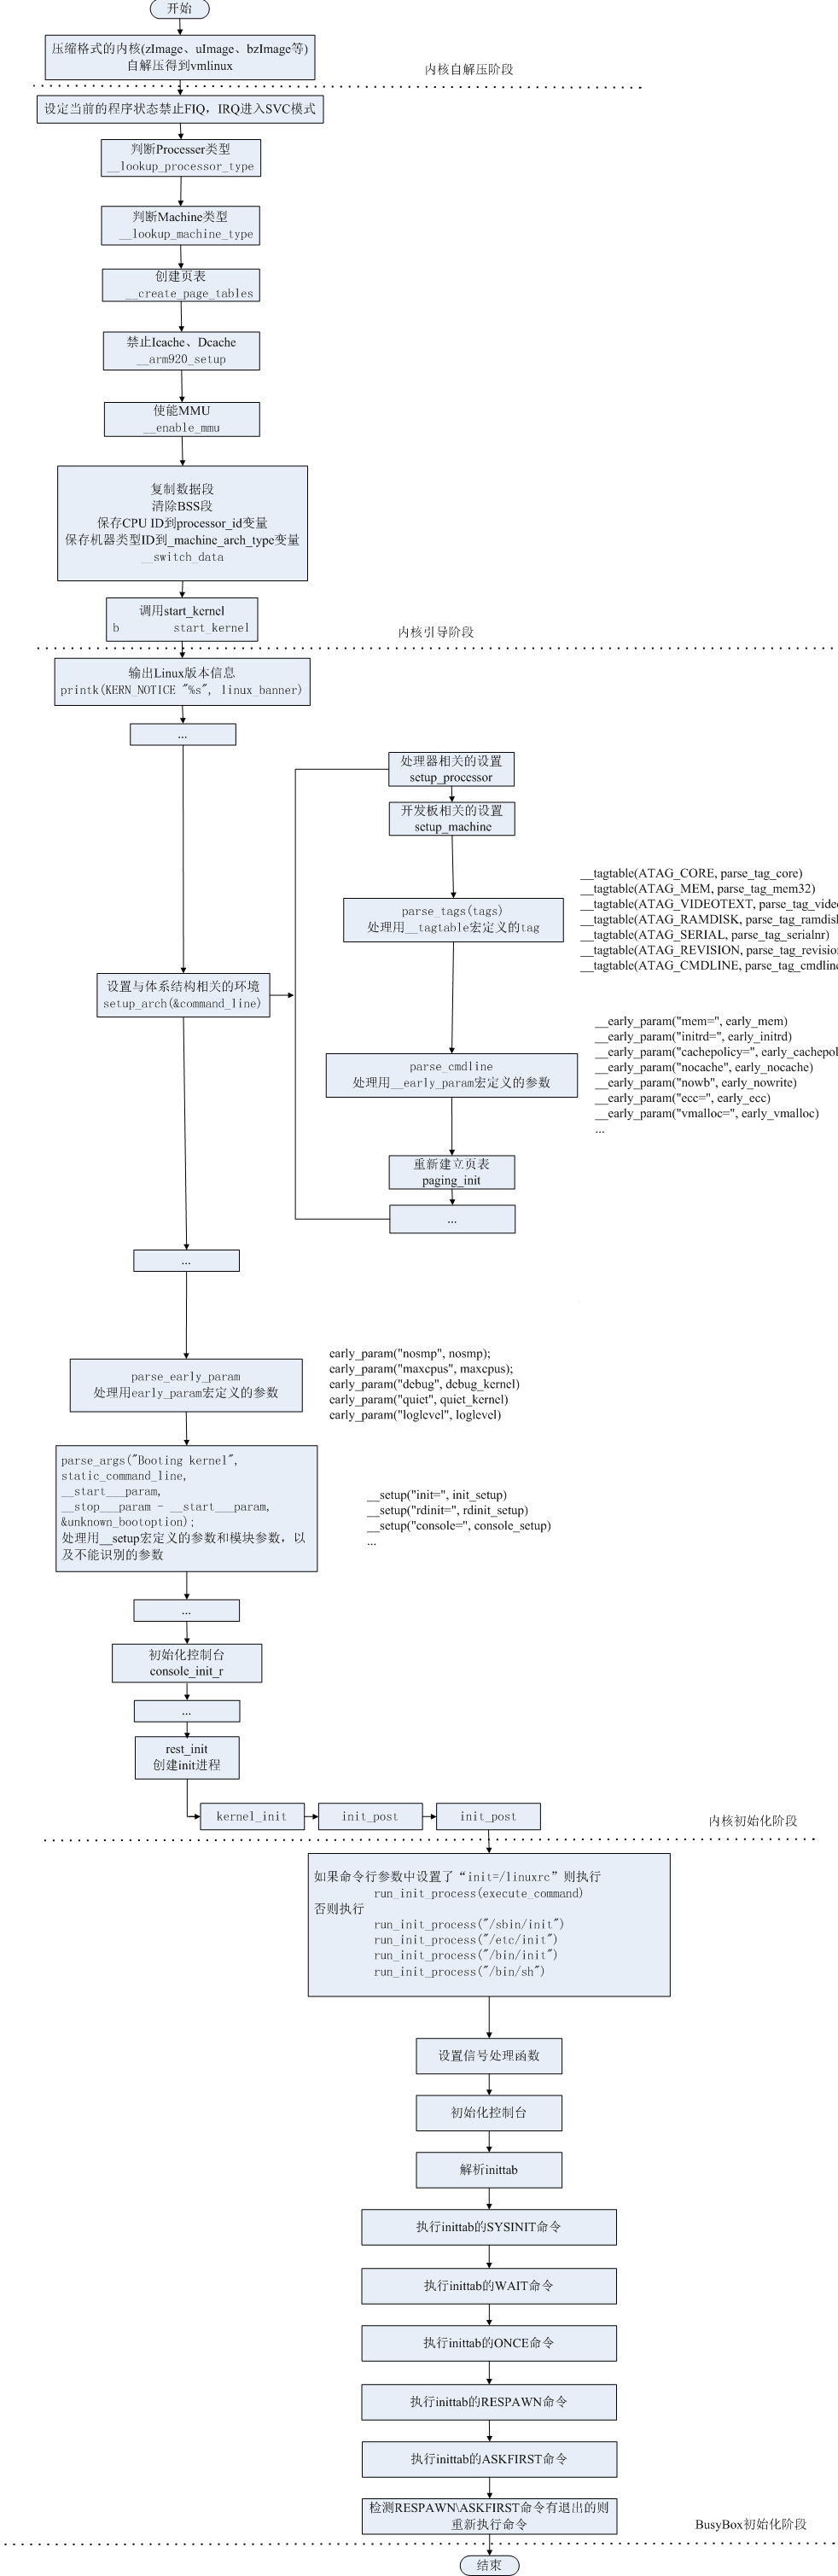
2.1pre linux内核镜像解压
kernel/lib/inflate.c的decompress_kernel, inflate.c是从gzip 插件源代码移过来的。解压完后会看到:
UncompressingLinux...done, booting the kernel.
call_kernel: bl    cache_clean_flush
  bl    cache_off
  mov       r0, #0          @ must be zero
  mov       r1, r7          @ restore architecture number
  mov       r2, r8          @ restore atags pointer
  mov       pc, r4          @ call kernel
r4 中已经在head.S处预置为内核镜像的地址,因此会跳转到r4去执行,就是Linux 内核入口 stext。
#ifdef CONFIG_AUTO_ZRELADDR
  @determine final kernel image address
  mov       r4, pc
  and r4, r4, #0xf8000000
  add r4, r4, #TEXT_OFFSET
#else
  ldr   r4, =zreladdr
#endif
2.1 Linux 内核入口 stext
打开arch/arm/kernel/head.S可以看到:
/*
* Kernel startup entry point.
* ---------------------------
*
* This is normally called from the decompressor code. The requirements
* are: MMU = off, D-cache = off, I-cache = dont care, r0 = 0,
* r1 = machine nr, r2 = atags or dtb pointer.
.....
*/
Linux 内核的入口点 stext 其实相当于内核的入口函数,stext 函数内容如下:
依据上面的注释内容,Linux 内核启动之前要求如下:
①、关闭 MMU。
②、关闭 D-cache。
③、I-Cache 无所谓。
④、r0=0。
⑤、r1=machine nr(也就是机器 ID)。
⑥、r2=atags 或者设备树(dtb)首地址。
stext代码如下:
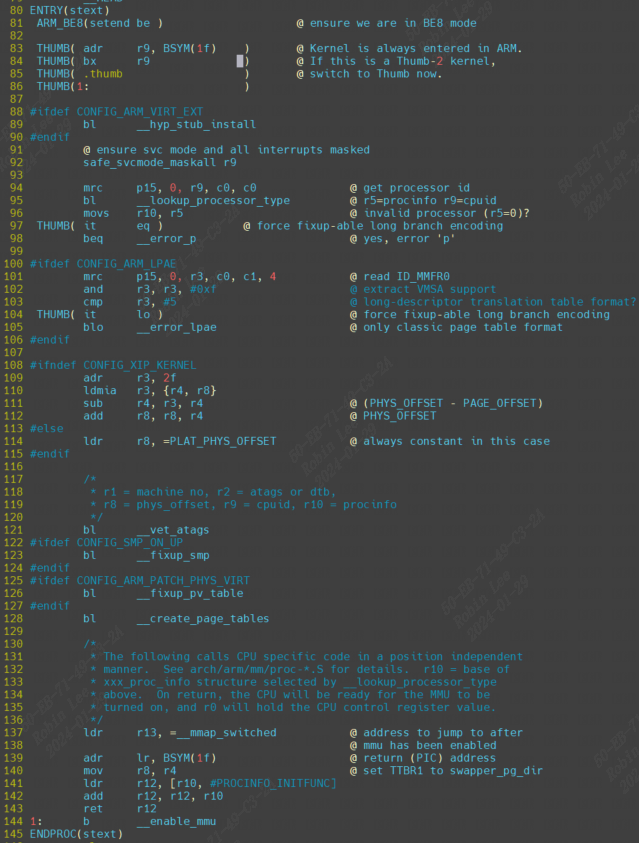
第 92 行,调用函数 safe_svcmode_maskall 确保 CPU 处于 SVC 模式,并且关闭了所有的中断。safe_svcmode_maskall 定义在文件 arch/arm/include/asm/assembler.h 中。
第 94 行,读处理器 ID,ID 值保存在 r9 寄存器中。
第 95 行,调用函数__lookup_processor_type 检查当前系统是否支持此 CPU,如果支持就获取 procinfo 信 息 。 procinfo 是 proc_info_list 类 型 的 结 构 体,proc_info_list 在 文 件arch/arm/include/asm/procinfo.h 中的定义:
struct proc_info_list {
	 unsigned int cpu_val;
	 unsigned int cpu_mask;
	 unsigned long __cpu_mm_mmu_flags; /* used by head.S */
	 unsigned long __cpu_io_mmu_flags; /* used by head.S */
	 unsigned long __cpu_flush; /* used by head.S */
	 const char *arch_name;
	 const char *elf_name;
	 unsigned int elf_hwcap;
	 const char *cpu_name;
	 struct processor *proc;
	 struct cpu_tlb_fns *tlb;
	 struct cpu_user_fns *user;
	 struct cpu_cache_fns *cache;
};
每种处理器都抽象为一个 proc_info_list 结构体,每种处理器都对应一个procinfo。因此可以通过处理器 ID 来找到对应的 procinfo 结构,__lookup_processor_type 函数找到对应处理器的 procinfo 以后会将其保存到 r5 寄存器中。
第121行,函数__vet_atags 验证 atags 或设备树(dtb)的合法性。函数__vet_atags 定义在文件 arch/arm/kernel/head-common.S 中。__vet_atags 用于检查传入的 dtb pointer 是否合法,编译生成的 dtb 头部会带有一个 4 字节的 dtb magic numer,如果是大端 CPU,这个 magic 是 0xd00dfeed,如果是小端 CPU,这个 magic 是 0xedfe0dd0。
第128行,调用函数__create_page_tables 创建页表。
第 137 行,将函数__mmap_switched 的地址保存到 r13 寄存器中。__mmap_switched 定义在文件 arch/arm/kernel/head-common.S,__mmap_switched 最终会调用 start_kernel 函数。
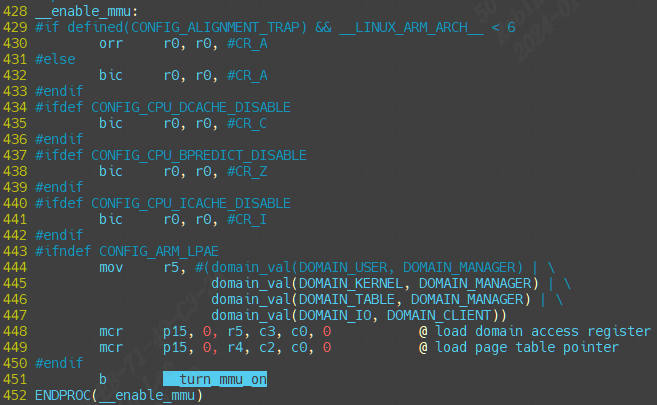
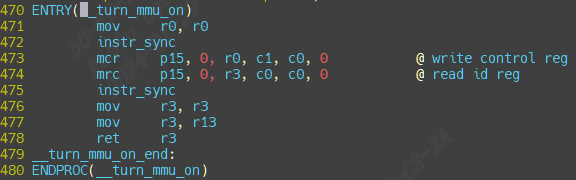
第 144 行 , 调 用 __enable_mmu 函 数 使 能 MMU ,__enable_mmu定 义 在 文 件arch/arm/kernel/head.S 中。__enable_mmu 最终会通过调用__turn_mmu_on 来打开 MMU,__turn_mmu_on 最后会执行 r13 里面保存的__mmap_switched 函数。
2.1.0 __create_page_tables
- 内核所在物理内存块的初始地址,保存在寄存器 r8 中。
- 内核代码相对于初始地址的偏移值,是在程序编译前就确定的一个宏:TEXT_OFFSET,arm32 中通常是 0x8000,也就是偏移地址为 32 K,前面保留的 32K 内存就是用来存放页表。
在建立页表之前,目前所处的相关寄存器环境为:r8 = phys_offset, r9 = cpuid, r10 = procinfo.
2.1.1 __enable_mmu
2.1.1.1 __mmap_switched
前面讲到__enable_mmu会调用__mmap_switched 函数(通过调用__turn_mmu_on 再调用r13)。现在具体分析它:
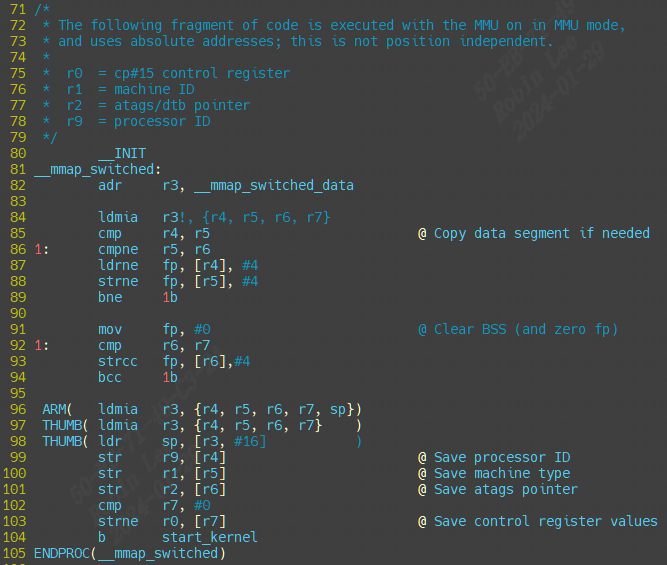
可以看到__mmap_switched主要就是做clear bss,然后保存处理器ID, 序列号,最终跳转start_kernel函数。
2.1.1.1.1 start_kernel
start_kernel会调用大量的子函数完成linux启动前的一些初始化工作,start_kernel 函数里面调用的子函数太多,而这些子函数又很复杂。我们简单的来看一下一些重要的子函数。精简并添加注释后的 start_kernel 函数内容如下:
init/main/start_kenel函数
asmlinkage __visible void __init start_kernel(void)
{
	char *command_line;
	char *after_dashes;

	/*
	 * Need to run as early as possible, to initialize the
	 * lockdep hash:
	 */
	lockdep_init();
	set_task_stack_end_magic(&init_task);
	smp_setup_processor_id();
	debug_objects_early_init();

	/*
	 * Set up the the initial canary ASAP:
	 */
	boot_init_stack_canary();

	cgroup_init_early();

	local_irq_disable();
	early_boot_irqs_disabled = true;

/*
 * Interrupts are still disabled. Do necessary setups, then
 * enable them
 */
	boot_cpu_init();
	page_address_init();
	pr_notice("%s", linux_banner);
	setup_arch(&command_line);
	mm_init_cpumask(&init_mm);
	setup_command_line(command_line);
	setup_nr_cpu_ids();
	setup_per_cpu_areas();
	smp_prepare_boot_cpu();	/* arch-specific boot-cpu hooks */

	build_all_zonelists(NULL, NULL);
	page_alloc_init();

	pr_notice("Kernel command line: %s\n", boot_command_line);
	parse_early_param();
	after_dashes = parse_args("Booting kernel",
				  static_command_line, __start___param,
				  __stop___param - __start___param,
				  -1, -1, &unknown_bootoption);
	if (!IS_ERR_OR_NULL(after_dashes))
		parse_args("Setting init args", after_dashes, NULL, 0, -1, -1,
			   set_init_arg);

	jump_label_init();

	/*
	 * These use large bootmem allocations and must precede
	 * kmem_cache_init()
	 */
	setup_log_buf(0);
	pidhash_init();
	vfs_caches_init_early();
	sort_main_extable();
	trap_init();
	mm_init();

	/*
	 * Set up the scheduler prior starting any interrupts (such as the
	 * timer interrupt). Full topology setup happens at smp_init()
	 * time - but meanwhile we still have a functioning scheduler.
	 */
	sched_init();
	/*
	 * Disable preemption - early bootup scheduling is extremely
	 * fragile until we cpu_idle() for the first time.
	 */
	preempt_disable();
	if (WARN(!irqs_disabled(),
		 "Interrupts were enabled *very* early, fixing it\n"))
		local_irq_disable();
	idr_init_cache();
	rcu_init();

	/* trace_printk() and trace points may be used after this */
	trace_init();

	context_tracking_init();
	radix_tree_init();
	/* init some links before init_ISA_irqs() */
	early_irq_init();
	init_IRQ();
	tick_init();
	rcu_init_nohz();
	init_timers();
	hrtimers_init();
	softirq_init();
	timekeeping_init();
	time_init();
	sched_clock_postinit();
	perf_event_init();
	profile_init();
	call_function_init();
	WARN(!irqs_disabled(), "Interrupts were enabled early\n");
	early_boot_irqs_disabled = false;
	local_irq_enable();

	kmem_cache_init_late();

	/*
	 * HACK ALERT! This is early. We're enabling the console before
	 * we've done PCI setups etc, and console_init() must be aware of
	 * this. But we do want output early, in case something goes wrong.
	 */
	console_init();
	if (panic_later)
		panic("Too many boot %s vars at `%s'", panic_later,
		      panic_param);

	lockdep_info();

	/*
	 * Need to run this when irqs are enabled, because it wants
	 * to self-test [hard/soft]-irqs on/off lock inversion bugs
	 * too:
	 */
	locking_selftest();

#ifdef CONFIG_BLK_DEV_INITRD
	if (initrd_start && !initrd_below_start_ok &&
	    page_to_pfn(virt_to_page((void *)initrd_start)) < min_low_pfn) {
		pr_crit("initrd overwritten (0x%08lx < 0x%08lx) - disabling it.\n",
		    page_to_pfn(virt_to_page((void *)initrd_start)),
		    min_low_pfn);
		initrd_start = 0;
	}
#endif
	page_ext_init();
	debug_objects_mem_init();
	kmemleak_init();
	setup_per_cpu_pageset();
	numa_policy_init();
	if (late_time_init)
		late_time_init();
	sched_clock_init();
	calibrate_delay();
	pidmap_init();
	anon_vma_init();
	acpi_early_init();
#ifdef CONFIG_X86
	if (efi_enabled(EFI_RUNTIME_SERVICES))
		efi_enter_virtual_mode();
#endif
#ifdef CONFIG_X86_ESPFIX64
	/* Should be run before the first non-init thread is created */
	init_espfix_bsp();
#endif
	thread_info_cache_init();
	cred_init();
	fork_init();
	proc_caches_init();
	buffer_init();
	key_init();
	security_init();
	dbg_late_init();
	vfs_caches_init(totalram_pages);
	signals_init();
	/* rootfs populating might need page-writeback */
	page_writeback_init();
	proc_root_init();
	nsfs_init();
	cpuset_init();
	cgroup_init();
	taskstats_init_early();
	delayacct_init();

	check_bugs();

	acpi_subsystem_init();
	sfi_init_late();

	if (efi_enabled(EFI_RUNTIME_SERVICES)) {
		efi_late_init();
		efi_free_boot_services();
	}

	ftrace_init();

	/* Do the rest non-__init'ed, we're now alive */
	rest_init();
}
如下,打上注释方便清楚每个子调用的含义:
	lockdep_init() //lockdep 是死锁检测模块,此函数会初始化两个 hash 表
	set_task_stack_end_magic() //设置任务栈结束魔术数,用于栈溢出检测
	smp_setup_processor_id() //跟 SMP 有关(多核处理器),设置处理器 ID
	debug_objects_early_init() //做一些和 debug 有关的初始化
	boot_init_stack_canary() //栈溢出检测初始化
	cgroup_init_early() //cgroup 初始化,cgroup 用于控制 Linux 系统资源
	local_irq_disable() //关闭当前 CPU 中断, 中断关闭期间做一些重要的操作,然后打开中断
	boot_cpu_init() //跟 CPU 有关的初始化
	page_address_init() //页地址相关的初始化
	pr_notice("%s", linux_banner);/* 打印 Linux 版本号、编译时间等信息 */
	setup_arch(&command_line); //架构相关的初始化,此函数会解析传递进来的ATAGS 或者设备树(DTB)文件。会根据设备树里面的 model 和 compatible 这两个属性值来查找Linux 是否支持这个单板。此函数也会获取设备树中 chosen 节点下的 bootargs 属性值来得到命令行参数,也就是 uboot 中的 bootargs 环境变量的值,获取到的命令行参数会保存到command_line 中
	mm_init_cpumask(&init_mm) //内存有关的初始化
	setup_command_line(command_line) //存储命令行参数
	setup_nr_cpu_ids() //如果只是 SMP(多核 CPU)的话,此函数用于获取CPU 核心数量,CPU 数量保存在变量nr_cpu_ids 中
	setup_per_cpu_areas() //在 SMP 系统中有用,设置每个 CPU 的 per-cpu 数据
	smp_prepare_boot_cpu()
	build_all_zonelists(NULL, NULL); /* 建立系统内存页区(zone)链表 */
	page_alloc_init(); /* 处理用于热插拔 CPU 的页 */
	pr_notice("Kernel command line: %s\n", boot_command_line); //打印命令行信息
	parse_early_param(); /* 解析命令行中的 console 参数 */
	after_dashes = parse_args("Booting kernel",
			static_command_line, __start___param,
			__stop___param - __start___param,
			-1, -1, &unknown_bootoption);
	setup_log_buf(0); /* 设置 log 使用的缓冲区*/
	pidhash_init(); // 构建 PID 哈希表,Linux 中每个进程都有一个 ID,这个 ID 叫做 PID。通过构建哈希表可以快速搜索进程信息结构体
	idr_init_cache(); // IDR 初始化,IDR 是 Linux 内核的整数管理机制,也就是将一个整数 ID 与一个指针关联起来
	rcu_init(); // 初始化 RCU,RCU 全称为 Read Copy Update(读-拷贝修改)
	trace_init(); // 跟踪调试相关初始化
	radix_tree_init(); //基数树相关数据结构初始化
	early_irq_init(); //初始中断相关初始化,主要是注册 irq_desc 结构体变量,因为 Linux 内核使用 irq_desc 来描述一个中断
	init_IRQ(); /* 中断初始化 */
	tick_init(); /* tick 初始化 */
	init_timers(); /* 初始化定时器 */
	hrtimers_init(); /* 初始化高精度定时器 */
	softirq_init(); /* 软中断初始化 */
	timekeeping_init();
	time_init(); /* 初始化系统时间 */
	WARN(!irqs_disabled(), "Interrupts were enabled early\n");
	early_boot_irqs_disabled = false;
	local_irq_enable(); /* 使能中断 */
	kmem_cache_init_late(); /* slab 初始化,slab 是 Linux 内存分配器 */
	console_init(); //初始化控制台,之前 printk 打印的信息都存放缓冲区中,并没有打印出来。只有调用此函数初始化控制台以后才能在控制台上打印信息
	locking_selftest() /* 锁自测 */
	kmemleak_init(); /* kmemleak 初始化,kmemleak 用于检查内存泄漏 */
	calibrate_delay(); /* 测定 BogoMIPS 值,可以通过 BogoMIPS 来判断 CPU 的性能BogoMIPS 设置越大,说明 CPU 性能越好*/
	pidmap_init(); /* PID 位图初始化 */
	anon_vma_init(); /* 生成 anon_vma slab 缓存 */
	cred_init(); /* 为对象的每个用于赋予资格(凭证) */
	fork_init(); /* 初始化一些结构体以使用 fork 函数 */
	proc_caches_init(); /* 给各种资源管理结构分配缓存 */
	buffer_init(); /* 初始化缓冲缓存 */
	key_init(); /* 初始化密钥 */
	security_init(); /* 安全相关初始化 */
	vfs_caches_init(totalram_pages); /* 为 VFS 创建缓存 */
	signals_init(); /* 初始化信号 */
	page_writeback_init(); /* 页回写初始化 */
	proc_root_init(); /* 注册并挂载 proc 文件系统 */
	cpuset_init(); /* 初始化 cpuset,cpuset 是将 CPU 和内存资源以逻辑性和层次性集成的一种机制,是 cgroup 使用的子系统之一*/
	cgroup_init(); /* 初始化 cgroup */
	taskstats_init_early(); /* 进程状态初始化 */
	check_bugs(); /* 检查写缓冲一致性 */
	rest_init(); /* rest_init 函数 */
start_kernel完成内核初始化工作。具体包括以下部分:
(1)内核架构 、通用配置相关初始化
(2) 内存管理相关初始化
(3)进程管理相关初始化
(4)进程调度相关初始化
(5)网络子系统管理
(6)虚拟文件系统
(7)文件系统
2.1.1.1.1.1 setup_arch
内核架构相关的初始化函数, 包含了处理器相关参数的初始化、内核启动参数(tagged list)的获取和前期处理、内存子系统的早期初始化。
setup_arch(&command_line);
若uboot中bootargs的值为空,command_line = default_command_line,即为内核中的默认命令行参数,其值在.config文件中配置,对应CONFIG_CMDLINE配置项。
2.1.1.1.1.2 setup_command_line、parse_early_param以及parse_args
完成命令行参数的解析、保存。譬如:
cmdline = console=ttySAC2,115200 root=/dev/mmcblk0p2 rw
init=/linuxrc rootfstype=ext3 #解析为一下四个参数:
console=ttySAC2,115200 #指定控制台的串口设备号,及其波特率
root=/dev/mmcblk0p2 rw #指定根文件系统rootfs的路径
init=/linuxrc #指定第一个用户进程init的路径rootf stype=ext3
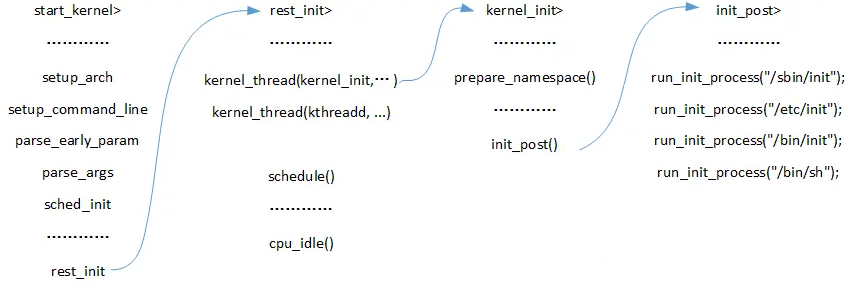
2.1.1.1.1.n reset_init
1)调用kernel_thread函数启动了2个内核线程,分别是:kernel_init和kthreadd。
    kernel_init线程中调用prepare_namespace函数挂载根文件系统rootfs;
    然后调用init_post函数,执行根文件系统rootfs下的第一个用户进程init。
    用户进程有4个备选方案,若command_line中init的路径错误,则会执行备用方案。
    第一备用:/sbin/init,第二备用:/etc/init,第三备用:/bin/init,第四备用:/bin/sh。

2)调用schedule函数开启内核调度系统;
3)调用cpu_idle函数,启动空闲进程idle,完成内核启动。
static noinline void __init_refok rest_init(void)
{
	int pid;

	rcu_scheduler_starting();
	smpboot_thread_init();
	/*
	 * We need to spawn init first so that it obtains pid 1, however
	 * the init task will end up wanting to create kthreads, which, if
	 * we schedule it before we create kthreadd, will OOPS.
	 */
	kernel_thread(kernel_init, NULL, CLONE_FS);
	numa_default_policy();
	pid = kernel_thread(kthreadd, NULL, CLONE_FS | CLONE_FILES);
	rcu_read_lock();
	kthreadd_task = find_task_by_pid_ns(pid, &init_pid_ns);
	rcu_read_unlock();
	complete(&kthreadd_done);

	/*
	 * The boot idle thread must execute schedule()
	 * at least once to get things moving:
	 */
	init_idle_bootup_task(current);
	schedule_preempt_disabled();
	/* Call into cpu_idle with preempt disabled */
	cpu_startup_entry(CPUHP_ONLINE);
}
调用函数 rcu_scheduler_starting,启动 RCU 锁调度器。
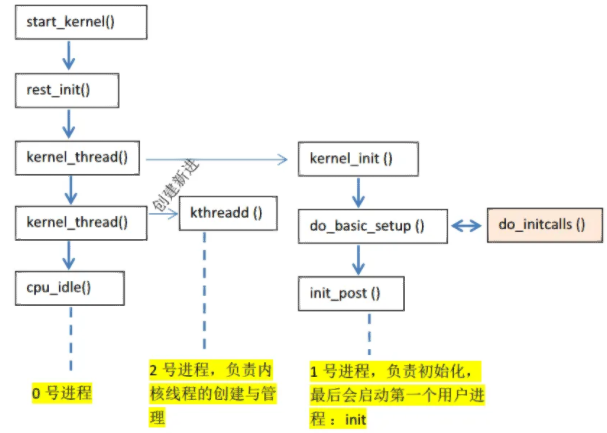
调用函数 kernel_thread 创建 kernel_init 进程,也就是大名鼎鼎的 init 内核进程。init 进程的 PID 为 1。init 进程一开始是内核进程(也就是运行在内核态),后面 init 进程会在根文件系统中查找名为“init”这个程序,这个“init”程序处于用户态,通过运行这个“init”程序,init 进程就会实现从内核态到用户态的转变。
调用函数 kernel_thread 创建 kthreadd 内核进程,此内核进程的 PID 为 2。kthreadd进程负责所有内核进程的调度和管理。
最后调用函数 cpu_startup_entry 来进入 idle 进程,cpu_startup_entry 会调用cpu_idle_loop,cpu_idle_loop 是个 while 循环,也就是 idle 进程代码。idle 进程的 PID 为 0,idle进程叫做空闲进程,如果学过 FreeRTOS 或者 UCOS 的话应该听说过空闲任务。idle 空闲进程就和空闲任务一样,当 CPU 没有事情做的时候就在 idle 空闲进程里面“瞎逛游”,反正就是给CPU 找点事做。当其他进程要工作的时候就会抢占 idle 进程,从而夺取 CPU 使用权。其实大家应该可以看到 idle 进程并没有使用 kernel_thread 或者 fork 函数来创建,因为它是有主进程演变而来的。
在 Linux 终端中输入“ps -A”就可以打印出当前系统中的所有进程,其中就能看到 init 进程和 kthreadd 进程:
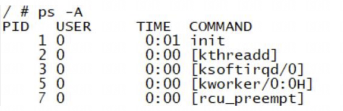
init 进程的 PID 为 1,kthreadd 进程的 PID 为 2。没有显示 PID 为 0 的 idle 进程,那是因为 idle 进程是内核进程。kernel_init 就是 init 进程的进程函数。
2.2 kernel_init-init进程详解
把reset_init中的kernel_init 拆出来,函数kernel_init 就是 init 进程具体做的工作,函数内容如下:
static int __ref kernel_init(void *unused)
{
	int ret;
	kernel_init_freeable(); /* init 进程的一些其他初始化工作 */
	/* need to finish all async __init code before freeing the memory */
	async_synchronize_full(); /* 等待所有的异步调用执行完成 */
	free_initmem(); /* 释放 init 段内存 */
	mark_rodata_ro();
	system_state = SYSTEM_RUNNING; /* 标记系统正在运行 */
	numa_default_policy();

	flush_delayed_fput();

	if (ramdisk_execute_command) {
		ret = run_init_process(ramdisk_execute_command);
		if (!ret)
			return 0;
		pr_err("Failed to execute %s (error %d)\n",
		ramdisk_execute_command, ret);
	}

	/*
	* We try each of these until one succeeds.
	*
	* The Bourne shell can be used instead of init if we are
	* trying to recover a really broken machine.
	*/
	if (execute_command) {
		ret = run_init_process(execute_command);
		if (!ret)
			return 0;
		panic("Requested init %s failed (error %d).",
		execute_command, ret);
	}
	if (!try_to_run_init_process("/sbin/init") ||
		!try_to_run_init_process("/etc/init") ||
		!try_to_run_init_process("/bin/init") ||
		!try_to_run_init_process("/bin/sh"))
		return 0;

	panic("No working init found. Try passing init= option to kernel. "
	"See Linux Documentation/init.txt for guidance.");
}
kernel_init_freeable 函数用于完成 init 进程的一些其他初始化工作,稍后再来具体看一下此函数。
ramdisk_execute_command 是一个全局的 char 指针变量,此变量值为“/init”,也就是根目录下的 init 程序。ramdisk_execute_command 也可以通过 uboot 传递,在 bootargs 中使用“rdinit=xxx”即可,xxx 为具体的 init 程序名字。
如果存在“/init”程序的话就通过函数 run_init_process 来运行此程序。
如果 ramdisk_execute_command 为空的话就看 execute_command 是否为空,反正不管如何一定要在根文件系统中找到一个可运行的 init 程序。execute_command 的值是通过uboot 传递,在 bootargs 中使用“init=xxxx”就可以了,比如“init=/linuxrc”表示根文件系统中的 linuxrc 就是要执行的用户空间 init 程序。
如果ramdisk_execute_command和 execute_command 都为空,那么就依次查找“/sbin/init”、“/etc/init”、“/bin/init”和“/bin/sh”,这四个相当于备用 init 程序,如果这四个也不存在,那么 Linux 启动失败!
如果以上步骤都没有找到用户空间的 init 程序,那么就提示错误发生!
2.2.1 kernel_init_freeable
kernel_init_freeable 定义在文件 init/main.c 中,缩减后的函数内容如下:
static noinline void __init kernel_init_freeable(void)
{
	/*
	* Wait until kthreadd is all set-up.
	*/
	wait_for_completion(&kthreadd_done);/* 等待 kthreadd 进程准备就绪 */
	smp_init(); /* SMP 初始化 */
	sched_init_smp(); /* 多核(SMP)调度初始化 */
	do_basic_setup(); /* 设备初始化都在此函数中完成 */
	/* Open the /dev/console on the rootfs, this should never fail */
	if (sys_open((const char __user *) "/dev/console", O_RDWR, 0) < 0)
		pr_err("Warning: unable to open an initial console.\n");
	(void) sys_dup(0);
	(void) sys_dup(0);
	/*
	* check if there is an early userspace init. If yes, let it do
	* all the work
	*/
	if (!ramdisk_execute_command)
		ramdisk_execute_command = "/init";
	if (sys_access((const char __user *) ramdisk_execute_command, 0) != 0) {
		ramdisk_execute_command = NULL;
		prepare_namespace();
	}
	/*
	* Ok, we have completed the initial bootup, and
	* we're essentially up and running. Get rid of the
	* initmem segments and start the user-mode stuff..
	*
	* rootfs is available now, try loading the public keys
	* and default modules
	*/
	integrity_load_keys();
	load_default_modules();
}
2.2.1.1 driver_init
do_basic_setup 函数用于完成 Linux 下设备驱动初始化工作!非常重要。do_basic_setup 会调用 driver_init 函数完成 Linux 下驱动模型子系统的初始化。
2.2.1.2 设置控制台
打开设备“/dev/console”,在 Linux 中一切皆为文件!因此“/dev/console”也是一个文件,此文件为控制台设备。每个文件都有一个文件描述符,此处打开的“/dev/console”文件描述符为 0,作为标准输入(0)。
sys_dup 函数将标准输入(0)的文件描述符复制了 2 次,一个作为标准输出(1),一个作为标准错误(2)。这样标准输入、输出、错误都是/dev/console 了。console 通过uboot 的 bootargs 环境变量设置,“console=ttymxc0,115200”表示将/dev/ttymxc0 设置为 console,也就是 I.MX6U 的串口 1。当然,也可以设置其他的设备为 console,比如虚拟控制台 tty1,设置 tty1 为 console 就可以在 LCD 屏幕上看到系统的提示信息。
2.2.1.3 挂载根文件系统
调用函数 prepare_namespace 来挂载根文件系统。根文件系统也是由命令行参数指定的,就是 uboot 的 bootargs 环境变量。比如“root=/dev/mmcblk1p2 rootwait rw”就表示根文件系统在/dev/mmcblk1p2 中,也就是 EMMC 的分区 2 中。
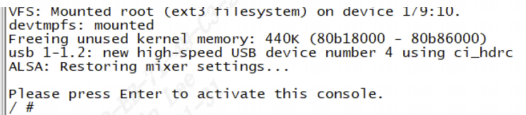
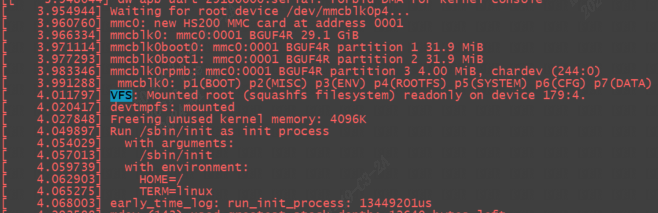
下面2张图都是emmc存储,分别挂载ext3格式和squashfs格式根文件系统:
如果根文件系统缺失错误,这里我们故意将:
setenv bootargs 'console=ttymxc0,115200'
saveenv
这时候挂载根文件系统时,由于没有指定root=/dev/mmcblk1p2 rootwait rw,因此报错如下:
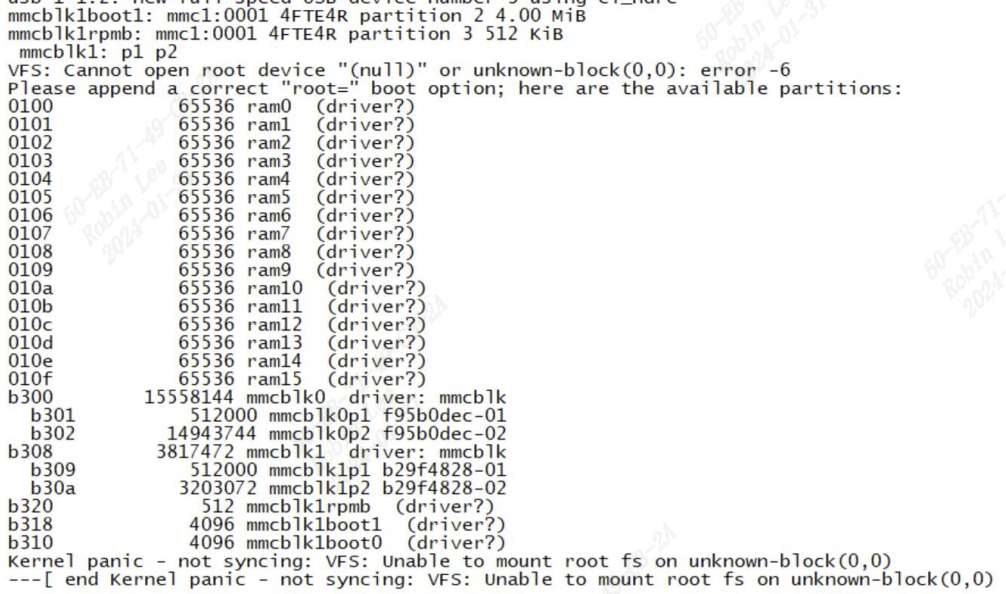
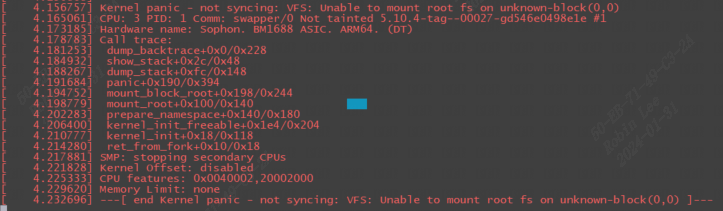
还能看到call trace如下:
2.2.1.3.1 init 服务
启动init服务时,init服务会读取/etc/inittab文件,/etc/inittab中设置了初始化系统环境的工作。 /etc/inittab定义 init 服务在 linux启动过程中必须依序执行以下几个Script :
/etc/rc.d/rc.sysinit
/etc/rc.d/rc
/etc/rc.d/rc.local
2.2.1.3.1.1 rc.sysinit
/etc/rc.d/rc.sysinit主要的功能是设置系统的基本环境:
(1)启动udev
(2)设置内核参数:执行sysctl –p ,以便从 /etc/sysctl.conf 设置内核参数
(3)设置系统时间:将硬件时间设置为系统时间
(4)启用交换内存空间:执行 swpaon –a –e,以便根据/etc/fstab的设置启用所有的交换内存空间。
(5)检查并挂载所有文件系统:检查所有需要挂载的文件系统,以确保这些文件系统的完整性。检查完毕后以可读可写的方式挂载文件系统。
(6)初始化硬件设备:Linux除了在启动内核时以静态驱动程序驱动部分的硬件外,在执行rc.sysinit 时,也会试着驱动剩余的硬件设备
3 Linux内核initcall机制
linux内核提供xxx_init(init_func)宏定义接口,驱动开发者只需要将驱动程序的init_func使用xxx_init()来修饰,这个函数就被自动添加到了上述的段中,开发者完全不需要关心实现细节。
3.1 xxx_initcall的源码
在平台对应的init.h文件中,可以找到xxx_initcall的定义:
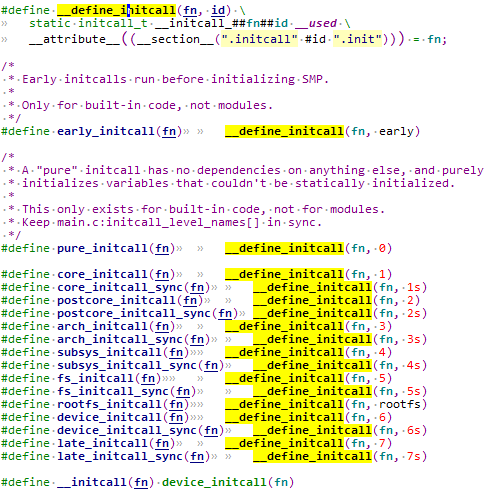
n是一个数字或者是数字+s,这个数字代表这个fn执行的优先级,数字越小,优先级越高,带s的fn优先级低于不带s的fn优先级。可以看到上面的从pure_initcall到late_initcall优先级依次变低。
这里__attribute__((__section__(".initcall" #id ".init")))表示编译时将目标符号放置在括号指定的段中。
举个例子,对pure_initcall(test_init);展开:
- 首先宏展开成:
__define_initcall(test_init, 0) - 然后接着展开:
static initcall_t __initcall_test_init0 = test_init;这就是一个简单的变量定义。 - 同时声明
__initcall_test_init0这个变量即使没被引用也保留符号,且将其放置在内核镜像的.initcall0.init段处。
在开发者添加 xxx_initcall(fn) 时,事实上是将fn放置到了 ".initcall##level##.init" 的段中。
3.2 xxx_initcall修饰的函数怎么被调用
见Linux-4.9.88\init\main.c
3.2.1 do_initcalls
start_kernel
-> rest_init();
    -> kernel_thread(kernel_init, NULL, CLONE_FS);
        -> kernel_init()
            -> kernel_init_freeable();
                -> do_basic_setup();
                    -> do_initcalls();
这个do_initcalls()就是我们需要寻找的函数了,在这个函数中执行所有使用xxx_initcall()声明的函数。
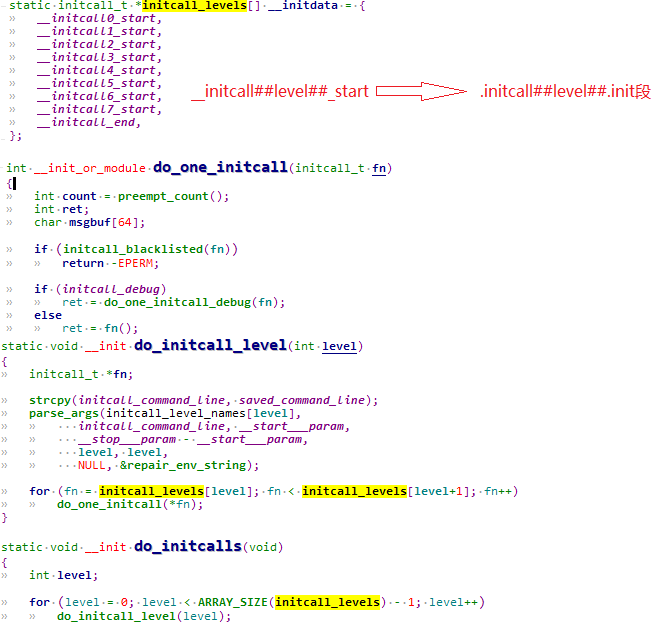
do_initcalls() 循环调用 do_initcall_level(level),level就是 initcall 的优先级数字,由 for 循环的终止条件ARRAY_SIZE(initcall_levels) - 1可知,总共会调用8次。
而 do_initcall_level(level) 中则会遍历 initcall_levels[level] 中的每个函数指针,initcall_levels[level] 实际上是对应的__initcall##level##_start 指针变量,然后依次取出__initcall##level##_start 指向地址存储的每个函数指针,并调用 do_one_initcall(*fn),实际上就是执行当前函数。
这个__initcall##level##_start 所存储的函数指针就是开发者用 xxx_initcall() 宏添加的函数,对应".initcall_##level##.init"段。
听起来很绕,举个例子:
比如有一个core_initcall(beagle_init);展开为__define_initcall(beagle_init, 1),所以 beagle_init() 这个函数被放置在 ".initcall1.init"段处。
再比如有一个core_initcall(beagle2_init);, 在 ".initcall1.init"段就会增加一组函数。
那么do_one_initcall(*fn) 的执行:判断initcall_debug的值,如果为真,则调用 do_one_initcall_debug(fn); 如果为假,则直接调用fn。
事实上,调用do_one_initcall_debug(fn)只是在调用fn的基础上添加一些额外的打印信息,可以直接看成是调用fn。
可能有些C语言基础不太好的朋友不太理解 do_initcall_level() 函数中依次取出地址并执行的函数执行逻辑:
for (fn = initcall_levels[level]; fn < initcall_levels[level+1]; fn++)
    do_one_initcall(*fn);
fn为函数指针,fn++相当于函数指针+1,相当于:内存地址+sizeof(fn),sizeof(fn)根据平台不同而不同,一般来说,32位机上是4字节,64位机则是8字节.
也就是在同等level下,会从同一个".initcall_##level##.init"段中依次取出对应的函数指针。
也就是从".initcall##level##.init"段开始,每次取一个函数出来执行,并累加指针,直到取完(即到了下一个段的起始地址就表示取完了)。
3.2.1.1 __initcall##level##_start与.initcall##level##.init段的关联
前面说了在开发者添加 xxx_initcall(fn) 时,事实上是将fn放置到了 ".initcall##level##.init" 的段中。
在do_initcall()的时候,却是从initcall_levels[level](即__initcall##level##_start指针)取出,那么
initcall_levels[level] 是怎么关联到".initcall##level##.init"段的呢?
在vmlinux.lds.h中:
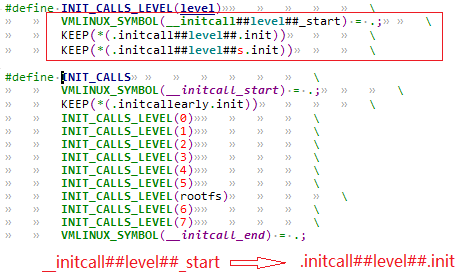
关联到".initcallearly.init"段。
然后对每个 level 定义了INIT_CALLS_LEVEL(level),将INIT_CALLS_LEVEL(level)展开之后的结果是定义 __initcall##level##_start,并将__initcall##level##_start关联到 ".initcall##level##.init" 段和".initcall##level##s.init"段。
到这里,__initcall##level##_start 和".initcall##level##.init"段的对应就比较清晰了,所以,从 initcall_levels[level] 部分一个个取出函数指针并执行函数就是执行xxx_init_call()定义的函数。

 浙公网安备 33010602011771号