象棋图片转FEN字符串详细教程
如把下图
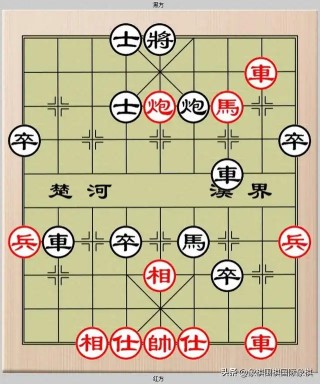
转换成:3ak4/7R1/3aCcN2/p7p/6r2/9/Pr1p1n2P/4B1p2/9/2BAKA1R1
模型21K,Intel N100上训练时间0.969秒,识别时间0.957秒。识别率好像是100%
一、安装软件包
apt install python3-scipy python3-pil
二、建目录data, data\0 a A b B c C k K n N p P r R
识别就是分类。每个目录对应一类,存放属于该类的所有图片。
三、收集和预处理数据
百度搜相似图片。运行prepare.py:


#!/usr/bin/python
from common import *
from pathlib import Path

fn = sys.argv[1]
a = slice(fn)
fn = Path(fn).stem
for i in range(len(a)):
  cv.imwrite(f'data/{fn}-{i}.png', a[i])

exit()

from PIL import Image, ImageDraw
img = Image.open(sys.argv[1])
id = ImageDraw.Draw(img)
sz = img.size; S,L,T = size(sz[0], sz[1])
for yy in range(10):
  for xx in range(9):
    y = T + yy * S
    x = L + xx * S
    id.rectangle((x,y,x+S,y+S), outline=(0,255,0,255), width=1)
img.show()
如何知道square的大小?图片查看器Gwenview和IfranView显示选择区的大小。或者用OpenCV的演示程序squares.py来高射炮打蚊子。
人工标注数据。文件管理器里按图标查看,把比如红车的改名为首字母为R。按大小排序,改名时列表不会来回乱变。
#!/usr/bin/python
from glob import glob
from shutil import move

s = 'rnbakcp'; s += s.upper() + '0'

for c in s:
 for p in [c + '*.png', c + '*.jpg']:
  for f in glob(p): move(f, c)
四、训练,运行train.py
from common import *
from sklearn.svm import SVC
import pickle

data_dir = "data"
features = []; labels = []
for label in os.listdir(data_dir):
  label_dir = os.path.join(data_dir, label)
  if not os.path.isdir(label_dir): continue
  for img_file in os.listdir(label_dir):
    img_path = os.path.join(label_dir, img_file)
    img = cv.imread(img_path)
    if img is None: continue
    feature = extract_features(img)
    if feature is None: continue
    features.append(feature)
    labels.append(label)

model = SVC(kernel='rbf', C=10, gamma=0.1)
model.fit(features, labels)
with open("model.pkl", "wb") as f: pickle.dump(model, f)
五,识别
#!/usr/bin/python
from common import *
import pickle

b = [[' '] * 9 for i in range(10)]

with open('model.pkl', 'rb') as f: model = pickle.load(f)
a = slice(sys.argv[1])
for i in range(len(a)):
  f = extract_features(a[i])
  b[i // 9][i % 9] = model.predict([f])[0]

def brd2fen (b):
  f = ''
  for y in range(10):
   n = 0
   for x in range(9):
    c = b[y][x]
    if c == '0': n += 1
    else:
     if n: f += str(n)
     f += c; n = 0
   if n: f += str(n)
   if y != 9: f += '/'
  return f

print(brd2fen(b))
for i in range(10): print(b[i])
鄙人的brd2fen是最长的。:-)
五 common.py
import numpy as np
import cv2 as cv
import pickle
import os
import sys

def size (W, H):
  S = 68 if W == 640 else 86 # size
  L = (W - 9 * S) // 2 # left
  T = (H - 10 * S) // 2 # top
  return S,L,T

def slice (fn):
  all = []

  img = cv.imread(fn); H,W = img.shape[:2]
  S,L,T = size(W, H)

  mask = np.zeros((S, S), dtype=bool)
  HS = S // 2; R = HS - 4 # half S & radius
  for y in range(S):
    for x in range(S):
      # 圆形mask. hypotenuse: 斜边
      if np.hypot(x - HS, y - HS) > R: mask[y, x] = True

  for yy in range(10):
    for xx in range(9):
      x = L + xx * S; y = T + yy * S
      x2 = min(W, x + S); y2 = min(H, y + S)
      sl = img[y:y2, x:x2]; sl[mask] = 0
      all.append(sl)

  return all

def extract_features (img):
  gray = cv.cvtColor(img, cv.COLOR_BGR2GRAY)
  _, bin = cv.threshold(gray, 0, 255, cv.THRESH_BINARY + cv.THRESH_OTSU)
  contours, _ = cv.findContours(bin, cv.RETR_EXTERNAL, cv.CHAIN_APPROX_SIMPLE)
  if len(contours) == 0: return None

  contour = max(contours, key=cv.contourArea)
  moments = cv.moments(contour)
  hu_moments = cv.HuMoments(moments).flatten()

  # 在阴影或强光条件下,RGB会整体变化,而HSV的色调H和饱和度S相对稳定,更适合颜色识别任务。V是亮度。
  hsv = cv.cvtColor(img, cv.COLOR_BGR2HSV)
  color_features = np.concatenate([
    cv.mean(hsv)[:3],
    cv.meanStdDev(hsv)[1].flatten()
  ])

  return np.concatenate([hu_moments, color_features])
六 其它
circles.py没有用到,但我辛苦地调了参数,愚蠢地用了直径去设置min/max raidus,一并附上。
#!/usr/bin/python
import numpy as np
import cv2 as cv
import sys
import os

fn = sys.argv[1]
img = cv.imread(fn); height, width = img.shape[:2]
fn = os.path.basename(fn)

circles = cv.HoughCircles(
  cv.cvtColor(img, cv.COLOR_BGR2GRAY), # 只支持灰度
  cv.HOUGH_GRADIENT, # 梯度,not 渐变
  1, # 改成2影响很大
  60, # Minimum distance between the centers of the detected circles
  param1=150, # 减小可增加检测到的圆数量
  param2=35, # The smaller it is, the more false circles may be detected.
  minRadius=30,
  maxRadius=48
) # 返回shape为(1,n,3)的ndarray
if circles is None: exit()
circles = np.around(circles).astype(int)

mask = np.zeros((96,96), dtype=bool)
for y in range(96):
  for x in range(96):
    # 以(48,48)为圆心,40为半径的mask. hypotenuse 斜边
    if np.hypot(x - 48, y - 48) > 40: mask[y, x] = True

for x,y,r in circles[0]:
  cv.circle(img, (x, y), r, (0, 255, 0), 2)

  x1 = max(0, x - r); x2 = min(width, x + r)
  y1 = max(0, y - r); y2 = min(height, y + r)
  ps = cv.resize(img[y1:y2, x1:x2], (96,96))
  ps[mask] = 255
  #cv.imwrite(f'tmp/{fn}-{x},{y}.png', ps)

from PIL import Image
img = Image.fromarray(cv.cvtColor(img, cv.COLOR_BGR2RGB))
img.show()

print(f'{circles.shape[1]} pieces')
七 补充
① train.py和predict.py不用import pickle, common.py import了。
② 在我机器上,用OpenCV显示图像,出来后卡死了,Ctrl-C都不行得kill。PIL的show先在/tmp下存文件再用系统默认图片查看器打开。OpenCV应该是因为我乱改KDE配置坏的事。

这个tough. 死活只能找到31个棋子,带框的炮不行。

 浙公网安备 33010602011771号