Scrapy 分布式数据采集方案
运行环境 CentOS7.3 + Python2.7 + Scrapy1.4 + MongoDB3.4  + BeautifulSoup4.6
编程工具 PyCharm + Robomongo + Xshell

请确保你的 python版本为2.7.5以上 版本
强烈推荐直接【FQ 安 装】,简单轻松
yum install gcc libffi-devel python-devel openssl-devel
pip install scrapy

如果提示以下错误
AttributeError: 'module' object has no attribute 'OP_NO_TLSv1_1'
说明你的 Twisted 版本过高,请执行
pip install Twisted==16.4.1

然后再安装以下内容
pip install scrapyd
pip install scrapy-mongodb
pip install beautifulsoup4
pip install scrapy-redis
pip install pymongo
pip install scrapyd-client
pip install Pillow
pip install python-scrapyd-api

# windows下安装方法也是一样的,推荐顺手安装一下windows版本,这样在 IDE(PyCharm)下能够得到Scrapy的代码提示,而且不会报 类不存在 的错误

然后执行
scrapy startproject fusnion
就可以创建一个名为 funsion 的项目

附录A:Scrapy Shell 调试
Linux 命令行下输入(以本站点为例)
scrapy shell 'http://www.cnblogs.com/funsion/'
进入交互式shell,输入以下内容
>>> from bs4 import BeautifulSoup
>>> soup = BeautifulSoup(response.body, 'html.parser')
>>> print soup.title
如果能输出 <title>Funsion Wu - 博客园</title> 则代表成功

附录B:参考文档
Scrapy 中文文档  http://scrapy-chs.readthedocs.org/zh_CN/latest/index.html
参考文档   https://piaosanlang.gitbooks.io/spiders/01day/README1.html
Scrapyd 文档    http://scrapyd.readthedocs.io/en/stable/
BeautifulSoup 中文手册  http://www.crummy.com/software/BeautifulSoup/bs4/doc/index.zh.html
Scrapy-Redis 文档    http://scrapy-redis.readthedocs.io/en/stable/
Scrapy-Mongodb 文档     https://github.com/sebdah/scrapy-mongodb
Pillow 文档    http://pillow.readthedocs.io/en/latest/index.html
Python-Scrapyd-Api 文档  http://python-scrapyd-api.readthedocs.io/en/latest/
参考文档  http://www.pastandnow.com/2015/11/16/Use-Scrapyd-client-Deploy-Spider/

附录C:mongodb安装方法
下载文件 https://fastdl.mongodb.org/linux/mongodb-linux-x86_64-rhel70-3.4.6.tgz
tar zxf mongodb-linux-x86_64-rhel70-3.4.6.tgz
cd mongodb-linux-x86_64-rhel70-3.4.6/
mkdir -p /data/{mongodb_data,mongodb_log}
ln -s /usr/local/src/mongodb-linux-x86_64-rhel70-3.4.6/bin/mongo /usr/local/bin/
nohup /usr/local/src/mongodb-linux-x86_64-rhel70-3.4.6/bin/mongod --dbpath=/data/mongodb_data --logpath=/data/mongodb_log/mongodb.log --logappend --fork > /dev/null 2>&1 &
编辑/etc/rc.local,加入下述代码然后再保存即可。
nohup /usr/local/src/mongodb-linux-x86_64-rhel70-3.4.6/bin/mongod --dbpath=/data/mongodb_data --logpath=/data/mongodb_log/mongodb.log --logappend --fork > /dev/null 2>&1 &

附录D:Scrapy代理解决方案
https://github.com/TeamHG-Memex/scrapy-rotating-proxies
https://github.com/luyishisi/Anti-Anti-Spider        (防采集策略)
http://www.cnblogs.com/kylinlin/p/5242266.html    (Scrapy+Tor防采集)

附录E:Scrapy-Demo地址
https://gitee.com/funsion_wu/demo/tree/master/scrapy
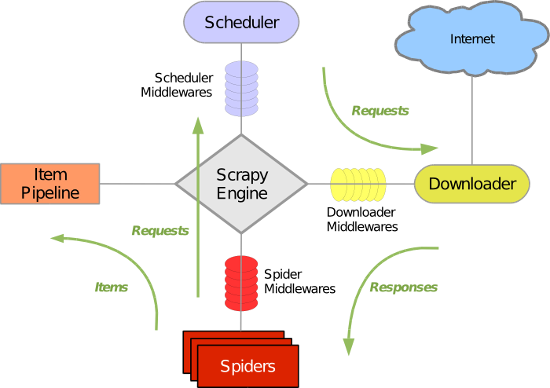
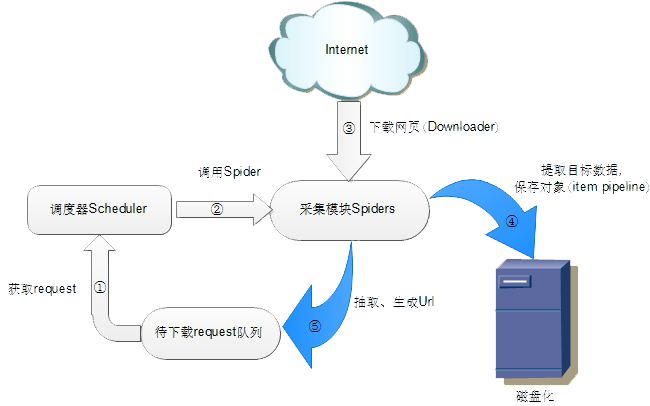
Scrapy架构图
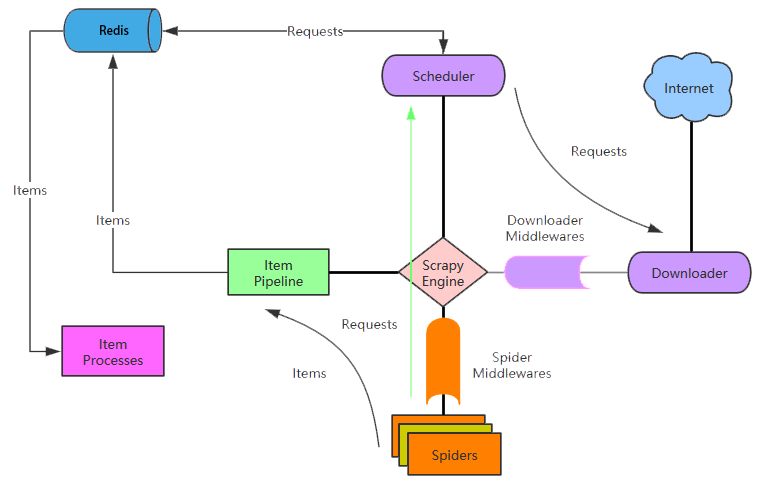
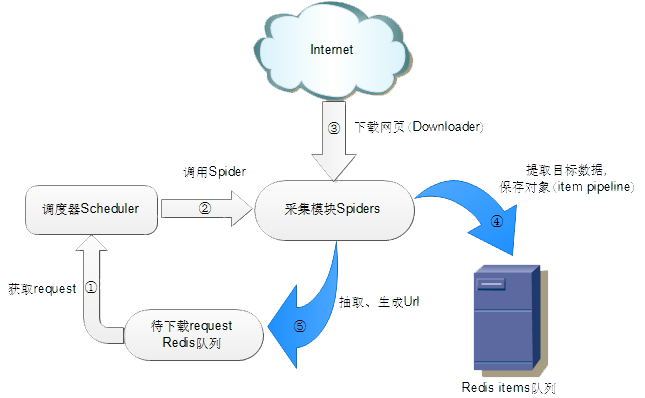
Scrapy-Redis架构图

 浙公网安备 33010602011771号