1. PyQt5
# PyQt5安装
pip install PyQt5 -i http://mirrors.aliyun.com/pypi/simple/
# 安装PyQt5图形界面工具(designer)
pip install PyQt-tools -i http://mirrors.aliyun.com/pypi/simple/
1.1 PyQt5 常用模块介绍
PyQt5.QtWidgets: 控件元素集
PyQt5.QtCore: 核心非GUI功能, 处理涉及到的文件 目录 链接 线程等对象
PyQt5.QtGui: 图形处理 事件处理 字体文本
PyQt5.Network: 网络编程类,实现Tcp/Ip 及Udp协议
PyQt5.QtBluetooth:蓝牙活动类,涉及扫描设备 链接 数据流交互操作
2.窗口
2.1 种类:QWidget | QMainWindow | QDialog
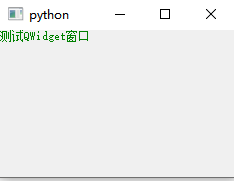
from PyQt5.QtWidgets import QWidget, QLabel, QApplication


class Q(QWidget):
    """
    QWidget:
    窗口定义自由度高,
    可自由扩展控件,
    修改样式
    """
    def __init__(self):
        super(Q, self).__init__()

        # 控件
        l = QLabel('测试QWidget窗口', self)
        l.setStyleSheet('color:green')


if __name__ == '__main__':
    app = QApplication([])
    w = Q()
    w.show()
    app.exec()
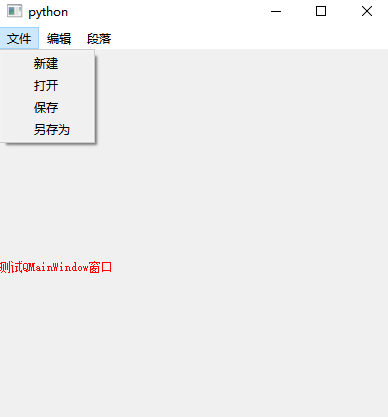
2.3 QMainWindow
from PyQt5.QtWidgets import QMainWindow, QApplication, QLabel, QMenuBar


class Q(QMainWindow):
    def __init__(self):
        """
        QMainWindow:
        QWidget子类,添加了额外扩展
        菜单栏QMenuBar
        工具栏QToolBar
        状态栏QStatusBar等
        """
        super(Q, self).__init__()
        self.init()

    def init(self):
        # 控件
        l = QLabel('测试QMainWindow窗口')  # 内容显示在主窗口区域
        l.setStyleSheet('color:red')  # 样式修改
        l.setParent(self)  # 添加控件到主窗口

        # ps:菜单栏
        m = QMenuBar()

        # 一级菜单栏
        fm = m.addMenu('文件')
        m.addMenu('编辑')
        m.addMenu('段落')

        # 二级
        fm.addAction('新建')
        fm.addAction('打开')
        fm.addAction('保存')
        fm.addAction('另存为')

        # 添加菜单栏
        self.setMenuBar(m)
        self.setCentralWidget(m)


if __name__ == '__main__':
    app = QApplication([])
    w = Q()
    w.show()
    app.exec()
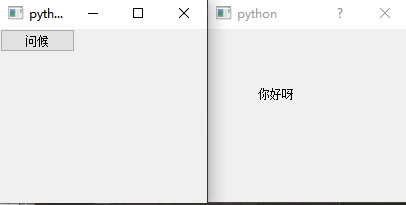
2.4 QDialog
import sys

from PyQt5.QtWidgets import *


class Q(QDialog):
    def __init__(self):
        """
        自定义对话框
        不作为主窗口存在
        多用于自定义信息提示
        """
        super(Q, self).__init__()

        l = QLabel('你好呀', self)
        l.setGeometry(50, 50, 100, 30)  # 设置绝对位置


class W(QWidget):
    def __init__(self, d):
        """主窗口"""
        super(W, self).__init__()

        # 添加控件
        bt = QPushButton('问候', self)

        # 添加点击事件
        bt.clicked.connect(self.click)
        self.d = d

    def click(self):
        self.d.show()


if __name__ == '__main__':
    app = QApplication(sys.argv)
    d = Q()
    w = W(d)
    w.show()
    # 程序进行循环等待状态
    app.exec()
3.控件
3.2 常用控件
from PyQt5.QtWidgets import *


class Q(QWidget):
    def __init__(self):
        super(Q, self).__init__()

        self.setWindowTitle('常用控件')
        # 布局
        f = QFormLayout(self)

        # 控件
        f.addRow(QLabel('纯文本&&链接&&图片标签'))
        f.addRow(QLineEdit('单行输入框'))
        f.addRow(QTextEdit('多行文本框'))

        r1 = QRadioButton('好')  # 单选
        r2 = QRadioButton('不好')

        b1 = QCheckBox('类型一')  # 多选
        b2 = QCheckBox('类型二')
        b3 = QCheckBox('类型三')

        f.addRow(r1)
        f.addRow(r2)
        f.addRow(b1)
        f.addRow(b2)
        f.addRow(b3)
        f.addRow(QPushButton('按钮'))


if __name__ == '__main__':
    app = QApplication([])
    w = Q()
    w.show()
    app.exec()
3.3 自定义控件
# coding=utf8
from PyQt5.QtGui import *
from PyQt5.QtWidgets import *


class Clock(QWidget):
    def __init__(self):
        super(Clock, self).__init__()
        self.resize(300, 300)

    def paintEvent(self, QPaintEvent):
        """窗口控件初始化调用"""
        # 画家
        painter = QPainter(self)

        # 画笔设置图画样式
        # pen = QPen()
        # pen.setColor(QColor(255, 255, 0))
        # painter.setPen(pen)

        # 作画
        # 线段p1(x1, x2);p2(x2,y2)
        # painter.drawLine(150, 10, 150, 280)

        # 圆形(中心点x,y ; rx, ry)
        # painter.drawEllipse(QPoint(150, 120), 30, 30)

        # 多边形
        # painter.drawConvexPolygon(QPoint(100, 100), QPoint(100, 150), QPoint(150, 100), QPoint(150, 200))

        # 矩形(x,y,w,h)
        # painter.drawRect(QRect(50, 50, 200, 50))

        # 扇形(x,y,w,h,a,e)
        painter.drawPie(10, 100, 200, 200, 300, 1500)

        # 文本
        # painter.drawText(150, 150, '文本测试')


if __name__ == '__main__':
    app = QApplication([])
    w = Clock()
    w.show()
    app.exec()
# 通过designer.exe得到的ui文件转换成py源码
>pyuic5 D:\xxx.ui -o D:\xxx.py
# 动态加载ui
# coding=utf8
from PyQt5.QtWidgets import *
from PyQt5 import uic


class Q(QWidget):
    def __init__(self):
        super(Q, self).__init__()

        # 动态加载ui文件
        uic.loadUi("C:/Users/FSH/Desktop/a.ui")


if __name__ == '__main__':
    app = QApplication([])
    w = Q()
    w.show()
    app.exec()
3.5 图片
from PyQt5.QtGui import *
from PyQt5.QtWidgets import *


class Q(QWidget):
    def __init__(self):
        """加载图片"""
        super(Q, self).__init__()

        # 加载图片(内部使用 外部打包存在问题)
        l = QLabel(self)
        p = QPixmap('./icon.png')
        l.setPixmap(p)


if __name__ == '__main__':
    app = QApplication([])
    w = Q()
    w.show()
    app.exec()
# coding=utf8
from PyQt5.QtGui import *
from PyQt5.QtWidgets import *

"""
使用pyrcc完成图片资源二进制化
>pyrcc  xx.rcc -o xx.py
--------------xx.rcc--------------------
<!DOCTYPE RCC>
<RCC>
	<qresource>
		<file>./xx.png</file>
	</qresource>
</RCC>
----------------------------------------
"""
# 导入图片资源
# from Gui_pygt import icon


class Q(QWidget):
    def __init__(self):
        """直接加载图片二进制文件"""
        super(Q, self).__init__()

        l = QLabel(self)
        # p = QPixmap('./icon.png')
        p = QPixmap(':/icon.png')
        l.setPixmap(p)


if __name__ == '__main__':
    app = QApplication([])
    w = Q()
    w.show()
    app.exec()
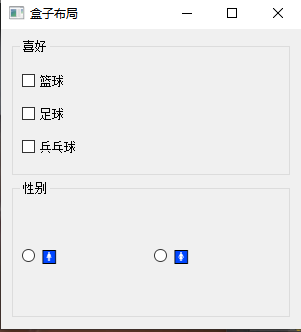
4.布局 = 容器
4.1 QLayout 是所有布局的基类
4.2 盒子布局 : QBoxLayout = QHBoxLayout + QVBoxLayout
import sys
from PyQt5.QtWidgets import QApplication, QWidget, QVBoxLayout, QCheckBox, QGroupBox, QHBoxLayout, QRadioButton


class MQ(QWidget):
    def __init__(self):
        super(MQ, self).__init__()

        # 设置固定大小
        # self.setFixedSize(300, 300)

        # 设置默认大小
        self.resize(300, 300)

        # 设置标题
        self.setWindowTitle('盒子布局')

        # 创建外部容器布局分组容器 > outer.setLayout(self)
        outer = QVBoxLayout(self)

        # 设置分组容器
        vg = QGroupBox("喜好")

        vg.resize(200, 200)

        # 创建垂直布局容器并定位到分组容器
        vb = QVBoxLayout(vg)

        # 容器控件
        c1 = QCheckBox("篮球")
        c2 = QCheckBox("足球")
        c3 = QCheckBox("兵乓球")

        # 添加控件到容器内
        vb.addWidget(c1)
        vb.addWidget(c2)
        vb.addWidget(c3)

        # 创建水平分组容器
        hg = QGroupBox('性别')

        hg.resize(200, 200)

        # 创建水平布局容器
        hb = QHBoxLayout(hg)

        # 容器控件
        r1 = QRadioButton('🚹')
        r2 = QRadioButton('🚺')

        # 添加控件到容器内
        hb.addWidget(r1)
        hb.addWidget(r2)

        # 添加分组容器到外部容器
        outer.addWidget(vg)
        outer.addWidget(hg)


if __name__ == '__main__':
    app = QApplication(sys.argv)
    w = MQ()

    w.show()
    app.exec()
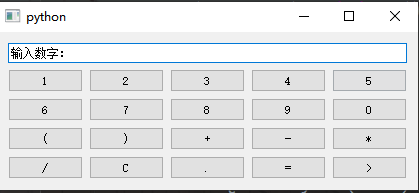
4.3 网格布局: QGridLayout
import sys

from PyQt5.QtWidgets import QWidget, QApplication, QVBoxLayout, QLineEdit, QGridLayout, QPushButton


class WL(QWidget):
    def __init__(self):
        super(WL, self).__init__()
        self._init()

    def _init(self):
        """设计内容"""
        # 外部容器
        outer = QVBoxLayout(self)

        # 文本框
        n = QLineEdit('输入数字:')

        # 网格容器
        g = QGridLayout()

        # 数据处理
        data = [
            '1', '2', '3', '4', '5',
            '6', '7', '8', '9', '0',
            '(', ')', '+', '-', '*',
            '/', 'C', '.', '=', '>'
        ]
        for i, d in enumerate(data):
            bt = QPushButton(d)
            g.addWidget(bt, i//5, i % 5)  # 行 列

        # 添加控件&容器
        outer.addWidget(n)
        outer.addLayout(g)


if __name__ == '__main__':
    app = QApplication(sys.argv)
    w = WL()
    w.show()
    app.exec()
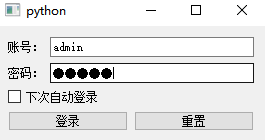
# coding=utf-8
from PyQt5.QtWidgets import QWidget, QVBoxLayout, QFormLayout, QPushButton, QApplication, QLineEdit, QCheckBox, \
    QHBoxLayout


class Fq(QWidget):
    def __init__(self):
        super(Fq, self).__init__()

        # 外部垂直容器
        outer = QVBoxLayout(self)

        # 表单容器
        f = QFormLayout()

        # 控件
        user = QLineEdit()
        psw = QLineEdit()
        user.setPlaceholderText('请输入账号')  # 设置输入框显示内容
        psw.setPlaceholderText('请输入密码')
        psw.setEchoMode(QLineEdit.Password)  # 设置密码不可见

        f.addRow('账号:', user)
        f.addRow('密码:', psw)

        bc = QCheckBox('下次自动登录')

        # 添加内部水平容器
        inner = QHBoxLayout()
        bt = QPushButton('登录')
        bz = QPushButton('重置')
        bt.setFixedSize(120, 20)
        bz.setFixedSize(120, 20)

        # 初始化控件&容器
        outer.addLayout(f)
        outer.addWidget(bc)
        inner.addWidget(bt)
        inner.addWidget(bz)
        outer.addLayout(inner)
        outer.addStretch(1)  # 设置控件拉伸间距


if __name__ == '__main__':
    app = QApplication([])

    w = Fq()
    w.show()

    app.exec()
4.5 多页面切换布局: QStackedLayout
from PyQt5.QtWidgets import *
from PyQt5.QtCore import *


class W(QWidget):
    def __init__(self):
        super(W, self).__init__()

        # 布局
        sl = QStackedLayout(self)

        # 控件
        sl.addWidget(QLabel('测试文本1'))
        sl.addWidget(QLabel('测试文本2'))
        sl.addWidget(QLabel('测试文本3'))
        sl.addWidget(QLabel('测试文本4'))

        # 循环计时切换
        t = QTimer(self)

        t.timeout.connect(lambda: sl.setCurrentIndex((sl.currentIndex() + 1) % sl.count()))
        t.start(1000)


if __name__ == '__main__':
    app = QApplication([])
    w = W()
    w.show()
    app.exec()
5. 信号 &槽
5.1 信号 => js事件 || 槽 => 事件处理方法(函数)
5.2 使用
import sys

from PyQt5.QtWidgets import *


class Signal(QWidget):
    def __init__(self):
        super(Signal, self).__init__()

        # 添加控件
        bt = QPushButton('点击一下', self)

        # 绑定槽函数
        bt.clicked.connect(self.handle)

    def handle(self):
        """
        槽函数的参数
        取决于信号参数clicked(args,)
        """
        print('按钮点击触发......')


if __name__ == '__main__':
    app = QApplication(sys.argv)
    w = Signal()
    w.show()
    app.exec()
5.3 自定义信号
import sys

from PyQt5.QtWidgets import *
from PyQt5.QtCore import *


class ISignal(QWidget):
    # 添加信号
    signal = pyqtSignal(str)  # 可携带参数

    def __init__(self):
        """自定义信号"""
        super(ISignal, self).__init__()

        # 绑定信号和槽
        self.signal.connect(self.data)

        # 控件
        bt = QPushButton('点击一下', self)

        # 控件绑定槽函数
        bt.clicked.connect(self.click)

    def click(self):
        # 触发信号
        self.signal.emit('你好呀!!!')

    @staticmethod
    def data(d):
        print('点击事件完成\n信号传递的数据:', d)


if __name__ == '__main__':
    app = QApplication(sys.argv)
    w = ISignal()
    w.show()
    app.exec()

 浙公网安备 33010602011771号