
vue后台(二)
一,添加品牌的表单验证
前台表单校验(内置规则和自定义规则)
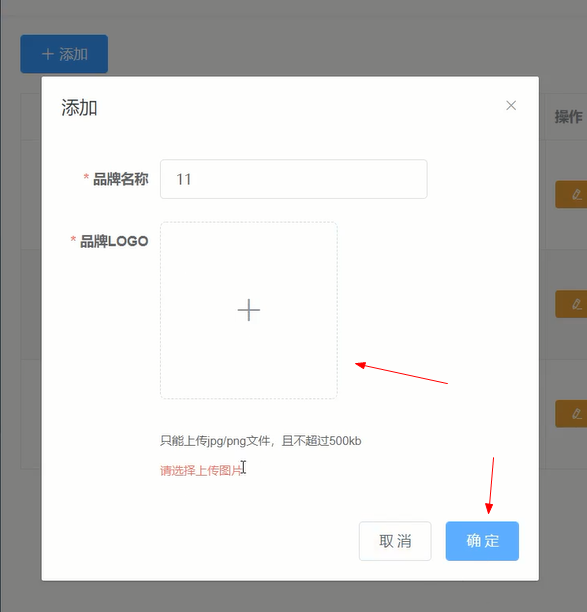
如果不加校验,那么没有图片也会上传过去
使用element-ui的form
品牌名称:
1、必须有 输入过程中校验
2、长度 失去焦点校验
品牌logo
必须有 点击确认按钮去校验
校验时机:三种
参考官方文档
我们的代码点击确定要先去整体校验校验 参考文档 修改代码
1.通过element官网的form表单验证规则,单一验证,在el-form中定义rules属性,然后在data中定义rules, 然后在el-form-item中配置prop属性
 <el-form :model="form" style="width:80%" :rules="rules" ref="form">
        <el-form-item label="品牌名称" :label-width="formLabelWidth" prop="tmName">
          <el-input v-model="form.tmName" autocomplete="off"></el-input>
        </el-form-item>
        <el-form-item label="品牌LOGO" :label-width="formLabelWidth" prop="logoUrl">
          <el-upload
            class="avatar-uploader"
            action="/dev-api/admin/product/fileUpload"
            :show-file-list="false"
            :on-success="handleLogoSuccess"
            :before-upload="beforeLogoUpload"
          >
            <!-- 上传图片的接口地址,需要通过转发去到真实的接口地址 -->

            <img v-if="form.logoUrl" :src="form.logoUrl" class="avatar" />
            <i v-else class="el-icon-plus avatar-uploader-icon"></i>
            <div class="el-upload__tip" slot="tip">只能上传jpg/png文件,且不超过500kb</div>
          </el-upload>
        </el-form-item>
      </el-form>
2,在data中定义rules
2.1,对象形式,tmName为输入框的输入数据的验证规则
2.2, message: 对表单验证的提示
2.3, trigger,通过哪些事件触发验证,blur为失去焦点判断,change,输入框数据改变时验证
2.4,图片change事件完成,上传成功后,不会有提示验证,但是在点击弹框的确定按钮,会有整体验证,此时会有提示
 rules: {
        tmName: [
          { required: true, message: "请输入品牌名称", trigger: "blur" },
          // {
          //   min: 2,
          //   max: 10,
          //   message: "长度在 2 到 10 个字符",
          //   trigger: "change",
          // },
          { validator: this.validateTmName, trigger: "change" },
        ],
        logoUrl: [
          { required: true, message: "请选择上传图片", trigger: "change" },
        ],
      },
3,点击弹框的确定按钮,需要整体验证,此时需要在<el-form 中配置ref属性
<el-form :model="form" style="width:80%" :rules="rules" ref="form">
        <el-form-item label="品牌名称" :label-width="formLabelWidth" prop="tmName">
 <div slot="footer" class="dialog-footer">
        <el-button @click="isShowDialog = false">取 消</el-button>
        <el-button type="primary" @click="addOrupdateTrademark">确 定</el-button>
      </div>
    </el-dialog>
    addOrupdateTrademark() {
      //整体添加验证规则
      this.$refs.form.validate(async (valid) => {
        //valid,整体表单项验证成功,才可以发送请求
        if (valid) {
          //添加和修改二合一
          //找参数
          let trademark = this.form;
          //发请求
          const result = await this.$API.trademark.addOrUpdate(trademark);
          //成功干啥
          if (result.code === 200) {
            this.$message.success(`${trademark.id ? "修改" : "添加"}品牌成功`);
            this.getTrademarkList(trademark.id ? this.page : 1); //重新加载数据 默认添加的新的品牌在最后
            this.isShowDialog = false;
          } else {
            //失败干啥
            this.$message.error(`${trademark.id ? "修改" : "添加"}品牌失败`);
          }
        } else {
          console.log("验证失败");
          return false;
        }
      });

      // //添加和修改二合一
      // //找参数
      // let trademark = this.form;
      // //发请求
      // const result = await this.$API.trademark.addOrUpdate(trademark);
      // //成功干啥
      // if (result.code === 200) {
      //   this.$message.success(`${trademark.id ? "修改" : "添加"}品牌成功`);
      //   this.getTrademarkList(trademark.id ? this.page : 1); //重新加载数据 默认添加的新的品牌在最后
      //   this.isShowDialog = false;
      // } else {
      //   //失败干啥
      //   this.$message.error(`${trademark.id ? "修改" : "添加"}品牌失败`);
      // }
    },
3.1,此时上传图片的change事件触发后,并不会有验证规则,只有点击弹框的确定按钮,才会验证
4.自定义规则,去官网查找, 对输入框输入数据的长度自定义规则,this.validateTmName为定义的一个函数,需要在methods中定义
 rules: {
        tmName: [
          { required: true, message: "请输入品牌名称", trigger: "blur" },
          // {
          //   min: 2,
          //   max: 10,
          //   message: "长度在 2 到 10 个字符",
          //   trigger: "change",
          // },
          { validator: this.validateTmName, trigger: "change" },
        ],
        logoUrl: [
          { required: true, message: "请选择上传图片", trigger: "change" },
        ],
      },
  methods: {
    //value为输入的字符串
    validateTmName(rule, value, callback){
      if (value.length < 2 || value.length > 10) {
        // callback 这个函数调用带了error错误信息,代表不通过
        callback(new Error("请输入2-10个字符"));
      } else {
        // callback 这个函数如果不带任何参数信息,代表验证过
        callback();
      }
    },
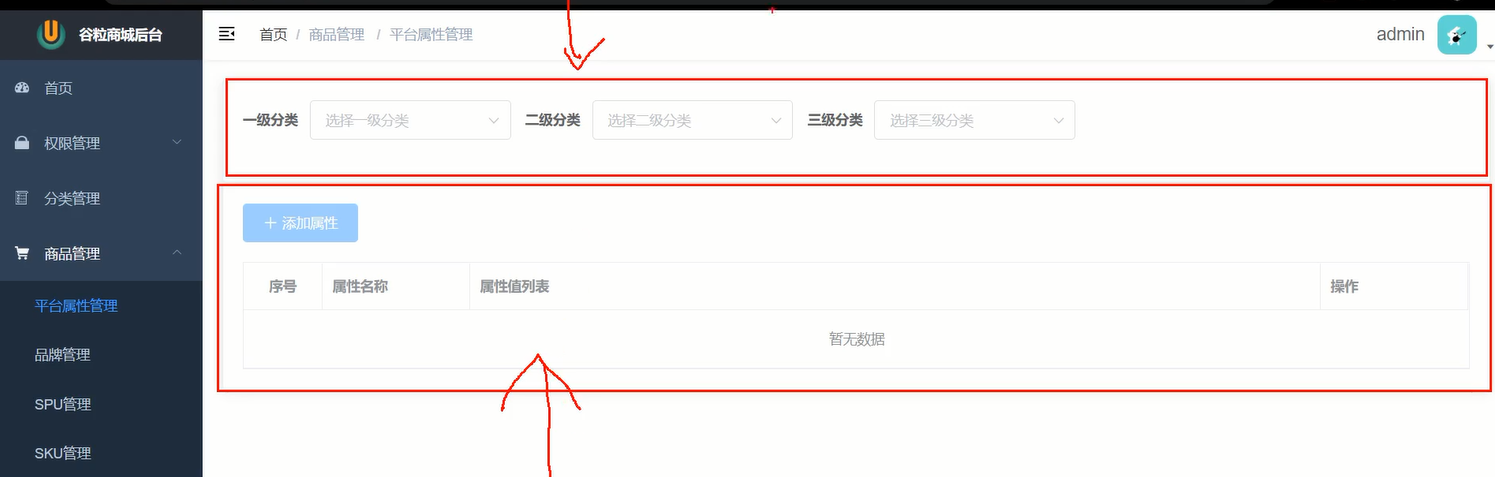
商品属性接口函数
商品属性(平台属性)相关的接口函数,并且导入到整体的index.js并导出让后面的组件当中可以导入使用
    内部更新和添加使用的是同一个,一个参数需要id 一个不需要
    在组件当中去测试一个
在api新建atrr文件夹(index.js)
import request from '@/utils/request'

const api_name = '/admin/product'

export default {
  /*
  获取属性列表
  GET /admin/product/attrInfoList/{category1Id}/{category2Id}/{category3Id
  */
  getList(category1Id,category2Id,category3Id) {
    return request({
      url: `${api_name}/attrInfoList/${category1Id}/${category2Id}/${category3Id}`,
      method: 'get',
    })
  },

  /*
  增加或者修改属性
  POST /admin/product/saveAttrInfo
  增加和修改一体  增加没id 修改有id
  */
  addOrUpdate(attr){
    return request({
      url:`${api_name}/saveAttrInfo`,
      method:'post',
      data:attr
    })
  },
  /*
  DELETE /admin/product/deleteAttr/{attrId}
  */
  delete(attrId){
    return request({
      url:`${api_name}/deleteAttr/${attrId}`,
      method:'delete'
    })
  }

}
在api新建文件夹category,搞三级列表接口函数
import request from '@/utils/request'

export default {

  /*
  查找一级分类列表
  */
  getCategorys1() {
    return request({
      url: '/admin/product/getCategory1',
      method: 'get'
    })
  },

  /*
  查找二级分类列表
  */
  getCategorys2(category1Id) {
    return request({
      url: '/admin/product/getCategory2/' + category1Id,
      method: 'get'
    })
  },

  /*
  查找三级分类列表
  */
  getCategorys3(category2Id) {
    return request({
      url: '/admin/product/getCategory3/' + category2Id,
      method: 'get'
    })
  }
}
在api总的入口引入接口模块
// 引入准备全局注册的组件
import HintButton from '@/components/HintButton'
import CategorySelector from '@/components/CategorySelector'

// 注册全局组件
Vue.component('HintButton', HintButton)
Vue.component('CategorySelector', CategorySelector)
在attr中引入,外头包含一个el-card组件,忽悠立体浮动效果
<template>
  <div>
    <el-card>
      <CategorySelector @handlerCategory="handlerCategory"></CategorySelector>
    </el-card>
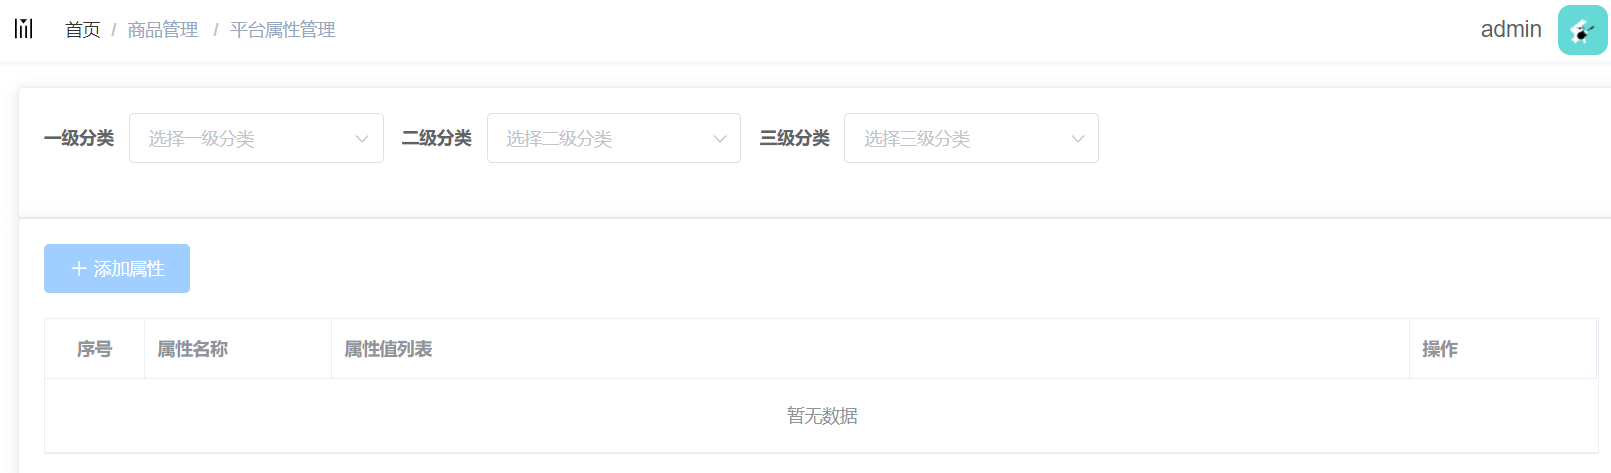
静态页面搭建
:model="cForm" 收集三个id的对象,是因为要通过id发送请求,请求数据,在data中定义
:inline="true" 表单是行内样式
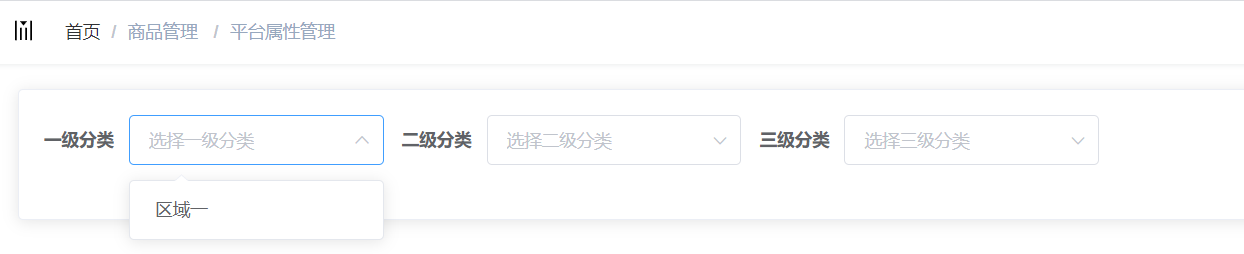
<template>
    <el-form :inline="true" :model="cForm" class="demo-form-inline">
    <el-form-item label="一级分类">
      <el-select v-model="cForm.category1Id" placeholder="选择一级分类">
        <el-option
          label="区域一"
          value="上海"

        ></el-option>
      </el-select>
    </el-form-item>
    <el-form-item label="二级分类">
      <el-select v-model="cForm.category2Id" placeholder="选择二级分类">
        <el-option
           label="区域一"
          value="上海"

        ></el-option>
         <el-option
           label="区域二"
          value="北京"

        ></el-option>
      </el-select>
    </el-form-item>
    <el-form-item label="三级分类">
      <el-select v-model="cForm.category3Id" placeholder="选择三级分类">
        <el-option
           label="区域二"
          value="北京"
        ></el-option>
      </el-select>
    </el-form-item>
  </el-form>
</template>

<script>
export default {
  name: "CategorySelector",
  data(){
    return {
      //为了收集选中的类别id
      cForm: {
        category1Id: "",
        category2Id: "",
        category3Id: "",
      },
    }
  }

};
</script>
2,三级分类的组件动态显示数据 ,点击一级分类的数据(change事件),发送请求,获取分类列表的数据,就会决定二级分类展示什么数据,三级分类的数据也是如此
2.1,获取分类列表的响应数据,是个数组
{
  "code": 0,
  "data": [
    {
      "id": 0,
      "name": "string"
    }
  ],
  "message": "string",
  "ok": true
}
2.2, 在data中定义配置三级分类列表的响应数据
 //为了存储请求回来的数据
      category1List: [],
      category2List: [],
      category3List: [],
2.3, 在CategorySelector组件中加载的时候,就需要获取一级分类列表的数据,需要发送请求获取
  mounted() {
    this.getCategory1List();
  },
  methods: {
    //获取一级分类列表
    async getCategory1List() {
      const result = await this.$API.category.getCategorys1();
      if (result.code === 200) {
        this.category1List = result.data;
      }
    },
2.4在html模板中填充数据
 <el-form :inline="true" :model="cForm" class="demo-form-inline">
    <el-form-item label="一级分类">
      <el-select v-model="cForm.category1Id" placeholder="选择一级分类" @change="handlerC1">
        <el-option
          :label="c1.name"
          :value="c1.id"
          v-for="(c1, index) in category1List"
          :key="c1.id"
        ></el-option>
      </el-select>
    </el-form-item>
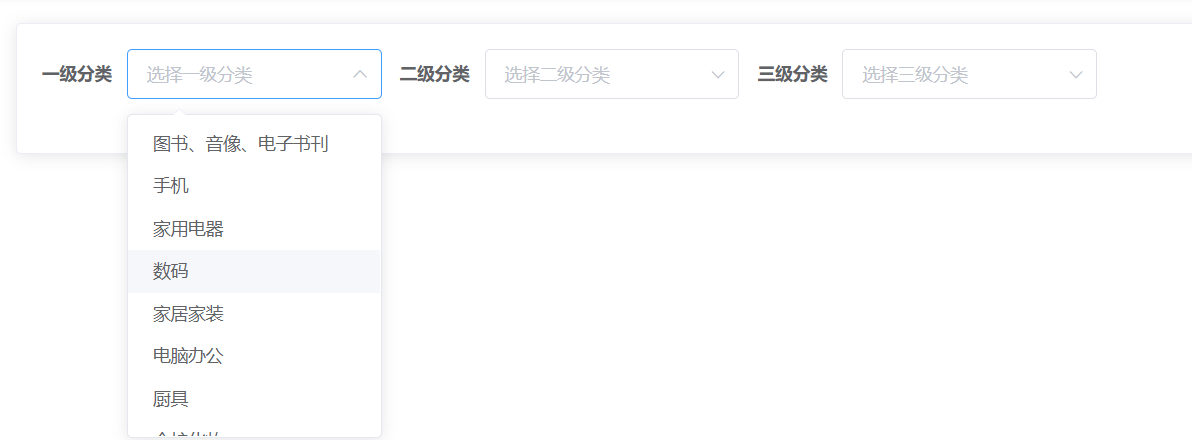
3,选中一级分类的时候触发获取二级分类列表,在<el-select绑定@change事件,默认传递的是选中值,也就是id值

 <el-form-item label="一级分类">
      <el-select v-model="cForm.category1Id" placeholder="选择一级分类" @change="handlerC1">
        <el-option
js代码,绑定该事件后,发送请求,获取二级分类列表数据
 // 选中一级分类的时候触发获取二级分类列表
    // @change="handlerC1",实参为默认选中的值
    async handlerC1(category1Id) {


      const result = await this.$API.category.getCategorys2(category1Id);
      if (result.code === 200) {
        this.category2List = result.data;
      }
    },
在模板中填充数据
   <el-form-item label="二级分类">
      <el-select v-model="cForm.category2Id" placeholder="选择二级分类" @change="handlerC2">
        <el-option
          :label="c2.name"
          :value="c2.id"
          v-for="(c2, index) in category2List"
          :key="c2.id"
        ></el-option>
      </el-select>
    </el-form-item>
 <el-form-item label="三级分类">
      <el-select v-model="cForm.category3Id" placeholder="选择三级分类" @change="handlerC3">
        <el-option
          :label="c3.name"
          :value="c3.id"
          v-for="(c3, index) in category3List"
          :key="c3.id"
        ></el-option>
      </el-select>
    </el-form-item>
js代码,绑定该事件后,发送请求,获取三级分类列表数据
// 选中二级分类的时候触发获取三级分类列表
    async handlerC2(category2Id) {

      const result = await this.$API.category.getCategorys3(category2Id);
      if (result.code === 200) {
        this.category3List = result.data;
      }
    },
5,此时有个bug,重新选择一级分类的数据,二级分类的数据没有变化,重新选择二级分类的数据,三级分类的数据没有变化,我们需要一选中一级分类的数据,二级,三级的id清空,并且
他们的数组分类数据也要清空, 一选中二级分类的数据,三级的id清空,并且三级数组分类数据也要清空
// 选中一级分类的时候触发获取二级分类列表
    // @change="handlerC1",实参为默认选中的值
    async handlerC1(category1Id) {
      //选中1级分类 把23级分类相关的都清空
      this.cForm.category2Id = "";
      this.cForm.category3Id = "";
      this.category2List = [];
      this.category3List = [];

      //向父传递选中的1级分类id
      this.$emit("handlerCategory", { categoryId: category1Id, level: 1 });

      const result = await this.$API.category.getCategorys2(category1Id);
      if (result.code === 200) {
        this.category2List = result.data;
      }
    },
 // 选中二级分类的时候触发获取三级分类列表
    async handlerC2(category2Id) {
      //选中2级分类 把3级分类相关的都清空
      this.cForm.category3Id = "";
      this.category3List = [];

      this.$emit("handlerCategory", { categoryId: category2Id, level: 2 });

      const result = await this.$API.category.getCategorys3(category2Id);
      if (result.code === 200) {
        this.category3List = result.data;
      }
    },
6,三级分类列表选择通知父组件发请求获取attr组件的属性数据
 获取属性列表
  GET /admin/product/attrInfoList/{category1Id}/{category2Id}/{category3Id
  */
  getList(category1Id,category2Id,category3Id) {
    return request({
      url: `${api_name}/attrInfoList/${category1Id}/${category2Id}/${category3Id}`,
      method: 'get',
    })
  },
6.1,每次选择1,2,3级分类的数据,需要传递id给父组件attr, 因为父组件需要接受三个id作为请求参数,发送请求,获取属性数据。而且是父组件获取到三级id时,正好可以发送请求,获取数据,子组件对id做个标识,区分id是哪级分裂的id
attr组件通过自定义函数和父子通信
  // 选中一级分类的时候触发获取二级分类列表
    // @change="handlerC1",实参为默认选中的值
    async handlerC1(category1Id) {
      //选中1级分类 把23级分类相关的都清空
      this.cForm.category2Id = "";
      this.cForm.category3Id = "";
      this.category2List = [];
      this.category3List = [];

      //向父传递选中的1级分类id
      this.$emit("handlerCategory", { categoryId: category1Id, level: 1 });

      const result = await this.$API.category.getCategorys2(category1Id);
      if (result.code === 200) {
        this.category2List = result.data;
      }
    },
 // 选中二级分类的时候触发获取三级分类列表
    async handlerC2(category2Id) {
      //选中2级分类 把3级分类相关的都清空
      this.cForm.category3Id = "";
      this.category3List = [];

      this.$emit("handlerCategory", { categoryId: category2Id, level: 2 });

      const result = await this.$API.category.getCategorys3(category2Id);
      if (result.code === 200) {
        this.category3List = result.data;
      }
    },
此时三级列表选中数据后,向父组件传递id
 <el-form-item label="三级分类">
      <el-select v-model="cForm.category3Id" placeholder="选择三级分类" @change="handlerC3">
        <el-option
   },
    // 选中三级分类的时候触发,给父传递选中的3级id
    handlerC3(category3Id) {
      this.$emit("handlerCategory", { categoryId: category3Id, level: 3 });
    },
6.2, attr父组件通过自定义函数和父子通信
<el-card>
      <CategorySelector @handlerCategory="handlerCategory"></CategorySelector>
    </el-card>
js代码
注,当获取到了三级id,此时发送请求获取最佳
如果用户重新选中三级列表的数据,传递过来了id,那么之前的id需要清空,之前获取的数组attrList数据也要清空
handlerCategory({ categoryId, level }) {
      // console.log(categoryId,level)
      if (level === 1) {
        //清空之前保留的2级级3级id以及之前请求的attrList
        this.category2Id = "";
        this.category3Id = "";
        this.attrList = [];

        this.category1Id = categoryId;
      } else if (level === 2) {
        this.category3Id = "";
        this.attrList = [];
        this.category2Id = categoryId;
      } else {
        this.category3Id = categoryId;
        //如果选中了三级,父组件会接收到3级id,代表要发请求,拿属性列表数据
        //三级被传过来,证明12级已经被传过来存储了
        //此时请求最佳
        this.getAttrList();
      }
    },
    async getAttrList() {
      let { category1Id, category2Id, category3Id } = this;
      const result = await this.$API.attr.getList(
        category1Id,
        category2Id,
        category3Id
      );
      if (result.code === 200) {
        this.attrList = result.data;
      }
    },
 data() {
    return {
      //获取数据所需的参数
      category1Id: "",
      category2Id: "",
      category3Id: "",
      attrList: [],
获取的响应数据
{
  "code": 200,
  "message": "成功",
  "data": [
    {
      "id": 1971,
      "attrName": "系统",
      "categoryId": 61,
      "categoryLevel": 3,
      "attrValueList": [
        {
          "id": 9922,
          "valueName": "ios",
          "attrId": 1971
        },
        {
          "id": 9921,
          "valueName": "塞班",
          "attrId": 1971
        },
        {
          "id": 9923,
          "valueName": "安卓",
          "attrId": 1971
        }
      ]
    },
    {
      "id": 1993,
      "attrName": "内存",
      "categoryId": 61,
      "categoryLevel": 3,
      "attrValueList": [
        {
          "id": 9911,
          "valueName": "32G",
          "attrId": 1993
        },
        {
          "id": 9908,
          "valueName": "8G",
          "attrId": 1993
        },
        {
          "id": 9910,
          "valueName": "16G",
          "attrId": 1993
        },
        {
          "id": 9907,
          "valueName": "4G",
          "attrId": 1993
        },
        {
          "id": 9909,
          "valueName": "12G",
          "attrId": 1993
        }
      ]
    },
7.atrr组件属性列表页的静态页面以及动态数据展示
注;添加属性按钮默认开始就是不可点击的,只要子组件传递过来的三级id,添加属性按钮才可以点击
el-tag,里头是双重遍历
<template>
  <div>
    <el-card>
      <CategorySelector @handlerCategory="handlerCategory"></CategorySelector>
    </el-card>

    <el-card >

        <el-button
          type="primary"
          icon="el-icon-plus"
          :disabled="!category3Id"

        >添加属性</el-button>
        <el-table :data="attrList" border style="width: 100%; margin-top:20px">
          <el-table-column align="center" type="index" label="序号" width="80"></el-table-column>
          <el-table-column prop="attrName" label="属性名称" width="150"></el-table-column>
          <el-table-column label="属性值列表" width="width">
            <template slot-scope="{row,$index}">
              <el-tag
                type="success"
                v-for="(attrValue, index) in row.attrValueList"
                :key="attrValue.id"
              >{{attrValue.valueName}}</el-tag>
            </template>
          </el-table-column>
          <el-table-column label="操作" width="150">
            <template slot-scope="{row,$index}">
              <el-button type="warning" icon="el-icon-edit" size="mini" title="修改"></el-button>
              <el-button type="danger" icon="el-icon-delete" size="mini" title="删除"></el-button>

            </template>
          </el-table-column>
        </el-table>

    </el-card>

  </div>
</template>
8,列表页和增加修改页的切换使用,没有用到路由,而是通过v-show实现,点击添加属性按钮触发
在data中定义isShowList:true,默认是展示列表页
<template>
  <div>
    <el-card>
      <CategorySelector @handlerCategory="handlerCategory"></CategorySelector>
    </el-card>

    <el-card >

      <div v-show="isShowList">
          <el-button
          type="primary"
          icon="el-icon-plus"
          :disabled="!category3Id"
          @click="showAddDiv"
        >添加属性</el-button>
        <el-table :data="attrList" border style="width: 100%; margin-top:20px">
          <el-table-column align="center" type="index" label="序号" width="80"></el-table-column>
          <el-table-column prop="attrName" label="属性名称" width="150"></el-table-column>
          <el-table-column label="属性值列表" width="width">
            <template slot-scope="{row,$index}">
              <el-tag
                type="success"
                v-for="(attrValue, index) in row.attrValueList"
                :key="attrValue.id"
              >{{attrValue.valueName}}</el-tag>
            </template>
          </el-table-column>
          <el-table-column label="操作" width="150">
            <template slot-scope="{row,$index}">
              <el-button type="warning" icon="el-icon-edit" size="mini" title="修改"></el-button>
              <el-button type="danger" icon="el-icon-delete" size="mini" title="删除"></el-button>

            </template>
          </el-table-column>
        </el-table>
      </div>

      <div v-show="!isShowList">
        添加修改页
      </div>

    </el-card>

  </div>
</template>
点击添加属性按钮,切换到添加修改页
showAddDiv(){
      this.isShowList=false
    }
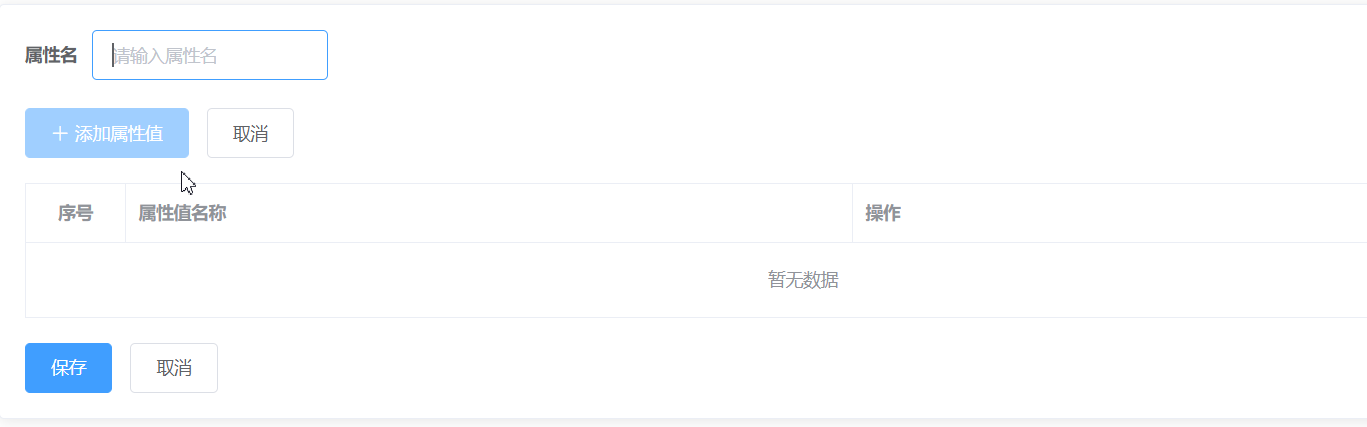
9,添加品牌属性页html页通过接口文档,收集请求体参数,
接口文档的请求体参数
{
  "attrName": "string",
  "attrValueList": [
    {
      "attrId": 0,
      "id": 0,
      "valueName": "string"
    }
  ],
  "categoryId": 0,
  "categoryLevel": 0,
  "id": 0
}
9.1,在attr组件中的data中收集参数
 form: {
        attrName:'',
        attrValueList:[],
        categoryId: '',
        categoryLevel:3
      },
9.2,然后在设置静态页面
注;收集的form对象给el-form,
 <div v-show="!isShowList">
        <el-form ref="form" :model="form" :inline="true">
          <el-form-item label="属性名">
            <el-input v-model="form.attrName" placeholder="请输入属性名"></el-input>
          </el-form-item>
        </el-form>

        <el-button type="primary" icon="el-icon-plus"  :disabled="!form.attrName" @click="addAttrValue">添加属性值</el-button>
        <el-button @click="isShowList = true">取消</el-button>

        <el-table
          border
          :data="form.attrValueList"
          style="width: 100%;margin:20px 0">
          <el-table-column
            align="center"
            type="index"
            label="序号"
            width="80">
          </el-table-column>
          <el-table-column
            prop="prop"
            label="属性值名称"
            width="width">
          <template slot-scope="{row,$index}">
              <el-input v-model="row.valueName" placeholder="请输入属性值名称" size="mini"></el-input>
            </template>

          </el-table-column>
          <el-table-column
            label="操作"
            width="width">
          </el-table-column>
        </el-table>
        <el-button type="primary">保存</el-button>
        <el-button @click="isShowList = true">取消</el-button>
      </div>
9.3,点击取消按钮,切换到商品属性展示页面,此时需要添加点击事件,对isShowList操作
添加属性值按钮,默认是置灰的,只要输入属性名,该按钮就不至灰,
<el-button type="primary" icon="el-icon-plus" :disabled="!form.attrName">添加属性值</el-button>
<el-button type="primary" icon="el-icon-plus" :disabled="!form.attrName" @click="addAttrValue">添加属性值</el-button>
 addAttrValue() {
      //点击添加属性值,需要给attrForm当中的attrValueList数组中塞一条数据,数据要参考接口文档
      //点击添加的这个属性值对象仅仅是为了让上面能出现一个输入框,此时这个属性值对象内部属性值都是空串和undefined

      // {
      // "attrId": 0,
      // "id": 0,
      // "valueName": "string"
      // }
      this.form.attrValueList.push({
        attrId: this.form.id, //添加属性可以添加属性值,但是添加属性的时候,这个新属性没有id
                                  //修改属性也可以添加属性值,那么修改的属性是有id的
        valueName: "",
      });
    },
此时这里有个bug,已经添加了属性值,返回到品牌属性展示页后,再次点击添加属性按钮,还是显示的是之前的属性的旧数据,此时必须在每次点击添加属性按钮时,清空form对象数据
 showAddDiv() {
       //清一下,为了把上次添加而取消的信息清理掉
      this.form = {
        attrName: "",
        attrValueList: [],
        categoryId: this.category3Id,
        categoryLevel: 3,
      },
      this.isShowList = false;
    },

 浙公网安备 33010602011771号