
SpringMVC
1.SpringMVC 初识
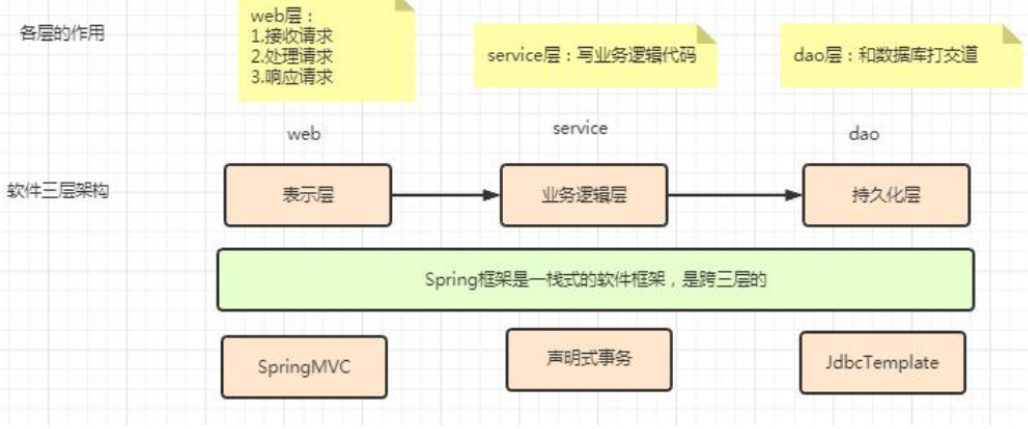
SpringMVC 本质是 Spring 的一个 web 模块,只不过在实际开发中、培训中一般都是当做一个单独的框架来学习,位于软件三层架构中的表示层。
MVC 模式
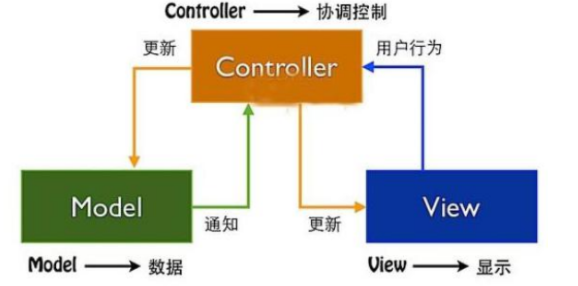
●Model(模型)是应用程序中用于处理应用程序数据逻辑的部分。通常负责在数据库中存取数据。
●View(视图)是应用程序中处理数据显示的部分。通常是依据模型数据创建的。
●Controller(控制器)是应用程序中处理用户交互的部分。通常负责从视图读取数据,控制用户输入。
MVC 分层有助于管理复杂的应用程序,因为您可以在一个时间内专门关注一个方面。
例如,您可以在不依赖业务逻辑的情况下专注于视图设计。同时也让应用程序的测试更加容易。
MVC 分层同时也简化了分组开发。不同的开发人员可同时开发视图、控制器逻辑和业务逻辑。
2.SpringMVC 第一个案例
1.步骤
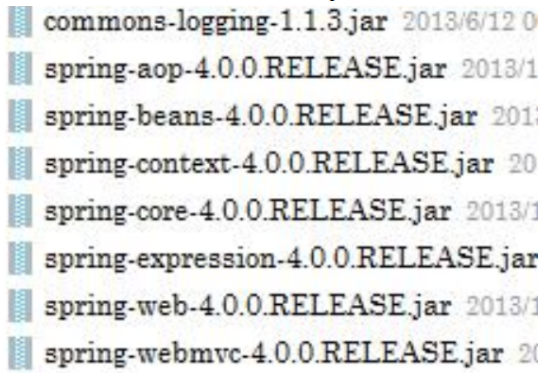
第一步:创建动态 web 工程,导入 jar 包
第二步:在 web.xml 文件中配置 springmvc 的前端控制器[DispatcherServlet]
<!-- 1.配置springmvc的前端控制器 -->
<servlet>
    <servlet-name>DispatcherServlet</servlet-name>
    <servlet-class>org.springframework.web.servlet.DispatcherServlet</servlet-class>
<!-- 2.指定springmvc,去类路径下加载springmvc的配置文件 -->
    <init-param>
        <param-name>contextConfigLocation</param-name>
        <param-value>classpath:springmvc.xml</param-value>
    </init-param>
    <!--
    该标签<load-on-startup>表示当前servlet对象的创建时机:
    0或者正整数:表示当前servlet对象是随着tomcat服务器启动就创建了(越小优先级越高)
    负整数或者不设置:表示当前servlet对象是第一个访问的时候创建
    -->
    <load-on-startup>1</load-on-startup>
</servlet>
<servlet-mapping>
    <servlet-name>DispatcherServlet</servlet-name>
    <url-pattern>/</url-pattern>
</servlet-mapping>
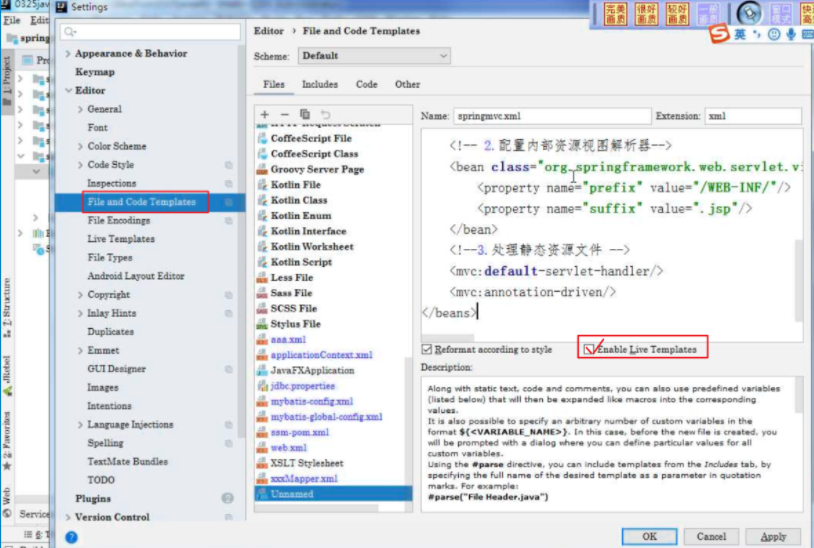
第三步:在 springmvc 的配置文件中的配置扫描包及内部资源视图解析器
<!-- 1.配置扫描包 -->
<context:component-scan base-package="com.atguigu"/>
<!-- 2.配置内部资源视图解析器
       作用:将逻辑视图转换为物理视图: prefix + return value + suffix
                                     /WEB-INF/success.jsp
-->
<bean class="org.springframework.web.servlet.view.InternalResourceViewResolver">
    <property name="prefix" value="/WEB-INF/"/>
    <property name="suffix" value=".jsp"/>
</bean>
第四步:编写控制层代码
@Controller
public class ActorController {
//用来映射浏览器请求的:http://localhost:8080/springmvc/hello
    @RequestMapping("/hello")
    public String success(){
        System.out.println("请求来到了.....");
        return "success";
    }
}
第五步:测试 http://localhost:8080/springmvc/hello
2.常见的几个问题
第一个:load-on-startup
<!--
该标签<load-on-startup>表示当前servlet对象的创建时机:
0或者正整数:表示当前servlet对象是随着tomcat服务器启动就创建了
负整数或者不设置:表示当前servlet对象是第一个访问的时候
-->
<load-on-startup>1</load-on-startup>
第二个:url-pattern
/和/*的区别:
< url-pattern > / </ url-pattern >   不会匹配到*.jsp,即:*.jsp不会进入spring的 DispatcherServlet类 。
< url-pattern > /* </ url-pattern > 会匹配*.jsp,不写/*会出现返回jsp视图时再次进入spring的DispatcherServlet 类,导致找不到对应的controller所以报404错。

总之,关于web.xml的url映射的小知识:
< url-pattern>/</url-pattern>  会匹配到/login这样的路径型url,不会匹配到模式为*.jsp这样的后缀型url
< url-pattern>/*</url-pattern> 会匹配所有url:路径型的和后缀型的url(包括/login,*.jsp,*.js和*.html等)

<servlet-mapping>
<servlet-name>DispatcherServlet</servlet-name>
<url-pattern>/</url-pattern>
</servlet-mapping>
第三个:内部资源视图解析器
InternalResourceViewResolver
<!-- 2.配置内部资源视图解析器
作用:将逻辑视图转换为物理视图: prefix + return value + suffix
                                /WEB-INF/success.jsp
-->
<bean class="org.springframework.web.servlet.view.InternalResourceViewResolver">
<property name="prefix" value="/WEB-INF/"/>
<property name="suffix" value=".jsp"/>
</bean>
第四个问题:关于根目录
项目的根目录:http://localhost:8080/springmvc/
服务器的根目录:http://localhost:8080/

绝对路径:以/开头的路径,/代表服务器的根目录还是代表项目的根目录取决于/是被浏览器解析还是被服务器解析
    1.被浏览器解析,代表的是服务器的根目录,没有项目名(所以要在路径最前面加上 ${pageContext.request.contextPath}/...)
       例如:html页面中标签,jsp中html标签(href,form等),重定向。。。
    2.被服务器解析,代表的是项目的根目录,有项目名 [ 特殊情况:String类型返回值以redirect:(表示重定向)开头 是服务器解析而		不是浏览器解析]
     例如 转发:"/"  ,配置文件中"/"(web.xml、springmvc.xml、applicationContext.xml、mybatis.xml)  jsp特殊标签  		jsp.forward
相对路径: 不以/开头的路径
前端页面中${pageContext.request.contextPath}表示:当前项目下(此处表示springmvc/actor)
<form action="${pageContext.request.contextPath}/actor/testRequestParam" method="post">
用户名:<input type="text" name="username"><br/>
密 码:<input type="password" name="pwd"><br/>
<input type="submit" value="发送GET请求">
</form>
跨域问题:
访问的接口所在的方法或者Controller没有配置允许跨域 解决方法:controller层加@CrossOrigin注解
SpringMVC接受并处理一个请求,获取处理请求的HandlerMapping时
先使用路径和Handler的路径匹配,如果匹配失败 404
如果匹配到,在判断请求方式 ,如果请求方式不匹配 405
如果路径和请求方式都一样 ,在检查handler绑定的方法的要求的形参列表 是否本次请求都携带,如果没有匹配 400
上面三个都匹配,匹配成功
后端测试工具
接口测试时,一般使用浏览器直接测试,但是浏览器默认行为为GET,其他方式的接口不能直接测试:
1、postman
功能强大
可以自定义请求报文[请求参数、请求头、请求体、请求方式]
持续压力测试
2、ab或者jmeter
并发压力测试工具
3、swagger:
简单版的postman,但是不能自定义请求头
在项目中直接可以整合后 访问它的页面进行接口测试
生成项目的接口文档,便于前后端 敏捷开发 联调
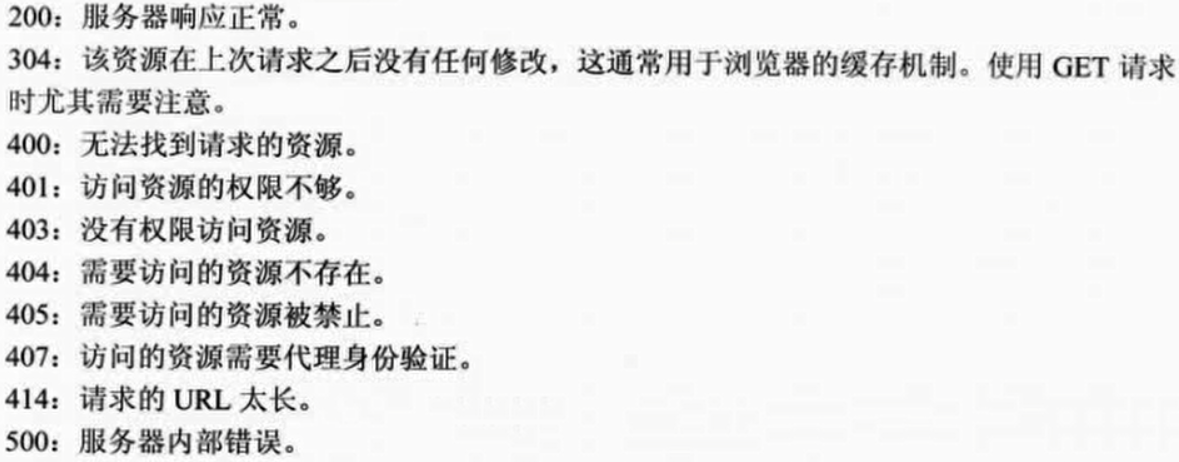
常见的响应报文状态码
20X:成功
30X:重定向
40X:请求不合法、参数不合法、跨域等等前端问题
50X:服务器端错误
200: 响应成功
302: 重定向
400: 请求参数的数据类型和后端接口要求的参数类型不一致
404: 路径访问的资源不存在
405: 请求方式和访问的资源要求的方式不一样
400:请求参数和后端接口要求的参数不一致
500: 服务器端内部错误:java、jsp代码
503:网关[一个请求提交给网关,网关可以根据路由配置匹配到一个目标微服务,但是去注册中心找不到该微服务的配置(已宕机等情况)]
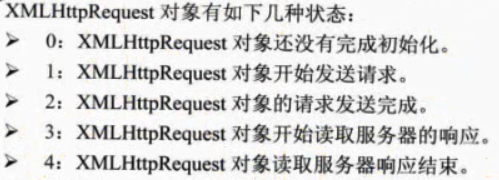
XMLHttpRequest对象的状态
public enum HttpStatus {

	// 1xx Informational

	/**
	 * {@code 100 Continue}.
	 * @see <a href="https://tools.ietf.org/html/rfc7231#section-6.2.1">HTTP/1.1: Semantics and Content, section 6.2.1</a>
	 */
	CONTINUE(100, "Continue"),
	/**
	 * {@code 101 Switching Protocols}.
	 * @see <a href="https://tools.ietf.org/html/rfc7231#section-6.2.2">HTTP/1.1: Semantics and Content, section 6.2.2</a>
	 */
	SWITCHING_PROTOCOLS(101, "Switching Protocols"),
	/**
	 * {@code 102 Processing}.
	 * @see <a href="https://tools.ietf.org/html/rfc2518#section-10.1">WebDAV</a>
	 */
	PROCESSING(102, "Processing"),
	/**
	 * {@code 103 Checkpoint}.
	 * @see <a href="https://code.google.com/p/gears/wiki/ResumableHttpRequestsProposal">A proposal for supporting
	 * resumable POST/PUT HTTP requests in HTTP/1.0</a>
	 */
	CHECKPOINT(103, "Checkpoint"),

	// 2xx Success

	/**
	 * {@code 200 OK}.
	 * @see <a href="https://tools.ietf.org/html/rfc7231#section-6.3.1">HTTP/1.1: Semantics and Content, section 6.3.1</a>
	 */
	OK(200, "OK"),
	/**
	 * {@code 201 Created}.
	 * @see <a href="https://tools.ietf.org/html/rfc7231#section-6.3.2">HTTP/1.1: Semantics and Content, section 6.3.2</a>
	 */
	CREATED(201, "Created"),
	/**
	 * {@code 202 Accepted}.
	 * @see <a href="https://tools.ietf.org/html/rfc7231#section-6.3.3">HTTP/1.1: Semantics and Content, section 6.3.3</a>
	 */
	ACCEPTED(202, "Accepted"),
	/**
	 * {@code 203 Non-Authoritative Information}.
	 * @see <a href="https://tools.ietf.org/html/rfc7231#section-6.3.4">HTTP/1.1: Semantics and Content, section 6.3.4</a>
	 */
	NON_AUTHORITATIVE_INFORMATION(203, "Non-Authoritative Information"),
	/**
	 * {@code 204 No Content}.
	 * @see <a href="https://tools.ietf.org/html/rfc7231#section-6.3.5">HTTP/1.1: Semantics and Content, section 6.3.5</a>
	 */
	NO_CONTENT(204, "No Content"),
	/**
	 * {@code 205 Reset Content}.
	 * @see <a href="https://tools.ietf.org/html/rfc7231#section-6.3.6">HTTP/1.1: Semantics and Content, section 6.3.6</a>
	 */
	RESET_CONTENT(205, "Reset Content"),
	/**
	 * {@code 206 Partial Content}.
	 * @see <a href="https://tools.ietf.org/html/rfc7233#section-4.1">HTTP/1.1: Range Requests, section 4.1</a>
	 */
	PARTIAL_CONTENT(206, "Partial Content"),
	/**
	 * {@code 207 Multi-Status}.
	 * @see <a href="https://tools.ietf.org/html/rfc4918#section-13">WebDAV</a>
	 */
	MULTI_STATUS(207, "Multi-Status"),
	/**
	 * {@code 208 Already Reported}.
	 * @see <a href="https://tools.ietf.org/html/rfc5842#section-7.1">WebDAV Binding Extensions</a>
	 */
	ALREADY_REPORTED(208, "Already Reported"),
	/**
	 * {@code 226 IM Used}.
	 * @see <a href="https://tools.ietf.org/html/rfc3229#section-10.4.1">Delta encoding in HTTP</a>
	 */
	IM_USED(226, "IM Used"),

	// 3xx Redirection

	/**
	 * {@code 300 Multiple Choices}.
	 * @see <a href="https://tools.ietf.org/html/rfc7231#section-6.4.1">HTTP/1.1: Semantics and Content, section 6.4.1</a>
	 */
	MULTIPLE_CHOICES(300, "Multiple Choices"),
	/**
	 * {@code 301 Moved Permanently}.
	 * @see <a href="https://tools.ietf.org/html/rfc7231#section-6.4.2">HTTP/1.1: Semantics and Content, section 6.4.2</a>
	 */
	MOVED_PERMANENTLY(301, "Moved Permanently"),
	/**
	 * {@code 302 Found}.
	 * @see <a href="https://tools.ietf.org/html/rfc7231#section-6.4.3">HTTP/1.1: Semantics and Content, section 6.4.3</a>
	 */
	FOUND(302, "Found"),
	/**
	 * {@code 302 Moved Temporarily}.
	 * @see <a href="https://tools.ietf.org/html/rfc1945#section-9.3">HTTP/1.0, section 9.3</a>
	 * @deprecated in favor of {@link #FOUND} which will be returned from {@code HttpStatus.valueOf(302)}
	 */
	@Deprecated
	MOVED_TEMPORARILY(302, "Moved Temporarily"),
	/**
	 * {@code 303 See Other}.
	 * @see <a href="https://tools.ietf.org/html/rfc7231#section-6.4.4">HTTP/1.1: Semantics and Content, section 6.4.4</a>
	 */
	SEE_OTHER(303, "See Other"),
	/**
	 * {@code 304 Not Modified}.
	 * @see <a href="https://tools.ietf.org/html/rfc7232#section-4.1">HTTP/1.1: Conditional Requests, section 4.1</a>
	 */
	NOT_MODIFIED(304, "Not Modified"),
	/**
	 * {@code 305 Use Proxy}.
	 * @see <a href="https://tools.ietf.org/html/rfc7231#section-6.4.5">HTTP/1.1: Semantics and Content, section 6.4.5</a>
	 * @deprecated due to security concerns regarding in-band configuration of a proxy
	 */
	@Deprecated
	USE_PROXY(305, "Use Proxy"),
	/**
	 * {@code 307 Temporary Redirect}.
	 * @see <a href="https://tools.ietf.org/html/rfc7231#section-6.4.7">HTTP/1.1: Semantics and Content, section 6.4.7</a>
	 */
	TEMPORARY_REDIRECT(307, "Temporary Redirect"),
	/**
	 * {@code 308 Permanent Redirect}.
	 * @see <a href="https://tools.ietf.org/html/rfc7238">RFC 7238</a>
	 */
	PERMANENT_REDIRECT(308, "Permanent Redirect"),

	// --- 4xx Client Error ---

	/**
	 * {@code 400 Bad Request}.
	 * @see <a href="https://tools.ietf.org/html/rfc7231#section-6.5.1">HTTP/1.1: Semantics and Content, section 6.5.1</a>
	 */
	BAD_REQUEST(400, "Bad Request"),
	/**
	 * {@code 401 Unauthorized}.
	 * @see <a href="https://tools.ietf.org/html/rfc7235#section-3.1">HTTP/1.1: Authentication, section 3.1</a>
	 */
	UNAUTHORIZED(401, "Unauthorized"),
	/**
	 * {@code 402 Payment Required}.
	 * @see <a href="https://tools.ietf.org/html/rfc7231#section-6.5.2">HTTP/1.1: Semantics and Content, section 6.5.2</a>
	 */
	PAYMENT_REQUIRED(402, "Payment Required"),
	/**
	 * {@code 403 Forbidden}.
	 * @see <a href="https://tools.ietf.org/html/rfc7231#section-6.5.3">HTTP/1.1: Semantics and Content, section 6.5.3</a>
	 */
	FORBIDDEN(403, "Forbidden"),
	/**
	 * {@code 404 Not Found}.
	 * @see <a href="https://tools.ietf.org/html/rfc7231#section-6.5.4">HTTP/1.1: Semantics and Content, section 6.5.4</a>
	 */
	NOT_FOUND(404, "Not Found"),
	/**
	 * {@code 405 Method Not Allowed}.
	 * @see <a href="https://tools.ietf.org/html/rfc7231#section-6.5.5">HTTP/1.1: Semantics and Content, section 6.5.5</a>
	 */
	METHOD_NOT_ALLOWED(405, "Method Not Allowed"),
	/**
	 * {@code 406 Not Acceptable}.
	 * @see <a href="https://tools.ietf.org/html/rfc7231#section-6.5.6">HTTP/1.1: Semantics and Content, section 6.5.6</a>
	 */
	NOT_ACCEPTABLE(406, "Not Acceptable"),
	/**
	 * {@code 407 Proxy Authentication Required}.
	 * @see <a href="https://tools.ietf.org/html/rfc7235#section-3.2">HTTP/1.1: Authentication, section 3.2</a>
	 */
	PROXY_AUTHENTICATION_REQUIRED(407, "Proxy Authentication Required"),
	/**
	 * {@code 408 Request Timeout}.
	 * @see <a href="https://tools.ietf.org/html/rfc7231#section-6.5.7">HTTP/1.1: Semantics and Content, section 6.5.7</a>
	 */
	REQUEST_TIMEOUT(408, "Request Timeout"),
	/**
	 * {@code 409 Conflict}.
	 * @see <a href="https://tools.ietf.org/html/rfc7231#section-6.5.8">HTTP/1.1: Semantics and Content, section 6.5.8</a>
	 */
	CONFLICT(409, "Conflict"),
	/**
	 * {@code 410 Gone}.
	 * @see <a href="https://tools.ietf.org/html/rfc7231#section-6.5.9">
	 *     HTTP/1.1: Semantics and Content, section 6.5.9</a>
	 */
	GONE(410, "Gone"),
	/**
	 * {@code 411 Length Required}.
	 * @see <a href="https://tools.ietf.org/html/rfc7231#section-6.5.10">
	 *     HTTP/1.1: Semantics and Content, section 6.5.10</a>
	 */
	LENGTH_REQUIRED(411, "Length Required"),
	/**
	 * {@code 412 Precondition failed}.
	 * @see <a href="https://tools.ietf.org/html/rfc7232#section-4.2">
	 *     HTTP/1.1: Conditional Requests, section 4.2</a>
	 */
	PRECONDITION_FAILED(412, "Precondition Failed"),
	/**
	 * {@code 413 Payload Too Large}.
	 * @since 4.1
	 * @see <a href="https://tools.ietf.org/html/rfc7231#section-6.5.11">
	 *     HTTP/1.1: Semantics and Content, section 6.5.11</a>
	 */
	PAYLOAD_TOO_LARGE(413, "Payload Too Large"),
	/**
	 * {@code 413 Request Entity Too Large}.
	 * @see <a href="https://tools.ietf.org/html/rfc2616#section-10.4.14">HTTP/1.1, section 10.4.14</a>
	 * @deprecated in favor of {@link #PAYLOAD_TOO_LARGE} which will be
	 * returned from {@code HttpStatus.valueOf(413)}
	 */
	@Deprecated
	REQUEST_ENTITY_TOO_LARGE(413, "Request Entity Too Large"),
	/**
	 * {@code 414 URI Too Long}.
	 * @since 4.1
	 * @see <a href="https://tools.ietf.org/html/rfc7231#section-6.5.12">
	 *     HTTP/1.1: Semantics and Content, section 6.5.12</a>
	 */
	URI_TOO_LONG(414, "URI Too Long"),
	/**
	 * {@code 414 Request-URI Too Long}.
	 * @see <a href="https://tools.ietf.org/html/rfc2616#section-10.4.15">HTTP/1.1, section 10.4.15</a>
	 * @deprecated in favor of {@link #URI_TOO_LONG} which will be returned from {@code HttpStatus.valueOf(414)}
	 */
	@Deprecated
	REQUEST_URI_TOO_LONG(414, "Request-URI Too Long"),
	/**
	 * {@code 415 Unsupported Media Type}.
	 * @see <a href="https://tools.ietf.org/html/rfc7231#section-6.5.13">
	 *     HTTP/1.1: Semantics and Content, section 6.5.13</a>
	 */
	UNSUPPORTED_MEDIA_TYPE(415, "Unsupported Media Type"),
	/**
	 * {@code 416 Requested Range Not Satisfiable}.
	 * @see <a href="https://tools.ietf.org/html/rfc7233#section-4.4">HTTP/1.1: Range Requests, section 4.4</a>
	 */
	REQUESTED_RANGE_NOT_SATISFIABLE(416, "Requested range not satisfiable"),
	/**
	 * {@code 417 Expectation Failed}.
	 * @see <a href="https://tools.ietf.org/html/rfc7231#section-6.5.14">
	 *     HTTP/1.1: Semantics and Content, section 6.5.14</a>
	 */
	EXPECTATION_FAILED(417, "Expectation Failed"),
	/**
	 * {@code 418 I'm a teapot}.
	 * @see <a href="https://tools.ietf.org/html/rfc2324#section-2.3.2">HTCPCP/1.0</a>
	 */
	I_AM_A_TEAPOT(418, "I'm a teapot"),
	/**
	 * @deprecated See
	 * <a href="https://tools.ietf.org/rfcdiff?difftype=--hwdiff&url2=draft-ietf-webdav-protocol-06.txt">
	 *     WebDAV Draft Changes</a>
	 */
	@Deprecated
	INSUFFICIENT_SPACE_ON_RESOURCE(419, "Insufficient Space On Resource"),
	/**
	 * @deprecated See
	 * <a href="https://tools.ietf.org/rfcdiff?difftype=--hwdiff&url2=draft-ietf-webdav-protocol-06.txt">
	 *     WebDAV Draft Changes</a>
	 */
	@Deprecated
	METHOD_FAILURE(420, "Method Failure"),
	/**
	 * @deprecated
	 * See <a href="https://tools.ietf.org/rfcdiff?difftype=--hwdiff&url2=draft-ietf-webdav-protocol-06.txt">
	 *     WebDAV Draft Changes</a>
	 */
	@Deprecated
	DESTINATION_LOCKED(421, "Destination Locked"),
	/**
	 * {@code 422 Unprocessable Entity}.
	 * @see <a href="https://tools.ietf.org/html/rfc4918#section-11.2">WebDAV</a>
	 */
	UNPROCESSABLE_ENTITY(422, "Unprocessable Entity"),
	/**
	 * {@code 423 Locked}.
	 * @see <a href="https://tools.ietf.org/html/rfc4918#section-11.3">WebDAV</a>
	 */
	LOCKED(423, "Locked"),
	/**
	 * {@code 424 Failed Dependency}.
	 * @see <a href="https://tools.ietf.org/html/rfc4918#section-11.4">WebDAV</a>
	 */
	FAILED_DEPENDENCY(424, "Failed Dependency"),
	/**
	 * {@code 425 Too Early}.
	 * @since 5.2
	 * @see <a href="https://tools.ietf.org/html/rfc8470">RFC 8470</a>
	 */
	TOO_EARLY(425, "Too Early"),
	/**
	 * {@code 426 Upgrade Required}.
	 * @see <a href="https://tools.ietf.org/html/rfc2817#section-6">Upgrading to TLS Within HTTP/1.1</a>
	 */
	UPGRADE_REQUIRED(426, "Upgrade Required"),
	/**
	 * {@code 428 Precondition Required}.
	 * @see <a href="https://tools.ietf.org/html/rfc6585#section-3">Additional HTTP Status Codes</a>
	 */
	PRECONDITION_REQUIRED(428, "Precondition Required"),
	/**
	 * {@code 429 Too Many Requests}.
	 * @see <a href="https://tools.ietf.org/html/rfc6585#section-4">Additional HTTP Status Codes</a>
	 */
	TOO_MANY_REQUESTS(429, "Too Many Requests"),
	/**
	 * {@code 431 Request Header Fields Too Large}.
	 * @see <a href="https://tools.ietf.org/html/rfc6585#section-5">Additional HTTP Status Codes</a>
	 */
	REQUEST_HEADER_FIELDS_TOO_LARGE(431, "Request Header Fields Too Large"),
	/**
	 * {@code 451 Unavailable For Legal Reasons}.
	 * @see <a href="https://tools.ietf.org/html/draft-ietf-httpbis-legally-restricted-status-04">
	 * An HTTP Status Code to Report Legal Obstacles</a>
	 * @since 4.3
	 */
	UNAVAILABLE_FOR_LEGAL_REASONS(451, "Unavailable For Legal Reasons"),

	// --- 5xx Server Error ---

	/**
	 * {@code 500 Internal Server Error}.
	 * @see <a href="https://tools.ietf.org/html/rfc7231#section-6.6.1">HTTP/1.1: Semantics and Content, section 6.6.1</a>
	 */
	INTERNAL_SERVER_ERROR(500, "Internal Server Error"),
	/**
	 * {@code 501 Not Implemented}.
	 * @see <a href="https://tools.ietf.org/html/rfc7231#section-6.6.2">HTTP/1.1: Semantics and Content, section 6.6.2</a>
	 */
	NOT_IMPLEMENTED(501, "Not Implemented"),
	/**
	 * {@code 502 Bad Gateway}.
	 * @see <a href="https://tools.ietf.org/html/rfc7231#section-6.6.3">HTTP/1.1: Semantics and Content, section 6.6.3</a>
	 */
	BAD_GATEWAY(502, "Bad Gateway"),
	/**
	 * {@code 503 Service Unavailable}.
	 * @see <a href="https://tools.ietf.org/html/rfc7231#section-6.6.4">HTTP/1.1: Semantics and Content, section 6.6.4</a>
	 */
	SERVICE_UNAVAILABLE(503, "Service Unavailable"),
	/**
	 * {@code 504 Gateway Timeout}.
	 * @see <a href="https://tools.ietf.org/html/rfc7231#section-6.6.5">HTTP/1.1: Semantics and Content, section 6.6.5</a>
	 */
	GATEWAY_TIMEOUT(504, "Gateway Timeout"),
	/**
	 * {@code 505 HTTP Version Not Supported}.
	 * @see <a href="https://tools.ietf.org/html/rfc7231#section-6.6.6">HTTP/1.1: Semantics and Content, section 6.6.6</a>
	 */
	HTTP_VERSION_NOT_SUPPORTED(505, "HTTP Version not supported"),
	/**
	 * {@code 506 Variant Also Negotiates}
	 * @see <a href="https://tools.ietf.org/html/rfc2295#section-8.1">Transparent Content Negotiation</a>
	 */
	VARIANT_ALSO_NEGOTIATES(506, "Variant Also Negotiates"),
	/**
	 * {@code 507 Insufficient Storage}
	 * @see <a href="https://tools.ietf.org/html/rfc4918#section-11.5">WebDAV</a>
	 */
	INSUFFICIENT_STORAGE(507, "Insufficient Storage"),
	/**
	 * {@code 508 Loop Detected}
	 * @see <a href="https://tools.ietf.org/html/rfc5842#section-7.2">WebDAV Binding Extensions</a>
 	 */
	LOOP_DETECTED(508, "Loop Detected"),
	/**
	 * {@code 509 Bandwidth Limit Exceeded}
 	 */
	BANDWIDTH_LIMIT_EXCEEDED(509, "Bandwidth Limit Exceeded"),
	/**
	 * {@code 510 Not Extended}
	 * @see <a href="https://tools.ietf.org/html/rfc2774#section-7">HTTP Extension Framework</a>
	 */
	NOT_EXTENDED(510, "Not Extended"),
	/**
	 * {@code 511 Network Authentication Required}.
	 * @see <a href="https://tools.ietf.org/html/rfc6585#section-6">Additional HTTP Status Codes</a>
	 */
	NETWORK_AUTHENTICATION_REQUIRED(511, "Network Authentication Required");
}
3.请求相关操作
0.参数携带的方式
1、如果每次请求都需要携带的参数 参数类型简单 ,可以使用路径参数
list/{pageNum}/{pageSize}
getById/{id}
@PathVariable("pageNum") Integer pageNum
以后访问时 必须指定路径参数 才可以访问路径映射的方法
2、get或者post方式 可以以请求参数的方式携带
url?p1=v1&p2=v2&p2=v3 一般是get方式使用
3、以json的形式 在请求体中携带参数 [get方式不能使用:get的请求报文没有请求体]
请求首行
请求头
请求空行
请求体[可以设置要提交的数据:可以是json 可以是任意类型的字符串或者文件]
0.@RequestBody
详见印象笔记
@RequestBody本质:通过无参构造器new的对象,然后通过set方法设置,
如果在实体类中添加了有参构造器,没加无参构造器,接收参数时异常
注:一个请求,只有一个RequestBody;一个请求,可以有多个RequestParam。
注:当同时使用@RequestParam()和@RequestBody时,@RequestParam()指定的参数可以是普通元素、
数组、集合、对象等等(即:当,@RequestBody 与@RequestParam()可以同时使用时,原SpringMVC接收
参数的机制不变,只不过RequestBody 接收的是请求体里面的数据;而RequestParam接收的是key-value
里面的参数,所以它会被切面进行处理从而可以用普通元素、数组、集合、对象等接收)。
即:如果参数时放在请求体中,application/json传入后台的话,那么后台要用@RequestBody才能接收到;
如果不是放在请求体中的话,那么后台接收前台传过来的参数时,要用@RequestParam来接收,或
则形参前 什么也不写也能接收。
注:如果参数前写了@RequestParam(xxx),那么前端必须有对应的xxx名字才行(不管其是否有值,当然可以通
过设置该注解的required属性来调节是否必须传),如果没有xxx名的话,那么请求会出错,报400。
注:如果参数前不写@RequestParam(xxx)的话,那么就前端可以有可以没有对应的xxx名字才行,如果有xxx名
的话,那么就会自动匹配;没有的话,请求也能正确发送。
注:这里与feign消费服务时不同;feign消费服务时,如果参数前什么也不写,那么会被默认是@RequestBody的。
1.@RequestMapping
@GetMapping(value="/hello")  相当于@RequestMapping(value = "/hello",method = RequestMethod.GET)
@PostMapping(value="/hello") 相当于@RequestMapping(value = "/hello",method = RequestMethod.POST)
@PutMapping(value="/hello")  相当于@RequestMapping(value = "/hello",method = RequestMethod.PUT)
@DeleteMapping(value="/hello")相当于@RequestMapping(value = "/hello",method = RequestMethod.DELETE)
作用:用来限制请求的(用来映射浏览器请求的:http://localhost:8080/springmvc/hello)
位置:标记在方法上,也可以标记在类上(类上的@RequestMapping值表示某种资源,方法上表示何种操作)
属性:(注意: @RequestMapping下面这些属性之间是"&"的关系,必须同时满足。)
Ant风格(通配符方式)
- value: 用来限制请求地址的,字符串串数组类型,支持Ant风格(通配符方式)
Ant 风格资源地址支持 3 种匹配符: ?:任意一个字符 *:任意多个任意字符 **:任意多层字符
@RequestMapping("/he/**/llo")
    public String success(){
        System.out.println("请求来到了.....");
        return "success";
    }
- metohd:用来限制请求方式的,RequestMethod数组类型,默认情况下,四种请求方式都支持(GET/POST/PUT/DELETE)
SpringMVC支持Rest 请求风格(一种规范,类似驼峰命名法),详见下 - params:用来限制请求参数的,字符串数组类型
params={"username"}: 表示要求前端必须携带一个键为username(值可以为null)的参数
params={"!username"}:表示要求前端不能携带一个键为username的参数
params={"username=zhangsan"}:表示要求前端必须携带一个键为username,值为zhangsan的参数
params={"username!=zhangsan"}:表示要求前端必须携带一个键为username,值不能为zhangsan的参数
params={"username=zhangsan","pwd"}:表示要求前端必须携带一个键为username,值为zhangsan的参数,并且还要携带一个键为pwd(值可以为null)的参数 - headers:用来限制请求头的,字符串数组类型
headers={"Connection"}: 表示要求前端必须携带一个键为Connection(值可以为null)的请求头
headers={"!Connection"}:表示要求前端不能携带一个键为Connection的请求头
headers={"username=zhangsan"}:表示要求前端必须携带一个键为username,值为zhangsan的请求头
headers={"username!=zhangsan"}:表示要求前端必须携带一个键为username,值不能为zhangsan的请求头
headers={"username=zhangsan","pwd"}:表示要求前端必须携带一个键为username,值为zhangsan的请求头,并且还要携带一个键为pwd(值可以为null)的请求头
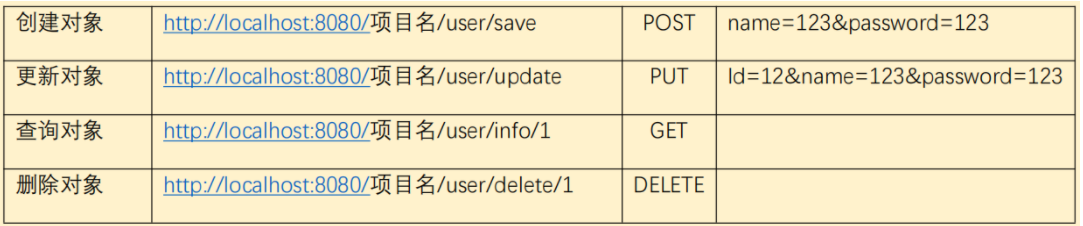
Rest 请求风格
Rest是一种规范,一种请求参数的风格。
SpringMVC支持Rest 请求风格(一种规范,类似驼峰命名法)
(@PathVariable为REST请求风格奠定了技术支持,将路径占位符信息绑定到目标方法的参数上,详见下)
简单的说,就是利用Http协议通过GET/POST/PUT/DELETE/PATCH来操作具有URI标识的服务器资源。并且返回统一格式的资源信息,比如:JSON、xml、csv等格式。
Rest 请求风格:
1.建议:使用请求方式表示对服务器的资源进行何种处理
请求方式:
GET: 获取服务器的数据
POST: 向服务器添加数据
PUT: 修改服务器的数据(在tomcat8.x及以上,jsp不支持PUT或者delete请求)
DELETE:删除服务器的数据
2.建议:在传递id值的时候,进行使用请求路径传递,而不是使用请求参数传递
给后端发送PUT或者DELETE请求
(将post请求转化为PUT或者DELETE请求)
第一步:在web.xml文件配置HiddenHttpMethodFilter
<!-- 将POST请求转换为PUT或者delete请求 -->
<filter>
    <filter-name>HiddenHttpMethodFilter</filter-name>
    <filter-class>org.springframework.web.filter.HiddenHttpMethodFilter</filter-class>
</filter>
<filter-mapping>
    <filter-name>HiddenHttpMethodFilter</filter-name>
    <url-pattern>/*</url-pattern>
</filter-mapping>
第二步:必须发送POST请求
第三步:必须携带(可以用隐藏域)键为 _method ,值为 put或delete
<form action="${pageContext.request.contextPath}/actor/testRequestParam" method="post">
<input type="hidden" name="_method" value="put"/>
用户名:<input type="text" name="uname"><br/>
密 码:<input type="password" name="pwd"><br/>
<input type="submit" value="发送put请求">
</form>
2.@RequestParam 注解
@RequestParam接收的参数是来自HTTP请求体或请求url的QueryString中
@RequestParam可以接受简单类型的属性(也可以接受对象类型,前提:①url路径?后面的参数能封装成一个对象②@RequestParam要省略不写)
@RequestParam批注还可用于将“ multipart / form-data”请求的一部分与支持相同方法参数类型的方法参数相关联
@RequestParam("file") MultipartFile file
作用:获取请求参数信息
位置:标记在目标方法的参数上
属性:
value: 要求必须和前端传递过来的请求参数的键[表单项的name值]保持一致
required:默认是true,表示当前参数是必须携带的(键必须有,值可以为null),false:表示当前参数不是必须携带的(键都没有)
defaultValue: 当required属性值设置为false的时候,如果前端携带了这个请求参数,就用前端携带过来的请求参数值(键必须有,值可 以为null),如果前端没有携带这个请求参数,就使用这个默认值(没有这个键)
注意:当前端传递过来的请求参数的键和目标方法的参数名一致的情况下,@RequestParam可以省略
前端传过来到参数过多可以用poji类对象接收(详见下面8)
@RequestMapping(value = "testRequestParam")
public String testRequestParam(@RequestParam(value = "uname",defaultValue = "张三") String username, @RequestParam(value = "pwd")String password){
    System.out.println("请求到来了");
    System.out.println("用户名为:"+username+",密码为:"+password);
    return "success";
}
3.@RequestHeader注解
作用:获取请求头信息
位置:标记在目标方法的参数上
属性:
value: 要求必须和前端传递过来的请求头的键(表单项的name值)保持一致
required:默认是true,表示当前请求头是必须携带的,false:表示当前请求头不是必须携带的
defaultValue:当required属性值设置为false的时候,如果前端携带了这个请求头,就用前端携带过来的请求头
如果前端没有携带这个请求头,就使用这个默认值
@GetMapping("/testRequestHeader")
public String testRequestHeader(@RequestHeader(value = "Cookie") String content){
    System.out.println("获取到的请求头信息为:" + content);
    return "success";
}
上述注解间的区别:
1.@RequestMapping注解的params属性和@RequestParam区别:
@RequestMapping注解的params属性:限制请求参数
@RequestParam:获取请求参数
2.@RequestMapping注解的header属性和@RequestHeader区别:
@RequestMapping注解的header属性:限制请求头信息
@RequestHeader:获取请求头信息的
4.@CookieValue
使用方法同@RequestHeader及@RequestParam
作用:获取某个Cookie对应的值
位置:目标方法的参数上
属性:
value: 要求和指定cookie的键保持一致(JSESSIONID=6840CA1E7DCBB23C5836D629A310E56B)
required:
defaultValue:
@GetMapping("/testCookieValue")
public String testCookieValue(@CookieValue(value = "JSESSIONID") String params){
    System.out.println(params);
    //6840CA1E7DCBB23C5836D629A310E56B
    //6840CA1E7DCBB23C5836D629A310E56B
    return "success";
}
5.@PathVariable
映射 URL 绑定的占位符
作用:为REST请求风格奠定了技术支持,将路径占位符信息绑定到目标方法的参数上
位置:标记在目标方法的参数前面
属性:
value:要求和路径占位符保持一致
http://localhost:8080/springmvc/actor/delete/1
@GetMapping("/delete/{id}") //{..}路径占位符
public String testPathVariable(@PathVariable("id") String pid){
    System.out.println("获取到的id值为:"+pid);
    return "success";
}
6.如何使用原生 API
所谓原生 API 是指的 javaweb 部分就学过的:HttpServletRequest、HttpServletResponse、HttpSession等
只要在目标方法声明对应的变量即可使用,至于对象的创建,将对象赋值给对应的参数我们不需要关注,框架底层(通过反射)自己完成
@GetMapping("/testRawApi") //或者@RequestMapping
public String testRawApi(HttpServletRequest request, HttpServletResponse response, HttpSession session){
    System.out.println(request);//request所以方法都可以使用
    System.out.println(session);//response所以方法都可以使用
    System.out.println(response);//session所以方法都可以使用
    return "success";
}
7.使用 pojo 对象作为方法参数
前端页面:(0和1返回给后端时可以boolean类型接收,会自动转换成false和true)
1.pojo 对象属性为字面量时,键名与属性名一致
2.pojo 对象属性为引用数据类型时,键名为使用连缀方式
例如:address.province 此处address是自定义的引用数据类型,可以封装一个address赋值给pojo对象
3.pojo 对象属性为数组、列表等时,键名可以使用下标
例如books[0].bookName给列表的每个元素封装一个Book对象,然后将封装好的列表Books赋值给pojo对象
前端代码:(所有数据整体封装了一个pojo的User对象)
<form action="${pageContext.request.contextPath}/actor/pojo" method="get">
用户名:<input type="text" name="username"> <br/>
密 码:<input type="password" name="pwd"> <br/>
年 龄:<input type="text" name="age"> <br/>
性 别:<input type="radio" name="gender" value="1">男 //(0和1返回给后端时可以boolean类型接收,会自动转换成false和true)
<input type="radio" name="gender" value="0">女<br/>
邮 箱:<input type="text" name="email"> <br/>
爱好:
<input type="checkbox" name="hobby" value="ppq">乒乓球
<input type="checkbox" name="hobby" value="ymq">羽毛球
<input type="checkbox" name="hobby" value="lq">篮球<br/>
<!-- springmvc支持连缀的方式 -->
家庭地址:省:<input type="text" name="address.province">-
市:<input type="text" name="address.city">-县:<input type="text" name="address.country"><br/>
四大名著:<br/>
书名:<input type="text" name="books[0].bookName">-作者:<input type="text" name="books[0].author">-价格:<input type="text" name="books[0].price"><br/>
书名:<input type="text" name="books[1].bookName">-作者:<input type="text" name="books[1].author">-价格:<input type="text" name="books[1].price"><br/>
书名:<input type="text" name="books[2].bookName">-作者:<input type="text" name="books[2].author">-价格:<input type="text" name="books[2].price"><br/>
书名:<input type="text" name="books[3].bookName">-作者:<input type="text" name="books[3].author">-价格:<input type="text" name="books[3].price"><br/>
<input type="submit" value="发送GET请求">
</form>
后端代码
@RequestMapping("pojo")
public String testPojo(User user){
    System.out.println(user);
    return "success";
}

class User {
    private String username;
    private String pwd;
    private Integer age;
    private boolean gender;
    private String[] hobby;
    private Address address;
    private List<Book> books;
}
8.乱码问题
1.请求乱码:
GET请求乱码:
tomcat8.x及以上:tomcat自己解决
tomcat8.x以下: 去配置文件 tomcat\conf\server.xml 下
POST请求乱码:
方法一:(自己创建filter,设置)request.setCharacterEncoding("UTF-8"); (放在所有filter之前)
方法二:在 web.xml 文件中配置 CharacterEncodingFilter、设置 encoding 属性值(放在所有filter之前)
<!-- 解决POST请求乱码问题-->
<filter>
    <filter-name>CharacterEncodingFilter</filter-name>
    <filter-class>org.springframework.web.filter.CharacterEncodingFilter</filter-class>
    <!-- 指定解码格式 -->
    <init-param>
        <param-name>encoding</param-name>
        <param-value>UTF-8</param-value>
    </init-param>
</filter>
<filter-mapping>
    <filter-name>CharacterEncodingFilter</filter-name>
    <url-pattern>/*</url-pattern>
</filter-mapping>
2.响应返回中文时乱码
自己定义一个过滤器来设置响应的编码格式
response.setContentType("text/html;charset=utf-8")
@WebFilter("/*")
public class MyCharacterEncodingFilter implements Filter {
    @Override
    public void init(FilterConfig filterConfig) throws ServletException {
    }
    @Override
    public void doFilter(ServletRequest servletRequest, ServletResponse servletResponse, FilterChain filterChain) throws IOException, ServletException {
        servletRequest.setCharacterEncoding("utf-8");
        servletResponse.setContentType("text/html;charset=utf-8");
        filterChain.doFilter(servletRequest,servletResponse);
    }
    @Override
    public void destroy() {

    }
}
9.类型转换器
SpringMVC 框架自带了简单的数据类型转换器,比如:
String --->Integer/int
String---->Boolean/boolean
但是 Springmvc 默认不能将指定格式的字符串 yyyy-MM-dd 转换为时间类型。
如果想要将这种指定类型的字符串转换成想要的数据类型要使用类型转换器。
9.1全局类型转换器
全局类型转换器:只需要在 springmvc 的配置文件中配置一次,在任何 controller 类的方法中都可以使用。
第一步:自定义一个类,实现 Converter<S,T>,还要将当前类对象加入到容器
@Component
public class DateTimeConverter implements Converter<String, Date> {
    @Override
    public Date convert(String args) {
        SimpleDateFormat sdf = new SimpleDateFormat("yyyy-MM-dd");
        try{
            Date date = sdf.parse(args);
            return date;
        }catch (Exception ex){
             ex.printStackTrace();
        }
        return null;
    }
}
第二步:在 springmvc 的配置文件中配置 FormattingConversionServiceFactoryBean,指定他的converters属性(可以引用多个转换器类) 第三步:mvc:annotation-driven 配置一个 conversion-service 属性,引用上述对象。
<bean id="conversionServiceFactoryBean" class="org.springframework.format.support.FormattingConversionServiceFactoryBean">
    <property name="converters">
        <set>
            <ref bean="dateTimeConverter"></ref>
        </set>
    </property>
</bean>
<mvc:annotation-driven conversion-service="conversionServiceFactoryBean"/>
9.2局部类型转换器
局部类型转换器:每次使用的时候都需要配置一次。
首选要在sprigmvc.xml中配置 mvc:annotation-driven/
@DateTimeFormat:(获取时间为1990-01-01格式的字符串封装到对象Date属性时)
作用:将指定的字符串转换时间类型
位置:标记在属性、参数上
属性:pattern:指定字符串的格式
public class User {
    private String username;
    private String pwd;
    @DateTimeFormat(pattern = "yyyy-MM-dd")
    private Date date;
    。。。
}
@RequestMapping("pojo")
public String testPojo(User user, @DateTimeFormat(pattern = "yyyy-YY-dd") Date date){
    System.out.println(user);
    return "success";
}
@NumberFormat:(获取数值为122,122,232,31格式的字符串封装到对象Double属性时)(老外常用的数值写法,每1000位加 ,)
作用:将指定的字符串转换数值类型
位置:标记在属性、参数上
属性:pattern:指定字符串的格式
public class User {
    private String username;
        。。。
    @NumberFormat(pattern = "###,###,###.##")
    private Double salary;
    。。。
}
@RequestMapping("pojo")
public String testPojo(User user, @NumberFormat(pattern = "###,###,###.##") Double salary){
    System.out.println(user);
    return "success";
}
10.mvc:view-controller 标签
一般用在做添加操作时,直接进入操作页面,不用通过后端代码转发进入WEB-INF目录下的添加页面
该标签允许我们在不经过 controller 层接口的情况下,直接访问 WEB-INF 目录下的页面。
<!--  该标签属性:
     path:对应着浏览器的请求地址 http://localhost:8080/springmvc/qxfw //当强求qxfw时直接可以访问到WEB-INF的success.jsp
     view-name:逻辑视图名,会经过内部资源视图解析器的解析,加上prefix+view-name+suffix找到对应的页面,转发过去
    注意:配置了该标签之后,原来controller接口就不能正常访问了,要想正常访问,需要添加<mvc:annotation-driven/>
-->
<mvc:view-controller path="qxfw" view-name="success"/>
<mvc:annotation-driven/>
前端代码
<a href="${pageContext.request.contextPath}/qxfw">强行访问</a>
4.响应相关操作
1、同步请求响应
1.1、同步请求响应数据类型
同步请求响应的数据类型:
String:逻辑视图名
ModelAndView:包含两部分数据,一个是封装数据的Model,一个是展示数据的页面[会经过内部资源视图解析器解析]
void:一般不使用,如果使用也是和HttpServletResponse一起使用
1.2、响应乱码
返回json数据乱码:设置produces属性
@RequestMapping(value = "void",produces = "application/json;charset=utf-8")
返回字符串乱码:自己定义一个过滤器来设置响应的编码格式
servletResponse.setContentType("text/html;charset=utf-8");
@WebFilter("/*")
public class MyCharacterEncodingFilter implements Filter {
    @Override
    public void init(FilterConfig filterConfig) throws ServletException {
    }
    @Override
    public void doFilter(ServletRequest servletRequest, ServletResponse servletResponse, FilterChain filterChain) throws IOException, ServletException {
        servletRequest.setCharacterEncoding("utf-8");
        servletResponse.setContentType("text/html;charset=utf-8");
        filterChain.doFilter(servletRequest,servletResponse);
    }
    @Override
    public void destroy() {

	}
}
1.3、如何将 controller 数据携带到页面上
第一种:使用ModelAndView作为方法返回值:
第二种:使用String返回值[逻辑视图名],使用Map/Model/ModelMap类型的数据作为方法的形参,(使用put/addAttribute方法)携带数据即可。
无论是使用ModelAndView作为方法返回值还是(String类型返回值的方法)使用Map/Model/ModelMap类型的参数向页面传递数据,
本质上是springmvc框架把放入到ModelAndView或者Map/Model/ModelMap中数据在框架底层放入到request域中一份。
后端代码
@RequestMapping("mav")
public ModelAndView testModelAndView(){
    ModelAndView mav = new ModelAndView("success");
    mav.addObject("list", Arrays.asList(new String[]{"张三","李四"}));
    return mav;
}
@RequestMapping("map")
public String testMap(Map<String, Object> map){
    map.put("username","张三");
    return "success";
}
@RequestMapping("model")
public String testModel(Model model){
    model.addAttribute("username","李四");
    return "success";
}
@RequestMapping("modelMap")
public String testModelMap(ModelMap modelMap){
    modelMap.addAttribute("username","王五");
    return "success";
}
<body>
    <h1>成功页面</h1>
    ${requestScope.list}
    ${username}
</body>
1.4、另一种形式的页面跳转
返回值是以 redirect: (重定向)或者 forward: (转发)开头的字符串,这种特殊的字符串不会经过内部资源视图解析器的解析。
注意点:
]此处重定向是服务器解析的,并不是浏览器解析,所以 代表的是项目的根目录,有项目名(详见2.4)
redirect:/ forward:/ 表示从根目录下(详见下)
项目的根目录:http://localhost:8080/springmvc/
服务器的根目录:http://localhost:8080/
@RequestMapping("testRedirect")
public String testRedirect(){
    return "redirect:/index.jsp";
}

@RequestMapping("/testForward")
public String testForward(){
    return "forward:/WEB-INF/success.jsp";
}
2、异步请求响应
2.1、静态资源的请求
-
静态资源文件:html、css、js、img 图片等
-
despatcherServlet内配置了< url-pattern>/,默认会拦截除了jsp外的所有请求,
所有请求都会去Controller层找对应RequestMapping值的接口执行其中的方法(实际上静态资源并没有),所以其他静态资源需要在springmvc.xml 文件中进行配置<!-- 该标签就是告诉springmvc,当遇到静态资源文件,springmvc处理不了的时候,就交给tomcat服务器处理(tomcat内部配置了default-servlet的mapping) --> <mvc:default-servlet-handler/> <mvc:annotation-driven/>index.jsp 页面:
<%@ page contentType="text/html;charset=UTF-8" language="java" %>
<html>
  <head>
    <title>$Title$</title>
    <script type="text/javascript" src="static/js/jquery.min.js"></script>
    <script type="text/javascript">
      //就绪函数
      $(function () {
        alert("123");//此处应用了Jquery的就绪函数,当页面加载时就弹出123,
      });           //没有在springmvc.xml中配置时,页面加载时向Jquery(jquery.min.js)发起的请求会被当成接口请求
    </script>
  </head>
  <body>
  </body>
</html>
2.2、后端如何返回 json 数据
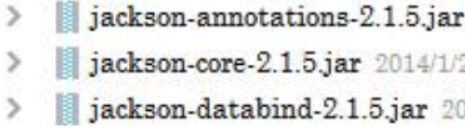
第一步:导入 json 的三个 jar 包
第二步:在 controller 方法上标记一个@ResponseBody 注解
(或者直接在类上加@RestController注解,默认给本类所有方法加了@ResponseBody)
@RequestMapping("/testJson")
@ResponseBody//将java对象转换为json对象
public Map<String,Object> testJson(){
    Map<String,Object> map =new HashMap<String,Object>();
    map.put("username","张三");
    map.put("gender", "男");
    return map;
}
第三步:在 springmvc.xml 文件中配置mvc:annotation-driven/标签
<mvc:annotation-driven/>
后端代码
@RequestMapping("testJson")
@ResponseBody
public Map<String,Object> testJson(){
    HashMap<String, Object> map = new HashMap<String, Object>();
    map.put("张三的书",new Book("斗破苍穹","唐家三少",12.4));
    map.put("李四的书",new Book("光之子","唐家三少",13.4));
    return map;
}
前端数据
{
 "李四的书":{"bookName":"光之子","author":"唐家三少","price":13.4},
 "张三的书":{"bookName":"斗破苍穹","author":"唐家三少","price":12.4}
}
2.3、异步请求响应数据类型
同步请求响应的数据类型:(会被转换为Json数据返回给前端)
Map、POJO 对象、List<POJO 对象> ==>到前端会被转换为Json数组、 List
补充:
1.前端 json数据和后端Java对象间的转换
{}:json对象<>map、pojo对象
[]:json数组<>List
2. JSON对象和json数组可以相互嵌套。(参考下面例子)
JSON对象属性调用:【对象名.属性名】的方式访问即可。
var jsons = {
    "key1":"abc", // 字符串类型

    "key2":1234, // Number

    "key3":[1234,"21341","53"], // 数组
    "key4":{ // json类型
        "key4_1" : 12,
        "key4_2" : "kkk"
    },

    "key5":[ // json数组
    {
        "key5_1_1" : 12,
        "key5_1_2" : "abc"
    },
    {
        "key5_2_1" : 41,
        "key5_2_2" : "bbj"
    }]
};

jsons.key2
jsons.key3[0]
jsons.key4.key4_2
jsons.key5[0].key5_1_2
3、前后异步交互
3.1 jquery异步交互
后端代码
@Controller
@RequestMapping("/student")
public class StudentController {

    @RequestMapping("/list")
    @ResponseBody
    public List<Student> getList(){
        List<Student> list = new ArrayList<Student>();
        list.add(new Student(1,"董阳",true,"dongyang@163.com", 13000.0));
        list.add(new Student(2,"游勇",true,"youyong@163.com", 14000.0));
        list.add(new Student(3,"陈用杰",true,"chenyongjie@163.com", 13000.0));
        list.add(new Student(4,"世举",false,"shiju@163.com", 13000.0));
        list.add(new Student(5,"戴进",true,"daijin@163.com", 13000.0));
        return list;
    }
}
前端代码
<%@ page contentType="text/html;charset=UTF-8" language="java" %>
<html>
<head>
    <title>Title</title>
    <script type="text/javascript" src="static/js/jquery.min.js"></script>
    <style>
        a {
            text-decoration: none;
        }
    </style>
    <script>
        $(function () {
            $.ajax({
                type:"GET",
                url:"${pageContext.request.contextPath}/student/list",
                success:function (msg) {
                  //msg:[{"sid":1,"studentName":"董阳"},{"sid":1,"studentName":"董阳"}]
                    $(msg).each(function (index,item) {
                        var tr= "<tr align='center'>"
                                    +"<td>"+item.sid+"</td>"
                                    +"<td>"+item.studentName+"</td>"
                                    +"<td>"+(item.gender==true?'男':'女')+"</td>"
                                    +"<td>"+item.email+"</td>"
                                    +"<td>"+item.salary+"</td>"
                                    +"<td><a href='javascript:void(0)'>删除</a> | <a href='javascript:void(0)'>修改</a></td>"
                               +"</tr>";
                        $("#list1").append(tr);
                    });

                    var tr="<tr align='center'>"
                            +"<td colspan='6'><a href='javascript:void(0)'>添加</a></td>"
                        +"</tr>";

                    $("#list1").append(tr);
                }
            });
        });
    </script>
</head>
<body>
   <table id="list1" border="1px" align="center" width="70%" cellspacing="0px" cellpadding="10px">
       <tr>
           <th>用户id</th>
           <th>用户名称</th>
           <th>性别</th>
           <th>邮箱</th>
           <th>薪资</th>
           <th>操作</th>
       </tr>

   </table>
</body>
</html>
3.2 axios异步交互
5.SpringMVC 标准配置
所谓标准配置:就是只要我们使用 springmvc,上来就把这配置信息先配置上。
第一步:创建动态 web 工程,导入 jar 包
第二步:在 web.xml 文件中配置 springmvc 的前端控制器、两个 filter
<!-- 解决POST请求乱码问题-->
<filter>
    <filter-name>CharacterEncodingFilter</filter-name>
    <filter-class>org.springframework.web.filter.CharacterEncodingFilter</filter-class>
    <!-- 指定解码格式 -->
    <init-param>
        <param-name>encoding</param-name>
        <param-value>UTF-8</param-value>
    </init-param>
</filter>
<filter-mapping>
    <filter-name>CharacterEncodingFilter</filter-name>
    <url-pattern>/*</url-pattern>
</filter-mapping>

<!--配置将post请求转化为put/delete -->
<filter>
    <filter-name>HiddenHttpMethodFilter</filter-name>
    <filter-class>org.springframework.web.filter.HiddenHttpMethodFilter</filter-class>
</filter>
<filter-mapping>
    <filter-name>HiddenHttpMethodFilter</filter-name>
    <url-pattern>/*</url-pattern>
</filter-mapping>

<!--配置springmvc的前端控制器 -->
<servlet>
    <servlet-name>DispatcherServlet</servlet-name>
    <servlet-class>org.springframework.web.servlet.DispatcherServlet</servlet-class>
    <!-- 配置springmvc配置文件的路径及名称 -->
    <init-param>
        <param-name>contextConfigLocation</param-name>
        <param-value>classpath:springmvc.xml</param-value>
    </init-param>
    <!-- 表示当前servlet对象是在启动tomcat服务器的时候就创建
        该<load-on-startup>取值:
           0或者正整数:  表示当前servlet对象是在服务器启动的时候创建,值越小,优先级越高
           负整数|不配置:表示当前servlet对象是在第一次请求的时候才创建
     -->
    <load-on-startup>0</load-on-startup>
</servlet>
<servlet-mapping>
    <servlet-name>DispatcherServlet</servlet-name>
    <url-pattern>/</url-pattern>
</servlet-mapping>
第三步:在 springmvc.xml 配置扫描包、内部资源视图解析器、处理静态资源
<?xml version="1.0" encoding="UTF-8"?>
<beans xmlns="http://www.springframework.org/schema/beans"
       xmlns:xsi="http://www.w3.org/2001/XMLSchema-instance"
       xmlns:context="http://www.springframework.org/schema/context"
       xmlns:mvc="http://www.springframework.org/schema/mvc"
       xsi:schemaLocation="http://www.springframework.org/schema/beans http://www.springframework.org/schema/beans/spring-beans.xsd http://www.springframework.org/schema/context http://www.springframework.org/schema/context/spring-context.xsd http://www.springframework.org/schema/mvc https://www.springframework.org/schema/mvc/spring-mvc.xsd">

    <!-- 1.配置扫描包 -->
    <context:component-scan base-package="com.atguigu"/>
    <!-- 2.配置内部资源视图解析器 -->
    <bean class="org.springframework.web.servlet.view.InternalResourceViewResolver">
        <property name="prefix" value="/WEB-INF/"/>
        <property name="suffix" value=".jsp"/>
    </bean>
    <!-- 3.处理静态资源文件-->
    <mvc:default-servlet-handler></mvc:default-servlet-handler>
    <mvc:annotation-driven/>
   <!-- 4.类型转换器-->
   <!--    <bean id="conversionServiceFactoryBean" class="org.springframework.format.support.FormattingConversionServiceFactoryBean">-->
    <!--        <property name="converters">-->
    <!--            <set>-->
    <!--                <ref bean="dateTimeConverter"></ref>-->
    <!--            </set>-->
    <!--        </property>-->
    <!--    </bean>-->
    <!--    <mvc:annotation-driven conversion-service="conversionServiceFactoryBean"/>-->
</beans>
配置文件可以配置为模板
使用异步请求发送 PUT 或者 DELETE 的两种方式
第一种:用前面提到的过的方式(将post请求转化为put/delete请求)
前端代码:
<script>
  $(function () {
    $("#btn").click(function () {
      $.ajax({
        type:"POST",
        url:"${pageContext.request.contextPath}/test/info",
        data:{"uid":1,"username":"张三","gender":true,"_method":"PUT"},
        success:function (msg) {
          alert(msg.username);
        }
      });
    });
  });
</script>
后端代码:
@RequestMapping(value = "/info",method = RequestMethod.PUT)
@ResponseBody
public User getUser(User user){
    return user;
}
第二种方式
1.发送给后端的数据格式从Json对象转化为Json字符串,并注明前端发送给后端的数据格式 contentType:"application/json"
2.后端接收数据时,加@RequestBody 将接收到的Json字符串转化为Java对象
知识点:
指定前端发送给后端的数据格式 contentType:"application/json"
指定后端发送给前端的数据格式 Type:"json"
前端代码
<script>
  $(function () {
    $("#btn").click(function () {
      $.ajax({
        type:"PUT",
        url:"${pageContext.request.contextPath}/test/info",
        data:JSON.stringify({"uid":1,"username":"李四","gender":true}),
        contentType:"application/json",
        success:function (msg) {
          alert(msg.username);
        }
      });
    });
  });
</script>
后端代码
@RequestMapping(value = "/info",method = RequestMethod.PUT)
@ResponseBody//给前端发送(将java对象转化为的)json数据
public User getUser(@RequestBody User user){ //@RequestBody 接受前端数据将json数据转换为java对象
    return user;
}
控制台乱码问题 -Dfile.encoding=utf-8
6.文件上传与文件下载
1、文件上传
-
前端要求:
第一个:必须是 post 请求(表单的method属性必须为post)
第二个:表单项的 type 属性值为 file (控件是input,file 属性才可以选择上传文件)
第三个:form 表单的enctype属性必须为multipart/form-data (encytype=“multipart/form-data”)
enctype就是encode type就是编码类型的意思。
multipart/form-data是指表单数据有多部分构成,既有文本数据,又有文件等二进制数据的意思。
需要注意的是:默认情况下,enctype的值是application/x-www-form-urlencoded,不能用于文件上传,只有使用了 multipart/form-data,才能完整的传递文件数据。 -
后端要求:
第一个:必须导入文件上传所需要的两个 jar 包 commons-fileupload、commons-io
第二个:在 springmvc 的配置文件中配置多部件解析器 CommonsMultipartResolver
第三个:在目标方法使用 MultiPartFile 类型的参数接收文件
前端页面代码:
<form action="${pageContext.request.contextPath}/file/uploadFile" enctype="multipart/form-data" method="post">
    用户名:<input type="text" name="username"/> <br/>
    文 件:<input type="file" name="photo"> <br/>
    <input type="submit" value="上传">
</form>
springmvc.xml 文件:
<!-- 1.配置多部件解析器 -->
<bean id="multipartResolver"
class="org.springframework.web.multipart.commons.CommonsMultipartResolver">
<!--指定编码格式 -->
<property name="defaultEncoding" value="UTF-8"/>
<!--指定上传文件的最大值 -->
<property name="maxUploadSize" value="#{500*1024*1024}"/>
</bean>
后端代码 1:
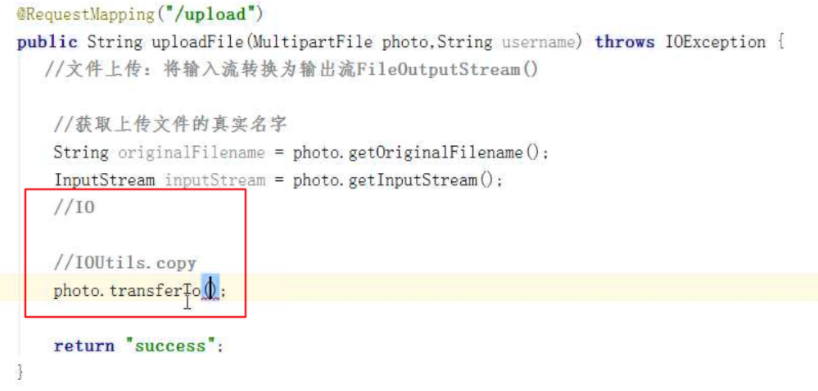
@RequestMapping("/upload")
public ModelAndView uploadFile(MultipartFile photo, String username, HttpServletRequest request) throws IOException {
   //文件上传:将输入流转换为输出流FileOutputStream()
    //获取上传文件的真实名字
    String fileName = UUID.randomUUID().toString().replaceAll("-","") + photo.getOriginalFilename();
    InputStream inputStream = photo.getInputStream();
    //获取绝对路径
    String realPath = request.getServletContext().getRealPath("/upload");
    File file =new File(realPath);
    //这个目录如果不存在,就创建出来
    if(!file.exists()){
        file.mkdirs();
    }
    FileOutputStream fos = new FileOutputStream(new File(realPath+"/"+fileName));
    IOUtils.copy(inputStream,fos);
    fos.flush();
    fos.close();
    inputStream.close();
    ModelAndView mv = new ModelAndView("success");
    mv.addObject("fileName",fileName);
    return mv;
}
后端代码 2:
@RequestMapping("/uploadFile")
public ModelAndView upload(MultipartFile photo, String username, HttpServletRequest request) throws IOException {
    String fileName = UUID.randomUUID().toString().replaceAll("-","")+photo.getOriginalFilename();
    String realPath = request.getServletContext().getRealPath("/upload");
    File file =new File(realPath);
    //这个目录如果不存在,就创建出来
    if(!file.exists()){
        file.mkdirs();
    }
    photo.transferTo(new File(realPath+"/"+fileName));
    ModelAndView mv = new ModelAndView("success");
    mv.addObject("fileName",fileName);
    return mv;
}
后端代码3
多线程处理读取文件问题--待补充和校验
https://blog.csdn.net/qq_32233421/article/details/81022185
2、文件下载
在 springmvc框架这儿,要实现文件下载
要求:1.方法返回值类型必须为ResponseEntity<byte[]> 2.设置两个响应头信息。前端页面:
<a href="file/download">下载</a>
后端代码:
@RequestMapping("/download")
public ResponseEntity<byte[]> downloadFile(HttpServletRequest request) throws Exception {
    String fileName="风吹麦浪.mp3";
    String realPath = request.getServletContext().getRealPath("/WEB-INF/" + fileName);
    FileInputStream fis =new FileInputStream(realPath);
    byte[] body=new byte[fis.available()];
    //将输入流读到bety[]中
    fis.read(body);
    MultiValueMap<String,String> map = new HttpHeaders();//设置响应头信息
    //解决文件名乱码问题
    fileName = new String(fileName.getBytes("gbk"),"iso8859-1");
    //不再被浏览器解析,会被当做附件下载
    map.add("Content-Disposition", "attachment;filename="+fileName);
    HttpStatus status = HttpStatus.OK;
    ResponseEntity<byte[]> responseEntity= new ResponseEntity<>(body,map,status);
    return responseEntity;
}
7.springmvc 全局异常处理
所谓全局异常处理:是指所有 controller 层抛出的指定异常,springmvc 都能一次性处理掉。
方法:定义全局异常处理类,处理指定类型的异常
1、基于注解的全局异常处理
@ControllerAdvice标记的类就是全局异常处理类 处理异常后返回视图名称进行转发
@RestControllerAdvice处理异常后返回数据转为json响应
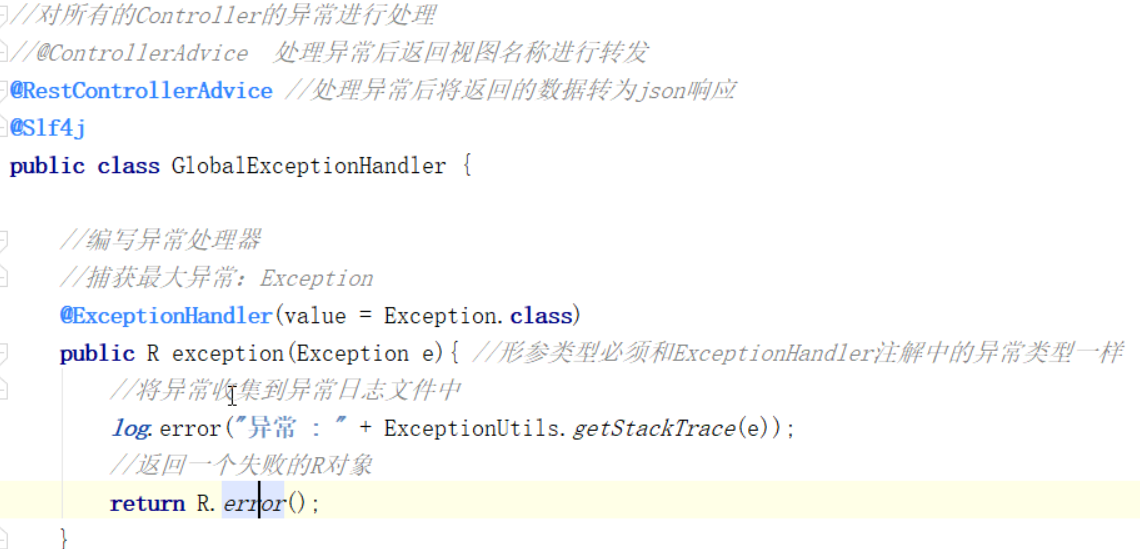
注意:
1.如果想要在异常处理方法这里获取异常信息,可以使用Exception类型的参数接收异常信息
2.假如要把异常信息携带到页面上,只能使用ModelAndView作为方法返回值
3.标记在方法上@ExceptionHandler注解必须指定value属性值(指定类型的异常)
4.当前全局异常处理类中有多个可以处理这个指定异常的方法时,根据就近原则,找继承关系近的那个异常处理方法执行。
@ControllerAdvice
public class HandleException {

    @ExceptionHandler(value = {ArithmeticException.class})
    public ModelAndView handleArithmeticException(Exception ex){
        ModelAndView mv =new ModelAndView("error");
        mv.addObject("ex",ex.getMessage());
        System.out.println("走了异常处理方法.......ArithmeticException");
        return mv;
    }
}
2、基于xml配置的全局异常处理
在springmvc.xml中配置
注意点同上
<bean class="org.springframework.web.servlet.handler.SimpleMappingExceptionResolver">
    <!-- 指定异常信息在request域中的键 -->
    <property name="exceptionAttribute" value="ex"/>
    <property name="exceptionMappings">
        <props>
            <!--key:异常类的全类名  value:逻辑视图名(会经过内部资源视图解析器解析)-->
            <prop key="java.lang.ArithmeticException">error</prop>
        </props>
    </property>
</bean>
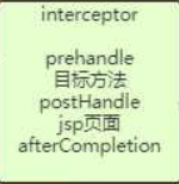
8.拦截器
拦截器[Interceptor]:SpringMVC 中的拦截器类
是在请求到达目标方法之前拦截,拦截之后可以做权限验证、日志记录等功能。
1、如何自定义拦截器
具体步骤:
第一步:自定义一个类,实现 HandlerInterceptor 接口
  public class FirstInterceptor implements HandlerInterceptor {
            /************************************************************
             preHandle:
             执行时机:在目标方法执行之前执行
             返回值:boolean类型,true表示放行请求,false表示拦截请求
             作用: 权限验证,日志记录,事务等。
             ************************************************************/
            @Override
            public boolean preHandle(HttpServletRequest
                                             request, HttpServletResponse
                                             httpServletResponse, Object o) throws Exception
            {
                System.out.println("FirstInterceptor preHandle....");
                return true;//默认是false,需要改为true后续的拦截器和目标方法才会继续
            }
            /************************************************************
             postHandle:
             执行时机:在目标方法执行之后,视图渲染[render]之前执行
             返回值:void
             作用:
             在这里还可以修改request域中的属性和视图
             ************************************************************/
            @Override
            public void postHandle(HttpServletRequest
                                           request, HttpServletResponse response, Object o,
                                   ModelAndView mv) throws Exception {
                System.out.println("FirstInterceptor
                        postHandle....");
            }
            /************************************************************
             afterCompletion:
             执行时机:在视图渲染之后执行
             返回值: void
             作用: 释放资源,比如threadLocal的remove
             ************************************************************/
            @Override
            public void afterCompletion(HttpServletRequest
                                                httpServletRequest, HttpServletResponse
                                                httpServletResponse, Object o, Exception e) throws
                    Exception {
                System.out.println("FirstInterceptor afterCompletion....");
            }
        }
第二步:在 springmvc.xml 中配置该拦截器信息
<mvc:interceptors>
<!--默认拦截当前项目下所有的请求:不包含jsp -->
<bean class="com.atguigu.interceptor.FirstInterceptor"></bean>
</mvc:interceptors>
<!--配置拦截器-->
   <mvc:interceptors>
       <mvc:interceptor>
           <!--配置拦截路径-->
           <mvc:mapping path="/user/**"/>
           <!--配置不拦截路径:不拦截路径是指从拦截路径中排除-->
           <mvc:exclude-mapping path="/user/sayByby"></mvc:exclude-mapping>
           <!--配置拦截器bean-->
           <bean class="com.atguigu.interceptor.LogInterceptor2"></bean>
       </mvc:interceptor>
   </mvc:interceptors>
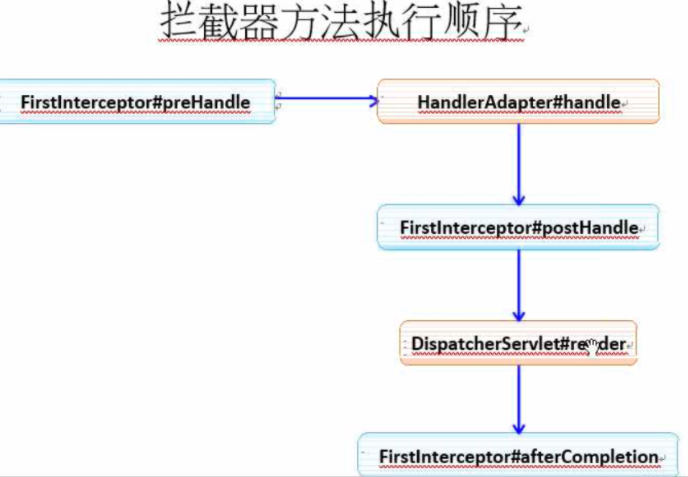
单拦截器情况下,各个方法的执行顺序(单拦截器)自定义拦截器 方法执行顺序
2、拦截器的详细配置、执行顺序
<mvc:interceptors>
    <!--默认拦截当前项目下所有的请求:不包含jsp -->
    <bean class="com.atguigu.interceptor.FirstInterceptor"></bean>
    <!--每一个<mvc:interceptor>都对应一个拦截器的详细配置 -->
    <mvc:interceptor>
        <!-- 使用<mvc:mapping>配置当前拦截器要拦截的请求 -->
        <mvc:mapping path="/**"/>
        <!-- 使用<mvc:exclude-mapping>配置当前拦截器不拦截的请求 -->
        <mvc:exclude-mapping path="/user/edit"/>
        <bean class="com.atguigu.interceptor.SecondInterceptor"></bean>
    </mvc:interceptor>
</mvc:interceptors>
多拦截器情况下,拦截器中的方法和目标方法的执行顺序:
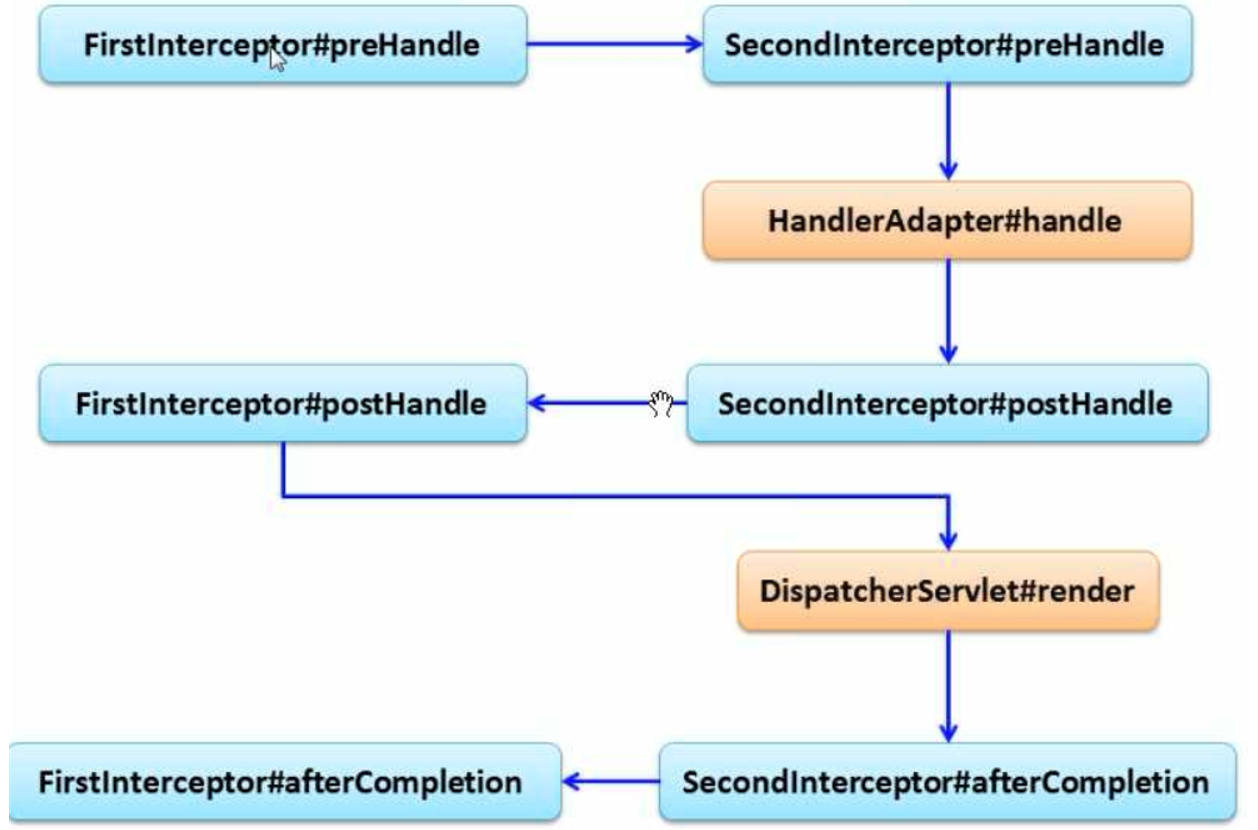
多拦截器情况下,拦截器的执行顺序是?
由配置 springmvc.xml 文件中的顺序决定的,谁在前面,谁先执行。
3.拦截器和 filter 区别?
拦截器是 springmvc 框架中的,框架本身不拦截的请求,拦截器也拦截不了,filter 可以拦截所有的请求。
拦截器中直接注入 spring、springmvc 容器中的对象,filter 中却不能直接注入 spring、springmvc 容器中的对象
实际用途:
拦截器是由 springmvc 管理的,主要是拦截接口的请求的,filter 是由 tomcat 管理的,拦截所有请求。
4.SpringBoot中配置拦截器
拦截器:判断登录状态
怎么自定义拦截?
1.编写实现类实现HandlerInterceptor接口
preHandle:前置方法,handler方法之前执行
postHandle:后置方法,handler方法执行之后执行
afterCompletion:完成方法,视图渲染完成之后
@Component
public class LoginInterceptor implements HandlerInterceptor {

    @Override
    public boolean preHandle(HttpServletRequest request, HttpServletResponse response, Object handler) throws Exception {
        System.out.println("preHandle");
        return true;
    }

    @Override
    public void postHandle(HttpServletRequest request, HttpServletResponse response, Object handler, ModelAndView modelAndView) throws Exception {

    }

    @Override
    public void afterCompletion(HttpServletRequest request, HttpServletResponse response, Object handler, Exception ex) throws Exception {

    }
}
2.配置拦截器
spring:
<mvc:interceptors>
    <mvc:interceptor>
        <mvc:mapping path="/**"/>
        <bean class="拦截器的全路径"/>
    </mvc:interceptor>
</mvc:interceptors>
springboot
编写一个配置类实现WebMvcConfigurer接口
@Configuration
public class MvcConfig implements WebMvcConfigurer {

    @Autowired
    private LoginInterceptor loginInterceptor;
    @Override
    public void addInterceptors(InterceptorRegistry registry) {
        registry.addInterceptor(loginInterceptor).addPathPatterns("/**");
    }
}
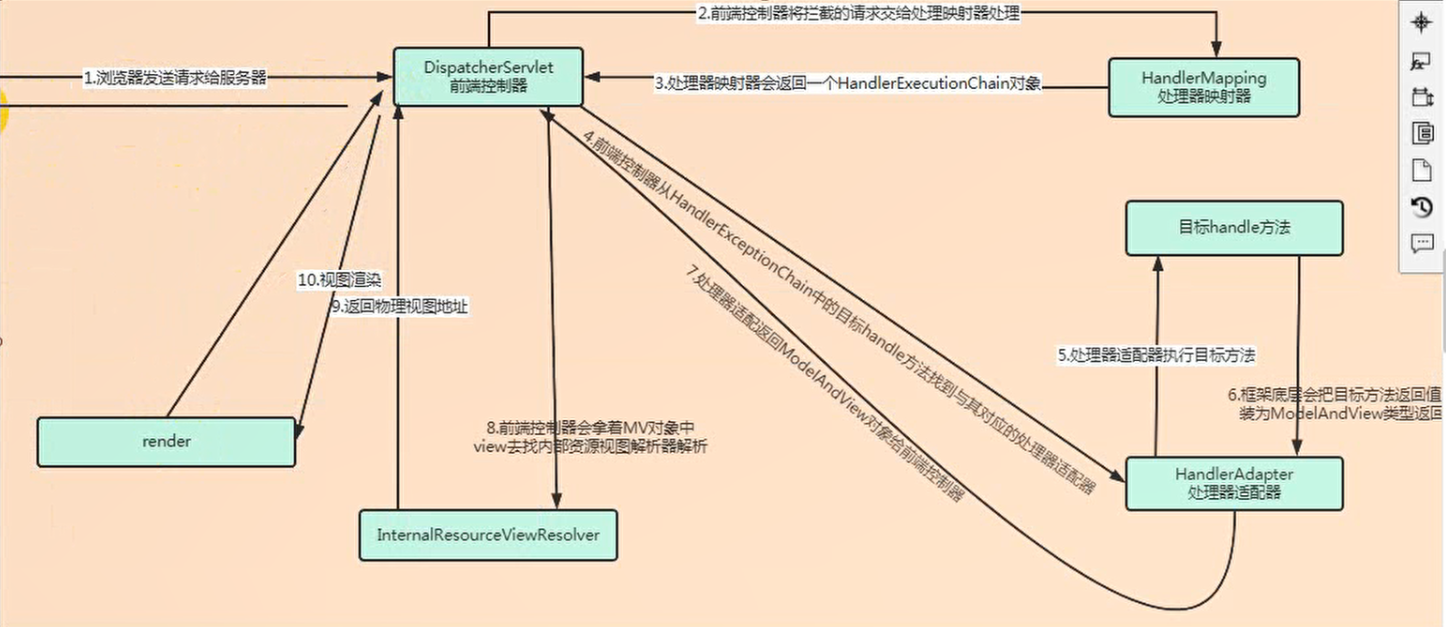
9.SpringMVC 运行流程|运行原理
第一步:发起请求到前端控制器(DispatcherServlet)
第二步:前端控制器请求HandlerMapping查找 Handler
可以根据xml配置、注解进行查找
第三步:处理器映射器HandlerMapping向前端控制器返回Handler
第四步:前端控制器调用处理器适配器去执行Handler
第五步:处理器适配器HandlerAdapter去执行Handler
第六步:Handler执行完成给适配器返回ModelAndView
第七步:处理器适配器向前端控制器返回ModelAndView
ModelAndView是springmvc框架的一个底层对象,包括Model和view
第八步:前端控制器请求视图解析器去进行视图解析
根据逻辑视图名解析成真正的视图(jsp)
第九步:视图解析器向前端控制器返回View
第十步:前端控制器进行视图渲染
视图渲染将模型数据(在ModelAndView对象中)填充到request域
第十一步:前端控制器向用户响应结果
组件:
1、前端控制器DispatcherServlet(不需要程序员开发)
作用接收请求,响应结果,相当于转发器,中央处理器。
有了DispatcherServlet减少了其它组件之间的耦合度
2、处理器映射器HandlerMapping(不需要程序员开发)
作用:根据请求的url查找Handler
根据当前请求的找到对应的 Handler,并将 Handler(执行程序)与一堆 HandlerInterceptor(拦截器)
封装到 HandlerExecutionChain 对象中
3、处理器适配器HandlerAdapter
作用:调用具体的方法对用户发来的请求来进行处理。
当 handlerMapping 获取到执行请求的 controller 时,
DispatcherServlte 会根据 controller 对应的 controller 类型来调用相应的 HandlerAdapter 来进行处理
4、处理器Handler(需要程序员开发,类似action)
注意:编写Handler时按照HandlerAdapter的要求去做,这样适配器才可以去正确执行Handler
5、视图解析器View resolver(不需要程序员开发)
作用:进行视图解析,根据逻辑视图名解析成真正的视图(view)
6、视图View(需要程序员开发jsp)
View是一个接口,实现类支持不同的View类型(jsp、freemarker、pdf...)

10.SpringMVC和Spring整合
第一步:创建动态 web 工程,导入 jar 包
第二步:在 web.xml 文件配置 :
1.spring 的监听器:ContextLoaderListener、
2.springmvc的前端控制器:DispatcherServlet
3.两个 Filter(1.处理post请求乱码,放在上面 2.将post请求转化为put/delete)
<!-- 1.配置spring的监听器 -->
<listener>
    <listener-class>org.springframework.web.context.ContextLoaderListener</listener-class>
</listener>
<context-param>
    <param-name>contextConfigLocation</param-name>
    <param-value>classpath:applicationContext.xml</param-value>
</context-param>
<!-- 2.配置springmvc的前端控制器 -->
<servlet>
    <servlet-name>DispatcherServlet</servlet-name>
    <servlet-class>org.springframework.web.servlet.DispatcherServlet</servlet-class>
    <init-param>
        <param-name>contextConfigLocation</param-name>
        <param-value>classpath:springmvc.xml</param-value>
    </init-param>
    <load-on-startup>1</load-on-startup>
</servlet>
<servlet-mapping>
    <servlet-name>DispatcherServlet</servlet-name>
    <url-pattern>/</url-pattern>
</servlet-mapping>
<!-- 3.处理POST请求乱码的过滤器 -->
<filter>
    <filter-name>CharacterEncodingFilter</filter-name>
    <filter-class>org.springframework.web.filter.CharacterEncodingFilter</filter-class>
    <init-param>
        <param-name>encoding</param-name>
        <param-value>UTF-8</param-value>
    </init-param>
</filter>
<filter-mapping>
    <filter-name>CharacterEncodingFilter</filter-name>
    <url-pattern>/*</url-pattern>
</filter-mapping>
<!-- 4.处理POST转换为PUT或者DELETE请求过滤器 -->
<filter>
    <filter-name>HiddenHttpMethodFilter</filter-name>
    <filter-class>org.springframework.web.filter.HiddenHttpMethodFilter</filter-class>
</filter>
<filter-mapping>
    <filter-name>HiddenHttpMethodFilter</filter-name>
    <url-pattern>/*</url-pattern>
</filter-mapping>
第三步:配置springmvc.xml (只扫描Controller层类注解和全局异常处理类注解)
<!-- 1.配置扫描包 -->
<!--使用 exclude-filter 和 include-filter 子节点来规定只能扫描的注解-->
<context:component-scan base-package="com.atguigu" use-default-filters="false">
    <context:include-filter type="annotation" expression="org.springframework.stereotype.Controller"/>    	  <context:include-filter type="annotation" expression="org.springframework.web.bind.annotation.ControllerAdvice"/>
</context:component-scan>
<!-- 2.配置内部资源视图解析器-->
<bean class="org.springframework.web.servlet.view.InternalResourceViewResolver">
    <property name="prefix" value="/"/>
    <property name="suffix" value=".jsp"/>
</bean>
<!-- 3.配置处理静态资源文件的标签-->
<mvc:default-servlet-handler/>
<mvc:annotation-driven/>
第四步:配置 applicationContext.xml (除了Controller层类和全局异常处理类,其他都要扫描)
<!-- 1.配置扫描包 -->
<context:component-scan base-package="com.atguigu">
     <context:exclude-filter type="annotation" expression="org.springframework.stereotype.Controller"/>
     <context:exclude-filter type="annotation" expression="org.springframework.web.bind.annotation.ControllerAdvice"/>
</context:component-scan>
<!-- 2.加载properties文件 -->
<context:property-placeholder location="classpath:jdbc.properties"/>
<!-- 3.配置数据源信息-->
<bean id="dataSource" class="com.alibaba.druid.pool.DruidDataSource">
     <property name="username" value="${jdbc.userName}"/>
     <property name="password" value="${jdbc.password}"/>
     <property name="url" value="${jdbc.jdbcUrl}"/>
     <property name="driverClassName" value="${jdbc.driverClass}"/>
</bean>

<!--4. 配置JdbcTemplate -->
<bean class="org.springframework.jdbc.core.JdbcTemplate">
     <property name="dataSource" ref="dataSource"/>
</bean>
<!-- 5.配置数据源事务管理器 -->
<bean id="transactionManager" class="org.springframework.jdbc.datasource.DataSourceTransactionManager">
     <property name="dataSource" ref="dataSource"/>
</bean>
<!-- 6.基于注解的事务支持 -->
<tx:annotation-driven transaction-manager="transactionManager"/>
第五步:编写软件三层架构,测试。
spring 容器与 springmvc 容器的关系
1.Spring容器和 SpringMVC容器是父子关系,Spring容器是父容器, SpringMVC是子容器
2.子容器中的对象可以使用父容器中的对象,反之不行

 浙公网安备 33010602011771号