
vue项目--vuex状态管理器
本文取之官网和其他文章结合自己的理解用简单化的语言表达。用于自己的笔记记录,也希望能帮到其他小伙伴理解,学习更多的前端知识。
-
Vuex 是什么?
Vuex 是一个专为 Vue.js 应用程序开发的状态管理模式。它采用集中式存储管理应用的所有组件的状态,并以相应的规则保证状态以一种可预测的方式发生变化。
官方文档: https://vuex.vuejs.org/zh/
简单的说,这个vuex可以用于存储数据的状态。例如:
我的个人信息是否完善的这个状态,可以存储在vuex中,在不同的页面可以读取、更改这个状态。这样就不用页面之间传参等方式。
当然也可以存储一些信息,例如数组、对象、字符串都可以,类似前端的数据库。如果只有这个特点的话,有的小伙伴会有疑问,那本地存储也可以做到的,现在我们就看一下vuex与本地存储的区别。
1.区别:vuex存储在内存,localstorage(本地存储)则以文件的方式存储在本地,永久保存;sessionstorage( 会话存储 ) ,临时保存。localStorage和sessionStorage只能存储字符串类型,对于复杂的对象可以使用ECMAScript提供的JSON对象的stringify和parse来处理
2.应用场景:vuex用于组件之间的传值,localstorage,sessionstorage则主要用于不同页面之间的传值。
3.永久性:当刷新页面(这里的刷新页面指的是 --> F5刷新,属于清除内存了)时vuex存储的值会丢失,sessionstorage页面关闭后就清除掉了,localstorage不会。
注:很多同学觉得用localstorage可以代替vuex, 对于不变的数据确实可以,但是当两个组件共用一个数据源(对象或数组)时,如果其中一个组件改变了该数据源,希望另一个组件响应该变化时,localstorage,sessionstorage无法做到,原因就是区别1
原始网址:https://blog.csdn.net/sinat_36729274/article/details/87433615
- vuex安装
安装命令行:npm install vuex --save

安装成功后,使用命令行:npm run dev 运行项目。接下来会在项目中使用vuex,首先,在src文件夹下新建一个名为store的文件夹,在store文件夹下新建index.js文件,index.js文件的内容分为:
import Vue from 'vue'  // 引入vue
import Vuex from 'vuex'  // 引入vuex

// 使用vuex
Vue.use(Vuex)

// 创建vuex实例
const store = new Vuex.Store({

})

export default store
然后在main.js文件中引入store文件夹下的index.js文件。main.js文件中内容如下:
import Vue from 'vue'
import App from './App'
import router from './router'

import store from './store'      // ------------ 引入store文件夹下面的index.js

Vue.config.productionTip = false

/* eslint-disable no-new */
new Vue({
  el: '#app',
  store,   //  -------------- 将store 添加到vue的实例中
  router,
  components: { App },
  template: '<App/>'
})
这样我们就在项目中引入vuex了,那怎么使用vuex呢?
vuex的核心概念是以下几个:
-
- State
- Getter
- Mutation
- Action
- Module
下面是具体来讲一下vuex核心概念的使用方法吧。
- State
Vuex 使用单一状态树——是的,用一个对象就包含了全部的应用层级状态。至此它便作为一个“唯一数据源 (SSOT)”而存在。这也意味着,每个应用将仅仅包含一个 store 实例。单一状态树让我们能够直接地定位任一特定的状态片段,在调试的过程中也能轻易地取得整个当前应用状态的快照。
以上是官网的说法,我的理解就是在state中声明变量,可以在全部页面都可以使用state中的变量。
现在,我们开始新建和使用state,在store文件夹下面新建state文件夹,state文件夹下面新建index.js文件,index.js文件内容如下:
const state = {
    name: 'weish',
    age: 22,
    todos: [
        { id: 1, text: '1111', done: true },
        { id: 2, text: '2222', done: false }
      ]
};

export default state;
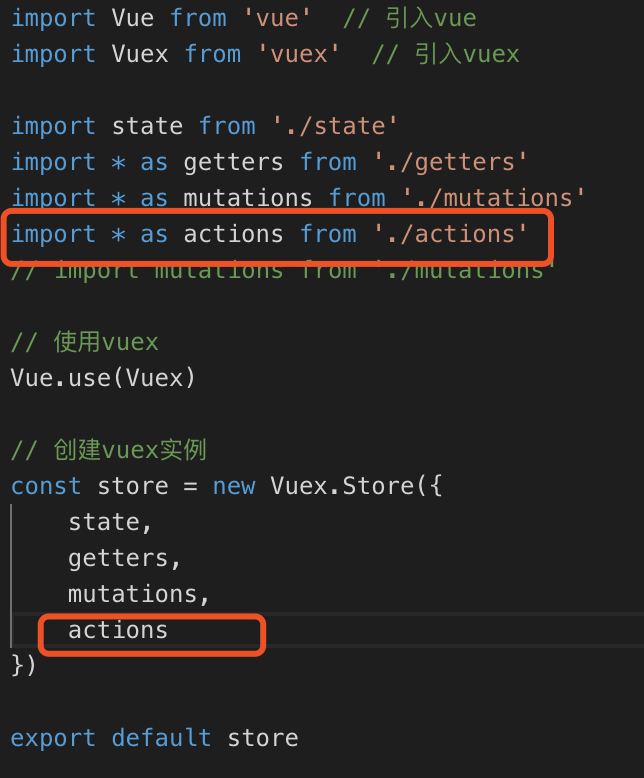
然后将state引入到store中,所以在store文件夹下的index.js内容如下:
import Vue from 'vue'  // 引入vue
import Vuex from 'vuex'  // 引入vuex

import state from './state'   // ---------引入state

// 使用vuex
Vue.use(Vuex)

// 创建vuex实例
const store = new Vuex.Store({
    state   //     ---------将state添加到实例中
})

export default store
做完上面state中的声明与store中的引入,我们就可以在页面中使用state中的变量了。
HelloWorld.vue内容如下:
<template>
  <div class="hello">
    <h1>{{ msg }}</h1>
    <h2>state:方法一:{{this.$store.state.age}}</h2>
    <h2>state:方法二:{{age2}}</h2>
  </div>
</template>

<script>
export default {
  name: 'HelloWorld',
  data () {
    return {
      msg: 'Welcome to Your Vue.js App'
    }
  },
   computed:{
     age2(){
       return this.$store.state.age
     }
   }
}
</script>

<!-- Add "scoped" attribute to limit CSS to this component only -->
<style scoped>

</style>
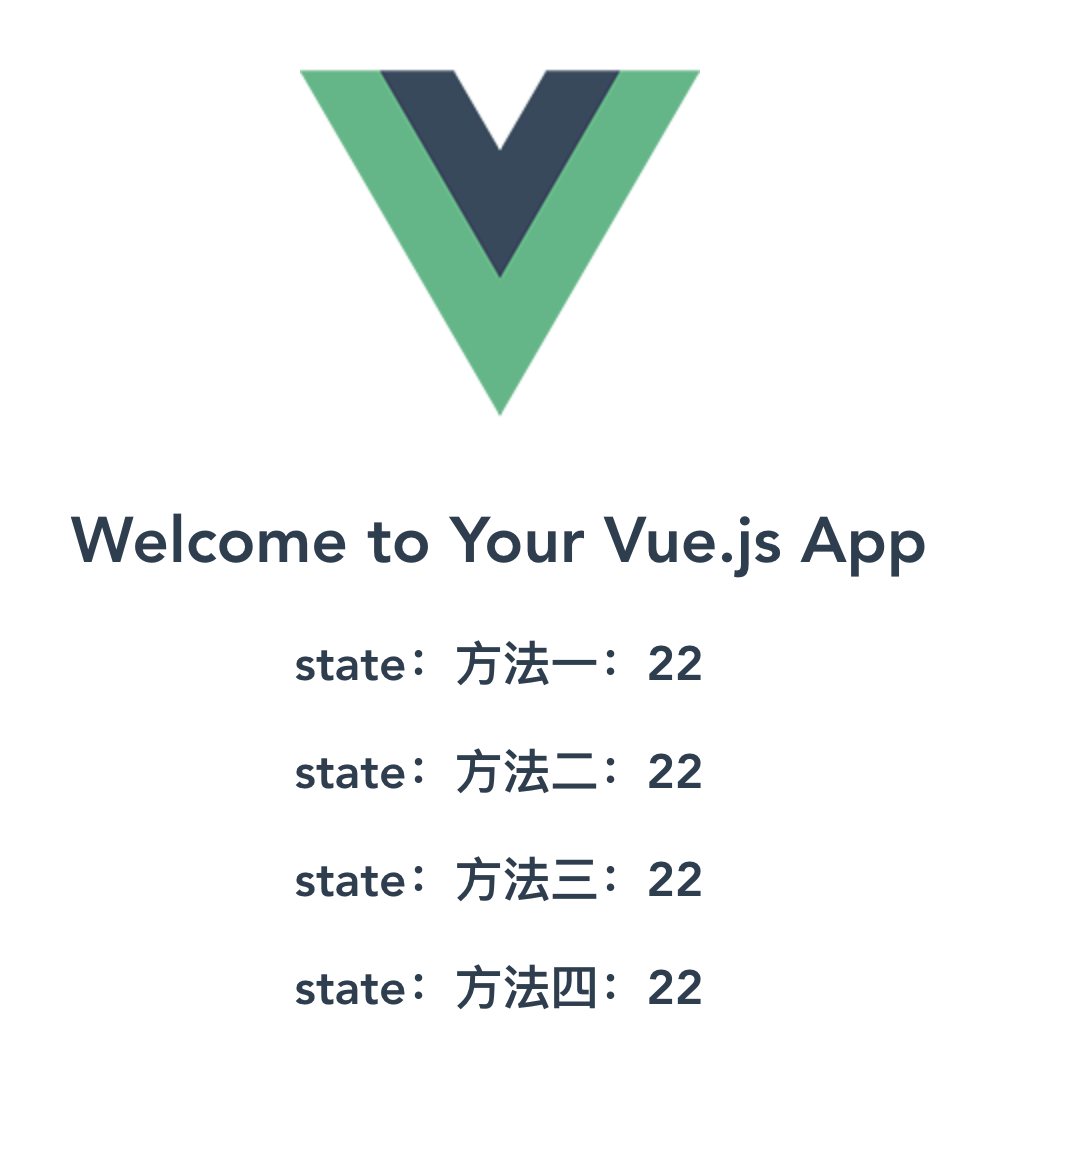
使用辅助函数mapState时,HelloWorld.vue内容如下:
<template>
  <div class="hello">
    <h1>{{ msg }}</h1>
    <h2>state:方法一:{{this.$store.state.age}}</h2>
    <h2>state:方法二:{{age2}}</h2>
    <h2>state:方法三:{{age3}}</h2>
    <h2>state:方法四:{{age4}}</h2>
  </div>
</template>

<script>
// 辅助函数为 Vuex.mapState
import { mapState } from 'vuex'
export default {
  name: 'HelloWorld',
  data () {
    return {
      msg: 'Welcome to Your Vue.js App'
    }
  },
  computed: mapState({
    age2: 'age',    //方法2
    age3: (state) => state.age,  // 方法3
    age4:function () {
      return this.$store.state.age  // 普通函数的使用store的方式,方法4
    }
  })
  //没有使用mapState时,普通函数的写法
  // computed:{
  //   age5(){
  //     return this.$store.state.age   //方法5
  //   },
  //   ...mapState(['name','age'])    // 方法6
  // }
}
</script>

<!-- Add "scoped" attribute to limit CSS to this component only -->
<style scoped>

</style>
页面效果如下:
- Getter
有时候我们需要从 store 中的 state 中派生出一些状态,例如对列表进行过滤并计数:
computed: {
  doneTodosCount () {
    return this.$store.state.todos.filter(todo => todo.done).length
  }
}
如果有多个组件需要用到此属性,我们要么复制这个函数,或者抽取到一个共享函数然后在多处导入它——无论哪种方式都不是很理想。
Vuex 允许我们在 store 中定义“getter”(可以认为是 store 的计算属性)。就像计算属性一样,getter 的返回值会根据它的依赖被缓存起来,且只有当它的依赖值发生了改变才会被重新计算。
在store文件夹下新建getters文件夹,在getters文件夹下新建index.js,内容如下:
export const doneTodosCount = (state) => {
    return state.todos.filter(todo => todo.done).length;
}
在store文件夹下index.js中引入getters
import Vue from 'vue'  // 引入vue
import Vuex from 'vuex'  // 引入vuex

import state from './state'
import * as getters from './getters' // ---------引入

// 使用vuex
Vue.use(Vuex)

// 创建vuex实例
const store = new Vuex.Store({
    state,
    getters      // --------添加
})

export default store
可以通过属性访问:store.getters.doneTodosCount
<template>
  <div class="hello">
    <h1>{{ msg }}</h1>
    <h2>getters: {{Count}}</h2>
  </div>
</template>

<script>

export default {
  name: 'HelloWorld',
  data () {
    return {
      msg: 'Welcome to Your Vue.js App'
    }
  },
  computed:{
    Count() {
      return this.$store.getters.doneTodosCount   // -------1
    }
  }
}
</script>

<!-- Add "scoped" attribute to limit CSS to this component only -->
<style scoped>

</style>
页面效果如下:

使用辅助函数mapGetters,内容如下:
<template>
  <div class="hello">
    <h1>{{ msg }}</h1>
    <h2>getters: {{Count}}</h2>
    <h2>getters:mapGetters {{doneTodosCount}}</h2>     // -----------页面中{{doneTodoCount}}
  </div>
</template>

<script>
// 在单独构建的版本中辅助函数为 Vuex.mapState 和mapGetter
import { mapState,mapGetters } from 'vuex'      // -----引入mapGetters
export default {
  name: 'HelloWorld',
  data () {
    return {
      msg: 'Welcome to Your Vue.js App'
    }
  },
  computed:{
    age(){
      return this.$store.state.age
    },
    ...mapState(['name','age','todos']),
    ...mapGetters(['doneTodosCount']),   //-----------在computed使用mapGetter
    Count() {
      return this.$store.getters.doneTodosCount
    }
  }
}
</script>

<!-- Add "scoped" attribute to limit CSS to this component only -->
<style scoped>

</style>
- Mutation
更改 Vuex 的 store 中的状态的唯一方法是提交 mutation。mutations必须是同步函数。
在store文件夹下新增mutations文件夹,在mutations文件夹下新增index.js,内容如下:
export const CACHE_AGE = (state, param) => {  // 当提交格式是简单数据格式,例如:123,'123'
    state.age += param;
}
export const newName = (state,payload) => {  // 当提交格式是对象格式
  state.name = payload.newName
}
在store文件夹下index.js中引入mutations
import Vue from 'vue'  // 引入vue
import Vuex from 'vuex'  // 引入vuex

import state from './state'
import * as getters from './getters'
import * as mutations from './mutations'   // -----------引入mutations

// 使用vuex
Vue.use(Vuex)

// 创建vuex实例
const store = new Vuex.Store({
    state,
    getters,
    mutations      //    ---------添加到实例
})

export default store
在页面中使用mutations修改state中age
<template>
  <div class="hello">
    <h1>{{ msg }}</h1>
    <h2>state:方法一:{{this.$store.state.age}}</h2>
    <h2>getters: {{Count}}</h2>
    <h2>getters:mapGetters {{doneTodosCount}}</h2>
    <div><button @click="plus()">点我age加2</button></div>
   <h2>{{name}}</h2>
   <div><button @click="changeName()">点我name修改为Alise</button></div>
  </div>
</template>

<script>
// 在单独构建的版本中辅助函数为 Vuex.mapState
import { mapState,mapGetters } from 'vuex'
export default {
  name: 'HelloWorld',
  data () {
    return {
      msg: 'Welcome to Your Vue.js App'
    }
  },
  computed:{
    age(){
      return this.$store.state.age
    },
    ...mapState(['name','age','todos']),
    ...mapGetters(['doneTodosCount']),
    Count() {
      return this.$store.getters.doneTodosCount
    }
  },
  methods:{
    plus(){
      this.$store.commit('CACHE_AGE', 2)
    },
  changeName(){
    // this.$store.commit({type:'newName',newName:'Alise'})   //--------------对象风格提交格式   方法一
    this.$store.commit('newName',{newName:'Alise'})    // -------------对象风格提交格式  方法二
  }
  }
}
</script>
-
- 使用常量替代Mutation事件类型
把这些常量放在单独的文件中可以让你的代码合作者对整个 app 包含的 mutation 一目了然。用不用常量取决于你——在需要多人协作的大型项目中,这会很有帮助。但如果你不喜欢,你完全可以不这样做。
在mutations文件夹下面新建mutation-types.js,内容如下:
export const CACHE_NAME_TYPE = 'CACHE_NAME_TYPE'
mutations文件夹下index.js,内容如下:
import { CACHE_NAME_TYPE } from './mutation-types'
const mutations = {
    [CACHE_NAME_TYPE](state,payload){
        state.name = payload.newName
    }
}
export default mutations

// ps:如果mutation部分写成这种格式,那么在store文件夹下的index.js中引入mutations的方式需要修改写成
// import mutations from './mutations'
// 而不是 import * as mutations from './mutations'
在页面中使用mapMutations辅助函数:
<template>
  <div class="hello">
    <h1>{{ msg }}</h1
    <h2>state:name:{{name}}</h2>
    <div><button @click="changeName()">点我store的名字变成alise</button></div>
    <div><button @click="changeName1()">点我store的名字变成Mark</button></div>
  </div>
</template>
<script>
// 在单独构建的版本中辅助函数为 Vuex.mapState
import { mapState,mapGetters,mapMutations } from 'vuex'    //  ------引入mapMutation
export default {
  name: 'HelloWorld',
  data () {
    return {
      msg: 'Welcome to Your Vue.js App'
    }
  },
computed:{
    ...mapState(['name','age','todos']),
    ...mapGetters(['doneTodosCount'])
  },
methods:{
    ...mapMutations(['CACHE_NAME']),          //    -------------在methods中映射,将this.CACHE_NAME()映射为this.$store.commit('CACHE_NAME')
    changeName(){
       this.$store.commit('newName',{newName:'Alise'})
  },
   changeName1(){
     this.CACHE_NAME({newName:'MARK'})    // -------使用
   }
  }
}
</script>
- Action
action类似mutation,不同之处在于:
-
- action提交的mutation,而不是直接改变的状态
- action可以包含任一异步操作
在store文件夹下新建actions文件夹,actions文件夹下新建index.js,内容如下:
export const setName = ({ commit }, param) => {
    commit('CACHE_NAME', param)
}
在store文件夹下的index.js中引入actions
就可以在页面中使用actions了,在页面中调用actions的方法是:this.$store.dispatch('setName',{newName:'Tom'}),具体代码如下:
<template>
  <div class="hello">
    <h1>{{ msg }}</h1
    <h2>state:name:{{name}}</h2>
    <div><button @click="changeName()">点我store的名字变成alise</button></div>
    <div><button @click="changeName1()">点我store的名字变成Mark</button></div>
   <div><button @click="changeName2()">点我store的名字通过actions方式变成Tom</button></div>
  </div>
</template>
<script>
import { mapState,mapGetters,mapMutations } from 'vuex'
export default {
  name: 'HelloWorld',
  data () {
    return {
      msg: 'Welcome to Your Vue.js App'
    }
  },
computed:{
    ...mapState(['name','age','todos']),
    ...mapGetters(['doneTodosCount'])
  },
methods:{
    ...mapMutations(['CACHE_NAME']),
    changeName(){
       this.$store.commit('newName',{newName:'Alise'})
  },
   changeName1(){
     this.CACHE_NAME({newName:'MARK'})
   },
    changeName2(){
     this.$store.dispatch('setName',{newName:'Tom'})
   }
  }
}
</script>
使用mapActions辅助函数:
<template>
  <div class="hello">
    <h1>{{ msg }}</h1
    <h2>state:name:{{name}}</h2>
    <div><button @click="changeName()">点我store的名字变成alise</button></div>
    <div><button @click="changeName1()">点我store的名字变成Mark</button></div>
   <div><button @click="changeName2()">点我store的名字通过actions方式变成Tom</button></div>
  </div>
</template>
<script>
import { mapState,mapGetters,mapMutations,mapActions } from 'vuex'    // ------------添加mapActions
export default {
  name: 'HelloWorld',
  data () {
    return {
      msg: 'Welcome to Your Vue.js App'
    }
  },
computed:{
    ...mapState(['name','age','todos']),
    ...mapGetters(['doneTodosCount'])
  },
methods:{
    ...mapMutations(['CACHE_NAME']),
    ...mapActions(['setName']),                // 修改二:在methods中添加...mapActions
    changeName(){
       this.$store.commit('newName',{newName:'Alise'})
  },
   changeName1(){
     this.CACHE_NAME({newName:'MARK'})
   },
    changeName2(){
     // this.$store.dispatch('setName',{newName:'Tom'})
     this.setName({newName:'Tom1111'})            //  修改三:使用this.setName提交修改mutation
   }
  }
}
</script>
actions中通常是异步操作,可以组合使用action,以处理更复杂的流程。可查看官网例子组合action,官网地址:https://vuex.vuejs.org/zh/guide/actions.html
- Modules
由于使用单一状态树,应用的所有状态会集中到一个比较大的对象。当应用变得非常复杂时,store 对象就有可能变得相当臃肿。
为了解决以上问题,Vuex 允许我们将 store 分割成模块(module)。每个模块拥有自己的 state、mutation、action、getter、甚至是嵌套子模块——从上至下进行同样方式的分割。官方地址:https://vuex.vuejs.org/zh/guide/modules.html。
在store文件夹下,新建modules文件夹,在modules文件夹下面新建moduleA.js文件,内容如下:
const moduleA = {
    state: { count: 0 },
    mutations: {
      increment (state,num) {
        // 这里的 `state` 对象是模块的局部状态
        state.count += num
      }
    },
    getters: {
        sumWithRootCount (state, getters, rootState) {
            return state.count + rootState.age
        }
    },
    actions:{
        incrementIfOddOnRootSum ({ state, commit, rootState },param) {
            console.log(state,rootState,param)  // state :局部state传入值,如:{count:0},rootState:根元素state传入值,param:外部传入参
              commit('increment',param.num)
        }
    }
  }
export default moduleA
在store文件夹下index.js文件中,引入moduleA.js,内容如下:
import Vue from 'vue'  // 引入vue
import Vuex from 'vuex'  // 引入vuex

import state from './state'
import * as getters from './getters'
import * as mutations from './mutations'
import * as actions from './actions'
// import mutations from './mutations'

// moudules
import mouduleA from './modules/moduleA'     // --------引入moduleA

// 使用vuex
Vue.use(Vuex)

// 创建vuex实例
const store = new Vuex.Store({
    state,
    getters,
    mutations,
    actions,
    modules:{
        a:mouduleA             //  -----------实例化
    }
})

export default store
在页面中使用moduleA,helloword.vue内容如下:
<template>
  <div class="hello">
    <h1>{{ msg }}</h1>
    <h2>mouduleA--count:{{a.count}}</h2>        // 使用mapState在页面中显示,也可直接写 this.$store.state.a.count
    <h2>moduleA--sumWithRootCount:{{sumWithRootCount}}</h2>   // 使用mapGetters
    <div><button @click="changeCount()">点我ModuleA的Count+某个数</button></div>
  </div>
</template>
<script>
// 在单独构建的版本中辅助函数为 Vuex.mapState
import { mapState,mapGetters,mapMutations,mapActions } from 'vuex'     // -------引入mapState,mapGetters,mapMutations,mapActions
export default {
  name: 'HelloWorld',
  data () {
    return {
      msg: 'Welcome to Your Vue.js App'
    }
  },
  computed:{
    ...mapState(['a']),                 // 在computed中 --------------使用mapState
    ...mapGetters(['sumWithRootCount']),    // computed中-----------使用mapGetters
    Count() {
      return this.$store.getters.doneTodosCount
    }
  },
  methods:{
    ...mapMutations(['increment']),       //  在methods中-----------使用mapMutations
    ...mapActions(['incrementIfOddOnRootSum']),   // 在methods中---------使用mapActions
   changeCount(){
    //  this.$store.commit('increment',11)       // ------------一般方法 mutation 修改moduleA中state中的值
    //  this.$store.dispatch('incrementIfOddOnRootSum',{num:12})   // --------------一般方法 action 提交mutation
    // this.increment(12)   // ----------使用mapMutations  修改moduleA中state的值
    this.incrementIfOddOnRootSum({num:10})         // ------------使用mapActions    提交mutations
   }
  }
}
</script>

<!-- Add "scoped" attribute to limit CSS to this component only -->
<style scoped>

</style>
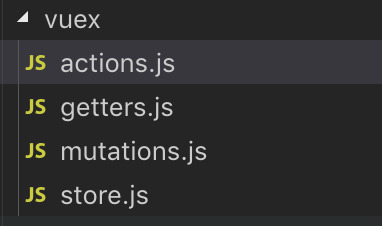
- store文件夹目录
store文件夹下,经过上述的关于核心概念的介绍,新建了actions、getters、state、mutations和modules五个文件夹,除modules文件夹下面是moduleA.js之外,其他下面都是index.js文件。第一图是store文件夹下的目录,中图是展开后,当然也可以根据自己的习惯管理文件。例如第三图。


ok,上述代码均经过本人测试,如果有问题,欢迎留言。

 浙公网安备 33010602011771号