
Docker 简介与shell操作使用
一.Docker概述
1.Docker简介
Docker是一个开源的应用容器引擎;是一个轻量级容器技术;Docker支持将软件编译成一个镜像;然后在镜像中各种软件做好配置,将镜像发布出去,其他使用者可以直接使 用这个镜像;运行中的这个镜像称为容器,容器启动是非常快速的。
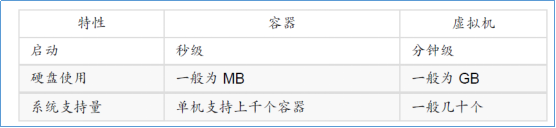
对比传统虚拟机总结:
2.Docker术语
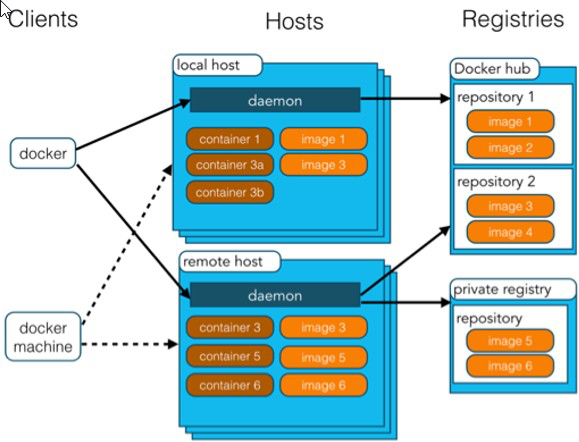
- docker主机(Host):安装了Docker程序的机器(Docker直接安装在操作系统之上);
- docker客户端(Client):连接docker主机进行操作; docker仓库(Registry):用来保存各种打包好的软件镜像;
- docker镜像(Images):软件打包好的镜像;放在docker仓库中;
- docker容器(Container):镜像启动后的实例称为一个容器;容器是独立运行的一个或一组应用。
使用Docker的步骤:
1)、安装Docker
2)、去Docker仓库找到这个软件对应的镜像;
3)、使用Docker运行这个镜像,这个镜像就会生成一个Docker容器;
4)、对容器的启动停止就是对软件的启动停止;
二.Docker安装
1.安装linux虚拟机
1)、VMWare、VirtualBox(安装); VirtualBox下载地址: https://www.virtualbox.org/wiki/Downloads
2)、安装linux系统CentOS7;
3)、双击启动linux虚拟机;使用 root/ 123456登陆
4)、使用客户端连接linux服务器进行命令操作;
5)、设置虚拟机网络;桥接网络=选好网卡==接入网线;
6)、设置好网络以后使用命令重启虚拟机的网络 service network restart ip addr
2.linux上安装docker
1、检查内核版本,必须是3.10及以上 uname ‐r ,如果不是需要 yum update升级软件包及内核

2、安装docker ,输入y确认安装
[root@localhost ~]# yum install docker

yum方式安装的docker不是最新版的,通过下面方式安装最新版的docker
[root@localhost ~]# curl -sSL https://get.daocloud.io/docker | sh

3、启动docker 查看docker版本号
[root@localhost ~]# systemctl start docker
4、设置开机启动docker
[root@localhost ~]# systemctl enable docker

5、停止docker
[root@localhost ~]# systemctl stop docker
6、查看docker帮助
[root@localhost ~]# docker --help
帮助命令如下:


[root@localhost ~]# docker --help

Usage:  docker COMMAND

A self-sufficient runtime for containers

Options:
      --config string      Location of client config files (default "/root/.docker")
  -D, --debug              Enable debug mode
      --help               Print usage
  -H, --host list          Daemon socket(s) to connect to (default [])
  -l, --log-level string   Set the logging level ("debug", "info", "warn", "error", "fatal") (default "info")
      --tls                Use TLS; implied by --tlsverify
      --tlscacert string   Trust certs signed only by this CA (default "/root/.docker/ca.pem")
      --tlscert string     Path to TLS certificate file (default "/root/.docker/cert.pem")
      --tlskey string      Path to TLS key file (default "/root/.docker/key.pem")
      --tlsverify          Use TLS and verify the remote
  -v, --version            Print version information and quit

Management Commands:
  container   Manage containers
  image       Manage images
  network     Manage networks
  node        Manage Swarm nodes
  plugin      Manage plugins
  secret      Manage Docker secrets
  service     Manage services
  stack       Manage Docker stacks
  swarm       Manage Swarm
  system      Manage Docker
  volume      Manage volumes

Commands:
  attach      Attach to a running container
  build       Build an image from a Dockerfile
  commit      Create a new image from a container's changes
  cp          Copy files/folders between a container and the local filesystem
  create      Create a new container
  diff        Inspect changes on a container's filesystem
  events      Get real time events from the server
  exec        Run a command in a running container
  export      Export a container's filesystem as a tar archive
  history     Show the history of an image
  images      List images
  import      Import the contents from a tarball to create a filesystem image
  info        Display system-wide information
  inspect     Return low-level information on Docker objects
  kill        Kill one or more running containers
  load        Load an image from a tar archive or STDIN
  login       Log in to a Docker registry
  logout      Log out from a Docker registry
  logs        Fetch the logs of a container
  pause       Pause all processes within one or more containers
  port        List port mappings or a specific mapping for the container
  ps          List containers
  pull        Pull an image or a repository from a registry
  push        Push an image or a repository to a registry
  rename      Rename a container
  restart     Restart one or more containers
  rm          Remove one or more containers
  rmi         Remove one or more images
  run         Run a command in a new container
  save        Save one or more images to a tar archive (streamed to STDOUT by default)
  search      Search the Docker Hub for images
  start       Start one or more stopped containers
  stats       Display a live stream of container(s) resource usage statistics
  stop        Stop one or more running containers
  tag         Create a tag TARGET_IMAGE that refers to SOURCE_IMAGE
  top         Display the running processes of a container
  unpause     Unpause all processes within one or more containers
  update      Update configuration of one or more containers
  version     Show the Docker version information
  wait        Block until one or more containers stop, then print their exit codes

Run 'docker COMMAND --help' for more information on a command.
三.Docker镜像操作
|
操作 |
命令 |
说明 |
|
检索 |
docker search 关键字 eg:docker search mysql |
我们经常去docker hub上检索镜像的详细信息,如镜像的TAG |
|
拉取 |
docker pull 镜像名:tag |
:tag是可选的,tag表示标签,多为软件的版本,默认是latest(最新的) |
|
列表 |
docker images |
查看所有本地镜像 |
|
删除 |
docker rmi image-id |
删除指定的本地镜像 |
1.检索镜像
[root@localhost ~]# docker search centos
默认会去 https://hub.docker.com/ 搜索,搜过结果如下
[root@localhost ~]# docker search centos
NAME                               DESCRIPTION                                     STARS               OFFICIAL            AUTOMATED
centos                             The official build of CentOS.                   4709                [OK]
ansible/centos7-ansible            Ansible on Centos7                              118                                     [OK]
jdeathe/centos-ssh                 CentOS-6 6.10 x86_64 / CentOS-7 7.5.1804 x86…   99                                      [OK]
consol/centos-xfce-vnc             Centos container with "headless" VNC session…   63                                      [OK]
imagine10255/centos6-lnmp-php56    centos6-lnmp-php56                              45                                      [OK]
tutum/centos                       Simple CentOS docker image with SSH access      43
centos/mysql-57-centos7            MySQL 5.7 SQL database server                   39
gluster/gluster-centos             Official GlusterFS Image [ CentOS-7 +  Glust…   34                                      [OK]
openshift/base-centos7             A Centos7 derived base image for Source-To-I…   33
centos/python-35-centos7           Platform for building and running Python 3.5…   30
centos/postgresql-96-centos7       PostgreSQL is an advanced Object-Relational …   29
kinogmt/centos-ssh                 CentOS with SSH                                 22                                      [OK]
openshift/jenkins-2-centos7        A Centos7 based Jenkins v2.x image for use w…   15
pivotaldata/centos-gpdb-dev        CentOS image for GPDB development. Tag names…   7
openshift/wildfly-101-centos7      A Centos7 based WildFly v10.1 image for use …   5
openshift/jenkins-1-centos7        DEPRECATED: A Centos7 based Jenkins v1.x ima…   4
darksheer/centos                   Base Centos Image -- Updated hourly             3                                       [OK]
pivotaldata/centos-mingw           Using the mingw toolchain to cross-compile t…   2
pivotaldata/centos                 Base centos, freshened up a little with a Do…   2
blacklabelops/centos               CentOS Base Image! Built and Updates Daily!     1                                       [OK]
pivotaldata/centos-gcc-toolchain   CentOS with a toolchain, but unaffiliated wi…   0
pivotaldata/centos7-test           CentosOS 7 image for GPDB testing               0
pivotaldata/centos7-build          CentosOS 7 image for GPDB compilation           0
smartentry/centos                  centos with smartentry                          0                                       [OK]
jameseckersall/sonarr-centos       Sonarr on CentOS 7                              0                                       [OK]
- NAME:仓库名称
- DESCRIPTION:镜像描述
- STARS:用户评价,反应一个镜像的受欢迎程度
- OFFICIAL:是否官方
- AUTOMATED:自动构建,表示该镜像由Docker Hub自动构建流程创建的
2.拉取镜像
拉取镜像默认是从docker hub拉取,这是docker默认的公用仓库,不过缺点是国内下载会比较慢。这里设置从ustc拉取镜像(建议使用)。
在宿主机器编辑文件:vi /etc/docker/daemon.json,在该配置文件中加入(没有该文件的话,请先建一个):
{
 "registry-mirrors": ["https://docker.mirrors.ustc.edu.cn"]
}

最后,需要重启docker服务 systemctl restart docker.service 执行拉取镜像命令
[root@localhost ~]# docker pull centos
Using default tag: latest
latest: Pulling from library/centos
256b176beaff: Pull complete
Digest: sha256:6f6d986d425aeabdc3a02cb61c02abb2e78e57357e92417d6d58332856024faf
Status: Downloaded newer image for centos:latest

3.列表镜像
[root@localhost ~]# docker images
REPOSITORY                TAG                 IMAGE ID            CREATED             SIZE
docker.io/tomcat          latest              41a54fe1f79d        3 days ago          463 MB
docker.io/centos          latest              5182e96772bf        5 weeks ago         200 MB
- REPOSITORY:镜像所在的仓库名称
- TAG:镜像标签
- lMAGE ID:镜像ID
- CREATED:镜像的创建日期(不是获取该镜像的日期)
- SIZE:镜像大小
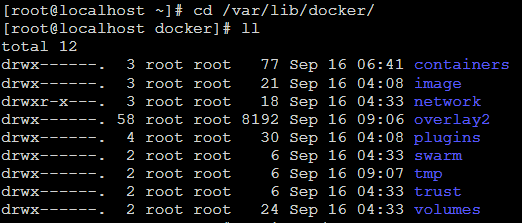
这些镜像都是存储在Docker宿主机的/var/lib/docker目录下
4.删除镜像
[root@localhost ~]# docker rmi 41a54fe1f79d
四.Docker容器操作
|
操作 |
命令 |
说明 |
|
运行 |
docker run --name container-name -d image-name eg:docker run –name myredis –d redis |
--name:自定义容器名 -d:后台运行 image-name:指定镜像模板 |
|
列表 |
docker ps(查看正在运行中的容器); |
docker ps -a:查看历史运行过的容器 docker ps -l:查看最近运行过的容器 |
|
停止 |
docker stop container-name/container-id |
停止当前你运行的容器 |
|
启动 |
docker start container-name/container-id |
启动容器 |
|
删除 |
docker rm container-id |
删除指定容器 |
|
端口映射 |
-p 6379:6379 eg:docker run -d -p 6379:6379 --name myredis docker.io/redis |
-p: 主机端口(映射到)容器内部的端口 |
|
容器日志 |
docker logs container-name/container-id |
|
|
更多命令 |
https://docs.docker.com/engine/reference/commandline/docker/ |
|
1.启动容器
1)以交互方式启动容器:docker run -it --name 容器名称 镜像 /bin/bash;
- -i:表示以“交互模式”运行容器
- -t:表示容器启动后会进入其命令行。加入这两个参数后,容器创建就能登录进去。即分配一个伪终端。
- --name :为创建的容器命名。
- -v:表示目录映射关系(前者是宿主机目录,后者是映射到宿主机上的目录),可以使用多个-v做多个目录或文件映射。注意:最好做目录映射,在宿主机上做修改,然后共享到容器上。
- -d:在run后面加上-d参数,则会创建一个守护式容器在后台运行(这样创建容器后不会自动登录容器,如果只加-i -t两个参数,创建后就会自动进去容器)。
- -p:表示端口映射,前者是宿主机端口,后者是容器内的映射端口。可以使用多个-p做多个端口映射
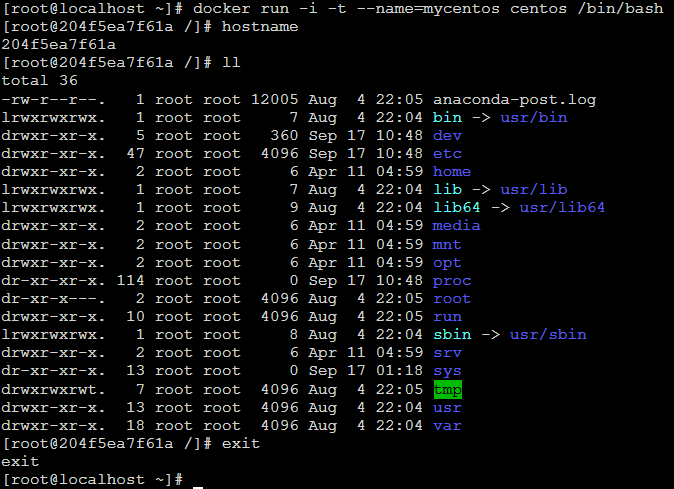
创建一个交互式容器并取名为mycentos
[root@localhost docker]# docker run -i -t --name=mycentos centos /bin/bash
2)以守护进程后台方式启动容器:docker run -d --name 容器名称 镜像
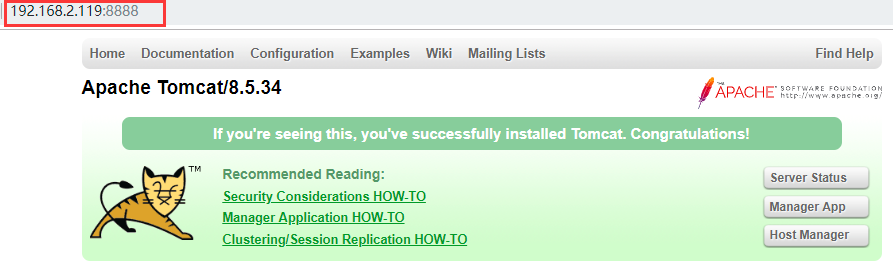
[root@localhost ~]# docker search tomcat                                       #搜索tomcat
[root@localhost ~]# docker pull tomcat                                         #拉取tomcat镜像
[root@localhost ~]# docker run -d --name mytomcat -p 8888:8080 tomcat:latest   #启动tomcat容器,并做端口映射
[root@localhost ~]# docker  ps                                                 #查看容器运行列表

2.停止容器
docker stop 容器名称或者容器ID
[root@localhost ~]# docker stop 62a021b1c0fd

3.重启容器
docker start 容器名称或者容器ID
[root@localhost ~]# docker start 62a021b1c0fd
4.删除容器
删除容器必须是已经停止的容器,删除指定容器:docker rm 容器名称或者容器ID;删除所有容器:docker rm ‘docker ps -a -q’
[root@localhost ~]# docker rm 62a021b1c0fd

五.Docker下部署应用程序
1. 构建镜像方案
- 方案一:直接通过docker pull拉取别人提交好的tomcat、nginx等应用程序镜像,然后基于这些镜像去创建容器。
- 方案二:通过dockerfile制作自己的应用程序镜像
- 方案三:根据系统镜像创建Docker容器,这个时候Docker就相当于一个虚拟机,然后进入容器部署对应的应用。具体步骤如下:
- 启动Centos系统镜像的容器my_container;
- 在该容器中部署应用程序,例如:Tomcat、Nginx等;
- 将部署完的my_container提交为新的镜像;
- 然后根据新的镜像去创建容器;
- 这个镜像可以打包,导入到其他的Docker服务器上
2. 构建MySQL镜像
1、 获取基础镜像CentOS
[root@localhost ~]# docker pull centos
2、 启动容器并且在容器内部安装MySQL
docker run -i -t --name mycentos-mysql centos /bin/bash(通过下面的命令运行centos容器。否则安装后的mysql无法启动。)
[root@localhost ~]# docker run -it --privileged --name=mycentos-mysql centos /usr/sbin/init
另起一个窗口进入容器:[root@localhost ~]# docker exec -it mycentos-mysql /bin/bash
[root@53ee11bff386 /]# yum install -y wget net-tools
[root@53ee11bff386 /]# wget http://dev.mysql.com/get/mysql-community-release-el7-5.noarch.rpm
[root@53ee11bff386 /]# rpm -ivh mysql-community-release-el7-5.noarch.rpm
[root@53ee11bff386 /]# yum install mysql-community-server
3、 启动mysql,并设置密码
[root@53ee11bff386 /]# systemctl start mysqld
[root@53ee11bff386 /]# mysql -uroot -p 回车
mysql> SET PASSWORD = PASSWORD('123456');
mysql> GRANT ALL PRIVILEGES ON *.* TO 'root'@'%' IDENTIFIED BY '123456' WITH GRANT OPTION;
mysql> FLUSH PRIVILEGES;
mysql> exit;
4、 提交为新镜像
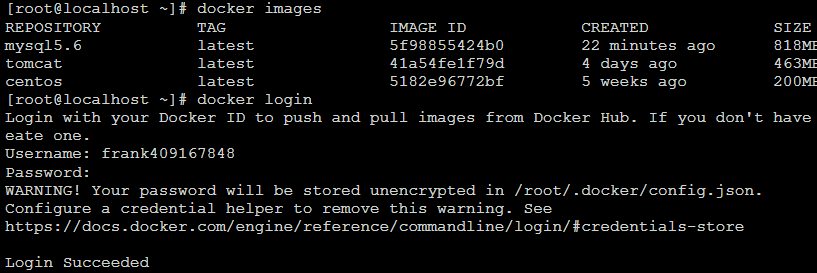
[root@localhost ~]# docker commit mycentos-mysql mysql5.6
[root@localhost ~]# docker images

5、 启动mysql容器
[root@localhost ~]# docker run -d -e "container=docker" --privileged=true --name mysql5.6 -p 3306:3306 mysql5.6
6、 进入容器启动MySQL服务
[root@localhost ~]# docker exec -it mysql5.6 /bin/bash
[root@6dda80c75bfc /]# systemctl start mysql
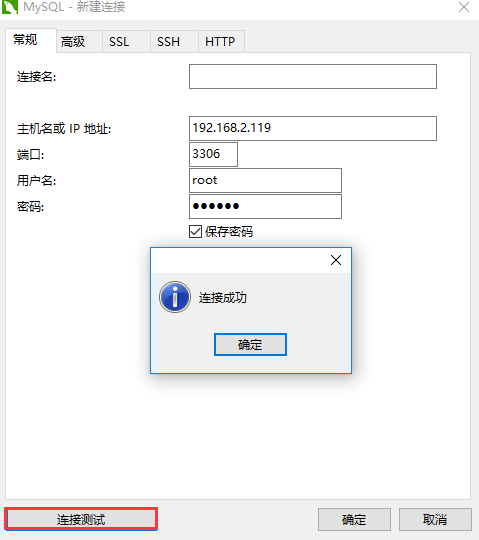
7、 Navicat连接
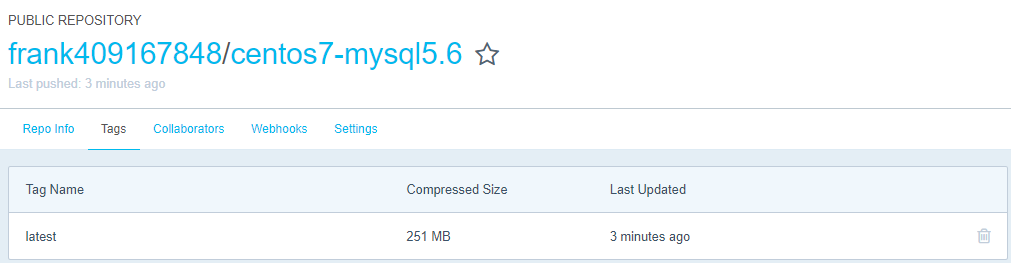
8、 上传镜像到Docker hub
- 注册Docker hub账号,在Docker Hub注册后创建private/public的Repository。
- 登录docker login [root@localhost ~]# docker login
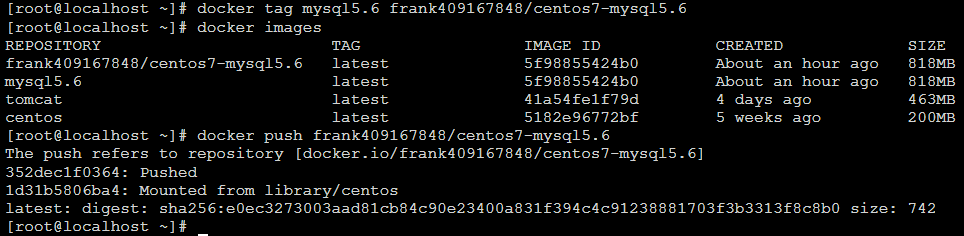
- tag修改镜像名称 [root@localhost ~]# docker tag mysql5.6 frank409167848/centos7-mysql5.6
- 推送docker push [root@localhost ~]# docker push frank409167848/centos7-mysql5.6
- Docker hub 查看
- 下载
六.报错问题
1.启动docker报错
[root@localhost ~]# systemctl start docker
Job for docker.service failed because the control process exited with error code. See "systemctl status docker.service" and "journalctl -xe" for details.
查看docker状态
[root@localhost ~]# systemctl status docker.service
● docker.service - Docker Application Container Engine
   Loaded: loaded (/usr/lib/systemd/system/docker.service; disabled; vendor preset: disabled)
   Active: failed (Result: exit-code) since Sun 2018-09-16 04:13:30 EDT; 8min ago
     Docs: http://docs.docker.com
  Process: 2124 ExecStart=/usr/bin/dockerd-current --add-runtime docker-runc=/usr/libexec/docker/docker-runc-current --default-runtime=dock
er-runc --exec-opt native.cgroupdriver=systemd --userland-proxy-path=/usr/libexec/docker/docker-proxy-current --init-path=/usr/libexec/dock
er/docker-init-current --seccomp-profile=/etc/docker/seccomp.json $OPTIONS $DOCKER_STORAGE_OPTIONS $DOCKER_NETWORK_OPTIONS $ADD_REGISTRY $B
LOCK_REGISTRY $INSECURE_REGISTRY $REGISTRIES (code=exited, status=1/FAILURE)
 Main PID: 2124 (code=exited, status=1/FAILURE)

Sep 16 04:13:27 localhost.localdomain systemd[1]: Starting Docker Application Container Engine...
Sep 16 04:13:29 localhost.localdomain dockerd-current[2124]: time="2018-09-16T04:13:29.348086797-04:00" level=warning msg="could no...ound"
Sep 16 04:13:29 localhost.localdomain dockerd-current[2124]: time="2018-09-16T04:13:29.365854628-04:00" level=info msg="libcontaine...2128"
Sep 16 04:13:30 localhost.localdomain dockerd-current[2124]: time="2018-09-16T04:13:30.457340010-04:00" level=warning msg="overlay2: the...
Sep 16 04:13:30 localhost.localdomain dockerd-current[2124]: Error starting daemon: SELinux is not supported with the overlay2 grap...alse)
Sep 16 04:13:30 localhost.localdomain systemd[1]: docker.service: main process exited, code=exited, status=1/FAILURE
Sep 16 04:13:30 localhost.localdomain systemd[1]: Failed to start Docker Application Container Engine.
Sep 16 04:13:30 localhost.localdomain systemd[1]: Unit docker.service entered failed state.
Sep 16 04:13:30 localhost.localdomain systemd[1]: docker.service failed.
Hint: Some lines were ellipsized, use -l to show in full.
Solutions:根据高亮的错误日志得知,此linux的内核中的SELinux不支持 overlay2 graph driver ,解决方法有两个,要么启动一个新内核,要么就在docker里禁用selinux,--selinux-enabled=false
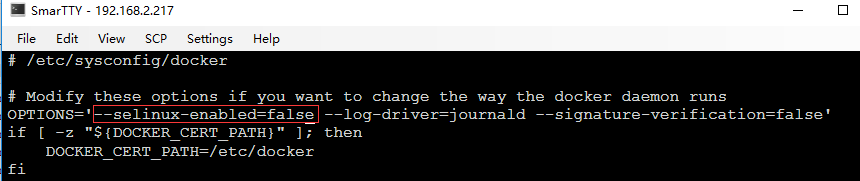
如上改为--selinux-enabled=false后保存,重启docker,搞定!
2.启动mysql报错
[root@dfb1cc594f9b /]# systemctl start mysql
Failed to get D-Bus connection: Operation not permitted
解决办法:
生成容器: # docker run -d -e "container=docker" --privileged=true --name mysql5.6 -p 3306:3306 mysql5.6
进入容器: # docker exec -it mysql /bin/bash
这样可以使用systemctl启动服务了。

 浙公网安备 33010602011771号