
第九章 SportsStore: 用户功能
 1 //Listing 9-1. Commenting Out Statements in the PagedList.cs File in the Models/Pages Folder
 2 using System.Collections.Generic;
 3 using System.Linq;
 4 using System;
 5 using System.Linq.Expressions;
 6 using System.Diagnostics;
 7 namespace SportsStore.Models.Pages
 8 {
 9     public class PagedList<T> : List<T>
10     {
11         public PagedList(IQueryable<T> query, QueryOptions options = null)
12         {
13             CurrentPage = options.CurrentPage;
14             PageSize = options.PageSize;
15             Options = options;
16             if (options != null)
17             {
18                 if (!string.IsNullOrEmpty(options.OrderPropertyName))
19                 {
20                     query = Order(query, options.OrderPropertyName,
21                     options.DescendingOrder);
22                 }
23                 if (!string.IsNullOrEmpty(options.SearchPropertyName)
24                 && !string.IsNullOrEmpty(options.SearchTerm))
25                 {
26                     query = Search(query, options.SearchPropertyName,
27                     options.SearchTerm);
28                 }
29             }
30             //Stopwatch sw = Stopwatch.StartNew();
31             //Console.Clear();
32             TotalPages = query.Count() / PageSize;
33             AddRange(query.Skip((CurrentPage - 1) * PageSize).Take(PageSize));
34             //Console.WriteLine($"Query Time: {sw.ElapsedMilliseconds} ms");
35         }
36         // ...other members omitted for brevity...
37     }
38 }
1 Listing 9-2. Adding a Namespace in the _ViewImports.cshtml File in the Views Folder
2 @using SportsStore.Models
3 @using SportsStore.Models.Pages
4 @addTagHelper *, Microsoft.AspNetCore.Mvc.TagHelpers
 1 //Listing 9-3. Adding a Property in the Products.cs File in the Models Folder
 2 namespace SportsStore.Models
 3 {
 4     public class Product
 5     {
 6         public long Id { get; set; }
 7         public string Name { get; set; }
 8         public string Description { get; set; }
 9
10         public decimal PurchasePrice { get; set; }
11         public decimal RetailPrice { get; set; }
12         public long CategoryId { get; set; }
13         public Category Category { get; set; }
14     }
15 }
为了更容易按类别查询和存储数据,我在Category类中添加了一个导航属性,Entity Framework Core就能使用外键关联的Product对象填充该类,如清单9-4所示。
 1 //Listing 9-4. Adding a Navigation Property in the Category.cs File in the Models Folder
 2 using System.Collections.Generic;
 3 namespace SportsStore.Models
 4 {
 5     public class Category
 6     {
 7         public long Id { get; set; }
 8         public string Name { get; set; }
 9         public string Description { get; set; }
10         public IEnumerable<Product> Products { get; set; }
11     }
12 }
  1 //Listing 9-5. Adding Production Seed Data in the SeedController.cs File in the Controllers Folder
  2 using Microsoft.AspNetCore.Mvc;
  3 using Microsoft.EntityFrameworkCore;
  4 using SportsStore.Models;
  5 using System.Linq;
  6 namespace SportsStore.Controllers
  7 {
  8     public class SeedController : Controller
  9     {
 10         private DataContext context;
 11         public SeedController(DataContext ctx) => context = ctx;
 12         public IActionResult Index()
 13         {
 14             ViewBag.Count = context.Products.Count();
 15             return View(context.Products
 16             .Include(p => p.Category).OrderBy(p => p.Id).Take(20));
 17         }
 18
 19         // ...other actions omitted for brevity...
 20         [HttpPost]
 21         public IActionResult CreateProductionData()
 22         {
 23             ClearData();
 24             context.Categories.AddRange(new Category[] {
 25                 new Category {
 26                     Name = "Watersports",
 27                     Description = "Make a splash",
 28                     Products = new Product[] {
 29                         new Product {
 30                                 Name = "Kayak",
 31                                 Description = "A boat for one person",
 32                                 PurchasePrice = 200,
 33                                 RetailPrice = 275
 34                             },
 35                         new Product {
 36                                 Name = "Lifejacket",
 37                                 Description = "Protective and fashionable",
 38                                 PurchasePrice = 40,
 39                                 RetailPrice = 48.95m
 40                             },
 41                         }
 42                     },
 43                 new Category {
 44                     Name = "Soccer",
 45                     Description = "The World's Favorite Game",
 46                     Products = new Product[] {
 47                         new Product {
 48                                 Name = "Soccer Ball",
 49                                 Description = "FIFA-approved size and weight",
 50                                 PurchasePrice = 18,
 51                                 RetailPrice = 19.50m
 52                         },
 53                         new Product {
 54                                 Name = "Corner Flags",
 55                                 Description = "Give your playing field a professional touch",
 56                                 PurchasePrice = 32.50m, RetailPrice = 34.95m
 57                         },
 58                         new Product {
 59                                 Name = "Stadium",
 60                                 Description = "Flat-packed 35,000-seat stadium",
 61                                 PurchasePrice = 75000,
 62                                 RetailPrice = 79500
 63                         }
 64                     }
 65                 },
 66                 new Category {
 67                     Name = "Chess",
 68                     Description = "The Thinky Game",
 69                     Products = new Product[] {
 70                         new Product {
 71                                 Name = "Thinking Cap",
 72                                 Description = "Improve brain efficiency by 75%",
 73                                 PurchasePrice = 10,
 74                                 RetailPrice = 16
 75                         },
 76                         new Product {
 77                                 Name = "Unsteady Chair",
 78                                 Description = "Secretly give your opponent a disadvantage",
 79                                 PurchasePrice = 28, RetailPrice = 29.95m
 80                         },
 81                         new Product {
 82                                 Name = "Human Chess Board",
 83                                 Description = "A fun game for the family",
 84                                 PurchasePrice = 68.50m,
 85                                 RetailPrice = 75
 86                         },
 87                         new Product {
 88                                 Name = "Bling-Bling King",
 89                                 Description = "Gold-plated, diamond-studded King",
 90                                 PurchasePrice = 800,
 91                                 RetailPrice = 1200
 92                         }
 93                     }
 94                 }
 95             });
 96             context.SaveChanges();
 97             return RedirectToAction(nameof(Index));
 98         }
 99     }
100 }
新的action方法创建一系列Category对象,并将Products导航属性设置为一个Product对象集合。所有对象都传递给AddRange方法,调用SaveChanges方法之后,存储在数据库中。 为了针对新的操作方法,我在Seed控制器的Index视图中添加了如下清单9-6所示的元素。
 1 Listing 9-6. Adding an Element in the Index.cshtml File in the Views/Seed Folder
 2 @model IEnumerable<Product>
 3 <h3 class="p-2 bg-primary text-white text-center">Seed Data</h3>
 4 <form method="post">
 5     <div class="form-group">
 6         <label>Number of Objects to Create</label>
 7         <input class="form-control" name="count" value="50" />
 8     </div>
 9     <div class="text-center">
10         <button type="submit" asp-action="CreateProductionData"
11                 class="btn btn-outline-primary">
12             Production Seed
13         </button>
14         <button type="submit" asp-action="CreateSeedData" class="btn btn-primary">
15             Seed Database
16         </button>
17         <button asp-action="ClearData" class="btn btn-danger">
18             Clear Database
19         </button>
20     </div>
21 </form>
22 <h5 class="text-center m-2">
23     There are @ViewBag.Count products in the database
24 </h5>
25 <div class="container-fluid">
26     <div class="row">
27         <div class="col-1 font-weight-bold">Id</div>
28         <div class="col font-weight-bold">Name</div>
29         <div class="col font-weight-bold">Category</div>
30         <div class="col font-weight-bold text-right">Purchase</div>
31         <div class="col font-weight-bold text-right">Retail</div>
32     </div>
33     @foreach (Product p in Model)
34     {
35         <div class="row">
36             <div class="col-1">@p.Id</div>
37             <div class="col">@p.Name</div>
38             <div class="col">@p.Category.Name</div>
39             <div class="col text-right">@p.PurchasePrice</div>
40             <div class="col text-right">@p.RetailPrice</div>
41         </div>
42     }
43 </div>
button元素发送一个HTTP POST请求,它的作用是清除数据库,并生成测试数据,即标准的SportsStore产品和类别对象数据。
Listing 9-7. Preparing the Database
dotnet ef migrations add Customer
dotnet ef database drop --force
dotnet ef database update
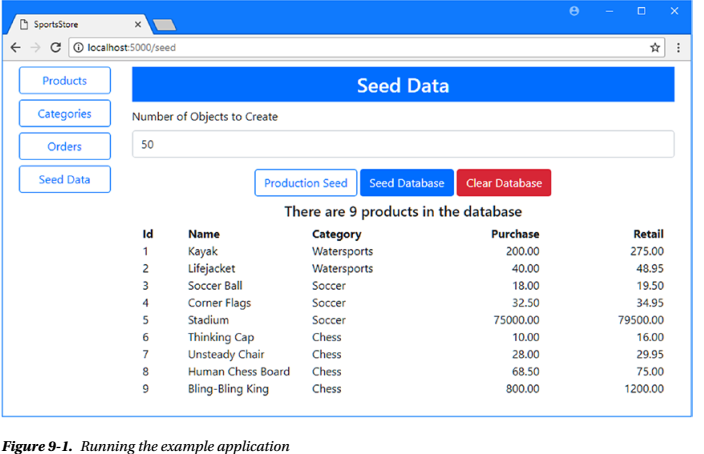
使用dotnet run启动应用程序,导航到http://localhost:5000,单击Seed Data按钮,然后单击Production Seed按钮。产品和类别将被添加到数据库中并显示出来,如图9-1所示。
 1 //Listing 9-8. Querying by Category in the IRepository.cs File in the Models Folder
 2 using System.Collections.Generic;
 3 using SportsStore.Models.Pages;
 4 namespace SportsStore.Models
 5 {
 6     public interface IRepository
 7     {
 8         IEnumerable<Product> Products { get; }
 9         PagedList<Product> GetProducts(QueryOptions options, long category = 0);
10         Product GetProduct(long key);
11
12         void AddProduct(Product product);
13         void UpdateProduct(Product product);
14         void UpdateAll(Product[] products);
15         void Delete(Product product);
16     }
17 }
在清单9-9中,我对实现类做了相应的更改,使用LINQ Where方法基于外键属性(每个Product对象都有一个关联的Category对象)去查询。
 1 //Listing 9-9. Querying by Category in the DataRepository.cs File in the Models Folder
 2 using System.Collections.Generic;
 3 using System.Linq;
 4 using Microsoft.EntityFrameworkCore;
 5 using SportsStore.Models.Pages;
 6 namespace SportsStore.Models
 7 {
 8     public class DataRepository : IRepository
 9     {
10         private DataContext context;
11         public DataRepository(DataContext ctx) => context = ctx;
12         public IEnumerable<Product> Products => context.Products
13           .Include(p => p.Category).ToArray();
14         public PagedList<Product> GetProducts(QueryOptions options,
15           long category = 0)
16         {
17             IQueryable<Product> query = context.Products.Include(p => p.Category);
18             if (category != -0)
19             {
20                 query = query.Where(p => p.CategoryId == category);
21             }
22             return new PagedList<Product>(query, options);
23         }
24         // ...other methods omitted for brevity...
25     }
26 }
IQueryable<T>接口允许我根据方法参数拼接查询,创建一个对象,仅在遍历(列举)时才查询数据库。这是使用IQueryable<T>对象的优点,尽管缺点是程序员容易一不小心触发重复的查询。
 1 //Listing 9-10. The Contents of the StoreController.cs File in the Controllers Folder
 2 using Microsoft.AspNetCore.Mvc;
 3 using SportsStore.Models;
 4 using SportsStore.Models.Pages;
 5 namespace SportsStore.Controllers
 6 {
 7     public class StoreController : Controller
 8     {
 9         private IRepository productRepository;
10         private ICategoryRepository categoryRepository;
11         public StoreController(IRepository prepo, ICategoryRepository catRepo)
12         {
13             productRepository = prepo;
14             categoryRepository = catRepo;
15         }
16         public IActionResult Index([FromQuery(Name = "options")]  //从URL的查询字符串中获得
17                     QueryOptions productOptions,
18                     QueryOptions catOptions,
19                     long category)
20         {
21             ViewBag.Categories = categoryRepository.GetCategories(catOptions);
22             ViewBag.SelectedCategory = category;
23             return View(productRepository.GetProducts(productOptions, category));
24         }
25     }
26 }
 1 Listing 9-11. The Contents of the _Layout.cshtml File in the Views/Store Folder
 2 <!DOCTYPE html>
 3 <html>
 4 <head>
 5     <meta name="viewport" content="width=device-width" />
 6     <link rel="stylesheet" href="~/lib/bootstrap/dist/css/bootstrap.min.css" />
 7     <title>SportsStore</title>
 8 </head>
 9 <body>
10     <div class="container-fluid">
11         <div class="row bg-dark p-4 text-white">
12             <div class="col-auto"><h4>SPORTS STORE</h4></div>
13             <div class="col"></div>
14             <div class="col-auto text-right">
15                 (Cart Goes Here)
16             </div>
17         </div>
18     </div>
19     @RenderBody()
20 </body>
21 </html>
这个布局展示了我在大多数书中使用的标准的SportsStore的header元素,以及客户购物车摘要的占位符,稍后我将把它添加到应用程序中。为了显示产品列表,我在Views/Store文件夹下添加了一个名为Index.cshtml的文件。其内容如清单9-12所示。
 1 Listing 9-12. The Contents of the Index.cshtml File in the Views/Store Folder
 2 @model PagedList<Product>
 3 <div class="container-fluid">
 4     <div class="row no-gutters">
 5         <div class="col-auto">
 6             @Html.Partial("Categories", ViewBag.Categories as PagedList<Category>)
 7         </div>
 8         <div class="col">
 9             <div class="container-fluid">
10                 <div class="row pt-4 pb-1">
11                     <div class="col text-center">
12                         @Html.Partial("Pages", Model)
13                     </div>
14                 </div>
15                 <div class="row pt-1 pb-1">
16                     <div class="col"></div>
17                     <div class="col-6 text-center form-group">
18                         <input form="pageform" type="hidden"
19                                name="options.searchpropertyname" value="Name" />
20                         <input form="pageform" name="options.searchterm"
21                                placeholder="Seach..." class="form-control" />
22                     </div>
23                     <div class="col">
24                         <button form="pageform" class="btn btn-secondary"
25                                 type="submit">
26                             Search
27                         </button>
28                     </div>
29                     <div class="col"></div>
30                 </div>
31                 @foreach (Product p in Model)
32                 {
33                     <div class="row">
34                         <div class="col">
35                             <div class="card m-1 p-1 bg-light">
36                                 <div class="bg-faded p-1">
37                                     <h4>
38                                         @p.Name
39                                         <span class="badge badge-pill badge-primary"
40                                               style="float:right">
41                                             <small>$@p.RetailPrice</small>
42                                         </span>
43                                     </h4>
44                                 </div>
45                                 <form id="@p.Id" asp-action="AddToCart"
46                                       asp-controller="Cart" method="post">
47                                     <input type="hidden" name="Id" value="@p.Id" />
48                                     <input type="hidden" name="Name"
49                                            value="@p.Name" />
50                                     <input type="hidden" name="RetailPrice"
51                                            value="@p.RetailPrice" />
52                                     <input type="hidden" name="returnUrl" value="@ViewContext.HttpContext.Request.PathAndQuery()" />
53                                     <span class="card-text p-1">
54                                         @(p.Description
55                                                                                                     ?? "(No Description Available)")
56                                         <button type="submit"
57                                                 class="btn btn-success btn-sm pull-right"
58                                                 style="float:right">
59                                             Add To Cart
60                                         </button>
61                                     </span>
62                                 </form>
63                             </div>
64                         </div>
65                     </div>
66                 }
67             </div>
68         </div>
69     </div>
70 </div>
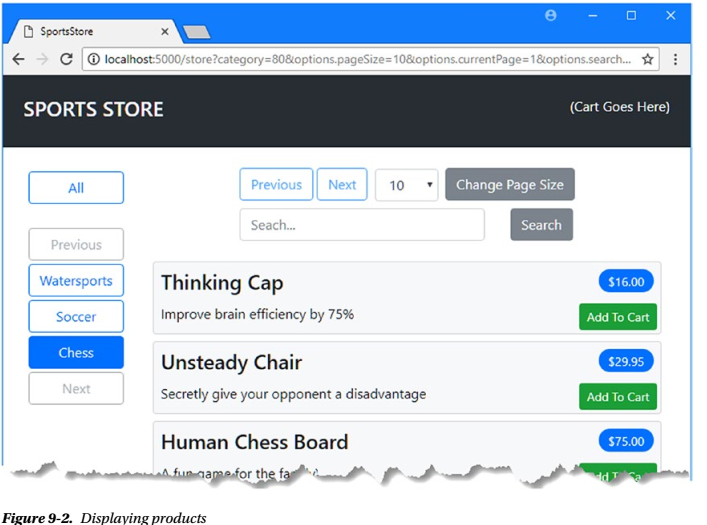
这个视图集合了许多特性来显示产品,包括分页和搜索支持。为了向用户显示类别列表,我添加了一个名为categories.cshtml的文件到 Views/Store文件夹。内容见清单9-13。
 1 Listing 9-13. The Contents of the Categories.cshtml File in the Views/Store Folder
 2 @model PagedList<Category>
 3 <div class="container-fluid mt-4">
 4     <div class="row no-gutters">
 5         <div class="col mt-1">
 6             <button form="pageform" name="category" value="0" type="submit"
 7                     class="btn btn-block @(ViewBag.SelectedCategory == 0
 8                         ? "btn-primary" : "btn-outline-primary")">
 9                 All
10             </button>
11         </div>
12     </div>
13     <div class="row no-gutters mt-4"></div>
14     <div class="row no-gutters">
15         <div class="col mt-1">
16             <button form="pageform"
17                     name="catoptions.currentPage" value="@(Model.CurrentPage -1)"
18                     class="btn btn-block btn-outline-secondary
19                         @(!Model.HasPreviousPage ? "disabled" : "")"
20                     type="submit">
21                 Previous
22             </button>
23         </div>
24     </div>
25     @foreach (Category c in Model)
26     {
27         <div class="row no-gutters">
28             <div class="col mt-1">
29                 <button form="pageform" name="category" value="@c.Id"
30                         type="submit"
31                         class="btn btn-block @(ViewBag.SelectedCategory == c.Id
32                         ? "btn-primary" : "btn-outline-primary")">
33                     @c.Name
34                 </button>
35             </div>
36         </div>
37     }
38     <div class="row no-gutters">
39         <div class="col mt-1">
40             <button form="pageform"
41                     name="catoptions.currentPage" value="@(Model.CurrentPage +1)"
42                     class="btn btn-block btn-outline-secondary
43                         @(!Model.HasNextPage? "disabled" : "")"
44                     type="submit">
45                 Next
46             </button>
47         </div>
48     </div>
49 </div>
 1 //Listing 9-14. The Contents of the UrlExtensions.cs File in the Infrastructure Folder
 2 using Microsoft.AspNetCore.Http;
 3 namespace SportsStore.Infrastructure
 4 {
 5     public static class UrlExtensions
 6     {
 7         public static string PathAndQuery(this HttpRequest request) =>
 8           request.QueryString.HasValue
 9           ? $"{request.Path}{request.QueryString}"
10           : request.Path.ToString();
11     }
12 }
该类定义了PathAndQuery扩展方法,即我在清单9-13中的表单元素中使用的。为了在视图中启用该扩展方法,我将清单9-15所示的语句添加到视图导入中。
1 Listing 9-15. Adding a Namespace in the _ViewImports.cshtml File in the Views Folder
2 @using SportsStore.Models
3 @using SportsStore.Models.Pages
4 @using SportsStore.Infrastructure
5 @addTagHelper *, Microsoft.AspNetCore.Mvc.TagHelpers
 1 Listing 9-16. Adding Packages in the SportsStore.csproj File in the SportsStore Folder
 2 <Project Sdk="Microsoft.NET.Sdk.Web">
 3     <PropertyGroup>
 4         <TargetFramework>netcoreapp2.0</TargetFramework>
 5     </PropertyGroup>
 6     <ItemGroup>
 7         <Folder Include="wwwroot\" />
 8     </ItemGroup>
 9     <ItemGroup>
10         <PackageReference Include="Microsoft.AspNetCore.All" Version="2.0.3" />
11         <DotNetCliToolReference Include="Microsoft.EntityFrameworkCore.Tools.DotNet"
12                                 Version="2.0.0" />
13         <DotNetCliToolReference Include="Microsoft.Extensions.Caching.SqlConfig.Tools"
14                                 Version="2.0.0" />
15     </ItemGroup>
16 </Project>
保存更改,Visual Studio将下载并安装新包。打开一个新的命令提示符,并在SportsStore项目文件夹中运行清单9-17所示的命令来创建会话数据库。
小心: 您可能很想创建自己的会话数据特性,但是不要低估了所需的工作量,特别是要确保定期从数据库中清除过期的会话。我的建议是将您的时间和技能用在您的应用程序业务上,而不是重复去造微软已经造好的轮子。
Listing 9-17. Creating the Session Database
dotnet sql-cache create "Server=(localdb)\MSSQLLocalDB;Database=SportsStore" "dbo"
"SessionData"
上面的命令行中,dotnet sql-cache create命令来配置会话数据库,但是使用它很困难,因为它不是从appsettings.json中读取配置的。这意味着必须小心输入命令后面的参数。第一个参数是数据库的连接字符串,第二个参数是数据库框架名(默认情况下是dbo),最后一个参数是要添加到数据库的表名,我指定为SessionData。
 1 //Listing 9-18. Enabling Sessions in the Startup.cs File in the SportsStore Folder
 2 using System;
 3 using System.Collections.Generic;
 4 using System.Linq;
 5 using System.Threading.Tasks;
 6 using Microsoft.AspNetCore.Builder;
 7 using Microsoft.AspNetCore.Hosting;
 8 using Microsoft.AspNetCore.Http;
 9 using Microsoft.Extensions.DependencyInjection;
10 using SportsStore.Models;
11 using Microsoft.EntityFrameworkCore;
12 using Microsoft.Extensions.Configuration;
13 namespace SportsStore
14 {
15     public class Startup
16     {
17         public Startup(IConfiguration config) => Configuration = config;
18         public IConfiguration Configuration { get; }
19         public void ConfigureServices(IServiceCollection services)
20         {
21             services.AddMvc();
22             services.AddTransient<IRepository, DataRepository>();
23             services.AddTransient<ICategoryRepository, CategoryRepository>();
24             services.AddTransient<IOrdersRepository, OrdersRepository>();
25             string conString = Configuration["ConnectionStrings:DefaultConnection"];
26             services.AddDbContext<DataContext>(options =>
27             options.UseSqlServer(conString));
28             services.AddDistributedSqlServerCache(options => {
29                 options.ConnectionString = conString;
30                 options.SchemaName = "dbo";
31                 options.TableName = "SessionData";
32             });
33             services.AddSession(options => {
34                 options.Cookie.Name = "SportsStore.Session";
35                 options.IdleTimeout = System.TimeSpan.FromHours(48);
36                 options.Cookie.HttpOnly = false;
37             });
38         }
39         public void Configure(IApplicationBuilder app, IHostingEnvironment env)
40         {
41             app.UseDeveloperExceptionPage();
42             app.UseStatusCodePages();
43             app.UseStaticFiles();
44             app.UseSession();
45             app.UseMvcWithDefaultRoute();
46         }
47     }
48 }
会话特性只存储字符串值。为了使这个特性更容易使用,我在 Infrastructure文件夹中添加了一个名为SessionExtensions.cs的文件,并添加如清单9-19所示的代码。
 1 //Listing 9-19. The Contents of the SessionExtensions.cs File in the Infrastructure Folder
 2 using Microsoft.AspNetCore.Http;
 3 using Newtonsoft.Json;
 4 namespace SportsStore.Infrastructure
 5 {
 6     public static class SessionExtensions
 7     {
 8         public static void SetJson(this ISession session, string key, object value)
 9         {
10             session.SetString(key, JsonConvert.SerializeObject(value));
11         }
12         public static T GetJson<T>(this ISession session, string key)
13         {
14             var sessionData = session.GetString(key);
15             return sessionData == null
16               ? default(T) : JsonConvert.DeserializeObject<T>(sessionData);
17         }
18     }
19 }
这个类定义了一些扩展方法,这些方法将对象序列化为JSON格式字符串,并可以从JSON格式字符串反序列化它们转为对象,从而允许我轻松地将简单的对象存储为会话数据。
 1 //Listing 9-20. The Contents of the Cart.cs File in the Models Folder
 2 using System.Collections.Generic;
 3 using System.Linq;
 4 namespace SportsStore.Models
 5 {
 6     public class Cart
 7     {
 8         private List<OrderLine> selections = new List<OrderLine>();
 9         public Cart AddItem(Product p, int quantity)
10         {
11             OrderLine line = selections
12               .Where(l => l.ProductId == p.Id).FirstOrDefault();
13             if (line != null)
14             {
15                 line.Quantity += quantity;
16             }
17             else
18             {
19                 selections.Add(new OrderLine
20                 {
21                     ProductId = p.Id,
22                     Product = p,
23                     Quantity = quantity
24                 });
25             }
26             return this;
27         }
28         public Cart RemoveItem(long productId)
29         {
30             selections.RemoveAll(l => l.ProductId == productId);
31             return this;
32         }
33         public void Clear() => selections.Clear();
34         public IEnumerable<OrderLine> Selections { get => selections; }
35     }
36 }
Cart类管理OrderLine对象的集合,这些对象表示选中的产品,并且在创建订单时可以轻松地存储在数据库中。
 1 //Listing 9-21. The Contents of the CartController.cs File in the Controllers Folder
 2 using Microsoft.AspNetCore.Mvc;
 3 using SportsStore.Models;
 4 using SportsStore.Infrastructure;
 5 using Microsoft.AspNetCore.Mvc.ViewComponents;
 6 using Microsoft.AspNetCore.Mvc.ViewFeatures;
 7 using Microsoft.AspNetCore.Http;
 8 using System.Linq;
 9 namespace SportsStore.Controllers
10 {
11     [ViewComponent(Name = "Cart")]
12     public class CartController : Controller
13     {
14         private IRepository productRepository;
15         private IOrdersRepository ordersRepository;
16         public CartController(IRepository prepo, IOrdersRepository orepo)
17         {
18             productRepository = prepo;
19             ordersRepository = orepo;
20         }
21         public IActionResult Index(string returnUrl)
22         {
23             ViewBag.returnUrl = returnUrl;
24             return View(GetCart());
25         }
26         [HttpPost]
27         public IActionResult AddToCart(Product product, string returnUrl)
28         {
29             SaveCart(GetCart().AddItem(product, 1));
30             return RedirectToAction(nameof(Index), new { returnUrl });
31         }
32         [HttpPost]
33         public IActionResult RemoveFromCart(long productId, string returnUrl)
34         {
35             SaveCart(GetCart().RemoveItem(productId));
36             return RedirectToAction(nameof(Index), new { returnUrl });
37         }
38
39         public IActionResult CreateOrder()
40         {
41             return View();
42         }
43         [HttpPost]
44         public IActionResult CreateOrder(Order order)
45         {
46             order.Lines = GetCart().Selections.Select(s => new OrderLine
47             {
48                 ProductId = s.ProductId,
49                 Quantity = s.Quantity
50             }).ToArray();
51             ordersRepository.AddOrder(order);
52             SaveCart(new Cart());
53             return RedirectToAction(nameof(Completed));
54         }
55         public IActionResult Completed() => View();
56         private Cart GetCart() =>
57         HttpContext.Session.GetJson<Cart>("Cart") ?? new Cart();
58         private void SaveCart(Cart cart) =>
59         HttpContext.Session.SetJson("Cart", cart);
60         public IViewComponentResult Invoke(ISession session)
61         {
62             return new ViewViewComponentResult()
63             {
64                 ViewData = new ViewDataDictionary<Cart>(ViewData,
65             session.GetJson<Cart>("Cart"))
66             };
67         }
68     }
69 }
这个控制器定义从购物车中添加和删除商品、显示购物车内容以及允许客户创建订单的操作(Action方法)。其中一些方法接受returnUrl参数,该参数允许用户返回到产品列表,而不会丢失配置分页和Category筛选的查询字符串参数。(也就是返回时,能够显示原先的分页和筛选等,其实就是返回原来页面的时候,用returnUrl参数再查询一次)。这个类也是一个视图组件,我将使用它在面向用户的布局中显示购物车的摘要。
 1 Listing 9-22. The Contents of the Index.cshtml File in the Views/Cart Folder
 2 @model Cart
 3 @{
 4     Layout = "~/Views/Store/_Layout.cshtml";
 5 }
 6 <h2 class="m-3">Your Cart</h2>
 7 <div class="container-fluid">
 8     <div class="row">
 9         <div class="col font-weight-bold">Quantity</div>
10         <div class="col font-weight-bold">Product</div>
11         <div class="col font-weight-bold text-right">Price</div>
12         <div class="col font-weight-bold text-right">Subtotal</div>
13         <div class="col"></div>
14     </div>
15     @if (Model.Selections.Count() == 0)
16     {
17         <div class="row mt-2"><div class="col-12"><h4>Cart is Empty</h4></div></div>
18     }
19     else
20     {
21         @foreach (OrderLine line in Model.Selections)
22         {
23             <div class="row mt-1">
24                 <div class="col">@line.Quantity</div>
25                 <div class="col">@line.Product.Name</div>
26                 <div class="col text-right">
27                     $@line.Product.RetailPrice.ToString("f2")
28                 </div>
29                 <div class="col text-right">
30                     $@((line.Product.RetailPrice
31                                                     * line.Quantity).ToString("f2"))
32                 </div>
33                 <div class="col">
34                     <form asp-action="RemoveFromCart">
35                         <button type="submit" name="productId"
36                                 value="@line.ProductId"
37                                 class="btn btn-sm btn-outline-danger">
38                             Remove
39                         </button>
40                     </form>
41                 </div>
42             </div>
43         }
44     }
45     <div class="row mt-2">
46         <div class="col"></div>
47         <div class="col"></div>
48         <div class="col text-right font-weight-bold">Total:</div>
49         <div class="col text-right font-weight-bold">
50             $@(Model.Selections.Sum(l => l.Product.RetailPrice
51                                             * l.Quantity).ToString("f2"))
52         </div>
53         <div class="col"></div>
54     </div>
55 </div>
56 <div class="text-center m-2">
57     @if (ViewBag.returnUrl != null)
58     {
59         <a href="@ViewBag.returnUrl" class="btn btn-outline-primary">
60             Continue Shopping
61         </a>
62     }
63     <a asp-action="CreateOrder" class="btn btn-primary">
64         Place Order
65     </a>
66 </div>
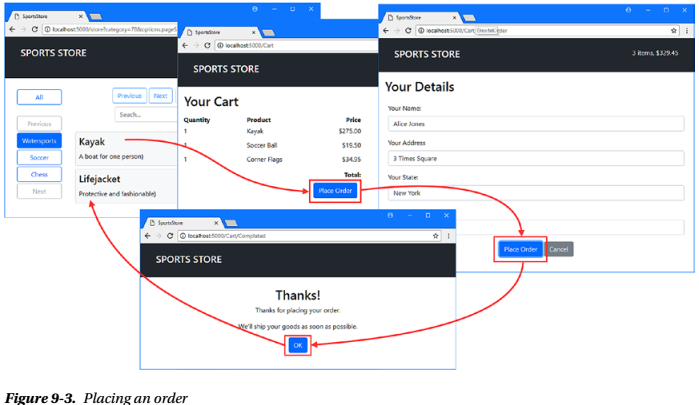
该视图显示客户选择的摘要,并提供返回产品列表或继续创建订单的按钮。为了收集创建订单所需的信息,我添加了一个名为CreateOrder.cshtml的文件,到Views/Cart文件夹,其内容如清单9-23所示。
 1 Listing 9-23. The Contents of the CreateOrder.cshtml File in the Views/Cart Folder
 2 @model Order
 3 @{
 4     Layout = "~/Views/Store/_Layout.cshtml";
 5 }
 6 <h2 class="m-3">Your Details</h2>
 7 <form asp-action="CreateOrder" method="post" class="m-4">
 8     <div class="form-group">
 9         <label>Your Name:</label>
10         <input asp-for="CustomerName" class="form-control" />
11     </div>
12     <div class="form-group">
13         <label> Your Address</label>
14         <input asp-for="Address" class="form-control" />
15     </div>
16     <div class="form-group">
17         <label>Your State:</label>
18         <input asp-for="State" class="form-control" />
19     </div>
20     <div class="form-group">
21         <label>Your Zip Code:</label>
22         <input asp-for="ZipCode" class="form-control" />
23     </div>
24     <div class="text-center m-2">
25         <button type="submit" class="btn btn-primary">Place Order</button>
26         <a asp-action="Index" class="btn btn-secondary">Cancel</a>
27     </div>
28 </form>
为了在创建订单之后向用户显示消息,我添加了一个名为Completed.cshtml的文件,到Views/Cart文件夹,其内容如清单9-24所示。
 1 Listing 9-24. The Contents of the Completed.cshtml File in the Views/Cart Folder
 2 @{
 3     Layout = "~/Views/Store/_Layout.cshtml";
 4 }
 5 <div class="text-center m-4">
 6     <h2>Thanks!</h2>
 7     <p>Thanks for placing your order.</p>
 8     <p>We'll ship your goods as soon as possible.</p>
 9     <a asp-action="Index" asp-controller="Store"
10        class="btn btn-primary">
11         OK
12     </a>
13 </div>
为了给购物车摘要的小部件创建视图,我创建了Views/Shared/Components/Cart文件夹,并向其中添加了一个名为Cart.cshtml的文件,其内容如清单9-25所示。
 1 Listing 9-25. The Contents of the Default.cshtml File in the Views/Shared/Components/Cart Folder
 2 @model Cart
 3 @if (Model?.Selections?.Count() > 0)
 4 {
 5     <div>
 6         @Model.Selections.Count() items,
 7         $@(Model.Selections.Sum(l => l.Quantity
 8                * l.Product.RetailPrice).ToString("f2"))
 9     </div>
10     if (ViewContext.RouteData.Values["controller"] as string != "Cart")
11     {
12         <a asp-action="Index" asp-controller="Cart"
13            class="btn btn-sm btn-light">
14             Checkout
15         </a>
16     }
17 }
此视图显示购物车中的商品数量及总额。如果购物车控制器不是呈现视图的控制器,那么还有一个按钮将导航到购物车控制器。为了显示购物车小部件,我使用了Component.InvokeAsync方法,将视图组件添加到用于存储特性的布局中,如清单9-26所示。
 1 Listing 9-26. Adding an Element in the _Layout.cshtml File in the Views/Store Folder
 2 <!DOCTYPE html>
 3 <html>
 4 <head>
 5     <meta name="viewport" content="width=device-width" />
 6     <link rel="stylesheet" href="~/lib/bootstrap/dist/css/bootstrap.min.css" />
 7     <title>SportsStore</title>
 8 </head>
 9 <body>
10     <div class="container-fluid">
11         <div class="row bg-dark p-4 text-white">
12             <div class="col-auto"><h4>SPORTS STORE</h4></div>
13             <div class="col"></div>
14             <div class="col-auto text-right">
15                 @await Component.InvokeAsync("Cart", Context.Session)
16             </div>
17         </div>
18     </div>
19     @RenderBody()
20 </body>
21 </html>
1 ...
2 order.Lines = GetCart().Selections.Select(s => new OrderLine {
3   ProductId = s.ProductId, Quantity = s.Quantity
4   }).ToArray();
5 ...


 浙公网安备 33010602011771号