


第二章 第一个EFCore应用
学习Entity Framework Core的最佳方法是直接使用它。 本章我创建了一个使用Entity Framework Core和ASP.NET Core MVC的简单应用程序,这样你就可以看到它们是怎么合在一起的。 为了简化示例,我跳过了一些细节(后面章节再详述)。
2.1准备工作
要准备本章以及后面章节的示例,你需要安装一些开发工具。ASP.NET Core MVC和Entity Framework Core开发所需的工具都有免费版。我在书中使用的就是免费版。
由于微软仍在继续开发.NET Core、ASP.NET Core和EF Core的新版本,所以如果书中有需要跟随微软一起更新的地方请去 https://github.com/apress/pro-ef-core-2-for-asp.net-core-mvc 查看
2.1.1 安装.NET Core
.NET Core SDK包括编译和运行.NET项目所需的运行时(runtime)和开发工具。欲在Windows上安装.NET Core SDK,请从 https//www.microsoft.com/net/download/thank-you/dotnet-sdk-2.1.4-windows-x64-installer下载安装程序。此URL适用于64位.NET Core SDK版本2.1.4,这是本书中使用的版本(微软也发布了仅含运行时的安装程序,但它不包含本书所需的工具。)
运行安装程序,安装过程完成后,新打开一个PowerShell窗口或命令行并运行清单2-1中所示的命令以检查.NET Core是否已经正常工作。
清单2-1 检查.NET Core版本
>>dotnet --version
该命令会显示计算机上安装的最新版.NET Core runtime版本号。比如2.2.101
2.1.2 安装VS2017
Visual Studio是ASP.NET Core和Entity Framework Core项目的传统开发环境。可从https//www.visualstudio.com/vs下载安装程序。Visual Studio 2017有不同的版本可供用,但免费的社区版本足以练习本书示例。
执行安装程序并确保选择了 .NET Core Cross-Platform Development workload,如图2-1所示:

此workload包括LocalDB以及在Visual Studio中ASP.NET Core MVC和Entity Framework Core开发所需的功能。 点击"安装"按钮开始下载和安装所选的Visual Studio功能。
2.1.3 添加Visual Studio扩展
有两个Visual Studio扩展对于处理ASP.NET Core MVC项目是至关重要的。 第一个是Razor语言服务(Razor Language Service),它在编辑Razor视图时,为视图的tag helper提供智能感知支持。
第二个叫做项目文件工具(Project File Tools),它为编辑.csproj文件提供了自动完成功能,简化了将NuGet包添加到项目的过程。
从Visual Studio"工具"菜单中选择"扩展和更新",选择"在线"页,然后使用搜索框寻找扩展。 单击"下载"按钮,如图2-2所示,下载扩展文件。
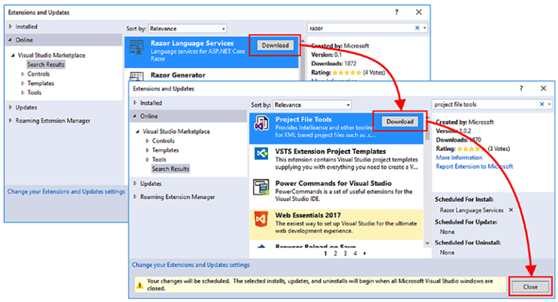
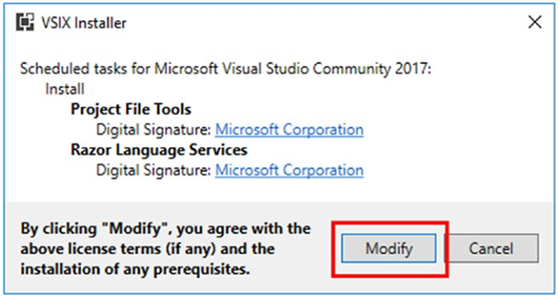
单击"关闭"按钮关闭扩展列表,开始自动安装下载的扩展程序。VS将提示你是否接受更改和许可条款,如图2-3所示。 单击"修改"按钮安装扩展。
该过程完成后,您需要重新启动Visual Studio。
2.2 创建项目
下面开始使用Entity Framework Core,我将展示如何创建一个简单的数据输入应用程序将数据存储在数据库中。 我将快速完成整个过程,不累述细节,只是为了让你了解ASP.NET Core MVC和Entity Framework Core如何协同工作。 但不要担心:我在本章中所做的一切都会在后面的章节中深入解析。
2.2.1 场景设置
想象一下,一位朋友决定举办一个新年前夜聚会。请我创建一个Web应用,允许受邀者以电子方式回复。 她要求具备以下四个关键功能:
•显示聚会信息的主页
•可用于RSVP的表单
•验证RSVP表单,显示感谢页面
•查询页面,显示谁来参加聚会(即答复信息)
这是在我另一本书Pro ASP.NET MVC Core 2中使用的同一个例子,本书的不同之处在于我将使用Entity Framework Core把答复存到数据库。
2.2.2 创建工程
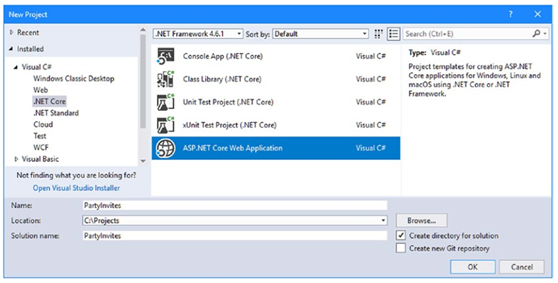
启动Visual Studio,选择ASP.NET Core Web Application创建工程,取名PartyInvites,如图2-4所示
小贴士:你可以直接去https://github.com/apress/pro-ef-core-2-for-asp.net-core-mvc下载该例子。
单击"确定"按钮后继续,先在弹出窗口顶部确保选中.NET Core和ASP.NET Core 2.0然后单击Empty模板,如图2-5所示。
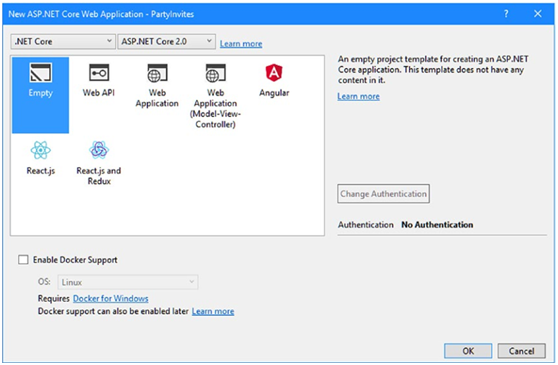
你当然也可以使用能直接将ASP.NET Core MVC和Entity Framework Core引用添加到一个工程中的工程模板,但这么做会掩盖一些有用的细节。所以我们选择的是Empty空白模板。
单击"确定"按钮,Visual Studio将使用基本配置创建PartyInvites项目,安装ASP.NET Core相关引用,但不配置MVC框架或EFCore。
2.2.3 添加Bootstrap CSS框架
我在本书使用Bootstrap CSS框架来设置HTML元素的样式。下面把Bootstrap添加到项目中,右键单击Solution Explorer中的PartyInvites工程,从右键菜单中选择Add->NewItem使用JSON文件模板(在ASP.NET Core ➤Web➤常规 中找到)来创建一个名为.bowerrc的文件,其内容如清单2-2所示。 (重要的是要注意这个文件名:
它以句点开头,包含字母r两次且没有文件扩展名)。
清单 2-2. 文件.bowerrc的内容
{
"directory": "wwwroot/lib"
}
再次使用JSON文件模板创建一个bower.json的文件,其内容如清单2-3所示。
清单 2-3. 文件bower.json 的内容
{
"name": "asp.net",
"private": true,
"dependencies": { "bootstrap": "4.0.0" }
}
当你保存文件时,VS会自动下载新版的BootStrap包并把它安装到 wwwroot/lib目录
2.2.4 配置HTTP端口
修改ASP.NET Core应用接收HTTP请求的端口,这可以使小例子简单一点。需要编辑Properties目录下的launchSettings.json文件如下面清单2-4修改URL。
清单 2-4.修改Properties\launchSettings.json文件中的 HTTP端口
 1 {
 2   "iisSettings": {
 3     "windowsAuthentication": false,
 4     "anonymousAuthentication": true,
 5     "iisExpress": {
 6       "applicationUrl": "http://localhost:5000/",
 7       "sslPort": 0
 8     }
 9   },
10
11   "profiles": {
12     "IIS Express": {
13       "commandName": "IISExpress",
14       "launchBrowser": true,
15       "environmentVariables": {
16         "ASPNETCORE_ENVIRONMENT": "Development"
17       }
18     },
19     "PartyInvites": {
20       "commandName": "Project",
21       "launchBrowser": true,
22       "environmentVariables": {
23         "ASPNETCORE_ENVIRONMENT": "Development"
24       },
25       "applicationUrl": "http://localhost:5000/"
26     }
27   }
28 }
此文件中的URL用于配置从IIS Express启动或从命令行运行应用时,它监听HTTP请求的URL地址。 本书中的所有示例都是从命令行运行的,可以很容易地看到日志消息。
2.3 创建数据模型和上下文类
当您创建一个同时使用ASP.NET Core MVC和Entity Framework Core的应用程序时,数据模型变得尤为重要。 为创建数据模型类,我在项目中添加了一个Models文件夹,在其中创建了一个名为GuestResponse.cs的文件,并添加了代码。如清单2-5所示:
 1 namespace PartyInvites.Models
 2 {
 3     public class GuestResponse
 4     {
 5         public long Id { get; set; }
 6         public string Name { get; set; }
 7         public string Email { get; set; }
 8         public string Phone { get; set; }
 9         public bool? WillAttend { get; set; }
10     }
11 }
EFCore能够存储常规C#类的实例,只要该类具有能唯一标识它每个对象实例的属性值,该属性称为主键属性(如上面类中的Id属性)。
EFCore功能由数据库上下文类提供,该类将数据模型类标识到EF Core中,用于访问数据库中的数据。为了创建上下文类,我创建一个名为DataContext.cs的文件添加到Models文件夹中,并在文件中写了如清单2-6所示的代码。
 1 //Listing 2-6. The Contents of the DataContext.cs File in the Models Folder
 2
 3 using Microsoft.EntityFrameworkCore;
 4
 5  namespace PartyInvites.Models {
 6     public class DataContext : DbContext {
 7    public DataContext(DbContextOptions<DataContext> options)
 8        : base(options) { }
 9    public DbSet<GuestResponse> Responses { get; set; }
10  }
11 }
创建数据库上下文类时要写一个构造器,用来接收一个配置对象并将其传递给基类构造器,这点非常重要。 对于你想要访问的每个Model类(数据模型),上下文类都应定义一个返回DbSet<T>对象的属性,是通过该属性(返回的DbSet<T>对象)来存储和检索数据的。上例中我定义了一个返回DbSet<GuestResponse>对象的属性Response,所以我可以用它存储和检索GuestResponse类型的Model对象。
2.4 创建MVC的控制器(Controller)和视图(View)
为了向应用程序提供控制器,我创建了Controllers文件夹并在其中添加了一个HomeController.cs,代码如清单2-7所示。
 1 //Listing 2-7. The Contents of the HomeController.cs File in the Controllers Folder
 2 using Microsoft.AspNetCore.Mvc;
 3 using PartyInvites.Models;
 4 using System.Linq;
 5 namespace PartyInvites.Controllers {
 6    public class HomeController : Controller {
 7      private DataContext context;
 8      public HomeController(DataContext ctx) => context = ctx;
 9      public IActionResult Index() => View();
10      public IActionResult Respond() => View();
11      [HttpPost]
12      public IActionResult Respond(GuestResponse response) {
13        context.Responses.Add(response);
14        context.SaveChanges();
15        return RedirectToAction(nameof(Thanks),
16        new { Name = response.Name, WillAttend = response.WillAttend });
17      }
18      public IActionResult Thanks(GuestResponse response) => View(response);
19      public IActionResult ListResponses() =>
20        View(context.Responses.OrderByDescending(r => r.WillAttend));
21    }
22 }
上面的控制器接受DataContext对象作为其构造器的参数,并使用它来访问由EFCore管理的数据。由上下文类的Responses属性返回的DbSet<GuestResponse>对象的类实现了IEnumerable<GuestResponse>接口,当遍历(访问)到该对象时,将自动去数据库查询之前存储的GuestResponse对象(数据)。
当然DbSet<GuestResponse>对象也用于存储Model对象。Add方法把你要Insert的对象(数据)发给EFCore,而SaveChanges方法执行Update。
小贴士:在复杂的项目中,我建议使用存储库模式来访问EFCore功能,第10章会有讲述。对于本章中的简单项目,控制器直接操作数据库上下文。
我创建了Views/Home文件夹,并在其中添加了一个名为_Layout.cshtml的文件见清单2-8。此layout为本章中的所有其他视图提供公共布局,并包括引入Bootstrap CSS文件的link元素。
 1 Listing 2-8. The Contents of the _Layout.cshtml File in the Views/Home Folder
 2 <!DOCTYPE html>
 3 <html>
 4       <head>
 5           <meta name="viewport" content="width=device-width" />
 6           <title>Party Invites</title>
 7           <link rel="stylesheet" href="/lib/bootstrap/dist/css/bootstrap.css" />
 8       </head>
 9       <body>
10             @RenderBody()
11       </body>
12 </html>
为了在其他视图中默认使用此布局,我在Views文件夹下添加了一个名为_ViewStart.cshtml的文件见清单2-9。
1 Listing 2-9. The Contents of the _ViewStart.cshtml File in the Views Folder
2 @{
3  Layout = "_Layout";
4 }
下面创建首页的视图,我在Views/Home中添加了一个Index.cshtml文件见清单2-10。
1 Listing 2-10. The Contents of the Index.cshtml File in the Views/Home Folder
2 <div class="text-center m-4">
3    <h3>We're going to have an exciting party!</h3>
4    <h4>And you are invited</h4>
5    <a class="btn btn-primary" asp-action="Respond">RSVP Now</a>
6 </div>
为了接收用户响应的详细信息,我在Views/Home中添加了一个Respond.cshtml文件见清单2-11。
 1 Listing 2-11. The Contents of the Respond.cshtml File in the Views/Home Folder
 2 @model GuestResponse
 3 <div class="bg-primary p-2 text-white text-center">
 4    <h2>RSVP</h2>
 5 </div>
 6 <form asp-action="Respond" method="post" class="m-4">
 7    <div class="form-group">
 8      <label>Your Name</label>
 9      <input asp-for="Name" class="form-control" />
10    </div>
11    <div class="form-group">
12      <label>Your Email</label>
13      <input asp-for="Email" class="form-control" />
14    </div>
15    <div class="form-group">
16      <label>Your Phone Number</label>
17      <input asp-for="Phone" class="form-control" />
18    </div>
19    <div class="form-group">
20      <label>Will You Attend?</label>
21      <select asp-for="WillAttend" class="form-control">
22        <option value="">Choose an option</option>
23        <option value="true">Yes, I'll be there</option>
24        <option value="false">No, I can't come</option>
25      </select>
26    </div>
27    <div class="text-center">
28      <button type="submit" class="btn btn-primary">Submit RSVP</button>
29    </div>
30 </form>
为了确认用户提供的响应,我在Views/Home中添加了一个Thanks.cshtml文件见清单2-12。
 1 Listing 2-12. The Contents of the Thanks.cshtml File in the Views/Home Folder
 2 @model GuestResponse
 3 <div class="text-center mt-3">
 4    <h1>Thank you, @Model.Name!</h1>
 5    @if (Model.WillAttend == true) {
 6      <div>
 7          It's great that you're coming. The drinks are already in the fridge!
 8      </div>
 9    } else {
10      <div>
11          Sorry to hear that you can't make it, but thanks for letting us know.
12      </div>
13    }
14    Click <a asp-action="ListResponses">here</a> to see who is coming.
15 </div>
为了创建最终视图,我将一个ListResponses.cshtml的文件添加到Views/Home文件夹中,见清单2-13,将会列出程序收到的所有响应。
 1 Listing 2-13. The Contents of the ListResponses.cshtml File in the Views/Home Folder
 2 @model IEnumerable<GuestResponse>
 3 <h3 class="bg-primary p-2 text-white text-center">Here is the list of people who have
 4 responded</h3>
 5 <div class="container-fluid">
 6    <div class="row p-1">
 7      <div class="col font-weight-bold">Name</div>
 8      <div class="col font-weight-bold">Email</div>
 9      <div class="col font-weight-bold">Phone</div>
10      <div class="col font-weight-bold">Attending</div>
11    </div>
12    @foreach (GuestResponse r in Model) {
13      <div class="row p-1">
14        <div class="col">@r.Name</div>
15        <div class="col">@r.Email</div>
16        <div class="col">@r.Phone</div>
17        <div class="col">@(r.WillAttend == true ? "Yes" : "No")</div>
18      </div>
19     }
20 </div>
为了完成程序视图的配置,我在Views文件夹添加了一个_ViewImports.cshtml文件,见清单2-14。
1 Listing 2-14. The Contents of the _ViewImports.cshtml File in the Views Folder
2 @using PartyInvites.Models
3 @addTagHelper *, Microsoft.AspNetCore.Mvc.TagHelpers
这些语句允许在视图中使用Models命名空间里的类,而无需限定。另外这样也会激活tag helpers的辅助功能,我还指望它在视图中帮我配置一些HTML元素。
2.5 配置EFCore
当Visual Studio创建一个新的ASP.NET Core工程时,它几乎添加了ASP.NET Core MVC和Entity Framework Core开发所需的所有NuGet包。另外我们还需要添加对命令行工具的支持,EFCore使用该工具来配置数据库的访问。右键单击PartyInvites工程,选择Edit PartyInvites.csproj,添加清单2-15中的元素。
 1 Listing 2-15. Adding a Package in the PartyInvites.csproj File in the PartyInvites Folder
 2 <Project Sdk="Microsoft.NET.Sdk.Web">
 3   <PropertyGroup>
 4     <TargetFramework>netcoreapp2.0</TargetFramework>
 5   </PropertyGroup>
 6   <ItemGroup>
 7     <Folder Include="wwwroot\" />
 8   </ItemGroup>
 9   <ItemGroup>
10     <PackageReference Include="Microsoft.AspNetCore.All" Version="2.0.5" />
11     <DotNetCliToolReference Include="Microsoft.EntityFrameworkCore.Tools.DotNet"
12       Version="2.0.1" />
13   </ItemGroup>
14 </Project>
Visual Studio的NuGet管理器无法安装这种提供命令行工具的包,必须使用DotNetCliToolReference元素才行。保存工程文件后,Visual Studio将下载该软件包并添加到工程中。
2.5.1 配置连接字符串
使用数据库时,必须提供连接字符串,该字符串告诉EFCore如何操作连接到数据库,通常还包括其他信息,如身份验证。右键单击PartyInvites工程,选择添加➤新项,然后选择ASP.NET配置文件。名字设为appsettings.json,如图2-6所示。
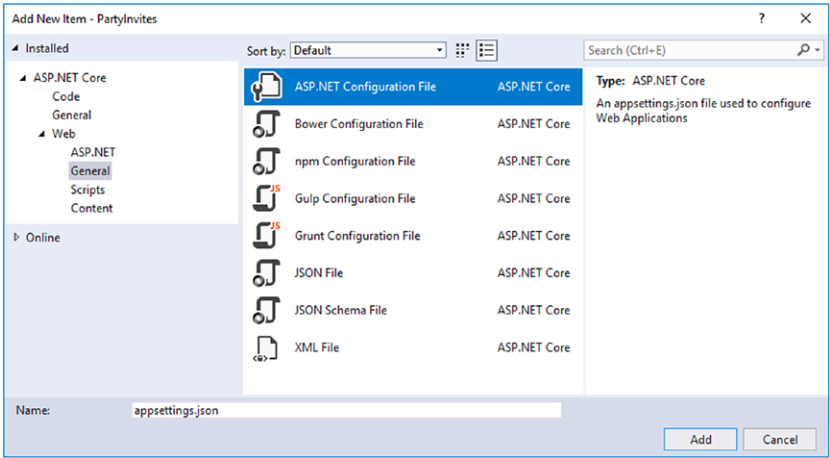
创建文件后,内容改为下面清单2-16的内容:
1 Listing 2-16. Defining the Connection String in the appsettings.json File in the PartyInvites Folder
2 {
3    "ConnectionStrings": {
4    "DefaultConnection": "Server=(localdb)\\MSSQLLocalDB;Database=PartyInvites"
5    }
6 }
此连接字符串告诉Entity Framework Core使用名为PartyInvites的数据库LocalDB(它与Visual Studio一起安装的)。
2.6 配置Startup类
下一步是设置ASP.NET Core MVC和Entity Framework Core,即将清单2-17中的语句添加到Startup类。
 1 //Listing 2-17. Configuring the Application in the Startup.cs File in the PartyInvites Folder
 2 using System;
 3 using System.Collections.Generic;
 4 using System.Linq;
 5 using System.Threading.Tasks;
 6 using Microsoft.AspNetCore.Builder;
 7 using Microsoft.AspNetCore.Hosting;
 8 using Microsoft.AspNetCore.Http;
 9 using Microsoft.Extensions.DependencyInjection;
10 using Microsoft.EntityFrameworkCore;
11 using Microsoft.Extensions.Configuration;
12 using PartyInvites.Models;
13 namespace PartyInvites {
14  public class Startup {
15      public Startup(IConfiguration config) => Configuration = config;
16      public IConfiguration Configuration { get; }
17      public void ConfigureServices(IServiceCollection services) {
18          services.AddMvc();
19          string conString = Configuration["ConnectionStrings:DefaultConnection"];
20          services.AddDbContext<DataContext>(options =>
21             options.UseSqlServer(conString));
22      }
23      public void Configure(IApplicationBuilder app, IHostingEnvironment env) {
24          app.UseDeveloperExceptionPage();
25          app.UseStatusCodePages();
26          app.UseStaticFiles();
27          app.UseMvcWithDefaultRoute();
28      }
29   }
30 }
这些更改会加载appsettings.json文件中的设置,并使用它们来配置数据库上下文类。以便EF Core使用该上下文类对象,通过DI(依赖注入)功能将它作为一个服务提供出来,允许应用程序的其他部分轻松获取该上下文对象和访问EF Core功能。
2.7 准备数据库
EF Core必须创建和配置数据库,存储GuestResponse对象, 这是通过创建Migration来完成的。 EFCore会先检查应用程序的数据模型并弄清楚如何将其存储在关系数据库中。创建的Migration会产生一系列说明给到Database Provider来生成SQL语句,这些SQL让数据库服务创建出所需的数据库。我将会在第十二章详细讲解Migration是如何工作的。
Migration是通过命令行工具进行创建和应用的。新打开一个PowerShell或者命令行,导航到PartyInvites工程目录(该目录包含bower.json和Startup.cs文件),然后运行下面清单2-18所示的命令
Listing 2-18. Creating a New Migration
dotnet ef migrations add Initial
要应用migration并创建数据库,请在PartyInvites工程目录运行清单2-19中所示的命令
Listing 2-19. Applying a Migration
dotnet ef database update
2.8 测试应用程序
要启动应用程序,请在PartyInvites项目目录下执行清单2-20所示的命令。虽然你可以直接用Visual Studio启动应用程序,但本书中的许多示例都需要在命令行打印log,更方便调试查看。这是我在后面的所有章节中采用的方法。
Listing 2-20. Starting the Application
dotnet run
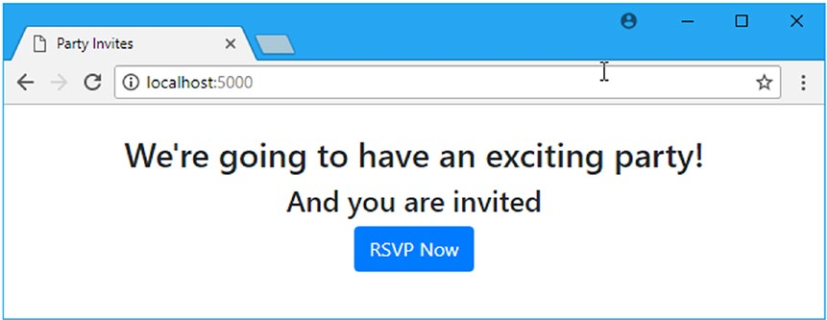
应用程序启动后,打开一个新的浏览器窗口并导航到http://localhost:5000看到如图2-7所示的内容。
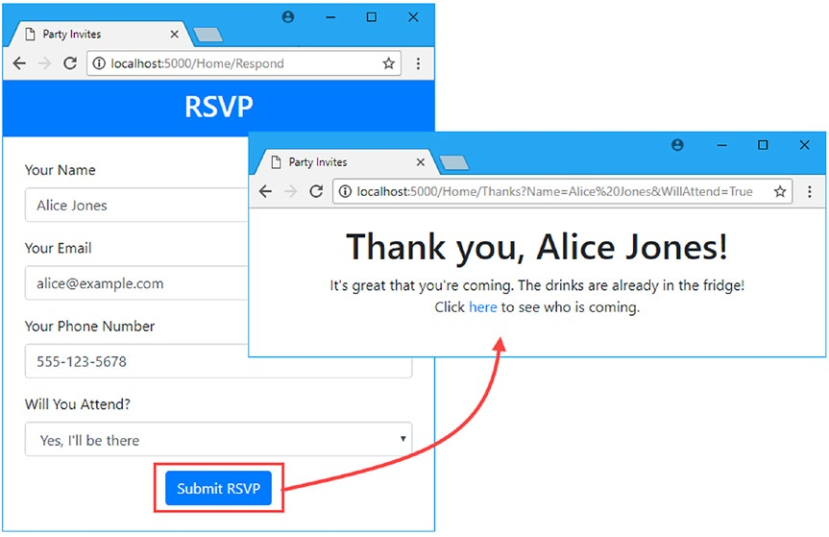
单击"RSVP Now"按钮,填写表单,然后单击"提交RSVP"按钮。 你会看到的响应如图2-8所示。
单击链接以查看响应列表。 您将看到类似于图2-9所示的内容显示我创建的其他响应。
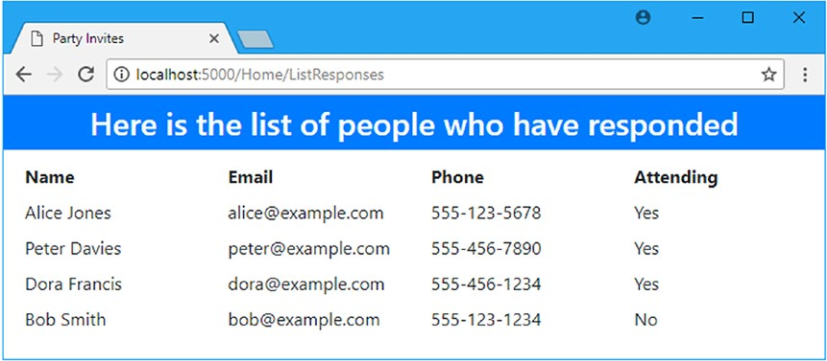
MVC的model binder根据HTTP Post 请求中的值创建GuestResponse对象,对象被EFCore存储到数据库中。 当你请求查看“响应”列表时,EFCore将查询数据库,而后根据返回的结果集创建一系列GuestResponse对象,MVC将来用它们生成网页上的列表。
2.9 本章小结
本章我创建了一个ASP.NET Core MVC工程,用它写了一个简单的数据输入程序,该程序使用EF Core将数据存储到LocalDB数据库中。你可以看到将EF Core添加到一个MVC应用之中是多么的简单,小程序做数据持久化所需的代码更改是多么的少。用于简单的应用程序。 在下一章中,我将概述Visual Studio提供的数据库工具,然后使用它们来解释Entity Framework Core依赖的最重要的SQL命令。


 浙公网安备 33010602011771号