mybatis
1.1 Mybatis核心组件概述
SqlSessionFactoryBuilder(构造器):它会根据 配置或者代码来生成SqlSessionFactory,采用的是分布式构件的Builder模式。
SqlSessionFactory(工厂接口):依靠它来生成SqlSession,使用的是工厂模式
SqlSession(会话):一个既可以发送SQL执行返回结果,也可以获取Mapper的接口,一般我们会让其在业务逻辑代码中“消失”,而使用的是Mybatis提供的SQL Mapper接口编程技术,他能提高代码的可读性和可维护性
SQL Mapper(映射器): Mybatis新设计存在的组件,它由一个Java接口和XML文件(或注解)构成,需要给出对应的SQL和映射规则,它负责发送SQL去执行,并返回结果。
1.2 SqlSessionFactory
SqlSessionFactory的构建
SqlSessionFactoryBuilder会根据配置或者代码来生成SqlSessionFactory,当有了配置或者代码后,Mybatis会读取配置文件,通过Configuration类对象构建整个Mybati的上下文。
SqlSessionFactory是一个接口,在Mybatis中他存在两个实现类:SqlSessionManager和DefaultSqlSessionFactory,一般是由DefaultSqlSessionFactory去实现,而SqlSessionManager使用在多线程的环境中,其具体实现也是依靠DefaultSqlSessionFactory的。
1.2.1使用XML构建SqlSessionFactory(配置的方式)
Mybatis中的XML文件分为两类:一类是基础配置文件,通常只有一个,主要是配置一些最基本的上下文参数和运行环境;另一类是映射文件,他可以配置映射关系、SQL、参数等信息。
Mybatis基础配置文件 "mybatis-config.xml"
<!--Mybatis基础配置文件-->
?useUnicode=true&characterEncoding=UTF-8
有了配置文件之后,生成SqlSessionFactory的代码
SqlSessionFactory SqlSessionFactory=null;
String resource = "mybatis-config.xml";
InputStream inputStream;
try {
    inputStream = Resources.getResourceAsStream(resource);
    sqlSessionFactory = new SqlSessionFactoryBuilder().build(inputStream);
} catch (IOException e) {
    e.printStackTrace();
    return null;
}
1.2.2 使用代码生成SqlSessionFactory
这种方式写起来繁琐,且不易维护,不推荐使用
//数据库连接池信息
PooledDataSource dataSource = new PooledDataSource();
dataSource.setDriver("com.mysql.jdbc.Driver");
dataSource.setUsername("root");
dataSource.setPassword("123456");
dataSource.setUrl("jdbc:mysql://localhost:3306/chapter3");
dataSource.setDefaultAutoCommit(false);
//采用MyBatis的JDBC事务方式
TransactionFactory transactionFactory = new JdbcTransactionFactory();
Environment environment = new Environment("development", transactionFactory, dataSource);
//创建Configuration对象
Configuration configuration = new Configuration(environment);
//注册一个MyBatis上下文别名
configuration.getTypeAliasRegistry().registerAlias("role", Role.class);
//加入一个映射器
configuration.addMapper(RoleMapper.class);
configuration.addMapper(RoleMapper2.class);
//使用SqlSessionFactoryBuilder构建SqlSessionFactory
sqlSessionFactory =
    new SqlSessionFactoryBuilder().build(configuration);
return sqlSessionFactory;
1.3 SqlSession
在Mybatis中,SqlSession是其核心接口。在Mybatis中有两个实现类,DefaultSqlSession和SqlSessionManager。DefaultSqlSession是单线程使用的,SqlSessionManager是在多线程环境下使用的。SqlSession的作用类似于一个JDBC中的Connection对象,代表着一个连接资源的启用,SqlSession具有如下3个作用:
获取Mapper接口(参考1.4.4)
发送SQL给数据库(一般不用SqlSession发送SQL给数据库,而是通过Mapper接口发送SQL给数据库,参考1.4.3和1.4.4)
控制数据库事务
1.3.1创建SqlSession(需要先得到SqlSessionFactory对象)
SqlSession sqlSession = sqlSessionFactory.openSession();
1.3.2 SqlSession事务控制
SqlSession sqlSession=null;
try {
    //打开SqlSession会话
    sqlSession=sqlSessionFactory.openSession();
    //some code
    sqlSession.commit();//提交事务
}
catch (Exception ex){
    sqlSession.rollback();//回滚事务
}
finally {
    //在finally语句中确保资源被顺利关闭
    if(sqlSession!=null){
        sqlSession.close();
    }
}
要确保sqlSession在finally语句中被关闭,因为SqlSession代表着一个数据库连接资源,如果不关闭,那么数据库的链接资源很快就会被耗光,整个系统就会陷入瘫痪。
1.4 映射器
映射器是Mybatis中最重要,最复杂的组件,它由一个接口和对应的XML文件(或注解)组成,它可以配置一下内容:
描述映射规则
提供SQL语句,并可以配置SQL参数类型、返回类型、缓存刷新等信息
配置缓存
提供动态SQL
映射器的主要作用就是将SQL查询到的结果映射为一个POJO,或者将POJO的内容插入到数据库中,并定义一些关于缓存的重要内容
1.4.1 用XML实现映射器
POJO类
package com.learn.ssm.chapter3.pojo;
public class Role {
private Long id;
private String roleName;
private String note;
/** setter and getter **/
public Long getId() {
return id;
}
public void setId(Long id) {
this.id = id;
}
public String getRoleName() {
return roleName;
}
public void setRoleName(String roleName) {
this.roleName = roleName;
}
public String getNote() {
return note;
}
public void setNote(String note) {
this.note = note;
}
}
映射器=接口+XML配置文件/注解
映射器接口
package com.learn.ssm.chapter3.mapper;
public interface RoleMapper {
    public Role getRole(Long id);
}
XML配置文件
Mybatis会把SQL的查询结果自动映射为POJO
1.4.2 注解实现映射器
这种方式只需要一个接口就可以通过Mybatis的注解来注入SQL,这种方法的效果和4.1中配置XML的效果完全等同
package com.learn.ssm.chapter3.mapper;

import org.apache.ibatis.annotations.Select;

import com.learn.ssm.chapter3.pojo.Role;

public interface RoleMapper2 {

	@Select("select id, role_name as roleName, note from t_role where id=#{id}")
	public Role getRole(Long id);
}
在mybatis-config配置文件中加入通过注解方式实现的映射器:
<mapper class="com.learn.ssm.chapter3.mapper.RoleMapper2"/>
如果同时定义XML和注解,XML会覆盖注解,Mybatis官方推荐使用XML的方式实现映射器,因为在实际应用中,SQL语句会极其复杂,使用注解的方式实现映射器会降低代码的可读性,注解也会十分复杂,不利于日后的维护和修改。
1.4.3 SqlSession发送SQL
Role role=(Role)sqlSession.selectOne("com.learn.ssm.chapter3.mapper.RoleMapper.getRole",1L);
这种方法已经不推荐了
1.4.4 用Mapper接口发送SQL
//sqlSession的getMapper接受一个接口的class对象,返回一个该接口的实现类的实例,调用该实例的方法就会执行相应的SQL语句
RoleMapper roleMapper = sqlSession.getMapper(RoleMapper.class);
Role role=roleMapper.getRole(1L);
1.5. 生命周期
SqlSessionFactoryBuilder的生命周期:SqlSessionFactoryBuilder的作用在于创建SqlSessionFactory,创建成功后就失去了作用,因此它只能存在于创建SqlSessionFactory的方法中,而不要让其长期存在
SqlSessionFactory的生命周期:SqlSessionFactory可以被认为是一个数据库连接池,其作用是创建SqlSession接口对象,所以SqlSessionFactory的生命周期在于整个Mybati应用中,可以认为SqlSessionFactory的生命走起就等同于Mybatis的应用周期 它占据着连接数据库的连接资源,如果创建多个SqlSessionFactory,那么就存在多个数据库连接池,这样不利于对数据库资源的控制,也会导致数据库链接资源被消耗光,出现宕机的情况,因此在一般的应用中我们往往希望SqlSessionFactory作为一个单例。
SqlSession的生命周期:如果说SqlSessionFactory相当于数据库连接池,那么SqlSession就相当于一个数据库链接(Connection对象),它应该存活在一个业务请求中,处理完整个请求后,应关闭这条链接,让它归还给SqlSessionFactory,否则数据库资源很快被耗费光,系统就会瘫痪
Mapper(注意这里的Mapper是接口,而不是映射器)的生命周期:Mapper接口由SqlSession所创建(创建实现了Mapper接口的类的实例),所以
<dependencies>
    <dependency>
      <groupId>junit</groupId>
      <artifactId>junit</artifactId>
      <version>4.11</version>
      <scope>test</scope>
    </dependency>
    <dependency>
      <groupId>org.mybatis</groupId>
      <artifactId>mybatis</artifactId>
      <version>3.5.1</version>
    </dependency>
    <dependency>
      <groupId>mysql</groupId>
      <artifactId>mysql-connector-java</artifactId>
      <version>5.1.9</version>
    </dependency>
    <dependency>
      <groupId>org.mybatis</groupId>
      <artifactId>mybatis</artifactId>
      <version>3.5.6</version>
      <scope>test</scope>
    </dependency>
  </dependencies>

  <!--更改maven构建配置,在构建的时候将所有xml文件也打包到target中-->
  <build>
    <resources>
      <resource>
        <directory>src/main/java</directory>
        <includes>
          <include>**/*.xml</include>
        </includes>
        <filtering>false</filtering>
      </resource>
    </resources>
  </build>
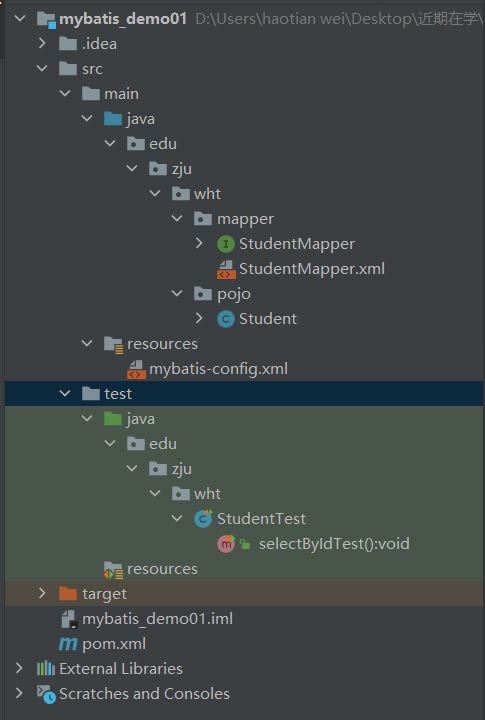
2. 如何创建一个Mybatis的Maven项目
首先看一下文件结构
StudentMapper
package edu.zju.wht.mapper;

import edu.zju.wht.pojo.Student;

public interface StudentMapper {
    Student selectById(long id);
}
StudentMapper.xml
<?xml version="1.0" encoding="UTF-8" ?>
<!DOCTYPE mapper PUBLIC "-//mybatis.org//DTD Mapper 3.0//EN"
        "http://mybatis.org/dtd/mybatis-3-mapper.dtd">
<!--namespace对应的是接口的全限定名称,mybatis上下文可以通过它找到对应的接口-->
<mapper namespace="edu.zju.wht.mapper.StudentMapper">

    <!--select表明这是一条查询语句,id标识了这条SQL,parameterType表示传递给SQL的参数类型,resultType="role"表示返回类型是一个role类型,role是前面mybatis-config.xml文件中配置的别名,指代com.learn.ssm.chapter3.pojo.Role-->
    <!-- #{id} 表示传入的参数,其类型对应parameterType的值-->
    <select id="selectById" parameterType="long" resultType="edu.zju.wht.pojo.Student">
        select id,
               name from student where id = #{id}
    </select>
</mapper>
student
package edu.zju.wht.pojo;

public class Student {
    private long id;
    private String name;

    public long getId() {
        return id;
    }

    public void setId(long id) {
        this.id = id;
    }

    public String getName() {
        return name;
    }

    public void setName(String name) {
        this.name = name;
    }

    @Override
    public String toString() {
        return "Student{" +
                "id=" + id +
                ", name='" + name + '\'' +
                '}';
    }
}
mybatis-config.xml
<?xml version="1.0" encoding="UTF-8" ?> <!DOCTYPE configuration PUBLIC "-//mybatis.org//DTD Config 3.0//EN" "http://mybatis.org/dtd/mybatis-3-config.dtd"> <configuration> <!-- 数据库环境 --> <environments default="development"> <environment id="development"> <!--配置事务管理器--> <transactionManager type="JDBC"/> <!--配置数据库,type="POOLED"代表采用Mybatis内部提供的连接池方式--> <dataSource type="POOLED"> <!--JDBC的属性信息--> <property name="driver" value="com.mysql.jdbc.Driver"/> <property name="url" value="jdbc:mysql://localhost:3306/student?useUnicode=true&characterEncoding=UTF-8"/> <property name="username" value="root"/> <property name="password" value="1234"/> </dataSource> </environment> </environments> <!-- 映射文件 --> <mappers> <!--引入一个映射器,改映射器通过xml方式配置,这里只需要给出xml文件的路径,对应的接口文件可以再xml文件中的namespace属性中找到--> <mapper resource="edu/zju/wht/mapper/StudentMapper.xml"/> </mappers> </configuration>
StudentTest
package edu.zju.wht;

import edu.zju.wht.mapper.StudentMapper;
import edu.zju.wht.pojo.Student;
import org.apache.ibatis.io.Resources;
import org.apache.ibatis.session.SqlSession;
import org.apache.ibatis.session.SqlSessionFactory;
import org.apache.ibatis.session.SqlSessionFactoryBuilder;
import org.junit.Test;

import java.io.IOException;
import java.io.InputStream;

public class StudentTest {
    @Test
    public void selectByIdTest(){
        SqlSessionFactory sqlSessionFactory=null;
        String resource = "mybatis-config.xml";
        InputStream inputStream;
        try {
            inputStream = Resources.getResourceAsStream(resource);
            sqlSessionFactory = new SqlSessionFactoryBuilder().build(inputStream);
        } catch (IOException e) {
            e.printStackTrace();
        }
        SqlSession session=sqlSessionFactory.openSession();
        StudentMapper mapper=session.getMapper(StudentMapper.class);
        System.out.println(mapper.selectById(1L));
    }
}
pom.xml
<?xml version="1.0" encoding="UTF-8"?>

<project xmlns="http://maven.apache.org/POM/4.0.0" xmlns:xsi="http://www.w3.org/2001/XMLSchema-instance"
  xsi:schemaLocation="http://maven.apache.org/POM/4.0.0 http://maven.apache.org/xsd/maven-4.0.0.xsd">
  <modelVersion>4.0.0</modelVersion>

  <groupId>edu.zju.wht</groupId>
  <artifactId>mybatis_demo01</artifactId>
  <version>1.0-SNAPSHOT</version>

  <name>mybatis_demo01</name>
  <!-- FIXME change it to the project's website -->
  <url>http://www.example.com</url>

  <properties>
    <project.build.sourceEncoding>UTF-8</project.build.sourceEncoding>
    <maven.compiler.source>1.7</maven.compiler.source>
    <maven.compiler.target>1.7</maven.compiler.target>
  </properties>

  <dependencies>
    <dependency>
      <groupId>junit</groupId>
      <artifactId>junit</artifactId>
      <version>4.11</version>
      <scope>test</scope>
    </dependency>
    <dependency>
      <groupId>org.mybatis</groupId>
      <artifactId>mybatis</artifactId>
      <version>3.5.1</version>
    </dependency>
    <dependency>
      <groupId>mysql</groupId>
      <artifactId>mysql-connector-java</artifactId>
      <version>5.1.9</version>
    </dependency>

  </dependencies>

  <!--更改maven构建配置,在构建的时候将所有xml文件也打包到target中-->
  <build>
    <resources>
      <resource>
        <directory>src/main/java</directory>
        <includes>
          <include>**/*.xml</include>
        </includes>
        <filtering>false</filtering>
      </resource>
    </resources>
  </build>
</project>


 浙公网安备 33010602011771号