TensorFlow基础知识
1 综述
TensorFlow的编程系统中:
- 使用张量(
tensor)来表示数据 - 使用图(
graph)来表示计算任务。 图中的节点被称之为 op (operation 的缩写). 一个 op 获得 0 个或多个 Tensor, 执行计算, 产生 0 个或多个 Tensor. 每个 Tensor 是一个类型化的多维数组。 - 使用会话(
Session)的上下文(context)中执行图 - 通过变量(
Variable)维护状态 - 使用
feed和fetch赋值和获取数据.
2 张量(Tensor)
张量就是多维数组(列表),用“阶”表示张量的维度。
- 0阶张量称作标量(scalar),表示一个单独的数;举例 S=123
- 1阶张量称作向量(vector),表示一个一维数组;举例 V=[1,2,3]
- 2阶张量称作矩阵(matrix),表示一个二维数组,它可以有 i 行 j 列个元素,每个元素可
以用行号和列号共同索引到;
举例 m=[[1, 2, 3], [4, 5, 6], [7, 8, 9]]
判断张量是几阶的,就通过张量右边的方括号数,0 个是 0 阶,n 个是 n 阶。例如 t=[ [ [... ] ] ]为 3 阶。
代码演示:
import tensorflow as tf
a=tf.constant([1.0,2.0])
b=tf.constant([3.0,4.0])
result=a+b
print(result)
输出的结果为:
Tensor("add:0", shape=(2,), dtype=float32)
解释:
- add :节点名
- shape :维度信息,括号里只有一个数“2“,表示维度是1且一个维度里有两个元素
- dtpye :数据类型
另:
c=tf.constant([1.0,2.0])  #Tensor("Const_2:0", shape=(2,), dtype=float32) 是个向量,有两个元素
d=tf.constant([[1.0,2.0]])  #Tensor("Const_3:0", shape=(1, 2), dtype=float32) 1行2列矩阵
e=tf.constant([[1.0],[2.0]])  #Tensor("Const_4:0", shape=(2, 1), dtype=float32) 2行1列矩阵
2 计算图
计算图(Graph):搭建神经网络的计算过程,是承载一个或多个计算节点的一张图,只搭建网络,不运算。
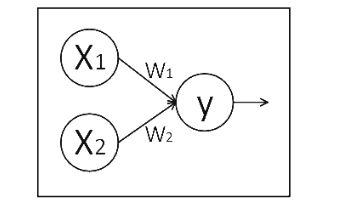
x1、x2 表示输入,w1、w2 分别是 x1 到 y 和 x2 到 y 的权重,y=x1w1+x2w2。
我们实现上述计算图:
import tensorflow as tf #引入模块
x = tf.constant([[1.0, 2.0]]) #定义一个 2 阶张量等于[[1.0,2.0]]
w = tf.constant([[3.0], [4.0]]) #定义一个 2 阶张量等于[[3.0],[4.0]]
y = tf.matmul(x, w) #实现 xw 矩阵乘法
print y #打印出结果
可以打印出这样一句话:
Tensor(“matmul:0”, shape(1,1), dtype=float32),
从这里我们可以看出,print 的结果显示 y 是一个张量,只搭建承载计算过程的
计算图,并没有运算,如果我们想得到运算结果就要用到“会话 Session()”了。
3 会话
会话(Session):执行计算图中的节点运算。
我们用 with 结构实现,语法如下:
with tf.Session() as sess:
    print(sess.run(y))
【举例】
我们执行 Session()会话可得到矩阵相乘结果:
import tensorflow as tf #引入模块
x = tf.constant([[1.0, 2.0]]) #定义一个 2 阶张量等于[[1.0,2.0]]
w = tf.constant([[3.0], [4.0]]) #定义一个 2 阶张量等于[[3.0],[4.0]]
y = tf.matmul(x, w) #实现 xw 矩阵乘法
print y #打印出结果
with tf.Session() as sess:
    print(sess.run(y)) #执行会话并打印出执行后的结果
可以打印出这样的结果:
Tensor(“matmul:0”, shape(1,1), dtype=float32)
[[11.]]
我们可以看到,运行 Session()会话前只打印出 y 是个张量的提示,运行 Session()
会话后打印出了 y 的结果 1.0 * 3.0 + 2.0 * 4.0 = 11.0。
4 变量
4.1 变量创建
变量的创建使用一个张量作为初始值传入构造函数Variable(),初始值是常量或是随机值。
注意,所有这些操作符都需要你指定张量的shape。那个形状自动成为变量的shape。变量的shape通常是固定的,但TensorFlow提供了高级的机制来重新调整其行列数
# 创建一个变量, 初始化为标量 0.
state = tf.Variable(0, name="counter")

# 权重和偏置
weights = tf.Variable(tf.random_normal([784, 200], stddev=0.35),name="weights")
biases = tf.Variable(tf.zeros([200]), name="biases")
常用的生成随机数/数组的函数有:
tf.random_normal()   #生成正态分布随机数
tf.truncated_normal() #生成去掉过大偏离点的正态分布随机数
tf.random_uniform()  #生成均匀分布随机数
tf.zeros         #表示生成全 0 数组
tf.ones       #表示生成全 1 数组
tf.fill     #表示生成全定值数组
tf.constant #表示生成直接给定值的数组
具体可以查看:http://www.tensorfly.cn/tfdoc/api_docs/python/constant_op.html
4.2 变量初始化
变量的初始化必须在模型的其它操作运行之前完成
最简单的方法就是添加一个给所有变量初始化的操作,并在使用模型之前首先运行那个操作。
4.2.1 tf.initialize_all_variables()
使用tf.initialize_all_variables()添加一个操作对变量做初始化。记得在完全构建好模型并加载之后再运行那个操作。
# Create two variables.
weights = tf.Variable(tf.random_normal([784, 200], stddev=0.35),
                      name="weights")
biases = tf.Variable(tf.zeros([200]), name="biases")
...
# Add an op to initialize the variables.
init_op = tf.initialize_all_variables()

# Later, when launching the model
with tf.Session() as sess:
  # Run the init operation.
  sess.run(init_op)
  ...
  # Use the model
  ...
4.2.2 initialized_value()
。由于tf.initialize_all_variables()是并行地初始化所有变量,有时候会需要用另一个变量的初始化值给当前变量初始化。
用其它变量的值初始化一个新的变量时,使用其它变量的initialized_value()属性。你可以直接把已初始化的值作为新变量的初始值,或者把它当做tensor计算得到一个值赋予新变量。
# Create a variable with a random value.
weights = tf.Variable(tf.random_normal([784, 200], stddev=0.35),
                      name="weights")
# Create another variable with the same value as 'weights'.
w2 = tf.Variable(weights.initialized_value(), name="w2")
# Create another variable with twice the value of 'weights'
w_twice = tf.Variable(weights.initialized_value() * 0.2, name="w_twice")
4.3 保存和加载
4.3.1 保存变量
最简单的保存和恢复模型的方法是使用tf.train.Saver对象。构造器给graph的所有变量,或是定义在列表里的变量,添加save和restore ops。saver对象提供了方法来运行这些ops,定义检查点文件的读写路径。
变量存储在二进制文件里,主要包含从变量名到tensor值的映射关系。
当你创建一个Saver对象时,你可以选择性地为检查点文件中的变量定义变量名。默认情况下,将使用每个变量Variable.name属性的值。
保存变量时,用tf.train.Saver()创建一个Saver来管理模型中的所有变量。
# Create some variables.
v1 = tf.Variable(..., name="v1")
v2 = tf.Variable(..., name="v2")
...
# Add an op to initialize the variables.
init_op = tf.initialize_all_variables()

# Add ops to save and restore all the variables.
saver = tf.train.Saver()

# Later, launch the model, initialize the variables, do some work, save the
# variables to disk.
with tf.Session() as sess:
  sess.run(init_op)
  # Do some work with the model.
  ..
  # Save the variables to disk.
  save_path = saver.save(sess, "/tmp/model.ckpt")
  print "Model saved in file: ", save_path
4.3.2 恢复变量
用同一个Saver对象来恢复变量。注意,当你从文件中恢复变量时,不需要事先对它们做初始化。
# Create some variables.
v1 = tf.Variable(..., name="v1")
v2 = tf.Variable(..., name="v2")
...
# Add ops to save and restore all the variables.
saver = tf.train.Saver()

# Later, launch the model, use the saver to restore variables from disk, and
# do some work with the model.
with tf.Session() as sess:
  # Restore variables from disk.
  saver.restore(sess, "/tmp/model.ckpt")
  print "Model restored."
  # Do some work with the model
  ...
5 Fetch和Feed
5.1 Fetch
为了取回操作的输出内容, 可以在使用 Session 对象的 run() 调用 执行图时, 传入一些 tensor, 这些 tensor 会帮助你取回结果,也就是Fetch操作。
示例代码:
# 创建一个变量, 初始化为标量 0.
state = tf.Variable(0, name="counter")

# 创建一个 op, 其作用是使 state 增加 1

one = tf.constant(1)
new_value = tf.add(state, one)
update = tf.assign(state, new_value)

# 启动图后, 变量必须先经过`初始化` (init) op 初始化,
# 首先必须增加一个`初始化` op 到图中.
init_op = tf.initialize_all_variables()

# 启动图, 运行 op
with tf.Session() as sess:
  # 运行 'init' op
  sess.run(init_op)
  # 打印 'state' 的初始值
  print sess.run(state)
  # 运行 op, 更新 'state', 并打印 'state'
  for _ in range(3):
    sess.run(update)
    print sess.run(state)

# 输出:

# 0
# 1
# 2
# 3
在之前的例子里, 我们只取回了单个节点 state, 但是你也可以取回多个 tensor:
input1 = tf.constant(3.0)
input2 = tf.constant(2.0)
input3 = tf.constant(5.0)
intermed = tf.add(input2, input3)
mul = tf.mul(input1, intermed)

with tf.Session():
  result = sess.run([mul, intermed])
  print result

# 输出:
# [array([ 21.], dtype=float32), array([ 7.], dtype=float32)]
需要获取的多个 tensor 值,在 op 的一次运行中一起获得(而不是逐个去获取 tensor)。
5.2 Feed
上述示例在计算图中引入了 tensor, 以常量或变量的形式存储. TensorFlow 还提供了 feed 机制, 该机制 可以临时替代图中的任意操作中的 tensor 可以对图中任何操作提交补丁, 直接插入一个tensor.
feed 使用一个 tensor 值临时替换一个操作的输出结果. 你可以提供 feed 数据作为 run() 调用的参数. feed 只在调用它的方法内有效, 方法结束, feed 就会消失. 最常见的用例是将某些特殊的操作指定为 "feed" 操作, 标记的方法是使用 tf.placeholder() 为这些操作创建占位符.
input1 = tf.placeholder(tf.types.float32)
input2 = tf.placeholder(tf.types.float32)
output = tf.mul(input1, input2)

with tf.Session() as sess:
  print sess.run([output], feed_dict={input1:[7.], input2:[2.]})

# 输出:
# [array([ 14.], dtype=float32)]
参考:

 浙公网安备 33010602011771号