
前言
收藏了很多文章,也没有去好好整理,今天帮忙搭jira,翻出了久远的笔记,秉着温故而知新的态度,顺手也整理更新一下笔记。
JIRA是Atlassian公司出品的项目与事务跟踪工具,被广泛应用于缺陷跟踪、客户服务、需求收集、流程审批、任务跟踪、项目跟踪和敏捷管理等工作领域。
本文主要讲在Centos7.x下的安装与配置Jira,准确快速搭建Jira,免费方式仅限学习交流,请支持正版软件。
一、前期准备
- 1.1 Linux创建Jira用户
#root用户 创建jira组
groupadd jira

#创建jira用户
useradd -g jira -d /home/jira -m -s /bin/bash jira

#jira配置Sudo权限
visudo 添加jira sudo权限
说明:root用户安装,则跳过此步
-
1.2 相关软件(5个)
# jira安装文件
atlassian-jira-software-8.8.1-x64.bin

# java
java-1.8.0-openjdk

# Mysql数据库
mariadb

# Mysql-jdbc包
mysql-connector-java-5.1.44.jar

# Jira免费包
atlassian-extras-3.2.jar
-
1.3 配置mariadb国内源(yum)
# root用户
vim /etc/yum.repos.d/mariadb.repo
# 添加如下内容

# MariaDB 10.3 CentOS repository list - created 2017-07-03 06:59 UTC
# http://downloads.mariadb.org/mariadb/repositories/
[mariadb]
name = MariaDB
baseurl = https://mirrors.ustc.edu.cn/mariadb/yum/10.3/centos7-amd64
gpgkey=https://mirrors.ustc.edu.cn/mariadb/yum/RPM-GPG-KEY-MariaDB
gpgcheck=1
-
1.4 注册atlassian帐号
必须注册,后面需要申请试用许可
https://id.atlassian.com/signup

二、软件安装
-
2.1 JDK(JAVA)安装
# 查找所需JDK版本
yum search java|grep openjdk

# 安装所需版本1.8+
yum -y install java-1.8.0-openjdk

# 检查是否安装成功
java -version
说明:
1.可以安装java11
2.非root用户,命令前需要加sudo
-
2.2 Mysql安装配置
yum -y install MariaDB-server MariaDB-client
# 启动MariaDB
systemctl start mariadb

# 设置开机启动
systemctl enable mariadb
#配置Mysql
mysql_secure_installation

#首先是设置密码,会提示先输入密码
Enter current password for root (enter for none):<–初次运行直接[回车]

#设置密码:举例findyou123456
Set root password? [Y/n] <– 是否设置root用户密码,输入y并回车或直接回车
New password: <– 设置root用户的密码
Re-enter new password: <– 再输入一次你设置的密码

#其他配置
Remove anonymous users? [Y/n] <– 是否删除匿名用户,[回车]
Disallow root login remotely? [Y/n] <–是否禁止root远程登录,[回车]
Remove test database and access to it? [Y/n] <– 是否删除test数据库,[回车]
Reload privilege tables now? [Y/n] <– 是否重新加载权限表,[回车]

#初始化MariaDB完成,接下来测试登录
mysql -u root -pfindyou123456

#查看字符集
mysql>show variables like "%character%";show variables like "%collation%";
-
2.3 创建Jira数据库
mysql>create database jira default CHARACTER SET utf8 COLLATE utf8_bin;
mysql>grant all on jira.* to jira@'%' identified by "findyou123456";
mysql>flush privileges;
mysql>quit;
三、Jira安装配置
-
3.1 查看Linux系统 bit
getconf LONG_BIT
-
3.2 下载对应Jira版本
# 选择 Linux 64 Bit
# 最新版本8.8.1 - 2020年4月21日
https://www.atlassian.com/software/jira/download

# 文件上传Centos服务器
-
3.3 安装Jira 8.8.1
# 添加可执行权限
chmod 755 atlassian-jira-software-8.8.1-x64.bin

# 安装jira服务
./atlassian-jira-software-8.8.1-x64.bin
[root@localhost ~]$ ./atlassian-jira-software-8.8.1-x64.bin
Unpacking JRE ...
Starting Installer ...
You do not have administrator rights to this machine and as such,
\ some installation options will not be available.
\ Are you sure you want to continue?
Yes [y, Enter], No [n]  # 回车

This will install Jira Software 8.8.1 on your computer.
OK [o, Enter], Cancel [c] # 回车

Click Next to continue, or Cancel to exit Setup.

Choose the appropriate installation or upgrade option.
Please choose one of the following:
Express Install (use default settings) [1],
\ Custom Install (recommended for advanced users) [2, Enter],
\ Upgrade an existing Jira installation [3]  # 回车

Select the folder where you would like Jira Software to be installed.
Where should Jira Software be installed?
[/home/jira/atlassian/jira]  # 可以修改软件安装地址
/data/atlassian/jira

Default location for Jira Software data
[/home/jira/atlassian/application-data/jira]  # 可以修改数据存放地址
/data/atlassian/application-data/jira

Configure which ports Jira Software will use.
Jira requires two TCP ports that are not being used by any other
applications on this machine. The HTTP port is where you will access Jira
through your browser. The Control port is used to startup and shutdown Jira.
Use default ports (HTTP: 8080, Control: 8005) - Recommended [1, Enter],
Set custom value for HTTP and Control ports [2]  # 回车,或改端口为80
Details on where Jira Software will be installed and the settings that will be used.
Installation Directory: /data/atlassian/jira
Home Directory: /data/atlassian/application-data/jira
HTTP Port: 8080
RMI Port: 8005
Install as service: No
Install [i, Enter], Exit [e]  # 回车

Extracting files ...

Please wait a few moments while Jira Software is configured.

Installation of Jira Software 8.8.1 is complete
Start Jira Software 8.8.1 now?
Yes [y, Enter], No [n]  # 回车

Please wait a few moments while Jira Software starts up.
Launching Jira Software ...

Installation of Jira Software 8.8.1 is complete
Your installation of Jira Software 8.8.1 is now ready and can be accessed
via your browser.
Jira Software 8.8.1 can be accessed at http://localhost:8080
Finishing installation ...
-
3.4 安装Mysql-JDBC包
# 下载mysql jdbc依赖
http://mvnrepository.com
搜索mysql,找到对应jar包下载

# 上传服务器
mysql-connector-java-5.1.44.jar

# 拷贝包至jira目录lib中
cp mysql-connector-java-5.1.44.jar /data/atlassian/jira/atlassian-jira/WEB-INF/lib/
# 重启jira
cd /data/atlassian/jira/bin
sh shutdown.sh
sh startup.sh
说明:/data/atlassian/jira为本文jira路径,如与我路径不同,需要自行修改
-
3.5 Linux防火墙设置
# 检查是否开放8080端口
iptables --list

# 开发8080端口访问
iptables -I INPUT -p tcp --dport 8080 -j ACCEPT
-
3.6 浏览器访问并配置
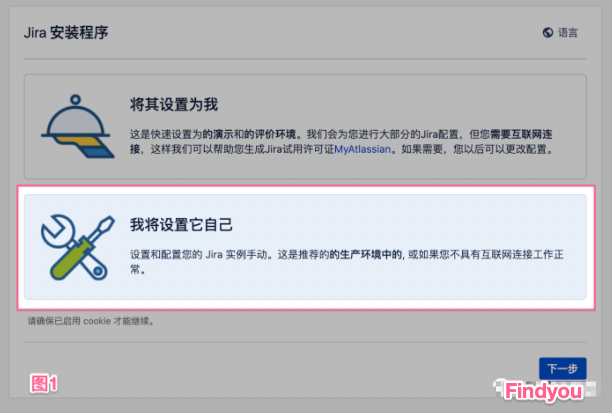
# 3.6.1 浏览器打开地址(安装Jira服务器IP)
http://172.27.1.18:8080

# 3.6.2 图1:配置择第二项
我将设置它自已(I'll set it up myself)
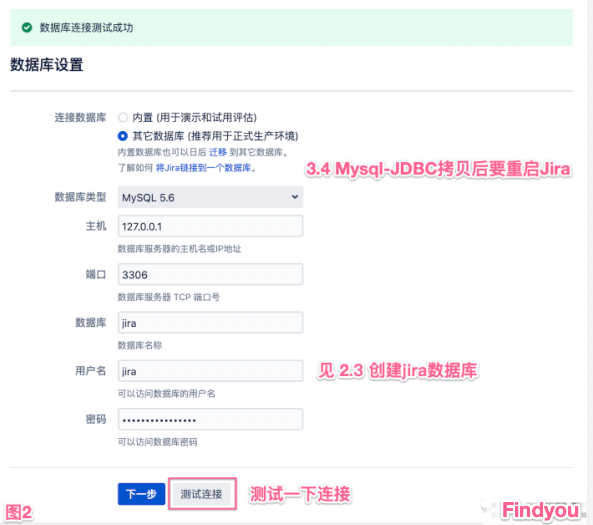
# 3.6.3 图2:数据库选择第二项
其它数据库 (推荐用于正式生产环境)
# 3.6.4 图3:设置应用程序的属性
程序标题:项目管理系统
运行模式:私营 # 即只有管理员才可创帐号
基本URL:默认

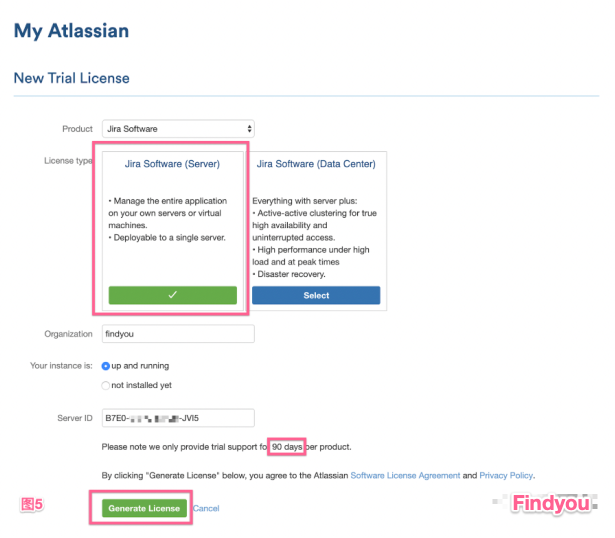
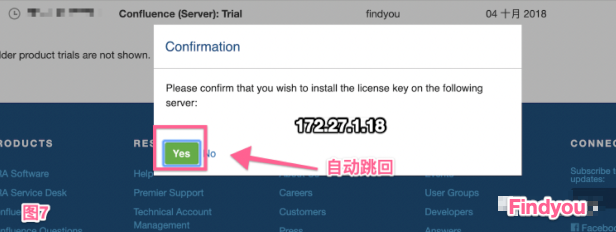
# 3.6.5 图4:请指定您的许可证关键字
记住服务器 ID :B7E0-xxxx-xxxx-JVI5
点击 {MyAtlassian生成JIRA试用许可证} 链接

#3.6.6 图5-8:跳转后登录1.4申请的帐号
申请Jira 90天试用
点击 [Generate Licenes]按钮生成Licenes


# 3.6.7 设置管理员帐户
全名(显示):findyou
邮箱:albert.peng@foxmail.com
用户名(登录用):findyou
密码:123456

# 3.6.8 设置电子邮件通知
以后再说

# 3.6.9 默认语言
中文 (中国) [默认]

# 3.6.10 选择头像
跳过

# 3.6.11 创建一个项目
Scrum开发方法

四、Jira免费使用
-
4.1 仅供交流学习使用
# 下载免费使用的jar包
atlassian-extras-3.2.jar

# 替换lib目录同名文件
/data/atlassian/jira/atlassian-jira/WEB-INF/lib/atlassian-extras-3.2.jar

# 重启jira
cd /data/atlassian/jira/bin
sh shutdown.sh
sh startup.sh

# 检查是否无用户限制
设置-》系统-》应用程序-》版本和许可证
user无限
2033年
五、其他配置
Jira默认时间格式不太符合国人习惯,简单说明如何修改显示时间格式。
-
5.1 界面时间格式修改
管理员-->设置-->系统-->外观-->日期/时间格式
# 例如23:55
时间格式:HH:mm

# 例如 星期二 23:55
日期格式:EEEE HH:mm

# 例如2007/05/22 23:55
完成日期/时间格式:yyyy/MM/dd HH:mm

#例如2007/05/22
年月日格式: yyyy/MM/dd
-
5.2 弹窗时间格式修改
管理员-->设置-->系统-->一般设置-->高级设置
jira.date.picker.java.format  yyyy/MM/dd
jira.date.time.picker.java.format  yyyy/MM/dd HH:mm
-
5.3 邮件服务器
管理员-->设置-->系统-->外发邮件-->添加SMTP
# 与邮件客户端配置方法基本一致
-
5.4 修改内存使用大小
cd /data/atlassian/jira/bin
vim setenv.sh

JVM_MINIMUM_MEMORY="1024m"
JVM_MAXIMUM_MEMORY="4096m"
暂时先就这些了,其他见google,慢慢整理笔记,隔三差五码一篇出来,请不要期待。
转载说明
本文为原创文章,如需转载,请在开篇显著位置注明作者Findyou和出处

 浙公网安备 33010602011771号