
MHA脚本管理方式
(1)获取管理脚本master_ip_failover
提示:yum安装的manager是没有这个脚本的。
我们需要从manager的源码包里复制一个。
[root@mysql-db03 ~]# ll mha4mysql-manager-0.56.tar.gz-rw-r--r--. 1 root root 113914 Sep 4 18:43 mha4mysql-manager-0.56.tar.gz[root@mysql-db03 ~]# tar xf mha4mysql-manager-0.56.tar.gz[root@mysql-db03 ~]# cd mha4mysql-manager-0.56[root@mysql-db03 mha4mysql-manager-0.56]# cd samples/scripts/[root@mysql-db03 scripts]# lltotal 32-rwxr-xr-x. 1 4984 users 3648 Mar 31 2014 master_ip_failover #这就是管理虚拟IP的脚本-rwxr-xr-x. 1 4984 users 9870 Mar 31 2014 master_ip_online_change-rwxr-xr-x. 1 4984 users 11867 Mar 31 2014 power_manager-rwxr-xr-x. 1 4984 users 1360 Mar 31 2014 send_report[root@mysql-db03 scripts]# cp master_ip_failover /usr/local/bin/ #复制到/usr/local/bin目录下[root@mysql-db03 scripts]# which master_ip_failover/usr/local/bin/master_ip_failover
(2)修改mha配置文件
[root@mysql-db03 scripts]# vim /etc/mha/mha1.cnf[root@mysql-db03 scripts]# cat /etc/mha/mha1.cnf[server default]manager_log=/var/log/mha/mha1/managermanager_workdir=/var/log/mha/mha1master_binlog_dir=/usr/local/mysql/datamaster_ip_failover_script=/usr/local/bin/master_ip_failover #添加脚本位置password=666666ping_interval=2repl_password=666666repl_user=repssh_user=rootuser=mha#candidate_master=1 #留着备用的注释项#check_repl_delay=0 #留着备用的注释项[server1]hostname=192.168.200.20port=3306[server2]hostname=192.168.200.28port=3306[server3]hostname=192.168.200.29port=3306
(3)修改源程序自带VIP漂移脚本
#在下边的脚本里添加如下4行代码:
[root@mysql-db03 scripts]# sed -n '34,37p' /usr/local/bin/master_ip_failover
my $vip = '192.168.0.60/24'; #定义VIP my $key = '0'; #定义网卡后缀数值,如果eth0就是0,eth1就是1
my $ssh_start_vip = "/sbin/ifconfig eth0:$key $vip"; #绑定VIP的命令 my $ssh_stop_vip = "/sbin/ifconfig eth0:$key down"; #关闭VIP的命令
(4)重启动mha管理端
[root@mysql-db03 ~]# ps -ef | grep mha | grep -v grep #查看mha进程root 14138 13211 0 19:22 pts/3 00:00:00 perl /usr/bin/masterha_manager --conf=/etc/mha/mha1.cnf --remove_dead_master_conf --ignore_last_failover[root@mysql-db03 ~]# pkill perl #杀掉perl进程[1]+ Exit 1 nohup masterha_manager --conf=/etc/mha/mha1.cnf --remove_dead_master_conf --ignore_last_failover < /dev/null > /var/log/mha/mha1/manager.log 2>&1[root@mysql-db03 ~]# ps -ef | grep mha | grep -v grep #查看mha进程[root@mysql-db03 ~]# nohup masterha_manager --conf=/etc/mha/mha1.cnf --remove_dead_master_conf --ignore_last_failover < /dev/null > #启动mha进程 /var/log/mha/mha1/manager.log 2>&1 &
(1)查看mysql-db01网络状态 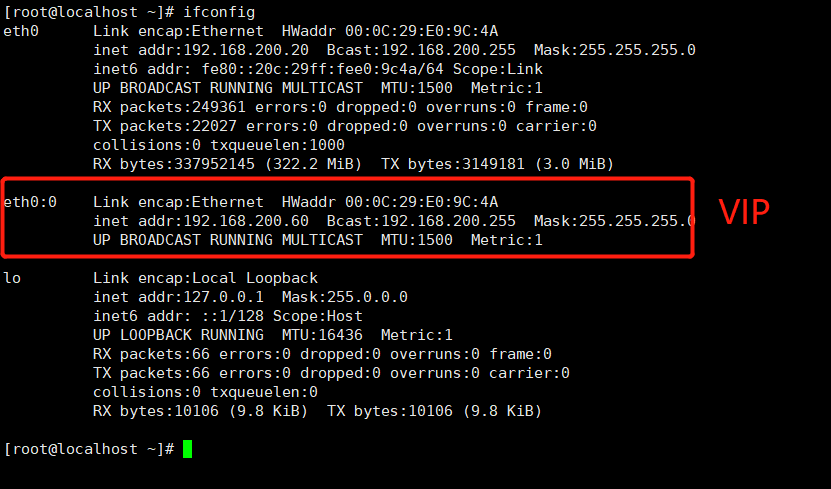
(2)停掉mysql-db01的MySQL数据库服务
[root@localhost ~]# /etc/init.d/mysqld stopShutting down MySQL....... SUCCESS![root@localhost ~]# ifconfig #VIP没了eth0 Link encap:Ethernet HWaddr 00:0C:29:E0:9C:4Ainet addr:192.168.200.20 Bcast:192.168.200.255 Mask:255.255.255.0inet6 addr: fe80::20c:29ff:fee0:9c4a/64 Scope:LinkUP BROADCAST RUNNING MULTICAST MTU:1500 Metric:1RX packets:249568 errors:0 dropped:0 overruns:0 frame:0TX packets:22184 errors:0 dropped:0 overruns:0 carrier:0collisions:0 txqueuelen:1000RX bytes:337973697 (322.3 MiB) TX bytes:3172031 (3.0 MiB)lo Link encap:Local Loopbackinet addr:127.0.0.1 Mask:255.0.0.0inet6 addr: ::1/128 Scope:HostUP LOOPBACK RUNNING MTU:16436 Metric:1RX packets:66 errors:0 dropped:0 overruns:0 frame:0TX packets:66 errors:0 dropped:0 overruns:0 carrier:0collisions:0 txqueuelen:0RX bytes:10106 (9.8 KiB) TX bytes:10106 (9.8 KiB)
(3)查看mysql-db02 
(4)查看mysql-db03的主从同步情况 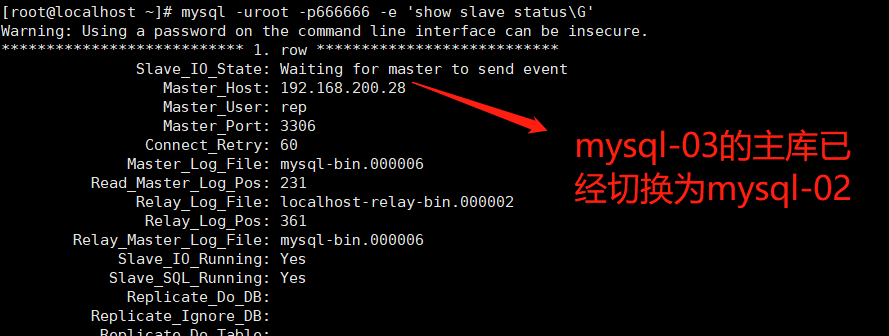
(5)mysql-db01故障恢复
[root@localhost ~]# /etc/init.d/mysqld startStarting MySQL........ SUCCESS![root@localhost ~]# mysql -uroot -p666666Warning: Using a password on the command line interface can be insecure.Welcome to the MySQL monitor. Commands end with ; or \g.Your MySQL connection id is 1Server version: 5.6.17-log MySQL Community Server (GPL)Copyright (c) 2000, 2014, Oracle and/or its affiliates. All rights reserved.Oracle is a registered trademark of Oracle Corporation and/or itsaffiliates. Other names may be trademarks of their respectiveowners.Type 'help;' or '\h' for help. Type '\c' to clear the current input statement.mysql> CHANGE MASTER TO MASTER_HOST='192.168.200.28', MASTER_PORT=3306, MASTER_AUTO_POSITION=1, MASTER_USER='rep', MASTER_PASSWORD='666666';Query OK, 0 rows affected, 2 warnings (0.11 sec)mysql> start slave;Query OK, 0 rows affected, 1 warning (0.13 sec)mysql> show slave status\G*************************** 1. row ***************************Slave_IO_State: Waiting for master to send eventMaster_Host: 192.168.200.28Master_User: repMaster_Port: 3306Connect_Retry: 60Master_Log_File: mysql-bin.000006Read_Master_Log_Pos: 231Relay_Log_File: localhost-relay-bin.000002Relay_Log_Pos: 361Relay_Master_Log_File: mysql-bin.000006Slave_IO_Running: YesSlave_SQL_Running: Yes...一下省略...
(6)补上缺失的mha配置文件
[root@localhost ~]# cat /etc/mha/mha1.cnf[server default]manager_log=/var/log/mha/mha1/managermanager_workdir=/var/log/mha/mha1master_binlog_dir=/usr/local/mysql/datamaster_ip_failover_script=/usr/local/bin/master_ip_failoverpassword=666666ping_interval=2repl_password=666666repl_user=repssh_user=rootuser=mha[server1]hostname=192.168.200.20port=3306[server2]hostname=192.168.200.28port=3306[server3]hostname=192.168.200.29port=3306
(7)启动mha管理进程
[root@localhost ~]# ps -ef | grep mha | grep -v grep[root@localhost ~]# nohup masterha_manager --conf=/etc/mha/mha1.cnf --remove_dead_master_conf --ignore_last_failover < /dev/null > /var/log/mha/mha1/manager.log 2>&1 &[1] 7382[root@localhost ~]# ps -ef | grep mha | grep -v greproot 7382 5389 1 03:14 pts/0 00:00:00 perl /usr/bin/masterha_manager --conf=/etc/mha/mha1.cnf --remove_dead_master_conf --ignore_last_failover
配置binlog-server备份服务器
主库宕机,也许会造成主库binlog复制不及时而导致数据丢失的情况出现,因此配置binlog-server进行时时同步备份,是必要的一种安全手段。
修改mha配置文件
[root@localhost ~]# vim /etc/mha/mha1.cnf[root@localhost ~]# cat /etc/mha/mha1.cnf[server default]manager_log=/var/log/mha/mha1/managermanager_workdir=/var/log/mha/mha1master_binlog_dir=/usr/local/mysql/data #全局的binlog存放位置master_ip_failover_script=/usr/local/bin/master_ip_failoverpassword=666666ping_interval=2repl_password=666666repl_user=repssh_user=rootuser=mha[server1]hostname=192.168.200.20port=3306[server2]hostname=192.168.200.28port=3306[server3]hostname=192.168.200.29port=3306[binlog1] #添加binlog模块no_master=1 #不允许切换为主hostname=192.168.200.29 #存放IPmaster_binlog_dir=/data/mysql/binlog/ #binlog存放位置优先级比全局的高
拉取主库上的binlog日志到mysql-db03的存放目录里
[root@localhost ~]# mkdir -p /data/mysql/binlog #创建存放目录[root@localhost ~]# cd /data/mysql/binlog #进入存放目录[root@localhost binlog]# lltotal 0[root@localhost binlog]# which mysqlbinlog/usr/local/bin/mysqlbinlog[root@localhost binlog]# mysqlbinlog -R --host=192.168.200.60 --user=mha --password=666666 --raw --stop-never mysql-bin.000001 & #拉取主库binlog,这里的IP是VIP的[2] 8133[root@localhost binlog]# Warning: Using a password on the command line interface can be insecure.[root@localhost binlog]# lltotal 24-rw-r--r--. 1 root root 143 Nov 25 03:37 mysql-bin.000001-rw-r--r--. 1 root root 174 Nov 25 03:37 mysql-bin.000002-rw-r--r--. 1 root root 685 Nov 25 03:37 mysql-bin.000003-rw-r--r--. 1 root root 254 Nov 25 03:37 mysql-bin.000004-rw-r--r--. 1 root root 254 Nov 25 03:37 mysql-bin.000005-rw-r--r--. 1 root root 120 Nov 25 03:37 mysql-bin.000006[root@localhost binlog]# ps -ef | grep mysqlbinlog | grep -v greproot 8133 5389 0 03:37 pts/0 00:00:00 mysqlbinlog -R --host=192.168.200.60 --user=mha --password=x xxxx --raw --stop-never mysql-bin.000001
启动mha管理进程
[root@localhost binlog]# nohup masterha_manager --conf=/etc/mha/mha1.cnf --remove_dead_master_conf --ignore_last_failover < /dev/null > /var/log/mha/mha1/manager.log 2>&1 &[root@localhost binlog]# ps -ef | grep mysqlbinlog | grep -v greproot 8133 5389 0 03:37 pts/0 00:00:00 mysqlbinlog -R --host=192.168.200.60 --user=mha --password=x xxxx --raw --stop-never mysql-bin.000001 #binlog进程在[root@localhost binlog]# ps -ef | grep perl | grep -v greproot 7382 5389 0 03:14 pts/0 00:00:01 perl /usr/bin/masterha_manager --conf=/etc/mha/mha1.cnf --remove_dead_master_conf --ignore_last_failover #mha进程在

 浙公网安备 33010602011771号