
intellij idea 下用java Apache axis 创建WebService 服务端 过程
因为用到这个技术 翻阅了一些 资料 中间也遇到了很多问题
IDEA版本 2016.2.5
请注意 这篇不是用来探讨这个技术的底层 而是 如何搭建这个环境 部署起来的
跟网上其他教程不一样 我们采取手动搭建的方式创建 可能使你对这个技术的部署有一点更深的理解
1.
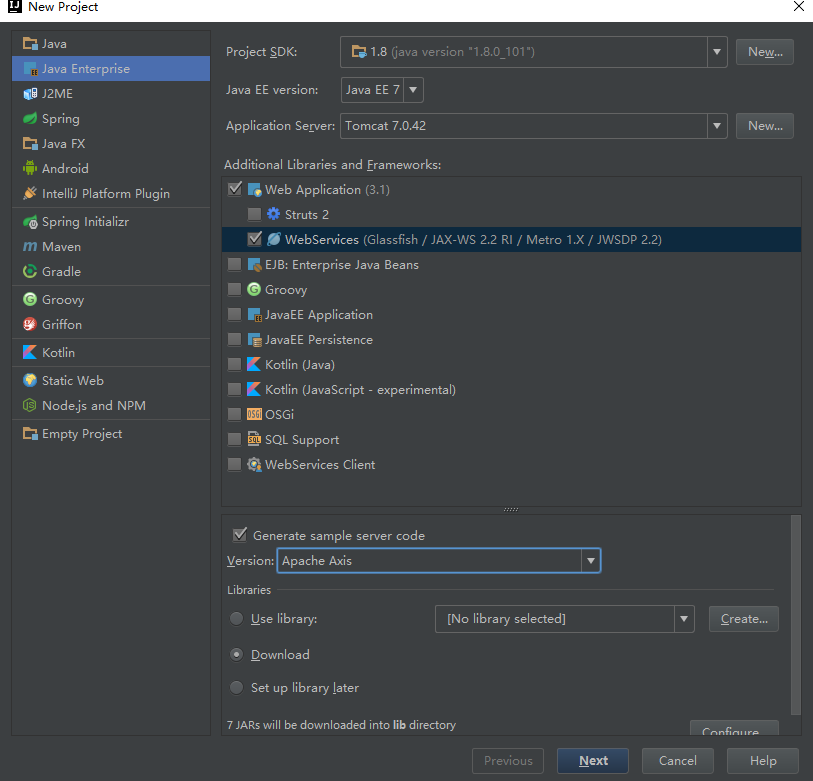
首先创建一个web工程 并勾选 WebServices 在下面的Version 选项中选择 Apache Axis
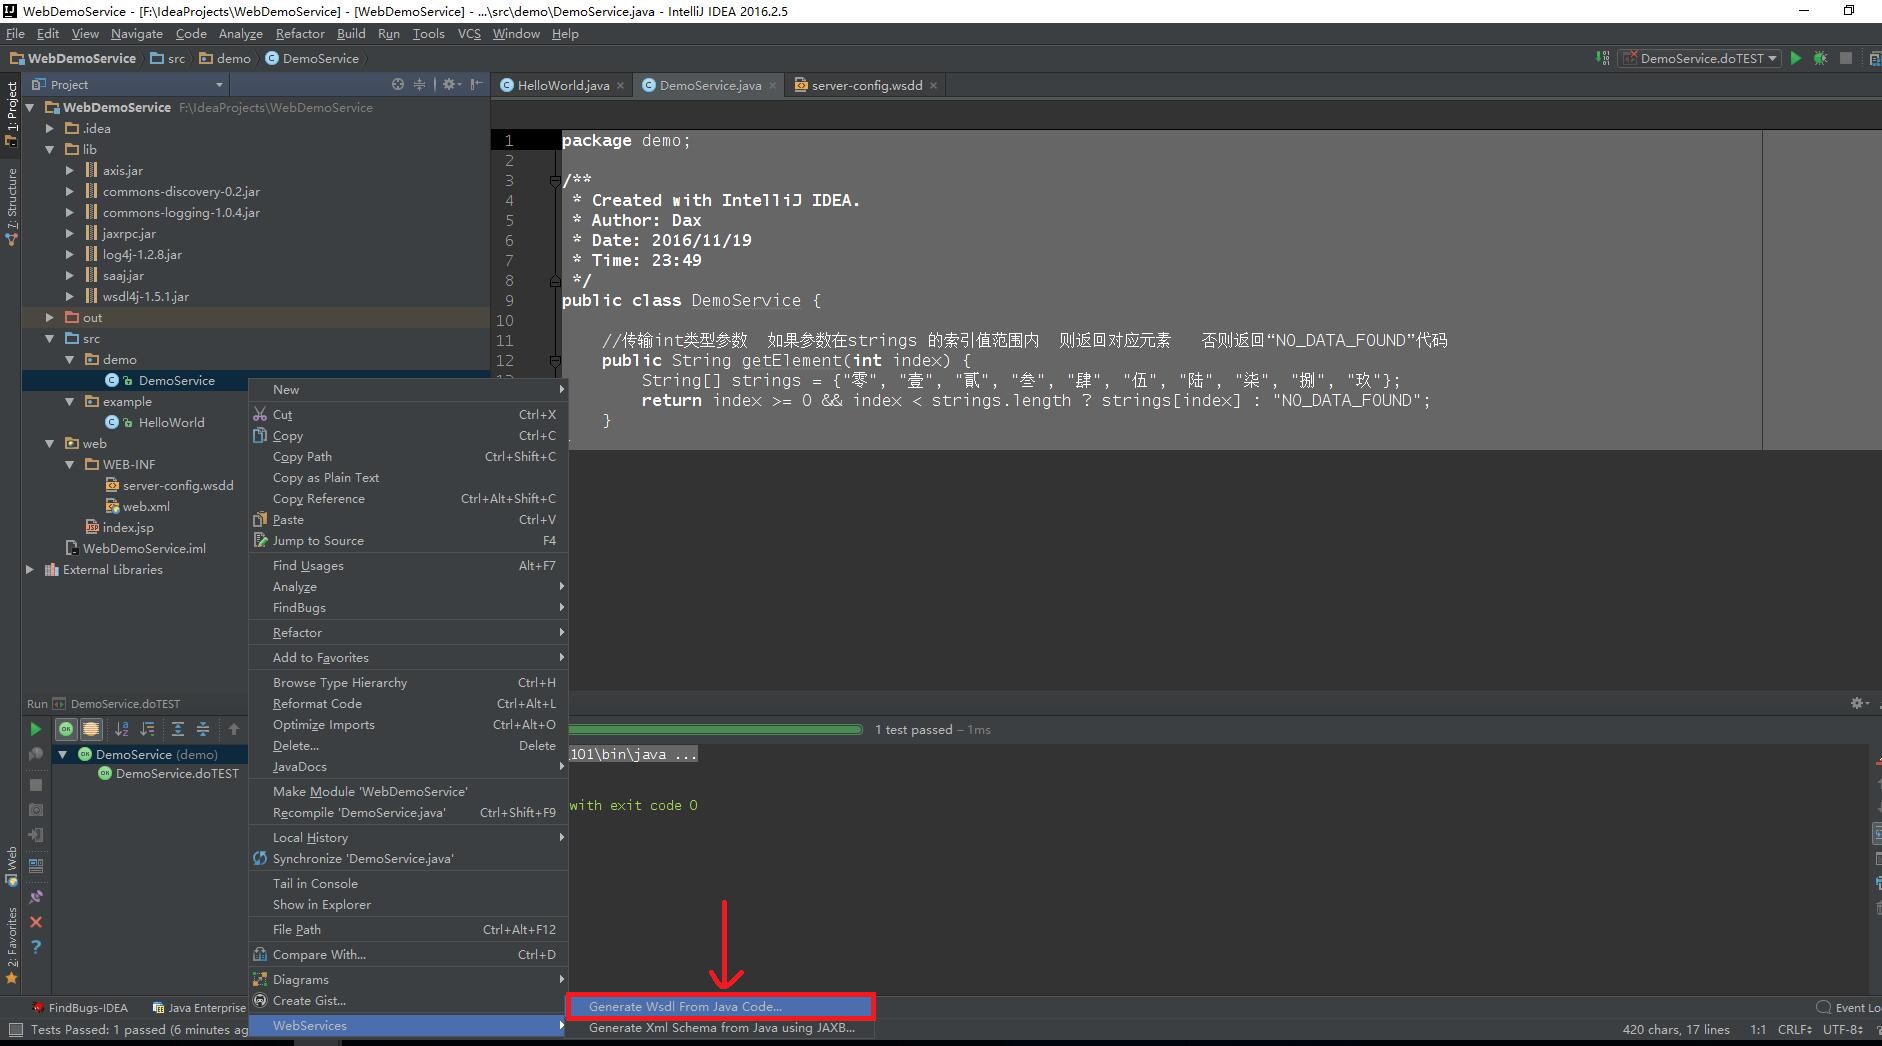
2. 下图是我创建的工程
lib 为 使用该技术最少的依赖
src下 的example 是自动生成的例子 我们要写自己定义的例子
WEB-INF 下 server-config.wsdd 是 WebServices服务的部署文件 所有的webservices服务都需要在这里部署
对应 IDEA 自动生成 HelloWord 服务 就在其中注册 如下 感兴趣相关的注释 可以在我另一篇博客中有注释 这里 等下注册自定义服务时 要用到 下面的格式
    <service name="HelloWorld" provider="java:RPC" style="document" use="literal">
        <parameter name="className" value="example.HelloWorld"/>
        <parameter name="allowedMethods" value="*"/>
        <parameter name="scope" value="Application"/>
        <namespace>http://example</namespace>
    </service>
web.xml 下 是相关servlet的映射配置

创建后用默认快捷键 Ctrl +shift+alt+S 打开Project structure 发现Problems有错误 点击Fix 选择Add就行
3. 在src 下新建个目录demo 然后定义一个类 作为服务类 方法的返回值 为String 类型 因为常用返回参数 返回 json格式
或 者XML格式 我的代码如下:
package demo;

/**
 * Created with IntelliJ IDEA.
 * Author: Dax
 * Date: 2016/11/19
 * Time: 23:49
 */
public class DemoService {

    //传输int类型参数  如果参数在strings 的索引值范围内  则返回对应元素   否则返回“NO_DATA_FOUND”代码
    public String getElement(int index) {
        String[] strings = {"零", "壹", "貳", "叁", "肆", "伍", "陆", "柒", "捌", "玖"};
        return index >= 0 && index < strings.length ? strings[index] : "NO_DATA_FOUND";
    }
}
4. 生成WSDL文件 WSDL文件 其实就是 将这个服务翻译 通用的格式 不同的语言 都可以识别的文件 发布到web上 可以由它来 生成服务端跟客户端 生成前应该编译一下 最简单打开tomcat跑一下 然后再按步骤生成wsdl文件 生成的方式如图:
点击后出现一个选项卡 如下:
Web Service Namespace : 这个是WSDL文件的名称空间用来标识该WSDL 具有唯一性 一旦定义 最好不要更改 除非你非常熟悉
一般格式为 http://+ 包的反向地址 此处我更改为 http://
service.demo.cn/demoService
WebService URL: 是你发布服务的访问URL 此处我更改为 :http://localhost:8080/services/DemoService
Binding style: document
Use items in bindings:literal
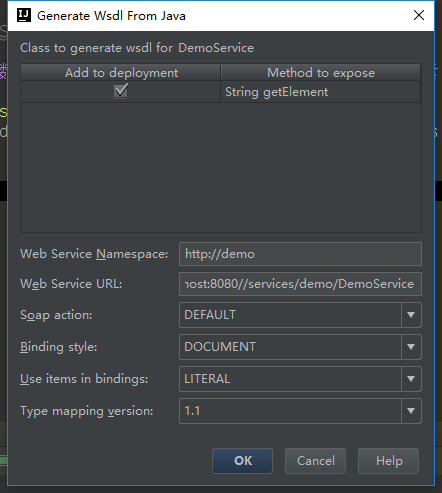
完成上面后 点击OK 生成 代码 其中可能 报错

直接删掉后 格式化代码如下:
<?xml version="1.0" encoding="UTF-8"?>
<wsdl:definitions targetNamespace="http:// service.demo.cn/demoService"
                  xmlns:impl="http:// service.demo.cn/demoService"
                  xmlns:wsdl="http://schemas.xmlsoap.org/wsdl/"
                  xmlns:wsdlsoap="http://schemas.xmlsoap.org/wsdl/soap/"
                  xmlns:xsd="http://www.w3.org/2001/XMLSchema">
    <!--WSDL created by Apache Axis version: 1.4
    Built on Apr 22, 2006 (06:55:48 PDT)-->
    <wsdl:types>
        <schema elementFormDefault="qualified" targetNamespace="http:// service.demo.cn/demoService"
                xmlns="http://www.w3.org/2001/XMLSchema">
            <element name="index" type="xsd:int"/>
            <element name="getElementReturn" type="xsd:string"/>
        </schema>
    </wsdl:types>

    <wsdl:message name="getElementRequest">

        <wsdl:part element="impl:index" name="index"/>

    </wsdl:message>

    <wsdl:message name="getElementResponse">

        <wsdl:part element="impl:getElementReturn" name="getElementReturn"/>

    </wsdl:message>

    <wsdl:portType name="DemoService">

        <wsdl:operation name="getElement" parameterOrder="index">

            <wsdl:input message="impl:getElementRequest" name="getElementRequest"/>

            <wsdl:output message="impl:getElementResponse" name="getElementResponse"/>

        </wsdl:operation>

    </wsdl:portType>

    <wsdl:binding name="DemoServiceSoapBinding" type="impl:DemoService">

        <wsdlsoap:binding style="document" transport="http://schemas.xmlsoap.org/soap/http"/>

        <wsdl:operation name="getElement">

            <wsdlsoap:operation soapAction=""/>

            <wsdl:input name="getElementRequest">

                <wsdlsoap:body use="literal"/>

            </wsdl:input>

            <wsdl:output name="getElementResponse">

                <wsdlsoap:body use="literal"/>

            </wsdl:output>

        </wsdl:operation>

    </wsdl:binding>

    <wsdl:service name="DemoServiceService">

        <wsdl:port binding="impl:DemoServiceSoapBinding" name="DemoService">

            <wsdlsoap:address location="http://localhost:8080/services/DemoService"/>

        </wsdl:port>

    </wsdl:service>

</wsdl:definitions>
5.然后在server-config.wsdd文件下注册 服务:
第一行 name 为 自己定义 DemoService 后面 跟上面第四步 定义的参数
第二行 服务类名 跟他的包地址
第三行 允许暴露的方法 全部暴露 用通配符 * 多个方法 方法名 用逗号隔开 如 value=" getData,getName"
第四行 定义域 此处为服务器
第五行 为第四部定义的名称空间
   <service name="DemoService" provider="java:RPC" style="document" use="literal">
        <parameter name="className" value="example.HelloWorld"/>
        <parameter name="allowedMethods" value="*"/>
        <parameter name="scope" value="Application"/>
        <namespace>http://service.demo.cn/demoService</namespace>
    </service>
注册完毕后在 服务类左边点击 按钮 会有如下:

6.运行tomcat 然后 地址栏输入 http://localhost:8080/services 显示该端口下的所有服务:
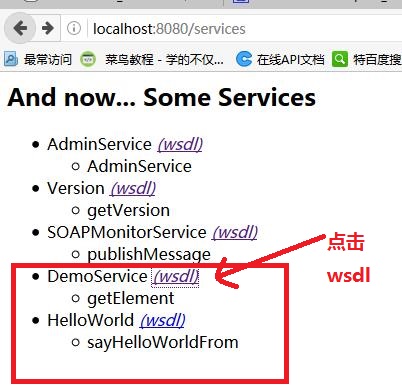
点击后 地址栏链接显示为:http://localhost:8080/services/DemoService?wsdl
会显示wsdl文件 如果 空白点击右键 查看页面源代码 显示如下:

部署webService服务成功 关于 客户端的生成 在下面的文章中有介绍详细的方法:

 浙公网安备 33010602011771号