

nginx + uwsgi 配置参考
文章下半部分包含了安装nginx ,配置nginx , 和 开启nginx 文件服务器的三个步骤,请参考
参考
http://www.runoob.com/django/django-nginx-uwsgi.html
####### 20181029
cd ~
wget http://python.org/ftp/python/2.7.5/Python-2.7.5.tar.bz2
tar xvf Python-2.7.5.tar.bz2
cd Python-2.7.5
./configure --prefix=/usr/local
make && make altinstall
4,更改系统默认版本
mv /usr/bin/python /usr/bin/python.bak
ln -s /usr/local/bin/python2.7 /usr/bin/python
在完成了上面4步之后,如果有使用yum的话会发现出错,这是因为yum 依赖2.4.3而现在默认的 Python 版本是 2.7.3 。
vim /usr/bin/yum
将首行显示的 !#/usr/bin/python 修改为 !#/usr/bin/python2.4
### pip
cd ~
wget https://bootstrap.pypa.io/get-pip.py
python get-pip.py
[root@pythontest ~]# python get-pip.py
Collecting pip
/tmp/tmpRRrzFV/pip.zip/pip/_vendor/urllib3/util/ssl_.py:369: SNIMissingWarning: An HTTPS request has been made, but the SNI (Server Name Indication) extension to TLS is not available on this platform. This may cause the server to present an incorrect TLS certificate, which can cause validation failures. You can upgrade to a newer version of Python to solve this. For more information, see https://urllib3.readthedocs.io/en/latest/advanced-usage.html#ssl-warnings
/tmp/tmpRRrzFV/pip.zip/pip/_vendor/urllib3/util/ssl_.py:160: InsecurePlatformWarning: A true SSLContext object is not available. This prevents urllib3 from configuring SSL appropriately and may cause certain SSL connections to fail. You can upgrade to a newer version of Python to solve this. For more information, see https://urllib3.readthedocs.io/en/latest/advanced-usage.html#ssl-warnings
/tmp/tmpRRrzFV/pip.zip/pip/_vendor/urllib3/util/ssl_.py:160: InsecurePlatformWarning: A true SSLContext object is not available. This prevents urllib3 from configuring SSL appropriately and may cause certain SSL connections to fail. You can upgrade to a newer version of Python to solve this. For more information, see https://urllib3.readthedocs.io/en/latest/advanced-usage.html#ssl-warnings
Downloading https://files.pythonhosted.org/packages/c2/d7/90f34cb0d83a6c5631cf71dfe64cc1054598c843a92b400e55675cc2ac37/pip-18.1-py2.py3-none-any.whl (1.3MB)
51% |████████████████▍ | 675kB 42kB/s eta 0:00:1 51% |████████████████▋ | 686kB 42kB/s eta 0:00:1 52% |████████████████▉ | 696kB 41kB/s eta 0:00:1 53% |█████████████████ | 706kB 34kB/s eta 0:00:1 54% |█████████████████▎ | 716kB 42kB/s eta 0:00: 54% |█████████████████▋ | 727kB 36kB/s eta 0:00: 55% |█████████████████▉ | 737kB 36kB/s eta 0:00: 56% |██████████████████ | 747kB 35kB/s eta 0:00: 57% |██████████████████▎ | 757kB 37kB/s eta 0:00 58% |██████████████████▋ | 768kB 31kB/s eta 0:00 58% |██████████████████▉ | 778kB 37kB/s eta 0:00 59% |███████████████████ | 788kB 31kB/s eta 0:00 60% |███████████████████▎ | 798kB 35kB/s eta 0:0 61% |███████████████████▋ | 808kB 37kB/s eta 0:0 61% |███████████████████▉ | 819kB 34kB/s eta 0:0 62% |████████████████████ | 829kB 34kB/s eta 0:0 63% |████████████████████▎ | 839kB 29kB/s eta 0: 64% |████████████████████▌ | 849kB 31kB/s eta 0: 64% |████████████████████▉ | 860kB 32kB/s eta 0: 65% |█████████████████████ | 870kB 35kB/s eta 0: 66% |█████████████████████▎ | 880kB 35kB/s eta 0 67% |█████████████████████▌ | 890kB 39kB/s eta 0 68% |█████████████████████▉ | 901kB 35kB/s eta 0 68% |██████████████████████ | 911kB 40kB/s eta 0 69% |██████████████████████▎ | 921kB 41kB/s eta 70% |██████████████████████▌ | 931kB 48kB/s eta 71% |██████████████████████▊ | 942kB 58kB/s eta 71% |███████████████████████ | 952kB 49kB/s eta 72% |███████████████████████▎ | 962kB 54kB/s eta 73% |███████████████████████▌ | 972kB 55kB/s eta 74% |███████████████████████▊ | 983kB 66kB/s eta 75% |████████████████████████ | 993kB 70kB/s eta 75% |████████████████████████▎ | 1.0MB 75kB/s et 76% |████████████████████████▌ | 1.0MB 71kB/s et 77% |████████████████████████▊ | 1.0MB 67kB/s et 78% |█████████████████████████ | 1.0MB 54kB/s et 78% |█████████████████████████▎ | 1.0MB 61kB/s e 79% |█████████████████████████▌ | 1.1MB 75kB/s e 80% |█████████████████████████▊ | 1.1MB 76kB/s e 81% |██████████████████████████ | 1.1MB 82kB/s e 82% |██████████████████████████▎ | 1.1MB 65kB/s 82% |██████████████████████████▌ | 1.1MB 72kB/s 83% |██████████████████████████▊ | 1.1MB 78kB/s 84% |███████████████████████████ | 1.1MB 66kB/s 85% |███████████████████████████▎ | 1.1MB 79kB/s 85% |███████████████████████████▌ | 1.1MB 92kB/s 86% |███████████████████████████▊ | 1.1MB 73kB/s 87% |████████████████████████████ | 1.2MB 73kB/s 88% |████████████████████████████▎ | 1.2MB 57kB/ 88% |████████████████████████████▌ | 1.2MB 59kB/ 89% |████████████████████████████▊ | 1.2MB 65kB/ 90% |█████████████████████████████ | 1.2MB 50kB/ 91% |█████████████████████████████▏ | 1.2MB 51kB 92% |█████████████████████████████▌ | 1.2MB 51kB 92% |█████████████████████████████▊ | 1.2MB 42kB 93% |██████████████████████████████ | 1.2MB 47kB 94% |██████████████████████████████▏ | 1.2MB 46k 95% |██████████████████████████████▌ | 1.3MB 46k 95% |██████████████████████████████▊ | 1.3MB 50k 96% |███████████████████████████████ | 1.3MB 45k 97% |███████████████████████████████▏| 1.3MB 50 98% |███████████████████████████████▍| 1.3MB 58 99% |███████████████████████████████▊| 1.3MB 52 99% |████████████████████████████████| 1.3MB 58 100% |████████████████████████████████| 1.3MB 73kB/s
Collecting wheel
Downloading https://files.pythonhosted.org/packages/5a/9b/6aebe9e2636d35d1a93772fa644c828303e1d5d124e8a88f156f42ac4b87/wheel-0.32.2-py2.py3-none-any.whl
Installing collected packages: pip, wheel
Successfully installed pip-18.1 wheel-0.32.2
/tmp/tmpRRrzFV/pip.zip/pip/_vendor/urllib3/util/ssl_.py:160: InsecurePlatformWarning: A true SSLContext object is not available. This prevents urllib3 from configuring SSL appropriately and may cause certain SSL connections to fail. You can upgrade to a newer version of Python to solve this. For more information, see https://urllib3.readthedocs.io/en/latest/advanced-usage.html#ssl-warnings
##########1030
http://www.runoob.com/django/django-nginx-uwsgi.html
https://www.cnblogs.com/Erick-L/p/7066455.html
https://www.aliyun.com/jiaocheng/518116.html
[root@pythontest conf]# [uWSGI] getting INI configuration from /etc/uwsgi9090.ini
[1]+ Done uwsgi --ini /etc/uwsgi9090.ini
[root@pythontest conf]# /usr/local/nginx/sbin/nginx
-bash: /usr/local/nginx/sbin/nginx: 没有那个文件或目录
[root@pythontest conf]# /usr/local/nginx-1.5.6/sbin/nginx
nginx: [emerg] bind() to 0.0.0.0:80 failed (98: Address already in use)
nginx: [emerg] bind() to 0.0.0.0:80 failed (98: Address already in use)
nginx: [emerg] bind() to 0.0.0.0:80 failed (98: Address already in use)
nginx: [emerg] bind() to 0.0.0.0:80 failed (98: Address already in use)
nginx: [emerg] bind() to 0.0.0.0:80 failed (98: Address already in use)
nginx: [emerg] still could not bind()
##solution
cd /var/run
touch uwsgi9090.pid
chmod 777 uwsgi9090.pid
edit file
/usr/local/nginx-1.5.6/conf/nginx.conf
location / {
# root html;
# index index.html index.htm;
include uwsgi_params;
uwsgi_pass 127.0.0.1:9090;
uwsgi_param UWSGI_SCRIPT demosite.wsgi;
uwsgi_param UWSGI_CHDIR /app/demosite;
index index.html index.htm;
client_max_body_size 35m;
}
edit file /etc/uwsgi9090.ini
[uwsgi]
socket = 127.0.0.1:9090
master = true //主进程
vhost = true //多站模式
no-site = true //多站模式时不设置入口模块和文件
workers = 2 //子进程数
reload-mercy = 10
vacuum = true //退出、重启时清理文件
max-requests = 1000
limit-as = 512
buffer-size = 30000
pidfile = /var/run/uwsgi9090.pid
daemonize = /website/uwsgi9090.log
pythonpath = /usr/local/lib/python2.7/site-packages
uwsgi --ini /etc/uwsgi9090.ini &
ps -ef|grep uwsgi
check log
tail -f /website/uwsgi9090.log
/usr/local/nginx-1.5.6/sbin/nginx
ps -ef|grep nginx
###########sample 1 安装nginx
https://www.cnblogs.com/z-qinfeng/p/12423246.html
1. 先安装依赖库
|
1
2
3
4
|
yum install -y gcc-c++yum install -y pcre pcre-develyum install -y zlib zlib-develyum install -y openssl openssl-devel |
2. 下载nginx安装包
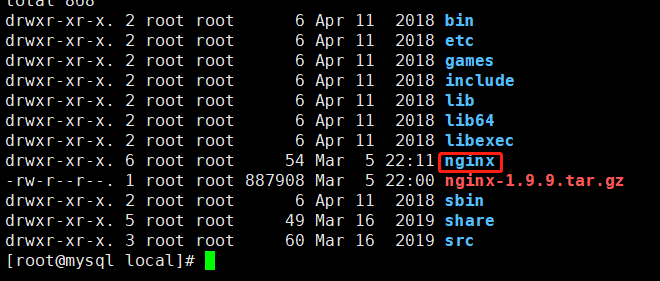
3. 将下载的nignx源码包上传到linux服务器上,解压

4. 进入nginx解压后的根目录,配置
cd nginx-1.9.9
./configure --prefix=/usr/local/nginx
configure完成之后,会有如下信息,诸如日志文件,配置文件啥的
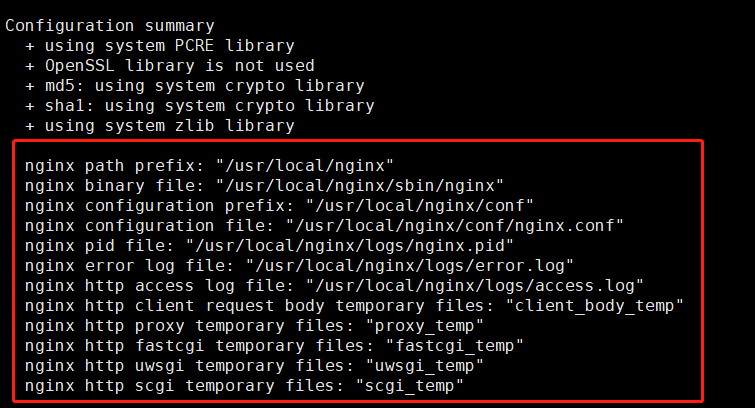
5. 编译安装
make && make install
6. nginx安装成功
7. 启动nginx
先检测nginx的配置是否正确
./nginx/sbin/nginx -t

如果出现上面两句话,说明nginx配置ok, 可以启动。
cd nginx/sbin
./nginx
没有日志输出 ,说明启动正常, 如果出现异常请参考配置时提示的错误日志路径,查看错误信息
可以查看nginx进程
ps -ef | grep nginx

8. 访问nginx
默认端口就是80,所以可以直接输入ip访问

ok ...
######sample 2 修改ngnix 访问的默认路径 和 建立nginx 文件服务器
https://blog.csdn.net/qq_15071263/article/details/85688546
使用Nginx搭建目录服务器【文件服务器】
简简单单OnlineZuozuo 2019-01-03 12:45:45 4678 收藏 4
分类专栏: 中间件领域 文章标签: nginx 文件服务器 目录服务器
版权
中间件领域
专栏收录该内容
26 篇文章0 订阅
订阅专栏
文章目录
使用Nginx搭建目录服务器【文件服务器】
1、下载nginx
2、解压压缩包
3、修改配置文件
4、访问服务器
5、官方文档地址
使用Nginx搭建目录服务器【文件服务器】
1、下载nginx
地址:Nginx 下载链接
2、解压压缩包
3、修改配置文件
1、打开Nginx 目录
2、打开conf 目录
3、打开nginx.conf 文件
4、修改配置
// 1、删掉里面原来全部的配置,换成这个
// 2、修改root 指向你的资源文件夹
worker_processes 1;
events {
worker_connections 1024;
}
http {
include mime.types;
default_type application/octet-stream;
sendfile on;
keepalive_timeout 65;
autoindex on;
autoindex_exact_size on;
autoindex_localtime on;
server {
listen 80;
server_name localhost;
// 修改成自己的资源文件夹路径,路径不能包含中文等特殊字符
root C:/Users/A-PC/Desktop/nginx-root;
error_page 500 502 503 504 /50x.html;
location = /50x.html {
root html;
}
}
}
1
2
3
4
5
6
7
8
9
10
11
12
13
14
15
16
17
18
19
20
21
22
23
24
25
26
27
28
29
30
31
32
33
34
35
5、启动Nginx
6、浏览器输入localhost 或者服务器IP 地址或者域名即可访问目录服务器
4、访问服务器
5、官方文档地址
————————————————
版权声明:本文为CSDN博主「简简单单OnlineZuozuo」的原创文章,遵循CC 4.0 BY-SA版权协议,转载请附上原文出处链接及本声明。
原文链接:https://blog.csdn.net/qq_15071263/article/details/85688546
######sample 3 修改nginx 访问路径的权限,重启nginx ,使用wget 下载整个目录的方法
vi /usr/local/nginx/conf/nginx.conf
worker_processes 1;
events {
worker_connections 1024;
}
http {
include mime.types;
default_type application/octet-stream;
sendfile on;
keepalive_timeout 65;
autoindex on;
autoindex_exact_size on;
autoindex_localtime on;
server {
listen 80;
server_name localhost;
root /test/oracle/test;
error_page 500 502 503 504 /50x.html;
location = /50x.html {
root html;
}
}
}
step 4:
查看nginx日志error.log日志
tail -f /usr/local/nginx/logs/error.log
2021/07/30 14:22:08 [error] 12826#0: *6 directory index of "/test/oracle/test/20210218/" is forbidden, client:
step 4:
chown -R root:root /test/oracle/test/
setp 5
pkill nginx
/usr/local/nginx/sbin/nginx
step 6
wget -r -np -nH -R index.html http://25.10.0.104/20210218/
wget -r -np -nH -R index.html http://25.10.0.104/20210219/
##不创建打开目录 -nd
wget -r -np -nd -nH -R index.html http://25.10.0.104/20210219/
https://blog.csdn.net/carcoon/article/details/108761700
step 7
Linux wget 403 forbidden错误解决方法
另外还有一种情况是资源所在目录没有权限,也会返回403错误,这种情况使用浏览器下载也会报错。
如果是某个文件问题,文件权限640权限,需要更换644 权限。
chown 644 *
如果是目录问题,请直接修改目录权限为777
###sample 4
平滑升级NGINX
检查旧的配置文件
cd /usr/local/nginx
cd sbin
[root@zhdjrestore01 sbin]# ./nginx -V
nginx version: nginx/1.19.4
built by gcc 7.3.0 (GCC)
configure arguments: --prefix=/usr/local/nginx
##备份旧的执行文件
mv /usr/local/nginx/sbin/nginx /usr/local/nginx/sbin/nginx-1.19
##生成新的执行文件
cd /tmp
tar xf nginx-1.22.1.tar.gz
cd nginx-1.22.1
./configure --prefix=/usr/local/nginx
make
##将新的执行文件,替代旧的执行文件
cp objs/nginx /usr/local/nginx/sbin/nginx
测试升级是否成功:
/usr/local/nginx/sbin/nginx -t
/usr/local/nginx/sbin/nginx -V
启动:
/usr/local/nginx/sbin/nginx

 浙公网安备 33010602011771号