
转:脱机环境下window 使用pycharm 连接cx_oracle 连接数据库
#sample 1 Python 2,7 已经安装,可以正常跑,但是cx_oracle windows 版本下载下来,无法安装
https://pypi.org/project/cx-Oracle/5.3/#files
1.现在现在版本 cx_Oracle-5.3-11g.win-amd64-py2.7 (321.4 kB) 是5.3 版本,配套oracle 11g client ,配置windos 64 位的
2,安装报错如下:
Python version 2.7 required, which was not found in the registry
使用这个方法可以 手工注册 注册表,正常执行安装
https://www.cnblogs.com/min0208/archive/2012/05/24/2515584.html
#sample2 pycharm 创建一个Project 的虚拟环境时候hang 住3分钟,
因为是脱机环境,可能不能同步数据,可以考虑中断。
然后打开现有的目录,即可
###sample 2.2
pyinstaller打包cx_Oracle库问题处理记录
这两天打包程序,遇到坑无数,记录一下。
综合网上各类参考信息摘录,地址如下:https://www.cnblogs.com/BigFishFly/p/6337014.html
报错 ImportError: DLL load failed: %1 不是有效的 Win32 应用程序。
1.下载cx_Oracle
在windows下不要使用easy_install或者pip,因为这样安装不会同步环境,并报错:
distutils.errors.DistutilsSetupError: cannot locate Oracle include files in...
因此下载cx_Oracle5.3.exe文件安装,确认好cx_oracle 是64位的,一般的安装包有64的说明
https://files.pythonhosted.org/packages/48/83/15dd03c752d8840ce763bfad5ebd02568f16b2d6709a2b7e6ff97bc3c0f3/cx_Oracle-5.3-11g.win-amd64-py2.7.exe
2. 下载Oracle Instant Client或使用完整的数据库客户端安装包,版本需11.2以上。
数据库客户端版本和python版本及位数需一致。
-》Windows系统查看python版本及位数
在Windows系统下,可以通过以下方法查看Python解释器的位数:
方法二:使用sys模块
打开Python交互式界面(命令提示符中输入Python)。
输入以下Python代码:
import sys
print(sys.maxsize > 2**32)
如果输出结果为True,则表示Python是64位;
如果输出结果为False,则表示Python是32位。
C:\Python27>.\python
Python 2.7.15 (v2.7.15:ca079a3ea3, Apr 30 2018, 16:22:17) [MSC v.1500 32 bit (In
tel)] on win32
Type "help", "copyright", "credits" or "license" for more information.
>>> import sys
>>> print(sys.maxsize > 2**32)
False
>>>
下载地址:
-》 要下载完整oracle clinet 带有sqlplus 的。 不能下载instanceclient . 安装完,确保64位的11G client 配置在$PATH 环境变量里
64位:https://www.oracle.com/technetwork/topics/winx64soft-089540.html
32位:http://www.oracle.com/technetwork/topics/winsoft-085727.html
该目录下可自建network\admin文件夹,存放tnsnames.ora, sqlnet.ora or oraaccess.xml文件
附录: 另外发现在windows 2016server ,拷贝文件到D盘会保权限问题,但是d:\tmp就不会报告权限问题
————————————————
版权声明:本文为CSDN博主「七三五」的原创文章,遵循CC 4.0 BY-SA版权协议,转载请附上原文出处链接及本声明。
原文链接:https://blog.csdn.net/weixin_32818587/article/details/113965946
#sample3 pycharm 需要手工配置解释器
Pycharm配置(1)——解释器(interpreter)
参考文档
https://blog.csdn.net/yuangan1529/article/details/80800411
今天导入模块,发现出了很多错,要升级pip,但是我发现在新建的工程项目(PycharmIDE)中有pip,而我安装的Python3中,也有pip ,那我升级哪一个呢?
1、首先,遇到的问题是:已经安装python,dos窗口却提示“python不是内部命令或外部命令,也不是可运行的程序”
解决方案:点击打开链接
2、发现两者都是一样的,都是解释器(Project Interpreter)的问题
(1)什么是解释器
先说一下,什么是解释器,Python的解释器就是Python.exe,是用来解释运行你编写的Python代码的,我们下载的Python(无论是2版本,还是3版本)其实自带解释器和编译器,可以直接在命令行敲入代码,或者写一个文本,然后调用Python的解释器来执行也可以,而Pycharm则是一个IDE(主要是让我们编写程序更加方便,或者说看起来更加简单,不需要用文本或在dos窗口编写代码),但是Pycharm是不带Python解释器的,所以你要在安装Pycharm之前,安装好Python。
上图是我的pycharm运行所需要的外部库:所在位置是一个项目文件中(注意:我的Python3安装位置是D:\\Python),然后我检查了一下Pycharm的运行环境:File——>Setting
上面列出的这个图,其实找的是我的项目文件Python编程所需要的项目解释器(Project Interpreter)在哪里,其配置是什么,可以看出,它的解释器就在项目文件下,而不是我安装的D盘中的Python3,那么我就要问了,既然创建项目的时候就有,我还安装Python3干什么?
原来这个问题,我之前遇到了(大约刚安装好Pycharm的时候吧),当时是这个问题:
一开始创建项目的时候,运行第一行代码,貌似是没有配置解释器的,那我当时是怎么配置呢?
还是上面的File——>Setting——>show all(在project Interpreter选项里面),点开以后得到:
点击加号,进行添加(我们看看这个配置的解释器和D盘里面的Python3有什么关系):点击加号以后,会有两个选项,一个是add Local Python Interpreter(这个其实就是你D盘里面的Python3,也就是本地的解释器),第二个是add remote Python interpreter,也就是远程的解释器(不在你的本地机器上,但是你可以远程访问它)
看到这个选项没有,这里说是虚拟环境,也就是说这是一个虚拟解释器,它是建立在D盘里面的Python解释器(第二个圆圈)基础之上的,这里的虚拟解释器在我理解来看,其实和缓存差不多,将要用到的东西放到项目文件夹中,用到的时候,直接调用邻近的,这样速度快,如果没有了,再去原解释器(D盘中),寻找需要的东西。
在网上找了一下关于解释器配置的几种不同说明,可以参考一下:pycharm下基于Virtualenvwrapper和anaconda的Python虚拟环境配置应用
上面提到这种虚拟环境,其实是起到隔离不同版本的Python的效果,virtualenv和conda是两种不同的虚拟隔离环境,当然这些我暂时还没有用到,就先不介绍了,conda用到的是Anaconda
(2)虚拟与基本解释器是否同步?
所以说一切的基础还是在D盘中的Python中,但是两者是同步的吗?
答案是不同步的,我在D盘的Python中安装了numpy模块,但是用虚拟解释器依然报错,只有在虚拟解释器(也就是你解释器的环境下,执行pip install才可以),再次更新一下,两者虽然是不同步的,但是更新下载的时候,只要D盘根解释器已经下载过了,那么虚拟环境中,就不需要联网下载了,可以直接复制D盘的模块,如下图:
上图,是我在D盘Python中下载numpy是,要联网下载关于numpy模块的包,但是我的虚拟解释器那边没有进行更新,但是我在虚拟解释器中下载安装numpy的时候,却非常简单:
如上图所示,没有下载文件,我猜测是直接复制粘贴的D盘中的内容
建议以后先在D盘的Python(我的base interpreter所在位置)安装模块,然后再在虚拟环境中安装,这样以后虚拟环境发生了改变,也可以快速再次安装
————————————————
版权声明:本文为CSDN博主「蓝亚之舟」的原创文章,遵循CC 4.0 BY-SA版权协议,转载请附上原文出处链接及本声明。
原文链接:https://blog.csdn.net/yuangan1529/article/details/80800411
####sample 4;
cx_Oracle 连接测试,参考文档
https://cloud.tencent.com/developer/article/1661831
# -*- coding:utf-8 -*-
import cx_Oracle
db = cx_Oracle.connect('dbmgr', 'dbmgr', '10.241.131.126:1521/pcrs')
# db = cx_Oracle.connect('C##oracle', 'oracle', '192.168.106.100:1521/orcl')
cursor=db.cursor()
# sql="SELECT COLUMN1, COLUMN2 FROM C##ORACLE.NEWTABLE"
sql="select du.username,su.password,du.profile,du.account_status \
from dba_users du,sys.user$ su \
where du.username in (select username from sys.t_user_cfg) \
and du.username = su.name"
cursor.execute(sql)
result = cursor.fetchall()
for i in result:
print(i)
cursor.close();
db.close();
###
##sample 1:cx-oracle-lob 读取,for x 后面加入,
https://stackoverflow.com/questions/8646968/how-do-i-read-cx-oracle-lob-data-in-python
cx-oracle-lob 读取,for x 后面加入,
There should be an extra comma in the for loop, see in below code, i have supplied an extra comma after x in for loop.
dsn = cx_Oracle.makedsn(hostname, port, sid)
orcl = cx_Oracle.connect(username + '/' + password + '@' + dsn)
curs = orcl.cursor()
sql = "select TEMPLATE from my_table where id ='6'"
curs.execute(sql)
rows = curs.fetchall()
for x, in rows:
print(x)
Share
Edit
Follow
Flag
##sample 2:cx_Oracle模块学习之绑定变量
https://www.cnblogs.com/riskyer/p/3310676.html
cur.execute('''select * from departments
where department_id=:id and
department_name=:name
''',id=dept_id,name=dept_name
)
cursor.execute('''SELECT DBMS_METADATA.GET_DDL('TABLESPACE',:tname) FROM DUAL''', tname=t_name)
cur.execute('''insert into departments (department_id,department_name,manager_id,location_id)
values(:ID,:NAME,:MGR_ID,:LOC_ID)
''', {'ID':555,'NAME':'WaterBin','MGR_ID':110,'LOC_ID':7788}
)
#######sample 3 How to change values in a tuple?
https://stackoverflow.com/questions/11458239/how-to-change-values-in-a-tuple
t = ('275', '54000', '0.0', '5000.0', '0.0')
lst = list(t)
lst[0] = '300'
t = tuple(lst)
####
#######sample 5
Flask 程序打包方法
1. 安装 PyInstaller
bash
pip install pyinstaller
2. 准备项目结构
确保项目结构如下:
my_flask_app/
├── app.py # 主程序
├── templates/ # HTML模板
│ └── index.html
├── static/ # 静态文件
│ └── css/
│ └── style.css
└── config.py # 配置文件
3. 创建打包配置文件 (.spec)
创建一个 flask_app.spec 文件:
python
# flask_app.spec
# -*- mode: python ; coding: utf-8 -*-
block_cipher = None
a = Analysis(
['app.py'], # 你的主程序文件
pathex=[],
binaries=[],
datas=[
('templates', 'templates'), # 打包templates文件夹
('static', 'static'), # 打包static文件夹
('executor.db', '.'), # 添加数据库文件
],
hiddenimports=['flask', 'werkzeug', 'jinja2'],
hookspath=[],
hooksconfig={},
runtime_hooks=[],
excludes=[],
win_no_prefer_redirects=False,
win_private_assemblies=False,
cipher=block_cipher,
noarchive=False,
)
pyz = PYZ(a.pure, a.zipped_data, cipher=block_cipher)
exe = EXE(
pyz,
a.scripts,
a.binaries,
a.zipfiles,
a.datas,
[],
name='flask_app',
debug=False,
bootloader_ignore_signals=False,
strip=False,
upx=True,
upx_exclude=[],
runtime_tmpdir=None,
console=True, # 如果是GUI改为 False
disable_windowed_traceback=False,
argv_emulation=False,
target_arch=None,
codesign_identity=None,
entitlements_file=None,
)
4. 执行打包
bash
pyinstaller flask_app.spec
简化方法(命令行)
如果不想创建 .spec 文件,可以用命令行直接打包:
bash
pyinstaller -F -w ^
--add-data "templates;templates" ^
--add-data "static;static" ^
--hidden-import=flask ^
--hidden-import=werkzeug ^
--hidden-import=jinja2 ^
app.py
注意: Windows 下路径分隔符用分号 ;,Linux/Mac 用冒号 :。
关键参数说明
参数 说明
--add-data "templates;templates" 打包模板文件夹
--add-data "static;static" 打包静态文件夹
--hidden-import 声明 Flask 依赖,避免打包遗漏
-w 隐藏命令行窗口
-F 打包成单个文件
打包后
生成的 .exe 文件在 dist 文件夹中。运行时需要确保同目录下有 templates 和 static 文件夹
(如果用了 --add-data,它们会被打包进 exe)。
python
a = Analysis(
['app.py'],
pathex=[],
binaries=[],
datas=[
('templates', 'templates'),
('static', 'static'),
('executor.db', '.'), # 添加数据库文件
],
hiddenimports=[
'flask',
'werkzeug',
'jinja2',
'sqlite3'
],
...
)
2. 数据库放在正确位置
打包后,数据库文件会在 exe 同目录下:输出文件在dist 。可执行文件大小在10M 左右,源文件大概100K,主要是第三方包
dist/
├── flask_app.exe
└── executor.db # 数据库文件
3.
# 进入dist目录
cd /f F:\新建文件夹\dist
# 用UPX压缩EXE(-9是最高压缩级别)
D:\python310\pythonProject\upx-5.1.1-win64\upx.exe -9 --force flask_app.exe
#######
###sample 1 from doc https://www.it610.com/article/1293833117810892800.htm
方法1:
(一般来说,pycharm 的项目 的可执行环境 一般 在 venv\scrips 目录下,)
cd e:\\test_py\magic_box\venv\Scripts>
pip install E:\\test_py\magic_box\package\PyMySQL-0.9.0-py2.py3-none-any.whl
or
python E:\\test_py\magic_box\package\PyMySQL-0.9.0\PyMySQL-0.9.0\setup.py install
cd E:\\test_py\magic_box\package\PyMySQL-0.9.0\PyMySQL-0.9.0
step step
from doc https://www.it610.com/article/1293833117810892800.htm
根据输出日志,安装顺序如下,依次安装每个补丁:
Installing collected packages: enum34, asn1crypto, pycparser, cffi, idna, ipaddress, cryptography, pymysql
实际安装步骤如下:
(切换到 pip 路径,执行按安装)
cd e:\\test_py\magic_box\venv\Scripts>
pip install E:\\test_py\magic_box\package\PyMySQL-0.9.0\asn1crypto-1.4.0-py2.py3-none-any.whl
pip install E:\\test_py\magic_box\package\PyMySQL-0.9.0\six-1.16.0-py2.py3-none-any.whl
pip install E:\\test_py\magic_box\package\PyMySQL-0.9.0\enum34-1.1.10-py2-none-any.whl
pip install E:\\test_py\magic_box\package\PyMySQL-0.9.0\pycparser-2.20-py2.py3-none-any.whl
pip install E:\\test_py\magic_box\package\PyMySQL-0.9.0\cffi-1.14.5-cp27-cp27m-win_amd64.whl
pip install E:\\test_py\magic_box\package\PyMySQL-0.9.0\idna-2.10-py2.py3-none-any.whl
pip install E:\\test_py\magic_box\package\PyMySQL-0.9.0\ipaddress-1.0.23-py2.py3-none-any.whl
pip install E:\\test_py\magic_box\package\PyMySQL-0.9.0\cryptography-2.6-cp27-cp27m-win_amd64.whl
pip install E:\\test_py\magic_box\package\PyMySQL-0.9.0-py2.py3-none-any.whl
方法2:先下载,然后本地安装,没问题,在移植到远程安装
cd C:\Python36\Scripts
pip3 download PyMySQL
c:\Python36_64\Scripts>pip3 download PyMySQL
Collecting PyMySQL
Downloading https://files.pythonhosted.org/packages/4f/52/a115fe175028b058df353c5a3d5290b71514a83f67078a6482cff24d6137/PyMySQL-1.0.2-py3-none-any.whl (43kB)
100% |████████████████████████████████| 51kB 77kB/s
Saved c:\python36_64\scripts\pymysql-1.0.2-py3-none-any.whl
Successfully downloaded PyMySQL
You are using pip version 10.0.1, however version 21.3.1 is available.
You should consider upgrading via the 'python -m pip install --upgrade pip' command.
#
#######sample 2 https://www.cnblogs.com/walk1314/p/7251126.html
python2(中文编码问题):UnicodeDecodeError: 'ascii' codec can't decode byte 0x?? in position 1
python在安装时,默认的编码是ascii,当程序中出现非ascii编码时,python的处理常常会报这样的错UnicodeDecodeError: 'ascii' codec can't decode byte 0x?? in position 1: ordinal not in range(128),python没办法处理非ascii编码的,此时需要自己设置将python的默认编码,一般设置为utf8的编码格式。
查询系统默认编码可以在解释器中输入以下命令:
python代码
>>>sys.getdefaultencoding()
设置默认编码时使用:
python代码
>>>sys.setdefaultencoding('utf8')
可能会报AttributeError: 'module' object has no attribute 'setdefaultencoding'的错误。执行reload(sys),再执行以上命令就可以顺利通过。
此时再执行sys.getdefaultencoding()就会发现编码已经被设置为utf8的了,但是在解释器里修改的编码只能保证当次有效,在重启解释器后,会发现,编码又被重置为默认的ascii了。
有2种方法设置python的默认编码:
一个解决的方案在程序中加入以下代码:
Python代码
# encoding=utf8
import sys
reload(sys)
sys.setdefaultencoding('utf8')
另一个方案是在python的Lib\site-packages文件夹下新建一个sitecustomize.py,内容为:
Python代码
# encoding=utf8
import sys
reload(sys)
sys.setdefaultencoding('utf8')
此时重启python解释器,执行sys.getdefaultencoding(),发现编码已经被设置为utf8的了,多次重启之后,效果相同,这是因为系统在python启动的时候,自行调用该文件,设置系统的默认编码,而不需要每次都手动的加上解决代码,属于一劳永逸的解决方法。
###sample 1 python print 中文
解决pycharm中中文列表输出'\xe5\xa4\xa7\xe8\x92\x9c'之类的字符串
wqy94103 2017-08-09 20:42:29 19850 收藏 7
分类专栏: python 文章标签: python
版权
#coding=utf-8
member=["贝贝","晶晶","欢欢"]
print(member)
print("北京欢迎您!")
1
2
3
4
如上代码块,结果输出为:
[‘\xe8\xb4\x9d\xe8\xb4\x9d’, ‘\xe6\x99\xb6\xe6\x99\xb6’, ‘\xe6\xac\xa2\xe6\xac\xa2’]
北京欢迎您!
该怎么解决以上pycharm中的中文列表输出的编码问题呢?
其实,只需将代码中的‘print(member)’改为’print str(member).decode(‘string-escape’)‘即可
————————————————
版权声明:本文为CSDN博主「wqy94103」的原创文章,遵循CC 4.0 BY-SA版权协议,转载请附上原文出处链接及本声明。
原文链接:https://blog.csdn.net/wqy94103/article/details/77016578
##sample 2 python 变量 %c %s 的区别
https://zhidao.baidu.com/question/2017135013606924908.html
符 号
描述
%c
格式化字符及其ASCII码
%s
格式化字符串
%d
格式化整数
%u
格式化无符号整型
%o
格式化无符号八进制数
%x
格式化无符号十六进制数
%X
格式化无符号十六进制数(大写)
%f
格式化浮点数字,可指定小数点后的精度 如:%.2f
%e
用科学计数法格式化浮点数
%E
作用同%e,用科学计数法格式化浮点数
%g
%f和%e的简写
%G
%f 和 %E 的简写
%p
用十六进制数格式化变量的地址
'%c'%65:输出ASII码65对应的字符,对应的是'A'
“%c”是占位符的一种,还有%s %d 等等
%c指的是 字符及其ASCII码
65的ASCII码就是A
#####
##sample for python2
参考https://www.cnblogs.com/ming5218/p/7965973.html
https://blog.csdn.net/jihu0412/article/details/81030308
##for python3
原因:
在 Python 3.x 版本后,ConfigParser.py 已经更名为 configparser.py 所以出错!
解决办法:
cp /usr/local/python3/lib/python3.6/configparser.py /usr/local/python3/lib/python3.6/ConfigParse
##for python2
import ConfigParser
config = ConfigParser.ConfigParser()
config.read('C:\\tt\\tt\\test_py\\magic_box\\config\\config.ini')
['C:\\tt\\tt\\test_py\\magic_box\\config\\config.ini']
##section 部分
print(config.sections())
['test', 'oracle', 'mysql']
##option 部分
r = config.options("mysql")
print(r)
config.get("mysql", "my_pass")
########### sample
https://www.cnblogs.com/kakaln/p/8192957.html#:~:text=%E5%9C%A8%E4%BD%BF%E7%94%A8pycharm%E6%97%B6%EF%BC%8C%E7%BB%8F%E5%B8%B8%E4%BC%9A%E9%9C%80%E8%A6%81%E5%A4%9A%E8%A1%8C%E4%BB%A3%E7%A0%81%E5%90%8C%E6%97%B6%E7%BC%A9%E8%BF%9B%E3%80%81%E5%B7%A6%E7%A7%BB%EF%BC%8Cpycharm%E6%8F%90%E4%BE%9B%E4%BA%86%E5%BF%AB%E6%8D%B7%E6%96%B9%E5%BC%8F%201%E3%80%81pycharm%E4%BD%BF%E5%A4%9A%E8%A1%8C%E4%BB%A3%E7%A0%81%E5%90%8C%E6%97%B6%E7%BC%A9%E8%BF%9B,%E9%BC%A0%E6%A0%87%E9%80%89%E4%B8%AD%E5%A4%9A%E8%A1%8C%E4%BB%A3%E7%A0%81%E5%90%8E%EF%BC%8C%E6%8C%89%E4%B8%8BTab%E9%94%AE%EF%BC%8C%E4%B8%80%E6%AC%A1%E7%BC%A9%E8%BF%9B%E5%9B%9B%E4%B8%AA%E5%AD%97%E7%AC%A6%202%E3%80%81pycharm%E4%BD%BF%E5%A4%9A%E8%A1%8C%E4%BB%A3%E7%A0%81%E5%90%8C%E6%97%B6%E5%B7%A6%E7%A7%BB%20%E9%BC%A0%E6%A0%87%E9%80%89%E4%B8%AD%E5%A4%9A%E8%A1%8C%E4%BB%A3%E7%A0%81%E5%90%8E%EF%BC%8C%E5%90%8C%E6%97%B6%E6%8C%89%E4%BD%8Fshift%2BTab%E9%94%AE%EF%BC%8C%E4%B8%80%E6%AC%A1%E5%B7%A6%E7%A7%BB
pycharm多行代码缩进、左移
在使用pycharm时,经常会需要多行代码同时缩进、左移,pycharm提供了快捷方式
1、pycharm使多行代码同时缩进
鼠标选中多行代码后,按下Tab键,一次缩进四个字符
2、pycharm使多行代码同时左移
鼠标选中多行代码后,同时按住shift+Tab键,一次左移四个字符
SPYDER 软件 缩进
往右缩进
先鼠标选中要缩进的多行代码,然后按tab建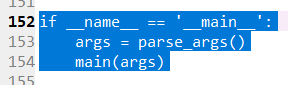
往左回退
同样选中多行,然后按shift+tab
########sample 1
##根据下载的顺序,倒叙安装
C:\Python27\Scripts>pip download faker
Collecting faker
Downloading https://files.pythonhosted.org/packages/35/28/0fbb15ffe79f1068211f6219b88dc817e5f6b455e23806e3d3a4699fd454/Faker-3.0.1-py2.py3-none-any.whl (977kB)
100% |████████████████████████████████| 983kB 181kB/s
Saved c:\python27\scripts\faker-3.0.1-py2.py3-none-any.whl
Collecting text-unidecode==1.3 (from faker)
Downloading https://files.pythonhosted.org/packages/a6/a5/c0b6468d3824fe3fde30dbb5e1f687b291608f9473681bbf7dabbf5a87d7/text_unidecode-1.3-py2.py3-none-any.whl (78kB)
100% |████████████████████████████████| 81kB 217kB/s
Saved c:\python27\scripts\text_unidecode-1.3-py2.py3-none-any.whl
Collecting ipaddress; python_version < "3.3" (from faker)
File was already downloaded c:\python27\scripts\ipaddress-1.0.23-py2.py3-none-any.whl
Collecting python-dateutil>=2.4 (from faker)
Downloading https://files.pythonhosted.org/packages/d4/70/d60450c3dd48ef87586924207ae8907090de0b306af2bce5d134d78615cb/python_dateutil-2.8.1-py2.py3-none-any.whl (227kB)
100% |████████████████████████████████| 235kB 252kB/s
Saved c:\python27\scripts\python_dateutil-2.8.1-py2.py3-none-any.whl
Collecting six>=1.10 (from faker)
File was already downloaded c:\python27\scripts\six-1.16.0-py2.py3-none-any.whl
##for faker
cd e:\\test_py\magic_box\venv\Scripts
pip install E:\\test_py\magic_box\package\faker\python_dateutil-2.8.1-py2.py3-none-any.whl
pip install E:\\test_py\magic_box\package\faker\text_unidecode-1.3-py2.py3-none-any.whl
pip install E:\\test_py\magic_box\package\faker\Faker-3.0.1-py2.py3-none-any.whl
##for openpyxl
cd E:\tt\test_py\magic_box\venv\Scripts
python E:\tt\test_py\magic_box\package\faker\et_xmlfile-1.0.1\et_xmlfile-1.0.1\setup.py install
pip install E:\tt\test_py\magic_box\package\faker\jdcal-1.4.1-py2.py3-none-any.whl
cd E:\tt\test_py\magic_box\package\faker\openpyxl-2.6.4\openpyxl-2.6.4\
E:\tt\test_py\magic_box\venv\Scripts\python setup.py install
##sampe 2
###sample 2 import openpyxl 报错如下:
报错如下:
import openpyxl
ImportError: No module named et_xmlfile
openpyxl.__version__
解决办法:
感谢 KiGiBoy https://www.cnblogs.com/ls11736/p/12398376.html
1.下载et_xmlfile,并解压,然后复制解压后的et_xmlfile,et_xmlfile.egg-info两个文件夹到site-packages下(E:\ddd\test_py\magic_box\venv\Lib\site-packages)
copy E:\ddd\test_py\magic_box\venv\Lib\site-packages
2.
cd E:\ddd\test_py\magic_box\package\faker\openpyxl-2.6.4\openpyxl-2.6.4\
E:\ddd\test_py\magic_box\venv\Scripts\python setup.py install
##sample 3
python中无法创建包含中文路径的文件
https://blog.csdn.net/qq_34621987/article/details/80877210
2.原因:python中默认使用unicode编码,将一个包含中文的utf-8编码的字符串用于创建文件时会出现上图错误中的情况,
应该将encode('utf-8')去掉,或者在字符串前加上u,如 u"一张图片.jpg"
###########sample1
###sample 1
1.首先找到anaconda,运行一次,即使启动不成功,也没关系。
3.
在spyder 右下角的控制台中可以用!pip 使用pip命令:
!pip install 你要安装的模块
pip install faker
pip list
import faker
######sample 2
##sample 2.0
工具/原料
-
pycharm
方法/步骤
-
首先,打开一个的pycharm的界面当中,需要选中编辑器中的 左侧。 (设置断点,这一步比较重要)
![pycharm怎么debug单步调试]()
-
然后pycharm的菜单中的 run 的菜单。
![pycharm怎么debug单步调试]()
-
点击了run的菜单之后,选中debug 的选项。
![pycharm怎么debug单步调试]()
-
就可以看到是在编辑器当中的 选中一个断点。
![pycharm怎么debug单步调试]()
-
然后就可以对于当前中的点击下一步中按钮。
![pycharm怎么debug单步调试]()
-
可以看到是代码就会移动到下一行的代码上了。
![pycharm怎么debug单步调试]()
-
或者使用快捷键的方式来移动下一步
![pycharm怎么debug单步调试]()
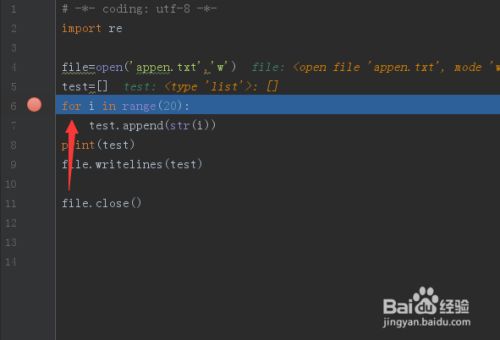

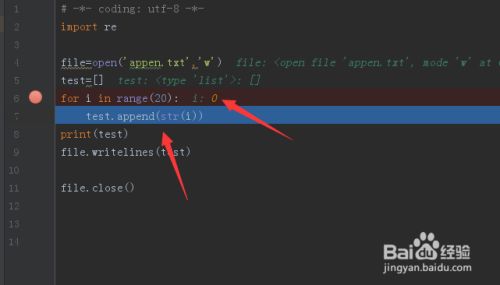
这里一排七个坐标的意思分别是
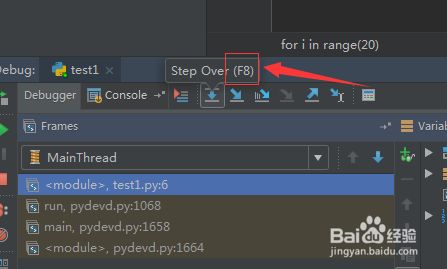
1.show execution point (F10) 显示当前所有断点
2.step over(F8) 单步 。
若函数A内存在子函数a时,不会进入子函数a内执行单步调试,而是把子函数a当作一个整体,一步执行
3.step into(F7) 单步调试。
若函数A内存在子函数a时,会进入子函数a内执行单步调试。
4.step into my code(Alt + Shift +F7) 执行下一行但忽略libraries(导入库的语句) -》 重要,这一个使用的非常普遍
5.force step into(Alt + Shift +F7) 执行下一行忽略lib和构造对象等
6.step out(Shift+F8)当目前执行在子函数a中时,选择该调试操作可以直接跳出子函数a,而不用继续执行子函数a中的剩余代码。并返回上一层函数。
7.run to cursor(Alt +F9) 直接跳到下一个断点
————————————————
版权声明:本文为CSDN博主「醒了的追梦人」的原创文章,遵循CC 4.0 BY-SA版权协议,转载请附上原文出处链接及本声明。
原文链接:https://blog.csdn.net/qq_33472146/article/details/90606359
##sampel 2,.2 如果要尝试看清楚别人写的200行的代码,有没有注释。
https://www.jetbrains.com/help/pycharm/debugging-code.html
https://blog.csdn.net/qqmuhua123/article/details/41090819
感谢 qqmuhua123
1:了解项目 要知道这个项目是用来干嘛的,有什么样的功能,
2:获取源代码
3:运行
5:读读单元测试用例
不要上来就看源代码,这样很容易迷失在源码中,特别是当项目的源码很多时,你不知道这个类或这个方法是用来干嘛的,类之间的依赖和关联更让人困惑和畏惧,导致很快失去了兴趣。
可以先读一读单元测试用例,它们是代码的活文档。
6. 修改源代码,编译运行,看修改前后有什么变化,这是感知代码用途的最佳途径
:7. 尝试弄清整个项目的业务逻辑 这是必须要做的,要想研究项目,或是维护项目弄清楚项目的整体业务逻辑是必须要做的,但这需要时间。所以不能放弃,视项目的大小这通常要花上数月甚至数年。
写文章,画图表,这是检验自己对项目理解的最好方式,
方法2: pycharm 查找某个py 文件 所有的相关字符串信息
第一步:
第二步: 下方的提示框 会出现如下 提示,哪些行有类似信息

继续调试方法:
1. 自己跑测试步骤,根据输出的记录,判断这一步跑到哪里了。
###########sample 4
https://www.jetbrains.com/help/pycharm/debugging-code.html#general-procedure
Configure debugging options
-
Configure common debugging properties and behavior in
If you are new to debugging, the out-of-the-box configuration will work for you. The topics about each debugger functionality provide references and explain the related settings where applicable. If you are an advanced user and looking for some particular property, see the Debugger reference section.
-
Under the Build, Execution and Deployment section, select Python Debugger, and configure the Python debugger options.
-
Under the
-
Define a run/debug configuration if you are going to use a custom one. This is required if you need some arguments to be passed to the program or some special activity to be performed before launch. For more information on how to set up run/debug configurations, refer to the Run/debug configurations section. Most of the time, you don't need this to debug a simple program that doesn't expect arguments or have any special requirements.
###sampl 2
3 spyder中debug的一些基本操作
F12是设置断点:
最上方总共有5个调试按钮,都是蓝色的,从左到右依次是:
进入调试;运行当前行;进入函数或方法内运行;跳出函数或方法;运行到下一个断点;退出调试。
我感觉还挺这些按钮的功能左右还对称的。
大概就这样吧,感觉这几个按钮用好了,调试起来效率非常高。
比如说在for循环里面,直接运行到下一个断点,就可以进入下一个循环,或者跳出循环等。
这个就要慢慢摸索了…
————————————————
版权声明:本文为CSDN博主「宇内虹游」的原创文章,遵循CC 4.0 BY-SA版权协议,转载请附上原文出处链接及本声明。
原文链接:https://blog.csdn.net/weixin_39278265/article/details/84963883
###########sample 3
3、按照程序员不同的需求进行调试。spyder中提供了调式面板,如图所示
其中第一个按钮是进行调试按钮,点击或者按Ctrl+F5就进入调式,程序到达你设置的第一个断点,这步是调式所必需的;第二个是单步调式按钮,点击或者按Ctrl+F10就可以在设置的断点之后单步调式;第三个按钮可以进入到光标所在句子中含有的函数体内部,或者按快捷键Ctrl+F11;第四个是从此函数中跳出;第五个是跳转到下一个断点;最后一个按钮是停止调试。
点击进行调试之后,可以在下图所示的地方看到变量信息。

#################sampl
https://blog.csdn.net/u012941152/article/details/83011110
Xpath (XML Path Language),是W3C定义的用来在XML文档中选择节点的语言
cols = len(jntua.find_elements_by_xpath('//*[@id="rs"]/table/tbody/tr[1]/th'))
从根目录/开始有点像Linux的文件查看,/代表根目录,一级一级的查找,直接子节点,相当于css_selector中的>号
/html/body/div/p
查找 所有 包含id=rs 的元素,下一级table ,下一级tbody,下一级tr
'//*[@id="rs"]/table/tbody/tr'
查找 所有 包含id=rs 的元素,下一级table ,下一级tbody,下一级tr,下一级th
'//*[@id="rs"]/table/tbody/tr[1]/th'))
找到所有 包含id=rs 的元素,下一级table ,下一级tbody,下一级tr[字符],下一级th[字符]
"//*[@id='rs']/table/tbody/tr[" + str(r) + "]/td[" + str(c) + "]"
####sample 3
selenium报错Message: This version of ChromeDriver only supports Chrome version xx
https://blog.csdn.net/qq_41605934/article/details/116330227
######sample 1
https://www.py.cn/tools/spyder/16326.html
怎么在spyder中建立工程?
yang
2020-02-12 12:37:592544浏览 · 0收藏 · 0评论

在spyder中建立工程的方法:(推荐:spyder使用教程)
1、Spyder项目的创建
新建一个Spyder项目需要点击Spyder上方标签栏中的Projects中的New Project选项。然后给项目取一个名字,选择一下项目存放的路径即可。
2、Spyder项目的打开
Spyder项目文件夹必须 存在.spyproject 这个文件夹,否则Spyder无法打开工程文件夹

Spyproject这个文件夹包含codestyle.ini encoding.ini vcs.ini workspace.ini 这几个配置文件
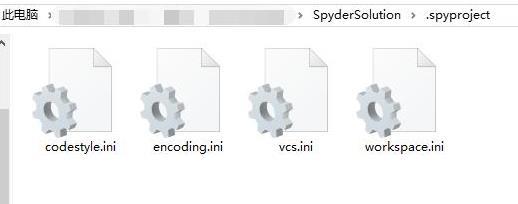
4,( 选择工具条的 project / open project 。这样就可以看到有右边的该项目文件的导航条)
##############
################sample 2 定位span 模块
https://blog.csdn.net/weixin_42346330/article/details/87093937
selenium如何定位span元素
test-runing 2019-02-12 16:02:48 24887 收藏 11
分类专栏: python+selenium自动化测试 文章标签: span元素定位 元素定位
版权
python+selenium自动化测试
专栏收录该内容
7 篇文章0 订阅
订阅专栏
在做自动化测试时,我们需要定位元素属性来进行操作,今天在做自动化时发现我要定位的登录注册元素找不到,我看了下代码发现,我用xpath获取绝对路径后,发现找不到,F12查看代码如下
代码如下
# _*_ coding: utf-8 _*_
from selenium import webdriver
import logging
import time
driver =webdriver.Chrome()
url="http:************ "
#driver.maximize_window()
driver.get(url) #进入兼职啦首页
time.sleep(2)
driver.find_element_by_xpath('//*[@id="J_site_login"]').click()
然后直接报错
原因:是因为它是内联函数,首先得定位到它的所在的模块。然后再进行定位内联函数
最后代码如下
最后俩行可以组合成一行
driver.find_element_by_xpath('/html/body/div[2]/div/div[4]/div/span//*[@id="J_site_login"]').click()
然后就
————————————————
版权声明:本文为CSDN博主「test-runing」的原创文章,遵循CC 4.0 BY-SA版权协议,转载请附上原文出处链接及本声明。
原文链接:https://blog.csdn.net/weixin_42346330/article/details/87093937
########sample 3 获得标签的 绝对路径
https://blog.csdn.net/qq_33852206/article/details/108767757
# -*- coding: utf-8 -*-
"""
Created on Mon Jul 19 16:12:28 2021
""
#通过下拉菜单,和 平级别菜单 来判断 div
from selenium import webdriver
import time
driver = webdriver.Chrome(executable_path="E:\logs\chromedriver_win32\chromedriver.exe")
#url = 'http://www.baidu.com'
#driver.get(url)
#
##绝对路径定位
#input_absPath = driver.find_element_by_xpath('/html/body/div/div/div[5]/div/div/form/span/input')
#print('绝对路径定位',input_absPath.get_attribute('outerHTML'))
url = 'http://ai.com.cn'
driver.get(url)
#绝对路径定位
#input_absPath = driver.find_element_by_xpath('/html/body/app-root/app-login/div/form/div[4]')
input_absPath = driver.find_element_by_xpath('/html/body/app-root/app-login/div/form/div[4]/button/span')
print('绝对路径定位',input_absPath.get_attribute('outerHTML'))
########sample 4 IT桔子网模拟登陆,selenium定位type属性
https://www.cnblogs.com/kai-/p/13191377.html
2
copy element 结果如下:
div 属性为input type="password"
<input type="password" autocomplete="off" placeholder="密码" class="el-input__inner">
selenium定位type属性
driver.find_element_by_css_selector('input[type="password"]').send_keys('Password')
from selenium import webdriver	#用来驱动浏览器的
from selenium.webdriver import ActionChains	#破解滑动验证码的时候用,可拖动图片
from selenium.webdriver.common.by import By #按照什么方式查找,By.ID,By.CSS_SELECTOR
from selenium.webdriver.common.keys import Keys	#键盘按键操作
from selenium.webdriver.support import expected_conditions as EC		# 和下面WebDriverWait一起用的
from selenium.webdriver.support.wait import WebDriverWait	#等待页面加载某些元素

driver = webdriver.Chrome()
driver.get('https://www.itjuzi.com/login?url=%2F')

# 方式一 Xpath
# driver.find_element_by_xpath('//*[@id="app"]/div[1]/div[2]/div/div/div/div/div[2]/div[1]/form/div[1]/div/div[1]/input').send_keys("jeremy.li@mioying.com")
# driver.find_element_by_xpath('//*[@id="app"]/div[1]/div[2]/div/div/div/div/div[2]/div[1]/form/div[2]/div/div/input').send_keys('Password')
# driver.find_element_by_xpath('//*[@id="app"]/div[1]/div[2]/div/div/div/div/div[2]/div[1]/div/button').click()

# driver.find_element_by_xpath('//form[@class="el-form"]/div/div/div/input').send_keys('jeremy.li@mioying.com')
# driver.find_element_by_xpath('//form[@class="el-form"]/div[2]/div/div/input').send_keys('Password')

# 方式二
driver.find_element_by_css_selector('.el-input__inner').send_keys('jeremy.li@mioying.com')
driver.find_element_by_css_selector('input[type="password"]').send_keys('Password')

q1:driver.find_element_by_css_selector('.el-input__inner').send_keys('jeremy.li@mioying.com')
A:说明如下:
1.
# div.el-input ,div 属性为.el-input ,copy select 结果如下
#app > div.page-container.d-flex.flex-column > div.content.login-content > div > div > div > div > div.login-form-box > div:nth-child(1) > form > div.el-form-item.is-error.is-required > div > div.el-input > input
copy element 结果如下:
<input type="text" autocomplete="off" placeholder="手机号/邮箱" class="el-input__inner">
Q2:driver.find_element_by_css_selector('input[type="password"]').send_keys('Password')A:说明如下:
copy element 结果如下:
div 属性为input type="password"
<input type="password" autocomplete="off" placeholder="密码" class="el-input__inner">
############sample 4
selenium.元素定位(find_element_by)
https://www.cnblogs.com/youngleesin/p/10447907.html

from selenium import webdriver
from time import sleep

driver = webdriver.Chrome()
driver.implicitly_wait(10)   #隐形等待
driver.get('https://www.baidu.com/')
sleep(1)

#以五种定位方式定位到百度首页的搜索输入框
kw_find = driver.find_element_by_id('kw')
#kw_find= driver.find_element_by_class_name('s_ipt')
#kw_find= driver.find_element_by_name('wd')
#kw_find = driver.find_element_by_xpath('//*[@id="kw"]')
#kw_find = driver.find_element_by_css_selector('#kw') #id用#kw,class用.s_ipt ,与css的简写方式相同

#send_keys() 是selenium自带的方法,用来输入文本
kw_find.send_keys('selenium')

#使用id定位方式定位到搜索按钮
su_find = driver.find_element_by_id('su')

#click() 是selenium自带的方法,用来点击定位的元素
su_find.click()

sleep(1)
driver.quit()


Q1:
kw_find = driver.find_element_by_css_selector('#kw') #id用#kw,class用.s_ipt ,与css的简写方式相同

A:
说明如下:
copy element 结果如下:
<input id="kw" name="wd" class="s_ipt" value="" maxlength="255" autocomplete="off">
#####sample 5 通过chrom 浏览器查找路径xpath的路径
https://www.cnblogs.com/lukechenblogs/p/10481000.html
selenium-百度搜索框输入后,定位联想下拉框元素 (重要)
/html/body/div[1]/div[1]/div[5]/div[1]/div/form/div/ul/li[1]
/html/body/div[1]/div[1]/div[5]/div[1]/div/form/div/ul/li[2]
<li data-key="123123交警官网app" class="bdsug-overflow">123<b>123交警官网app</b></li>
//*[@id="form"]/div/ul/li[2]
#举例如下:


##############sample  爬取网页的的excel 格式
https://blog.csdn.net/weixin_43507959/article/details/86380521
Python+selenium table表单处理
web后台软件经常会遇到一些table表单,记录一下table表单的处理方式
table特征
table表单页面源码一般有这几个明显的标签:table、tr、th、td
<table>标示一个表格
<tr>标示这个表格中间的一个行
</th> 定义表头单元格
</td> 定义单元格标签,一组<td>标签将将建立一个单元格,<td>标签必须放在<tr>标签内
源码
<?xml version="1.0" encoding="UTF-8"?>
<!DOCTYPE html>
<meta http-equiv="Content-Type" content="text/html; charset=utf-8" />
<html>
<head>
<title>Table模板</title>
</head>
<body>
<table border="1" id="myTable">
<tr>
<th>语言</th>
<th>工具</th>
<th>方向</th>
</tr>
<tr>
<td>python</td>
<td>selenium</td>
<td>自动化测试</td>
</tr>
<tr>
<td>C语言</td>
<td>LoadRunner</td>
<td> 性能测试 </td>
</tr>
</table>
</body>
</html>
定位方式
# coding=utf-8
from selenium import webdriver
driver = webdriver.Chrome()
driver.get("G:\Brand_card\\test_table.html")
# 打印整个表格信息
print(driver.find_element_by_xpath("//*[@id='myTable']/tbody").text)
# 打印表格第二行信息
print(driver.find_element_by_xpath("//*[@id='myTable']/tbody/tr[2]").text)
# 打印表格第二行第一列信息
print(driver.find_element_by_xpath("//*[@id='myTable']/tbody/tr[2]/td[1]").text)
driver.quit()
table表单定位的格式是固定的,只需改tr和td后面的数字就可以了.如第三行第三列 tr[3]td[3]
————————————————
版权声明:本文为CSDN博主「SitVen」的原创文章,遵循CC 4.0 BY-SA版权协议,转载请附上原文出处链接及本声明。
原文链接:https://blog.csdn.net/weixin_43507959/article/details/86380521
###sample 1
https://blog.csdn.net/qq_29566629/article/details/95374971
简介
python中与除法相关的三个运算符是// 和 / 和 %,下面逐一介绍。
“/”,这是传统的除法,3/2=1.5
“//”,在python中,这个叫“地板除”,3//2=1
“%”,这个是取模操作,也就是区余数,4%2=0,5%2=1
https://blog.csdn.net/anshuai_aw1/article/details/82347016
1.1 举最简单的例子
#单个参数的:
g = lambda x : x ** 2
print g(3)
"""
9
"""
#多个参数的:
g = lambda x, y, z : (x + y) ** z
print g(1,2,2)
"""
9
"""
1.2 再举一个普通的例子
将一个 list 里的每个元素都平方:
map( lambda x: x*x, [y for y in range(10)] )
————————————————
版权声明:本文为CSDN博主「anshuai_aw1」的原创文章,遵循CC 4.0 BY-SA版权协议,转载请附上原文出处链接及本声明。
原文链接:https://blog.csdn.net/anshuai_aw1/article/details/82347016
#########sample 1 test:
CSS3 :nth-child() 选择器
CSS :not(selector) 选择器
CSS :nth-last-child(n) 选择器
CSS 选择器参考手册
实例
规定属于其父元素的第二个子元素的每个 p 的背景色:
p:nth-child(2)
{
background:#ff0000;
}
##查找tr 父元素的第一个子元素td的数量
col = len(element.find_elements_by_css_selector('tr:nth-child(1) td'))
###sample 2
https://www.jianshu.com/p/229b9e48cc4f
# 2.只要元素包含在父元素里面,不一定是直接子元素,用空格隔开,如图一所示,form 下面的 span 里面的input
driver.find_element_by_css_selector("#form input")
# 2. 标签名及class属性值组合定位
driver.find_element_by_css_selector("input.s_ipt")
##查找表格为标签为A, 属性(class)为red的值
element.find_elements_by_css_selector('a.red')
element = browser.find_element_by_xpath('//*[@id="dataview"]/div[2]/div[2]/table/tbody')
# 提取表格内容td
# td_content = element.find_elements_by_tag_name("td") # 进一步定位到表格内容所在的td节点
以百度搜索首页为例,我们要定位到搜索输入框的话,应该如何写呢?
1.单属性查找
# 1.用 标签名 定位查找
driver.find_element_by_css_selector("input")
# 2.用 id 属性定位查找
driver.find_element_by_css_selector("kw")
# 3.用 class 属性定位查找
driver.find_element_by_css_selector("s_ipt")
# 4.其他属性定位
driver.find_element_by_css_selector("[name="wd"]")
A:copy element 如下:
<input id="kw" name="wd" class="s_ipt" value="" maxlength="255" autocomplete="off">
2. 组合属性查找
# 1. 标签名及id属性值组合定位
driver.find_element_by_css_selector("input#kw")
# 2. 标签名及class属性值组合定位
driver.find_element_by_css_selector("input.s_ipt")
# 3. 标签名及属性(含属性值)组合定位
driver.find_element_by_css_selector("input[name="wd"]")
# 4. 标签及属性名组合定位
driver.find_element_by_css_selector("input[name]")
# 5. 多个属性组合定位
driver.find_element_by_css_selector("[class="s_ipt"][name="wd"]")
A:copy element 如下:
<input id="kw" name="wd" class="s_ipt" value="" maxlength="255" autocomplete="off">
3.模糊匹配示例 , 如需匹配下图中的class
# 1. class拥有多个属性值,只匹配其中一个时
driver.find_element_by_css_selector("input[class ~= "bg"]")
# 2. 匹配以字符串开头的属性值
driver.find_element_by_css_selector("input[class ^= "bg"]")
# 3. 匹配以字符串结尾的属性值
driver.find_element_by_css_selector("input[class $= "s_btn"]")
# 4. 匹配被下划线分隔的属性值
driver.find_element_by_css_selector("input[class |= "s"]")
A:copy element 如下:
<input type="submit" id="su" value="百度一下" class="bg s_btn">
4.层级查找
# 1.直接子元素层级关系,如上图的 百度一下 ,input为span的直接子元素(用 > 表示)
driver.find_element_by_css_selector(".bg.s_btn_wr > input")
# class为bg和s_btn_wr 的span标签的子元素input
# 2.只要元素包含在父元素里面,不一定是直接子元素,用空格隔开,如图一所示,form 下面的 span 里面的input
driver.find_element_by_css_selector("#form input")
# id是form的form标签里面的input标签
# 3.多级关系
driver.find_element_by_css_selector("#form > span > input")
# id是form的form标签下面的span标签的下面的input标签
#其他
p:nth-child(1) # 选择第一个p标签,还可写为 p:first-child
p:nth-last-child(1) # 选择倒数第一个p标签(要保证最后一个标签是p)
p:only-child #唯一的p标签
A:
<form id="form" name="f>......</form>
<span class="soutu-btn"></span>
<input id="kw" name="wd" class="s_ipt" value="" maxlength="255" autocomplete="off">
########saple 3
###sample 3 Python将二维列表(list)的数据输出(TXT,Excel)
https://blog.csdn.net/weixin_41888503/article/details/79802443
代码如下:
list1 = [['张三','男','未婚',20],['李四','男','已婚',28],['小红','女','未婚',18],['小芳','女','已婚',25]]
output = open('data.xls','w',encoding='gbk')
output.write('name\tgender\tstatus\tage\n')
for i in range(len(list1)):
for j in range(len(list1[i])):
output.write(str(list1[i][j])) #write函数不能写int类型的参数,所以使用str()转化
output.write('\t') #相当于Tab一下,换一个单元格
output.write('\n') #写完一行立马换行
output.close()
————————————————
版权声明:本文为CSDN博主「数据之美ya」的原创文章,遵循CC 4.0 BY-SA版权协议,转载请附上原文出处链接及本声明。
原文链接:https://blog.csdn.net/weixin_41888503/article/details/79802443
方法2 Python使用cx_Oracle模块将oracle中数据导出到csv文件的方法
http://www.zzvips.com/article/80026.html
import sys
import csv
import cx_Oracle
connection = raw_input("Enter Oracle DB connection (uid/pwd@database) : ")
orcl = cx_Oracle.connect(connection)
curs = orcl.cursor()
printHeader = True # include column headers in each table output
sql = "select * from tab" # get a list of all tables
curs.execute(sql)
for row_data in curs:
if not row_data[0].startswith('BIN$'): # skip recycle bin tables
tableName = row_data[0]
# output each table content to a separate CSV file
csv_file_dest = tableName + ".csv"
outputFile = open(csv_file_dest,'wb', 'ignore') # 'wb'
output = csv.writer(outputFile, dialect='excel')
sql = "select * from " + tableName
curs2 = orcl.cursor()
curs2.execute(sql)
if printHeader: # add column headers if requested
cols = []
for col in curs2.description:
cols.append(col[0])
output.writerow(cols)
for row_data in curs2: # add table rows
output.writerow(row_data)
outputFile.close()
############sample 1 【已解决】UnicodeEncodeError: ‘gbk’ codec can’t encode character u’\u200e’ in position 43: illegal multib
https://blog.csdn.net/Ehcoing/article/details/51865873
添加ignore 选项
import codes
outputFile = codecs.open(csv_file_dest, 'wb',"gbk", 'ignore') # 'wb'
########sample 1
https://blog.csdn.net/wowocpp/article/details/79497719
Python 转义字符 \x
解释:数字默认会解析成\x, 比如19c 会解析成\x19c
这个时候加入 r 选项,比如以下
r"D:\nmon\19c_1.xlsx"
Python 转义字符
在需要在字符中使用特殊字符时,python用反斜杠()转义字符
如果不想让转义字符生效,需要显示字符串原来的意思,这就要用r和R来定义原始字符串。
# -*- coding:utf-8 -*-
print r'\t\r'
print 'Hello'
print '\t\r'
1
2
3
4
5
6
输出结果:
\t\r
Hello
Process finished with exit code 0
1
2
3
4
5
代码:
# -*- coding:utf-8 -*-
str = '\x35'
print str
str = '\x3536'
print str
str = '\x35\x36'
print str
1
2
3
4
5
6
7
8
9
10
11
12
结果:
5
536
56
Process finished with exit code 0
————————————————
版权声明:本文为CSDN博主「wowocpp」的原创文章,遵循CC 4.0 BY-SA版权协议,转载请附上原文出处链接及本声明。
原文链接:https://blog.csdn.net/wowocpp/article/details/79497719
########sample 2
Python操作Excel删除一个Sheet
在使用Python进行数据分析处理,操作Excel,有时需要删除某个Excel里的某个sheet,这里记录一个我测试成功的一个办法
软件环境:
1、OS:Win 10 64位
2.Python 3.7
3、使用openpyxl这个库
4、在当前文件夹下准备一个xlsx格式的Excel文件,【注意】:不支持删除xls格式的Excel文件的sheet
文件名:Test1.xlsx,其中有三个sheet,分别为:sheet1、sheet2、sheet3
参考代码:
#! -*- coding utf-8 -*-
#! Python Version 3.7

import openpyxl

def main():

    sExcelFile="Test1.xlsx"
    wb = openpyxl.load_workbook(sExcelFile)

    ws = wb["Sheet2"]

    wb.remove(ws)
    wb.save(sExcelFile)

    print("It is over")

if __name__=="__main__":
    main()
此代码成功运行,网上查找到的一些资料,可能和软件环境有关,执行屡屡报错,所以,这里给出明确的软件环境。
###########
#########sample 0 怎么获取一个CSS selector (怎么从一个网页正向获取一个CSS selector )
https://sqa.stackexchange.com/questions/27156/how-to-find-a-button-by-cssselector
To get a CSS Selector using Chrome dev tools
1.Right-click on the element
2. Select "Inspect"
a. Chrome's DevTools will on on the Elements tab with the element highlighted (in blue)
3. Right-click the highlighted element
4. Select "Copy" > "Copy selector"
If the selector uses the class and the class is compound (class=".btn .primary") then replace the spaces with periods.
Ex., ".btn.primary".
Share
element :元素
<input type="submit" class="btn" value="Go">
css selector: 选择
#dataview > div.dataview-pagination.tablepager > div.gotopage > form > input.btn
#dataview > div.dataview-pagination.tablepager > div.gotopage > form > input.btn
xpath: xpath 路径
//*[@id="dataview"]/div[3]/div[2]/form/input[2]
#J_TSearchForm > div.search-button > button
###sample 1 selenium显式等待 https://selenium-python-zh.readthedocs.io/en/latest/waits.html
5.1. 显式等待
显式等待是你在代码中定义等待一定条件发生后再进一步执行你的代码。 最糟糕的案例是使用time.sleep(),它将条件设置为等待一个确切的时间段。 这里有一些方便的方法让你只等待需要的时间。WebDriverWait结合ExpectedCondition 是实现的一种方式。
from selenium import webdriver
from selenium.webdriver.common.by import By
from selenium.webdriver.support.ui import WebDriverWait
from selenium.webdriver.support import expected_conditions as EC
driver = webdriver.Firefox()
driver.get("http://somedomain/url_that_delays_loading")
try:
element = WebDriverWait(driver, 10).until(
EC.presence_of_element_located((By.ID, "myDynamicElement"))
)
finally:
driver.quit()
在抛出TimeoutException异常之前将等待10秒或者在10秒内发现了查找的元素。 WebDriverWait 默认情况下会每500毫秒调用一次ExpectedCondition直到结果成功返回。 ExpectedCondition成功的返回结果是一个布尔类型的true或是不为null的返回值。
###sample 2 selenium进一步打印 这个元素的信息
https://blog.csdn.net/huilan_same/article/details/52544521
案例1:
from selenium import webdriver
from selenium.webdriver.common.by import By
from selenium.webdriver.support.ui import WebDriverWait
from selenium.webdriver.support import expected_conditions as EC
driver = webdriver.Chrome(executable_path="E:\logs\chromedriver_win32\chromedriver.exe")
wait = WebDriverWait(driver, 10)
driver.implicitly_wait(10) # 隐性等待和显性等待可以同时用,但要注意:等待的最长时间取两者之中的大者
driver.get('https://huilansame.github.io')
locator = (By.LINK_TEXT, 'CSDN')
try:
WebDriverWait(driver, 20, 0.5).until(EC.presence_of_element_located(locator))
print (driver.find_element_by_link_text('CSDN').get_attribute('href'))
finally:
driver.close()
案例2:selenium 调试方法
https://blog.csdn.net/u011541946/article/details/68923852
去掉import 部分
driver.get("https://www.baidu.com")
try:
#找到链接文字 新闻
driver.find_element_by_link_text("新闻")
#答应链接文字的 链接网址
print (driver.find_element_by_link_text('新闻').get_attribute('href'))
##继续找到元素 id s-top-left
wait.until(EC.presence_of_element_located((By.ID, "s-top-left")))
##如果找到元素,就答应如下信息
print ('test pass: element found by link text')
except Exception as e:
#如果没找到元素,就输出如下信息
print ("Exception found", format(e))
driver.quit()
###########
##sample 1
https://www.ijidi.cn/crx-download/mhjhnkcfbdhnjickkkdbjoemdmbfginb-11.html
下载 SelectorGadget 1.1
SelectorGadget 1.1安装说明
下载完 SelectorGadget 1.1的crx文件后, 打开Chrome浏览器扩展页面 (通过在地址栏输入chrome://extensions/ 或通过Chrome菜单图标> 更多工具> 扩展图标), 然后拖放 crx 文件到Chromer扩展页面就可以安装了。如果出现crx文件头损坏不能安装的错误,请打开Chrome的开发者选择,就可以安装了。
#######sample 2 如何使用
谷歌浏览器使用SelectorGadget和Xpath Helper获取xpath和css path
在上篇文章里,介绍了如何在火狐浏览器中获取网页元素的xpath和css path。
这篇文章将介绍,在谷歌浏览器中使用SelectorGadget和Xpath Helper实现同样功能。
这两个谷歌浏览器的扩展程序截图如下:


使用方法如下:
- 打开一个网页,例如www.hao123.com;
- 开启SelectorGadget(点击一个放大镜图案的按钮即可);
- 移动鼠标箭头到一个页面元素上并单击,该页面元素会变成绿色,SelectorGadget的文本框内显示出被选中页面元素的css path类型的定位字符串。“clear”按钮可以清空定位字符串,“clear”按钮中的数字是指定位字符串可以匹配的页面元素个数,其它具有相同定位字符串的页面元素都将变为黄色。单击这些黄色的页面元素,这些元素变为红色,表示剔除它们,用这种方式不断改变定位字符串,最终生成被选中元素的特有的定位字符串。
- 单击“xpath”按钮,可以生成被选择元素的xpath定位字符串,复制xpath定位字符串后,可以使用Xpath Helper扩展程序,验证xpath定位字符串能够匹配的页面元素个数。


###########sample 1
##先定位到表格,
element = browser.find_element_by_xpath('//*[@id="dataview"]/div[2]/div[2]/table')
# 提取表格内容td ,找很多元素
td_content = element.find_elements_by_tag_name("td") # 进一步定位到td 节点,不是td节点内容
td_content.txt 才是内容
td_content = element.find_elements_by_tag_name("td")
# 确定表格列数 len 找很多元素
col = len(element.find_elements_by_css_selector('tr:nth-child(1) td'))
##将list 按照col 长度,重新划分list 子类。
lst = [lst[i:i + col] for i in range(0, len(lst), col)]
## list 长度,打开某个list 的值
a= len(lst)
print (a)
print (lst[49])
#####sample 2 如果某个find_elements_by_css_selector
如果找不到css_selector,找不到元素
第一 有没有 使用如下三个方法 来定位
driver=webdriver.Chrome()
#driver.get('https://www.baidu.com/')
#1:通过id来定位
#driver.find_element_by_css_selector("#kw").send_keys("seleniumw我要自学网") #dlement后面不需要s,通过id来定位前面需要加#号+id
#2:通过class来定位
#driver.find_element_by_css_selector('.s_ipt').send_keys('seleniumw我要自学网') #class来定位,class前面+.
#3:通过属性来定位
#driver.find_element_by_css_selector("[autocomplete='off']").send_keys('seleniumw我要自学网') #属性要在[]里面
sleep(2)
driver.find_element_by_id('su').click()
sleep(2)
driver.quit()
第二:实在没有办法,使用xpath 来定位,
##########sample3 panda
Pandas Series 类似表格中的一个列(column),类似于一维数组,可以保存任何数据类型。
lst_link = pd.Series(lst_link)
创建一个DataFrame
df_table = pd.DataFrame(lst)
#########sample 1 .for python 2.7 install package pycrypto meet error: Unable to find vcvarsall.bat
q 1.for python 2.7 install package pycrypto meet error: Unable to find vcvarsall.bat
python E:\\test_py\magic_box\package\PyMySQL-0.9.0\PyMySQL-0.9.0\setup.py install
error: Unable to find vcvarsall.bat
cd E:\ddd\test_py\magic_box\package\pycrypto-2.6.1\pycrypto-2.6.1
python E:\ddd\test_py\magic_box\package\pycrypto-2.6.1\pycrypto-2.6.1\setup.py install
A:
1.1 安装setuptools
e:\ddd\test_py\magic_box\venv\Scripts
E:\ddd\test_py\magic_box\package\setuptools-41.2.0-py2.py3-none-any.whl
1.2 安装 windows c++ for python
1.3 配置
下载完成并安装。以本机为例,安装完成后的路径为:
1
C:\Users\Administrator\AppData\Local\Programs\Common\Microsoft\Visual C++ for Python\9.0
2.按照文档,修改注册表
https://www.pianshen.com/article/9113183184/
3.打开注册表,手动写注册表
①cmd>regedit
②根据python版本,增加相应的item:
32位,创建项:
HKEY_CURRENT_USER\Software\Microsoft\VisualStudio\9.0\Setup\VC
64位,创建项:
HKEY_CURRENT_USER\Software\Wow6432Node\Microsoft\VisualStudio\9.0\Setup\VC
③在新建的项下新建字符串值:
名称:productdir
数值: vcvarsall.bat所在路径
(C:\Users\Administrator\AppData\Local\Programs\Common\Microsoft\Visual C++ for Python\9.0)
1.4. 重新安装
e:\ddd\test_py\magic_box\venv\Scripts\python E:\ddd\test_py\magic_box\package\pycrypto-2.6.1\pycrypto-2.6.1\setup.py install
参考文档
https://www.cnblogs.com/lazyboy/p/4017567.html
https://www.pianshen.com/article/9113183184/
####sample 2
q2.安装 paramiko bcrypt cryptography pynacl six cffi enum34 ipaddress pycparser
pynacl
e:\ddd\test_py\magic_box\venv\Scripts\pip install PyNaCl-1.4.0-cp27-cp27m-win_amd64.whl
cryptography
e:\ddd\test_py\magic_box\venv\Scripts\pip install cryptography-3.3.2-cp27-cp27m-win_amd64.whl
bcrypt
e:\ddd\test_py\magic_box\venv\Scripts\pip install bcrypt-3.1.7-cp27-cp27m-win_amd64.whl
paramiko
e:\ddd\test_py\magic_box\venv\Scripts\pip install paramiko-2.7.2-py2.py3-none-any.whl
A:;另外 paramekou 的语法 和使用sftp 下载文件方法 见 https://blog.csdn.net/forever_wen/article/details/82556154
###sample 1 实现在字符和数字的拼接,并且打印出来
https://blog.csdn.net/weixin_39957027/article/details/110699289
为了将数字转换成字符串,可以使用 str() 或 repr() 函数,例如如下代码:s1 = "这是数字: "
p = 99.8
#字符串直接拼接数值,程序报错
print(s1 + p)
#使用str()将数值转换成字符串
print(s1 + str(p))
#使用repr()将数值转换成字符串
print(s1 + repr(p))
####sample 2 求python脚本,从txt检索出特定字符的行(有很多行,行里面有记录的时间),并从行中抓出对应的时间字符
2.1
https://zhidao.baidu.com/question/1540218616531243347.html
def main():
import re
time_format = "\d+-\d+-\d+" #时间格式
special_string = "name" #特定字符串
pattern = re.compile(time_format)
txt_content = open("test.txt", "r")
for line in txt_content:
l = line.strip()
if l.find(special_string)>=0: #如果有特定字符串
print l #打印对应的行
match =pattern.match(l) #如果有匹配的时间格式
if match:
print match.group() #打印对应的时间
if __name__ == '__main__':
main()
2.2
两种方法分割python多空格字符串
https://blog.csdn.net/lwgkzl/article/details/82145387
str = "aa bbbbb ccc d"
str_list = str.split()
print str_list
2.3
Python 去掉字符串中的特殊字符,空格
https://blog.csdn.net/u010891397/article/details/87694874
print re.sub(r'[^A-Za-z0-9_]+', ' ', str_list[2])
2.4 列表排序去重
https://blog.csdn.net/qq_40304090/article/details/82020576
li1 = [1,4,3,3,4,2,3,4,5,6,1]
new_li1 = list(set(li1))
2.5 如何从Python列表中删除方括号?(How to remove square brackets from list in Python?)
https://www.it1352.com/1564721.html
You could convert it to a string instead of printing the list directly:
print(", ".join(LIST))
If the elements in the list aren't strings, you can convert them to string using either repr (if you want quotes around strings) or str (if you don't), like so:
LIST = [1, "foo", 3.5, { "hello": "bye" }]
print( ", ".join( repr(e) for e in LIST ) )
Which gives the output:
1, 'foo', 3.5, {'hello': 'bye'}
##################
#########sample 1 元组不能修改,子列表可以修改,增删改
https://www.runoob.com/python/python-lists.html
https://www.cnblogs.com/heiguu/p/10046389.html
1、元组 列表 字典
元组( 元组是不可变的)
hello = (1,2,3,4,5)
2.
list01 = ['runoob', 786, 2.23, 'john', 70.2]
list02 = [123, 'john']
print list01
print list02
# 列表截取
print list01[0]
print list01[-1]
print list01[0:3]
# 列表重复
print list01 * 2
# 列表组合
print list01 + list02
# 获取列表长度
print len(list01)
# 删除列表元素
del list02[0]
print list02
# 元素是否存在于列表中
print 'john' in list02 # True
# 迭代
for i in list01:
print i
# 比较两个列表的元素
print cmp(list01, list02)
# 列表最大/最小值
print max([0, 1, 2, 3, 4])
print min([0, 1])
# 将元组转换为列表
aTuple = (1,2,3,4)
list03 = list(aTuple)
print list03
# 在列表末尾添加新的元素
list03.append(5)
print list03
# 在列表末尾一次性追加另一个序列中的多个值(用新列表扩展原来的列表)
list03.extend(list01)
print list03
# 统计某个元素在列表中出现的次数
print list03.count(1)
# 从列表中找出某个值第一个匹配项的索引位置
print list03.index('john')
# 将对象插入列表
list03.insert(0, 'hello')
print list03
# 移除列表中的一个元素(默认最后一个元素),并且返回该元素的值
print list03.pop(0)
print list03
# 移除列表中某个值的第一个匹配项
list03.remove(1)
print list03
# 反向列表中元素
list03.reverse()
print list03
# 对原列表进行排序
list03.sort()
print list03
####sample 2 Python 将列表 数据写入文件(txt、csv、excel)
https://cloud.tencent.com/developer/article/1477155?from=14588
https://www.cnblogs.com/cbig/p/13962296.html
import xlwt
def write_excel():
myWorkbook = xlwt.Workbook() # 创建Excel工作薄
mySheet = myWorkbook.add_sheet('A Test Sheet') # 添加Excel工作表
total_list = [['A', 'B', 'C', 'D', 'E'], [1, 2, 4, 6, 8], [4, 6, 7, 9, 0], [2, 6, 4, 5, 8]]
for r in range(len(total_list)):
for c in range(len(total_list[0])):
mySheet.write(r+1,c+1,total_list[r][c])
# excel中的行和列是从1开始计数的,所以需要+1
new_path = '生成的Excel_XLWT.xls'
myWorkbook.save(new_path) # 保存
print(new_path)
if __name__ == '__main__':
# 写入Excel
write_excel()
######sample 3 python怎么写中文至excel_Python 解决中文写入Excel时抛异常的问题
https://blog.csdn.net/weixin_39622905/article/details/110078075
UnicodeDecodeError: 'ascii' codec can't decode byte 0xe6 in position 0: ordinal not in range(128)
解决方法是,在创建workbook的时候设置字符集即可解决:
workbook = xlwt.Workbook(encoding = 'utf-8')
##########sample 1
########sample 1 一共有以下4部分
交互方式的输入变量
python 直接调用sqlplus 连接
设置python 的os 环境变量 os.environ['NLS_LANG'] = nls_env
执行expdp 命令
参考
https://my.oschina.net/u/351612/blog/1537191
https://www.cnblogs.com/52hadoop/p/3520489.html
https://blog.csdn.net/nanyangdujie2/article/details/49951729
https://www.cnblogs.com/hyl2018/p/8970769.html
https://www.jb51.net/article/82166.htm
https://www.cnblogs.com/52hadoop/p/3520489.html
import os
import time
###use sqlplus to check sql
import sys
from subprocess import Popen, PIPE
dbname = 'dba'
connect_string='dba/dba_1234@dba'
#setciont 1 .mkdir directory 交互方式的输入变量,主机上执行变量
import os
os.system('df -h ')
print " "
path = raw_input("choose a expdp path:")
# path = r'C:\Users\Administrator\Desktop\test'
os.mkdir(path )
time.sleep( 20 )
###section create directory
# sql0 = """
# create or replace directory dp_dir as '/home/oracle';
# """
sql0 = """
create or replace directory DUMP_DIR as '""" + path + """';
"""
sql = """
set linesize 400
col owner for a10
col object_name for a30
SELECT value FROM v$nls_parameters WHERE PARAMETER='NLS_CHARACTERSET';
"""
sql1 = """
set linesize 400
col DIRECTORY_NAME for a20
col DIRECTORY_PATH for a60
select DIRECTORY_NAME,DIRECTORY_PATH from dba_directories;
"""
###python 直接调用sqlplus 连接
# proc = Popen(["sqlplus", "-S", "/", "as", "sysdba"], stdout=PIPE, stdin=PIPE, stderr=PIPE)
proc = Popen(["sqlplus", "-S", connect_string], stdout=PIPE, stdin=PIPE, stderr=PIPE)
proc.stdin.write(sql0)
proc.stdin.write(sql)
proc.stdin.write(sql1)
(out, err) = proc.communicate()
if proc.returncode != 0:
print err
sys.exit(proc.returncode)
else:
print out
######设置python 的os 环境变量 os.environ['NLS_LANG'] = nls_env
nls_env = raw_input("nls_env(AMERICAN_AMERICA.<char_name>):")
# os.system('export NLS_LANG=AMERICAN_AMERICA.ZHS16GBK')
# os.system('env|grep NLS_LANG')
# os.environ['NLS_LANG'] = 'SIMPLIFIED CHINESE_CHINA.UTF8'
os.environ['NLS_LANG'] = nls_env
os.system('env|grep NLS_LANG')
###执行expdp 命令
command = "expdp userid=" + connect_string \
+ " directory=DUMP_DIR full=y dumpfile=%s.dmp,logfile=%s.log " %(dbname,dbname);
# print command
os.system(command);
#######sample 1
https://blog.csdn.net/jerrygaoling/article/details/81051447
Python中字符串String去除出换行符(\n,\r)和空格的问题
https://www.php.cn/python-tutorials-427456.html
python怎么把字符串换成元组
代码使用eval函数:(推荐学习:Python视频教程)
r='(23,5,6)'
val = eval(r)
print val
代码使用tuple函数:
r='(23,5,6)'
temp=r.replace('(','').replace(')','')
a=tuple([int(i) for i in temp.split(',')])
print a
结果:
#字符串变成了元组
(25,5,6)
https://www.py.cn/faq/python/17942.html#:~:text=python%E5%88%A0%E9%99%A4%E5%AD%97%E7%AC%A6%E4%B8%B2%E6%9C%80%E5%90%8E%E4%B8%80%E4%B8%AA%E5%AD%97%E7%AC%A6%E7%9A%84%E6%96%B9%E6%B3%95%EF%BC%9A%201%E3%80%81%E4%BD%BF%E7%94%A8strip%20%28%29%E6%96%B9%E6%B3%95%E5%88%A0%E9%99%A4%E6%9C%80%E5%90%8E%E4%B8%80%E4%B8%AA%E5%AD%97%E7%AC%A6%20Python%20strip,%28%29%20%E6%96%B9%E6%B3%95%E7%94%A8%E4%BA%8E%E7%A7%BB%E9%99%A4%E5%AD%97%E7%AC%A6%E4%B8%B2%E5%A4%B4%E5%B0%BE%E6%8C%87%E5%AE%9A%E7%9A%84%E5%AD%97%E7%AC%A6%EF%BC%88%E9%BB%98%E8%AE%A4%E4%B8%BA%E7%A9%BA%E6%A0%BC%E6%88%96%E6%8D%A2%E8%A1%8C%E7%AC%A6%EF%BC%89%E6%88%96%E5%AD%97%E7%AC%A6%E5%BA%8F%E5%88%97%E3%80%82%20strip%20%28%29%E6%96%B9%E6%B3%95%E8%AF%AD%E6%B3%95%EF%BC%9A%20str.strip%20%28%5Bchars%5D%29%3B
1、使用strip()方法删除最后一个字符
python_元组_循环遍历
https://www.cnblogs.com/shao-null/p/9269419.html
-
在 python 中,可以使用 for 循环遍历 所有非数字类型的遍历:列表、元组、字典 以及 字符串
-
提示:在实际开发中,除非 能够确认元组中的数据类型,否则针对元组的循环遍历需求并不多
info_tuple_01 = ("zhangsan",18,1.75)
#使用迭代遍历元组
for my_info in info_tuple_01:
#使用格式字符串彬姐 my_info 这个变量不方便
#因为元组中通常保存的数据类型是不同的
print(my_info)
##sample 1 TypeError: 'str' object is not callable (Python)
https://stackoverflow.com/questions/6039605/typeerror-str-object-is-not-callable-python
This is the problem:
global str
str = str(mar)
You are redefining what str() means. str is the built-in Python name of the string type, and you don't want to change it.
###sample 2 cx_oracle 结果输出为中文
connect_string='skzf'
###修改为 设置为中文 ,设置client 配置如下:
os.environ['NLS_LANG'] = 'SIMPLIFIED CHINESE_CHINA.UTF8'
###默认cx_oracle 连接 默认使用 utf-8 连接
db = cx_Oracle.connect(connect_string)
###### sample 3 cx_oracle 在线文档 SQL Execution 执行方法
https://cx-oracle.readthedocs.io/en/latest/user_guide/sql_execution.html
该语句是拼接 sql 带有变量 ,调试调试拼接sql 是否能满足要求,有的时候拼接sql 会带上单引号或者空格,导致sql 执行返回结果为空。
tab_name 初次处理带有 带有变量 \ 或者空格
##单行调试
# val = cursor.fetchall()
# t_name = str(val).decode('string - escape').split(",", 2)
# # print t_name ,这个时候t_name 带有变量 \ 或者空格
# tab_name= t_name[1].replace(' ', '').replace('\'', '')
##再次处理 就没有 变量\ 和空格了
cursor.execute("""
select :d1,:d2 from dual""", d1=tab_name, d2="GKZF")
val = cursor.fetchone()
print val
##如果返回结果集合为多行,可以使用如下进行单行调试。只取得结果集的一行进行调试
cursor.execute("""
select a.num_rows, a.TABLE_NAME, b.COMMENTS
from dba_tables a, dba_tab_comments b
WHERE a.TABLE_NAME = b.TABLE_NAME
and a.owner = :T1
order by TABLE_NAME""", T1=my_user)
val = cursor.fetchall()
########单步调试,要注意 带入的变量是否由(或者)特殊符号
##单行调试
# val = cursor.fetchall()
# t_name = str(val).decode('string - escape').split(",", 2)
# # print t_name ,这个时候t_name 带有变量 (引号)' 或者空格 ,前面加入反斜杠,是为了转义 引号
# tab_name= t_name[1].replace(' ', '').replace('\'', '')
##再次处理 就没有 变量\ 和空格了
# print tab_name
# #调试拼接sql
# # cursor.execute("""
# # select :d1,:d2 from dual""", d1=tab_name, d2="GKZF")
# # val = cursor.fetchone()
# # print val
######sample 1 字符串处理,切割,适用与处理sqlplus 返回的 字符串信息
https://www.runoob.com/python/att-string-split.html
# -*- coding:utf-8 -*-
txt = "Google#Runoob#Taobao#Facebook"
# 第二个参数为 1,返回两个参数列表
x = txt.split("#", 1)
print x[0]
#####sapmple 2
TypeError: 'newline' is an invalid keyword argument for this function 错误解决
后在网上查找解决方法,其中一种方法是把error line那行修改为:
outputFile = open('output1.csv', 'wb') # 'w' ---> 'wb'实测代码正确,且文档内容不是双倍行距。
########sample 1 举例讲解Python中的list列表数据结构用法
https://www.jb51.net/article/80832.htm
#########sampe 2 Python List index()方法
https://www.runoob.com/python/att-list-index.html
######sample 3 python 中如何将 list 拼接为一个字符串
https://blog.csdn.net/yu97271486/article/details/105996934/
######sample 4 如何用python计算1到10所有偶数的和?
https://zhidao.baidu.com/question/31979195.html
#######sample 5 【Python】字符串和变量拼接的写法
url="http://www.win4000.com/wallpaper_detail_160877_%d"%(num)
html=".html"
text=url+html
#######sample 6 解决python中TypeError: not enough arguments for format string
https://blog.csdn.net/w926498/article/details/80579520
目的是根据sqlplus 查询的用户结果(aaaa,bbbbb,cccc)
拼接一个查询语句
:USER1,:USER2,:USER3,:USER4
已经拼接另一个查询语句
USER1=lst[0], USER2=lst[1],USER3=lst[2],USER4=lst[3]
fruits = ['apples', 'oranges', 'pears', 'apricots']
length = len(fruits)
rst =''
rst_1=''
for i in range(0, length):
print i
print fruits[i]
user=":user%d," % (i)
user = ":user%d," % (i)
user1 = "USER%d=lst[%d]," % (i,i)
print user
rst += user
rst_1 += user1
print rst
print rst_1
###sample 1
#####cx_oracle 带入不同类型的 绑定变量的几种方法
https://stackoverflow.com/questions/32868717/python-cx-oracle-bind-variables/33882805
You are misusing the binding.
There are three different ways of binding variables with cx_Oracle as one can see here :
1) by passing a tuple to a SQL statement with numbered variables :
sql = "select * from sometable where somefield = :1 and otherfield = :2"
cur.execute(sql, (aValue, anotherValue))
2) By passing keyword arguments to a SQL statement with named variables :
sql = "select * from sometable where somefield = :myField and otherfield = :anotherOne"
cur.execute(sql, myField=aValue, anotherOne=anotherValue)
3) By passing a dictionary to a SQL statement with named variables :
sql = "select * from sometable where somefield = :myField and otherfield = :anotherOne"
cur.execute(sql, {"myField":aValue, "anotherOne":anotherValue})
a tuple 对应着 with numbered variables :
a tuple to 为如下这段 (aValue, anotherValue)
keyword 对应着 with named variables
keyword arguments 为如下这段 , myField=aValue, anotherOne=anotherValue
dictionary 对应着 named variables :
a dictionary 为如下这段 {"myField":aValue, "anotherOne":anotherValue}
###########sample 1 Pycharm回车之后不能换行或不能缩进的解决方法
https://blog.csdn.net/brawly/article/details/105571175
如果不小心按到键盘上的Insert键的话,光标显示的就不是一条竖线,而是一个类似方块的阴影区域,比如
插入一下insert键的介绍:它叫插入键,缩写INS。主要用于在文档中切换文本输入的模式。
有两种模式,一种是插入模式,新输入的字插入到光标位置,原来的字相应后移。这也是我们现在默认的使用模式。
另一种是覆盖模式,即在光标位置新输入的内容会替代原来的字。如果在覆盖模式,光标会变成一个方块而不是通常的竖线。就是上面出现的这种情况。
##########sample 2 cx_Oracle.NotSupportedError: Python value of type tuple not supported
https://stackoverflow.com/questions/58909841/cx-oracle-notsupportederror-python-value-of-type-tuple-not-supported
###### sample 3 AttributeError: 'tuple' object has no attribute 'strip'错误 (重要)
https://segmentfault.com/q/1010000009330077
1.oracle cx_oracle 查询的结果都是tuple 类型(),必须转成 str 类型
strip是字符串函数,tuple类型当然会报错啊
print str(lst[i]).replace(',', '').replace('\'', '').replace('(', '').replace(')', '')
2.
注意如果使用cx_oracle 返回的结果,默认是tuple 类型,带有() 号和单引号的化,需要做处理,转成字符串,在去掉 带有() 号和单引号 的特殊字符.
才能处理, 这样,这些新的str 类型的值才能 用来拼接新的查询SQL,否侧可能由问题
##########sample 4 请问python能循环赋值么?
https://bbs.csdn.net/topics/390177352
n = 100
alist = []
for i in range(n):
alist.append(i)
##############sample 5 拼接sql 带入新的cx_oracle 执行
注意如果使用cx_oracle 返回的结果,默认是tuple 类型,带有() 号和单引号的化,需要做处理,转成字符串,在去掉 带有() 号和单引号 的特殊字符.
才能处理, 这样,这些新的str 类型的值才能 用来拼接新的查询SQL,否侧可能由问题
# -*- coding:utf-8 -*-
import cx_Oracle
import ConfigParser
config = ConfigParser.ConfigParser()
config.read('C:\\\\\\test_py\\magic_box\\config\\config.ini')
o_user = config.get("oracle", "ora_user")
o_pass = config.get("oracle", "ora_pass")
m_pass = config.get("mysql","my_pass")
print(o_user)
print(o_pass)
print(m_pass)
##define
# db = cx_Oracle.connect('dbmgr', 'dbmgr', '10.241.25.44:1521/afa')
#11g
# db = cx_Oracle.connect(o_user, o_pass, '58.2.103.73:1528/pcrs')
db = cx_Oracle.connect(o_user, o_pass, '10.200.210.187:1529/ora11g')
cursor=db.cursor()
print " "
print "####### 检查问题sql "
# sql="SELECT client_name, window_name, jobs_created, jobs_started, jobs_completed FROM dba_autotask_client_history WHERE client_name like '%stats%'"
sql=" SELECT username \
FROM dba_users \
WHERE username not in \
('SYS', 'SYSTEM', 'PUBLIC', 'OUTLN', 'WMSYS', 'ORDSYS', 'MDSYS'"
cursor.execute(sql)
result = cursor.fetchall()
lst = result
alist = []
length = len(lst)
rst =''
rst_1=''
for i in range(0, length):
# print i
# 将cx_oracle
# 返回的tuple
# 值做处理。去掉( 和 ), 去掉单引号
#
# 在将这些值重新做一个新数组。
print str(lst[i]).replace(',', '').replace('\'', '').replace('(', '').replace(')', '')
alist.append(str(lst[i]).replace(',', '').replace('\'', '').replace('(', '').replace(')', ''))
user = ":user%d," % (i)
user1 = "user%d=alist[%d]," % (i,i)
# print user 循环加入字符串
rst += user
rst_1 += user1
print rst
print rst_1
# sql="SELECT username FROM dba_users WHERE username not in (" + rst[:-1] +")"
print rst_1[:-1]
# cursor.execute(sql, rst_1[:-1])
# cursor.execute(sql, (rst_1[:-1]))
sql="SELECT username FROM dba_users WHERE username not in (:user0,:user1,:user2,:user3,:user4,:user5,:user6,:user7)"
print sql
# cursor.execute(sql, {"user0":lst[0],"user1":lst[1],"user2":lst[2],"user3":lst[3],"user4":lst[4],"user5":lst[5],"user6":lst[6],"user7":lst[7]})
cursor.execute(sql, user0=alist[0],user1=alist[1],user2=alist[2],user3=alist[3],user4=alist[4],user5=alist[5],user6=alist[6],user7=alist[7])
# cursor.execute(sql, user0=lst[0],user1=lst[1],user2=lst[2],user3=lst[3],user4=lst[4],user5=lst[5],user6=lst[6],user7=lst[7])
result = cursor.fetchall()
for i in result:
print(i)
# cursor.execute(sql)
db.close();
############sample 1 cx_oracle 并将alist 数组带入这条sql,执行sql
https://stackoverflow.com/questions/61248730/cx-oracle-databaseerror-ora-01036-illegal-variable-name-number
import cx_Oracle
import csv

. . .

# Predefine the memory areas to match the table definition
cursor.setinputsizes(None, 25)

# Adjust the batch size to meet your memory and performance requirements
batch_size = 10000

with open('testsp.csv', 'r') as csv_file:
    csv_reader = csv.reader(csv_file, delimiter=',')
    sql = "insert into test (id,name) values (:1, :2)"
    data = []
    for line in csv_reader:
        data.append((line[0], line[1]))
        if len(data) % batch_size == 0:
            cursor.executemany(sql, data)
            data = []
    if data:
        cursor.executemany(sql, data)
    con.commit()


######### 举例如下:
db = cx_Oracle.connect(o_user, o_pass, ':1529/ora11g')
cursor=db.cursor()
print " "
print "####### 检查所有非系统用户的信息 "
# sql="SELECT client_name, window_name, jobs_created, jobs_started, jobs_completed FROM dba_autotask_client_history WHERE client_name like '%stats%'"
sql=" SELECT username \
FROM dba_users \
WHERE username not in \
('SYS', 'SYSTEM', 'PUBLIC', 'OUTLN', 'WMSYS', 'ORDSYS', 'MDSYS', \
'REMOTE_SCHEDULER_AGENT', 'PDBADMIN', 'GSMUSER', 'SYSRAC', 'OJVMSYS', 'AUDSYS','SYSDG','DBMGR','DBMONOPR')"
cursor.execute(sql)
result = cursor.fetchall()
lst = result
alist = []
length = len(lst)
rst =''
# rst_1=''
for i in range(0, length):
# print i
# 将cx_oracle
# 返回的tuple
# 值做处理。去掉( 和 ), 去掉单引号
#
# 在将查询的非系统用户,做字符串处理,这些值重新做一个新数组alist 。
print str(lst[i]).replace(',', '').replace('\'', '').replace('(', '').replace(')', '')
alist.append(str(lst[i]).replace(',', '').replace('\'', '').replace('(', '').replace(')', ''))
user = ":user%d," % (i)
# print user 循环加入字符串 例如user1,user2,user3
rst += user
print rst
print alist
###拼接sql
sql = "SELECT username FROM dba_users WHERE username not in (" + rst[:-1] + ")"
print sql
print(sql, alist)
#####执行拼接sql, alist 是一个元组,执行这条sql ,并将alist 数组带入这条sql
##('SELECT username FROM dba_users WHERE username not in (:user0,:user1,:user2,:user3,:user4,:user5,:user6,:user7)', ['IMS', 'SOE', '', 'CRBC', 'NAGIOS', 'T1', 'ZABBIX'])
cursor.execute(sql, alist)
result = cursor.fetchall()
for i in result:
print(i)
# cursor.execute(sql)
db.close();
https://blog.csdn.net/jpmsdn/article/details/86302389
#######sample 1 python 文件名包含变量
订阅专栏
ouput=open(str1+".txt",'w')
用引号括起来表示的是字符串常量,不在引号中才表示变量
windows下,str1中不能有在文件名中不能出现的特殊字符
————————————————
版权声明:本文为CSDN博主「test_sharing」的原创文章,遵循CC 4.0 BY-SA版权协议,转载请附上原文出处链接及本声明。
原文链接:https://blog.csdn.net/jpmsdn/article/details/86302389
####sample2 Python怎么把结果输出到txt文件
https://jingyan.baidu.com/article/fec4bce286acc4f2618d8baf.html
import time
f_time=time.strftime('%Y-%m-%d %H:%M:%S',time.localtime(time.time()))
#blank space
k=' '
path='c:\db'
##for for linux numm, for windows "//"
#jg=open(path+"//"+"impdp_target_19c.txt",'a')
jg=open(path+"/impdp_target_19c.txt",'a')
name=raw_input("pless put your name:")
#output
print ('welcome,' + name + '!')
jg.write('\n' + f_time + k + name)
jg.close()
#######sample 1 用 pymysql 打印 MySQL/MariaDB 的所有库名、表名和字段名
转自 https://blog.51cto.com/walkerqt/2150530
# encoding: utf-8
# author: walker
# date: 2018-07-26
# summary: 打印 MySQL/MariaDB 里面的所有库名、表名和字段名
import sys
reload(sys)
sys.setdefaultencoding('utf8')
import pymysql
import pprint
DBHost = r'10.241.26.35'
DBPort = 3306
DBUser = 'root'
DBPwd = 'Testesb123!'
# 忽略掉系统库
IgnoreDB = {'information_schema', 'mysql', 'performance_schema', 'sys'}
# 处理一个数据库
def ProcOneDB(dbName):
print('************ use %s ************' % dbName)
connDB = pymysql.connect(host=DBHost,
port=DBPort,
user=DBUser,
passwd=DBPwd,
db=dbName,
charset='utf8mb4')
cur = connDB.cursor()
sql = 'show tables;'
cur.execute(sql)
rowList = cur.fetchall()
tableList = list()
for row in rowList:
tableList.append(row[0])
####打印此数据库下的有多少表,每个表也显示出来名字(分行显示)
print('tableList(%d):\n%s\n' % (len(tableList), pprint.pformat(tableList, indent=1)))
# 处理每个表
for tabName in tableList:
print('table %s ...' % tabName)
sql = "select column_name from information_schema.columns where table_schema='%s' and table_name='%s';"
sql = sql % (dbName, tabName)
cur.execute(sql)
rowList = cur.fetchall()
fieldList = list()
for row in rowList:
fieldList.append(row[0])
###打印每个表有多少列,每个列名也显示(分行显示)
print('fieldList(%d):\n%s\n' % (len(fieldList), pprint.pformat(fieldList, indent=4)))
cur.close()
connDB.close()
# 处理所有数据库
def ProcAllDB():
connDB = pymysql.connect(host=DBHost,
port=DBPort,
user=DBUser,
passwd=DBPwd,
charset='utf8mb4')
cur = connDB.cursor()
sql = "show databases;"
print('input sql:' + sql)
cur.execute(sql)
rowList = cur.fetchall()
cur.close()
connDB.close()
dbList = list()
for row in rowList:
dbList.append(row[0])
###打印 总共有多少个数据库 ,并且打印每个数据库名字(分行打印)
print('dbList(%d):\n%s\n' % (len(dbList), pprint.pformat(dbList, indent=4)))
for dbName in dbList:
##判断是否数据库名字是否在IgnoreDB里面,如果在的话,忽略进入下一步,否则继续处理
if dbName in IgnoreDB:
continue
ProcOneDB(dbName)
if __name__ == '__main__':
ProcAllDB()
################pymysql
python使用pymysql操作MySQL错误代码1054和1064处理方式
1064 一般是sql 语法的问题
一般是这一步存在sql语法有问题
cursor.execute('create table %s (%s)',(table_name, values))
建议打开cursor.mogrify,并打印,一般可以看到sql语法的问题
sql_1 = cursor.mogrify('create table %s (%s)'% (table_name,values))print(sql_1)#######sample 2 分行打印 函数 pprint() 用法
https://www.jb51.net/article/179941.htm
https://www.jb51.cc/python/527166.html
##调用pprint.pprint 直接打印
import pprint
data=['generate_csv\\train_00.csv','generate_csv\\train_01.csv',
'generate_csv\\train_02.csv', 'generate_csv\\train_03.csv',
'generate_csv\\train_04.csv', 'generate_csv\\train_05.csv',
'generate_csv\\train_06.csv', 'generate_csv\\train_07.csv',
'generate_csv\\train_08.csv', 'generate_csv\\train_09.csv',
'generate_csv\\train_10.csv', 'generate_csv\\train_11.csv']
print(data)
print("--------分界线--------------")
pprint.pprint(data)
##或者 用print 函数调用 pprint.pformat的保存的变量,并且打印出来
import sys
import pprint
a=[1,2,[3,4,],5]
pprint.pformat(a, indent=2)
print('%s' % pprint.pformat(a, indent=6))
###如果仅仅想获得数据而不是输出数据也可以用pformat
import sys
import pprint
str = pprint.pformat(sys.path)
print str
rowList = cursor.fetchall()
sesList = list()
for row in rowList:
sesList.append(row)
print row
######sample 1 linux pycharm 无法启动。
有图形界面,但是图形界面报错
Required tools are missing: realpath (SHELL=/bin/bash PATH=/usr/lib64/qt-3.3/bin:/
解决方法
https://alltime.pp.ua/blog/how-to-install-realpath-on-centos-6/
wget http://ftp.tu-chemnitz.de/pub/linux/dag/redhat/el6/en/x86_64/rpmforge/RPMS/realpath-1.17-1.el6.rf.x86_64.rpm
How to install realpath on Centos 6
rpm -Uvh realpath-1.17-1.el6.rf.x86_64.rpm
######sample 2 linux pycharm 无法启动。
1.: /lib64/libc.so.6: version `GLIBC_2.14' not found (
参考文档 https://blog.csdn.net/changcsw/article/details/79761620
strings /lib64/libc.so.6 | grep GLIBC
该问题出现在该程序只能跑在redhat7,版本,redhat 7 内核支持GLIBC_2.14,redhat6 内核不支持GLIBC_2.14
sample 3 图形化界面出不来
需要安装GUI kgome ,进入完整的图形化窗口,(console 窗口)
如果你是在一个桌面环境比如 GNOME、KDE、Unity、Cinnamon 或者其他现代桌面上运行,那么你也可以通过桌面环境的菜单或者快捷方式来找到 PyCharm
安装linux pycharm 比较简单,解压缩,就可以运行启动命令
1. ctrl+alt+t打开终端窗口,输入以下命令:
sudo tar -zxvf pycharm-professional-2019.3.3.tar.gz
然后回车,接着输入密码回车进行解压。注意:输入的密码是不显示的,输入完密码回车即可。
输入cd pycharm-2019.3.3/bin
回车并运行安装程序
sh ./pycharm.sh
############sample 1 getopt模块 和 sys.argv[0] 模块的使用方法,
goto 模块是处理命令行的返回语句的方法
有-h, 还有自定义的模块几类
参考 https://www.runoob.com/python/python-command-line-arguments.html
#!/usr/bin/python
# -*- coding: UTF-8 -*-
import sys, getopt
def main(argv):
inputfile = ''
outputfile = ''
try:
opts, args = getopt.getopt(argv,"hi:o:",["ifile=","ofile="])
except getopt.GetoptError:
print 'test.py -i <inputfile> -o <outputfile>'
sys.exit(2)
for opt, arg in opts:
if opt == '-h':
print 'test.py -i <inputfile> -o <outputfile>'
sys.exit()
elif opt in ("-i", "--ifile"):
inputfile = arg
elif opt in ("-o", "--ofile"):
outputfile = arg
print '输入的文件为:', inputfile
print '输出的文件为:', outputfile
if __name__ == "__main__":
main(sys.argv[1:])
######sample 1. 怎样在windows 上安装ansible 模块
下载包,
http://pypi.doubanio.com/simple/ansible/
安装过程报错找不到依赖包PyYAML
e:\\test_py\magic_box\venv\Scripts>pip install E:\\test_py\magic_box\pac
kage\ansible\ansible-2.5.0b1-py2.py3-none-any.whl
DEPRECATION: Python 2.7 will reach the end of its life on January 1st, 2020. Ple
ase upgrade your Python as Python 2.7 won't be maintained after that date. A fut
ure version of pip will drop support for Python 2.7. More details about Python 2
support in pip, can be found at https://pip.pypa.io/en/latest/development/relea
se-process/#python-2-support
Processing e:\\test_py\magic_box\package\ansible\ansible-2.5.0b1-py2.py3-non
e-any.whl
Requirement already satisfied: paramiko in e:\\test_py\magic_box\venv\lib\si
te-packages (from ansible==2.5.0b1) (2.7.2)
Requirement already satisfied: cryptography in e:\\test_py\magic_box\venv\li
b\site-packages (from ansible==2.5.0b1) (3.3.2)
Requirement already satisfied: setuptools in e:\\test_py\magic_box\venv\lib\
site-packages (from ansible==2.5.0b1) (41.2.0)
WARNING: Retrying (Retry(total=4, connect=None, read=None, redirect=None, status
=None)) after connection broken by 'ConnectTimeoutError(<pip._vendor.urllib3.con
nection.VerifiedHTTPSConnection object at 0x0000000003BD6C08>, 'Connection to py
pi.org timed out. (connect timeout=15)')': /simple/pyyaml/
WARNING: Retrying (Retry(total=3, connect=None, read=None, redirect=None, status
=None)) after connection broken by 'ConnectTimeoutError(<pip._vendor.urllib3.con
nection.VerifiedHTTPSConnection object at 0x0000000003C03088>, 'Connection to py
pi.org timed out. (connect timeout=15)')': /simple/pyyaml/
WARNING: Retrying (Retry(total=2, connect=None, read=None, redirect=None, status
=None)) after connection broken by 'ConnectTimeoutError(<pip._vendor.urllib3.con
nection.VerifiedHTTPSConnection object at 0x0000000003C03208>, 'Connection to py
pi.org timed out. (connect timeout=15)')': /simple/pyyaml/
WARNING: Retrying (Retry(total=1, connect=None, read=None, redirect=None, status
=None)) after connection broken by 'ConnectTimeoutError(<pip._vendor.urllib3.con
nection.VerifiedHTTPSConnection object at 0x0000000003C03548>, 'Connection to py
pi.org timed out. (connect timeout=15)')': /simple/pyyaml/
WARNING: Retrying (Retry(total=0, connect=None, read=None, redirect=None, status
=None)) after connection broken by 'ConnectTimeoutError(<pip._vendor.urllib3.con
nection.VerifiedHTTPSConnection object at 0x0000000003C03648>, 'Connection to py
pi.org timed out. (connect timeout=15)')': /simple/pyyaml/
ERROR: Could not find a version that satisfies the requirement PyYAML (from ansi
ble==2.5.0b1) (from versions: none)
ERROR: No matching distribution found for PyYAML (from ansible==2.5.0b1)
e:\\test_py\magic_box\venv\Scripts>
########sample 1 pymysql之cur.fetchall() 和cur.fetchone()用法详解
https://cloud.tencent.com/developer/article/1737228
补充知识:python pymssql使用时,使用fetchone获取的值怎么在while里操作多条数据
项目描述:
想把status状态为1的数据查出来然后再通过while 遍历update 数据,为了清楚测试时候的数据。
刚开始的代码是这样的。
#coding:utf-8
import pymssql
def connect():
connect=pymssql.connect((‘x.x.x.x'),‘x',‘x',‘x')

cursor = connect.cursor() # 创建游标
sql001='select *from xxxxx where xxxxx=273and Status=1 order by sysno desc'#查询语句
cursor.execute(sql001)
row=cursor.fetchone()#读取查询结果
print(row)
if row==None:
 print("没有查到数据")
else:

 while row:
 print("sysno=%s" % (row[0]))
 cursor.execute("update xxxxx set Status=-1 where SysNo=%d", row[0]) # 执行语句\
 connect.commit()
 print(row)
 #cursor.execute(sql001)
 row=cursor.fetchone()
 #print(row)

connect()
报错信息:
File “D:/JiCaiZhuanTi/Case/test.py”, line 22, in connect row=cursor.fetchone() File “src\pymssql.pyx”, line 507, in pymssql.Cursor.fetchone pymssql.OperationalError: Statement not executed or executed statement has no resultset
自己查了不少文章,以前没有对这块有所涉及,因为本人是菜鸟,用到哪就看到哪。也仔细看了fetchone() 、fetchall() 还有pymssql的对数据库的基本炒作。看了好久在最后灵光一闪理解错误在哪里了。
错误出在while里的connect.commit()后直接又row=cursor.fetchone()而while里是(返回单个的元组,也就是一条记录(row),如果没有结果 则返回 None)因为我上一个查询是update语句,更新sql语句不会返回resultset,所以会报错。
然后我就这样改了一下,:
while row:
print(“sysno=%s” % (row[0]))
cursor.execute(“update xxxxx set Status=-1 where SysNo=%d”, row[0]) # 执行语句
connect.commit()
print(row)
cursor.execute(sql001)
row=cursor.fetchone()
在获取sql执行获取结果的 row=cursor.fetchone()我再去调用一次查询再次获取想要的数据。
我觉得应该有更好的办法,就是再第一次获取查询结果把所需要的sysno都拿出来,然后再while,这样可以减少对数据库的调用。
目前还没有写出来代码,不知道思路对不对,大家可以留言讨论下。
以上这篇pymysql之cur.fetchall() 和cur.fetchone()用法详解就是小编分享给大家的全部内容了,希望能给大家一个参考。
###########sample 1 如何查看当前运行的python的位数
参考 http://blog.itpub.net/26736162/viewspace-2676953/
如何查看Python的位数
---方法一:
如何查看python是32位还是64位:
import struct
struct.calcsize("P")
如果是4,说明是32位的;如果是其他的是,64位的。struct.calcsize用于计算格式字符串所对应的结果长度。
---方法二:
C:\Users\chinasoft_lhrxxt>python
Python 3.6.4 (v3.6.4:d48eceb, Dec 19 2017, 06:04:45) [MSC v.1900 32 bit (Intel)] on win32
Type "help", "copyright", "credits" or "license" for more information.
C:\Users\chinasoft_lhrxxt>python
Python 3.6.4 (v3.6.4:d48eceb, Dec 19 2017, 06:54:40) [MSC v.1900 64 bit (AMD64)] on win32
Type "help", "copyright", "credits" or "license" for more information.
##################
##sample 1 accoond3 3 自带 qt desginer. 所以使用python3 来跑qt desinger 和 PyQt5
参考https://blog.csdn.net/weixin_43935187/article/details/105583940
命名为Qtdesinger
Name:QtDesigner
Description:QtDesigner
Program:<安装Qt Designer中designer.exe文件的实际目录>\designer.exe
Working directory:$ProjectFileDir$
点击OK完成配置
Name:PyUIC
Description:PyUIC
Program:<project实际运行环境中python.exe文件的目录>\python.exe
Arguments:-m PyQt5.uic.pyuic $FileName$ -o $FileNameWithoutExtension$.py
Working directory:$FileDir$
点击OK完成配置
C:\Python27_64\python.exe: No module named PyQt5.uic
###sample 2 pycharm 使用acconda 环境创建一个新环境,报错提示 由于找不到python37.dll,无法执行代码,重新安装程序可能会解决问题
首先在acconda 安装目录下下找到python37.dll
接着copy 到如下目录,
C:\Windows\SysWOW64
如果还是不行,重新下载去python 网站 python3 64bit for windows 安装到另外一个目录
#######sample3 安装最新Python版本后,报错: No such file or directory: 'D:\\Anaconda3\\lib\\venv\\scripts\\nt\\python_d.exe'
参考这篇文档 https://blog.csdn.net/u010180815/article/details/95484960
首先找到python_d.exe 文件和pythonw_d.exe,
然后复制到报错的文件夹下即可
#######sample4 安装最新Python版本后,如果使用pycharm 初始化
参考这篇文档 https://blog.csdn.net/u010180815/article/details/95484960
首先找到python_d.exe 文件和pythonw_d.exe,
然后复制到报错的文件夹下即可
#######sample4 使用pycharm 初始化一个新的虚拟环境,报告权限不足permmison
如果Python 装在C盘目录,那么新的虚拟环境也最好在c盘目录下,不要在D 盘即可
######sample 5 pip3 安装sip 报错
pip3 报错 error: Microsoft Visual C++ 14.0 or greater is required. Get it with "Microsoft C++ Build Tools": https://visualstudio.microsoft.com/visual-cpp-build-tools/
原因如下
error: Microsoft Visual C++ 14.0 or greater is required. Get it with “Microsoft C++ Build Tools“
方法4 vc++ 百度网盘下载,安装完成后,仍然无法安装 pip3 install sip, 仍然报告一样的报错 error: Microsoft Visual C++ 14.0 or greater is require
参考https://blog.csdn.net/weixin_55555564/article/details/120355849
感谢胡子大叔~
最后呢我找到了一个有效的解决方案:
这里呢我提供一个微软常用运行库.zip,下载完成后安装运行即可成功!!
https://pan.baidu.com/s/13PVh5PYfBYygMj6DXXIfrg
这样返回重新下载python依赖包就成功了!
点这里!!!
提取码:aabb
方法1 https://www.jianshu.com/p/f5f07f2a2dd8 (解释python 安装包 Python whl包、tar包、tar.gz包 的区别)
感谢 点映文艺
(技术)聊聊pip3 安装 scrapy 提示错误Microsoft Visual C++ 14.0 is required的解决方法
首先说一下 pip3 为啥会提示 Microsoft Visual C++ 14.0 is required?
scrapy1.png
因为安装scrapy 安装需要依赖Twisted包,而通过 pip3 命令安装一般都用 ".whl" 包
但是 “pip3 install scrapy” 下载的依赖最新的 Twisted包已经不是.whl文件,而变成了 tar.gz文件,(可以通过 “ pip3 install twisted ”查看)
安装过程需要C++进行类似编译的过程,所以提示“Microsoft Visual C++ 14.0 is required”
但是问题是有时候环境已经安装的 c++ 还是提示这个错误,这该如何是好?
在说解决方法之前先叨逼叨一下Python whl包、tar包、tar.gz包的区别
python时经常可以发现某个lib有whl、tar、tar.gz等格式的包
whl包:已经编译的包,类似于exe文件;
tar包:源文件,只是打包在一起,还没有编译;
tar.gz包:源文件,压缩并打包在一起,还没有编译。
如果环境挺充足,可以用tar包或者tar.gz包;
如果环境欠缺,比如缺少某些编译环境,或者想要快速且稳定,可以考虑whl包
pip3 安装一般都用whl包
下面就来说一下如何不下载 Microsoft Visual C++ 安装 scrapy 的 twisted 依赖文件
第一步那既然pip3 安装一般都使用 whl 文件,那咱就下载 twisted 的whl文件,见下图:
twisted1.png
twisted 的whl文件 下载链接:https://www.lfd.uci.edu/~gohlke/pythonlibs/#twisted
特别说明:twisted 下载的版本一定要与你的Python 版本相匹配,否则会报错:
ERROR: Twisted-19.10.0-cp36-cp36m-win_amd64.whl is not a supported wheel on this platform.
第二步twisted 的whl文件下载完成后离线安装,见下图:
scrapy2.png
scrapy3.png
第三步twisted安装成功之后,通过 pip3 install scrapy 安装 scrapy
scrapy4.png
scrapy5.png
scrapy安装成功,查看一下版本
方法2 如何查考看看当前使用的python的版本,和它所需要的Vs软件的编译器的版本:
http://www.aobosir.com/blog/2016/11/26/Python-pip-error-Unable-to-find-vcvarsall-bat/
感谢AoboSir 博客
Python3 Pip 解决问题: Error: Unable to Find vcvarsall.bat
NOV 26TH, 2016 5:50 AM
当我给 python3.5 安装 第三方库 charset 时:pip install charset,出现了错误:
D:\WorkSpace\python_ws\python-large-web-crawler\firstdemo>pip install charset
Collecting charset
Downloading charset-1.0.1.tar.gz (189kB)
100% |████████████████████████████████| 194kB 3.9kB/s
Collecting chardet (from charset)
Using cached chardet-2.3.0.tar.gz
Installing collected packages: chardet, charset
Running setup.py install for chardet ... done
Running setup.py install for charset ... error
Complete output from command c:\users\aobo\appdata\local\programs\python\python35\python.exe -u -c "import setuptools, tokenize;__file__='C:\\Users\\AOBO\\AppData\\Local\\Temp\\pip-build-ydv8oep3\\charset\\setup.py';f=getattr(tokenize, 'open', open)(__file__);code=f.read().replace('\r\n', '\n');f.close();exec(compile(code, __file__, 'exec'))" install --record C:\Users\AOBO\AppData\Local\Temp\pip-hlxpja30-record\install-record.txt --single-version-externally-managed --compile:
running install
running build
running build_py
creating build
creating build\lib.win-amd64-3.5
creating build\lib.win-amd64-3.5\charset
copying charset\cmd.py -> build\lib.win-amd64-3.5\charset
copying charset\__init__.py -> build\lib.win-amd64-3.5\charset
running egg_info
writing charset.egg-info\PKG-INFO
writing top-level names to charset.egg-info\top_level.txt
writing dependency_links to charset.egg-info\dependency_links.txt
writing requirements to charset.egg-info\requires.txt
writing entry points to charset.egg-info\entry_points.txt
warning: manifest_maker: standard file '-c' not found
reading manifest file 'charset.egg-info\SOURCES.txt'
reading manifest template 'MANIFEST.in'
warning: no files found matching '*.txt' under directory 'docs'
warning: no files found matching '*.txt' under directory 'languagedet\data'
warning: no files found matching '*.pickle' under directory 'languagedet\data'
warning: no files found matching '*.conf' under directory 'languagedet\data'
writing manifest file 'charset.egg-info\SOURCES.txt'
running build_ext
building 'charset.detector' extension
error: Unable to find vcvarsall.bat
----------------------------------------
Command "c:\users\aobo\appdata\local\programs\python\python35\python.exe -u -c "import setuptools, tokenize;__file__='C:\\Users\\AOBO\\AppData\\Local\\Temp\\pip-build-ydv8oep3\\charset\\setup.py';f=getattr(tokenize, 'open', open)(__file__);code=f.read().replace('\r\n', '\n');f.close();exec(compile(code, __file__, 'exec'))" install --record C:\Users\AOBO\AppData\Local\Temp\pip-hlxpja30-record\install-record.txt --single-version-externally-managed --compile" failed with error code 1 in C:\Users\AOBO\AppData\Local\Temp\pip-build-ydv8oep3\charset\
为什么出现这个问题?
在命令行中执行:python,看看当前使用的python的版本,和它所需要的Vs软件的编译器的版本:
Alt text
当前python版本是:python3.5.0;当前需要的Vs编译器的版本是:MSC v. 1900
查看下面的表格,对于版本的Visual C ++使用的编译器版本如下:(表的参考网站)
Visual C ++版本 编译器版本
Visual C++ 4.x MSC_VER=1000
Visual C++ 5 MSC_VER=1100
Visual C++ 6 MSC_VER=1200
Visual C++ .NET MSC_VER=1300
Visual C++ .NET 2003 MSC_VER=1310
Visual C++ 2005 (8.0) MSC_VER=1400
Visual C++ 2008 (9.0) MSC_VER=1500
Visual C++ 2010 (10.0) MSC_VER=1600
Visual C++ 2012 (11.0) MSC_VER=1700
Visual C++ 2013 (12.0) MSC_VER=1800
Visual C++ 2015 (14.0) MSC_VER=1900
所以解决这个 error: Unable to find vcvarsall.bat 问题的方法就是:下载并安装 Visual Studio 2015 软件,问题即可解决。
解决办法 — 安装:Python Tools 2.2.5 for Visual Studio 2015
Step 1 . 下载 Visual Studio 2015 软件。
下载和安装 Visual Studio 2015 软件 的详细步骤请到这个博客查看:下载和安装 Visual Studio 2015 软件 的详细步骤图文教程。(我们按照这个网站的方法安装VS2015,但不按照这个博客里面说的安装。)
如果安装上面的网站的方法安装VS2015软件,那么问题还是不能解决。(error: Unable to find vcvarsall.bat)
Step 2 . 安装 Visual Studio 2015 软件
这个VS2015,安装时需要选择:自定义安装。(参考网站)
参考网站:
Alt text
Alt text
我们的目的就是安装这个软件:Python Tools 2.2.5 for Visual Studio 2015 。现在,这个软件已经安装完了。
Alt text
注意:
如果一直停留在:“正在配置您的系统,这可能需要一些时间”
Alt text
解决:关掉VS的所有进程。
搞定,问题解决
现在再执行:pip install charset。问题解决。
Alt text
方法3 下载如下 现在VC++, 装好编译C++环境
https://docs.microsoft.com/en-US/cpp/windows/latest-supported-vc-redist?view=msvc-170
方法4 https://riverbankcomputing.com/software/sip/ 有效
通过下载编译好的whl 文件,进行安装,跳过vc++ 编译步骤,可以规避这个问题,简单介绍sip 可以通过网站https://pypi.org/project/sip/#files 下载whl 文件
简单介绍Python 强大之处是可以兼容C++或者C 程序
What is SIP?
One of the features of Python that makes it so powerful is the ability to take existing libraries, written in C or C++, and make them available as Python extension modules. Such extension modules are often called bindings for the library.
SIP is a tool that makes it very easy to create Python bindings for C and C++ libraries. It was originally developed to create PyQt, the Python bindings for the Qt toolkit, but can be used to create bindings for any C or C++ library. For example, it is also used to create wxPython, the Python bindings for the wxWidget toolkit.
A detailed overview of SIP can be found in the documentation.
https://riverbankcomputing.com/software/sip/download
简单介绍sip 可以通过网站https://pypi.org/project/sip/#files 下载whl 文件
SIP Download
SIP is provided as a source distribution (sdist) and binary wheels from PyPI. To install it, run the following command:
######sample 1 下载pytho 历史版本for windows
下载pytho 历史版本for windows
https://www.python.org/downloads/windows/
这个提示代表没有对应python 版本for windows
Note that Python 3.6.13 cannot be used on Windows XP or earlier.
No files for this release.
这个提示代表有对应python 版本for windows
Python 3.6.2 - July 17, 2017
Note that Python 3.6.2 cannot be used on Windows XP or earlier.
Download Windows help file
Download Windows x86-64 embeddable zip file
Download Windows x86-64 executable installer
Download Windows x86-64 web-based installer
Download Windows x86 embeddable zip file
Download Windows x86 executable installer
Download Windows x86 web-based installer
检查python 版本
Python 3.7.3 (v3.7.3:ef4ec6ed12, Mar 25 2019, 22:22:05) [MSC v.1916 64 bit (AMD64)] on win32
#####问题2 python3 pip3 安装sip whell 包出现不支持的 sip-6.3.1-cp36-abi3-win_amd64.whl is not a supported wheel on this platform.
step1: 查看支持的版本名字的写法
出现这个问题的原因是版本不匹配
查看本机python的版本匹配哪些文件
>>>python
Python 3.7.0 (default, Jun 28 2018, 08:04:48) [MSC v.1912 64 bit (AMD64)] :: Anaconda, Inc. on win32
Type “help”, “copyright”, “credits” or “license” for more information.
>>>import pip._internal.pep425tags
注意:导入的是 pip._internal.pep425tags
导入不完整会出现:AttributeError: module ‘pip._internal’ has no attribute ‘pep425tags’
>>>print(pip._internal.pep425tags.get_supported()) #显示支持版本
step2 如何版本和机器都没问题,根据步骤1 支持文件的写法,可以修改文件名字,比如将
sip-6.3.1-cp36-abi3-win_amd64.whl 修改成 sip-6.3.1-cp36-none-win_amd64.whl
step 3 再次安装可以了。
Processing c:\python36_64\package\sip-6.3.1-cp36-none-win_amd64.whl
Collecting packaging (from sip==6.3.1)
Using cached https://files.pythonhosted.org/packages/05/8e/8de486cbd03baba4deef4142bd643a3e7bbe954a784dc1bb17142572d127/packaging-21.3-py3-none-any.whl
Collecting toml (from sip==6.3.1)
Using cached https://files.pythonhosted.org/packages/44/6f/7120676b6d73228c96e17f1f794d8ab046fc910d781c8d151120c3f1569e/toml-0.10.2-py2.py3-none-any.whl
Requirement already satisfied: setuptools in c:\python36_64\magic_box_36\venv\lib\site-packages\setuptools-39.1.0-py3.6.egg (from sip==6.3.1) (39.1.0)
Collecting pyparsing!=3.0.5,>=2.0.2 (from packaging->sip==6.3.1)
Using cached https://files.pythonhosted.org/packages/a0/34/895006117f6fce0b4de045c87e154ee4a20c68ec0a4c9a36d900888fb6bc/pyparsing-3.0.6-py3-none-any.whl
Installing collected packages: pyparsing, packaging, toml, sip
Successfully installed packaging-21.3 pyparsing-3.0.6 sip-6.3.1 toml-0.10.2
You are using pip version 10.0.1, however version 21.3.1 is available.
You should consider upgrading via the 'python -m pip install --upgrade pip' command.
如果遇到其他的tar.gz 无法安装,也可以使用同样方法去 https://pypi.org/project/PyQt5/5.14.0/#files 下载对应的wheel 安装
rocessing c:\python36_64\package\pyqt5-5.14.0-5.14.0-cp35.cp36.cp37.cp38-none-win_amd64.whl
Collecting PyQt5-sip<13,>=12.7 (from PyQt5==5.14.0)
Downloading https://files.pythonhosted.org/packages/ec/e8/b6425296eb28d3938e3049fdf94993d71da2818203d7fcdcb41c2823b1bb/PyQt5_sip-12.9.0-cp36-cp36m-win_amd64.whl (62kB)
100% |████████████████████████████████| 71kB 289kB/s
Installing collected packages: PyQt5-sip, PyQt5
Successfully installed PyQt5-5.14.0 PyQt5-sip-12.9.0
##########sample 1 Wireshark下载安装教程
https://my.oschina.net/u/4518087/blog/4758870?hmsr=kaifa_aladdin
https://jingyan.baidu.com/article/925f8cb8bc01f0c0dde0562f.html
搜索栏输入如下: 对ip 进行过滤
ip.addr == 220.181.38.148
###sample 2 Wireshark使用教程,在界面显示一行 host, 并且抓取api.fund.east 的研究得出数据接口:
https://www.yangyanxing.com/article/display-host-clumn-in-wireshark.html
搜索栏输入如下: 对host 进行过滤
http.host == "api.fund.eastmoney.com"
找到一行,然后双击一下这行,打开详情列表,然后找到hypertext trnasfer protocol
大概能发现如下api地址和连接
http://api.fund.eastmoney.com/f10/lsjz?callback=jQuery18303990184777899901_1641537846263&fundCode=000308&pageIndex=1&pageSize=20&startDate=2022-01-01&endDate=2022-01-07&_=1641537854672
如果直接在浏览器打开如上网址,到时候ie 打开出现反爬虫的提示,因此无法直接使用这个路径 访问下载信息网站
提示如下:
jQuery18303990184777899901_1641537846263({"Data":"","ErrCode":-999,"ErrMsg":"","TotalCount":0,"Expansion":null,"PageSize":0,"PageIndex":0})
写爬虫代码
这个爬虫代码代码比较简单,需要注意一点,要在header头中把Referer信息加上,否则会被反爬,这里直接把代码贴出来:
'Referer': 'http://fundf10.eastmoney.com/jjjz_{0}.html'.format(fundCode)
########sample 3 什么是api 接口
第一步:熟悉概念
https://jingyan.baidu.com/article/48b37f8d25fea01a64648807.html
什么是API,即应用程序编程接口,也就是在网站开发时预先定义的函数,就是常说的开源函数,只不过将一些固定的程序封装在这些函数中,
待调用时只需要一个借口引用,方便又简单。就像调用Jquery函数一样。
###sample 3.2 分析抓取腾讯微信公众号信息,(没成功,因为weixin 没有开放接口)
爬取微信公众号的文章
爬取微信公众号的文章
"Wireshark抓包分析微信功能----tcp/ip选修课期末大作业
" https://blog.csdn.net/qq_51795098/article/details/122356982?utm_medium=distribute.pc_relevant.none-task-blog-2~default~baidujs_baidulandingword~default-5.pc_relevant_antiscan&spm=1001.2101.3001.4242.4&utm_relevant_index=8
charles证书安装
https://www.jianshu.com/p/8346143aba53
"一键下载公众号所有文章,导出文件支持PDF,HTML,Markdown,Excel,chm等格式
" https://mp.weixin.qq.com/s?__biz=MzIyMjg2ODExMA==&mid=2247486362&idx=1&sn=b7394f006f7c9b3bf63c78aa79108aec&scene=21#wechat_redirect
#######sample 1 如何查看返回的jquery 数据
https://blog.csdn.net/weixin_39926588/article/details/111163813?utm_medium=distribute.pc_relevant.none-task-blog-2~default~baidujs_baidulandingword~default-0.pc_relevant_paycolumn_v2&spm=1001.2101.3001.4242.1&utm_relevant_index=3
https://www.pianshen.com/article/5440283910/
天天基金网,F12 查询 network , name 列表里一个个查找, 的preview 下的 可以看到Jquery 返回的data ,
可以看到 querY返回的 返回的为json格式数据:
可以看到 querY返回的 返回的为json格式数据:
Data
LSJZList[FSRQ:"2022-01-06",DWJZ:"6.47"]
b70afc5a14f26a69aa5b765cd99939b9.png
##########sample 1
观看视频一 https://www.bilibili.com/video/BV1Xz411i76u?p=3&spm_id_from=pageDriver
将qt designer 设计的前端页面 转换成py文件,命令如下:
C:\Python36_64\magic_box_36\venv\Scripts\pyuic5 -o test.py 2.ui -x
######### sample 1 如何使用 _init__ 和 self 和 class
##this is a class test
#refer https://baijiahao.baidu.com/s?id=1691747782805870537&wfr=spider&for=pc

class Cat:

 def __init__(self):
  self.color = 'Red'
  self.legs = 'Long'
  print('Cat say hi')

 def run(self):
  print('Cat is running', self.legs)

##实例化对象
nask = Cat()
##调用对象方法
nask.run()
# Cat.run()

总结如下:
这边可以注意到nask = Cat() 先创具体化物件,也就是把我们的猫咪设计图做成猫叫nash。
而后再用我们生成的物件nask去呼叫方法.run(),nask.run()就打印出Cat is running Long,
你会发现一件事如果使用self在同一类(Class)中不同方法(def)间也可以使用前面有加上self.的变数或者方法,
三、后记
其实你会发现self就是在class里面沟通的桥梁!
而__init__只是python的惯用法在具体化物件时要先执行的方法。
#python#
#######sample1
https://cloud.tencent.com/developer/article/1568078
python使用元组、字典向函数传递多个
2020-01-08阅读 2610
# -*- coding: utf-8 -*-
__author__ = 'River'
def fun(name,age):
print "%s %s" % (name,age)
def fun2(name,*args,**dicargs):
print "%s %s %s" % (name,args,dicargs)
t=("River","15")
dic={'name':'river','age':'26'}
#注意这个name和这个age的key,必须和fun中的参数一致
fun("ss",":")
fun(*t)#元组使用*
fun(**dic)#字典使用**
fun2(1,2,3)
fun2(1,2,3,x=10,y=20,n=100)
#有等号的是字典,之前是元组。。
=========
输入结果:
ss :
River 15
river 26
1 (2, 3) {}
1 (2, 3) {'y': 20, 'x': 10, 'n': 100}
#######sample2
https://cloud.tencent.com/developer/news/611
2.方法二:用codecs提供的open方法来指定打开的文件的语言编码,它会在读取的时候自动转换为内部unicode (推荐)
```
# coding:utf-8
import csv, codecs
import sys
reload(sys)
sys.setdefaultencoding('utf8')
f = codecs.open("xx.csv", 'wb', "gbk")
writer = csv.writer(f)
writer.writerow(["客户名称", "行业类型", "客户联系人", "职位", "联系方式", "邮箱","地址"])
# 多组数据存放list列表里面
datas = [
["客户名称", "行业类型", "客户联系人", "职位", "联系方式", "邮箱","地址"],
["客户名称", "行业类型", "客户联系人", "职位", "联系方式", "邮箱","地址"],
["客户名称", "行业类型", "客户联系人", "职位", "联系方式", "邮箱","地址"],
]
writer.writerows(datas)
f.close()
```
注意写一行,是writer.writerow(["客户名称", "行业类型", "客户联系人", "职位", "联系方式", "邮箱","地址"])
写N行是 writer.writerows(datas) 需要分行显示
#####sample 1 CX-ORACLE 写入excel tuple in tulpe <type 'tuple'> ,整体是(a,b)视作一行,以,为分割, 写入 写入excel
查看数据类型的好方法 ,设置断点,和debug ,step into 可以看步骤
####<type 'list'>,
##一承循环,无嵌套循环
# connection = raw_input("Enter Oracle DB connection (uid/pwd@database) : ")
orcl = cx_Oracle.connect(o_user, o_pass, 'ip:1529/ora11g')
curs = orcl.cursor()
printHeader = True # include column headers in each table output
csv_file_dest = "p.csv"
outputFile = open(csv_file_dest, 'w') # 'wb'
output = csv.writer(outputFile, dialect='excel')
sql = "select * from p" # get a list of all tables
curs.execute(sql)
for row_data in curs:
##row_data <type 'tuple'>
if printHeader: # add column headers if requested
cols = []
for col in curs.description:
cols.append(col[0])
output.writerow(cols)
for row_data in curs: # add table rows
output.writerow(row_data)
outputFile.close()
### 二承循环 ,嵌套循环
Python使用cx_Oracle模块将oracle中数据导出到csv文件的方法
更新时间:2015年05月16日 10:53:50 作者:秋风秋雨
这篇文章主要介绍了Python使用cx_Oracle模块将oracle中数据导出到csv文件的方法,涉及Python中cx_Oracle模块与csv模块操作Oracle数据库及csv文件的相关技巧,需要的朋友可以参考下
本文实例讲述了Python使用cx_Oracle模块将oracle中数据导出到csv文件的方法。分享给大家供大家参考。具体实现方法如下:
# Export Oracle database tables to CSV files
# FB36 - 201007117
import sys
import csv
import cx_Oracle
connection = raw_input("Enter Oracle DB connection (uid/pwd@database) : ")
orcl = cx_Oracle.connect(connection)
curs = orcl.cursor()
printHeader = True # include column headers in each table output
sql = "select * from tab" # get a list of all tables
curs.execute(sql)
for row_data in curs:
if not row_data[0].startswith('BIN$'): # skip recycle bin tables
tableName = row_data[0]
# output each table content to a separate CSV file
csv_file_dest = tableName + ".csv"
outputFile = open(csv_file_dest,'w') # 'wb'
output = csv.writer(outputFile, dialect='excel')
sql = "select * from " + tableName
curs2 = orcl.cursor()
curs2.execute(sql)
if printHeader: # add column headers if requested
cols = []
for col in curs2.description:
cols.append(col[0])
output.writerow(cols)
for row_data in curs2: # add table rows
output.writerow(row_data)
outputFile.close()
##############
######sample 2 python的基本数据类型有哪些?
https://www.php.cn/python-tutorials-422236.html
python的基本数据类型有哪些?下面一一给大家介绍:
1、数字 ---> int类
当然对于数字,Python的数字类型有int整型、long长整型、float浮点数、complex复数、以及布尔值(0和1),这里只针对int整型进行介绍学习。
2、布尔值 --->bool类
对于布尔值,只有两种结果即True和False,其分别对应与二进制中的0和1。而对于真即True的值太多了,我们只需要了解假即Flase的值有哪些---》None、空(即 [ ]/( ) /" "/{ })、0;
3、字符串 --->str类
关于字符串是Python中最常用的数据类型,其用途也很多,我们可以使用单引号 ‘’或者双引号“”来创建字符串。
4、列表 --->list类 (整体是【】)
列表是由一系列特定元素顺序排列的元素组成的,它的元素可以是任何数据类型即数字、字符串、列表、元组、字典、布尔值等等,同时其元素也是可修改的。
其形式为:
names = ['little-five","James","Alex"]2 #或者3
names = list(['little-five","James","Alex"])
索引、切片
追加-->append()
拓展-->extend()
Python列表追加多个元素
l = []
l.extend([1,2,3,4,5])
有一种方法可以达到你的目的。在
注:扩展extend与追加append的区别:-->前者为添加将元素作为一个整体添加,后者为将数据类型的元素分解添加至列表内。例:
insert() -->插入
pop() -->取出
remove()-->移除、del -->删除
sorted()-->排序,默认正序,加入reverse =True,则表示倒序
5、元组 --->tuple类 (整体是())
元组即为不可修改的列表。其于特性跟list相似。其使用圆括号而不是方括号来标识。
#元组name = ("little-five","xiaowu")
print(name[0])
6、字典 --->dict类
字典为一系列的键-值对,每个键值对用逗号隔开,每个键都与一个值相对应,可以通过使用键来访问对应的值。无序的。
键的定义必须是不可变的,即可以是数字、字符串也可以是元组,还有布尔值等。
而值的定义可以是任意数据类型。
遍历 -->items、keys、values
7、集合 -->set类
关于集合set的定义:在我看来集合就像一个篮子,你可以往里面存东西也可往里面取东西,但是这些东西又是无序的,你很难指定单独去取某一样东西;同时它又可以通过一定的方法筛选去获得你需要的那部分东西。故集合可以 创建、增、删、关系运算。
####sample 3 <type 'list'> list in list 整体是[a,b] 视作一行,以,分割, ["客户名称", "行业类型", "客户联系人", "职位", "联系方式", "邮箱","地址"],
##写入 csv 文件中
<type 'list'>
查看数据类型的好方法 , 设置断点,和debug ,step into 可以看步骤
#coding:utf-8
import csv, codecs
import sys
reload(sys)
sys.setdefaultencoding('utf8')
f = codecs.open("xx.csv", 'wb', "gbk")
writer = csv.writer(f)
a=["客户名称", "行业类型", "客户联系人", "职位", "联系方式", "邮箱","地址"]
print type(a)
##《list type》
writer.writerow(["客户名称", "行业类型", "客户联系人", "职位", "联系方式", "邮箱","地址"])
# 多组数据存放list列表里面
datas = [
["客户名称", "行业类型", "客户联系人", "职位", "联系方式", "邮箱","地址"],
["客户名称", "行业类型", "客户联系人", "职位", "联系方式", "邮箱","地址"],
["客户名称", "行业类型", "客户联系人", "职位", "联系方式", "邮箱","地址"],
]
print type(datas)
##《list type》
writer.writerows(datas)
f.close()
############# sample 3 python 将数据字典 type (dict in list )写入 excel, 数据字典无法写入excel,只有转成数组或者列表才可以。
##查看数据类型的好方法 , 设置断点,和debug ,step into 可以看步骤
###
参考 https://blog.csdn.net/weixin_44346972/article/details/106048675
#coding:utf-8
import csv, codecs
import sys
reload(sys)
sys.setdefaultencoding('utf8')
f = codecs.open("xx.csv", 'wb', "gbk")
writer = csv.writer(f)
header = ['name', 'age'] # 数据列名
datas = [{'name': 'Tony', 'age': 17},
{'name': '李华', 'age': 21}] # 字典数据
writer = csv.DictWriter(f, fieldnames=header)
# 提前预览列名,当下面代码写入数据时,会将其一一对应。
writer.writeheader() # 写入列名
writer.writerows(datas) # 写入数据
######sample 4 tuple in list 类型,[('ORA11G', '2019-08-08'), ('ivms', '2016')]
设置断点,和debug ,step into 可以看步骤
orcl = cx_Oracle.connect(o_user, o_pass, 'ip:1529/ora11g')
curs = orcl.cursor()
printHeader = True # include column headers in each table output
csv_file_dest = "p.csv"
outputFile = open(csv_file_dest, 'wb') # 'wb'
output = csv.writer(outputFile, dialect='excel')
sql = "select * from p" # get a list of all tables
curs.execute(sql)
row = curs.fetchall()
data_list = []
for i in row:
data_list.append(i)
output.writerow(i)
outputFile.close()
##########sample 5 Python 写入 csv 文件中空行解决办法
https://blog.csdn.net/riguangxia/article/details/81436175
解释python2 b 二进制写入
python3版本 更改为二级制写入方式 会报错 官方推荐 newline=''
Python 写入 csv 文件中空行解决办法
李正旺的Python空间 2018-08-05 22:02:44 6892 收藏 8
分类专栏: Python问题汇总 文章标签: Python csv 空行
版权
初学Python爬虫,将搜索到的信息写入CSV文件保存,用以下代码发现其中有空行
with open("test.csv","w") as f:
1
网络搜索后,发现解决办法如下
我用的是Python2.7版本,将打开方式中的“w” 改成"wb"即可。
with open("test.csv","wb") as f:
1
如果是Python3.0 则可改成:
with open("test.csv","w",newline="") as f:
1
Python 2.7中其他参数如下:
r 以只读方式打开文件,该文件必须存在。
r+ 以可读写方式打开文件,该文件必须存在。
rb+ 读写打开一个二进制文件,只允许读写数据。
rt+ 读写打开一个文本文件,允许读和写。
w 打开只写文件,若文件存在则文件长度清为0,即该文件内容会消失。若文件不存在则建立该文件。
w+ 打开可读写文件,若文件存在则文件长度清为零,即该文件内容会消失。若文件不存在则建立该文件
a 以附加的方式打开只写文件。若文件不存在,则会建立该文件,如果文件存在,写入的数据会被加到文件尾,即文件原先内容会被保留。(EOF符保留)
a+ 以附加方式打开可读写的文件。若文件不存在,则会建立该文件,如果文件存在,写入的数据会被加到文件尾后,即文件原先的内容会被保留。
wb 只写打开或新建一个二进制文件;只允许写数据。
wb+ 读写打开或建立一个二进制文件,允许读和写。
wt+ 读写打开或着建立一个文本文件;允许读写。
at+ 读写打开一个文本文件,允许读或在文本末追加数据。
ab+ 读写打开一个二进制文件,允许读或在文件末追加数据。
————————————————
版权声明:本文为CSDN博主「李正旺的Python空间」的原创文章,遵循CC 4.0 BY-SA版权协议,转载请附上原文出处链接及本声明。
原文链接:https://blog.csdn.net/riguangxia/article/details/81436175
###################################################
##########sample 6 Python中的*self,*self._args, **kwargs 传递元组,传递字典
https://blog.csdn.net/qq_39521554/article/details/80151713
在python中,有些常见方法参数是:*self._args, **kwargs,如:self._target(*self._args, **self._kwargs)。经过查找一些资料,可以归纳为以下两种类型:
*self._args 表示接受元组类参数;
**kwargs 表示接受字典类参数;
例子:
def foo(*args, **kwargs):
print 'args = ', args
print 'kwargs = ', kwargs
print '---------------------------------------'
if __name__ == '__main__':
foo(1,2,3,4)
foo(a=1,b=2,c=3)
foo(1,2,3,4, a=1,b=2,c=3)
foo('a', 1, None, a=1, b='2', c=3)
输出结果如下:
args = (1, 2, 3, 4)
kwargs = {}
---------------------------------------
args = ()
kwargs = {'a': 1, 'c': 3, 'b': 2}
---------------------------------------
args = (1, 2, 3, 4)
kwargs = {'a': 1, 'c': 3, 'b': 2}
---------------------------------------
args = ('a', 1, None)
kwargs = {'a': 1, 'c': 3, 'b': '2'}
---------------------------------------
可以看到,这两个是python中的可变参数。*args表示任何多个无名参数,它是一个tuple;**kwargs表示关键字参数,它是一个dict。并且同时使用*args和**kwargs时,必须*args参数列要在**kwargs前,像foo(a=1, b='2', c=3, a', 1, None, )这样调用的话,会提示语法错误“SyntaxError: non-keyword arg after keyword arg”
————————————————
版权声明:本文为CSDN博主「图灵的猫i」的原创文章,遵循CC 4.0 BY-SA版权协议,转载请附上原文出处链接及本声明。
原文链接:https://blog.csdn.net/qq_39521554/article/details/80151713
########sample python 2 函数定义 的参数 和传参数
https://www.cnblogs.com/jessicaxu/p/7735701.html
一、无需传参的自定义函数
不传递参数的函数是用的比较少的,相当于已经把各种信息都放在了函数内部,无需传参。
import randomdef generate_random():for i in range(10):ran = random.randint(1, 20)print(ran, end=' ')generate_random()>>>6 20 18 6 19 2 13 7 11 19
二、必选参数的自定义函数
函数的必选参数,指的是函数调用的时候必须传入的参数,如以下示例中,如果不传入number这个参数,那就会报错TypeError,传入参数之后就会正常输出结果。
import randomdef generate_random(number):for i in range(number):ran = random.randint(1, number)print(ran, end=' ')generate_random()>>>TypeError: generate_random() missing 1 required positional argument: 'number'generate_random(8)>>>2 7 8 7 4 8 5 2
练习:随机生成若干个数字,并求最大值
import randomdef max_value(number):ran = []for i in range(number):value = random.randint(1,number)ran.append(value)print(ran)max1 = ran[0]for i in ran:if max1<i:max1 = iprint(max1)max_value(20)>>>[3, 7, 12, 10, 19, 16, 5, 8, 3, 4, 17, 19, 18, 7, 13, 13, 12, 13, 19, 18]19
三、可变参数的自定义函数
顾名思义,可变参数就是传入的参数个数是可变的,可以是1个、2个到任意个,还可以是0个。要定义出这个函数,我们必须确定输入的参数。由于参数个数不确定,我们首先想到可以把一个list或tuple传进来,但这样太过繁琐。
定义可变参数和定义一个list或tuple参数相比,仅仅在参数前面加了一个*号。在函数内部,参数接收到的是一个tuple,因此,函数代码完全不变。但是,调用该函数时,可以传入任意个参数,包括0个参数。
import randomdef add(*args):sum = 0if len(args) > 0:for i in args:sum += iprint('累加的和为:', sum)else:print('没有累加的和:', sum)add()add(1)add(1, 2, 3)>>>没有累加的和: 0累加的和为: 1累加的和为: 6
当传入两个或多个参数,且既包含可变参数又包含必选参数时,必选参数必须放在可变参数的前面。
import randomdef add(name, *args):sum = 0if len(args) > 0:for i in args:sum += iprint('%s累加的和为:%s' % (name, sum))else:print('{}没有累加的和:{}'.format(name, sum))add('李1')add('李2', 1)add('李3', 1, 2, 3)>>>李1没有累加的和:0李2累加的和为:1李3累加的和为:6
四、默认参数的自定义函数
默认参数就是在传入的参数中有的值本身是有默认值的,这个时候调用函数的时候可以传入这个参数,用新的值取代它,也可以只传入非默认值,默认参数不传入。
如以下示例所示,其中b和c都是默认参数
def add(a,b=5,c=8):sum = a+b+cprint(sum)add(1) #此时传入的1为a的值>>>14add(1,2) #此时传入的1为a的值,2替换了原本的默认参数>>>11add(1,2,3) #此时传入的1为a的值,2和3分别替换了原本的默认参数>>>6add(1,c=4) #当只想改变第三个参数的默认值而不改变第二个默认值时,就需要加上第三个参数的名字>>>10
从上面的例子可以看出,默认参数可以简化函数的调用。设置默认参数时,需要注意:
1、必选参数在前,默认参数在后,否则Python的解释器会报错;
2、设置默认参数时,当函数有多个参数时,把变化大的参数放前面,变化小的参数放后面。变化小的参数就可以作为默认参数。
使用默认参数最大的好处是能降低调用函数的难度,而一旦需要更复杂的调用时,又可以传递更多的参数来实现。
五、关键字参数的自定义函数
可变参数允许你传入0个或任意个参数,这些可变参数在函数调用时自动组装为一个tuple。而关键字参数允许你传入0个或任意个含参数名的参数,这些关键字参数在函数内部自动组装为一个dict。
def aa(**kwargs):print(kwargs)装包aa(a=1,b='hello',c='tom')>>>{'a': 1, 'b': 'hello', 'c': 'tom'}拆包dict1 = {'a':1,'b':'hello','c':'tom'}aa(**dict1)>>>{'a': 1, 'b': 'hello', 'c': 'tom'}
示例:a和b都是必要参数,c为可变参数,d为关键字参数
def bb(a,b,*c,**d):print(a,b,c,d)a,b两个必要参数传入,可变参数没有传返回空元组,关键字参数也没传返回空字典bb(1,2)>>>12(){}a,b两个必要参数传入,3和4为可变参数的值,因此返回元组,关键字参数也没传返回空字典bb(1,2,3,4)>>>12(3,4){}a,b两个必要参数传入,可变参数没有传返回空元组,x,y为关键字参数返空字典bb(1,2,x=100,y=200)>>>12(){'x':100,'y':200}a,b两个必要参数传入,3为可变参数的值返回元组,x为关键字参数返字典bb(1,2,3,x=100)>>>12(3,){'x':100}
关键字参数的作用:它可以扩展函数的功能。比如你正在做一个用户注册的功能,除了用户名和年龄是必填项外,其他都是可选项,利用关键字参数来定义这个函数就能满足注册的需求。
六、命名关键字参数的自定义函数
对于关键字参数,函数的调用者可以传入任意不受限制的关键字参数。至于到底传入了哪些,就需要在函数内部通过kw检查。但是调用者仍可以传入不受限制的关键字参数:如果要限制关键字参数的名字,就可以用命名关键字参数。
和关键字参数**kw不同,命名关键字参数需要一个特殊分隔符,后面的参数被视为命名关键字参数。
示例:
以下示例表明,原本对于关键字参数,输入是没有限制的,但是下面使用了命名关键字参数,以'*'号标记来分隔,限制了关键字必须为height和city两个,输入其他的均会报错。
def actor_lady(name, age, *, height, city):print(name, age, height, city)actor_lady('白冰', 28, 168, '南京')>>>TypeError:actor_lady()takes2positionalargumentsbut4weregivenactor_lady('白冰', 28, height=168, hometown='南京')>>>TypeError:actor_lady()gotanunexpectedkeywordargument'hometown'actor_lady('白冰', 28, height=168, city='南京')>>> 白冰 28 168 南京
总结:
1、在Python中定义函数,可以用必选参数、默认参数、可变参数、关键字参数和命名关键字参数,这5种参数都可以组合使用,除了可变参数无法和命名关键字参数混合。但是请注意,参数定义的顺序必须是:必选参数、默认参数、可变参数/命名关键字参数和关键字参数。
2、*args是可变参数,args接收的是一个tuple;**kwargs是关键字参数,kwargs接收的是一个dict。
3、命名的关键字参数是为了限制调用者可以传入的参数名,同时可以提供默认值。定义命名的关键字参数不要忘了写分隔符 ' * ',否则定义的将是必选参数。
##########sample 1 传递变量和元组的方法,见下面这一行,变量放在最前面
self._to_csv(output,*i)
##csv write on
csv_file_dest = "p.csv"
outputFile = codecs.open(csv_file_dest, 'wb', "gbk")
output = csv.writer(outputFile, dialect='excel')
header0 = [ self.hostip, self.instance]
output.writerow(header0)
header = ['文件名称', '文件ID','表空间名称','表空间大小','表空间已使用大小','表空间状态']
output.writerow(header)
data_list = []
for i in r_row:
data_list.append(i)
self._to_csv(output,*i)
########################
########sample 2 Python错误集锦:开启线程时提示TypeError: func() argument after * must be an iterable, not int
https://blog.csdn.net/juzicode00/article/details/111413246
原文链接:http://www.juzicode.com/archives/2756
错误提示:
开启线程时提示TypeError: func() argument after * must be an iterable, not int
#juzicode.com/vx:桔子code
import threading
def func(para1):
print(para1)
if __name__ == '__main__':
para1 =11
t0 = threading.Thread(target=func, name='func-0',args=(para1))
t0.start()
Exception in thread func-0:
Traceback (most recent call last):
File "d:\python\python38\lib\threading.py", line 932, in _bootstrap_inner
self.run()
File "d:\python\python38\lib\threading.py", line 870, in run
self._target(*self._args, **self._kwargs)
TypeError: func() argument after * must be an iterable, not int
可能原因:
1、使用threading.Thread()创建线程时,args参数传递的是一个元组,即使这个时候函数只有1个参数。
解决方法:
1、改用元组传递参数,t0 = threading.Thread(target=func, name=’func-0′,args=(para1,)) ,para1之后有个逗号”,”
#juzicode.com/vx:桔子code
import threading
def func(para1):
print(para1)
if __name__ == '__main__':
para1 =1234567890
t0 = threading.Thread(target=func, name='func-0',args=(para1,))
t0.start()
1234567890
至于为什么要增加逗号,可以参考 好冷的Python–tuple和逗号的恩怨情、Python进阶–多线程
————————————————
版权声明:本文为CSDN博主「桔子code」的原创文章,遵循CC 4.0 BY-SA版权协议,转载请附上原文出处链接及本声明。
原文链接:https://blog.csdn.net/juzicode00/article/details/111413246
###########sample1 Python 通过all()判断列表(list)中所有元素是否都包含某个字符串(string)
这种方法只能判断列表A的所有元素['a','b'] ,必须都存存在列表B每个元素里
https://www.cjavapy.com/article/104/
1、判断列表(list)中所有元素是否在集合(set)中
list_string = ['big', 'letters']
string_set = set(['hello', 'hi', 'big', 'cccc', 'letters', 'anotherword'])
result = all([word in string_set for word in list_string])
#结果是True
2、判断列表中的每个字符串元素是否含另一个列表的所有字符串元素中
list_string= ['big', 'letters']
list_text = ['hello letters', 'big hi letters', 'big superman letters']
result = all([word in text for word in list_string for text in list_text])
#结果是False,因为'big'不在'hello letters'中。
3、如果要获取符合条件字符串,可以用filter
list_string= ['big', 'letters']
list_text = ['hello letters', 'big hi letters', 'big superman letters']
all_words = list(filter(lambda text: all([word in text for word in list_string]), list_text ))
print(all_words)
#['big hi letters', 'big superman letters']
或者 使用for 循环,可以判断出,列表A ['a','b'] 的任意一个元素都在列表B的每一项 里
https://zhidao.baidu.com/question/562789439.html?sort=11&rn=5&pn=0#wgt-answers
感谢superhuster
#####python 判断某个列表中的所有元素在另一个列表中
list_string= ['a', 'c']
list_text = ['a', 'c', 'b']
def equal(list1, list2):
for each in list2:
if each in list1:
continue
else:
return False
return True
print equal(list_string,list_text)
##for strings is not null ,判断是否空值
check_data_list.append(i[0])
# print check_data_list summary
for each in check_data_list:
if len(each) !==0:
continue
else:
return 'FAILED'
return 'OK'
## for number 判断是否大于某个数字
# print check_data_list summary
list1=150000
for each in check_data_list:
if each < 150000:
continue
else:
return 'FAILED'
return 'OK'
########## python 网页版本游戏 https://py.checkio.org/en/mission/nearest-value/
##sample 1
##判断数组频繁出现的字符
def most_frequent(data):
"""
determines the most frequently occurring string in the sequence.
"""
# your code here
total = 0
lower = data
most = lower[0]
for i in lower:
if lower.count(i) > total:
most = i
total = lower.count(i)
elif lower.count(i) == total:
if i < most:
most = i
total = lower.count(i)
return most
def most_frequent(data: list) -> str:
"""
determines the most frequently occurring string in the sequence.
"""
# your code here
return max(data, key=lambda a: data.count(a))
##sample 2
https://www.cnblogs.com/curo0119/p/8952536.html
博客园首页新随笔联系管理订阅订阅随笔- 237 文章- 0 评论- 9 阅读- 44万
python中lambda的用法
一、lambda函数也叫匿名函数,即,函数没有具体的名称。先来看一个最简单例子:
def f(x):
return x**2
print f(4)
Python中使用lambda的话,写成这样
g = lambda x : x**2
print g(4)
二、lambda和普通的函数相比,就是省去了函数名称而已,同时这样的匿名函数,又不能共享在别的地方调用。
其实说的没错,lambda在Python这种动态的语言中确实没有起到什么惊天动地的作用,因为有很多别的方法能够代替lambda。
1. 使用Python写一些执行脚本时,使用lambda可以省去定义函数的过程,让代码更加精简。
2. 对于一些抽象的,不会别的地方再复用的函数,有时候给函数起个名字也是个难题,使用lambda不需要考虑命名的问题。
3. 使用lambda在某些时候让代码更容易理解。
lambda基础
lambda语句中,冒号前是参数,可以有多个,用逗号隔开,冒号右边的返回值。lambda语句构建的其实是一个函数对象,见证一下:
>>> foo = [2, 18, 9, 22, 17, 24, 8, 12, 27]
>>> print filter(lambda x: x % 3 == 0, foo)
[18, 9, 24, 12, 27]
>>> print map(lambda x: x * 2 + 10, foo)
[14, 46, 28, 54, 44, 58, 26, 34, 64]
>>> print reduce(lambda x, y: x + y, foo)
139
在对象遍历处理方面,其实Python的for..in..if语法已经很强大,并且在易读上胜过了lambda。
本文转载于:https://blog.csdn.net/yezonggang/article/details/50978114
###sample 3 删除数组中特定元素之前的所有字符
from typing import Iterable
def remove_all_before(items: list, border: int) -> Iterable:
# your code here
#return items
try:
#search for the item
index = items.index(border)
# print(f'the border is found at index {index}')
return items[index:]
except ValueError:
# print('border not present')
return items
##sample 1
题目分析:直接用upper函数将字符串转换为大写,再与给定的字符串进行比较
我的答案:
def is_all_upper(text: str) -> bool:
# your code here
if text.upper() == text:
return True
else:
return False
if __name__ == '__main__':
print("Example:")
print(is_all_upper('ALL UPPER'))
# These "asserts" are used for self-checking and not for an auto-testing
assert is_all_upper('ALL UPPER') == True
assert is_all_upper('all lower') == False
assert is_all_upper('mixed UPPER and lower') == False
assert is_all_upper('') == True
assert is_all_upper(' ') == True
assert is_all_upper('444') == True
assert is_all_upper('55 55 5') == True
print("Coding complete? Click 'Check' to earn cool rewards!")
##sample 2 https://tutorial.eyehunts.com/python/python-replace-the-first-character-in-string-example-code/#:~:text=Use%20Python%20built-in%20replace%20%28%29%20function%20to%20replace,replace%20the%20first%20character%20in%20a%20string%20Python
Another way
How to change character in string Python. Use the list() and join the funciton.
s = "Hello World!"
new = list(s)
new[0] = 'Y'
print(''.join(new))
####sample 3 将一个字符串两两分开,最后如果剩一个就加上“_”重新组成一对)
https://blog.csdn.net/weixin_51504379/article/details/119501518
def split_pairs(a):
# your code here
if a == '':
return []
if len(a) % 2 == 1:
a = a + "_"
b = [a[i:i+2] for i in range(0, len(a), 2)]
return b
————————————————
版权声明:本文为CSDN博主「this_is_GQ」的原创文章,遵循CC 4.0 BY-SA版权协议,转载请附上原文出处链接及本声明。
原文链接:https://blog.csdn.net/weixin_51504379/article/details/119501518
###sample 4(需要找到最接近目标值的值)
def nearest_value(values: set, one: int) -> int:
# your code here
#return None
new=list(values)
new.append(one)
new.sort()
p=new.index(one)
if new[p]==new[-1]:
return new[-2]
elif p==0:
return new[1]
else:
if abs(new[p-1]-one)<=abs(new[p+1]-one):
return new[p-1]
else:
return new[p+1]
###
##sample 1
给定一个字符串和两个标记字符(第一个和最后一个标记),找到两个标记符之间包含的子字符串。初始标记和最终标记始终不同;如果这两个标记在字符串中都不存在,则返回原字符串;如果没有初始标记,则应将第一个字符视为字符串的开头;如果没有最终标记,则最后一个字符应视为字符串的结尾;如果最终标记位于初始标记之前,则返回一个空字符串。
————————————————
版权声明:本文为CSDN博主「BOB • 鲍勃」的原创文章,遵循CC 4.0 BY-SA版权协议,转载请附上原文出处链接及本声明。
原文链接:https://blog.csdn.net/qq_36759224/article/details/103483228
def between_markers(text: str, begin: str, end: str) -> str:
"""
returns substring between two given markers
"""
# your code here
#return ''
start = text.find(begin)
finish = text.find(end)
return text[start+1:finish]
sample2 改写字符串,第一个字符大写,最后一个字符串 加入"."
def correct_sentence(text: str) -> str:
"""
returns a corrected sentence which starts with a capital letter
and ends with a dot.
"""
# your code here
#return text
if text[0].islower():
text = text[0].upper() + text[1:]
if text[-1] != '.':
text += '.'
return text
##sample 1
https://blog.csdn.net/weixin_44460564/article/details/111185420
题目
在给定的文本中,对数字进行求和,只计算单独的数字。如果一个数字是一个单词的一部分,就不计算在内。
文本中只包含字母、空格和数字。
def sum_numbers(text):
word = text.split()
num = 0
for i in word:
if i.isdigit():
num += int(i)
return num
偶数位相加,最后乘以最后一位
def checkio(array: list) -> int:
"""
sums even-indexes elements and multiply at the last
"""
#return 0
if len(array) == 0:
return 0
else:
sum = 0
last = array[-1]
for i in range(0, len(array), 2):
sum = sum + int(array[i])
sum1= sum * last
return sum1
##sample 3
使用xlrd函数包,安装: pip install xlrd
https://www.jb51.net/article/142411.htm
使用方法:
import xlrd
def fileload(filename = '待读取.xlsx'):
dataset = []
workbook = xlrd.open_workbook(filename)
table = workbook.sheets()[0]
for row in range(table.nrows):
dataset.append(table.row_values(row))
return dataset
这两个较为常用,需要知道如何使用
##sample 1 判断字符是否是3个连续字符
def checkio(words: str) -> bool:
#return True or False
word = words.split()
num = 0
for i in word:
if i.isalpha():
num += 1
else:
num=0
return (num>=3)
if __name__ == '__main__':
print('Example:')
print(checkio("Hello World hello"))
###sample2 替换tuple 里的对象 将right换成left,输出字符串
def left_join(phrases: tuple) -> str:
"""
Join strings and replace "right" to "left"
"""
return ",".join(phrases).replace("right", "left")
####sample 1
https://www.cnblogs.com/xioawu-blog/p/11024875.html
python 内置2to3工具将python2代码转换为python3代码
python2与python3代码不兼容,如果需要python2代码在python3环境下运行,需要将代码进行转换,本文介绍使用python3内置工具2to3.py对代码进行转换
一:2to3.py在 python\Tools\scripts 目录下,具体位置根据自己的python安装路径查看
在此文件夹内打开cmd命令窗口,
输入:
python 2to3.py + 需要修改的py文件
如:python3 2to3.py D:\workspace\project3.0\testsuit01\testcase01.py
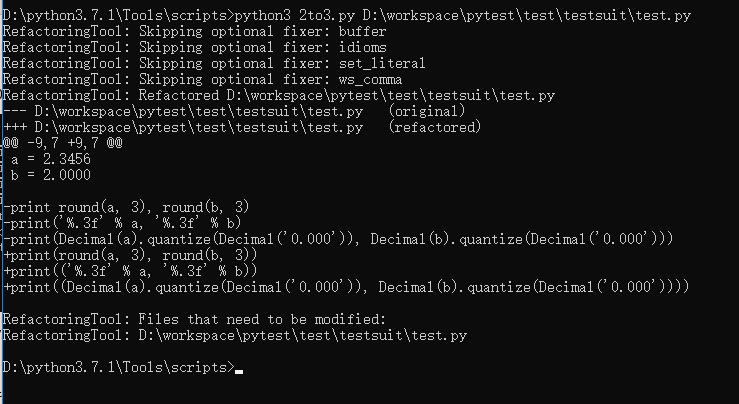
二:直接接文件夹位置可以批量修改文件下的py文件
python3 2to3.py D:\workspace\pytest\test\testsuit\
三:接-w加文件可以将修改的文件覆盖到原文件并留有.bak的备份文件用来恢复
python3 2to3.py -w D:\workspace\pytest\test\testsuit\test.py
四:-w -n效果是修改但不留备份文件
python3 2to3.py -w -n D:\workspace\pytest\test\testsuit\test.py
注:2to3.py完成了py2代码转换成py3的主要工作,有时还需对代码做一些微调
#######q1 解决python查询数据库字段为decimal类型的数据结果为科学计数法的问题
https://blog.csdn.net/RoninYang/article/details/107777911
解决python查询数据库字段为decimal类型的数据结果为科学计数法的问题
select CAST(u.amount AS CHAR) from user u
CAST(u.amount AS CHAR) ;u.amount: Decimal类型的字段
这样查询出来的数据就不会是科学计数法了,但是查出来的数据类型就转成了字符串类型了
验证
准备数据库数据
————————————————
版权声明:本文为CSDN博主「DesireYang」的原创文章,遵循CC 4.0 BY-SA版权协议,转载请附上原文出处链接及本声明。
原文链接:https://blog.csdn.net/RoninYang/article/details/107777911
##q2 为什么python从mysql中获取的数据后,数据未尾会多一个L?
https://developer.aliyun.com/ask/60458?spm=a2c6h.13159736
Python数字,python支持四种不同的数据类型 int整型 long长整型 float浮点型 complex复数
var1 = 10; #表示整型
var2 = 678L #表示长整型
var3 = 12.34;#表示浮点型
var4 = 123j #复数
var5 = 123+45j #复数
L表示长整形, nt最大值在sys.maxint,超过这个值会自动转换成long,
L表示python的数字长整型,不用管它,python会自动对数字在需要的时候进行转换
https://www.cnblogs.com/wangleiblog/p/10676481.html
###sample1 使用 Python 识别并提取图像中的文字
1. 介绍
介绍使用 python 进行图像的文字识别,将图像中的文字提取出来,可以帮助我们完成很多有趣的事情。
2. 必备工具
tesseract-ocr
下载地址: https://github.com/UB-Mannheim/tesseract/wiki
tesseract-ocr 是一个开源的图片OCR识别库, 功能及其强大,支持多国语言。
更高级的用法,它还支持机器学习算法,通过训练的方式,使OCR识别更加智能化及准确。
https://cloud.tencent.com/developer/article/1913342
下载安装。注意:安装的时候选中中文包(安装时把所有选项都勾上)。本人安装目录:e\Program Files\Tesseract-OCR\tessdata
python 库
使用安装 pytesseract 和 pillow 库:
pip install pytesseract
或者
pip install pytesseract==0.3.7
pip install pillow
3. 开发使用
使用 python 配合 tesseract 识别文字中的图像可以非常简单,几行代码就可以搞定。
例如,识别下面这张图片:
首先导入 pytesseract 和 pillow 库
import pytesseract
from PIL import Image
然后指定 tesseract 目录:
pytesseract.pytesseract.tesseract_cmd = 'f:/tessert/tesseract.exe'
然后使用 pillow 库加载图片:
img = Image.open('test.png')
最后使用 tesseract 识别图像的文字:
text = pytesseract.image_to_string(img, lang='chi_sim')
print(text)
最后的结果是:
可以看到,有偏差,但是基本上都识别出来了。
4. 总结
这里只是入门级的介绍,当然还有问题,比如彩色图像识别一般效果不好,对比度低的图像识别也不一定好,这就需要我们对图片进行处理后再来识别。比如提取灰度图片,锐化图片等操作,具体涉及到的是数字图像处理的领域了,这个后面有机会再讨论。
travel between codes
cd E:/Program Files/Tesseract-OCR/
e:
tesseract -v tesseract --list-langs -v tesseract --list-langs # 查看Tesseract-OCR支持语言
########
##pandas 使用初探
https://www.runoob.com/pandas/pandas-cleaning.html
https://blog.csdn.net/m0_37911706/article/details/125334422
Pandas常用数据结构 (重要)
https://www.cjavapy.com/article/682/
df.query('A > B')
https://www.cnblogs.com/Jaryer/p/15151425.html
pandas dataframe 筛选数据
Pandas查询数据df.query
https://blog.csdn.net/qq_45176548/article/details/112755795
https://blog.csdn.net/weixin_39576066/article/details/111492454?utm_medium=distribute.pc_relevant.none-task-blog-2~default~baidujs_baidulandingword~default-0-111492454-blog-124634996.t5_layer_eslanding_sa_randoms&spm=1001.2101.3001.4242.1&utm_relevant_index=3
pandas获取全部列名_python获取Pandas列名的几种方法
##sample
person = {
"name": ['王文义', '于成龙' , 'Taobao'],
"age": [50, 200, 12345]
}
df = pandas.DataFrame(person)
df.query('name = "王文义"')
df.query("name == '王文义'")
df.query('age== 50')
df[df['name'] == '王文义']
####sample pyqt 前端设计
PyQt5 快速开发与实战
https://github.com/PyQt5/PyQt — 有很多例子 good\\
##python 输出日志
最明显的方法是打印到文件对象:
with open('out.txt', 'w') as f:
    print >> f, 'Filename:', filename     # Python 2.x
    print('Filename:', filename, file=f)  # Python 3.x
但是,重定向标准输出对我也有效。像这样的一次性脚本可能很好:
import sys

orig_stdout = sys.stdout
f = open('out.txt', 'w')
sys.stdout = f

for i in range(2):
    print 'i = ', i

sys.stdout = orig_stdout
f.close()


##python 2个数组对比
data_x = [
             (1, "a", 129),
             (2, "b", 1253)
]
data_y = [
    (2, "b", 168),
    (1, "a", 1213)
]
data_x = sorted(data_x, key=lambda x: x[0])
data_y = sorted(data_y, key=lambda y: y[0])
print(data_x)
print(data_y)

res = [(x[0], x[1], x[2]-y[2]) for x, y in zip(data_x, data_y)]
print(res)
########sample
平时在用Pycharm的时候注意到在补全函数提示词前面有c,m,p等小分类,这些到底是什么意思呢,一起看一下吧!
简写 代表
c Class:类
m Method:类实例方法
F Function:函数F
f Field:类属性,域
V Variable:变量
P Property:python内置函数
p Parameter:参数
<> 代表Element:元素
Directory 目录
Package 包
下面是官网解释:
官方网站地址:https://www.jetbrains.com/help/pycharm/symbols.html
————————————————
版权声明:本文为CSDN博主「老街小霸王」的原创文章,遵循CC 4.0 BY-SA版权协议,转载请附上原文出处链接及本声明。
原文链接:https://blog.csdn.net/weixin_45962167/article/details/108950258
###sample
###install dmpython in windows python2.7 for dameng
参考文档
https://blog.csdn.net/ouyanglin111/article/details/120225020?spm=1001.2101.3001.6650.2&utm_medium=distribute.pc_relevant.none-task-blog-2%7Edefault%7EBlogCommendFromBaidu%7ERate-2-120225020-blog-126891970.pc_relevant_3mothn_strategy_recovery&depth_1-utm_source=distribute.pc_relevant.none-task-blog-2%7Edefault%7EBlogCommendFromBaidu%7ERate-2-120225020-blog-126891970.pc_relevant_3mothn_strategy_recovery&utm_relevant_index=4
https://blog.csdn.net/qq_35349982/article/details/126891970
https://www.cnblogs.com/hxlasky/p/16821242.html
说明
dmPython 简介
dmPython 是 DM 提供的依据 Python DB API version 2.0 中 API 使用规定而开发的数据库访问接口。
使用 Python 连接达梦数据库时需要安装 dmPython。安装完 DM 数据库软件后,在安装路径下的 drivers 目录下,可以找到 dmPython 的驱动源码,由于提供的是源码,需要自己编译安装,下面分别介绍如何在 Windows 和 Linux 环境下编译安装 dmPython。
Windows 环境编译安装 dmPython
安装 DM 数据库软件并设置 DM_HOME 环境变量
dmPython 源码依赖 DM 安装目录中提供的 include 头文件,编译安装前需要检查是否安装 DM 数据库软件,并设置 DM_HOME 环境变量。
可访问达梦云适配中心下载试用,下载 DM8 数据库试用版并安装,请参考 DM 数据库安装。
设置 DM_HOME 环境变量
安装编译工具 Microsoft Visual C++ Build Tools
##开始安装
step 0 安装达梦管理工具,windows 版本,
接着进入windows 达梦管理工具的dmPython目录
cd E:\dba\dm8\app\drivers\python\dmPython
step 1: build 使用正确的python 环境,一般情况装了VC+
E:\test_py\magic_box\venv\Scripts\python setup.py build
pthon setup.py build
running build
running build_ext
building 'dmPython' extension
creating build
creating build\temp.win-amd64-2.7
creating build\temp.win-amd64-2.7\Release
C:\Users\Administrator\AppData\Local\Programs\Common\Microsoft\Visual C++ for Py
thon\9.0\VC\Bin\amd64\cl.exe /c /nologo /Ox /MD /W3 /GS- /DNDEBUG -DDM64 -DWIN32
-D_CRT_SECURE_NO_WARNINGS -IE:\dba\dm8\app\include -IE:\dba\dm8\app\drivers\pyt
hon\dmPython -IC:\Python27\include -IE:\\test_py\magic_box\venv\PC /Tcpy_Dam
eng.c /Fobuild\temp.win-amd64-2.7\Release\py_Dameng.obj -DBUILD_VERSION=2.4.5
py_Dameng.c
C:\Users\Administrator\AppData\Local\Programs\Common\Microsoft\Visual C++ for Py
thon\9.0\VC\Bin\amd64\cl.exe /c /nologo /Ox /MD /W3 /GS- /DNDEBUG -DDM64 -DWIN32
-D_CRT_SECURE_NO_WARNINGS -IE:\dba\dm8\app\include -IE:\dba\dm8\app\drivers\pyt
hon\dmPython -IC:\Python27\include -IE:\\test_py\magic_box\venv\PC /Tcrow.c
/Fobuild\temp.win-amd64-2.7\Release\row.obj -DBUILD_VERSION=2.4.5
row.c
C:\Users\Administrator\AppData\Local\Programs\Common\Microsoft\Visual C++ for Py
thon\9.0\VC\Bin\amd64\cl.exe /c /nologo /Ox /MD /W3 /GS- /DNDEBUG -DDM64 -DWIN32
-D_CRT_SECURE_NO_WARNINGS -IE:\dba\dm8\app\include -IE:\dba\dm8\app\drivers\pyt
hon\dmPython -IC:\
var.c(312) : warning C4018: '<' : signed/unsigned mismatch
var.c(568) : warning C4244: '=' : conversion from 'udint8' to 'udint4', possible
loss of data
var.c(607) : warning C4244: '=' : conversion from 'udint8' to 'udint4', possible
loss of data
var.c(1140) : warning C4244: '=' : conversion from 'slength' to 'udint4', possib
le loss of data
C:\Users\Administrator\AppData\Local\Programs\Common\Microsoft\Visual C++ for Py
thon\9.0\VC\Bin\amd64\cl.exe /c /nologo /Ox /MD /W3 /GS- /DNDEBUG -DDM64 -DWIN32
-D_CRT_SECURE_NO_WARNINGS -IE:\dba\dm8\app\include -IE:\dba\dm8\app\drivers\pyt
hon\dmPython -IC:\Python27\include -IE:\\test_py\magic_box\venv\PC /TcvCurso
r.c /Fobuild\temp.win-amd64-2.7\Release\vCursor.obj -DBUILD_VERSION=2.4.5
vCursor.c
C:\Users\Administrator\AppData\Local\Programs\Common\Microsoft\Visual C++ for Py
thon\9.0\VC\Bin\amd64\cl.exe /c /nologo /Ox /MD /W3 /GS- /DNDEBUG -DDM64 -DWIN32
-D_CRT_SECURE_NO_WARNINGS -IE:\dba\dm8\app\include -IE:\dba\dm8\app\drivers\pyt
hon\dmPython -IC:\Python27\include -IE:\\test_py\magic_box\venv\PC /TcvDateT
ime.c /Fobuild\temp.win-amd64-2.7\Release\vDateTime.obj -DBUILD_VERSION=2.4.5
vDateTime.c
build\temp.win-amd64-2.7\Release\vLob.obj build\temp.win-amd64-2.7\Release\vNum
ber.obj build\temp.win-amd64-2.7\Release\vObject.obj build\temp.win-amd64-2.7\Re
lease\vString.obj build\temp.win-amd64-2.7\Release\vlong.obj build\temp.win-amd6
4-2.7\Release\exBfile.obj build\temp.win-amd64-2.7\Release\vBfile.obj build\temp
.win-amd64-2.7\Release\trc.obj /OUT:build\lib.win-amd64-2.7\dmPython.pyd /IMPLIB
:build\temp.win-amd64-2.7\Release\dmPython.lib /MANIFESTFILE:build\temp.win-amd6
4-2.7\Release\dmPython.pyd.manifest
py_Dameng.obj : warning LNK4197: export 'initdmPython' specified multiple times;
using first specification
Creating library build\temp.win-amd64-2.7\Release\dmPython.lib and object bui
ld\temp.win-amd64-2.7\Release\dmPython.exp
E:\dba\dm8\app\drivers\python\dmPython>
step 3 .install
E:\test_py\magic_box\venv\Scripts\python setup.py install
removing 'build\bdist.win-amd64\egg' (and everything under it)
Processing dmPython-2.4.5-py2.7-win-amd64.egg
Copying dmPython-2.4.5-py2.7-win-amd64.egg to e:\\test_py\magic_box\venv\lib
\site-packages
Installed e:\test_py\magic_box\venv\lib\site-packages\dmpython-2.4.5-py2.7-
win-amd64.egg
Processing dependencies for dmPython==2.4.5
Finished processing dependencies for dmPython==2.4.5
step 4: 复制DM_HOME 的dpi 目录下E:\dba\dm8\app\drivers\dpi 文件全部拷贝到,dmPython的包安装位置,如我的电脑:
e:\\test_py\magic_box\venv\lib\site-packages
注意,一定是要与这个文件在同目录下:
dmPython-2.4.5-py2.7-win-amd64.egg
dmPython 通过调用 DM DPI 接口完成 Python 模块扩展。在其使用过程中,除 Python标准库以外,还需要 DPI 的运行环境。
进入 python 解释器查看搜索路径
python
import sys
sys.path
['C:\\Program Files\\JetBrains\\PyCharm Community Edition 2020.1.1\\plugins\\python-ce\\helpers\\pydev', 'C:\\Program Files\\JetBrains\\PyCharm Community Edition 2020.1.1\\plugins\\python-ce\\helpers\\third_party\\thriftpy', 'C:\\Program Files\\JetBrains\\PyCharm Community Edition 2020.1.1\\plugins\\python-ce\\helpers\\pydev', 'E:\\\\test_py\\magic_box\\venv\\Scripts\\python27.zip', 'E:\\\\test_py\\magic_box\\venv\\DLLs', 'E:\\\\test_py\\magic_box\\venv\\lib', 'E:\\\\test_py\\magic_box\\venv\\lib\\plat-win', 'E:\\\\test_py\\magic_box\\venv\\lib\\lib-tk', 'E:\\\\test_py\\magic_box\\venv\\Scripts', 'C:\\Python27\\Lib', 'C:\\Python27\\DLLs', 'C:\\Python27\\Lib\\lib-tk', 'E:\\\\test_py\\magic_box\\venv', 'E:\\\\test_py\\magic_box\\venv\\lib\\site-packages', 'E:\\\\test_py\\magic_box\\venv\\lib\\site-packages\\et_xmlfile-1.0.1-py2.7.egg', 'E:\\\\test_py\\magic_box\\venv\\lib\\site-packages\\openpyxl-2.6.4-py2.7.egg', 'E:\\\\test_py\\magic_box\\venv\\lib\\site-packages\\mysqldb_rich-2.7-py2.7.egg', 'E:\\\\test_py\\magic_box\\venv\\lib\\site-packages\\dmpython-2.4.5-py2.7-win-amd64.egg', 'E:\\\\test_py\\magic_box', 'E://test_py/magic_box']
step4 .进入python 管理页面
4.1
E:\\test_py\magic_box\venv\Scripts\python
import dmPython
报错
>>> import dmPython
E:\\test_py\magic_box\venv\lib\site-packages\dmpython-2.4.5-py2.7-win-amd64.
egg\dmPython.py:3: UserWarning: Module dmPython was already imported from E:\pen
g\test_py\magic_box\venv\lib\site-packages\dmpython-2.4.5-py2.7-win-amd64.egg\dm
Python.pyc, but e:\dba\dm8\app\drivers\python\dmpython is being added to sys.pat
h
Traceback (most recent call last):
File "<stdin>", line 1, in <module>
File "build\bdist.win-amd64\egg\dmPython.py", line 7, in <module>
File "build\bdist.win-amd64\egg\dmPython.py", line 6, in __bootstrap__
ImportError: DLL load failed: 找不到指定的模块。
4.2. 如果4.1 报错,那么需要手工添加 操作系统属性 添加环境变量
$DM_HOME/dpi目录
将如下一个路径,加入到PATH中
E:\\test_py\magic_box\venv\Scripts\python
import dmPython

 浙公网安备 33010602011771号