实验三
实验任务一
原代码
button.hpp
点击查看代码
#pragma once

#include <iostream>
#include <string>

class Button {
public:
    Button(const std::string &label_);
    const std::string& get_label() const;
    void click();

private:
    std::string label;
};

Button::Button(const std::string &label_): label{label_} {
}

inline const std::string& Button::get_label() const {
    return label;
}

inline void Button::click() {
    std::cout << "Button '" << label << "' clicked\n";
}
window.hpp
点击查看代码
#pragma once

#include <iostream>
#include <vector>
#include <algorithm>
#include "button.hpp"

// 窗口类
class Window{
public:
    Window(const std::string &title_);
    void display() const;
    void close();
    void add_button(const std::string &label);
    void click_button(const std::string &label);

private:
    bool has_button(const std::string &label) const;//什么时候暴露为公有?

private:
    std::string title;
    std::vector<Button> buttons;
};

Window::Window(const std::string &title_): title{title_} {
    buttons.emplace_back(Button("close"));
}

inline void Window::display() const {
    std::string s(40, '*');
    std::cout << s << std::endl;
    std::cout << "window : " << title << std::endl;
    int cnt = 0;
    for(const auto &button: buttons)
        std::cout << ++cnt << ". " << button.get_label() << std::endl;
    std::cout << s << std::endl;
}

inline void Window::close() {
    std::cout << "close window '" << title << "'" << std::endl;
    click_button("close");
}

inline bool Window::has_button(const std::string &label) const {
    for(const auto &button: buttons)
        if(button.get_label() == label)
            return true;

    return false;
}

inline void Window::add_button(const std::string &label) {
    if(has_button(label))
        std::cout << "button " << label << " already exists!\n";
    else
        buttons.emplace_back(Button(label));
}

inline void Window::click_button(const std::string &label) {
    for(auto &button:buttons)
        if(button.get_label() == label) {
            button.click();
            return;
        }

    std::cout << "no button: " << label << std::endl;
}
task1.cpp
点击查看代码
#include "window.hpp"
#include <iostream>

void test(){
    Window w("Demo");
    w.add_button("add");
    w.add_button("remove");
    w.add_button("modify");
    w.add_button("add");
    w.display();
    w.close();
}

int main() {
    std::cout << "用组合类模拟简单GUI:\n";
    test();
}
运行截图
问题
问题1:window 和 Button 是组合关系。Window类内部有一个名为buttons的成员变量,类型是std::vector Button。那么Window每一个实例都拥有一个Button对象的集合。
问题2:bool has_button(const std::string &label) const; 被设计为私有:
优点:用户可以通过这个接口查询某个按钮是否存在。
缺点:
1.has_button是一个内部实现细节,如果公开,会破坏封装。
2.click_button和 add_button已经处理了按钮存在/不存在的情况,所以用户并不真的需要has_button。
问题3:
接口1: const std::string& get_label() const;
接口2: const std::string get_label() const;
1.接口一直接引用get_label,不需要花费额外的空间。但是存在安全问题,如果调用者保存了这个引用但是原始的Button对象被销毁了,会出现未定义行为。
2.接口二创建一个label成员的副本,会带来额外的内存开销。但是非常安全,不会出现接口一的风险。
问题4:emplace_back与push_back的主要区别在于它们的实现机制。push_back在向vector尾部添加元素时,会先创建一个元素,然后将其拷贝或移动到容器中。如果是拷贝操作,之后会自动销毁创建的临时元素。而emplace_back则是直接在容器尾部创建元素,省去了这个中间步骤。
实验任务二
源代码
task2.cpp
点击查看代码
#include <iostream>
#include <vector>

void test1();
void test2();
void output1(const std::vector<int> &v);
void output2(const std::vector<int> &v);
void output3(const std::vector<std::vector<int>>& v);

int main() {
    //深复制会拷贝数据实体,两个对象完全独立;浅复制仅拷贝数据的 “引用 / 指针”,两个对象共享底层数据。
    std::cout << "深复制验证1: 标准库vector<int>\n";
    test1();

    std::cout << "\n深复制验证2: 标准库vector<int>嵌套使用\n";
    test2();
}

void test1() {
    std::vector<int> v1(5, 42);//创建一个向量,长度5,元素都是42
    const std::vector<int> v2(v1);
    std::cout << "v1 size: " << v1.size() << '\n';

    std::cout << "**********拷贝构造后**********\n";
    std::cout << "v1: "; output1(v1);
    std::cout << "v2: "; output1(v2);

    v1.at(0) = -1;//将第一个元素替换为-1

    std::cout << "**********修改v1[0]后**********\n";
    std::cout << "v1: "; output1(v1);
    std::cout << "v2: "; output1(v2);
}

void test2() {
    std::vector<std::vector<int>> v1{{1, 2, 3}, {4, 5, 6, 7}};
    const std::vector<std::vector<int>> v2(v1);

    std::cout << "v1: " << v1.size() << "\n";
    std::cout << "v2: " << v2.size() << "\n";
    std::cout << "v1[0]: " << v1[0].size() << "\n";

    std::cout << "**********拷贝构造后**********\n";
    std::cout << "v1: "; output3(v1);
    std::cout << "v2: "; output3(v2);

    v1.at(0).push_back(-1);//在容器的末尾添加一个元素
    std::vector<int>& r = v1.at(0);
    std::cout << r.at(r.size() - 1) << '\n';
    std::cout << "**********修改v1[0]后**********\n";
    std::cout << "v1: \n";  output3(v1);
    std::cout << "v2: \n";  output3(v2);
}

// 使用xx.at()+循环输出vector<int>数据项
void output1(const std::vector<int> &v) {
    if(v.size() == 0) {
        std::cout << '\n';
        return;
    }

    std::cout << v.at(0);
    for(auto i = 1; i < v.size(); ++i)
        std::cout << ", " << v.at(i);
    std::cout << '\n';
}

// 使用迭代器+循环输出vector<int>数据项
void output2(const std::vector<int> &v) {
    if(v.size() == 0) {
        std::cout << '\n';
        return;
    }

    auto it = v.begin();
    std::cout << *it;

    for(it = v.begin()+1; it != v.end(); ++it)
        std::cout << ", " << *it;
    std::cout << '\n';
}

// 使用auto for分行输出vector<vector<int>>数据项
void output3(const std::vector<std::vector<int>>& v) {
    if(v.size() == 0) {
        std::cout << '\n';
        return;
    }

    for(auto &i: v)
        output2(i);
}
运行截图
问题
问题1:分别是含参构造和复制构造。
v1、v2都含有5个值为42的数据。
问题2:v1.size() 、 v2.size() 、 v1[0].size()分别是2、2、3。v1是二维的,含有2个子vector,v2复制v1,也是2,v1[0]访问的是第一个子vector,有3个元素。
问题3:效果是等同的,将v1第一个元素变成-1。at()会进行边界检查,而通过下标不能进行边界检查,容易越界。
问题4:
1.可以输出-1.因为v1.at(0).push_back(-1)在第一个vector容器末尾添加-1,所以访问第一个容器的位置可以访问末尾的元素,是-1。
2.
优势:避免拷贝子vector,节省内存开销。
劣势:无法通过r修改其引用的子vector内容。
问题5:
1.标准库模板类 vector 的复制构造函数实现的是深复制。根据输出结果v1,v2是独立的,修改v1不会改变v2。
2.当 v 是 vector
所以必须提供at()的重载版本。
实验任务三
源代码
vectorInt.hpp
点击查看代码
#pragma once

#include <iostream>

// 动态int数组对象类
class vectorInt{
public:
    vectorInt();
    vectorInt(int n_);
    vectorInt(int n_, int value);
    vectorInt(const vectorInt &vi);
    ~vectorInt();

    int size() const;
    int& at(int index);
    const int& at(int index) const;
    vectorInt& assign(const vectorInt &vi);

    int* begin();
    int* end();
    const int* begin() const;
    const int* end() const;

private:
    int n;     // 当前数据项个数
    int *ptr;  // 数据区
};

vectorInt::vectorInt():n{0}, ptr{nullptr} {
}

vectorInt::vectorInt(int n_): n{n_}, ptr{new int[n]} {
}

vectorInt::vectorInt(int n_, int value): n{n_}, ptr{new int[n_]} {
    for(auto i = 0; i < n; ++i)
        ptr[i] = value;
}

vectorInt::vectorInt(const vectorInt &vi): n{vi.n}, ptr{new int[n]} {
    for(auto i = 0; i < n; ++i)
        ptr[i] = vi.ptr[i];
}

vectorInt::~vectorInt() {
    delete [] ptr;
}

int vectorInt::size() const {
    return n;
}

const int& vectorInt::at(int index) const {
    if(index < 0 || index >= n) {
        std::cerr << "IndexError: index out of range\n";
        std::exit(1);
    }

    return ptr[index];
}

int& vectorInt::at(int index) {
    if(index < 0 || index >= n) {
        std::cerr << "IndexError: index out of range\n";
        std::exit(1);
    }

    return ptr[index];
}

vectorInt& vectorInt::assign(const vectorInt &vi) {
    if(this == &vi)
        return *this;

    int *ptr_tmp;
    ptr_tmp = new int[vi.n];
    for(int i = 0; i < vi.n; ++i)
        ptr_tmp[i] = vi.ptr[i];

    delete[] ptr;
    n = vi.n;
    ptr = ptr_tmp;
    return *this;
}

//vectorInt& vectorInt::assign(const vectorInt& vi) {
//    delete[] ptr;
//    n = vi.n;
//    ptr = new int[n];
//    for (int i = 0; i < n; ++i)
//        ptr[i] = vi.ptr[i];
//    return *this;
//}

int* vectorInt::begin() {
    return ptr;
}

int* vectorInt::end() {
    return ptr+n;
}

const int* vectorInt::begin() const {
    return ptr;
}

const int* vectorInt::end() const {
    return ptr+n;
}
task3.cpp
点击查看代码
#include "vectorInt.hpp"
#include <iostream>
void test1();
void test2();
void output1(const vectorInt &vi);
void output2(const vectorInt &vi);
int main() {
std::cout << "测试1: \n";
test1();
std::cout << "\n测试2: \n";
test2();
}
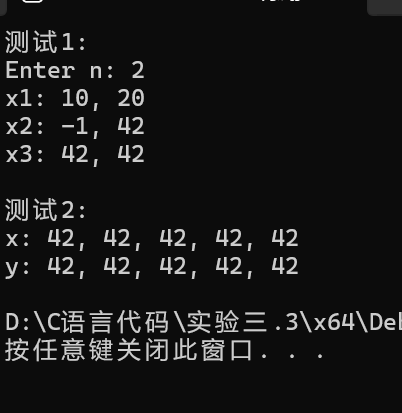
void test1() {
int n;
std::cout << "Enter n: ";
std::cin >> n;
vectorInt x1(n);
for(auto i = 0; i < n; ++i)
x1.at(i) = (i+1)*10;
std::cout << "x1: "; output1(x1);
vectorInt x2(n, 42);
vectorInt x3(x2);
x2.at(0) = -1;
std::cout << "x2: "; output1(x2);
std::cout << "x3: "; output1(x3);
}
void test2() {
const vectorInt x(5, 42);
vectorInt y;
y.assign(x);
std::cout << "x: "; output2(x);
std::cout << "y: "; output2(y);
}
// 使用xx.at()+循环输出vectorInt对象数据项
void output1(const vectorInt &vi) {
if(vi.size() == 0) {
std::cout << '\n';
return;
}
std::cout << vi.at(0);
for(auto i = 1; i < vi.size(); ++i)
std::cout << ", " << vi.at(i);
std::cout << '\n';
}
// 使用迭代器+循环输出vectorInt对象数据项
void output2(const vectorInt &vi) {
if(vi.size() == 0) {
std::cout << '\n';
return;
}
auto it = vi.begin();
std::cout << *it;
for(it = vi.begin()+1; it != vi.end(); ++it)
std::cout << ", " << *it;
std::cout << '\n';
}
运行截图
问题
问题1:
1)第二个版本中未进行‘自复制’处理,也就是如果出现y.assign(y)情况,会出现问题(经过测试)。因为如果输入的参数是本身,那么assign内部就会出现把自身的数据删除,出现未定义行为。
(2)版本二先把ptr的内存释放在进行分分配,但是如果分配失败,ptr还会丢失原来的数据。
问题2:
(1)static_cast<const vectorInt>(this) 的作用是将this指针类型转换为const vectorint类型。
转换前 this 的类型:vectorInt(在非 const 成员函数里)。
转换后类型:const vectorInt。
(2)const_cast
那么这个函数可以实现根据调用at的成员的类型返回对应的类型,例如const类型的变量通过调用at(),返回的是const类型。相当于把原代码两个重载合并了
问题3:
(1)v1是非const类型的变量,所以调用非const类型的begin();v2是const类型的变量,调用const类型的变量。const类型的变量只能调用const类型的成员函数,而非const类型的变量都可以调用,但是优先调用非const类型的成员函数
(2)迭代器就是一组操作的抽象(解引用 *、前进 ++、比较 !=、随机访问 +/- 等);指针恰好实现了这些操作,所以“指针就是最简单的随机访问迭代器”。
问题4:
使用
- std::fill_n(ptr, n, value);
功能:这个函数用来填充一个序列。它会从 ptr 指向的地址开始,将 n 个 int 元素都设置为 value。
作用:它替代了 vectorInt(int n_, int value) 构造函数中用于初始化的 for 循环,功能完全相同,但代码更简洁。
- std::copy_n(vi.ptr, vi.n, ptr);
功能:这个函数用于复制一个序列。它会从源地址 vi.ptr 开始,复制 vi.n 个 int 元素到目标地址 ptr。
作用:它替代了拷贝构造函数 vectorInt(const vectorInt &vi) 中用于复制数据的 for 循环,功能一致,意图更明确。
- std::copy_n(vi.ptr, vi.n, ptr_tmp);
功能:与上一个类似,它从源地址 vi.ptr 复制 vi.n 个元素到目标地址 ptr_tmp(一个临时缓冲区)。
作用:它替代了 assign 成员函数中用于将源数据复制到临时缓冲区的 for 循环。
实验任务四
源代码
matrix.hpp
点击查看代码
#pragma once

#include <iostream>
#include <algorithm>
#include <cstdlib>

// 类Matrix声明
class Matrix {
public:
    Matrix(int rows_, int cols_, double value = 0); // 构造rows_*cols_矩阵对象, 初值value
    Matrix(int rows_, double value = 0);    // 构造rows_*rows_方阵对象, 初值value
    Matrix(const Matrix &x);    // 深复制
    ~Matrix();

    void set(const double *pvalue, int size);   // 按行复制pvalue指向的数据,要求size=rows*cols,否则报错退出
    void clear();   // 矩阵对象数据项置0

    const double& at(int i, int j) const;   // 返回矩阵对象索引(i,j)对应的数据项const引用(越界则报错后退出)
    double& at(int i, int j);   // 返回矩阵对象索引(i,j)对应的数据项引用(越界则报错后退出)

    int rows() const;   // 返回矩阵对象行数
    int cols() const;   // 返回矩阵对象列数

    void print() const;   // 按行打印数据

private:
    int n_rows;      // 矩阵对象内元素行数
    int n_cols;       // 矩阵对象内元素列数
    double *ptr;    // 数据区
};
matrix.cpp
点击查看代码
#include "matrix.hpp"
#include <iostream>
#include <cstdlib> // For exit()
#include <algorithm> // For std::fill

// 构造函数:创建 rows_ x cols_ 矩阵,并用 value 初始化
Matrix::Matrix(int rows_, int cols_, double value) : n_rows(rows_), n_cols(cols_) {
    if (rows_ <= 0 || cols_ <= 0) {
        std::cerr << "Error: 矩阵行和列必须是整数" << std::endl;
        exit(1);
    }
    ptr = new double[n_rows * n_cols];
    std::fill(ptr, ptr + n_rows * n_cols, value);
}

// 构造函数:创建 rows_ x rows_ 方阵
Matrix::Matrix(int rows_, double value) : Matrix(rows_, rows_, value) {
    // 委托构造
}

// 深复制构造函数
Matrix::Matrix(const Matrix& x) : n_rows(x.n_rows), n_cols(x.n_cols) {
    ptr = new double[n_rows * n_cols];
    std::copy(x.ptr, x.ptr + n_rows * n_cols, ptr);
}

// 析构函数
Matrix::~Matrix() {
    delete[] ptr;
}

// 按行设置矩阵元素
void Matrix::set(const double* pvalue, int size) {
    if (size != n_rows * n_cols) {
        std::cerr << "Error: size不符合矩阵的大小." << std::endl;
        exit(1);
    }
    std::copy(pvalue, pvalue + size, ptr);
}

// 将矩阵所有元素清零
void Matrix::clear() {
    std::fill(ptr, ptr + n_rows * n_cols, 0.0);
}

// 返回 (i, j) 处元素的 const 引用
const double& Matrix::at(int i, int j) const {
    if (i < 0 || i >= n_rows || j < 0 || j >= n_cols) {
        std::cerr << "Error: Matrix index (" << i << "," << j << ") is out of bounds." << std::endl;
        exit(1);
    }
    return ptr[i * n_cols + j];
}

// 返回 (i, j) 处元素的引用
double& Matrix::at(int i, int j) {
    if (i < 0 || i >= n_rows || j < 0 || j >= n_cols) {
        std::cerr << "Error: Matrix index (" << i << "," << j << ") is out of bounds." << std::endl;
        exit(1);
    }
    return ptr[i * n_cols + j];
}

// 返回行数
int Matrix::rows() const {
    return n_rows;
}

// 返回列数
int Matrix::cols() const {
    return n_cols;
}

// 按行打印矩阵
void Matrix::print() const {
    for (int i = 0; i < n_rows; ++i) {
        for (int j = 0; j < n_cols; ++j) {
            std::cout << at(i, j) << "\t";
        }
        std::cout << std::endl;
    }
}
task4.cpp
点击查看代码
#include <iostream>
#include <cstdlib>
#include "matrix.hpp"
void test1();
void test2();
void output(const Matrix &m, int row_index);
int main() {
std::cout << "测试1: \n";
test1();
std::cout << "\n测试2: \n";
test2();
}
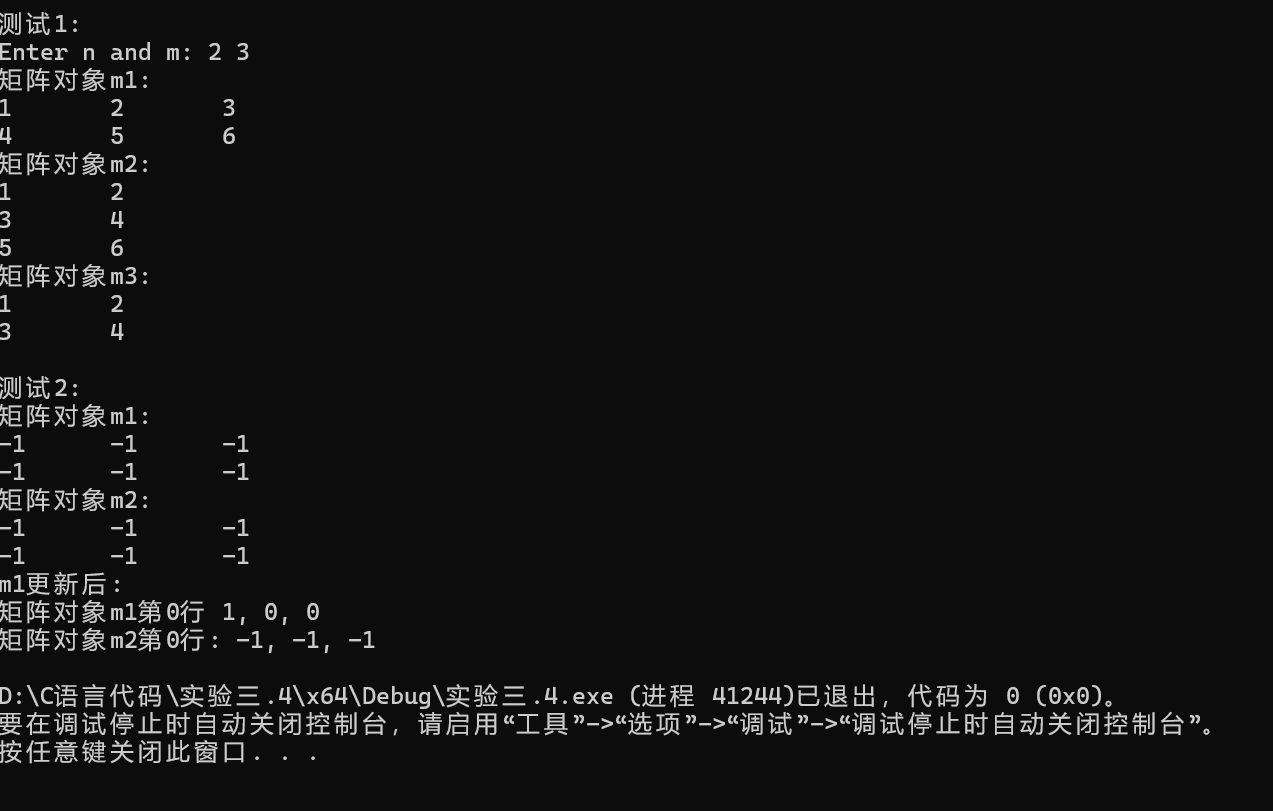
void test1() {
double x[1000] = {1, 2, 3, 4, 5, 6, 7, 8, 9, 10};
int n, m;
std::cout << "Enter n and m: ";
std::cin >> n >> m;
Matrix m1(n, m); // 创建矩阵对象m1, 大小n×m
m1.set(x, n*m); // 用一维数组x的值按行为矩阵m1赋值
Matrix m2(m, n); // 创建矩阵对象m2, 大小m×n
m2.set(x, m*n); // 用一维数组x的值按行为矩阵m1赋值
Matrix m3(n); // 创建一个n×n方阵对象
m3.set(x, n*n); // 用一维数组x的值按行为矩阵m3赋值
std::cout << "矩阵对象m1: \n"; m1.print();
std::cout << "矩阵对象m2: \n"; m2.print();
std::cout << "矩阵对象m3: \n"; m3.print();
}
void test2() {
Matrix m1(2, 3, -1);
const Matrix m2(m1);
std::cout << "矩阵对象m1: \n"; m1.print();
std::cout << "矩阵对象m2: \n"; m2.print();
m1.clear();
m1.at(0, 0) = 1;
std::cout << "m1更新后: \n";
std::cout << "矩阵对象m1第0行 "; output(m1, 0);
std::cout << "矩阵对象m2第0行: "; output(m2, 0);
}
// 输出矩阵对象row_index行所有元素
void output(const Matrix &m, int row_index) {
if(row_index < 0 || row_index >= m.rows()) {
std::cerr << "IndexError: row index out of range\n";
exit(1);
}
std::cout << m.at(row_index, 0);
for(int j = 1; j < m.cols(); ++j)
std::cout << ", " << m.at(row_index, j);
std::cout << '\n';
}
运行截图
拓展思考
1.std::vector 对象在创建时获取资源(内存),在其生命周期结束时自动释放资源。这使得资源管理变得自动化和确定化,从根本上消除了内存泄漏,使用起来更加安全。
2.修改后的版本将资源所有权交给了 std::vector,Matrix 类本身不再拥有资源。因此,它不需要任何特殊的成员函数,例如析构函数和构造函数,让代码变得极其简洁。
实验任务五
源代码
contact.hpp
点击查看代码
#pragma once

#include <iostream>
#include <string>

// 联系人类
class Contact {
public:
    Contact(const std::string &name_, const std::string &phone_);

    const std::string &get_name() const;
    const std::string &get_phone() const;
    void display() const;

private:
   std::string name;    // 必填项
   std::string phone;   // 必填项
};

Contact::Contact(const std::string &name_, const std::string &phone_):name{name_}, phone{phone_} {
}

const std::string& Contact::get_name() const {
    return name;
}

const std::string& Contact::get_phone() const {
    return phone;
}

void Contact::display() const {
    std::cout << name << ", " << phone;
}
contackBook.hpp
点击查看代码
# pragma  once

#include <iostream>
#include <string>
#include <vector>
#include <algorithm>
#include "contact.hpp"

// 通讯录类
class ContactBook {
public:
    void add(const std::string &name, const std::string &phone); // 添加联系人
    void remove(const std::string &name); // 移除联系人
    void find(const std::string &name) const; // 查找联系人
    void display() const; // 显示所有联系人
    size_t size() const;

private:
    int index(const std::string &name) const;  // 返回联系人在contacts内索引,如不存在,返回-1
    void sort(); // 按姓名字典序升序排序通讯录

private:
    std::vector<Contact> contacts;
};

void ContactBook::add(const std::string &name, const std::string &phone) {
    if(index(name) == -1) {
        contacts.push_back(Contact(name, phone));
        std::cout << name << " add successfully.\n";
        sort();
        return;
    }

    std::cout << name << " already exists. fail to add!\n";
}

void ContactBook::remove(const std::string &name) {
    int i = index(name);

    if(i == -1) {
        std::cout << name << " not found, fail to remove!\n";
        return;
    }

    contacts.erase(contacts.begin()+i);
    std::cout << name << " remove successfully.\n";
}

void ContactBook::find(const std::string &name) const {
    int i = index(name);

    if(i == -1) {
        std::cout << name << " not found!\n";
        return;
    }

    contacts[i].display();
    std::cout << '\n';
}

void ContactBook::display() const {
    for(auto &c: contacts) {
        c.display();
        std::cout << '\n';
    }
}

size_t ContactBook::size() const {
    return contacts.size();
}

// 返回联系人在contacts内索引; 如不存在,返回-1
int ContactBook::index(const std::string& name) const {
    for (size_t i = 0; i < contacts.size(); ++i) {
        if (contacts[i].get_name() == name) {
            return static_cast<int>(i);
        }
    }
    return -1;
}

// 按姓名字典序升序排序通讯录
void ContactBook::sort() {
    std::sort(contacts.begin(), contacts.end(), [](const Contact& a, const Contact& b) {
        return a.get_name() < b.get_name();
    });
}
task5.cpp
点击查看代码
#include "contactBook.hpp"
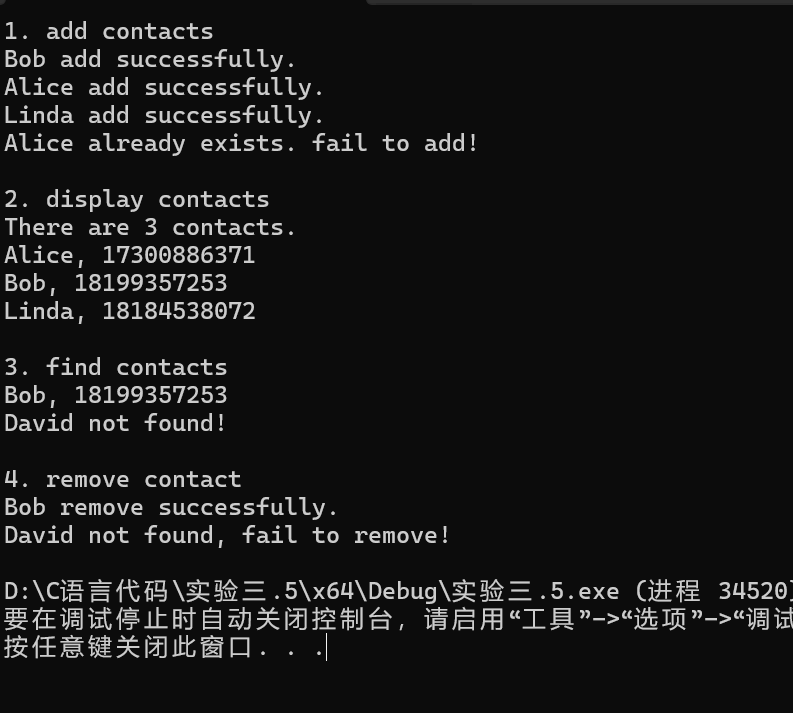
void test() {
ContactBook contactbook;
std::cout << "1. add contacts\n";
contactbook.add("Bob", "18199357253");
contactbook.add("Alice", "17300886371");
contactbook.add("Linda", "18184538072");
contactbook.add("Alice", "17300886371");
std::cout << "\n2. display contacts\n";
std::cout << "There are " << contactbook.size() << " contacts.\n";
contactbook.display();
std::cout << "\n3. find contacts\n";
contactbook.find("Bob");
contactbook.find("David");
std::cout << "\n4. remove contact\n";
contactbook.remove("Bob");
contactbook.remove("David");
}
int main() {
test();
}
运行截图
拓展思考
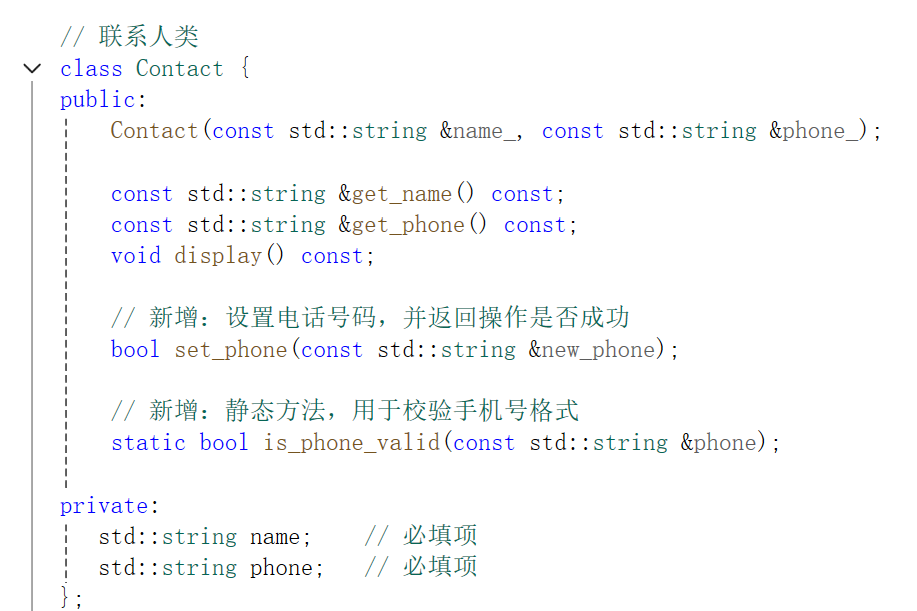
后续迭代1:修改联系人的功能
我在contact.hpp中,添加bool set_phone(const std::string &new_phone)这一个公有接口,将它进行封装,避免私有成员phone被修改。
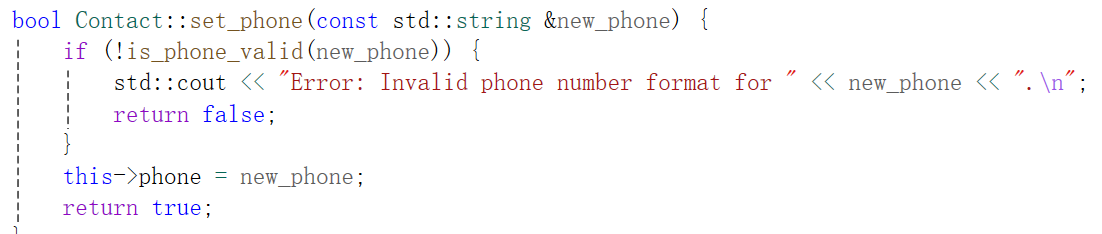
后续迭代2:数据有效性校验
我将“电话号码是否有效”这个判断逻辑,抽象成一个独立的、可重用的静态方法。这个函数只做一件事,就是检验电话号码是否是规定的格式。如果规则改变只需要修改这段代码就可以了,不需要改动其他调用了这个函数的代码。

总结:对类进行拓展,保持接口稳定性就需要让新增功能不破坏现有接口,将新增功能拆分为独立模块(如工具类、私有成员函数),避免核心类(如ContactBook)代码膨胀。通过封装扩展逻辑,使核心类仅暴露必要接口,降低维护复杂度。
小结
收获:
1.理解深复制与浅复制的差别,也知道了标准库模板类 vector 的复制构造函数实现的是深复制,编译器默认生成的拷贝构造函数为浅复制。
2.初步理解了迭代器:迭代器就是一组操作的抽象(解引用 *、前进 ++、比较 !=、随机访问 +/- 等);指针恰好实现了这些操作,所以“指针就是最简单的随机访问迭代器”。
新的发现:
1.通过查阅资料,了解了const_cast
2.static_cast
点击查看代码
#include <iostream>

int main()
{
    char c { 'a' };
    std::cout << static_cast<int>(c) << '\n'; // prints 97 rather than a

    return 0;
}
3.了解到自复制问题可能会带来安全问题,例如试验任务三额版本二代码,一开始释放ptr内存,如果变量调用自己,会出现未定义行为。

 浙公网安备 33010602011771号