
2024-11-21-Thu-T-Spring6
Spring
1 概述
Spring是一款主流的Java EE轻量级开源框架
-
广义的Spring
泛指以Spring Framework为核心的Spring技术栈, 如: Spring Framework, Spring MVC, SpringBoot, SpringCloud, SpringData, Spring Security, 其中Spring Framework是其他子项目的基础. -
狭义的Spring
特指Spring Framework, 通常称为Spring框架. Spring框架是一个分层的、面向切面的java应用程序的一站式轻量级解决方案, 它是Spring技术栈的核心和基础, 是为了解决企业级应用开发的复杂性而创建的.
Spring有两个核心模块, IoC和AOP.
IoC: Inverse of Control: 控制反转, 指把创建对象的过程交给Spring进行管理
AOP: Aspect Oriented Programing: 面向切面编程. AOP用来封装多个类的公共行为, 将那些与业务无关, 却为业务模块所共同调用的逻辑封装起来, 减少系统的重复代码, 降低模块间的耦合度. 另外, AOP还解决了一些系统层面的问题, 比如日志、事务、权限等.
1.1 Spring Framework特点
- 非侵入式: 使用Spring Framework开发应用时, Spring对应用程序本身的结构影响非常小, 对领域模型可以做到零污染; 对功能性组件也只需要使用几个简单的注解进行标记, 完全不会破坏原有结构, 反而能将组件结构进一步简化. 这就让Spring Frame开发应用程序时结构清晰, 简洁优雅.
- 控制反转: 框架创建对象
- 面向切面: 在不修改源代码的基础上增强代码功能
- 容器: Spring IoC是一个容器, 包含并管理组件对象的生命周期
- 组件化: Spring实现了使用简单的组件配置组合成一个复杂的应用, 在Spring中可以使用xml和注解组合这些对象
- 一站式: 可以整合各种开源框架
1.2 Spring模块组成

- Spring Core
- spring-core
- spring-beans
- spring-context
- spring-expression
- Spring AOP
- spring-aop
- spring-aspects
- spring-instrument
- Spring Data Access
- spring-jdbc
- spring-orm
- spring-oxm
- spring-jms
- spring-tx
- Spring Web
- spring-web
- spring-webmvc
- spring-websocket
- spring-webflux
- Spring Message
- spring-messaging
- Spring Test
- spring-test
1.3 Spring6特点
1.4 Log4j2日志概述
Apache Log4j2是一个开源的日志记录组件, 在工程中代替了system.out等打印语句, 是java中最流行的日志工具
Log4j2主要由几个重要组件组成
- 日志信息的优先级
- TRACE: 追踪, 是最低的日志级别, 相当于追踪程序的执行
- DEBUG: 调试, 一般在开发中, 都将其设置为最低的日志级别
- INFO: 信息, 输出一些重要信息, 使用较多
- WARN: 警告, 输出警告信息
- ERROR: 错误, 输出错误信息
- FATAL: 严重错误
- 日志信息的输出目的地: 指定了日志的输出是在控制台还是文件中
- 日志信息的输出格式: 控制了日志信息的显示内容
引入log4j2
<!--log4j2-->
        <dependency>
            <groupId>org.apache.logging.log4j</groupId>
            <artifactId>log4j-core</artifactId>
            <version>2.19.0</version>
        </dependency>
        <dependency>
            <groupId>org.apache.logging.log4j</groupId>
            <artifactId>log4j-slf4j2-impl</artifactId>
            <version>2.19.0</version>
        </dependency>
加载日志配置文件
<!--文件名固定为log4j2.xml, 文件必须在类的根路径下-->
使用日志
public class TestUser {
    Logger logger = LoggerFactory.getLogger(TestUser.class);
    @Test
    public void testLog(){
        logger.info("Log info printed....");
        logger.debug("Log debug printed....");
        logger.error("Log error printed....");
    }
}
2 容器: IoC
控制反转(IoC)通过依赖注入(DI)实现
2.1 基于xml方式进行bean管理
1. 获取Bean的三种方式
package com.learning.spring6.iocxml;

import org.springframework.context.ApplicationContext;
import org.springframework.context.support.ClassPathXmlApplicationContext;

/**
 * @author fei
 * @version 1.0
 */
public class TestUser {
    public static void main(String[] args) {
        ApplicationContext applicationContext = new ClassPathXmlApplicationContext("bean.xml");
        // 获取bean
        //1. 根据id获取
        User user1 = (User)applicationContext.getBean("user");
        System.out.println("user1 = " + user1);

        //2. 根据类型获取, ⚠️⚠️⚠️ !!!注意: 当根据类型获取bean时, 要求IOC容器中指定类型的bean有且只能有一个
        User user2 = applicationContext.getBean(User.class);
        System.out.println("user2 = " + user2);


        //3.根据id和类型获取
        User user3 = applicationContext.getBean("user", User.class);
        System.out.println("user3 = " + user3);
    }
}
2. 依赖注入之set注入
<!--依赖注入-->
    <!--1. 基于set方法注入-->
    <bean id="book" class="com.learning.spring6.iocxml.di.Book">
        <property name="author" value="zhangsan"/>
        <property name="name" value="Spring"/>
    </bean>
3. 依赖注入之构造器注入
    <!--2. 基于构造器方式注入-->
    <bean id="bookContract" class="com.learning.spring6.iocxml.di.Book">
        <constructor-arg name="name" value="DI"/>
        <constructor-arg name="author" value="jack"/>
    </bean>
4. 特殊值处理
<!--1. 空值-->
<constructor-arg name="name">
<null/>
</constructor-arg>
<!--2. 特殊符号-->
<!-- <xml实体>. -->
<constructor-arg name="author" value="< >"/>
<!-- CDATA节 -->
<constructor-arg name="author" >
<value><![CDATA[a < b]]></value>
</constructor-arg>
5. 为对象类型属性赋值
    <!--1. 引用外部Bean-->
    <bean id="dept1" class="com.learning.spring6.iocxml.ditest.Dept">
        <property name="name" value="Finance"> </property>
    </bean>
    <bean id="emp1" class="com.learning.spring6.iocxml.ditest.Emp">
        <!--普通属性注入-->
        <property name="name" value="jack"/>
        <property name="age" value="99"/>
        <!--对象类型注入-->
        <property name="dept" ref="dept1"/>
    </bean>

    <!--2. 内部Bean-->
    <bean id="emp2" class="com.learning.spring6.iocxml.ditest.Emp">
        <!--普通属性注入-->
        <property name="name" value="jack"/>
        <property name="age" value="99"/>
        <!--内部Bean-->
        <property name="dept">
            <bean class="com.learning.spring6.iocxml.ditest.Dept">
                <property name="name" value="Tech"/>
            </bean>
        </property>
    </bean>

    <!--3. 级联属性赋值-->
    <bean id="dept3" class="com.learning.spring6.iocxml.ditest.Dept">
        <property name="name" value="On Bench"/>
    </bean>
    <bean id="emp3" class="com.learning.spring6.iocxml.ditest.Emp">
        <!--普通属性注入-->
        <property name="name" value="jack"/>
        <property name="age" value="99"/>

        <!--级连赋值-->
        <property name="dept" ref="dept3"/>
        <property name="dept.name" value="Human Resource"/>
    </bean>
6. 为数组类型属性赋值
    <!--数组类型属性-->
    <bean id="empA" class="com.learning.spring6.iocxml.ditest.Emp">
        <property name="name" value="tom"/>
        <property name="age" value="19"/>
        <property name="dept" ref="dept1"/>
        <!--数组类型-->
        <property name="hobbies">
            <array>
                <value>Guitar</value>
                <value>Piano</value>
                <value>笛子</value>
            </array>
        </property>
    </bean>

    <!--List集合注入-->
    <bean id="deptL" class="com.learning.spring6.iocxml.ditest.Dept">
        <property name="name" value="Finance"/>
        <property name="empList">
            <list>
                <ref bean="emp1"/>
                <ref bean="emp2"/>
                <ref bean="empA"/>
            </list>
        </property>
    </bean>
7. 为集合类型属性赋值
方式一:
 <!--集合类型注入-->
    <bean id="math" class="com.learning.spring6.iocxml.school.Teacher">
        <property name="name" value="liu"/>
        <property name="age" value="46"/>
    </bean>
    <bean id="chinese" class="com.learning.spring6.iocxml.school.Teacher">
        <property name="name" value="wang"/>
        <property name="age" value="70"/>
    </bean>
    <bean id="english" class="com.learning.spring6.iocxml.school.Teacher">
        <property name="name" value="Zhang"/>
        <property name="age" value="30"/>
    </bean>

    <bean id="fei" class="com.learning.spring6.iocxml.school.Student">
        <property name="name" value="fei"/>
        <property name="age" value="19"/>
        <property name="map">
            <map>
                <entry>
                    <key>
                        <value>英语</value>
                    </key>
                    <ref bean="english"/>
                </entry>
                <entry value-ref="chinese">
                    <key>
                        <value>语文</value>
                    </key>
                </entry>
                <entry key="数学" value-ref="math"/>
            </map>
        </property>
    </bean>
方式二:
<!--标签添加util -->
<?xml version="1.0" encoding="UTF-8"?>
<beans xmlns="http://www.springframework.org/schema/beans"
       xmlns:xsi="http://www.w3.org/2001/XMLSchema-instance"
       xmlns:util="http://www.springframework.org/schema/util"
       xsi:schemaLocation="http://www.springframework.org/schema/beans
       http://www.springframework.org/schema/beans/spring-beans.xsd
       http://www.springframework.org/schema/util
       http://www.springframework.org/schema/util/spring-util.xsd">


    <bean id="lesson1" class="com.learning.spring6.iocxml.school.Lesson">
        <property name="name" value="CHINESE"/>
        <property name="teacher" ref="teacherZhang"/>
    </bean>

    <bean id="lesson2" class="com.learning.spring6.iocxml.school.Lesson">
        <property name="name" value="MATH"/>
        <property name="teacher" ref="teacherLiu"/>
    </bean>

    <bean id="teacherZhang" class="com.learning.spring6.iocxml.school.Teacher">
        <property name="name" value="MR ZHANG"/>
        <property name="age" value="35"/>
    </bean>

    <bean id="teacherLiu" class="com.learning.spring6.iocxml.school.Teacher">
        <property name="name" value="MR LIU"/>
        <property name="age" value="40"/>
    </bean>

    <bean id="student1" class="com.learning.spring6.iocxml.school.Student">
        <property name="name" value="tom"/>
        <property name="age" value="18"/>
        <property name="lessonList" ref="lessonList"/>
        <property name="teacherMap" ref="teacherMap"/>
    </bean>


    <util:list id="lessonList">
        <ref bean="lesson1"/>
        <ref bean="lesson2"/>
    </util:list>

    <util:map id="teacherMap">
        <entry>
            <key>
                <value>MATH</value>
            </key>
            <ref bean="teacherZhang"/>
        </entry>
        <entry>
            <key>
                <value>CHINESE</value>
            </key>
            <ref bean="teacherZhang"/>
        </entry>
    </util:map>

</beans>
8. p命名空间
<!-- 命名空间注入 -->
<?xml version="1.0" encoding="UTF-8"?>
<beans xmlns="http://www.springframework.org/schema/beans"
       xmlns:xsi="http://www.w3.org/2001/XMLSchema-instance"
       xmlns:p="http://www.springframework.org/schema/p"
       xmlns:util="http://www.springframework.org/schema/util"
       xsi:schemaLocation="http://www.springframework.org/schema/beans
       http://www.springframework.org/schema/beans/spring-beans.xsd
       http://www.springframework.org/schema/util
       http://www.springframework.org/schema/util/spring-util.xsd">

    <!--P名称空间注入-->
    <bean id="student_p" class="com.learning.spring6.iocxml.school.Student"
    p:name="Jerry" p:lessonList-ref="lessonList" p:teacherMap-ref="teacherMap">

    </bean>
</beans>
9. 引入外部属性文件
- 加入数据库相关依赖
        <!--mysql驱动-->
        <dependency>
            <groupId>mysql</groupId>
            <artifactId>mysql-connector-java</artifactId>
            <version>8.0.30</version>
        </dependency>

        <!--数据源, 连接池-->
        <dependency>
            <groupId>com.alibaba</groupId>
            <artifactId>druid</artifactId>
            <version>1.0.31</version>
        </dependency>
- 创建外部属性文件, properties格式: 定义数据信息, 用户名、密码、地址等
jdbc.user=root
jdbc.password=root
jdbc.url=jdbc:mysql://localhost:3306/spring?serverTimezone=UTC
jdbc.driver=com.mysql.jdbc.Driver
- 创建Spring配置文件, 引入context命名空间, 引入属性文件使用表达式完成注入
<?xml version="1.0" encoding="UTF-8"?>
<beans xmlns="http://www.springframework.org/schema/beans"
       xmlns:xsi="http://www.w3.org/2001/XMLSchema-instance"
       xmlns:context="http://www.springframework.org/schema/context"
       xsi:schemaLocation="http://www.springframework.org/schema/beans
       http://www.springframework.org/schema/beans/spring-beans.xsd
       http://www.springframework.org/schema/context
       http://www.springframework.org/schema/context/spring-context.xsd">

    <!--引入外部属性文件-->
    <context:property-placeholder location="jdbc.properties"/>

    <!--完成数据库信息注入-->
    <bean id="druidDataSource" class="com.alibaba.druid.pool.DruidDataSource">
        <property name="url" value="${jdbc.url}"/>
        <property name="username" value="${jdbc.user}"/>
        <property name="password" value="${jdbc.password}"/>
        <property name="driverClassName" value="${jdbc.driver}"/>

    </bean>

</beans>
- 测试
@Test
public void demo2(){

    ApplicationContext applicationContext = new ClassPathXmlApplicationContext("bean-jdbc.xml");
    DruidDataSource bean = applicationContext.getBean(DruidDataSource.class);
    System.out.println(bean);
    System.out.println(bean.getUrl());
}
10. bean的作用域
在spring中可以通过配置bean标签的scope属性来指定bean的作用域范围:
- singleton(默认): 在IOC容器中, 这个bean的对象始终是单实例, 在IOC容器初始化时创建
- prototype: 在IOC容器中有多实例, 获取bean时创建
如果在WebApplicationContext环境下还有如下作用域(不常用):
- request: 在一个请求中有效
- session: 在一个会话范围内有效
11. bean生命周期
- bean对象的创建(调用无参数构造)
- 给bean对象设置相关属性
- 调用bean前置处理器(初始化之前)
- bean对象初始化(调用指定的初始化方法)
- 调用bean后置处理器(初始化之后)
- bean对象创建完成
- bean对象销毁(配置指定的销毁方法)
- IoC容器关闭
案例:
bean类定义
package com.learning.spring6.iocxml.lifecircle;

/**
 * @Author fei
 * @Version 1.0
 * @Description TODO
 * @DATA 2024/11/18  18:53
 */
public class User {
    private String name;

    //无参数构造, bean初始化时调用
    public User(){
        System.out.println("1. bean对象创建, 调用无参数构造");
    }

    //bean初始化方法
    //方法名随便起
    public void initMethod(){
        System.out.println("4. bean对象初始化(调用指定的初始化方法)");
    }

    //bean销毁方法
    public void destroyMethod(){
        System.out.println("7. bean对象销毁(配置指定的销毁方法)");
    }

    public String getName() {
        System.out.println("6. bean对象创建完成, 使用bean");
        return name;
    }

    public void setName(String name) {
        System.out.println("2. 给bean对象设置相关属性");
        this.name = name;
    }
}
bean配置
<?xml version="1.0" encoding="UTF-8"?>
<beans xmlns="http://www.springframework.org/schema/beans"
       xmlns:xsi="http://www.w3.org/2001/XMLSchema-instance"
       xsi:schemaLocation="http://www.springframework.org/schema/beans http://www.springframework.org/schema/beans/spring-beans.xsd">

    <bean id="user" class="com.learning.spring6.iocxml.lifecircle.User"
          scope="singleton"
    init-method="initMethod" destroy-method="destroyMethod" >
        <property name="name" value="TOM"/>
    </bean>

    <!--bean的后置处理器需要放入IOC容器才能生效-->
    <bean id="myBeanProcessor" class="com.learning.spring6.iocxml.lifecircle.MyBeanProcess"/>
</beans>
测试
public class TestLife {
    public static void main(String[] args) {
        ClassPathXmlApplicationContext applicationContext = new ClassPathXmlApplicationContext("bean-life.xml");
        User user = applicationContext.getBean("user", User.class);
        System.out.println(user.getName());
        applicationContext.close();
    }
}
12. FactoryBean
- 自定义factorybean
public class MyFactoryBean implements FactoryBean<User> {


    @Override
    public User getObject() throws Exception {
        return new User();
    }

    @Override
    public Class<?> getObjectType() {
        return User.class;
    }
}
- xml配置
<?xml version="1.0" encoding="UTF-8"?>
<beans xmlns="http://www.springframework.org/schema/beans"
       xmlns:xsi="http://www.w3.org/2001/XMLSchema-instance"
       xsi:schemaLocation="http://www.springframework.org/schema/beans http://www.springframework.org/schema/beans/spring-beans.xsd">

    <bean id="user" class="com.learning.spring6.iocxml.factorybean.MyFactoryBean"/>
</beans>
- 测试
public class TestFactoryBean {
    @Test
    public void testFactoryBean(){
        ApplicationContext applicationContext = new ClassPathXmlApplicationContext("bean-factorybean.xml");
        User user = applicationContext.getBean("user", User.class);
        System.out.println(user);

    }
}
13. 基于xml自动装配

定义bean类, 以controller为例:
package com.learning.spring6.iocxml.auto.controller;

import com.learning.spring6.iocxml.auto.service.UserService;

/**
 * @Author fei
 * @Version 1.0
 * @Description TODO
 * @DATA 2024/11/18  19:29
 */
public class UserController {

    private UserService userService;

    public void setUserService(UserService userService) {
        this.userService = userService;
    }

    public void addUser(){
        userService.addUserService();
        System.out.println("Controller method addUser executed");
    }
}
xml对应配置:
<?xml version="1.0" encoding="UTF-8"?>
<beans xmlns="http://www.springframework.org/schema/beans"
       xmlns:xsi="http://www.w3.org/2001/XMLSchema-instance"
       xsi:schemaLocation="http://www.springframework.org/schema/beans http://www.springframework.org/schema/beans/spring-beans.xsd">

    <bean id="controller" class="com.learning.spring6.iocxml.auto.controller.UserController" autowire="byType"/>
    <bean id="service" class="com.learning.spring6.iocxml.auto.service.UserServiceImpl" autowire="byType"/>
    <!-- 当autowire使用byName时, 需要让xml配置的id或name值与对应类中定义的属性名称保持一致 -->
    <bean id="dao" class="com.learning.spring6.iocxml.auto.dao.UserDaoImpl"/>

</beans>
3.2.2 基于注解方式进行bean管理
注解是代码中的一种特殊标记, 在Spring中使用注解可以简化Spring的XML配置
Spring 通过注解实现自动装配的步骤如下:
- 引入依赖
- 开启组件扫描
spring 中默认是不使用注解装配bean, 因此需要在xml配置文件中开启Spring Beans的自动扫描功能
<?xml version="1.0" encoding="UTF-8"?>
<beans xmlns="http://www.springframework.org/schema/beans"
       xmlns:xsi="http://www.w3.org/2001/XMLSchema-instance"
       xmlns:context="http://www.springframework.org/schema/context"
       xsi:schemaLocation="http://www.springframework.org/schema/beans
       http://www.springframework.org/schema/beans/spring-beans.xsd
       http://www.springframework.org/schema/context
       http://www.springframework.org/schema/context/spring-context.xsd">

    <!--开启组件扫描-->
    <context:component-scan base-package="com.learning.spring6"/>

</beans>
- 使用注解定义Bean
@Component: 用于描述Spring的bean, 它是一个泛化的概念, 仅仅表示容器中的一个组件(Bean). 并且可以应用到任何层次. 例如Service层, DAO层.@Repository: 该注解用于数据访问层(DAO), 将Dao层的类标识为Spring的Bean@Service: 用于业务层(Service)@Controller: 用于控制层(Controller)
 @Component
public class User {
}
- 依赖注入
Autowire: 默认根据类型进行匹配, Autowire注解属于Spring框架, 需要spring相关依赖
//注入service
//1. 属性注入 //根据类型找到对应的对象, 完成注入
@Autowired
private UserService userService;

//2. set方法注入
@Autowire
public void setUserService(UserService userService){
  this.userService = userService;
}

//3. 构造器注入

@Autowire
public UserController(UserService userService){
  this.userService = userService;
}

//4. 构造形参注入
public UserController(@Autowire UserService userService){
  this.userService = userService;
}
Qualifier:
    @Autowired
    @Qualifier(value = "userDaoImpl")
    UserDao userDao;
Resource: Resource用在属性和setter方法上, 属于JDK扩展包的一部分, 标准注解, 具备通用型
如果jdk版本低于8或者高于11, 需要引入如下依赖
<dependency>
    <groupId>jakarta.annotation</groupId>
    <artifactId>jakarta.annotation-api</artifactId>
    <version>2.1.1</version>
</dependency>
@Resource(name = "userDaoImpl", type = UserDao.class)
UserDao userDao;
2.3 全注解开发
全注解开发就是不再使用spring配置文件, 写一个配置类来代替配置文件
package com.learning.spring6.config;

import org.springframework.context.annotation.ComponentScan;
import org.springframework.context.annotation.Configuration;

@Configuration //表示此类为配置类
@ComponentScan("com.learning.spring6.autowire") //开启组件扫描
// 等于xml中的配置“<context:component-scan base-package="com.learning.spring6"/>”
public class SpringConfig {

}
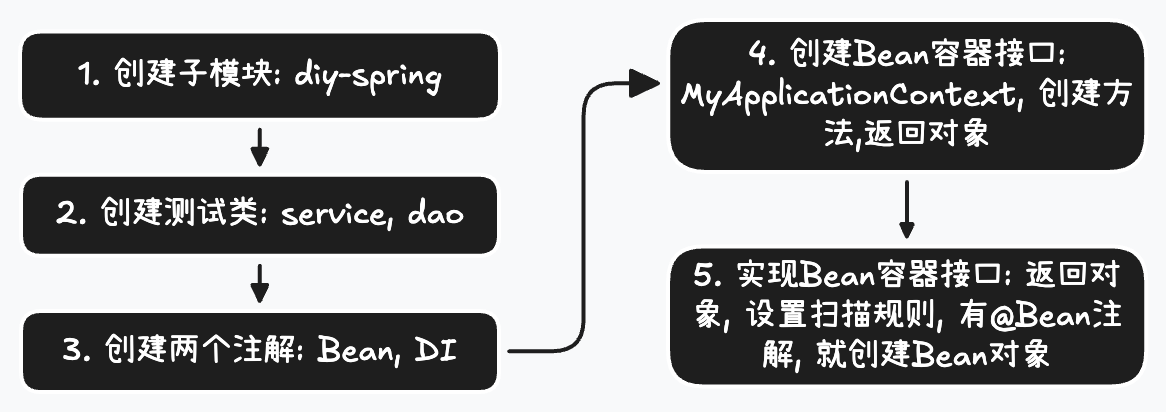
3 原理: 手写IoC
实现过程
package com.learning.bean;

import com.learning.anno.Bean;
import com.learning.anno.DI;
import org.springframework.context.ApplicationContext;

import java.io.File;
import java.io.IOException;
import java.lang.reflect.Field;
import java.lang.reflect.InvocationTargetException;
import java.net.URL;
import java.net.URLDecoder;
import java.nio.charset.StandardCharsets;
import java.util.Enumeration;
import java.util.HashMap;
import java.util.Map;
import java.util.Set;

/**
 * @Author fei
 * @Version 1.0
 * @Description 在spring中, IOC创建的对象都放在了一个Map的集合中, 这里做复现
 * @DATA 2024/11/19  15:31
 */
public class MyAnnotationApplicationContext implements MyApplicationContext {

    //创建一个Map集合, 用于存放bean的实例对象
    Map<Class,Object> beans = new HashMap<>();
    private String rootPath;


    //返回对象
    @Override
    public Object getBean(Class clazz) {
        return beans.get(clazz);
    }

    public MyAnnotationApplicationContext() {}

    //设置包的扫描规则
    //当前包或者子包,如果类上有@Bean注解, 则通过反射将其实例化
    //创建有参数的构造,传递包的路径
    public MyAnnotationApplicationContext(String basePackage) throws IOException, ClassNotFoundException, InvocationTargetException, NoSuchMethodException, InstantiationException, IllegalAccessException {
        String packagePath = basePackage.replaceAll("\\.", "/");
        System.out.println(packagePath);
        Enumeration<URL> resources = Thread.currentThread().getContextClassLoader().getResources(packagePath);
        while (resources.hasMoreElements()) {
            URL url = resources.nextElement();
            String filePath = URLDecoder.decode(url.getFile(), StandardCharsets.UTF_8);
            rootPath = filePath.substring(0, filePath.length() - packagePath.length());
            System.out.println("rootPath = " + rootPath);
            //包扫描
            System.out.println("filePath = " + filePath);
            loadBean(new File(filePath));
            loadDI();
        }

    }

    private void loadBean(File file) throws ClassNotFoundException, NoSuchMethodException, InvocationTargetException, InstantiationException, IllegalAccessException {
        if (file.isDirectory()) {
            File[] childrenFiles = file.listFiles();
            if(childrenFiles == null && childrenFiles.length > 0) {
                return;
            }
            for (File childFile : childrenFiles) {
                if (childFile.isDirectory()) {
                    loadBean(childFile);
                }else {
                    //得到包路径
                    String pathWithClass = childFile.getAbsolutePath().substring(rootPath.length());
                    if(pathWithClass.contains(".class")) {

                        //得到com.learning.service.UserServiceImpl
                        String allName = pathWithClass.replaceAll("/", ".")
                                .replaceAll(".class", "");
                        System.out.println("all name is = " + allName);

                        Class<?> aClass = Class.forName(allName);
                        if(!aClass.isInterface()) {
                            if(aClass.getAnnotation(Bean.class) != null){
                                Object instance = aClass.getConstructor().newInstance();
                                beans.put(aClass,instance);
                            }
                        }

                    }
                }
            }
        }


    }

    private void loadDI(){
        Set<Map.Entry<Class, Object>> entries = beans.entrySet();
        for (Map.Entry<Class, Object> entry : entries) {
            Object obj = entry.getValue();
            Class<?> aClass = obj.getClass();
            Field[] fields = aClass.getDeclaredFields();
            for (Field field : fields) {
                DI annotation = field.getAnnotation(DI.class);
                if(annotation != null) {
                    field.setAccessible(true);
                    try {
                        field.set(obj, beans.get(field.getType()));
                    } catch (IllegalAccessException e) {
                        throw new RuntimeException(e);
                    }
                }
            }
        }

    }
}
4 面向切面: AOP
4.1 场景模拟
package learning.spring6.aop.example;

/**
 * @Author fei
 * @Version 1.0
 * @Description TODO
 * @DATA 2024/11/19  16:47
 */
public class CalculatorLogImpl implements Calculator{
    @Override
    public int add(int a, int b) {
        System.out.println("日志: a="+a+",b = "+b);
        int result = a + b;
        System.out.println("日志: result =  "+result);
        System.out.println("方法内部 result: " + result);
        return result;
    }

    @Override
    public int sub(int a, int b) {
        System.out.println("日志: a="+a+",b = "+b);
        int result = a - b;
        System.out.println("日志: result =  "+result);
        System.out.println("方法内部 result: " + result);
        return result;
    }

    @Override
    public int mul(int a, int b) {
        System.out.println("日志: a="+a+",b = "+b);
        int result = a * b;
        System.out.println("日志: result =  "+result);
        System.out.println("方法内部 result: " + result);
        return result;
    }

    @Override
    public int div(int a, int b) {
        System.out.println("日志: a="+a+",b = "+b);
        int result = a / b;
        System.out.println("日志: result =  "+result);
        System.out.println("方法内部 result: " + result);
        return result;
    }
}
4.2 代理模式
静态代理
public class CalculatorStaticProxy implements Calculator {

    //传入目标对象
    private Calculator calculator;
    public CalculatorStaticProxy(Calculator calculator) {
        this.calculator = calculator;
    }

    @Override
    public int add(int a, int b) {
        //输出日志
        System.out.println("日志: a="+a+",b = "+b);

        //调用目标方法
        int result = calculator.add(a, b);
        //输出日志
        System.out.println("方法内部 result: " + result);
        return 0;
    }
}
静态代理中, 由于代码写死了, 不具备灵活性, 如果有其他地方需要加日志, 还需要添加代码.
动态代理
package learning.spring6.aop.example;

import java.lang.reflect.InvocationHandler;
import java.lang.reflect.Method;
import java.lang.reflect.Proxy;
import java.util.Arrays;

/**
 * @Author fei
 * @Version 1.0
 * @Description TODO
 * @DATA 2024/11/19  17:13
 */
public class ProxyFactory {

    //目标对象
    private Object target;

    public ProxyFactory(Object target) {
        this.target = target;
    }

    //返回代理对象
    public Object getProxy() {
        /**
         * ClassLoader: 加载动态生成代理类的类加载器
         * Class<?> [] interfaces: 目标对象实现的所有接口的class数组
         * InvocationHandler: 设置代理对象实现目标对象方法的过程
         */
        ClassLoader classLoader = target.getClass().getClassLoader();
        Class<?>[] interfaces = target.getClass().getInterfaces();
        InvocationHandler invocationHandler = new InvocationHandler() {

            /**
             *
             * @param proxy the proxy instance that the method was invoked on
             * 代理对象
             * @param method the {@code Method} instance corresponding to
             * the interface method invoked on the proxy instance.  The declaring
             * class of the {@code Method} object will be the interface that
             * the method was declared in, which may be a superinterface of the
             * proxy interface that the proxy class inherits the method through.
             * 重写目标对象中的方法
             * @param args an array of objects containing the values of the
             * arguments passed in the method invocation on the proxy instance,
             * or {@code null} if interface method takes no arguments.
             * Arguments of primitive types are wrapped in instances of the
             * appropriate primitive wrapper class, such as
             * {@code java.lang.Integer} or {@code java.lang.Boolean}.
             * 上述方法传入的参数
             * @return
             * @throws Throwable
             */
            @Override
            public Object invoke(Object proxy, Method method, Object[] args) throws Throwable {
                System.out.println("动态代理日志1: " + Arrays.toString(args));
                Object result = method.invoke(target, args);
                System.out.println("动态代理日志2: " + Arrays.toString(args));
                return result;
            }
        };
        return Proxy.newProxyInstance(classLoader, interfaces, invocationHandler);
    }
}
4.3 AOP基本概念和相关术语
Aspect Oriented Programming 是一种设计思想, 是软件设计领域的面向切面编程, 它是面向对象编程的一种补充和完善.
相关术语
- 横切关注点: 分散在各个模块中解决同一个问题, 例如用户验证、日志管理、事务处理、数据缓存等都属于横切关注点. 同一类等非核心业务
- 通知(增强): 通俗说就是需要增加等功能, 比如安全, 事务, 日志等. 每一个横切关注点所处理的东西都需要写一个方法来实现, 这个方法就是通知方法
- 切面: 封装通知方法的类
- 目标: 目标对象
- 代理: 代理对象
- 连接点: 逻辑概念, 不是语法定义, 通俗说就是spring中允许通知的地方
- 切入点: 通俗说就是实际需要增强方法的地方
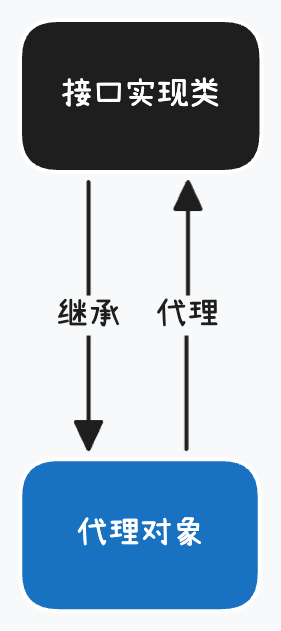
4.4 基于注解的AOP
动态代理分类: JDK动态代理和cglib动态代理
- 当代理对象有实现接口时, 使用JDK动态代理, 生成接口实现类的代理对象(实现代理对象对应的接口):

- 如果代理对象没有实现接口, 使用cglib动态代理, 生成子类的代理对象
Spring是通过Aspectj中的注解实现了AOP功能. Aspectj是AOP的一种实现, 本质上采用静态代理. 将代理逻辑织入目标类编译得到的字节码文件, 所以最终效果是动态的
使用Aspectj步骤:
- 引入相关依赖:
<dependency>
    <groupId>org.springframework</groupId>
    <artifactId>spring-aop</artifactId>
    <version>6.0.2</version>
</dependency>

<dependency>
    <groupId>org.springframework</groupId>
    <artifactId>spring-aspects</artifactId>
    <version>6.0.20</version>
</dependency>
-
创建目标资源
(1) 接口
(2) 实现类 -
创建切面类
package learning.spring6.aop.annotationaop;
import org.aspectj.lang.JoinPoint;
import org.aspectj.lang.ProceedingJoinPoint;
import org.aspectj.lang.Signature;
import org.aspectj.lang.annotation.*;
import org.springframework.context.annotation.Bean;
import org.springframework.stereotype.Component;

import java.util.Arrays;

/**
 * @Author fei
 * @Version 1.0
 * @Description 切面类
 * @DATA 2024/11/20  12:04
 */
@Aspect //表示切面类
@Component //表示在spring的ioc容器中进行管理
public class LogAspect {

    //设置切入点和通知类型
    //通知类型: 前置 返回  异常  后置  环绕
    //@Before(), @AfterReturning(), @AfterThrowing(), @After(), @Around()


    @Before(value = "execution(public int learning.spring6.aop.annotationaop.Calculator.add(int, int))")
    public void beforeMethod(JoinPoint joinPoint) {
        String methodName = joinPoint.getSignature().getName();
        Object[] args = joinPoint.getArgs();
        System.out.println("前置通知... ====>>>> " + methodName + " === " + Arrays.toString(args) );
    }

    @AfterReturning(value = "execution(public * learning.spring6.aop.annotationaop.Calculator.add(..))", returning = "anynameok")
    public void afterReturningMethod(JoinPoint joinPoint, int anynameok) {
        Signature signature = joinPoint.getSignature();
        System.out.println("返回后通知吗>>>>>> " + anynameok);
    }

    @AfterThrowing(value = "execution(public * learning.spring6.*.*.*.add(..))", throwing = "anynameok")
    public void afterThrowingMethod(JoinPoint joinPoint, Throwable anynameok) {
        System.out.println("异常通知...>>>>> " + anynameok);
    }

    @After(value = "execution(public * learning.spring6.aop.annotationaop.Calculator.add(int, int))")
    public void after(JoinPoint joinPoint){
        String methodName = joinPoint.getSignature().getName();
        System.out.println("后置通知????? ====>>>> " + methodName);
    }

    @Around(value = "execution(public int learning.spring6.aop.annotationaop.Calculator.add(int, int))")
    public Object around(ProceedingJoinPoint joinPoint) {
        Object[] args = joinPoint.getArgs();
        String string = Arrays.toString(args);
        System.out.println("环绕通知");
        Object result = null;
        try{
            System.out.println("环绕通知>>>> 目标方法之前");
            //调用目标方法
            result = joinPoint.proceed();
            System.out.println("环绕通知>>> 目标方法之后执行");

        } catch (Throwable e) {

            System.out.println("环绕通知>>>> 目标方法出现异常执行");
            throw new RuntimeException(e);
        } finally {
            System.out.println("环绕通知>>> 目标方法完成后执行");
        }

        return result;

    }
}
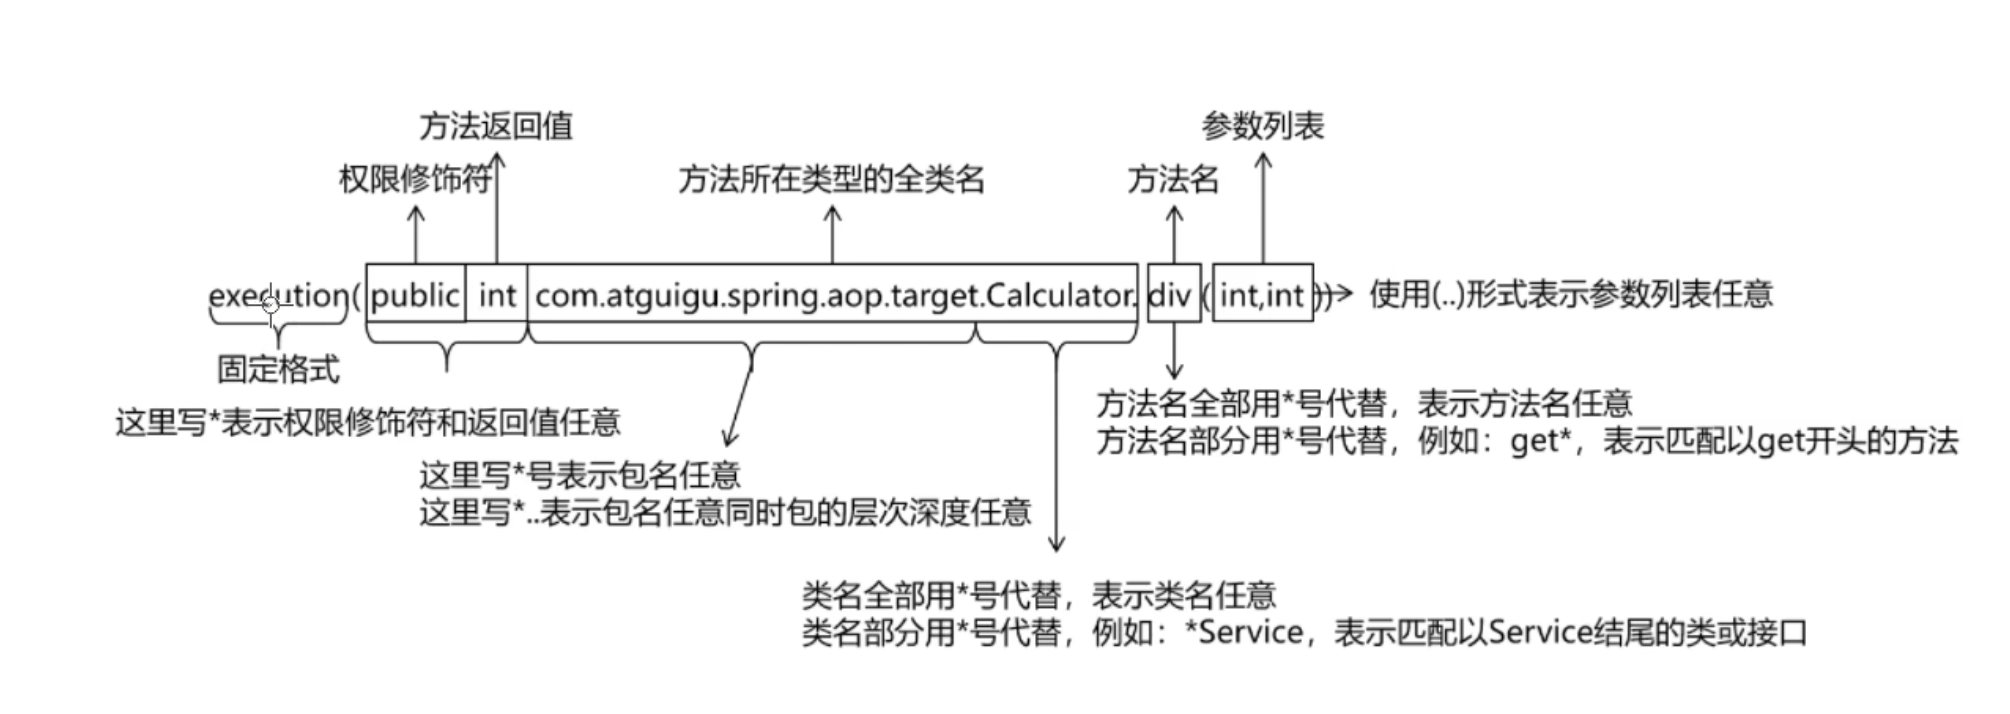
切入点表达式语法:
使用PointCut重用切入点表达式:
    @Pointcut(value = "execution(public int learning.spring6.aop.annotationaop.Calculator.add(int, int))")
    public void pointCut() {
    }

    @After(value = "pointCut()")
    //或者 value="全类名.pointCut()"
    public void after(){
        System.out.println("后置通知: 使用pointCut重用切入点表达式");
    }
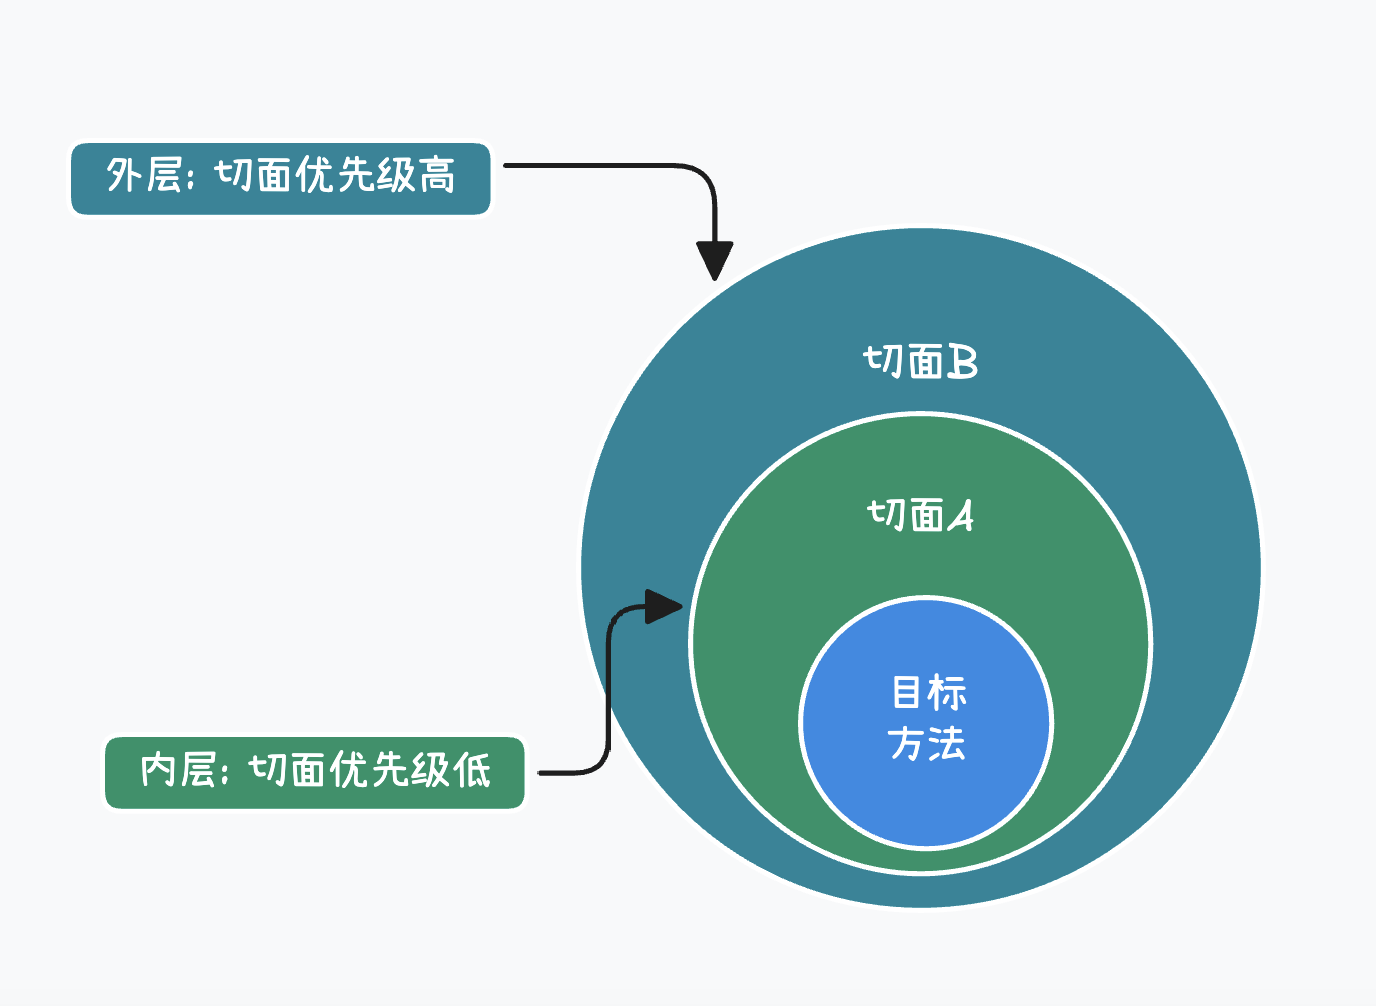
4.5 切面的优先级
相同目标方法上同时存在多个切面时, 切面的优先级控制切面的内外嵌套顺序:
- 优先级高的切面: 外面
- 优先级低的切面: 里面
使用@Order注解可以控制切面的优先级:
- @Order(较小的数): 优先级高
- @Order(较大的数): 优先级低
5 单元测试: JUnit
对于创建Spring容器, 最终获取对象, 这个过程每次测试都需要写相应的代码, 较为繁琐. 所以我们需要程序自动帮我我们创建容器.
Junit无法知晓我们是否使用了Spring. 但是对于Spring, 它提供了一个运行器, 可以读取配置文件或注解来创建容器. 我们只需告诉它配置文件位置即可.
这样我们就可以通过Spring整合Junit来创建spring容器了.
- 引入相关依赖
<!--spring对junit支持的相关依赖-->
<dependency>
    <groupId>org.springframework</groupId>
    <artifactId>spring-test</artifactId>
    <version>6.0.2</version>
</dependency>

<!--junit5-->
<dependency>
    <groupId>org.junit.jupiter</groupId>
    <artifactId>junit-jupiter-api</artifactId>
    <version>5.9.0</version>
</dependency>
- 使用
package com.learning.spring6.junit.junit5;

import com.learning.spring6.junit.config.SpringConfig;
import org.junit.jupiter.api.Test;
import org.springframework.beans.factory.annotation.Autowired;
import org.springframework.beans.factory.annotation.Qualifier;
import org.springframework.stereotype.Component;
import org.springframework.test.context.junit.jupiter.SpringJUnitConfig;

/**
 * @Author fei
 * @Version 1.0
 * @Description TODO
 * @DATA 2024/11/20  14:02
 */

@SpringJUnitConfig(SpringConfig.class)
public class TestJunit5 {
    @Autowired
    private User user;


    @Test
    public void testJunit5() {
        user.sayHello();
    }
}
//Junit4
@RunWith(SpringJUnit4ClassRunner.class)
@ContextConfiguration(classes = SpringConfig.class)
public class TestJunit4 {

    @Autowired
    @Qualifier(value = "user1")
    private User user;

    @Test
    public void test(){
        System.out.println("test 444");
        user.sayHello();
    }

}
6 事务
6.1 JdbcTemplate
Spring框架对JDBC进行封装, JdbcTemplate方便对数据库操作
- 引入相关依赖
        <!--Spring持久化层支持的jar-->
        <dependency>
            <groupId>org.springframework</groupId>
            <artifactId>spring-jdbc</artifactId>
            <version>6.0.2</version>
        </dependency>

        <!--mysql驱动-->
        <dependency>
            <groupId>mysql</groupId>
            <artifactId>mysql-connector-java</artifactId>
            <version>8.0.30</version>
        </dependency>

        <!--数据源 连接池-->
        <dependency>
            <groupId>com.alibaba</groupId>
            <artifactId>druid</artifactId>
            <version>1.2.15</version>
        </dependency>
USE spring;
create Table `t_tmp` (
     `id` int(11) NOT NULL AUTO_INCREMENT,
     `name` varchar(20) DEFAULT NULL COMMENT "姓名",
     `age` int(11) DEFAULT NULL Comment "年龄",
     `sex` varchar(2) DEFAULT NULL COMMENT "性别",
     PRIMARY KEY (`id`)
     )ENGINE=InnoDB DEFAULT CHARSET=utf8mb4;
配置
package com.learning.spring6.tx.config;

import com.alibaba.druid.pool.DruidDataSource;
import org.springframework.beans.factory.annotation.Autowired;
import org.springframework.beans.factory.annotation.Value;
import org.springframework.context.annotation.Bean;
import org.springframework.context.annotation.ComponentScan;
import org.springframework.context.annotation.Configuration;
import org.springframework.context.annotation.PropertySource;
import org.springframework.jdbc.core.JdbcTemplate;
import org.springframework.transaction.annotation.EnableTransactionManagement;

/**
 * @Author fei
 * @Version 1.0
 * @Description TODO
 * @DATA 2024/11/20  15:04
 */
@Configuration
@EnableTransactionManagement
@ComponentScan("com.learning.spring6.tx")
@PropertySource("classpath:jdbc.properties")
public class SpringConfig {
    @Value("${jdbc.url}")
    private String jdbcUrl;

    @Value("${jdbc.user}")
    private String jdbcUsername;

    @Value("${jdbc.password}")
    private String jdbcPassword;

    @Value("${jdbc.driver}")
    private String jdbcDriverClassName;

    @Bean
    public DruidDataSource dataSource() {
        DruidDataSource dataSource = new DruidDataSource();
        dataSource.setDriverClassName(jdbcDriverClassName);
        dataSource.setUrl(jdbcUrl);
        dataSource.setUsername(jdbcUsername);
        dataSource.setPassword(jdbcPassword);
        return dataSource;
    }

    @Bean
    public JdbcTemplate jdbcTemplate(DruidDataSource dataSource) {
        return new JdbcTemplate(dataSource);
    }

}
测试
@SpringJUnitConfig(SpringConfig.class)
public class JdbcTemplateTest {

    @Autowired
    private JdbcTemplate jdbcTemplate;

    @Test
    public void test01(){
        //添加

        String sql = "INSERT INTO t_tmp VALUES (NULL, ?,?,?)";
        int rows = jdbcTemplate.update(sql, "东方不败", 23, "未知");
        System.out.println(rows);
    }
}
6.2 事务的基本概念
数据库事务是一个对数据进行一系列操作的操作序列, 这些操作要么全部执行, 要么全部不执行, 是一个不可分割的单位.
事务由事务开始与事务结束之间的所有数据库操作组成
事务的特性ACID
- 原子性
- 一致性
- 隔离性
- 持久性
有编程式事务和声明式事务
- 编程式事务: 通过编写代码实现
- 声明式事务: spring框架通过配置声明实现
- 基于注解
- 基于xml
7 资源操作: Resouces
Spring的Resource接口位于org.springframework.core.io中. 旨在成为一个强大的接口, 用于抽象对低级资源的访问
7.1 Resource接口
public interface Resource extends InputStreamSource {
    boolean exists();

    default boolean isReadable() {
        return this.exists();
    }

    default boolean isOpen() {
        return false;
    }

    default boolean isFile() {
        return false;
    }

    URL getURL() throws IOException;

    URI getURI() throws IOException;

    File getFile() throws IOException;

    default ReadableByteChannel readableChannel() throws IOException {
        return Channels.newChannel(this.getInputStream());
    }

    long contentLength() throws IOException;

    long lastModified() throws IOException;

    Resource createRelative(String relativePath) throws IOException;

    @Nullable
    String getFilename();

    String getDescription();
}
7.2 Resource实现类
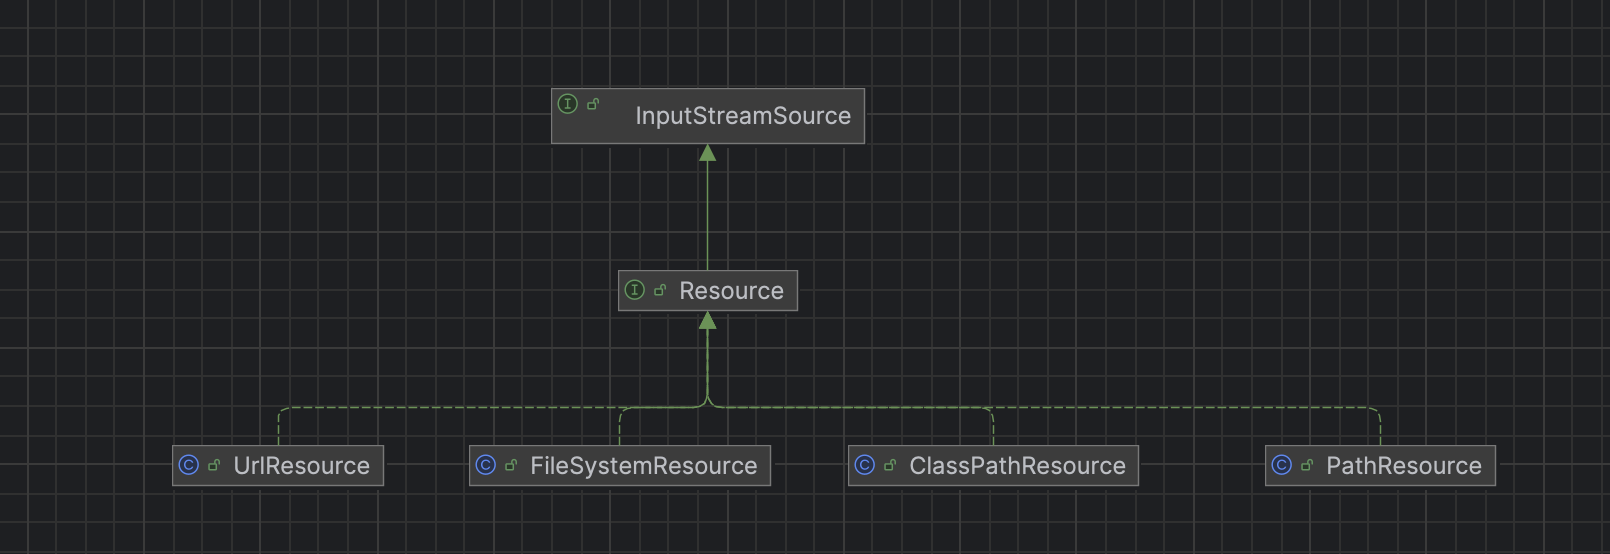
Resource接口是Spring资源访问策略的抽象, 它本身不提供任何资源访问实现, 具体资源访问由该接口的实现类完成
- UrlResource: 访问网络资源
- ClassPathResource: 获取类路径(classes)下的资源
- FileSystemResource: 访问文件资源系统, 一般用java本身的File类, 不使用本类访问
- ServletContextResource: 用于Web应用程序
7.3 Resource类图
7.4 ResourceLoader接口
该接口实现类的实例可以获得一个Resource实例
当Spring应用需要进行资源访问时, 实际上并不需要直接使用Resource实现类, 而是调用ResourceLoader实例的getResource()方法来获取资源. Resourceloader将会负责选择Resource实现类, 也就是确定具体的资源访问策略, 从而将应用程序和具体的资源访问策略分开.
7.5 ResourceLoaderAware接口
ResourceLoaderAware接口实现类的实例中可以获取一个ResourceLoader的引用
ResourceLoaderAware接口也提供了一个setResourceLoader()方法, 该方法由spring容器负责调用, Spring容器会将一个ResourceLoader对象作为该方法的参数传入
7.6 使用Resource作为属性
package com.learning.spring6.resource.di;

import org.apache.logging.log4j.core.config.plugins.validation.constraints.Required;
import org.springframework.aot.hint.annotation.Reflective;
import org.springframework.beans.factory.annotation.Autowired;
import org.springframework.beans.factory.annotation.Qualifier;
import org.springframework.beans.factory.annotation.Value;
import org.springframework.context.annotation.Configuration;
import org.springframework.context.annotation.PropertySource;
import org.springframework.core.io.Resource;
import org.springframework.stereotype.Component;

/**
 * @Author fei
 * @Version 1.0
 * @Description TODO
 * @DATA 2024/11/20  18:25
 */
@Component
public class ResourceBean {

    @Value("${r.url}")
    private Resource resource;

    @Autowired
    @Qualifier("configUrl")
    private String url;

    public void parse(){
        System.out.println(resource.getFilename());
        System.out.println(resource.getDescription());
        System.out.println(url);
    }


    public Resource getResource() {
        return resource;
    }

    public void setResource(Resource resource) {
        this.resource = resource;
    }
}
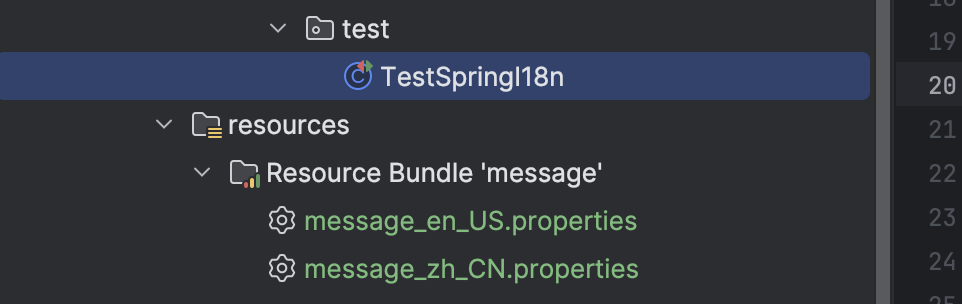
8 国际化: I18n
配置类
    @Bean
    public ResourceBundleMessageSource getMessageSource() {
        ResourceBundleMessageSource messageSource = new ResourceBundleMessageSource();
        messageSource.setBasename("message");
        messageSource.setDefaultEncoding("UTF-8");
        return messageSource;
    }
测试
@Autowired
    ResourceBundleMessageSource messageSource;

    @Test
    public void test01() {
        String test = messageSource.getMessage("test", null, Locale.US);
        System.out.println(test);
    }
9 数据校验: Validation
9.1 通过实现Validator接口校验
- 引入相关依赖
<dependency>
    <groupId>org.hibernate.validator</groupId>
    <artifactId>hibernate-validator</artifactId>
    <version>7.0.5.Final</version>
</dependency>

<dependency>
    <groupId>org.glassfish</groupId>
    <artifactId>jakarta.el</artifactId>
    <version>4.0.1</version>
</dependency>
- 创建实体类
package com.learning.spring6.validator.one;

/**
 * @Author fei
 * @Version 1.0
 * @Description TODO
 * @DATA 2024/11/21  16:02
 */
public class Person {
    private String name;
    private int age;

    public int getAge() {
        return age;
    }

    public void setAge(int age) {
        this.age = age;
    }

    public String getName() {
        return name;
    }

    public void setName(String name) {
        this.name = name;
    }
}
- 编写校验逻辑
package com.learning.spring6.validator.one;

import org.springframework.validation.Errors;
import org.springframework.validation.ValidationUtils;
import org.springframework.validation.Validator;

/**
 * @Author fei
 * @Version 1.0
 * @Description TODO
 * @DATA 2024/11/21  16:03
 */
public class PersonValidator implements Validator {

    /**
     * supports方法表示这个校验需要用在哪个类型上
     * @param clazz
     * @return
     */
    @Override
    public boolean supports(Class<?> clazz) {
        return Person.class.equals(clazz);
    }


    /**
     * 具体校验逻辑的地方
     * @param target
     * @param errors
     */
    @Override
    public void validate(Object target, Errors errors) {
        //name 不为空

        ValidationUtils.rejectIfEmpty(errors, "name", "name.empty", "name is null");

        //age 0~200
        Person person = (Person) target;
        if(person.getAge() < 0){
            errors.rejectValue("age", "ageless0", "age is null");
        }else if(person.getAge() > 200){
            errors.rejectValue("age", "ageover200", "age is greater than 200");
        }
    }
}
- 测试
package com.learning.spring6.validator.one;

import org.springframework.validation.BindingResult;
import org.springframework.validation.DataBinder;

/**
 * @Author fei
 * @Version 1.0
 * @Description TODO
 * @DATA 2024/11/21  16:09
 */
public class TestPerson {
    public static void main(String[] args) {
        Person person = new Person();
        person.setAge(1000);
        person.setName("jack");

        //创建person的databinder
        DataBinder binder = new DataBinder(person);


        //设置校验器
        binder.setValidator(new PersonValidator());

        //调用方法校验
        binder.validate();

        //得到结果
        BindingResult bindingResult = binder.getBindingResult();
        System.out.println(bindingResult);
    }
}
9.2 通过注解方式校验
- 创建配置类, 配置
LocalValidatorFactoryBean
package com.learning.spring6.validator.two;

import org.springframework.context.annotation.Bean;
import org.springframework.context.annotation.ComponentScan;
import org.springframework.context.annotation.Configuration;
import org.springframework.validation.beanvalidation.LocalValidatorFactoryBean;

/**
 * @Author fei
 * @Version 1.0
 * @Description TODO
 * @DATA 2024/11/21  16:20
 */

@Configuration
@ComponentScan("com.learning.spring6.validator.two")
public class ValidationConfig {

    @Bean
    public LocalValidatorFactoryBean getLocalValidatorFactoryBean() {
        return new LocalValidatorFactoryBean();
    }

}
- 创建实体类, 创建set和get方法, 载属性上使用注解实现校验规则
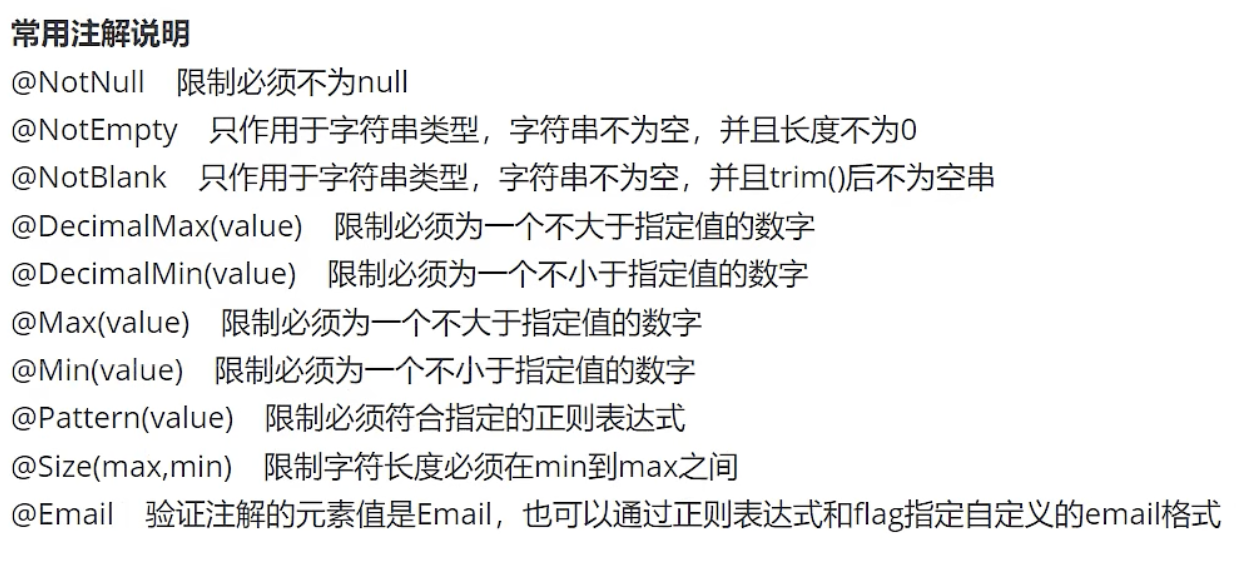
常用的注解
package com.learning.spring6.validator.two;

import jakarta.validation.constraints.Max;
import jakarta.validation.constraints.Min;
import jakarta.validation.constraints.NotNull;

/**
 * @Author fei
 * @Version 1.0
 * @Description TODO
 * @DATA 2024/11/21  16:21
 */
public class User {

    @NotNull
    private String name;

    @Min(value = 0, message = "不小于0")
    @Max(value = 200,message = "不大于200")
    private int age;

    public int getAge() {
        return age;
    }

    public void setAge(int age) {
        this.age = age;
    }

    public String getName() {
        return name;
    }

    public void setName(String name) {
        this.name = name;
    }
}
- 创建校验器
1 使用jakarta包的validator
package com.learning.spring6.validator.two;

import jakarta.validation.ConstraintViolation;
import jakarta.validation.Validator;
import jakarta.validation.groups.Default;
import org.springframework.beans.factory.annotation.Autowired;
import org.springframework.stereotype.Service;

import java.util.Set;

/**
 * @Author fei
 * @Version 1.0
 * @Description TODO
 * @DATA 2024/11/21  16:26
 */

@Service
public class MyValidator1 {

    @Autowired
    private Validator validator;

    public boolean validate1(User user) {
        Set<ConstraintViolation<User>> validate = validator.validate(user);
        return validate.isEmpty();
    }
}
2 使用spring框架的validator
package com.learning.spring6.validator.two;

import org.springframework.beans.factory.annotation.Autowired;
import org.springframework.stereotype.Component;
import org.springframework.validation.BindException;
import org.springframework.validation.Validator;

/**
 * @Author fei
 * @Version 1.0
 * @Description TODO
 * @DATA 2024/11/21  16:28
 */
@Component
public class MyValidator2 {
    @Autowired
    private Validator validator;

    public boolean validate2(User user){
        BindException bindException = new BindException(user, user.getName());
        validator.validate(user, bindException);
        return bindException.hasErrors();
    }
}
- 测试
@SpringJUnitConfig(ValidationConfig.class)
public class TestValidator {

    @Autowired
    private MyValidator1 myValidator1;

    @Autowired
    private MyValidator2 myValidator2;

    @Test
    public void test01(){
        User user = new User();
        user.setAge(180);
        user.setName("zhangsan");
        boolean b = myValidator1.validate1(user);
        System.out.println(b);

    }


    @Test
    public void test02(){
        User user = new User();
        user.setAge(18000);
        user.setName("zhangsan");
        boolean b = myValidator2.validate2(user);
        System.out.println(b);
    }
}
9.3 基于方法实现校验
- 创建配置类
@Configuration
@ComponentScan("com.learning.spring6.validator.by_method")
public class ValidationConfig {
    @Bean
    public MethodValidationPostProcessor methodValidationPostProcessor() {
        return new MethodValidationPostProcessor();
    }
}
- 创建实体类及校验规则
public class User {

    @NotNull
    private String name;

    @Max(150)
    @Min(0)
    private int age;

    public int getAge() {
        return age;
    }

    public void setAge(int age) {
        this.age = age;
    }

    @NonNull
    public String getName() {
        return name;
    }

    public void setName(@NonNull String name) {
        this.name = name;
    }
}
- 创建校验方法
@Service
@Validated
public class MyService {

    public String testMethod(@NotNull @Valid User user) {
        return user.getName();
    }
}
- 测试
@SpringJUnitConfig(ValidationConfig.class)
public class TestUser {

    @Autowired
    MyService myService;

    @Test
    public void test(){
        User user = new User();
        user.setAge(10);
        user.setName("zhangsan");
        String s = myService.testMethod(user);
        System.out.println(s);
    }
}
9.4 自定义校验
- 自定义校验注解和校验器
package com.learning.spring6.validator.by_selfdefine;

import jakarta.validation.Constraint;
import jakarta.validation.Payload;
import jakarta.validation.constraints.NotBlank;
import jakarta.validation.constraints.NotNull;

import java.lang.annotation.*;

/**
  * @Author fei
  * @Version 1.0
  * @Description TODO
  * @DATA 2024/11/21  17:17
  */

@Target({ElementType.FIELD})
@Retention(RetentionPolicy.RUNTIME)
@Documented
//@Repeatable(CannotBlank.List.class)
@Constraint(validatedBy = CannotBlankValidator.class)
public @interface CannotBlank {
    //默认提示信息
    String message() default "不能包含空格";

    Class<?>[] groups() default {};

    Class<? extends Payload>[] payload() default {};


    @Target({ElementType.METHOD, ElementType.FIELD, ElementType.ANNOTATION_TYPE, ElementType.CONSTRUCTOR, ElementType.PARAMETER, ElementType.TYPE_USE})
    @Retention(RetentionPolicy.RUNTIME)
    @Documented
    public @interface List {
        CannotBlank[] value();
    }
}
package com.learning.spring6.validator.by_selfdefine;

import jakarta.validation.ConstraintValidator;
import jakarta.validation.ConstraintValidatorContext;

/**
 * @Author fei
 * @Version 1.0
 * @Description TODO
 * @DATA 2024/11/21  17:19
 */
public class CannotBlankValidator implements ConstraintValidator<CannotBlank, String> {
    @Override
    public boolean isValid(String value, ConstraintValidatorContext context) {
        if(value != null && value.contains(" ")) {
            return false;
        }
        return true;
    }
}
- 定义实体类
package com.learning.spring6.validator.by_selfdefine;

/**
 * @Author fei
 * @Version 1.0
 * @Description TODO
 * @DATA 2024/11/21  17:34
 */
public class User {

    @CannotBlank
    private String name;


    private int age;

    public int getAge() {
        return age;
    }

    public void setAge(int age) {
        this.age = age;
    }

    public String getName() {
        return name;
    }

    public void setName(String name) {
        this.name = name;
    }
}
- 测试
@Service
@Validated
public class MyService {

    public String testMethod(@NotNull @Valid User user) {
        return user.getName();
    }
}
@SpringJUnitConfig(ValidationConfig.class)
public class TestMethod {

    @Autowired
    private MyService myService;

    @Test
    public void test(){
        User user = new User();
        user.setName("fdsfdsf");
        String s = myService.testMethod(user);
        System.out.println(s);
    }
}
10 提前编译: AOT
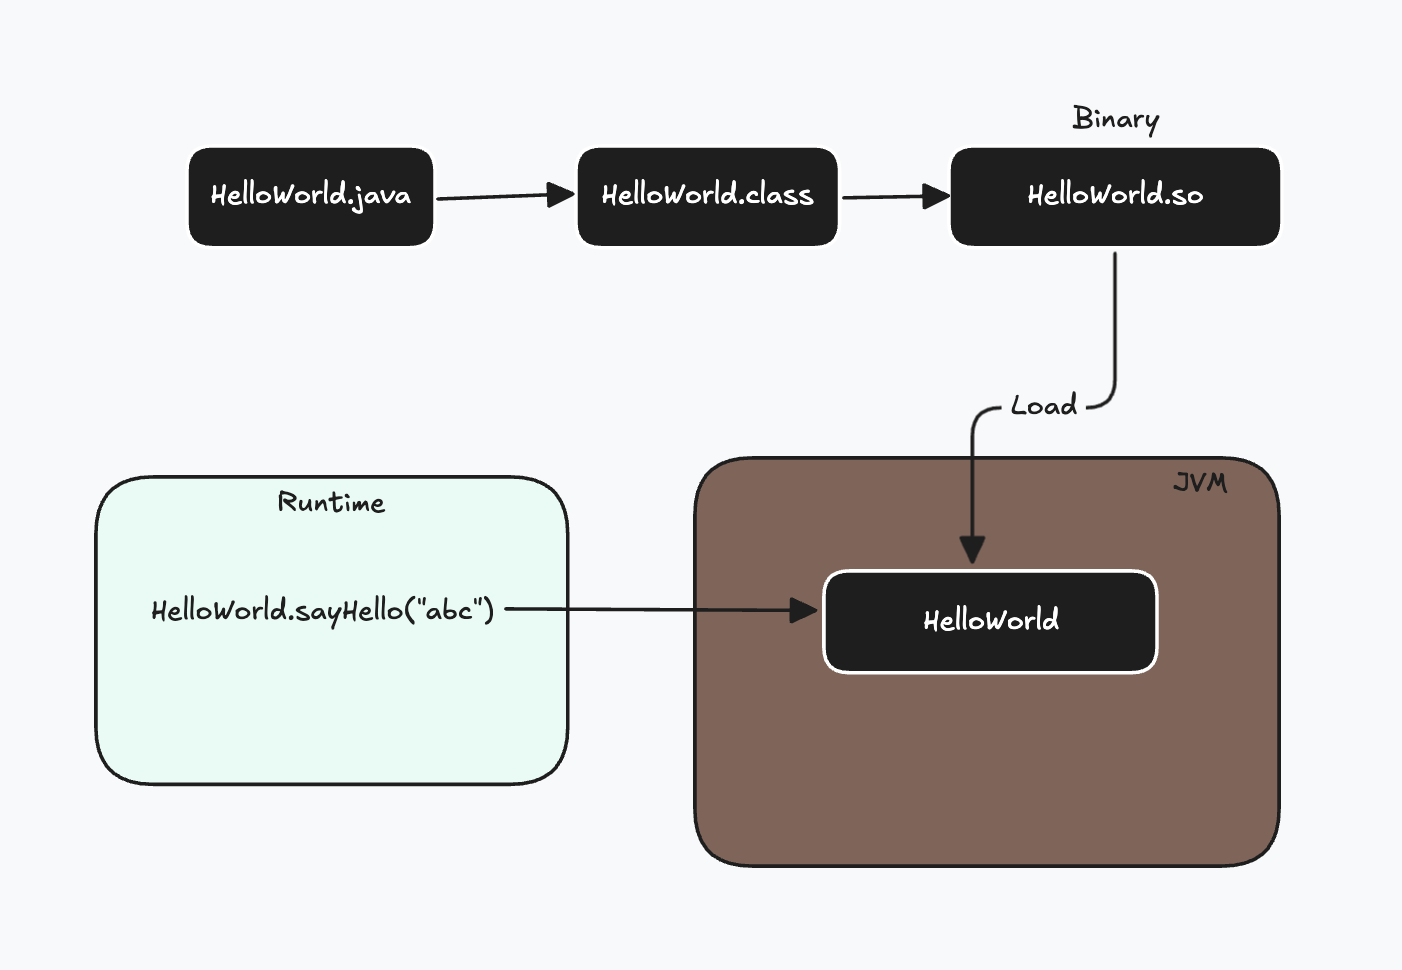
默认情况下, java使用实时编译JIT(Just In Time) 也叫动态编译, 进行编译, 边运行边编译. 特点是启动较慢, 编译时会占用运行时的资源,但是运行时可以进行性能优化
预编译AOT(Ahead Of Time), 可以将源码直接转化为机器码, 启动速度快, 内存占用低, 不过运行时无法进行性能优化, 安装时间很长.
.java --> .class --> (使用jaotc编译工具) --> .so(程序函数库, 即编译好的可以供其他程序使用的代码和数据)
-
安装GraalVM编译器:
- 官网: https://www.graalvm.org/latest/getting-started/macos/
- 国内安装SDKMAN:
curl -s "https://gitee.com/iCode504/my-sdkman/raw/master/install.sh" | bash - 安装Graal:
sdk install java 17.0.12-graal - 下载插件:
gu install native-image
-
编写java代码, 编译, 构建
- 编写java代码:
Hello.java - 代码编译:
javac Hello.java>>java.class - 构建:
native-image Hello>>hello - 运行:
./hello
- 编写java代码:

 浙公网安备 33010602011771号