python之模块
目录
7、序列化之json模块 、 pickle模块 和 shelve模块
1、sys模块
(1)安装
内置模块
import sys
(2)使用说明


sys.argv  # 实现从程序外部向程序传递参数。
sys.exit([arg])  # 程序中间的退出,arg=0为正常退出。
sys.getdefaultencoding()  # 获取系统当前编码,一般默认为ascii。
sys.setdefaultencoding()  # 设置系统默认编码,执行dir(sys)时不会看到这个方法,在解释器中执行不通过,可以先执行reload(sys),在执行 setdefaultencoding('utf8'),此时将系统默认编码设置为utf8。(见设置系统默认编码 )
sys.getfilesystemencoding()  # 获取文件系统使用编码方式,Windows下返回'mbcs',mac下返回'utf-8'.
sys.path  # 获取指定模块搜索路径的字符串集合,可以将写好的模块放在得到的某个路径下,就可以在程序中import时正确找到。
sys.stdin,sys.stdout,sys.stderr  # stdin , stdout , 以及stderr 变量包含与标准I/O 流对应的流对象. 如果需要更好地控制输出,而print 不能满足你的要求, 它们就是你所需要的. 你也可以替换它们, 这时候你就可以重定向输出和输入到其它设备( device ), 或者以非标准的方式处理它们
sys.maxsize  # 获取系统最大size
sys.platform  # 获取当前系统平台。
sys.version  # 获取python版本
sys.builtin_module_names  # 返回一个列表,包含内建模块的名字
sys.modules  # 返回一个字典,包含模块名字
(3)验证
待补充
(4)参考
官网
sys:https://docs.python.org/2/library/sys.html
2、os模块
(1)安装
内置模块
import os
(2)使用说明
os.getcwd() #获取当前工作目录,即当前python脚本工作的目录路径
os.chdir("dirname")  #改变当前脚本工作目录;相当于shell下cd
os.curdir  #返回当前目录: ('.')
os.pardir  #获取当前目录的父目录字符串名:('..')
os.makedirs('dirname1/dirname2')    #可生成多层递归目录
os.removedirs('dirname1')   # 若目录为空,则删除,并递归到上一级目录,如若也为空,则删除,依此类推
os.mkdir('dirname')   # 生成单级目录;相当于shell中mkdir dirname
os.rmdir('dirname')    #删除单级空目录,若目录不为空则无法删除,报错;相当于shell中rmdir dirname
os.listdir('dirname')    #列出指定目录下的所有文件和子目录,包括隐藏文件,并以列表方式打印
os.remove() # 删除一个文件
os.rename("oldname","newname") # 重命名文件/目录
os.stat('path/filename') # 获取文件/目录信息
os.sep    #输出操作系统特定的路径分隔符,win下为"\\",Linux下为"/"
os.linesep    #输出当前平台使用的行终止符,win下为"\t\n",Linux下为"\n"
os.pathsep    #输出用于分割文件路径的字符串
os.name    #输出字符串指示当前使用平台。win->'nt'; Linux->'posix'
os.system("bash command")  #运行shell命令,直接显示
os.environ  #获取系统环境变量
os.path.abspath(path)  #返回path规范化的绝对路径
os.path.split(path)  #将path分割成目录和文件名二元组返回
os.path.splitext()  # 分离文件名和扩展名
os.path.dirname(path) # 返回path的目录。其实就是os.path.split(path)的第一个元素
os.path.basename(path) # 返回path最后的文件名。如何path以/或\结尾,那么就会返回空值。即os.path.split(path)的第二个元素
os.path.exists(path)  #如果path存在,返回True;如果path不存在,返回False
os.path.isabs(path)  #如果path是绝对路径,返回True
os.path.isfile(path)  #如果path是一个存在的文件,返回True。否则返回False
os.path.isdir(path)  #如果path是一个存在的目录,则返回True。否则返回False
os.path.join(path1[, path2[, ...]]) # 将多个路径组合后返回,第一个绝对路径之前的参数将被忽略
os.path.getatime(path)  #返回path所指向的文件或者目录的最后存取时间
os.path.getmtime(path)  #返回path所指向的文件或者目录的最后修改时间
os.exit()  # 退出当前进程
os.path.getsize(filename)  # 返回文件或文件夹大小,与os.stat(filename).st_size
(3)验证
>>> os.getcwd()  # 查看当前目录
'C:\\Python36'
>>> os.chdir("Lib")  # 换路径
>>> os.getcwd()  # 换路径成功
'C:\\Python36\\Lib'
>>> os.curdir
'.'
>>> os.pardir
'..'
>>> os.chdir('..')  # 返回
>>> os.getcwd()
'C:\\Python36'
>>> os.makedirs("test1/test2")  # 创建文件夹,可创建多层递归目录
>>> os.chdir("test1/test2")
>>> os.getcwd()  # 创建成功
'C:\\Python36\\test1\\test2'
>>> os.chdir('..')  # 返回
>>> os.getcwd()
'C:\\Python36\\test1'
>>> os.removedirs('test2')  # 删除文件夹
>>> os.chdir('test2')  # 已成功删除
Traceback (most recent call last):
  File "<pyshell#16>", line 1, in <module>
    os.chdir('test2')
FileNotFoundError: [WinError 2] 系统找不到指定的文件。: 'test2'
>>>os.mkdir('dirname')  # 创建文件夹
>>> os.chdir('dirname')
>>> os.getcwd()  # 创建成功
'C:\\Python36\\test1\\dirname'
>>> os.chdir('..')
>>> os.getcwd()
'C:\\Python36\\test1'
>>> os.rmdir('dirname')  # 删除文件夹
>>> os.chdir('dirname')
Traceback (most recent call last):
  File "<pyshell#23>", line 1, in <module>
    os.chdir('dirname')
FileNotFoundError: [WinError 2] 系统找不到指定的文件。: 'dirname'

>>> os.listdir()
[]
>>> os.chdir('..')
>>> os.listdir()  # 列出本文件夹的文件夹或文件
['a.txt', 'DLLs', 'Doc', 'include', 'Lib', 'libs', 'LICENSE.txt', 'NEWS.txt', 'python3.dll', 'python3.exe', 'python36.dll', 'pythonw.exe', 'qt.conf', 'README.txt', 'Scripts', 'selenium', 'tcl', 'test.bak', 'test.dat', 'test.dir', 'test1', 'Tools', 'vcruntime140.dll']
>>> os.chdir('test1')
>>> os.listdir()
['test.txt', 'test1.txt']
>>> os.remove('test.txt')  # 删除单个文件,注意是文件。
>>> os.listdir()  # 删除成功
['test1.txt']
>>> os.rename('test1.txt','test1_rename.txt')  # 修改文件夹或文件的名字
>>> os.listdir()
['test1_rename.txt']
>>> os.stat('test1_rename.txt')  # 查看文件夹或文件的信息
os.stat_result(st_mode=33206, st_ino=6755399441094891, st_dev=1315649016, st_nlink=1, st_uid=0, st_gid=0, st_size=0, st_atime=1500994476, st_mtime=1500994476, st_ctime=1500994476)
>>> os.sep  # 系统分隔符,windows是\\,linux是/
'\\'
>>> os.linesep  #输出当前平台使用的行终止符,win下为"\t\n",Linux下为"\n"
'\r\n'
>>> os.pathsep  #输出用于分割文件路径的字符串
';'
>>> os.name  #输出字符串指示当前使用平台。win->'nt'; Linux->'posix'
'nt'
>>> os.system("bash command")  #运行shell命令,直接显示
1
>>> os.environ  #获取系统环境变量
environ({'ALLUSERSPROFILE': 'C:\\ProgramData', 'APPDATA': 'C:\\Users\\fat39\\AppData\\Roaming',  'COMMONPROGRAMW6432': 'C:\\Program Files\\Common Files', 'COMPUTERNAME': 'FAT39-PC', 。。。略})
>>> os.path.abspath('test')  #返回path规范化的绝对路径
'C:\\Python36\\test1\\test'
>>> os.path.split('test')  #将path分割成目录和文件名二元组返回
('', 'test')
>>> os.path.splitext('test1_rename.txt')  # 分离文件名和扩展名
('test1_rename', '.txt')
>>> os.path.dirname('test\\test\\test\\test1_rename.txt') # 返回path的目录。其实就是os.path.split(path)的第一个元素
'test\\test\\test'
>>> os.path.dirname(r'test\test\test\test1_rename.txt') # 返回path的目录。其实就是os.path.split(path)的第一个元素
'test\\test\\test'
>>> os.path.basename(r'test\test\test\test1_rename.txt') # 返回path最后的文件名。如何path以/或\结尾,那么就会返回空值。即os.path.split(path)的第二个元素
'test1_rename.txt'
>>> os.path.exists(r'test\test\test\test1_rename.txt')  #如果path存在,返回True;如果path不存在,返回False
False
>>> os.path.exists(r'test1_rename.txt')  #如果path存在,返回True;如果path不存在,返回False
True
>>> os.path.isabs(r'test1_rename.txt')  #如果path是绝对路径,返回True
False
>>> os.path.isfile(r'test\test\test\test1_rename.txt')  #如果path是一个存在的文件,返回True。否则返回False
False
>>> os.path.isfile(r'test1_rename.txt')  #如果path是一个存在的文件,返回True。否则返回False
True
>>> os.path.isdir('test2')  #如果path是一个存在的目录,则返回True。否则返回False
True
>>> os.path.isdir('test1_rename.txt')  #如果path是一个存在的目录,则返回True。否则返回False
False
>>> os.path.join('test1','test2') # 将多个路径组合后返回,第一个绝对路径之前的参数将被忽略
'test1\\test2'
>>> os.path.getatime('test1_rename.txt')  #返回path所指向的文件或者目录的最后存取时间
1500994476.0000696
>>> os.path.getmtime('test1_rename.txt')  #返回path所指向的文件或者目录的最后存取时间
1500994476.0000696
>>> os.path.getsize('test1_rename.txt')  # 返回文件或文件夹大小,与os.stat(filename).st_size
0
>>> os.path.getsize('test2')  # 返回文件或文件夹大小,与os.stat(filename).st_size
0
(4)参考
官网:
os:https://docs.python.org/2/library/os.html
3、subprocess模块
(1)安装
内置模块
ipmort subprocess
(2)使用说明
可以执行shell命令的相关模块和函数有:
os.system
os.spawn*
os.popen* --废弃
popen2.* --废弃
commands.* --废弃,3.x中被移除
以上执行shell命令的相关的模块和函数的功能均在 subprocess 模块中实现,并提供了更丰富的功能。
subprocess的目的就是启动一个新的进程并且与之通信。
1 call  # 执行命令,返回状态码执行命令,并返回执行状态,其中shell参数为False时,命令需要通过列表的方式传入,当shell为True时,可直接传入命令。如果出现错误,不进行报错。
2 check_call  # 用法与subprocess.call()类似,区别是,当返回值不为0时,直接抛出异常。
3 check_output  # 用法与上面两个方法类似,区别是,如果当返回值为0时,直接返回输出结果,如果返回值不为0,直接抛出异常。需要说明的是,该方法在python3.x中才有。
4 subprocess.Popen()  # 用于执行复杂的系统命令
5 # subprocess.Popen(args, bufsize=0, executable=None, stdin=None, stdout=None, stderr=None, preexec_fn=None, close_fds=False, shell=False, cwd=None, env=None, universal_newlines=False, startupinfo=None, creationflags=0)
 1 args:shell命令,可以是字符串或者序列类型(如:list,元组)
 2 bufsize:指定缓冲。0 无缓冲,1 行缓冲,其他 缓冲区大小,负值 系统缓冲
 3 stdin, stdout, stderr:分别表示程序的标准输入、输出、错误句柄
 4 preexec_fn:只在Unix平台下有效,用于指定一个可执行对象(callable object),它将在子进程运行之前被调用
 5 close_sfs:在windows平台下,如果close_fds被设置为True,则新创建的子进程将不会继承父进程的输入、输出、错误管道。
 6 所以不能将close_fds设置为True同时重定向子进程的标准输入、输出与错误(stdin, stdout, stderr)。
 7 shell:同上
 8 cwd:用于设置子进程的当前目录
 9 env:用于指定子进程的环境变量。如果env = None,子进程的环境变量将从父进程中继承。
10 universal_newlines:不同系统的换行符不同,True -> 同意使用 \n
11 startupinfo与createionflags只在windows下有效
12 将被传递给底层的CreateProcess()函数,用于设置子进程的一些属性,如:主窗口的外观,进程的优先级等等
child.wait()  # 等待子进程,类似于并发的join
child.poll() # 检查子进程状态
child.kill() # 终止子进程
child.send_signal() # 向子进程发送信号
child.terminate() # 终止子进程
ps: 子进程的PID存储在child.pid
(3)验证
- call方法:父进程等待子进程执行命令,返回子进程执行命令的状态码,如果出现错误,不进行报错。
- check_call方法:父进程等待子进程执行命令,返回执行命令的状态码,如果出现错误,进行报错【如果returncode不为0,则举出错误subprocess.CalledProcessError,该对象包含有returncode属性,可用try…except…来检查】
call() 和 check_call()使用方法如下:
import subprocess

subprocess.call("ls -l", shell=True)
# subprocess.call(["ls", "-l"], shell=False)
'''
总用量 4
-rw-r--r--. 1 root root 98 4月   7 13:53 mp.py
drwxr-xr-x. 2 root root  6 4月   7 14:15 t1
0
'''

subprocess.call("ping www.baidu.com",shell=True)
'''
PING www.a.shifen.com (163.177.151.110) 56(84) bytes of data.
64 bytes from 163.177.151.110: icmp_seq=1 ttl=128 time=68.9 ms
64 bytes from 163.177.151.110: icmp_seq=2 ttl=128 time=36.5 ms

--- www.a.shifen.com ping statistics ---
2 packets transmitted, 2 received, 0% packet loss, time 1001ms
rtt min/avg/max/mdev = 36.599/52.767/68.936/16.170 ms
0
'''

subprocess.call("ssh 1.1.1.40",shell=True)  # 通过call方法,直接从python跳转到ssh,python运行卡在这里
'''
root@1.1.1.40's password:
Last login: Sat Apr  7 10:07:14 2018 from 1.1.1.39
[root@fat40 ~]#
'''
# 以上,若执行成功,return值均为0
- check_output方法:父进程等待子进程执行命令,返回子进程向标准输出发送输出运行结果,检查退出信息,如果returncode不为0,则举出错误subprocess.CalledProcessError,该对象包含有returncode属性和output属性,output属性为标准输出的输出结果,可用try…except…来检查。
>>> res = subprocess.check_output('ls -l',shell=True)
>>> res  # 输出结果为bytes格式
b'\xe6\x80\xbb\xe7\x94\xa8\xe9\x87\x8f 4\n-rw-r--r--. 1 root root 98 4\xe6\x9c\x88   7 13:53 mp.py\ndrwxr-xr-x. 2 root root  6 4\xe6\x9c\x88   7 14:15 t1\n'


>>> res = subprocess.check_output("asdfsadfsadf",shell=True)
/bin/sh: asdfsadfsadf: 未找到命令
Traceback (most recent call last):
  File "<stdin>", line 1, in <module>
  File "/usr/local/lib/python3.6/subprocess.py", line 336, in check_output
    **kwargs).stdout
  File "/usr/local/lib/python3.6/subprocess.py", line 418, in run
    output=stdout, stderr=stderr)
subprocess.CalledProcessError: Command 'asdfsadfsadf' returned non-zero exit status 127.
>>>
- Popen方法:实际上,subprocess模块中只定义了一个类: Popen。上面的几个函数都是基于Popen()的封装(wrapper)。从Python2.4开始使用Popen来创建进程,用于连接到子进程的标准输入/输出/错误中去,还可以得到子进程的返回值。这些封装的目的在于让我们容易使用子进程。当我们想要更个性化我们的需求的时候,就要转向Popen类,该类生成的对象用来代表子进程。与上面的封装不同,Popen对象创建后,主程序不会自动等待子进程完成。我们必须调用对象的wait()方法,父进程才会等待 (也就是阻塞block)。
################## mp.py ####################
import subprocess

child = subprocess.Popen(['ping','-c','4','www.baidu.com'])
print('hello')

[root@fat39 test]# python3 mp.py
'''
hello
[root@fat39 test]# PING www.a.shifen.com (163.177.151.110) 56(84) bytes of data.
64 bytes from 163.177.151.110: icmp_seq=1 ttl=128 time=12.9 ms
64 bytes from 163.177.151.110: icmp_seq=2 ttl=128 time=37.4 ms
64 bytes from 163.177.151.110: icmp_seq=3 ttl=128 time=132 ms
64 bytes from 163.177.151.110: icmp_seq=4 ttl=128 time=687 ms

--- www.a.shifen.com ping statistics ---
4 packets transmitted, 4 received, 0% packet loss, time 3005ms
rtt min/avg/max/mdev = 12.932/217.491/687.172/274.817 ms
'''


################## mp2.py ####################
import subprocess

child = subprocess.Popen(['ping','-c','4','www.baidu.com'])
child.wait()
print('hello')


[root@fat39 test]# python3 mp2.py
'''
PING www.a.shifen.com (163.177.151.110) 56(84) bytes of data.
64 bytes from 163.177.151.110: icmp_seq=1 ttl=128 time=443 ms
64 bytes from 163.177.151.110: icmp_seq=2 ttl=128 time=539 ms
64 bytes from 163.177.151.110: icmp_seq=3 ttl=128 time=109 ms
64 bytes from 163.177.151.110: icmp_seq=4 ttl=128 time=36.1 ms

--- www.a.shifen.com ping statistics ---
4 packets transmitted, 4 received, 0% packet loss, time 3004ms
rtt min/avg/max/mdev = 36.177/282.106/539.028/213.638 ms
hello
'''
import subprocess
child = subprocess.Popen('ls -l',shell=True,stdout=subprocess.PIPE)
print(child.stdout.read())
"""
b'\xe6\x80\xbb\xe7\x94\xa8\xe9\x87\x8f 8\n-rw-r--r--. 1 root root 111 4\xe6\x9c\x88   7 14:51 mp2.py\n-rw-r--r--. 1 root root  98 4\xe6\x9c\x88   7 13:53 mp.py\ndrwxr-xr-x. 2 root root   6 4\xe6\x9c\x88   7 14:15 t1\n'
"""
"""
print(child.communicate())
(b'\xe6\x80\xbb\xe7\x94\xa8\xe9\x87\x8f 8\n-rw-r--r--. 1 root root 111 4\xe6\x9c\x88   7 14:51 mp2.py\n-rw-r--r--. 1 root root  98 4\xe6\x9c\x88   7 13:53 mp.py\ndrwxr-xr-x. 2 root root   6 4\xe6\x9c\x88   7 14:15 t1\n', None)
"""

import subprocess
child1 = subprocess.Popen(['cat','/etc/passwd'],stdout=subprocess.PIPE)
child2 = subprocess.Popen(['grep','root'],stdin=child1.stdout,stdout=subprocess.PIPE)
print(child2.communicate())  # subprocess.PIPE实际上为文本流提供一个缓存区。child1的stdout将文本输出到缓存区,随后child2的stdin从该PIPE中将文本读取走。child2的输出文本也被存放在PIPE中,直到communicate()方法从PIPE中读取出PIPE中的文本。注意:communicate()是Popen对象的一个方法,该方法会阻塞父进程,直到子进程完成
'''
(b'root:x:0:0:root:/root:/bin/bash\noperator:x:11:0:operator:/root:/sbin/nologin\n', None)
'''


import subprocess

obj = subprocess.Popen("python",shell=True, stdin=subprocess.PIPE, stdout=subprocess.PIPE, stderr=subprocess.PIPE, universal_newlines=True)
obj.stdin.write("print(1)\n")
obj.stdin.write("print(2)")
obj.stdin.close()

cmd_out = obj.stdout.read()
"""
1
2
"""
obj.stdout.close()
cmd_error = obj.stderr.read()
# 空白
obj.stderr.close()


import subprocess

obj = subprocess.Popen(["python"], stdin=subprocess.PIPE, stdout=subprocess.PIPE, stderr=subprocess.PIPE, universal_newlines=True)
obj.stdin.write("print(1)\n")
obj.stdin.write("print(2)")

out_error_list = obj.communicate()
print(out_error_list)
# ('1\n2\n', '')


import subprocess

obj = subprocess.Popen(["python"], stdin=subprocess.PIPE, stdout=subprocess.PIPE, stderr=subprocess.PIPE, universal_newlines=True)
out_error_list = obj.communicate('print("hello")')
print(out_error_list)
# ('hello\n', '')
(4)参考
参考:
http://www.cnblogs.com/wupeiqi/articles/5501365.html
https://www.cnblogs.com/sunailong/p/5162748.html
4、hashlib模块
(1)安装
内置模块
import hashlib
(2)使用说明
Python的hashlib提供了常见的摘要算法,如MD5,SHA1等等。
什么是摘要算法呢?摘要算法又称哈希算法、散列算法。它通过一个函数,把任意长度的数据转换为一个长度固定的数据串(通常用16进制的字符串表示)。
摘要算法就是通过摘要函数f()对任意长度的数据data计算出固定长度的摘要digest,目的是为了发现原始数据是否被人篡改过。
摘要算法之所以能指出数据是否被篡改过,就是因为摘要函数是一个单向函数,计算f(data)很容易,但通过digest反推data却非常困难。而且,对原始数据做一个bit的修改,都会导致计算出的摘要完全不同。
- python3,字符串需要encode("utf-8")
- 内容太长时,可分次update,结果与一次过hash是一样的
- 支持算法:md5, sha1, sha224, sha256, sha384, sha512
(3)验证
from hashlib import md5, sha1, sha224, sha256, sha384, sha512
from pprint import pprint

hash_funcs = [md5, sha1, sha224, sha256, sha384, sha512]


def hash_show(s):
    result = []
    for func in hash_funcs:  # 逐个算法
        s_hash_obj = func(s)
        s_hash_hex = s_hash_obj.hexdigest()
        result.append((s_hash_obj.name, s_hash_hex,  len(s_hash_hex)))
    return result


if __name__ == '__main__':
    s = 'hello python'.encode("utf-8")
    rs = hash_show(s)
    pprint(rs)
#hashlib简单使用
def md5(arg):#这是加密函数,将传进来的函数加密
    md5_pwd = hashlib.md5(bytes('abd',encoding='utf-8'))
    md5_pwd.update(bytes(arg,encoding='utf-8'))
    return md5_pwd.hexdigest()#返回加密的数据
def log(user,pwd):#登陆时候时候的函数,由于md5不能反解,因此登陆的时候用正解
    with open('db','r',encoding='utf-8') as f:
        for line in f:
            u,p=line.strip().split('|')
            if u ==user and p == md5(pwd):#登陆的时候验证用户名以及加密的密码跟之前保存的是否一样
                return True
def register(user,pwd):#注册的时候把用户名和加密的密码写进文件,保存起来
    with open('db','a',encoding='utf-8') as f:
        temp = user+'|'+md5(pwd)
        f.write(temp)

i=input('1表示登陆,2表示注册:')
if i=='2':
    user = input('用户名:')
    pwd =input('密码:')
    register(user,pwd)
elif i=='1':
    user = user = input('用户名:')
    pwd =input('密码:')
    r=log(user,pwd)#验证用户名和密码
    if r ==True:
        print('登陆成功')
    else:
        print('登陆失败')
else:
    print('账号不存在')
from random import Random
from hashlib import md5


# 获取由4位随机大小写字母、数字组成的salt值
def create_salt(length=4):
    salt = ''
    chars = 'AaBbCcDdEeFfGgHhIiJjKkLlMmNnOoPpQqRrSsTtUuVvWwXxYyZz0123456789'
    len_chars = len(chars) - 1
    random = Random()
    for i in range(length):
        # 每次从chars中随机取一位
        salt += chars[random.randint(0, len_chars)]
    return salt


# 获取原始密码+salt的md5值
def create_md5(pwd, salt):
    md5_obj = md5()
    md5_obj.update(pwd + salt)
    return md5_obj.hexdigest()


# 原始密码
pwd = '20141124'
# 随机生成4位salt
salt = create_salt()
# 加密后的密码
md5 = create_md5(bytes(pwd,encoding="utf-8"), bytes(salt,encoding="utf-8"))


print(pwd)  # 20141124
print(salt)  # wAAn  # 随机
print(md5)  # 7b22cb2fed415097c942b130f210aac3

'''
数据库:
username  |  md5  |  salt
20141124  |  xxx  |  xxx
'''
(4)参考
https://blog.csdn.net/secret5/article/details/70150486
https://www.cnblogs.com/xiaobeibei26/p/6422012.html
5、random模块
(1)安装
内置模块
import random
(2)使用说明
random.seed(a=None, version=2)  # 初始化伪随机数生成器。如果未提供a或者a=None,则使用系统时间为种子。如果a是一个整数,则作为种子。
random.getstate()  # 返回一个当前生成器的内部状态的对象
random.setstate(state)  # 传入一个先前利用getstate方法获得的状态对象,使得生成器恢复到这个状态。
random.getrandbits(k)  # 返回range(0,2**k)之间的一个整数,相当于randrange(0,2**k)
random.randrange(stop)  # 返回range(0,stop)之间的一个整数
random.randrange(start, stop[, step])  # 返回range(start,stop)之间的一个整数,可加step,跟range(0,10,2)类似
random.randint(a, b)  # 返回range(a,b+1)之间的一个整数,等价于然的range(a,b+1)
random.choice(seq)  # 从非空序列seq中随机选取一个元素。如果seq为空则弹出 IndexError异常。
random.choices(population, weights=None, *, cum_weights=None, k=1)  # 3.6版本新增。从population集群中随机抽取K个元素(可重复)。weights是相对权重列表,cum_weights是累计权重,两个参数不能同时存在。
random.shuffle(x[, random])  # 随机打乱序列x内元素的排列顺序。只能针对可变的序列,对于不可变序列,请使用下面的sample()方法。
random.sample(population, k)  # 从population样本或集合中随机抽取K个不重复的元素形成新的序列。常用于不重复的随机抽样。返回的是一个新的序列,不会破坏原有序列。要从一个整数区间随机抽取一定数量的整数,请使用sample(range(10000000), k=60)类似的方法,这非常有效和节省空间。如果k大于population的长度,则弹出ValueError异常。
random.random()  # 返回一个介于左闭右开[0.0, 1.0)区间的浮点数
random.uniform(a, b)  # 返回一个介于a和b之间的浮点数。如果a>b,则是b到a之间的浮点数。这里的a和b都有可能出现在结果中。
random.triangular(low, high, mode)  # 返回一个low <= N <=high的三角形分布的随机数。参数mode指明众数出现位置。
random.betavariate(alpha, beta)  # β分布。返回的结果在0~1之间
random.expovariate(lambd)  # 指数分布
random.gammavariate(alpha, beta)  # 伽玛分布
random.gauss(mu, sigma)  # 高斯分布
random.lognormvariate(mu, sigma)  # 对数正态分布
random.normalvariate(mu, sigma)  # 正态分布
random.vonmisesvariate(mu, kappa)  # 卡帕分布
random.paretovariate(alpha)  # 帕累托分布
random.weibullvariate(alpha, beta)  # 威布尔分布
(3)验证
>>> random()                             # 随机浮点数:  0.0 <= x < 1.0
0.37444887175646646

>>> uniform(2.5, 10.0)                   # 随机浮点数:  2.5 <= x < 10.0
3.1800146073117523


>>> randrange(10)                        # 0-9的整数:

>>> randrange(0, 101, 2)                 # 0-100的偶数

>>> choice(['win', 'lose', 'draw'])      # 从序列随机选择一个元素
'draw'

>>> deck = 'ace two three four'.split()
>>> shuffle(deck)                        # 对序列进行洗牌,改变原序列
>>> deck
['four', 'two', 'ace', 'three']

>>> sample([10, 20, 30, 40, 50], k=4)    # 不改变原序列的抽取指定数目样本,并生成新序列
[40, 10, 50, 30]


>>> # 6次旋转红黑绿轮盘(带权重可重复的取样),不破坏原序列,weight[18,18,2]
>>> choices(['red', 'black', 'green'], [18, 18, 2], k=6)
['red', 'green', 'black', 'black', 'red', 'black']

>>> # 德州扑克计算概率Deal 20 cards without replacement from a deck of 52 playing cards
>>> # and determine the proportion of cards with a ten-value
>>> # (a ten, jack, queen, or king).
>>> deck = collections.Counter(tens=16, low_cards=36)
>>> seen = sample(list(deck.elements()), k=20)
>>> seen.count('tens') / 20
0.15

>>> # 模拟概率Estimate the probability of getting 5 or more heads from 7 spins
>>> # of a biased coin that settles on heads 60% of the time.'H'的概率是0.6,“T”的概率是1-0.6
>>> trial = lambda: choices('HT', cum_weights=(0.60, 1.00), k=7).count('H') >= 5
>>> sum(trial() for i in range(10000)) / 10000
0.4169

>>> # Probability of the median of 5 samples being in middle two quartiles
>>> trial = lambda : 2500 <= sorted(choices(range(10000), k=5))[2]  < 7500
>>> sum(trial() for i in range(10000)) / 10000
0.7958
>>> from statistics import mean
>>> from random import choices

>>> data = 1, 2, 4, 4, 10
>>> means = sorted(mean(choices(data, k=5)) for i in range(20))  # mean是求平均
>>> print(f'The sample mean of {mean(data):.1f} has a 90% confidence '
      f'interval from {means[1]:.1f} to {means[-2]:.1f}')  # 这里的f用法
import random

checkcode = ''
for i in range(4):
    current = random.randrange(0,4)
    if current != i:
        temp = chr(random.randint(65,90))
    else:
        temp = random.randint(0,9)
    checkcode += str(temp)
print(checkcode)
import random, string


def gen_random_string(length):
    # 数字的个数随机产生
    num_of_numeric = random.randint(1,length-1)
    # 剩下的都是字母
    num_of_letter = length - num_of_numeric
    # 随机生成数字
    numerics = [random.choice(string.digits) for i in range(num_of_numeric)]
    # 随机生成字母
    letters = [random.choice(string.ascii_letters) for i in range(num_of_letter)]
    # 结合两者
    all_chars = numerics + letters
    # 洗牌
    random.shuffle(all_chars)
    # 生成最终字符串
    result = ''.join([i for i in all_chars])
    return result

if __name__ == '__main__':
    print(gen_random_string(64))
(4)参考
6、re模块
https://www.cnblogs.com/fat39/p/9510441.html
7、序列化之json模块 、 pickle模块 和 shelve模块
什么是序列化
我们把对象(变量)从内存中变成可存储或传输的过程称之为序列化,在Python中叫pickling,在其他语言中也被称之为serialization,marshalling,flattening等等,都是一个意思。序列化之后,就可以把序列化后的内容写入磁盘,或者通过网络传输到别的机器上。反过来,把变量内容从序列化的对象重新读到内存里称之为反序列化,即unpickling。
python用于序列化的两个模块
- json 用于【字符串】和 【python基本数据类型】 间进行转换
- pickle 用于【python特有的类型】 和 【python基本数据类型】间进行转换
另,可使用内置方法eval(xxxxx),但效果有限。
7.1、json模块
(1)安装
内置模块
import json
(2)使用说明
json,Json模块提供了四个功能:dumps、dump、loads、load
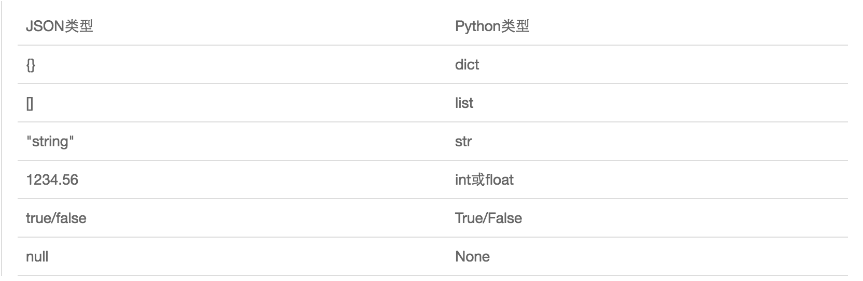
dumps  # 将字典转换成字符串,转换后的字典中的元素是由双引号表示的
dump  # dump方法接收一个文件句柄,直接将字典转换成json字符串写入文件
loads  # 将一个字符串转换成字典类型
load  # load方法接收一个文件句柄,直接将文件中的json字符串转换成数据结构返回
(3)验证
import json

dic={'k1':'v1','k2':'v2','k3':'v3'}  # dict类型

# 写dumps
with open("test.json","w") as f:
    str_dic = json.dumps(dic)  # str类型
    f.write(str_dic)  # f内容如下:{"k1": "v1", "k2": "v2", "k3": "v3"}

# 读loads
with open("test.json","r") as f:
    str_dic = f.read()  # str类型,内容是:  {"k1": "v1", "k2": "v2", "k3": "v3"}
    dic = json.loads(str_dic)  # dict类型,内容是:{"k1": "v1", "k2": "v2", "k3": "v3"}

# 写dump
dic2={'k4':'v4','k5':'v5','k6':'v6'}  # dict类型
with open("test2.json","w") as f:
    json.dump(dic2,f)  # f内容如下:{"k4": "v4", "k5": "v5", "k6": "v6"}

# 读loads
with open("test2.json","r") as f:
    res = json.load(f)   # dict类型,内容是{'k4': 'v4', 'k5': 'v5', 'k6': 'v6'}
################ JSONEncoder #############
import json
from datetime import datetime,date

class JsonCustomEncoder(json.JSONEncoder):
    def default(self, value):
        if isinstance(value, datetime):
            return value.strftime('%Y-%m-%d %H:%M:%S')  # 转换为字符串
        elif isinstance(value, date):
            return value.strftime('%Y-%m-%d')  # 转换为字符串
        else:
            return json.JSONEncoder.default(self, value)

dt = datetime.now()
d = date.today()

print(json.dumps(dt,cls=JsonCustomEncoder))  # "2018-04-06 09:52:03"
print(json.dumps(d,cls=JsonCustomEncoder))  # "2018-04-06"

################ JSONDecoder #############
简单验证,待完善
import json
dt = "2018-04-06 09:51:30"
d = "2018-04-06"

class JsonCustomDecoder(json.JSONDecoder):
    def decode(self,value):
        import time
        return time.strptime(value, "%Y-%m-%d %X")

print(json.loads(dt,cls=JsonCustomDecoder))  # time.struct_time(tm_year=2018, tm_mon=4, tm_mday=6, tm_hour=9, tm_min=51, tm_sec=30, tm_wday=4, tm_yday=96, tm_isdst=-1)
import json

v = {"k":"中国人"}

ret = json.dumps(v)  # 默认ensure_ascii=True,把中文也转为unicode
print(ret)  # {"k": "\u4e2d\u56fd\u4eba"}
ret = json.dumps(v,ensure_ascii=False)  # 不把中文转为unicode
print(ret)  # {"k": "中国人"}
(4)参考
7.2、pickle模块
(1)安装
内置模块
import pickle
(2)使用说明
pickle支持所有python数据类型,pickle模块提供了四个功能:dumps、dump、loads、load,与json类型
(3)验证
import pickle

dic = {'k1':'v1','k2':'v2','k3':'v3'}

str_dic=pickle.dumps(dic)  # # bytes类型,内容是: b'\x80\x03}q\x00(X\x02\x00\x00\x00k1q\x01X\x02\x00\x00\x00v1q\x02X\x02\x00\x00\x00k2q\x03X\x02\x00\x00\x00v2q\x04X\x02\x00\x00\x00k3q\x05X\x02\x00\x00\x00v3q\x06u.'
dic2 = pickle.loads(str_dic)  # dict类型,内容是: {'k1': 'v1', 'k2': 'v2', 'k3': 'v3'}
with open("test2.pickle","wb") as f:  # b模式
    pickle.dump(dic,f)

with open("test2.pickle","rb") as f:  # b模式
    x=pickle.load(f)  # dict类型,内容是:{'k1': 'v1', 'k2': 'v2', 'k3': 'v3'}


import time
now = time.localtime()  # struct time
with open("test3.pickle","wb") as f:
    pickle.dump(now,f)

with open("test3.pickle","rb") as f:
    x = pickle.load(f)  # time类型,内容是: time.struct_time(tm_year=2018, tm_mon=4, tm_mday=6, tm_hour=10, tm_min=3, tm_sec=41, tm_wday=4, tm_yday=96, tm_isdst=0)
(4)参考
7.3、shelve模块
(1)安装
内容模块
import shelve
(2)使用说明
shelve也是python提供给我们的序列化工具,比pickle用起来更简单一些。
shelve只提供给我们一个open方法,是用key来访问的,使用起来和字典类似。
这个模块有个限制,它不支持多个应用同一时间往同一个DB进行写操作。所以当我们知道我们的应用如果只进行读操作,我们可以让shelve通过只读方式打开DB
(3)验证
import shelve

f = shelve.open(r'shelve.txt')

########## 写 ############
f['stu1_info']={'name':'alex','age':'18'}
f['stu2_info']={'name':'alvin','age':'20'}
f['school_info']={'website':'oldboyedu.com','city':'beijing'}

f.close()


########## 读 ############
f = shelve.open(r'shelve.txt')
print(f.get("stu1_info")["age"])  # 18
(4)参考
8、configparser模块
(1)安装
内置模块
import configparser
(2)使用说明
源文件指定格式
# 注释1
;  注释2

[section1] # 节点
k1 = v1    # 值
k2:v2       # 值

[section2] # 节点
k1 = v1    # 值
import configparser

config = configparser.ConfigParser()
config.read('xxxooo', encoding='utf-8')
ret = config.sections()
print(ret)
import configparser

config = configparser.ConfigParser()
config.read('xxxooo', encoding='utf-8')
ret = config.items('section1')
print(ret)
import configparser

config = configparser.ConfigParser()
config.read('xxxooo', encoding='utf-8')
ret = config.options('section1')
print(ret)
import configparser

config = configparser.ConfigParser()
config.read('xxxooo', encoding='utf-8')


v = config.get('section1', 'k1')
# v = config.getint('section1', 'k1')
# v = config.getfloat('section1', 'k1')
# v = config.getboolean('section1', 'k1')

print(v)
import configparser

config = configparser.ConfigParser()
config.read('xxxooo', encoding='utf-8')


# 检查
has_sec = config.has_section('section1')
print(has_sec)

# 添加节点
config.add_section("SEC_1")
config.write(open('xxxooo', 'w'))

# 删除节点
config.remove_section("SEC_1")
config.write(open('xxxooo', 'w'))
import configparser

config = configparser.ConfigParser()
config.read('xxxooo', encoding='utf-8')

# 检查
has_opt = config.has_option('section1', 'k1')
print(has_opt)

# 删除
config.remove_option('section1', 'k1')
config.write(open('xxxooo', 'w'))

# 设置
config.set('section1', 'k10', "123")
config.write(open('xxxooo', 'w'))
(3)验证
#-*- encoding: utf-8 -*-

import  configparser
# 1、conf = configparser.ConfigParser()
# 2、settings = configparser.ConfigParser(interpolation=ExtendedInterpolation())  # 读ini文件,初始化不一样,用法一样

test = \
'''
[db]
db_host = 127.0.0.1
db_port = 3306
db_user = root
db_pass = 123

[concurrent]
thread = 10
processor = 20
'''

test_dict = {
    "db":{
        "db_host":"127.0.0.1",
        "db_port":"3306",
        "db_user":"root",
        "db_pass":"123"
    },
    "concurrent":{
        "thread":"10",
        "processor":"20"
    },
    "lab":{
        "name":"tom",
        "password":"123"
    }
}

conf = configparser.ConfigParser()
conf.read("test.conf")  # 读取文件
# conf.read_string(test)  # 读取str,比如上面的test字段
# conf.read_dict(test_dict)  # 读取dict,比如上面的test_dict

db_option = conf.options("db")  # 读取option,相当于dict的key,['db_host', 'db_port', 'db_user', 'db_pass']
db_items = conf.items("db")  # 相当于dict的item,[('db_host', '127.0.0.1'), ('db_port', '3306'), ('db_user', 'root'), ('db_pass', '123')]
sec = conf.sections()  # 读取标题,['db', 'concurrent']
#---------------------------------------------------------------------------------

db_host = conf.get("db","db_host") # type str  127.0.0.1
db_port = conf.getint("db","db_port")  # type int  3306
db_user = conf.get("db","db_user")  # type str  root
db_pass = conf.get("db","db_pass")  # type str  123

concurrent_thread = conf.getint("concurrent","thread")  # type int  10
concurrent_processor = conf.getint("concurrent","processor")  # type int  20

#---------------------------------------------------------------------------------
conf.set("db", "db_pass", "test123")  # 修改section db 的db_pass,新值是test123
conf.set("db","db_test","test_db")  # 新增,与修改是一个用法

#---------------------------------------------------------------------------------
conf.add_section("abc")  # 增加section,abc
conf.set("abc","country","CN")  # 增加字段
conf.set("abc","time_zone","+8")

#---------------------------------------------------------------------------------
print(conf.has_section("db"))  # True
print(conf.has_section("abcdefg"))  # False
print(conf.has_option("abc","country"))  # True
print(conf.has_option("abc","abc_name"))  # False

#---------------------------------------------------------------------------------
new_dict = {
    "guest":{
        "name":"guest",
        "password":"123"
    }
}

conf.update(new_dict)  # 直接通过dict更新

#---------------------------------------------------------------------------------
with open("test1.conf","w") as f:
    conf.write(f)


"""
[db]
db_host = 127.0.0.1
db_port = 3306
db_user = root
db_pass = test123
db_test = test_db

[concurrent]
thread = 10
processor = 20

[abc]
country = CN
time_zone = +8

[guest]
name = guest
password = 123

"""

#---------------------------------------------------------------------------------

settings_ini = \
"""
[SectionOne]
Param1: Hello
Param2: World

[SectionTwo]
Param1: ${SectionOne:Param1} ${SectionOne:Param2}

[SectionThree]
Alpha: One
Bravo: Two
Charlie: ${Alpha} Mississippi
"""


settings = configparser.ConfigParser(interpolation=configparser.ExtendedInterpolation())  # 用法同上
settings.read_string(settings_ini)

sec = settings.sections()  # ['SectionOne', 'SectionTwo', 'SectionThree']
SectionThree = settings.items("SectionThree")
print(SectionThree)  # [('alpha', 'One'), ('bravo', 'Two'), ('charlie', 'One Mississippi')]
(4)参考
9、xml模块
(1)安装
(2)使用说明
(3)验证
(4)参考
10、requests模块
https://www.cnblogs.com/fat39/p/9028551.html#tag1
11、logging模块
(1)安装
内置模块
import logging
(2)使用说明
logging.basicConfig()函数中可通过具体参数来更改logging模块默认行为,可用参数有:

filename:用指定的文件名创建FiledHandler,这样日志会被存储在指定的文件中。
filemode:文件打开方式,在指定了filename时使用这个参数,默认值为“a”还可指定为“w”。
format:指定handler使用的日志显示格式。
datefmt:指定日期时间格式。
level:设置rootlogger(后边会讲解具体概念)的日志级别
stream:用指定的stream创建StreamHandler。可以指定输出到sys.stderr,sys.stdout或者文件(f=open(‘test.log’,’w’)),默认为sys.stderr。若同时列出了filename和stream两个参数,则stream参数会被忽略。

format参数中可能用到的格式化串:
%(name)s Logger的名字
%(levelno)s 数字形式的日志级别
%(levelname)s 文本形式的日志级别
%(pathname)s 调用日志输出函数的模块的完整路径名,可能没有
%(filename)s 调用日志输出函数的模块的文件名
%(module)s 调用日志输出函数的模块名
%(funcName)s 调用日志输出函数的函数名
%(lineno)d 调用日志输出函数的语句所在的代码行
%(created)f 当前时间,用UNIX标准的表示时间的浮 点数表示
%(relativeCreated)d 输出日志信息时的,自Logger创建以 来的毫秒数
%(asctime)s 字符串形式的当前时间。默认格式是 “2003-07-08 16:49:45,896”。逗号后面的是毫秒
%(thread)d 线程ID。可能没有
%(threadName)s 线程名。可能没有
%(process)d 进程ID。可能没有
%(message)s用户输出的消息
CRITICAL = 50
FATAL = CRITICAL
ERROR = 40
WARNING = 30
WARN = WARNING
INFO = 20
DEBUG = 10
NOTSET = 0
另转了一篇logging模块文章:(转)一篇写的简明易懂的logging模块
补充:想改一下logging的方法如这里的info,但发现logging.getLogger(log_type)返回是一个实例对象,所以尝试了下面的方法,仅做记录。
# -*- coding:utf-8 -*-

from cl.conf import settings
import logging
import os


def test(system_log):
    class Test(type(system_log)):
        def info(self,*args,**kwargs):
            res = super(Test, self).info(*args,**kwargs)
            print("test info")
            return res
    return Test


def logger(log_type):
    logger = logging.getLogger(log_type)

    '''############# 增加了这一条 #############'''
    logger = test(logger)(log_type)
    '''############# 增加了这一条 #############'''

    logger.setLevel(settings.LOG_LEVEL)

    # create console handler and set level to debug
    ch = logging.StreamHandler()
    ch.setLevel(settings.LOG_LEVEL)

    # create file handler and set level to warning
    log_file = os.path.join(settings.LOG_FILES_DIR,settings.LOG_TYPES[log_type])
    fh = logging.FileHandler(log_file)
    fh.setLevel(settings.LOG_LEVEL)

    # create formatter
    formatter = logging.Formatter('%(asctime)s - %(name)s - %(levelname)s - %(message)s')

    # add formatter to ch and fh
    ch.setFormatter(formatter)
    fh.setFormatter(formatter)

    # add ch and fh to logger
    logger.addHandler(ch)  #  #logger对象可以添加多个fh和ch对象
    logger.addHandler(fh)

    return logger


system_log = logger("system")
# system_log.info("haha")
print(test(system_log).__mro__)  # (<class '__main__.test.<locals>.Test'>, <class '__main__.test.<locals>.Test'>, <class 'logging.Logger'>, <class 'logging.Filterer'>, <class 'object'>)
# -*- coding:utf-8 -*-

from cl.conf import settings
import logging
import os
from logging import Logger

class NewLogger(Logger):
    def info(self, *args, **kwargs):
        res = super(NewLogger, self).info(*args, **kwargs)
        print("test info")
        return res

def test(system_log):
    class Test(type(system_log)):
        def info(self,*args,**kwargs):
            res = super(Test, self).info(*args,**kwargs)
            print("test info")
            return res
    return Test


def logger(log_type):
    # logger = logging.getLogger(log_type)
    logger = NewLogger(log_type)
    '''############# 增加了这一条 #############'''
    # logger = test(logger)(log_type)
    '''############# 增加了这一条 #############'''

    logger.setLevel(settings.LOG_LEVEL)

    # create console handler and set level to debug
    ch = logging.StreamHandler()
    ch.setLevel(settings.LOG_LEVEL)

    # create file handler and set level to warning
    log_file = os.path.join(settings.LOG_FILES_DIR,settings.LOG_TYPES[log_type])
    fh = logging.FileHandler(log_file)
    fh.setLevel(settings.LOG_LEVEL)

    # create formatter
    formatter = logging.Formatter('%(asctime)s - %(name)s - %(levelname)s - %(message)s')

    # add formatter to ch and fh
    ch.setFormatter(formatter)
    fh.setFormatter(formatter)

    # add ch and fh to logger
    logger.addHandler(ch)  #  #logger对象可以添加多个fh和ch对象
    logger.addHandler(fh)

    return logger


system_log = logger("system")
system_log.info("haha")
# print(test(system_log).__mro__)  # (<class '__main__.test.<locals>.Test'>, <class '__main__.test.<locals>.Test'>, <class 'logging.Logger'>, <class 'logging.Filterer'>, <class 'object'>)
(3)验证
实验一
import logging

logging.basicConfig(filename='log.log',
                    format='%(asctime)s - %(name)s - %(levelname)s -%(module)s:  %(message)s',
                    datefmt='%Y-%m-%d %H:%M:%S %p',
                    level=10)

logging.debug('debug')
logging.info('info')
logging.warning('warning')
logging.error('error')
logging.critical('critical')
logging.log(10, 'log')


'''
2018-04-11 22:50:11 PM - root - DEBUG -test1:  debug
2018-04-11 22:50:11 PM - root - INFO -test1:  info
2018-04-11 22:50:11 PM - root - WARNING -test1:  warning
2018-04-11 22:50:11 PM - root - ERROR -test1:  error
2018-04-11 22:50:11 PM - root - CRITICAL -test1:  critical
2018-04-11 22:50:11 PM - root - DEBUG -test1:  log
'''
实验二 多个日志文件
# -*- coding:utf-8 -*-
import logging
# 定义文件
file_1_1 = logging.FileHandler('l1_1.log', 'a', encoding='utf-8')
fmt = logging.Formatter(fmt="%(asctime)s - %(name)s - %(levelname)s -%(module)s:  %(message)s")
file_1_1.setFormatter(fmt)

file_1_2 = logging.FileHandler('l1_2.log', 'a', encoding='utf-8')
fmt = logging.Formatter()
file_1_2.setFormatter(fmt)

# 定义日志
logger1 = logging.Logger('s1', level=logging.ERROR)
logger1.addHandler(file_1_1)
logger1.addHandler(file_1_2)


# 写日志
logger1.critical('1111')


############# l1.1.log ################
2018-04-11 22:52:29,330 - s1 - CRITICAL -test2:  1111


############# l1.2.log ################
1111
实验三
# -*- coding:utf-8 -*-
import os
import logging

############### 可写入settings.py ###############
BASE_DIR = os.path.dirname(os.path.abspath(__file__))
LOG_LEVEL = logging.INFO
LOG_TYPES = {
    'system': 'system.log',
    'interactive':"interactive.log"
}


def logger(log_type):
    # create logger
    logger = logging.getLogger(log_type)
    logger.setLevel(LOG_LEVEL)

    # create console handler and set level to debug
    ch = logging.StreamHandler()
    ch.setLevel(LOG_LEVEL)

    # create file handler and set level to warning
    log_file = "%s/log/%s" % (BASE_DIR, LOG_TYPES[log_type])
    fh = logging.FileHandler(log_file)
    fh.setLevel(LOG_LEVEL)

    # create formatter
    formatter = logging.Formatter('%(asctime)s - %(name)s - %(levelname)s - %(message)s')

    # add formatter to ch and fh
    ch.setFormatter(formatter)
    fh.setFormatter(formatter)

    # add ch and fh to logger
    logger.addHandler(ch)  #  #logger对象可以添加多个fh和ch对象
    logger.addHandler(fh)

    return logger
# -*- coding:utf-8 -*-

import logger

interact_log = logger.logger("interactive")
system_log = logger.logger("system")


############## 脚本开始 ##############
system_log.info("程序开始")


while True:
    cmd = input(">>:")
    print("执行命令,返回结果")
    if cmd.startswith("rm"):
        interact_log.warning(cmd)
    else:
        interact_log.info(cmd)

    if cmd == "exit":
        system_log.info("退出程序")
        exit()
########### interactive.log ###########
2018-04-11 22:36:32,417 - interactive - INFO - hi
2018-04-11 22:36:34,679 - interactive - INFO - ll
2018-04-11 22:36:38,597 - interactive - INFO - dsf
2018-04-11 22:36:41,887 - interactive - WARNING - rm -rf /
2018-04-11 22:37:07,331 - interactive - INFO - ok
2018-04-11 22:37:08,397 - interactive - INFO - exit

注:由于配置了StreamHandler,以上均在屏幕上显示出来

########### system.log ###########
2018-04-11 22:36:26,650 - system - INFO - 程序开始
2018-04-11 22:37:08,398 - system - INFO - 退出程序

注:由于配置了StreamHandler,以上均在屏幕上显示出来
(4)参考
http://www.cnblogs.com/yuanchenqi/articles/6766020.html#_label5
http://www.cnblogs.com/wupeiqi/articles/5501365.html
12、shutil模块
(1)安装
内置模块
import shutil
(2)使用说明
shutil.copyfileobj(fsrc, fdst[, length])  # 将文件内容拷贝到另一个文件中
shutil.copyfile(src, dst)  # 拷贝文件
shutil.copymode(src, dst)  # 仅拷贝权限。内容、组、用户均不变
shutil.copystat(src, dst)  # 仅拷贝状态的信息,包括:mode bits, atime, mtime, flags
shutil.copy(src, dst)  # 拷贝文件和权限
shutil.copy2(src, dst)  # 拷贝文件和状态信息
shutil.ignore_patterns(*patterns)  # 作为参数,传入下面的copytree。忽略某些字段的文件。
shutil.copytree(src, dst, symlinks=False, ignore=None)  # 递归的去拷贝文件夹
shutil.rmtree(path[, ignore_errors[, onerror]])  # 递归的去删除文件
shutil.move(src, dst)  # 递归的去移动文件,它类似mv命令,其实就是重命名。
shutil.make_archive(base_name, format,...)  # 创建压缩包并返回文件路径,例如:zip、tar
    base_name: 压缩包的文件名,也可以是压缩包的路径。只是文件名时,则保存至当前目录,否则保存至指定路径,
    如:www                        =>保存至当前路径
    如:/Users/wupeiqi/www =>保存至/Users/wupeiqi/
    format:    压缩包种类,“zip”, “tar”, “bztar”,“gztar”
    root_dir:    要压缩的文件夹路径(默认当前目录)
    owner:    用户,默认当前用户
    group:    组,默认当前组
    logger:    用于记录日志,通常是logging.Logger对象
(3)验证
1、copyfileobj
shutil.copyfileobj(open('old.xml','r'), open('new.xml', 'w'))
shutil.copyfileobj(open('old.xml','r'), open('new1.xml', 'a'))  # 在后面追加
'''
[root@fat40 shutil_test]# ll
总用量 16
-rw-r--r--. 1 root  root   42 4月   8 12:24 new1.xml
-rw-r--r--. 1 root  root   25 4月   8 12:24 new.xml
-rw-r--r--. 1 admin admin  25 4月   8 12:17 old.xml
-rw-r--r--. 1 root  root  141 4月   8 12:23 test.py
'''

2、copyfile
shutil.copyfile('old.xml', 'haha.xml')
'''
-rw-r--r--. 1 root  root   25 4月   8 12:28 haha.xml
'''

3、copymode
# shutil.copymode('old.xml', 'new.xml')  # 报错,因为没有该文件
shutil.copymode('old.xml', 'new2.xml')
'''
-rwxrwxrwx. 1 root  root    0 4月   8 12:33 new2.xml    # mode换了
-rwxrwxrwx. 1 admin admin  25 4月   8 12:17 old.xml
'''

4、copystat
shutil.copystat('old.xml', 'newnew.xml')
'''
-rwxrwxrwx. 1 root  root    0 4月   8 12:17 newnew.xml
-rwxrwxrwx. 1 admin admin  25 4月   8 12:17 old.xml

[root@fat40 shutil_test]# stat old.xml
  文件:"old.xml"
  大小:25            块:8          IO 块:4096   普通文件
设备:fd00h/64768d    Inode:102072723   硬链接:1
权限:(0777/-rwxrwxrwx)  Uid:( 1001/   admin)   Gid:( 1001/   admin)
环境:unconfined_u:object_r:admin_home_t:s0
最近访问:2018-04-08 12:17:53.843571572 +0800
最近更改:2018-04-08 12:17:03.979569888 +0800
最近改动:2018-04-08 12:33:53.440603988 +0800
创建时间:-


[root@fat40 shutil_test]# stat newnew.xml
  文件:"newnew.xml"
  大小:0             块:0          IO 块:4096   普通空文件
设备:fd00h/64768d    Inode:102072720   硬链接:1
权限:(0777/-rwxrwxrwx)  Uid:(    0/    root)   Gid:(    0/    root)
环境:unconfined_u:object_r:admin_home_t:s0
最近访问:2018-04-08 12:17:53.843571572 +0800
最近更改:2018-04-08 12:17:03.979569888 +0800
最近改动:2018-04-08 12:41:51.862620149 +0800
创建时间:-
'''

5、copy
shutil.copy("old.xml","new.xml")
'''
-rwxrwxrwx. 1 root  root   25 4月   8 13:02 new.xml
-rwxrwxrwx. 1 admin admin  25 4月   8 12:17 old.xml
'''

6、copy2
shutil.copy2("old.xml","new.xml")
'''
[root@fat40 shutil_test]# stat new.xml
  文件:"new.xml"
  大小:25            块:8          IO 块:4096   普通文件
设备:fd00h/64768d    Inode:102072721   硬链接:1
权限:(0777/-rwxrwxrwx)  Uid:(    0/    root)   Gid:(    0/    root)
环境:unconfined_u:object_r:admin_home_t:s0
最近访问:2018-04-08 13:02:38.419662258 +0800
最近更改:2018-04-08 12:17:03.979569888 +0800
最近改动:2018-04-08 13:05:25.222667893 +0800
创建时间:-
[root@fat40 shutil_test]# stat old.xml
  文件:"old.xml"
  大小:25            块:8          IO 块:4096   普通文件
设备:fd00h/64768d    Inode:102072723   硬链接:1
权限:(0777/-rwxrwxrwx)  Uid:( 1001/   admin)   Gid:( 1001/   admin)
环境:unconfined_u:object_r:admin_home_t:s0
最近访问:2018-04-08 13:02:38.419662258 +0800
最近更改:2018-04-08 12:17:03.979569888 +0800
最近改动:2018-04-08 12:33:53.440603988 +0800
创建时间:-
'''

7、ignore_patterns 和 copytree
shutil.copytree("a","new_folder",ignore=shutil.ignore_patterns("*.html","*.go"))  # 不复制html和go文件
'''
[root@fat40 shutil_test]# tree a
a
├── a.html
├── a.py
├── a.txt
└── b
    ├── b.c
    ├── b.go
    ├── b.html
    └── c
        ├── c.html
        ├── c.txt
        ├── c.zzz
        └── old.xml

2 directories, 10 files
[root@fat40 shutil_test]# tree new_folder/
new_folder/
├── a.py
├── a.txt
└── b
    ├── b.c
    └── c
        ├── c.txt
        ├── c.zzz
        └── old.xml

2 directories, 6 files
'''

8、rmtree
shutil.rmtree("new_folder")
'''
删除成功
'''

9、move
shutil.move("a","new_a")
'''
drwxr-xr-x. 3 root root  50 4月  11 10:10 new_a
'''

10、make_archive
ret = shutil.make_archive("hahaha","gztar",root_dir="new_a/b")
print(ret)
'''
root/shutil_test/hahaha.tar.gz
-rw-r--r--. 1 root root 313 4月  11 10:23 hahaha.tar.gz
'''

ret = shutil.make_archive("newfolder/hahaha","gztar",root_dir="new_a/b")
print(ret)

'''
/root/shutil_test/hahaha.tar.gz
[root@fat40 shutil_test]# tree newfolder/
newfolder/
└── hahaha.tar.gz

'''
import zipfile

# 压缩
z = zipfile.ZipFile('laxi.zip', 'w')
z.write('a.log')
z.write('data.data')
z.close()

# 解压
z = zipfile.ZipFile('laxi.zip', 'r')
z.extractall()
z.close()


import tarfile

# 压缩
tar = tarfile.open('your.tar','w')
tar.add('a/b/bbs2.log', arcname='bbs2.log')
tar.add('a/b/cmdb.log', arcname='cmdb.log')
tar.close()

# 解压
tar = tarfile.open('your.tar','r')
tar.extractall()  # 可设置解压地址
tar.close()
(4)参考
http://www.cnblogs.com/wupeiqi/articles/5501365.html
13、paramiko模块
(1)安装
pip3 install pycrypto  # 由于 paramiko 模块内部依赖pycrypto,所以先下载安装pycrypto
pip3 install paramiko
(2)使用说明
(3)验证
import paramiko

ssh = paramiko.SSHClient()
ssh.set_missing_host_key_policy(paramiko.AutoAddPolicy())
ssh.connect("1.1.1.39",22,"root","toor")
cmd = input(">>:")
stdin,stdout,stderr = ssh.exec_command(cmd)
print((stdout.read()+stderr.read()).decode("utf-8"),)
ssh.close()
private_key_path = r'C:\Users\fat39\.ssh\id_rsa'
key = paramiko.RSAKey.from_private_key_file(private_key_path)
ssh = paramiko.SSHClient()
ssh.set_missing_host_key_policy(paramiko.AutoAddPolicy())
ssh.connect("1.1.1.39",22,"root",key)
cmd = input(">>:")
stdin,stdout,stderr = ssh.exec_command(cmd)
print((stdout.read()+stderr.read()).decode("utf-8"),)
ssh.close()
################ 上传 ###################
t = paramiko.Transport(("1.1.1.39",22))
t.connect(username="root",password="toor")
sftp = paramiko.SFTPClient.from_transport(t)
sftp.put("paramiko-master.zip","/home/fat39/paramiko-master.zip")
t.close()


################ 下载 ###################

t = paramiko.Transport(("1.1.1.39",22))
t.connect(username="root",password="toor")
sftp = paramiko.SFTPClient.from_transport(t)
sftp.get("/home/fat39/paramiko-master.zip","haha.zip")
t.close()
############## 上传 ################
private_key_path = r'C:\Users\fat39\.ssh\id_rsa'
key = paramiko.RSAKey.from_private_key_file(private_key_path)
t = paramiko.Transport(('1.1.1.39',22))
t.connect(username='root',pkey=key)
sftp = paramiko.SFTPClient.from_transport(t)
sftp.put('paramiko-master.zip','/home/fat39/haha.zip')


############## 下载 ################
private_key_path = r'C:\Users\fat39\.ssh\id_rsa'
key = paramiko.RSAKey.from_private_key_file(private_key_path)
t = paramiko.Transport(('1.1.1.39',22))
t.connect(username='root',pkey=key)
sftp = paramiko.SFTPClient.from_transport(t)
sftp.get('haha.zip','haha2.zip')
(4)参考
14、时间之time模块 和 datetime模块
14.1、time模块
(1)安装
内置模块
import time
(2)使用说明
时间相关的操作,时间有三种表示方式:
- 时间戳timestamp 1522924616.3162944,1970年1月1日之后的秒,即:time.time()
- 格式化的字符串format time 2018-04-05 18:36:56, 即:time.strftime('%Y-%m-%d')
- 结构化时间struct time time.struct_time(tm_year=2018, tm_mon=4, tm_mday=5, tm_hour=18, tm_min=36, tm_sec=56, tm_wday=3, tm_yday=95, tm_isdst=0),元组包含了:年、日、星期等... time.struct_time 即:time.localtime()
转换示意图


time()  # 返回当前时间的时间戳
localtime([secs])  # 将一个时间戳转换为当前时区的struct_time。secs参数未提供,则以当前时间为准。
gmtime([secs])  # 和localtime()方法类似,gmtime()方法是将一个时间戳转换为UTC时区(0时区)的struct_time。
mktime(t)  # 将一个struct_time转化为时间戳。
asctime([t])  # 把一个表示时间的元组或者struct_time表示为这种形式:'Sun Jun 20 23:21:05 1993'。如果没有参数,将会将time.localtime()作为参数传入。
ctime([secs])  # 把一个时间戳(按秒计算的浮点数)转化为time.asctime()的形式。如果参数未给或者为None的时候,将会默认time.time()为参数。它的作用相当于time.asctime(time.localtime(secs))。
strftime(format[, t])  # 把一个代表时间的元组或者struct_time(如由time.localtime()和time.gmtime()返回)转化为格式化的时间字符串。如果t未指定,将传入time.localtime()。如果元组中任何一个元素越界,ValueError的错误将会被抛出。
time.strptime(string[, format])  # 把一个格式化时间字符串转化为struct_time。实际上它和strftime()是逆操作。在这个函数中,format默认为:"%a %b %d %H:%M:%S %Y"。
sleep(secs)  # 线程推迟指定的时间运行,单位为秒。
clock()  # 这个需要注意,在不同的系统上含义不同。在UNIX系统上,它返回的是“进程时间”,它是用秒表示的浮点数(时间戳)。而在WINDOWS中,第一次调用,返回的是进程运行的实际时间。而第二次之后的调用是自第一次调用以后到现在的运行时间,即两次时间差。
%y 两位数的年份表示(00-99)
%Y 四位数的年份表示(000-9999)
%m 月份(01-12)
%d 月内中的一天(0-31)
%H 24小时制小时数(0-23)
%I 12小时制小时数(01-12)
%M 分钟数(00=59)
%S 秒(00-59)
%a 本地简化星期名称
%A 本地完整星期名称
%b 本地简化的月份名称
%B 本地完整的月份名称
%c 本地相应的日期表示和时间表示
%j 年内的一天(001-366)
%p 本地A.M.或P.M.的等价符
%U 一年中的星期数(00-53)星期天为星期的开始
%w 星期(0-6),星期天为星期的开始
%W 一年中的星期数(00-53)星期一为星期的开始
%x 本地相应的日期表示
%X 本地相应的时间表示
%Z 当前时区的名称
%% %号本身
(3)验证
# 时间戳
time.time()  # 1522935462.4855645

# 格式化时间
time.asctime()  # 'Thu Apr  5 21:30:04 2018',参数是struct time,默认参数是time.localtime()
time.asctime(time.localtime())  # 'Thu Apr  5 21:35:27 2018',参数是struct time
time.asctime(time.localtime(150000))  # 'Sat Jan  3 01:40:00 1970',参数是struct time
time.ctime()  # 'Thu Apr  5 21:35:13 2018',参数是时间戳,默认参数是time.time()
time.ctime(time.time())  # 'Thu Apr  5 21:35:06 2018',参数是时间戳
time.ctime(150000)  # 'Thu Jan  1 08:25:00 1970',参数是时间戳

# struct time
time.localtime()  # 本地时间,timezone为+8,以后默认使用本地时间。默认参数是time.time()。  # time.struct_time(tm_year=2018, tm_mon=4, tm_mday=5, tm_hour=18, tm_min=59, tm_sec=56, tm_wday=3, tm_yday=95, tm_isdst=0)
t = time.localtime()
# t.tm_year,t.tm_mon,t.mday。。。
time.localtime(12313123)  # 参数是时间戳 time.struct_time(tm_year=1970, tm_mon=5, tm_mday=23, tm_hour=20, tm_min=18, tm_sec=43, tm_wday=5, tm_yday=143, tm_isdst=0)
time.gmtime()  # 格林威治时间,timezone为0。默认参数是time.time()


# 格式转换
################## 时间戳 <--> 结构化时间 ########################################
# 时间戳 转换为 struct time
time.localtime(time.time())  # 时间戳转换为struct time,time.localtime(123123543)
# struct time 转换为 时间戳
time.mktime(time.localtime())  # struct time转换为时间戳,本地时间转为时间戳

################# 格式化时间 <--> 结构化时间 ######################################
time.strftime("%Y-%m-%d",time.localtime())  # '2018-04-05',struct time 转换为 结构化时间
# time.strftime('%y/%m/%d  %H:%M:%S')  # '18/04/05  19:05:18'
time.strptime('2008-03-12',"%Y-%m-%d")  # 将字符串时间转换成结构化时间
time.strptime('Thu Apr 05 21:52:01 2018')  # 默认格式"%a %b %d %H:%M:%S %Y",等于下面
time.strptime('Thu Apr 05 21:52:01 2018',"%a %b %d %H:%M:%S %Y")  # "%a %b %d %H:%M:%S %Y"


# 其他
time.sleep(2)
(4)参考
14.2、datetime模块
(1)安装
内置模块
import datetime
(2)使用说明
与time模块一样,时间分为时间戳timestamp、格式化字符串format time、结构化时间struct time,转换关系一直。
datetime说明
有如下5个类
- class datetime.date: 一个理想化的日期, 提供year, month, day属性
- class datetime.time: 一个理想化的时间, 提供hour, minute, second, microsecond, tzinfo.
- class datetime.datetime: 日期和时间的组合.提供year, month, day, hour, minute, second, microsecond, tzinfo.
- class datetime.timedelta: 表达两个date,time和datetime持续时间内的微妙差异.
- class datetime.tzinfo: 时间对象的抽象基类.
################ date类 #################

# 类属性
date.min: 返回 date(MINYEAR, 1, 1).
date.max: 返回 date(MAXYEAR, 12, 31).
date.year: 返回 年, MINYEAR和MAXYEAR之间
date.month: 返回 月, 1到12月之间
date.day: 返回 1到 n 之间.

# 类方法
date.replace(year, month, day):返回一个相同值的data对象, 除了这些参数给关键字指定新的值.
date.timetuple(): 返回一个time.struct_time对象.
date.toordinal(): 返回一个Gregoian Calendar对象.
date.weekday(): 返回day of the week. 星期一为0,星期日为6.
date.isoweekday(): 返回day of the week. 星期一为1,星期日为7.
date.isocalendar(): 返回一个三元组, (ISO year, ISO week number, ISO weekday).
date.isoformat(): 返回 一个'YYYY-MM-DD'的字符串格式.
date.ctime(): 返回一个字符串日期, d.ctime() 等同于 time.ctime(time.mktime(d.timetuple())).
date.strftime(format): 返回一个字符串日期, 格式自定义.

################ datetime类 #################

# 类属性
datetime.min: datetime(MINYEAR, 1, 1).
datetime.max: datetime(MAXYEAR, 12, 31, 23, 59, 59, 999999).

# 实例属性
datetime.year: 1 至 9999
datetime.month: 1 至 12
datetime.day: 1 至 n
datetime.hour: In range(24). 0 至 23
datetime.minute: In range(60).
datetime.second: In range(60).
datetime.microsecond: In range(1000000).


# 类方法
datetime.today(): 返回当前本地datetime.随着 tzinfo None. 这个等同于datetime.fromtimestamp(time.time()).
datetime.now([tz]): 返回当前本地日期和时间, 如果可选参数tz为None或没有详细说明,这个方法会像today().
datetime.utcnow(): 返回当前的UTC日期和时间, 如果tzinfo None ,那么与now()类似.
datetime.fromtimestamp(timestamp[, tz]): 根据时间戳返回本地的日期和时间.tz指定时区.
datetime.utcfromtimestamp(timestamp): 根据时间戳返回 UTC datetime.
datetime.fromordinal(ordinal): 根据Gregorian ordinal 返回datetime.
datetime.combine(date, time): 根据date和time返回一个新的datetime.
datetime.strptime(date_string, format): 根据date_string和format返回一个datetime.

# 实例方法
datetime.date(): 返回相同年月日的date对象.
datetime.time(): 返回相同时分秒微秒的time对象.
datetime.replace(kw): kw in [year, month, day, hour, minute, second, microsecond, tzinfo], 与date类似.


################ time类 #################
# 与上差不多
时区转换
from datetime import datetime, timedelta, timezone

utc_dt = datetime.utcnow().replace(tzinfo=timezone.utc)
print(utc_dt)
cn_dt = utc_dt.astimezone(timezone(timedelta(hours=8)))
print(cn_dt)
jan_dt = utc_dt.astimezone(timezone(timedelta(hours=9)))
print(jan_dt)
cn_2_jan_dt = cn_dt.astimezone(timezone(timedelta(hours=9)))
print(cn_2_jan_dt)


# 实测
                if field.value > 958838733000:  # 2000-01-01
                    dt = datetime.fromtimestamp(field.value / 1000)
                    dt = dt.astimezone(timezone(timedelta(hours=8)))
(3)验证
# date类  date(year,month,day)
datetime.date.today()  # datetime.date(2018, 4, 5)  2018-04-05
# 初始化
td = datetime.date(2018,10,1)
# td.year  # 2018  int
# td.__getattribute__("year")
# td.month  # 10  int
# td.__getattribute__("month")
# td.day  # 1  int
# td.__getattribute__("day")

# 比较大小
a=datetime.date(2017,3,1)
b=datetime.date(2017,3,15)
a == b  # a.__eq__(b)  # False
a >= b  # a.__ge__(b)  # False
a > b   # a.__gt__(b)  # False
a <= b  # a.__le__(b)  # True
a < b   # a.__lt__(b)  # True
a != b  # a.__ne__(b)  # True

# 差值
a=datetime.date(2017,3,1)
b=datetime.date(2017,3,15)
a - b  # a.__sub__(b)  # datetime.timedelta(-14)
b - a  # a.__rsub__(b)  # datetime.timedelta(14)
# x = a - b
# x.days  # -14  int

# ISO标准化日期
a = datetime.date(2017,3,22)
a.isocalendar()  # (2017, 12, 3)  tuple  返回一个包含三个值的元组,三个值依次为:year年份,week number周数,weekday星期数(周一为1…周日为7)
a.isoformat()  # '2017-03-22'  str  返回符合ISO 8601标准 (YYYY-MM-DD) 的日期字符串;
a.isoweekday()  # 3  返回符合ISO标准的指定日期所在的星期数(周一为1…周日为7)
a.weekday()  # 2 与isoweekday(...)相似的还有一个weekday(...)方法,只不过是weekday(...)方法返回的周一为 0, 周日为 6


# 其他
a = datetime.date(2017,3,22)
a.timetuple()  # 该方法为了兼容time.localtime(...)返回一个类型为time.struct_time的数组,但有关时间的部分元素值为0
a.toordinal()  # 返回公元公历开始到现在的天数。公元1年1月1日为1
datetime.date.resolution  # date对象表示日期的最小单位。这里是天。
datetime.date.fromtimestamp(time.time())  # datetime.date(2018, 4, 5) 根据给定的时间戮,返回一个date对象
datetime.date.today()  # 返回当前日期
datetime.date.max  # date类能表示的最大的年、月、日的数值
datetime.date.min  # date类能表示的最小的年、月、日的数值

# 格式化
a = datetime.date(2017,3,22)
a.strftime("%Y%m%d")  # '20170322'  a.__format__("%Y%m%d")
# a.__format__('%Y-%m-%d')  # '2017-03-22'  <class 'str'>
# a.__format__('%Y/%m/%d')  # '2017/03/22'
# a.__format__('%y/%m/%d')  # '17/03/22'
# a.__format__('%D')  # '03/22/17'
a.__str__()  # '2017-03-22' str
a.ctime()  # 'Wed Mar 22 00:00:00 2017'
b = datetime.date.today()  # datetime.date(2018, 4, 5)
b.ctime()  # 'Thu Apr  5 00:00:00 2018'
import datetime

# time类

a = datetime.time(12,20,59,899)  # datetime.time(12, 20, 59, 899)
a.hour  # 12  a.__getattribute__("hour")


# 比较大小
# 与date类一致


# 其他
datetime.time.max  # datetime.time(23, 59, 59, 999999)
datetime.time.min  # datetime.time(0, 0)
datetime.time.resolution  # datetime.timedelta(0, 0, 1)


# 格式化
# 与date类一致,__format__(),strfttime()


# ISO标准输出
a = datetime.time(12,20,59,899)
a.isoformat()  # '12:20:59.000899'
import time
import datetime
# datetime类
# datetime(year, month, day[, hour[, minute[, second[, microsecond[,tzinfo]]]]])

a = datetime.datetime.now()  # datetime.datetime(2018, 4, 5, 23, 9, 54, 826895)
a.date()  # 返回datetime对象的日期部分 datetime.date(2018, 4, 5)
a.time()  # 返回datetime对象的时间部分 datetime.time(16, 9, 33, 494248)
a.utctimetuple()  # 返回UTC时间元组 time.struct_time(tm_year=2018, tm_mon=4, tm_mday=5, tm_hour=23, tm_min=9, tm_sec=54, tm_wday=3, tm_yday=95, tm_isdst=0)

datetime.datetime.utcnow()  # datetime.datetime(2018, 4, 5, 15, 12, 17, 336671)

# 格式化时间 <--> datetime
datetime.datetime.strptime('2017-3-22 15:25','%Y-%m-%d %H:%M')  # datetime.datetime(2017, 3, 22, 15, 25)
datetime.datetime.strftime(datetime.datetime.now(),'%Y-%m-%d %X')  # '2018-04-05 23:18:01'
# datetime.datetime.strptime('2017-3-22 15:25','%Y-%m-%d %H:%M').timetuple()  # struct time

datetime.datetime.fromtimestamp(123123123)  # datetime.datetime(1973, 11, 26, 8, 52, 3)
datetime.datetime.utcfromtimestamp(time.time())  # datetime.datetime(2018, 4, 5, 15, 13, 38, 693083)
a = datetime.datetime.now()  # datetime.datetime(2018, 4, 5, 23, 26, 18, 882579)
tr = datetime.timedelta(days=10,hours=3)
a - tr  # datetime.datetime(2018, 3, 26, 20, 26, 18, 882579)
1.获取当前日期时间
2.获取上个月第一天和最后一天的日期
3.获取时间差 时间差单位为秒
4.计算当前时间向后8个小时的时间
5.计算上周一和周日的日期
6.计算指定日期当月最后一天的日期和本月天数
7.计算指定日期下个月当天的日期
8.获得本周一至今天的时间段并获得上周对应同一时间段
# 1.获取当前日期时间
import datetime

now = datetime.datetime.now()  # datetime.datetime(2018, 4, 6, 0, 35, 22, 249989)
today = datetime.date.today()  # datetime.date(2018, 4, 6)
now.date()  # datetime.date(2018, 4, 6)
now.time()  # datetime.time(0, 35, 22, 249989)


# 2.获取上个月第一天和最后一天的日期
today = datetime.date.today()  # datetime.date(2018, 4, 6)
mlast_day = datetime.date(today.year, today.month, 1) - datetime.timedelta(1)  # datetime.date(2018, 3, 31)
mfirst_day = datetime.date(mlast_day.year, mlast_day.month, 1)  # datetime.date(2018, 3, 1)


# 3.获取时间差  时间差单位为秒
start_time = datetime.datetime.now()  # datetime.datetime(2018, 4, 6, 0, 38, 30, 119113)
end_time = datetime.datetime.now()  # datetime.datetime(2018, 4, 6, 0, 38, 34, 10000)
(end_time - start_time).seconds  # 3


# 4.计算当前时间向后8个小时的时间
d1 = datetime.datetime.now()  # datetime.datetime(2018, 4, 6, 0, 40, 9, 454170)
d2 = d1 + datetime.timedelta(hours=8)  # datetime.datetime(2018, 4, 6, 8, 40, 9, 454170)


# 5.计算上周一和周日的日期
today = datetime.date.today()  # datetime.date(2018, 4, 6)
today_weekday = today.isoweekday()  # 5
last_sunday = today - datetime.timedelta(days=today_weekday)  # datetime.date(2018, 4, 1)
last_monday = last_sunday - datetime.timedelta(days=6)  # datetime.date(2018, 3, 26)

# 6.计算指定日期当月最后一天的日期和本月天数
date = datetime.date(2017,12,20)
def eomonth(date_object):
    if date_object.month == 12:
        next_month_first_date = datetime.date(date_object.year + 1, 1, 1)
    else:
        next_month_first_date = datetime.date(date_object.year, date_object.month + 1, 1)
    return next_month_first_date - datetime.timedelta(1)

eomonth(date)  # datetime.date(2017, 12, 31)
eomonth(date).day  # 31


# 7.计算指定日期下个月当天的日期
date = datetime.date(2017,10,31)
# date = datetime.date(2017,12,20)

def eomonth(date_object):
    if date_object.month == 12:
        next_month_first_date = datetime.date(date_object.year + 1, 1, 1)
    else:
        next_month_first_date = datetime.date(date_object.year, date_object.month + 1, 1)
    return next_month_first_date - datetime.timedelta(1)

def edate(date_object):
    if date_object.month == 12:
        next_month_date = datetime.date(date_object.year+1, 1,date_object.day)
    else:
        next_month_first_day = datetime.date(date_object.year,date_object.month+1,1)
        if date_object.day > eomonth(next_month_first_day).day:
            next_month_date = datetime.date(date_object.year,date_object.month+1,eomonth(next_month_first_day).day)
        else:
            next_month_date = datetime.date(date_object.year, date_object.month+1, date_object.day)
    return next_month_date
edate(date)  # datetime.date(2018, 11, 30)
# edate(date)  # datetime.date(2018, 1, 20)


# 8.获得本周一至今天的时间段并获得上周对应同一时间段
today = datetime.datetime.now()  # datetime.datetime(2018, 4, 6, 1, 0, 44, 796079)
this_monday = today - datetime.timedelta(days=today.isoweekday()-1)  # datetime.datetime(2018, 4, 2, 1, 0, 44, 796079)
last_monday = this_monday - datetime.timedelta(days=7)  # datetime.datetime(2018, 3, 26, 1, 0, 44, 796079)
last_weekday = today - datetime.timedelta(days=7)  # datetime.datetime(2018, 3, 30, 1, 0, 44, 796079)
(4)参考
https://blog.csdn.net/cmzsteven/article/details/64906245
15、collections模块
http://www.cnblogs.com/fat39/p/7266344.html

 浙公网安备 33010602011771号